AZ-104 4
Azure auth 4
Azure Admin Services 4
AAD - User 4
Intune - Device Management Service 4
AIP - Azure information protection - Data Creation 4
CAS - Cloud App Security 4
ATP - Advanced Threat Protection 5
EMS - Enterprise Mobility Security 5
ASR - Azure recovery site 5
AAD Connect 5
Exchange Online and O365 6
Governance and Compliance 6
Managing subscriptions 6
Management group 6
Azure Policy 6
Tags 7
Identity 7
Azure Active Directory 7
Managing Tenants 9
Creating and managing Users, Groups and Roles 9
Admin Tasks 11
Administrative units 11
SSPR - Self Service Password Reset 12
Azure AD Device Management 13
Hybrid Identity/Azure AD Connect 14
Callouts 16
Storage 16
Azure Storage Account 16
Sub-Service 16
Components of storage account 16
Redundancy 17
Callouts 18
Azure Blob Storage 18
Types 18
Access Control 18
Blob Object Replication 18
Blob Lifecycle Management 19
Azure Files 20
Azure File Sync 22
Storage Network Access 22
Securing Storage Accounts 23
SA Encryption 23
SA Authentication 23
Securing SA 23
Azure Jobs 23
Storage Utilities 25
Networking 25
Basic Understanding 25
TODO 25
Terminologies 25
Common Questions 26
Architect Components 26
Flow 27
Delivery 27
DNS 27
Azure Traffic Manager 29
Azure Front Door 29
Content Delivery Network 30
Security 31
Network Security Group - NSG 31
Application Security Group - ASG 31
Load Balancer 32
Application Gateway 32
Firewall 33
Connectivity 35
Routing 35
Service Endpoint 36
Private Endpoint 37
VNet peering 37
VPN & VPN Gateway 38
Types 39
2 types of Gateways 40
Architecture 42
Steps 43
Express Route 44
Virtual WAN 45
Hub And Spoke 46
VNet Strategy 46
VNet/Subnet Strategy 46
Security Strategy 47
Performance Strategy 48
CALLOUTS 48
Compute 49
VM 49
VM Availability and Scale Sets/Availability set 50
VMSS 51
Managing VM Updates 51
Azure Bastion 52
Load Balanacer 53
Application gateway 55
App Service Plan 56
Web App 56
ACI 57
Messaging 57
Event Grid 57
Notification Hub 59
Event Hub 59
Service Bus 60
Azure Relay 61
Monitoring 62
Azure Monitor 62
Setting up Alerts and Action Group 64
Configuring Azure Monitor Logs 65
Log Analytics 65
Monitor Insights 65
Application Insights 66
Network Watcher 67
Backup 67
Backup Concepts 67
Disaster recovery 67
Recovery Point Objective VS Recovery Time Objectives 68
Disaster recovery method 68
Azure Backup 68
Azure Site Recovery 71
Backup Reports 72
AZ-104
Azure auth
Access mode
- Azure portal
- Azure CLI
- Powershell
- Azure resource manager —> Azure resource providers
- Azure resources
Flow
- Access mode —> Azure resource manager —> Azure resource providers —> Azure resources
Azure Admin Services
AAD - User
What: cloud or hybrid identity
Intune - Device Management Service
What: security and compliance has to be check on user’s device in order to be access to enterprise resources
How: Define security and compliance policy and configuration policy of the user device
AIP - Azure information protection - Data Creation
What: brings lot of services(O365, Apps, file service, directory sync, share point) into one place
- What data is being created by the user. Ex: email, pdf, powerpoint
- To control how data is shared and access by different identity
- Data protection by binding identities to all files itself adding authorization and number of features
Why: add protection of data of above services
How: create AIP, create policy(apply to user or groups), provide labels
CAS - Cloud App Security
What: User can use different platform/software which are not approved by your enterprise
- ex: if user uploads your application info to third party software(dropbox), which is not approved by your enterprise - shadow IT discovery
- to know which data is being uploaded to third party
How:
ATP - Advanced Threat Protection
What:
- What if a particular user account is compromised
- Ex: knows all admin accounts and try to brute force attack - lateral movement
- Ex: hacker is able to compromise account that has elevated privilege - get the domain dominance
How
- When you request any resources, the request has to go through domain controller - events
- So domain controller knows what each users usually request
- So If particular user trying to access particular resources that he’s not supposed to - this is anomaly
- Happens through ML and AI
Other Usage
- To protect services from attacks-identify threats, set auditing(troubleshoot anomalies), scan vulnerabilities reports
- On: SQL sever
EMS - Enterprise Mobility Security
What: all the above services comes user one suite
How: plan based: E5, E3
ASR - Azure recovery site
Backup: Azure VM, SQL server
What: recover VM from primary location to secondary location - one Az to another AZ/Region
How: VM has data stored in SA, ASR caches data in SA, replicate data to target location, create VM based on Data
AAD Connect
What:
- To integrate on-prem AD with 0365/Azure AD
- To meet Hybrid identity goals
- Sync object objects(Users, Contacts, Groups, Devices) from on-prem AD to cloud AD
- Sync passwords. So Clous users can use on-prem password
Why
- So the on-prem users can use cloud AD account services
- You want on-prem AD to have control on AAD. ex: AAD account changes has to be done through on-prem AD, ex: change password
How
- Create user on AAD
- Deploy AAD connect on a on-prem server
- Sync user accounts from On-prem AD to AAD
Exchange Online and O365
Governance and Compliance
Managing subscriptions
Azure AD Tenant
- Associate your Azure Subscriptions with singular Azure AD Tenant
- Azure AD Tenant: where your users live
- Azure AD Tenant can have multiple subscriptions
- One subscription can only be associated with the single organization (Azure AD Tenant) at a time
- One subscription can not be part of multiple AD tenants
- Ex:
- you have one business unit AD Tenants(Machine Learning),
- you want to have multiple subscription under this AD Tenants,
- So each subscription(dev, prod) can be attached to single AD Tenants individually
- You can’t associate dev subscription to another AD Tenants(Ex: AI business unit)
Management group
What: Manage multiple subscriptions and management group
- It can have a child management group along with subscriptions
- Management group has one or many subscription
- You can scope RBAC roles
Idea
- When you create a new MG —> it will falls under the parent MG along with your subscription
- You can create Subscription inside this MG
- You can attach Policy to this MG(governance —> policy)
- You have IAM/RBAC role where you can provide access and permissions to users/management identities through this MG
- The policy and permission you define will trickle down in the hierarchy from this MG
Azure Policy
What: enforce compliance and enable auditing
- Organizations need to implement enterprise, level governance, and compliance capabilities
What:
- Prohibit resources
- Control costs
- restrict service access(ex: only certain VM SKU can be created, restrict creation of certain resources)
- Allowed locations
How
- policy definition: which defines the great area for compliance and defines the actions that take place
- policy assignment: This is the scope to which we will assign our policy. The scope could be a management group, subscription, resource group, or resource.
- Initiative definition: which is a collection of policies that are tailored to achieving a singular high-level goal together, for example, ensuring that VMs meet standards
Example:
- policy definition: evaluate if a VM is being created with our tag project name, environment name. if the VM is missing the tag, then deny the creation of the resource
- policy assignment, choose the scope at where you need this policy assignment(ex: resource group)
- Restrict allowed locations: resources can be created only in this region
Tags
What: to identify what resource belongs to whom
- Tags are not inherited from the higher scope like RG, each resource must be tagged
Example:
- Can delete resources/RG based on the tags
- Shutting down resources baes in tags
- Cost analysis
Callouts on Cloud Governance
- Defining rules, policies, and compliance standards for the organization
- Control over resources, enforce rules, policies, and standards
What
- Management groups and subscription: organize into hierarchy
- Azure RBAC: Provide access to resources at varying scopes
- Policies and blueprint: to enforce standards for cloud environments
- Locks and tagging: lock resources to prevent deletion
Identity
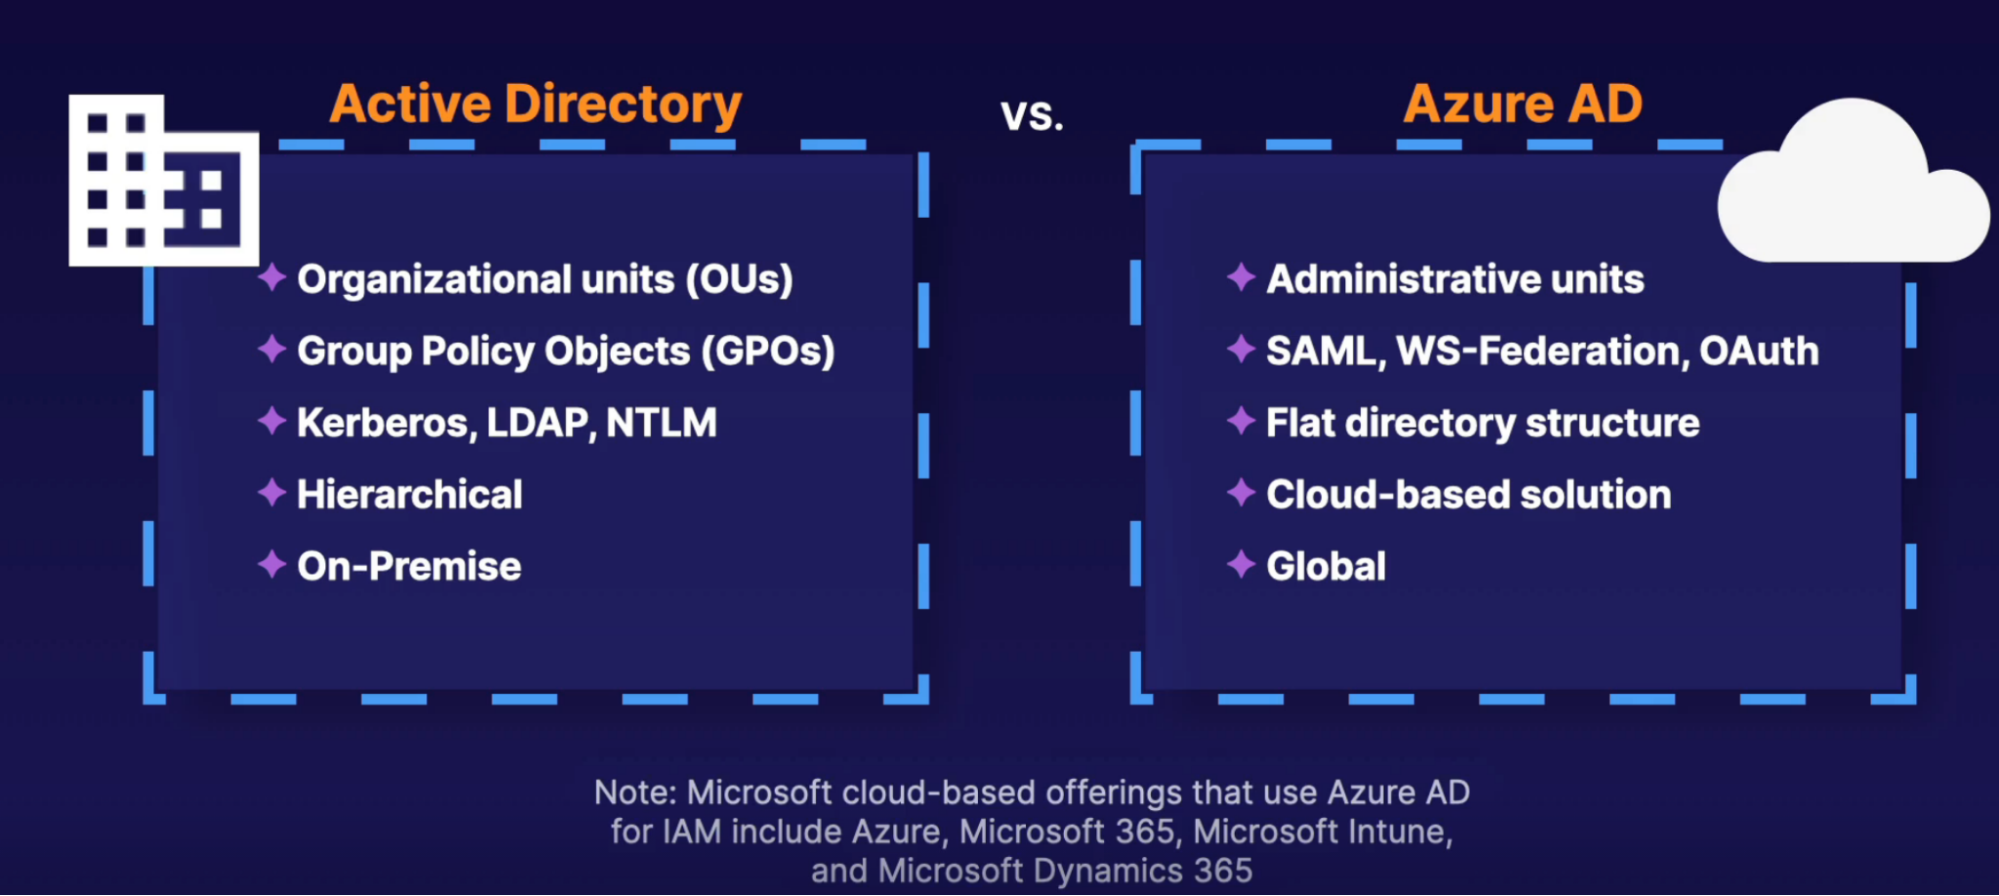
Azure Active Directory
What:
- IAM: cloud-based identity service for Azure that provides an identity repository
- Can create users and groups
- Manage identity security: enable MFA, control resource access, provide policy-based control
- Each Azure AD tenant is given a single top-level management group called the root management group. This root management group is built into the hierarchy to have all management groups and subscriptions fold up to it.
- Flow: Global Tenant → AAD Tenant → Management Group/s → Subscription/s
Architecture
- You get global AAD
- You can create multiple instances of AAD tenant within your global AAD
- In each AAD tenant, you can create users and identify resources(SUBSCRIPTIONS) inside of tenants
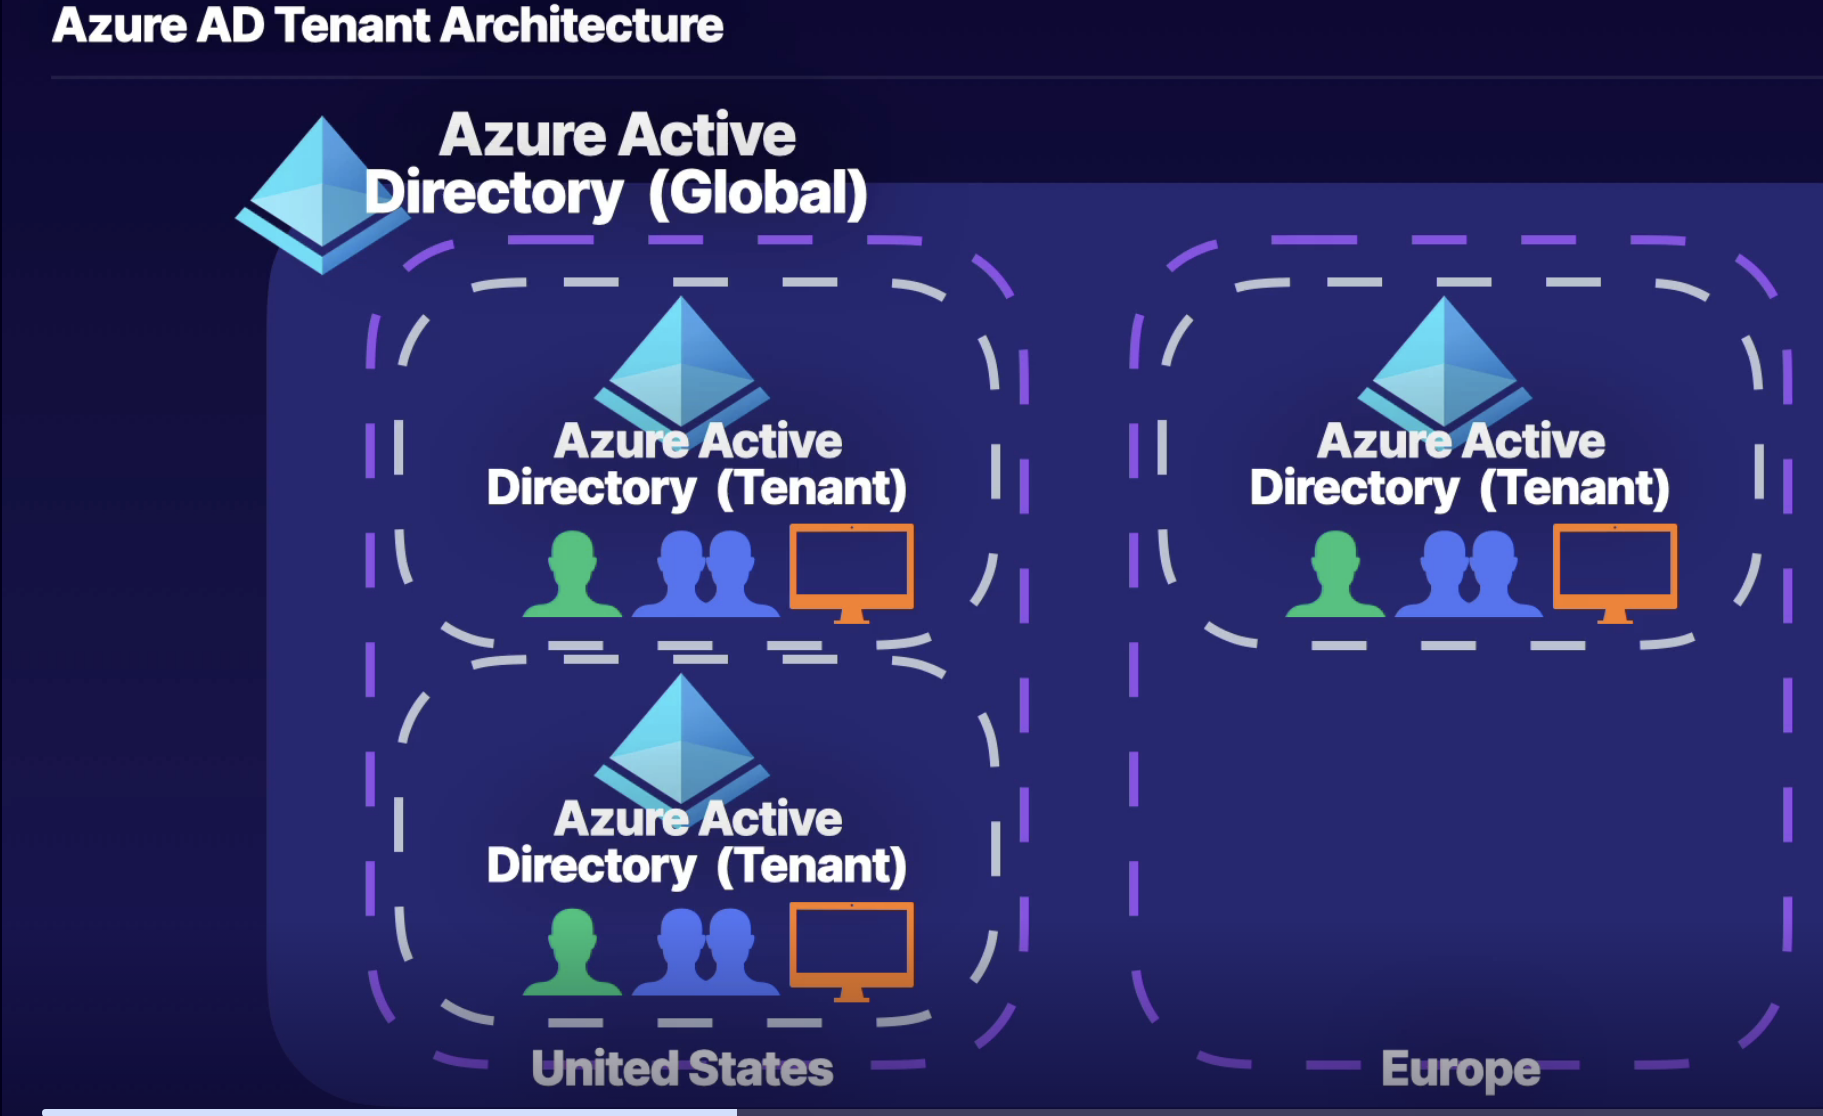
Terms
- Organization = Tenants = AAD
What
- You have a relationship between subscription and AAD
Managing Tenants
Designing tenants
- Build a secure foundation
- set up best practices like MFA, SSPR, backup global admin, and privileged users for specific tasks
- Populate identity resources
- add users, create groups, add devices, and setup hybrid identity
- Manage apps
- identify apps to be used from AD Gallery, and register apps from on premise
- Monitor and automate
- Monitor administrators, perform access reviews and automate user lifecycles
Examples
- When you signing to Azure you’ll get default global AAD
- You can create multiple AAD tenants from the default AAD
- Inside this tenant you can create, users, groups
Creating and managing Users, Groups and Roles
Users
What: Create users in org tenants
Types of user
- Admin users: user with admin role assigned
- Member of AD: regular users that are native to AAD
- Guest user: external users that are invited to the AAD tenant
Groups
What: container for users
- Can have multiple groups, HR, IT, Dev
- Assign role to this group, and users that are members of this group will inherit permission from that role rather than assigning an individual role for those users
How
- Owner and member of group
Types of group
- Security: provision access to Azure resources
- Microsoft 365: provides permission to Microsoft 365 suite
Membership type
- Assigned: Users are specifically selected to be members of group
- Dynamic user: membership rules are created, that automate group membership via user attributes
- Ex: add users into the group based on their properties. Write query
- If user type is guest then add into the guest group
- Dynamic device: membership rules are created that automate group membership via device attributes
Roles
Azure Roles - RBAC
Roles: a definition that defines what actions are allowed or denied for that specific role
Who: security principal (group or user)
What: roles are what users are able to do
Scope: where users are able to perform those actions(MG, Subscription, RG, resources)
Security principal —> Role assignment —> Roles
Security principal —> Effective Permission —> scope
Example:
You have a user(security principal)
Provide user a Azure/RBAC role (Contributor)
At specific scope (MG, Subscription, RG, resources)
Type of role
- Owner: Full access to resources and delegates access
- Reader: can only view resources
- Contributor: Can create and manage resource
- User access administrator: ability to delegate access to resources to other users
Azure AD Roles
What: rather than assigning roles to cloud resources, such as virtual machine or subscriptions or resource groups, we are providing access to the identities resources like the user and groups inside of our azure AD tenant
- AD roles: roles that we provide to the identities in our Azure AD tenant, and these roles provide access to identity resources(users, Groups) within the tenant
- RBAC roles: use this role to be able to provide access to cloud-based resources at various scopes(MG, Subscription, RG, Resource)
Example:
Role Example:
- Global administrator: Provides the user assigned to this role, the ability to manage all the azure AD resources and provide access to other users for Azure AD roles
- Billing administrator: provides the user the ability to perform billing tasks
- User administrator: provides the ability for user to manage other users that are inside of our Azure AD tenant and groups level
- Helpdesk administrator: provides the ability to reset passwords for other users, and perform similar helpdesk tasks
Azure AD Roles | Azure Roles - RBAC |
Controls access to Azure AD identity resources inside Azure AD Tenant(Users and Groups) | Controls access to Azure resources (MG, Subscription, RG, resources) |
Manage access to Azure AD resources | Manage access to Azure resources |
Scope is at tenant level | Scope can be at multiple levels |
Supports custom roles | Supports custom roles |
Main roles (Global, User, Billing administrator) | Main roles(owner, contributor, reader, and user access administrator |
Admin Tasks
- Create/Delete AAD users, groups, roles
- User: revoke/block access, reset password
- Groups: add members to the group
- Create/Delete bulk AAD users, groups, roles using CSV files
- User: revoke/block access, reset password
- Groups:
- You can’t create bulk groups
- You can add bulk users into the group
Administrative units
What:
- Azure AD resource for providing a container for groups and users objects
- Allows you to control the scope of your administrative users(ex: help desk admins)
- Administrative units based on geographical location, business departments, or subsidiary organizations of a parent organization
How:
- Let’s say you have admin users at the Azure tenant level.
- So these users can perform all the admin functionality on all the rest of the users/groups under the same tenant // which is not optimum and creates chaos as multiple admin users can perform an action on the single user at the same time, which can be a huge issue to troubleshoot when something goes wrong
- So idea is to break down the users/groups into logical containers(admin units) and name it for example department/country as Admin Units
- Now set the scope for admin user(ex: help desk admin) specific to certain Admin units. So this admin user can only perform action in USA Admin Unit users/groups and won’t be able to perform an action to Canada Admin Unit
Business Usecase
- You have AAD Tenant with users and group
- Create admin units; breakdown groups within the certain country
- Scope admin users to logical admin unit by creating role on an AAD tenant level
Steps
- In AAD → Admin Units, add a new AU
- Assign role: User Admin (Why: Scope role to this AU )
- Add assignment: select user (user you want to be admin)
- Create
- Nutshell, you have set admin user who can perform actions on users to specific country
SSPR - Self Service Password Reset
Scenario
- When a user forget its azure password, it reachout to help desk admin user asking to reset its password
- Admin user then help the user by creating reset link to change the password // This is less productive model
- Because user can’t work until the password is setup
- Because it adds the overhead on admin user to reset password everytime
Idea:
- User should be able to change/reset password without going to the admin user
How
Localization → Verification → Authentication → Password Reset → Notification
- So, when performing self-service password reset for either regular users or administrators, what's going to happen is localization.
- We're first going to check the browser locale settings.
- Then we're going to go through the verification process
- where we try to verify for our identity using various authentication methods that are provided to either regular users or administrators.
- Then the authentication process takes place
- where we're then authenticated to our identity, and because of this, we can perform our password reset.
- And then upon password reset,
- we can set whether or not we want the user to be notified. And in terms of administrators, by default when an administrator is changing their password, all other administrators inside of the Azure AD tenant will be notified as well.
Auth Method
- Mobile app
- Mobile app code
- Email
- Mobile phone // less recommended
- Office phone // less recommended
- Security questions
SSPR Consideration
- Enable and manage SSPR via Azure AD groups.
- Required Methods: One or more, available authentication methods is required for SSPR.
- SSPR for Admins: security questions not available for admins By default, admins must register for MFA methods
- Required Licenses: Azure AD P1 or P2, Microsoft Apps for Business, or Microsoft 365 licensing is required for SSPR.
Steps
Task: Enable SSPR on AAD Tenant level
- In AAD → Password rest
- Self service password reset enables: select one of the following
- None
- Selected: select AAD groups
- All
- Auth method
- Number of methods
- Choose method
- Registration
- Notification
Azure AD Device Management
What: register all the user devices(laptop, phone - from which user access Azure) in AAD so that we have some sort of control in terms of what resources, assets and data these devices are accessing
- What devices are allowed to access azure resources
How to register device
- Azure AD Register: bring your own device(BYOD) model
- Least restrictive option: allowing for bring your own device (BYOD) with a personal Microsoft or local account.
- How: SSO
- Supports Windows 10, iOS, iPad, Android, and macOS.
- Azure AD joined
- Device is owned by the organization and accesses Azure AD through a work account.
- These identities exist only in the cloud.
- How: Intune
- Supports Windows 10 and Server 2019.
- Hybrid Azure AD Joined
- Similar to Azure AD joined; however, these device identities exist both on-premises and in the cloud.
- Supports Windows 7, 8.1, 10, and Server 2008
Steps
Task: register your laptop/VM with Azure AD
- AAD → Devices → All Devices
- Device settings
- User may join devices to AAD(for windows user)
- All
- Select: group
- None
- User may register their devices to AAD(for windows user) (BYOD - model)
- All
- None
- Require MFA
- Set: yes
- Manage additional local admin on all Azure AD joined devices
- Add assignments
- Add user
- Click save
Hybrid Identity/Azure AD Connect
What: Azure Active Directory (AD) Connect is the underlying Microsoft tool used to deploy, configure, manage, and monitor hybrid identity between on-premises AD and Azure AD.
Features:
- Provides the ability to configure and deploy the following hybrid identity solutions:
- Password hash synchronization (PHS)
- Pass-through authentication (PTA)
- Federation integration including AD Federation Services
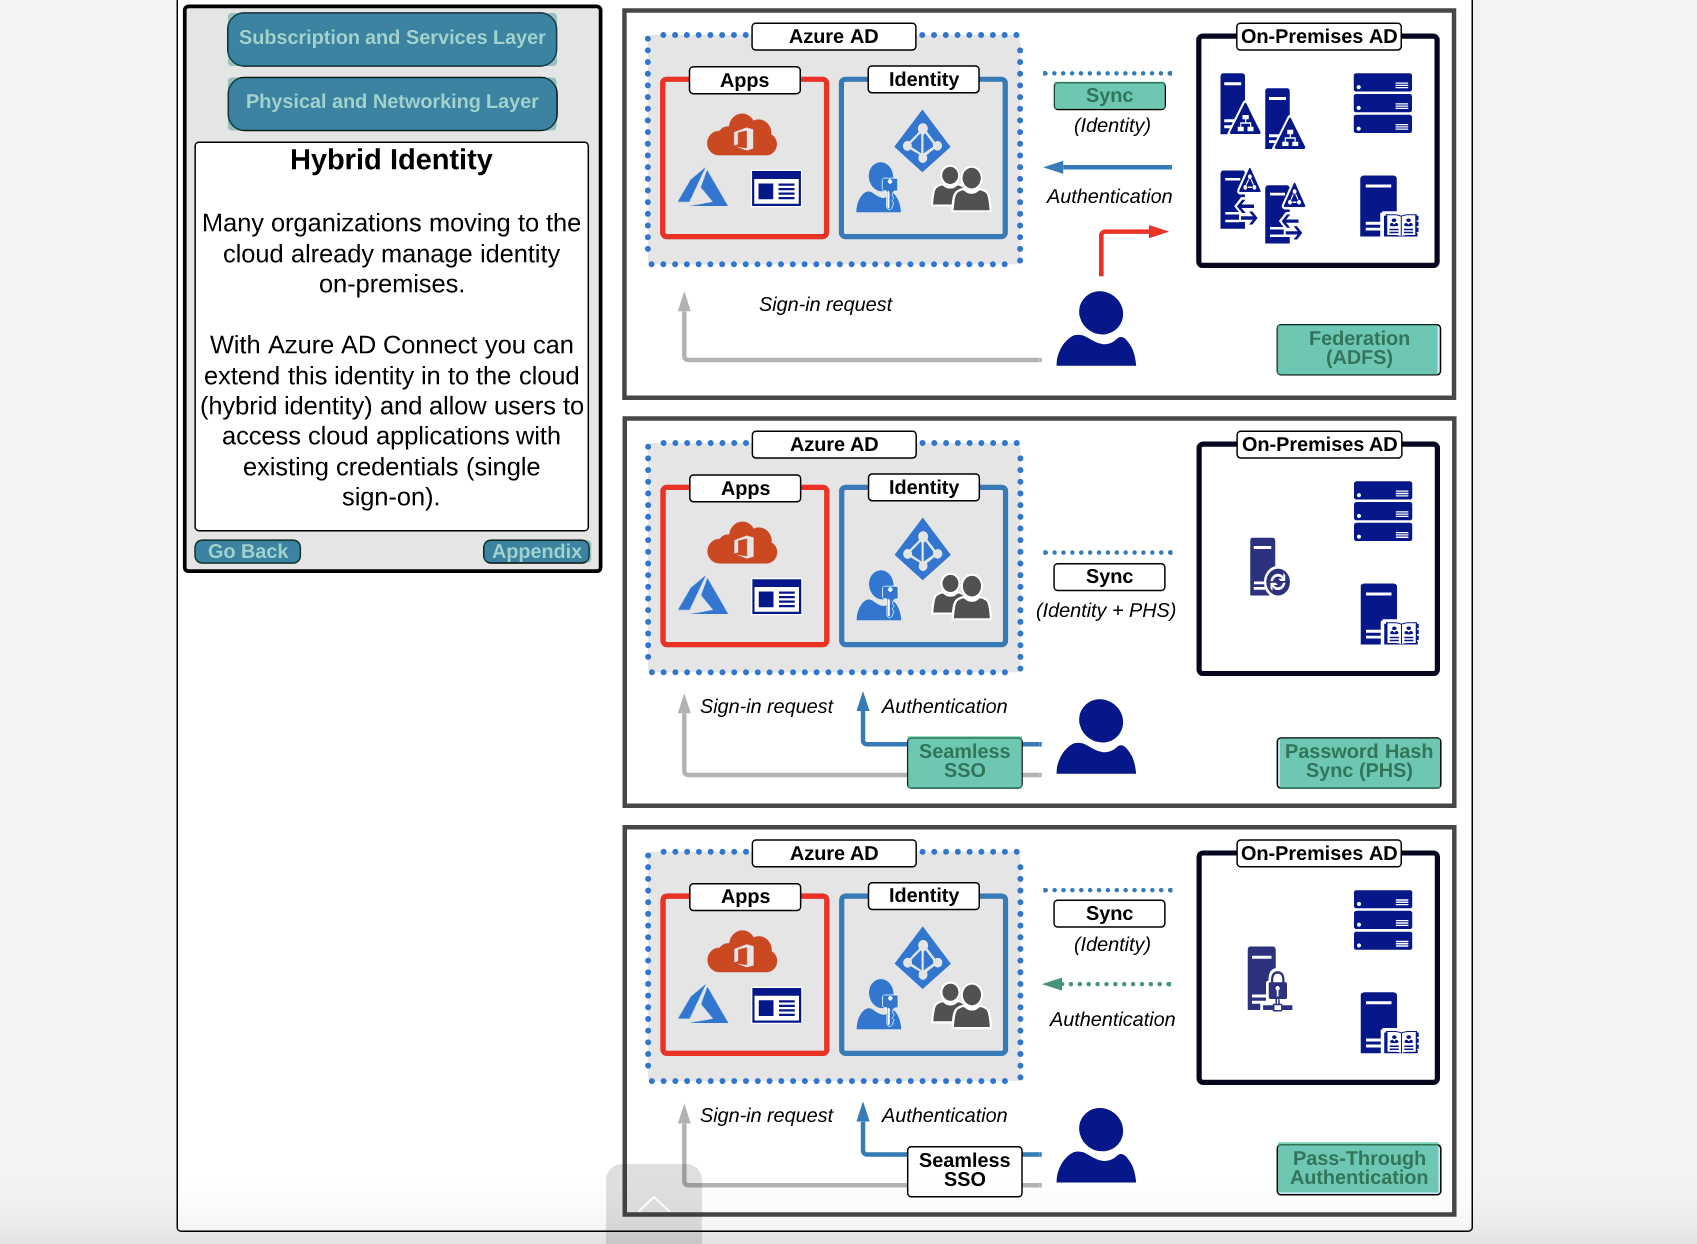
- Synchronization of users, groups, and other objects between on-premises AD and Azure AD
- Health monitoring, providing monitoring data which is visible within the Azure Portal
Important information about the synchronization service:
- Staging mode allows for Disaster recovery of Azure AD Connect:
- Azure AD Connect is installed to a separate server ideally in a different location to the first.
- During the configuration of Azure AD Connect, staging mode is enabled.
- Staging mode must be disabled for synchronization and hybrid identity functionality to be enabled.
- The following is a summary of some key management operations:
- To check the status of the synchronization service with PowerShell: Get -ADSyncScheduler.
- The Synchronization Service Manager GUI tool supports configuration and monitoring of synchronization operations.
- Sync operations can be triggered with PowerShell: Start -ADSyncSyncCycle.
- Note that by default, sync operations will operate every 30 minutes
Callouts
- When you signing into Azure you’ll get the default global AAD with your selected domain.
- There you can have your users and subscription
- You can create multiple AAD tenants from the default AAD.
- Forex: create a tenant for AI or Big Data organization
- There you can have your users and subscription for those tenants
- Inside the org tenant, you can create, users, and groups
Storage
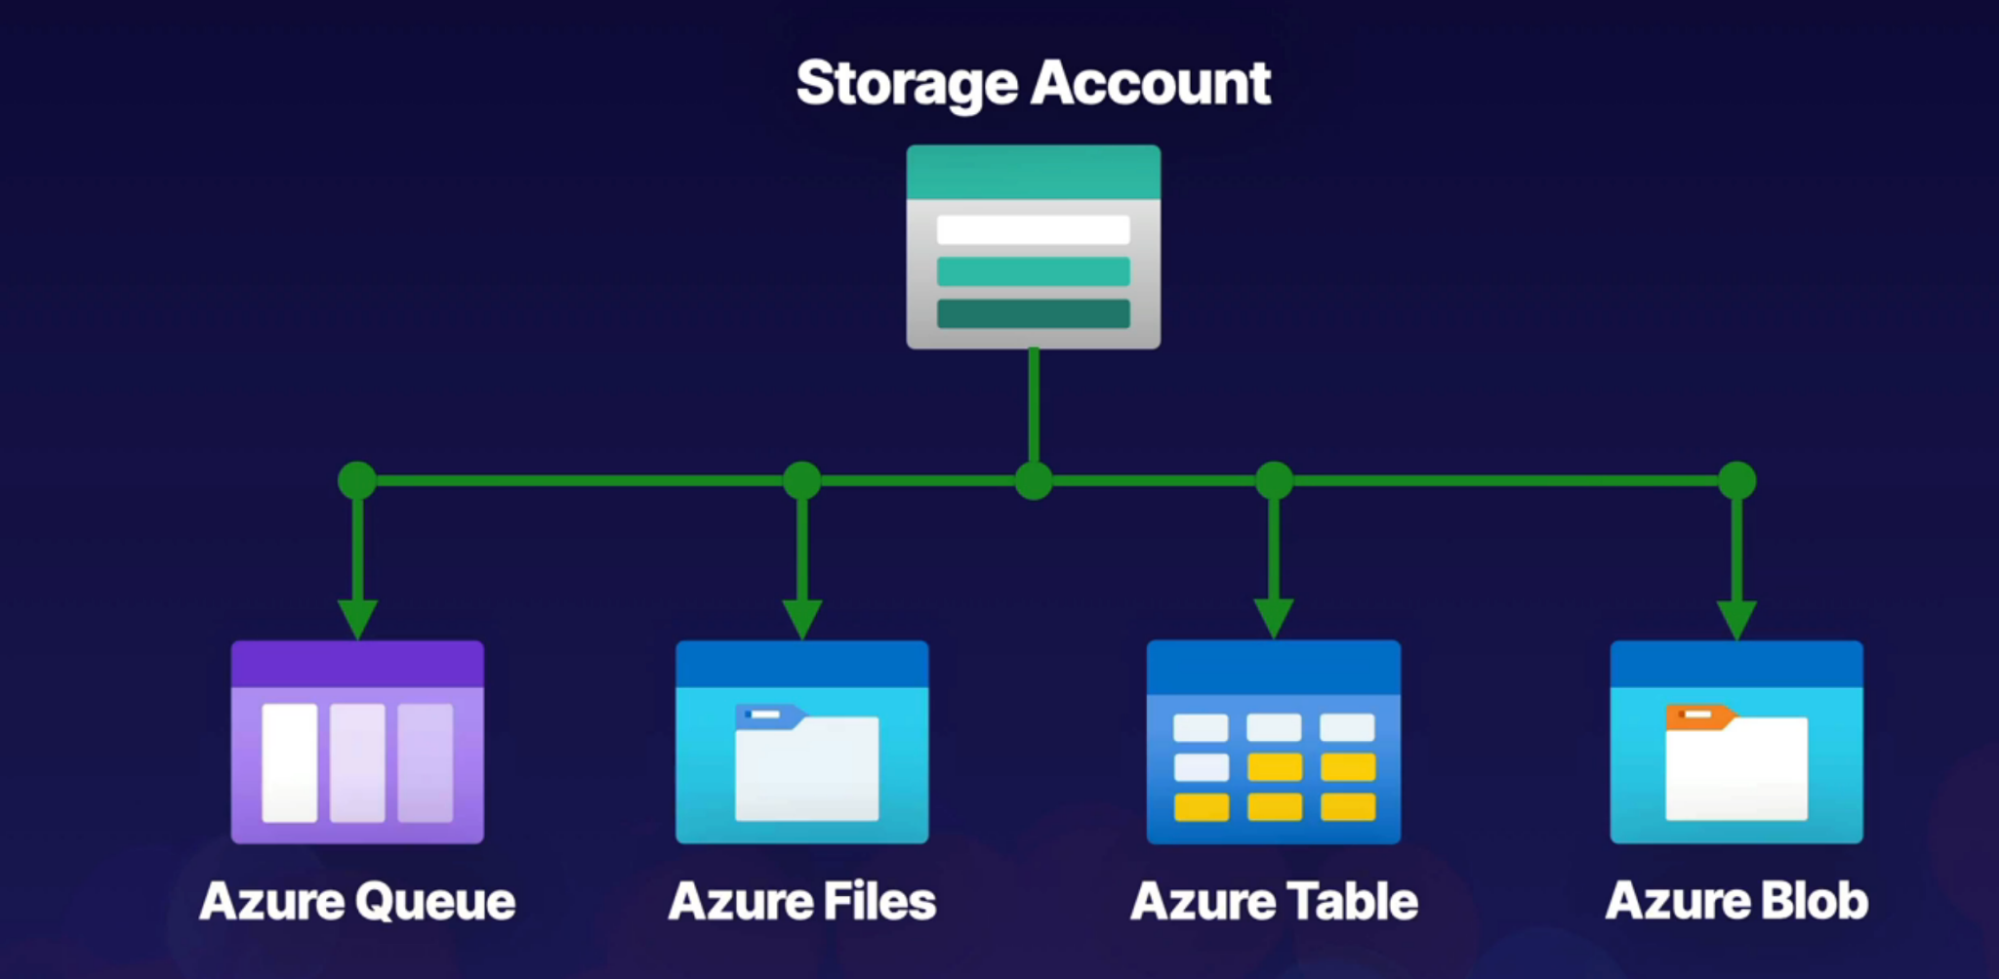
Azure Storage Account
What:
- Top-level storage resources for storage purpose
- Under this, you have multiple sub-service that provides different storage options
Sub-Service
- Azure Queue: message-based storage for microservices
- Azure table: non-relational, semi-structured data storage service
- Azure Files: cloud-based file sharing service
- Azure Blob: store MP3, images, and VHD file
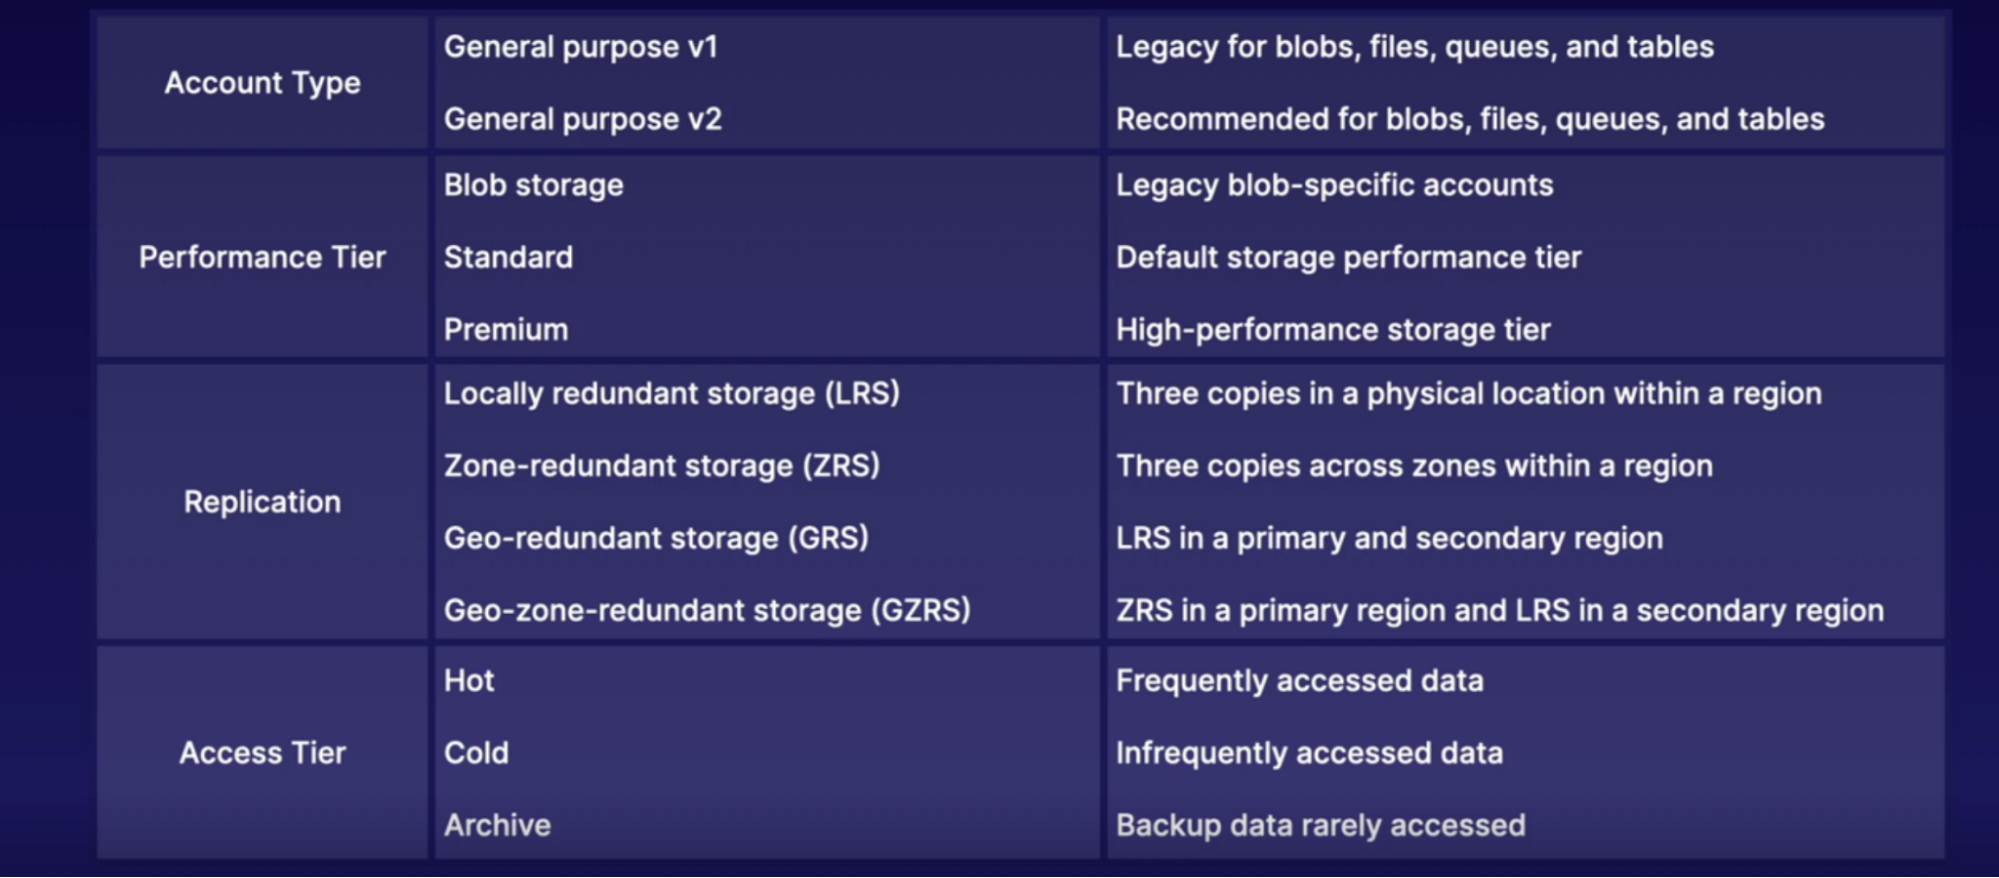
Components of storage account
- Account Type: determines feature and cost
- Performance Tier: determines performance level
- Replication: determines infrastructure redundancy
- Access Tier: determines access level and data cost
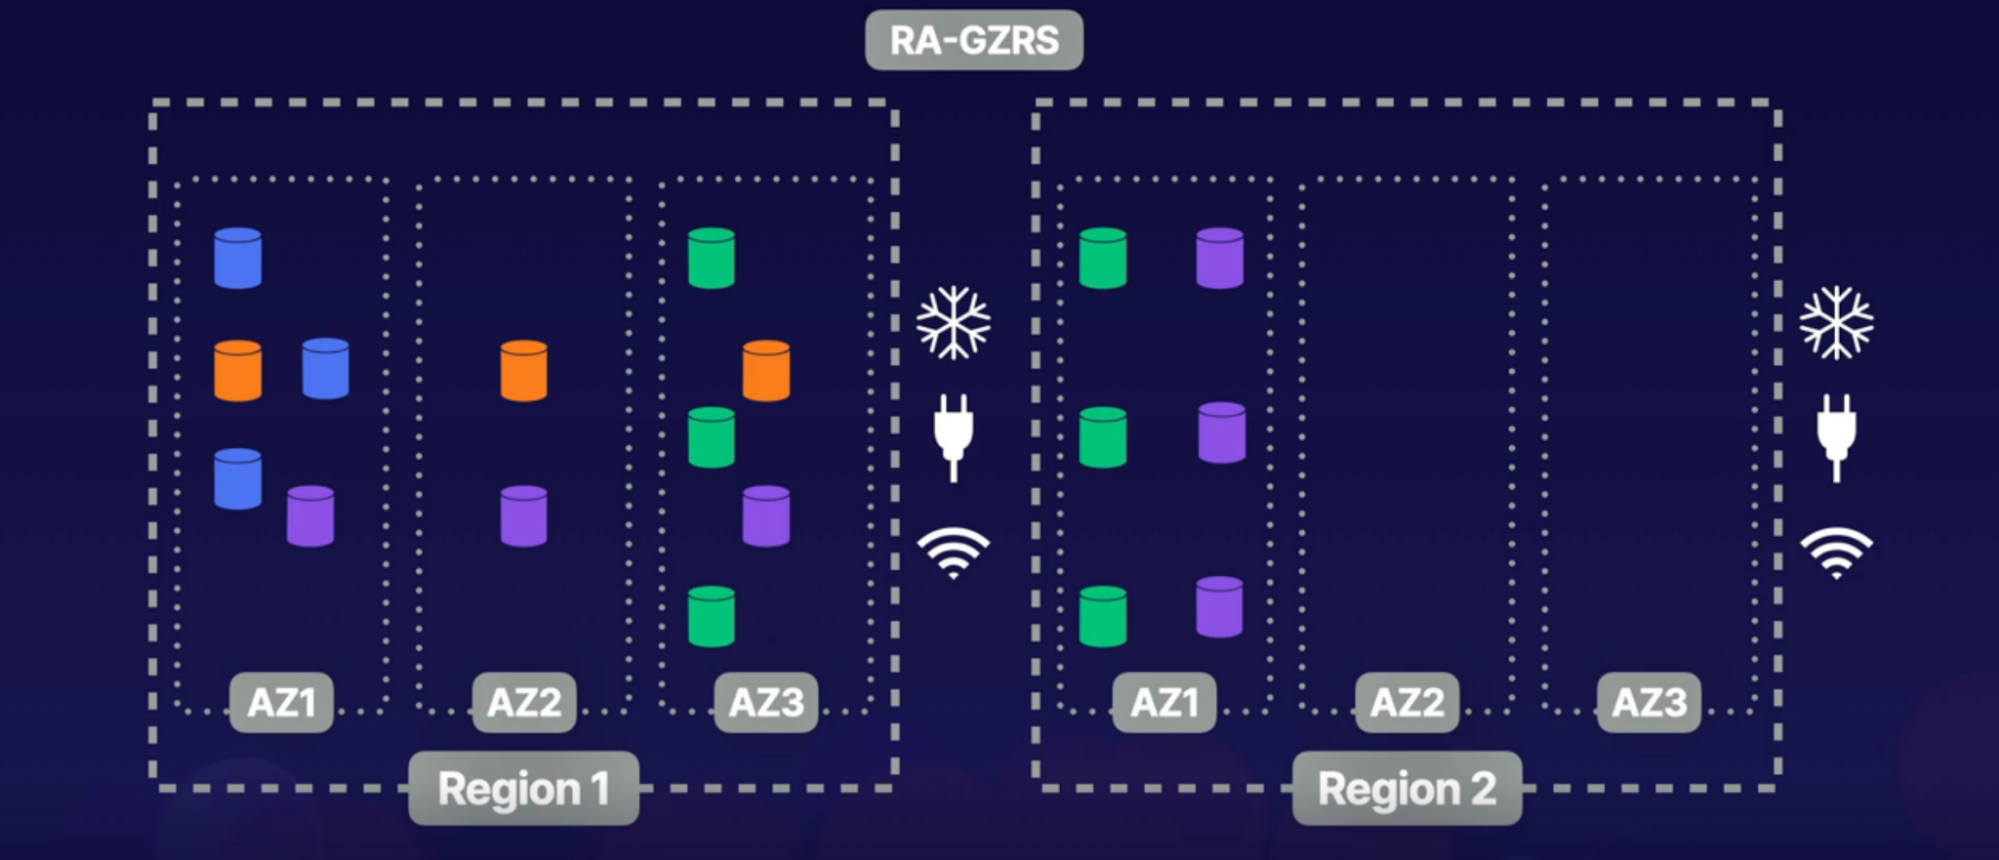
Redundancy
- Local Redundant Storage - LRS
- Store data inside of one availability zone within a single region
- Zone Redundant Storage - ZRS
- Store data inside of multiple availability zones within a single region
- Why: if one zone is down, then we have copy of our data in another AZ
- Geo Redundant Storage - GRS
- Store data in multiple regions
- How: store data in a single AZ in each region
- Geo Zonal Redundant Storage - GZRS
- Store data in multiple regions
- How: store data in multiple AZ in the home region, and store data in one AZ within the secondary region
- Read Access - Geo Zonal Redundant Storage: RA-GZRS
- Store data in multiple regions
- How: same as GZRS, except data stored in the secondary region, has read access
Callouts
Azure Blob Storage
What:
- Object-based and easily accessible from HTTP/REST
- Stores: image, video, text files, VHD, log files inside blob, inside the container
Flow
- SA → blob service → blob container → blobs(data)
Types
- Block blob: store image, videos (azure disk)
- Append blobs: log files
- Page blob: VHD-virtual machine disk
Access Control
- By-Default, public access to Blobs is granted at the storage account level
Container Access Levels
What: 3 concepts, access container and access blob inside that container, access both
- Private: No anonymous access to container
- Blob: anonymous read access to blob within a container(can’t access container though, because access is only allowed to blob and not the container)
- Container: anonymous read access to container and blobs it contains
Practical Usage Example
- Create SA
- Create Blob Container and upload files as blobs
- Review Access Level
Blob Object Replication
What: Object replication synchronously copies block blobs between storage accounts
Need:
- requires source and destination storage accounts
- requires versioning(to automatically maintain previous version of your blobs) and change feed(keep track of create, delete, modification changes to blobs)
Benefit
- Minimized latency: for read request
- Increased efficiency: processing block blog in different region
- Data distribution: processing and analyzing data in one location that replicates to another region
- Cost optimization: moving replicated data into archive tier can reduce cost
Steps
- Create 2 SA, each in different region(1 src and 1 destination)
- Under “data protection” field,
- enable versioning for blobs
- Enable change feed
- Repeat the same step for destination SA, except do not enable change feed for this SA
- Create containers on both SA
- On SRC container, data management → object replication = create replication rules
- Select DEST SA
- Select SRC container
- Select DEST container
- Add prefix: prefix/ // this is a folder where you store data to be copied from src to dest.
- So in the src container you will have 2 replicas of your objects. One at the root level and second under the prefix folder
- And objects under the prefix folder gets copied in =to dest container
- Copy over → everything
- Upload files in the SRC container
- Upload at the root level
- Upload the same files but with prefix (prefix is the folder)
Blob Lifecycle Management
What:
- Move our blobs through different access tier as they age(as the need of our blobs is changed)
- Ex: moving blob from “Hot” to “Cool” to “Archive” to “Deletion” as we don’t need them
Task: configure lifecycle management on SA
Steps
- Create SA
- Create container and upload files
- Upload regular files
- Upload files with prefix (folder)
- Under data management → lifecycle management
- Add a rule
- Name: move-to-cool
- Rule scope:
- Apply rule to all blobs in SA
- Limit blobs with filter // select this
- Blob type: block and append
- Blob subtype: base block
- Set condition
- If blob last modified 30 days ago
- Then move blob to cool
- Set filters
- Enter container/prefix/ // so anything inside this folder will go to move from hot to cool tier
Azure Files
What: sub-service of SA
- is a cloud-based managed File Share service
- Access through SMB - server message block or HTTP
Why: to replicate/mount files(which is on File Share) to local machine/VM with proper file structure/system. So that you can have file share in Azure which copies files from your local VM
- With blob storage, we have a prefix concept to have folders(file system)
- With azure files, we have a traditional file structure where we have folder and files // real file system
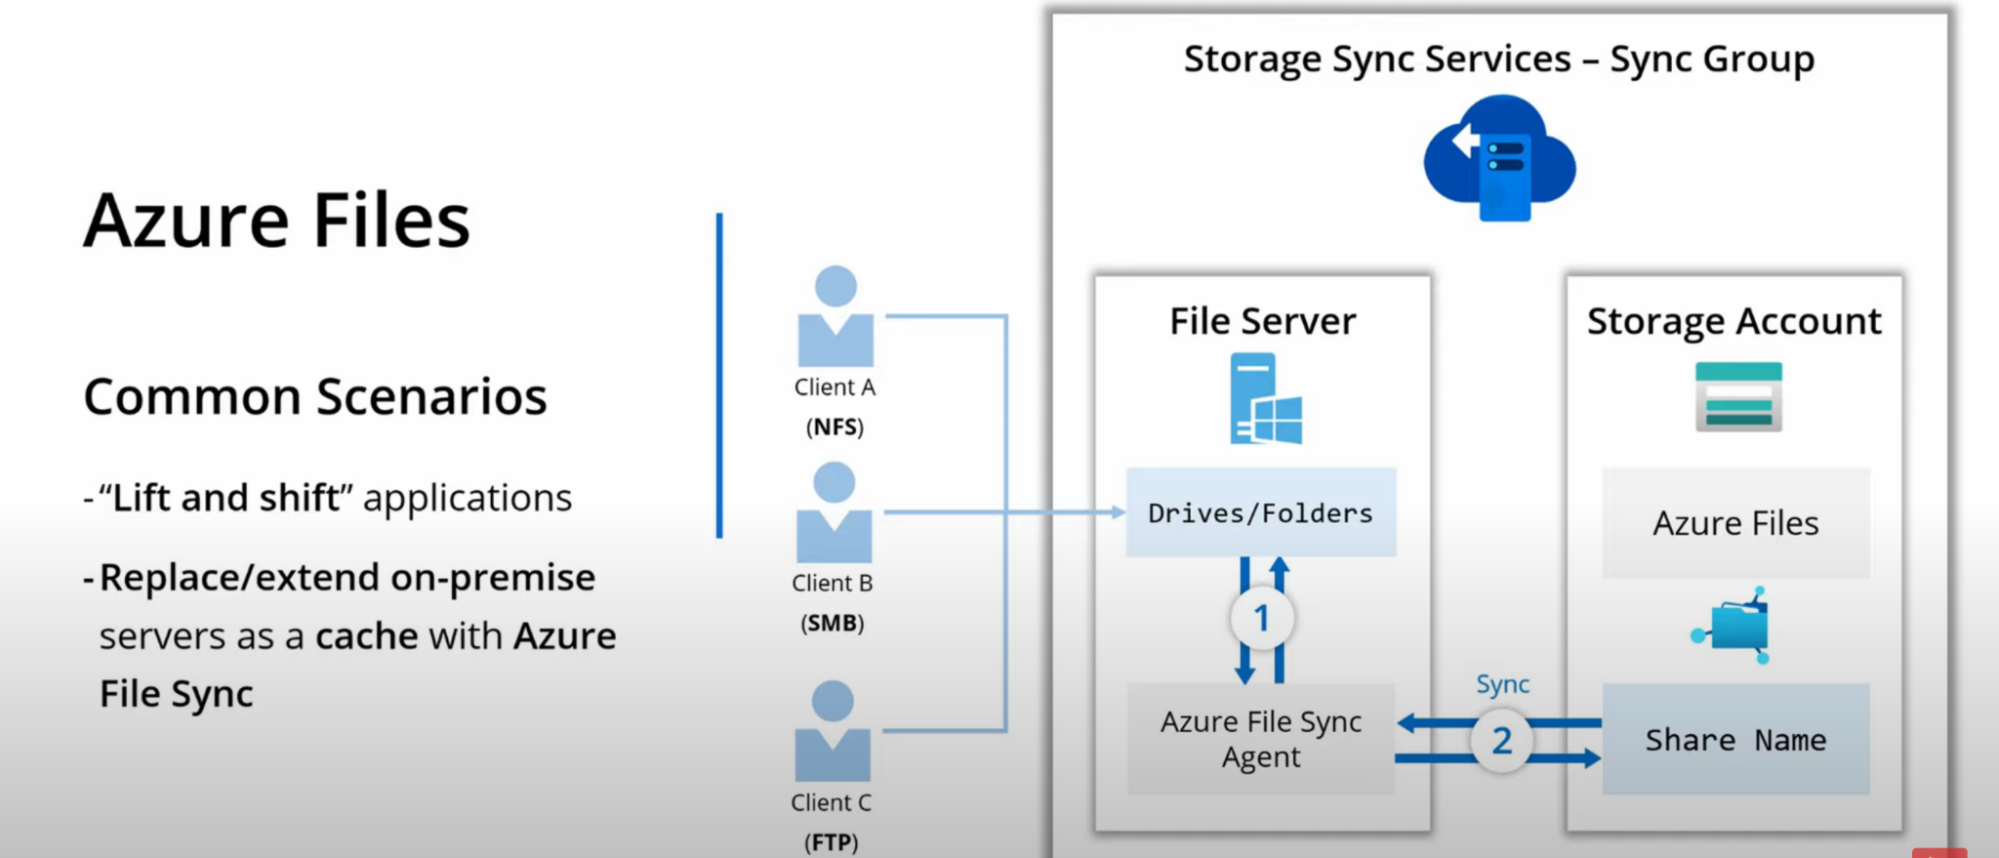
Practical Scenarios
- Life and shift application
- Ex: if you have an application running on web server and app has a drive that stores the data or logs
- You can create SA, File Share. Now you can mount this File Share to your local machine drive,
- So from that point all the file that your application saves to a local drive, will be saved to azure File Share through SMB
- Replace/Extend on-prem server as cache with Azure file sync
- Ex: you have file server on-prem, you expose them using SMB, FTP, NFS.
- Create SA, File Share
- Install Azure file sync agent on your on-prem file server
- This agent is responsible for syncing the server’s local folders with Azure SA
- Use Storage Sync Service - Sync Group to create the above sync
- In Sync Group you’ll point to that file sync agent and tell him synchronize those folders with this specific share
- This way your local file server act as a cache and Azure File share performs actual syncing
- Persistent storage for Kubernetes
Features
- SMB/NFS Connectivity
- Supports windows/linux/mac
- Extended by azure file sync
Connectivity Options
Task: Create Azure File Share and connect to it from local file system
- Local file could be your laptop or VM in Azure
Steps
- Create SA → File Share(Transaction Optimized type)
- Edit quota
- Upload file and folder in the File Share you created
- Connect to this File Share
- windows/linux/mac OS
- Auth method: SA Key/AD
- Show script
- Use this to moute this File Share to a client
- Paste it in your RDP session
Callouts
- Create File Share to share files to local PC or VM
- So files you have inside your Azure File Share will be replicated to VM
Azure File Sync
What: extension of azure Files that allows you to extend the capabilities of on-prem file server
- Map between local file server and Azure Files
- Cloud tiering: enable on-prem file share to locally cache frequently accessed files and just maintain a mapping to files that aren’t accessed frequently that maps back to that file on Azure File Share where we have more storage capacity
Idea
- Return frequently accessed files from Local file server (act as cache)
- Return infrequently accessed files from the Azure file share
Features:
- Locally cache frequently accessed files
- Require windows 2012 R2 or later
- SMB, NFS, FTPS
- Require File Sync Agent
Steps
- Create SA, File Share
- Create VM
- Public inbound port: RDS, HTTP, HTTPS
- Attach new disk: where we map our file share for the file sync
- Create Azure File Sync
- Navigate to VM
- Connect with RDP
- Download RDP file
Task
Your company needs to ensure that backups are in place for all Azure file shares. Because employees are often modifying files within the file share, file versioning is also important. To test functionality, you are tasked with taking a snapshot of a file share and restoring it to your Windows machine.
- Create SA, FS
- Connect FS to VM(RDP)
- Take a snapshot and recover data
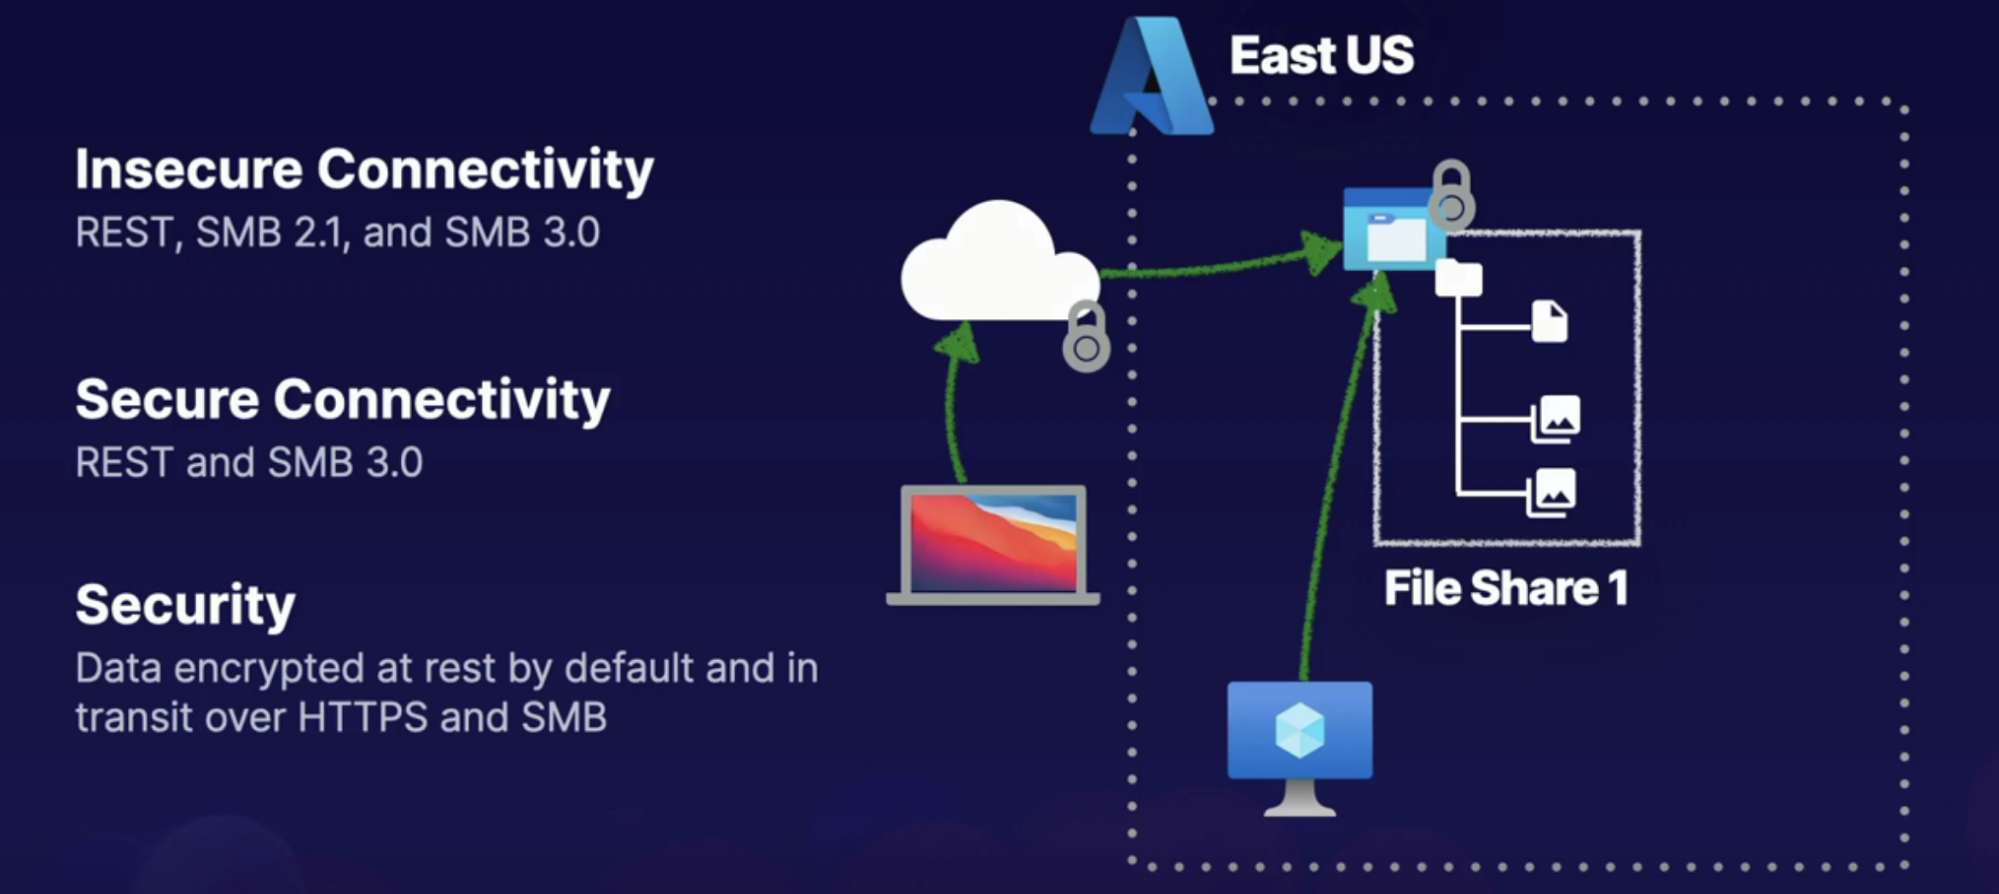
Storage Network Access
What: to access storage account
Access options
- Public endpoint: All services are public by default using the service's public endpoint URL.
- Each storage sub services(table, queue, files, blob) has its own URL, through which user can access it over the internet
- You can protect/secure public access via adding a SA firewall so that only specific IP address spaces, VNets can access the service
- Restrict access: Storage account access can be restricted to virtual networks, IP address ranges via the storage account's firewall, and via specific resource instances.
- Private endpoint: Allow private IP access for resources in an associated virtual network.
Securing Storage Accounts
SA Encryption
- Storage Service Encryption: By default, all data stored (data at rest) in any Azure Storage service is secured using Storage Service Encryption (SSE).
- All data in transit can be secured using transport-level security (HTTPS).: This means request to our data happens at HTTPS, rather than HTTP
- Enable Infrastructure encryption as an added layer of encryption on the actual Infrastructure inside of data center
SA Authentication
2 layer of providing access/auth to SA services
- Management: this layer is at SA
- Data: this layer is at SA services
Ways to access SA
- Access keys: Azure-generated keys that provide unlimited access to both the management and data layer of an Azure Storage solution.
- Shared Access Signature (SAS): An access signature, generated from access keys, that provides limited access at either the account level or the service level.
- Azure AD Authentication: Uses Azure role-based access control (RBAC) and Azure Active Directory (AD) identities to provide authentication (instead of access keys).
- This service is for Queues and Blobs
Securing SA
Use Azure Defender for SA
- detects potentially harmful attempts to access or exploit Blob containers and File shares in your storage accounts.
- Enjoy a 30-day free trial. When the trial ends, you'll be charged $0.02 per 10,000 transactions in Blob containers and File shares.
Azure Jobs
What: Move large amounts of data between on-premises and Azure Storage(Blob & Files).
- Move to/from Blob service
- Move to Files service
- Transport self-supplied drive
Supported drive types:
- SATA
- HDD
- SSD
Azure Import Job
What: Send large amounts of data to the Azure cloud when network bandwidth won't support data migration.
Task: import data from on prem to Azure
- Prepare disks (WAlmportExport): prepare disk and put the data on that disk
- Create job: provide carrier info and journal file
- Ship drives: ship drives to Azure
- Check job status: to see if we successfully uploaded data to Azure blob/files
- Receive disks
- Check data in Azure Storage
Azure Export Job
What: Receive large amounts of data on-premises from the Azure cloud when network bandwidth won't support data migration.
- Create job
- Ship drives (WAImportExport)
- Check job status
- Receive and unlock disks
How
- WAlmportExport CLI Tool: Use to prepare disks for data and to estimate number of disks needed.
- Windows Support Only
Steps
Task: import/Export data from on-prem into Azure
- Azure → Import/Export jobs
- Create // to create a job
- Basics
- Name
- Job details
- Upload journal file: Download the latest WAlmportExport tool to generate the .jrn file
- Destination azure region: this is your import destination where you want to dump on-prem data
- SA
- Shipping
- Carrier name
- Carrier account number
Storage Utilities
What: ways to work with SA outside of Azure account
Why: is it work with SA Activities like create blobs, snapshot, upload data
Ways to works with SA
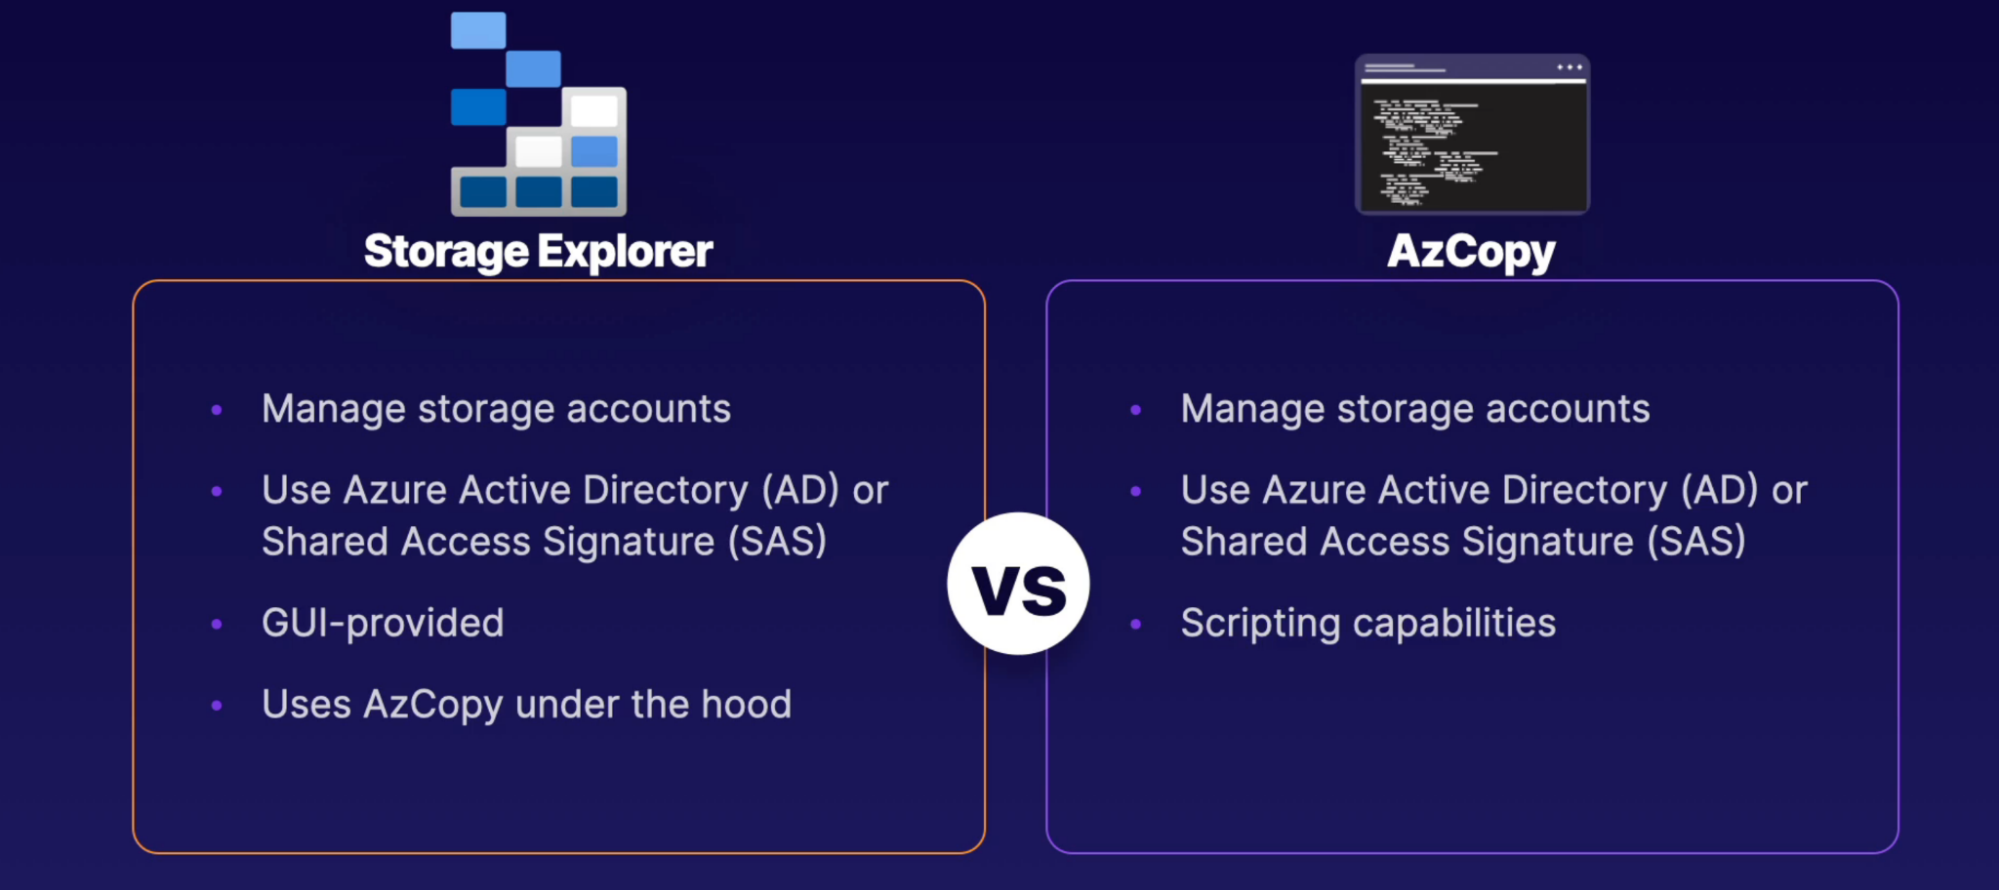
- Storage Explorer: A Graphical User Interface (GUI) tool for working with storage accounts. Supported for Windows, Linux, and MacOS.
- Download Storage Explorer client to use all the capabilities
- Storage Explorer in Azure portal has limited capabilities
- AzCopy: A command-line utility for working with storage accounts. Supported for Windows, Linux, and MacOS.
- Download AzCopy tool
Networking
Basic Understanding
TODO
- Determine IP CIDR
- Subnetting requirements
- Connectivity needs
- What type of connectivity is needed: internet, resources to resources, resources to service
Terminologies
- VNet
- DHCP server
- Subnet
- Network interface card - NIC: IP configuration
- What: Decide/set whether you want public or private connectivity with your resource that is attached to NIC
- Ex: if you want your VM to be accessible via the public internet, then you use NIC and associate Public IP in NIC, NIC is attached to VM. that’s how you can connect to your VM through public internet
- Caveat: you will need to attach NSG with NIC to allow inbound traffic
- Network security group - NSG
- Peering
- Network gateway
- AZ spanned
Common Questions
What happens when you create a resource in VNet
- Network interface Card(NIC) gets created/installed with your resources
- What: where you can see all the resources VNet details:
- which subnet it belongs to, what’s it IP address
- Assign static IP - You can also assign a specific IP address to the resources
- By default intra network traffic (private: subnet to subnet inside Vnet) and outbound traffic(communication to the internet) are allowed
- Private IP: By default, resources created in this VNet/Subnet get private IP, and they can communicate with resources with the same Vnet
- Public IP: resources to talk to the internet
- Basic SKU type: accessible by default and require NSG to restrict traffic, no Zonal supper
- Standard SKU: dynamically assigned IP, not accessible by default. Require NSG to allow traffic
Architect Components
What happens when you have VNet
- VNet
- Security
- Bastion host
- DDoS protection standard
- Firewall
- Subnetting
- 5 IPs are reserved
- x.x.x.0-3 and x.x.x.255(last octate)
- Private networking: Resources you put inside VNet(ex: VM) gets a private IP address.
- How: served out from DHCP server, which is built in to VNet
- Public networking: VNet supports public IP addressing(IPV4 IPV6) so that resources can have public connectivity
- Say explicitly whether you want to assign a Public IP to your resource
- Peering: the connection between VNet to VNet
- Peering in the same region and global region
- Network gateway(device): Azure VNet uses Network gateway(device) in gateway subnets to make VPN connection
- Monitoring: view logs of VNet to see where resources are in VNet
- Security: through firewall
- NSG at Subnet and NIC level
- Firewall
- Web application firewall with application gateway(layer 7 LB)
- Azure front door
- Managed firewall
Flow
- Create Vnet with multiple subnets (depending upon your application component)
- Ex: Web server subnet, App server subnet, DB server, backup server
- Each subnet has its own NSG - security settings
- Create/Place resources in a subnet.
- Each resource you put into the subnet will get private IP within that subnet CIDR range
- How: resources are added to the subnet through NIC(installed in them)
- Resources can have multiple NICs to connect multiple subnets at the same time
- NIC also supports NSG - acting as a firewall(same as subnet NSG) - so you get 2 layers of NSG (1 at subnet and 1 as NIC)
- 2 NSG at both of these layers is not recommended because of complexity and troubleshooting reasons
- NSG: the starting point of security. Use advanced features along with NSG
- When you create VNet with a subnet, NSG has 3 default inbound traffic rules
- AllowVnetInBound: traffic between computers running on the same network or connected networks is allowed: Vnet peering and VPN traffic
- AllowAzureLoadBalancerInBound: This is traffic from the load balancer. For example, from health probe is allowed
- DenyAllInBound: all other traffic is denied
- rules are evaluated in order. From the lowest priority number to the highest. The first rule to match the traffic is the rule that wins
- create custom rules with high priority to override the default rule effectively. because the default rule can’t be removed but rather overridden
- rule example: Port80, 443, 3389, 22
Delivery
DNS
Scenario
- A web browser using a domain name wants to connect to a Web server
- Domain name has no clue on where this Web server is located, nor the path required to get there
- Task: find the domain name’s IP so that user can reach to it’s web server
- so the first step of connecting to the web server is to look up the domain name in the domain name system DNS
- The global domain name system DNS will return an IP address to the browser for that domain name
- from that point on the browser will use the IP address to connect to the server
- it will cache the address for a limited period of time so doesn’t have to look it up all the time
- Web brower → Domain name → DNS(will return IP of the server to web browser) → Web server
Azure DNS
Scenario:
- So when the browser uses your domain name, browser will first go to a DNS server to find out the IP of the domain and use it to access your website
- DNS is complicated because not only does it contain the IP address for Web server. It also contains other types of records.
What: Is a managed domain name hosting service inside Azure
- if you already have a domain name, you can delegate that to Azure using your domain registrar
- within Azure you can manage all of the various records that you need to
- Azure DNS allows mapping between domain name and IP address - so we don’t have to memorize IP address and you can directly use domain name instead
Type of DNS zone
- Public: accessible on your public internet
- Private: accessible on your private network
Type of DNS Records
- A records: The IP address associated with the domain.
- This is the one that primarily translate a domain name into its IP address.
- Record set: you can assign same website map to different IPs. ex: Indian and US version of website
- Alias record: map Resource instead of IP. ex: Map domain name with dynamic Azure VM. so we don;t have to update IP regularly
- CNAME record: is used to indicate when one host or a subdomain is an alias for another
- MX record: The server that handles email
TODO:
- Say you have domain name bought from AWS
- In Azure, create DNS zone
- Name: gautampambhar.com
- See the info on your name server(4 entries) and DNS zone with name server records and SOA record
- Take and add the name server(4 entries) to your AWS registrar for your domain
- Add record set to attach your domain to your Azure VM
- Name: www.gautampambhar.com
- Type: alias record
Azure Traffic Manager
What:
- Avoid Region level failure
- If you have everything setup(LB, VMs) setup in one region, it can cause failure if the entire region is down
- ATM: Load balancing happens at global scale - global region
- Operates at DNS level
- Intelligent DNS server
- It’s not the true load balancer
How:
- You have a solution running on multi-region with one domain name
- Have servers running in multi-region for the same website
- So users will be connected to servers close to them with the fastest response time
- This is done through reverse IP lookup. It knows you are requesting answers from Asia, US. so it will tell your browser to go to the solution that performs best for you
Benefit
- Perform failover
- If one region is down then another region will serve your traffic
Azure Front Door
What:
- actual layer 7 load balancing between region
- Azure traffic manager is not load balancing solution at a global level, AFD is
- True load balancer: provides a more robust load, balancing service at a global level
- AFD is a scalable and secure entry point for the fast delivery of your global applications.
How:
- They provide performance benefits by having the service placed at edge locations closer to users.
- It provides global scale, layer 7 loads balancing similar to the application gateway. allowing you to distribute traffic to different regions intelligently based on the domain name and the path information
- Ex: /en traffic goes to certain region, /fr traffic goes to a certain region
- Also support caching just like CDN
Benefit
- Provide WAF and DDoS protection
Practical Usage
- Your solution is hosted in multiple regions. One acts as an active, the other is a standby
- If one fails, standby becomes active
Comparison
Azure Traffic Manager | Azure Front Door |
Avoid region failure | Avoid region failure |
Requires your solution to run in multiple region at the same time | Requires your solution run in one region. If that region fails, it failover to another region |
Operates at DNS level | Layer 7 LB |
Content Delivery Network
Scenario:
- when you request a website index.html page, you are not just requesting one html page request, but you’re also requesting hundreds of requests. for example each image on that page, CSS or JavaScript has it’s own additional request
- so you are requesting 200 requests with the single index.html page of that server/website
- to improve performance, your web browser might actually cache many of these files. so, second time you’re requesting that page it doesn’t have to go through that server
- server tells the browser how long it should remember the content of that file
- this is cute for one person-based scenario, but what if you have thousands of user accessing the same content across the globe
What:
- is a service that can reduce the number of files that your Web server needs to serve to any client and can also improve the performance perceived by your end user
Option
- Akamai
- Verizon
- Microsoft CDN
How
- It has edge location servers all around the globe
- stores your static files on dozens of edge servers around the world
- when an end-user requests to file, the file is served from those servers and not the actual server
- The actual server will see drastically fewer requests overall
Azure Front Door | Content Delivery Network |
Requires your solution run in one region. If that region fails, it failover to another region | It doesn’t require you to have solution deployed in multi-region |
Layer 7 LB | Its a caching mechanism using edge servers |
Security
Network Security Group - NSG
What:
- The starting point of security. Use advanced features along with NSG
- Controls traffic flowing through a VNet/Subnet, secure the routing pathways
- Create rules that’d define what is allowed/denied
- When you create VNet with a subnet, NSG has 3 default inbound traffic rules
- AllowVnetInBound: traffic between computers running on the same network or connected networks is allowed: Vnet peering and VPN traffic
- AllowAzureLoadBalancerInBound: This is traffic from the load balancer. For example, from health probe is allowed
- DenyAllInBound: all other traffic is denied
- Rules are evaluated in order. From the lowest priority number to the highest. The first rule to match the traffic is the rule that wins
- Create custom rules with high priority to override the default rule effectively. Because the default rule can’t be removed but rather overridden
- Rule example: Port80, 443, 3389, 22
- NSG is stateful, if you create an inbound rule for traffic, the outbound rule gets created automatically.
How: associate with a subnet or NIC
Practical:
- Say you have a standard public IP assigned to VM, and you can’t access to VM through SSH, With NSG you can create a rule for SSH to connect to a VM, now associate this NSG with NIC or Subnet
- Say you have 2 VMs in subnet. Each has their own NIC. you create 1 NSG and attach with subnet that allows SSH to VM. you have 2nd VM’s NIC and you attach 2nd NSG to it with deny inbound traffic.
- Result: you can SSH into 1st VM but can’t in 2nd.
- First NSG rule evaluate at subnet level. Then at NIC level
- The starting point of your security
Application Security Group - ASG
What: Allows you to define certain ranges of IP addresses into certain categories in labels so you can group related resources together
Practical:
- VM comes with NIC
- NIC can be associated with NSG
Load Balancer
What: layer 4 LB(transport layer) - so it only understands IP, ports, and networking at the level. It doesn’t understand internet URL
- Route traffic to identical VMs
- Public Proxy: public reach to LB first and not the VM
- VM can have private IP address given from Subnet
- So no hacker can be connected to VM as they don’t have an IP address
How
- LB uses round robin algorithm.
- Send 1 request to 1 server and a second request to the 2nd server
- It has a health probe that frequently checks if the VMs is in good condition. If not, then distribute traffic on available VMs
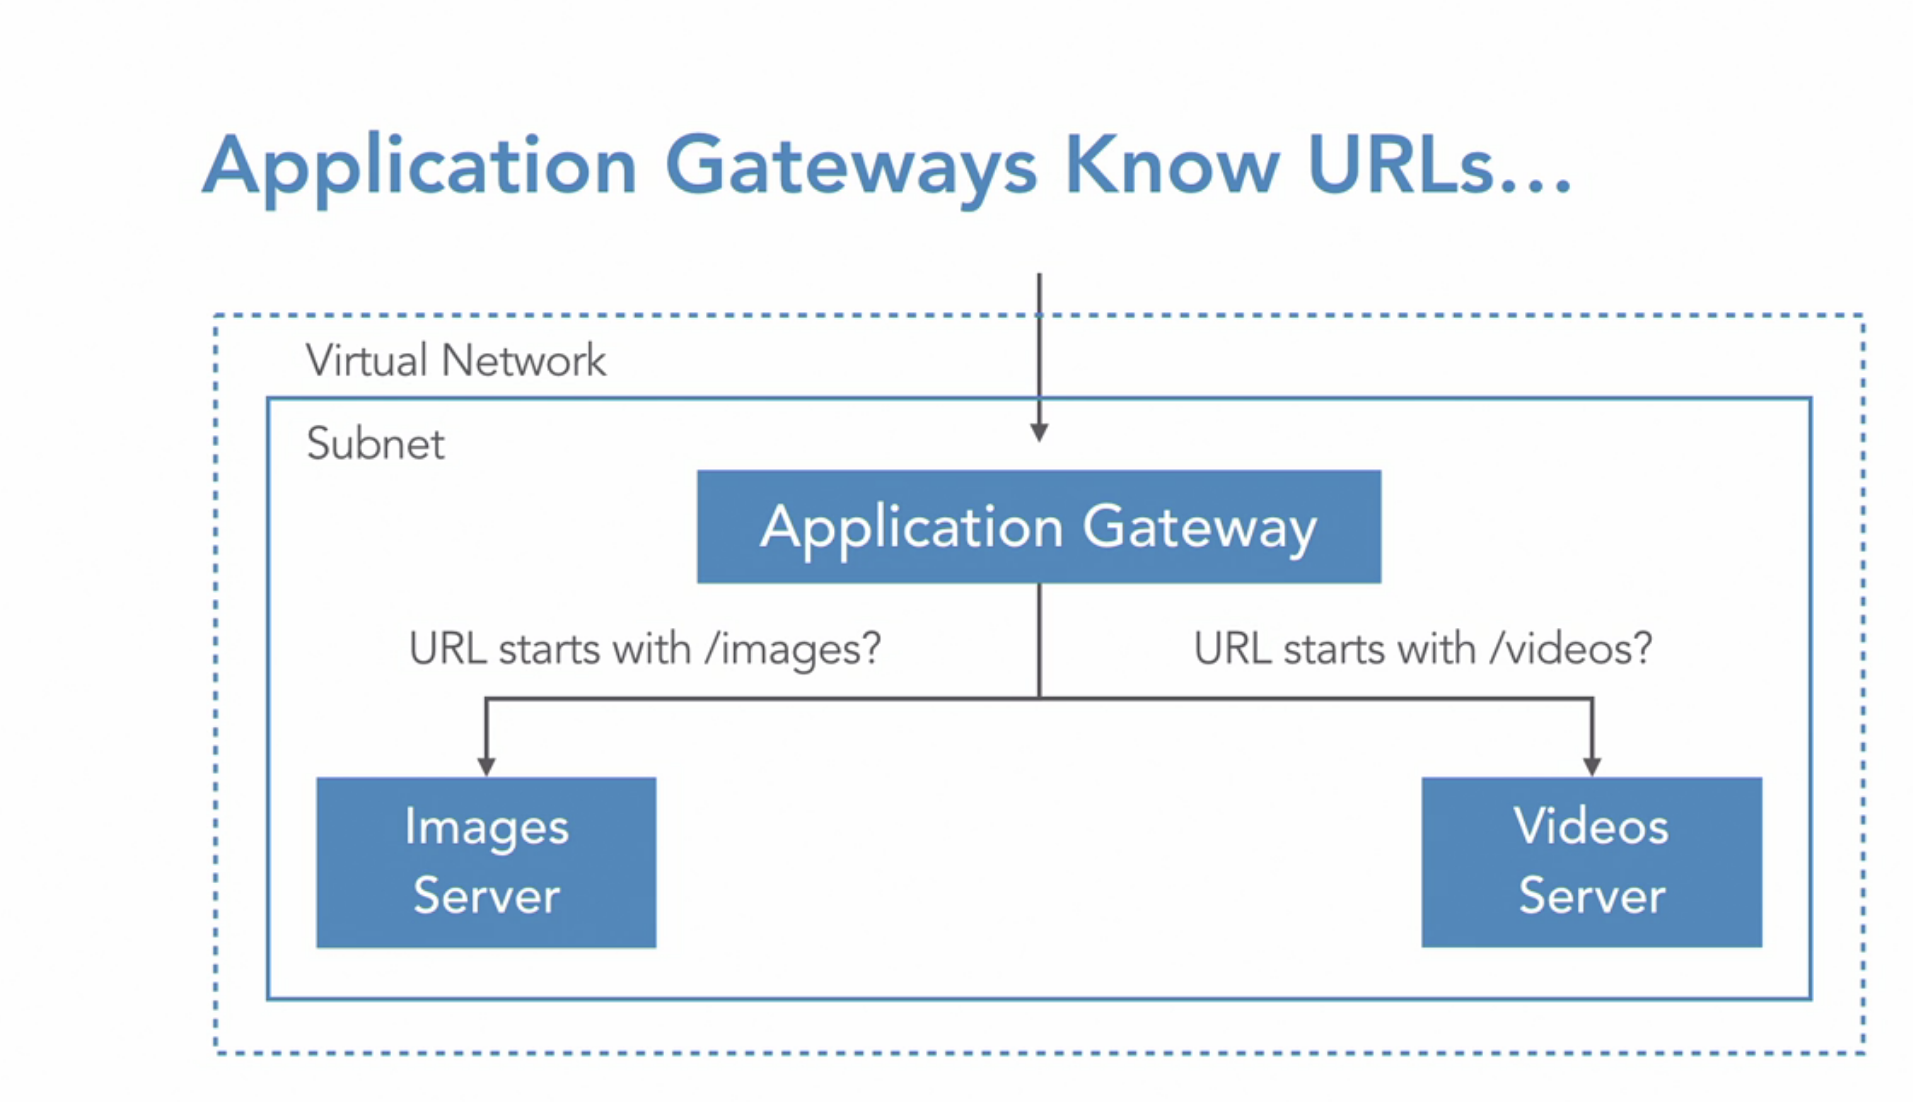
Application Gateway
What: Layer 7 LB(application layer)
- URL path based routing(image,video)
- Backend compute services: VM, VMSS, App Service
- Subnet: You’’ll need an Application gateway subnet
- Listener - how to route traffic: port, protocol and certificate configuration(SSL termination at app gateway)
- Rules: LB rules, HTTP setting, health prob
- recognize domain name being used and make routing decision based on that or you can look at the URL path and make a decision off of that
- recognize an attempt SQL injection attack and block it in the application gateway using a web application firewall- WAF
WAF
- The application gateway has options to have WAF, Which is a more sophisticated firewall
- this can detect common attacks, such as cross-site scripting in SQL injection, and stop this requests from even making it to the server
AG integrates with Azure monitor
Firewall
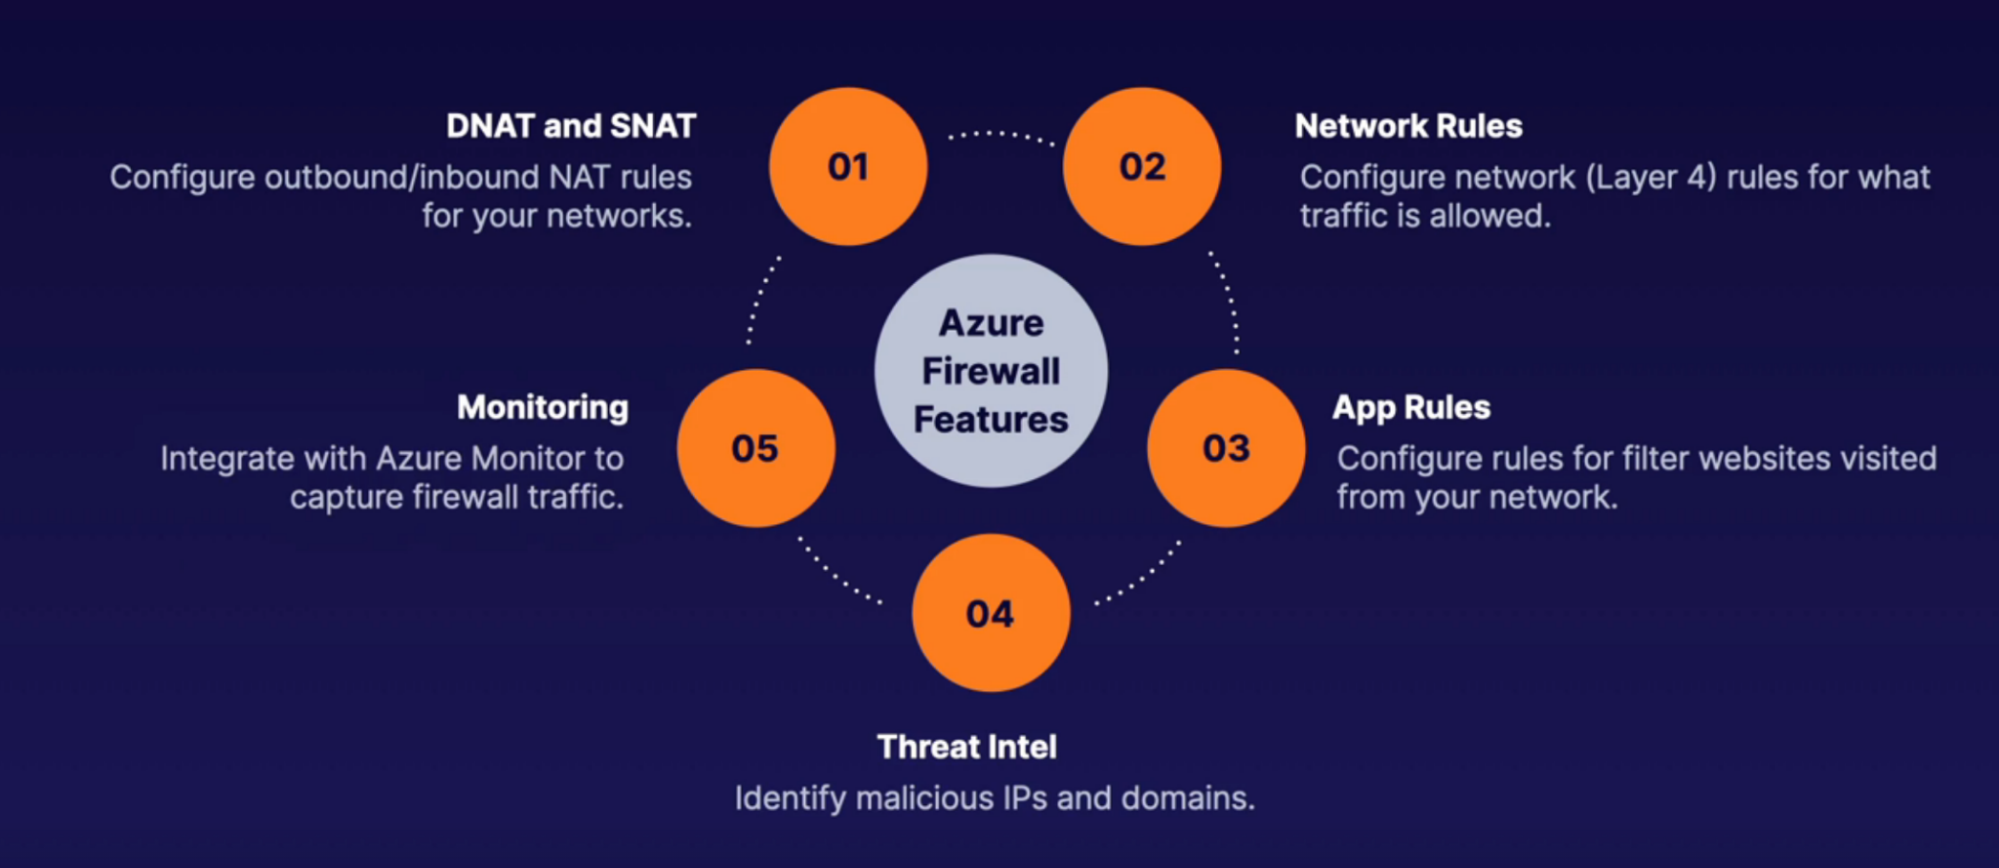
What: create a firewall with routing rules.
- PaaS service
- You get fully qualified domain name(FQDN)
Diagram: request comes to the firewall and then redirects to the respective server based on the routing rule you setup
How:
- You’ll need a subnet(must have /26 or lower IP range) specifically for firewall and then deploy firewall into this subnet
- Once firewall created, control traffic using NAT rules, application rules, and network rules in the rull collection inside of firewall or inside the Azurte policy
Implementation
Task: route traffic to VM using firewall
Features
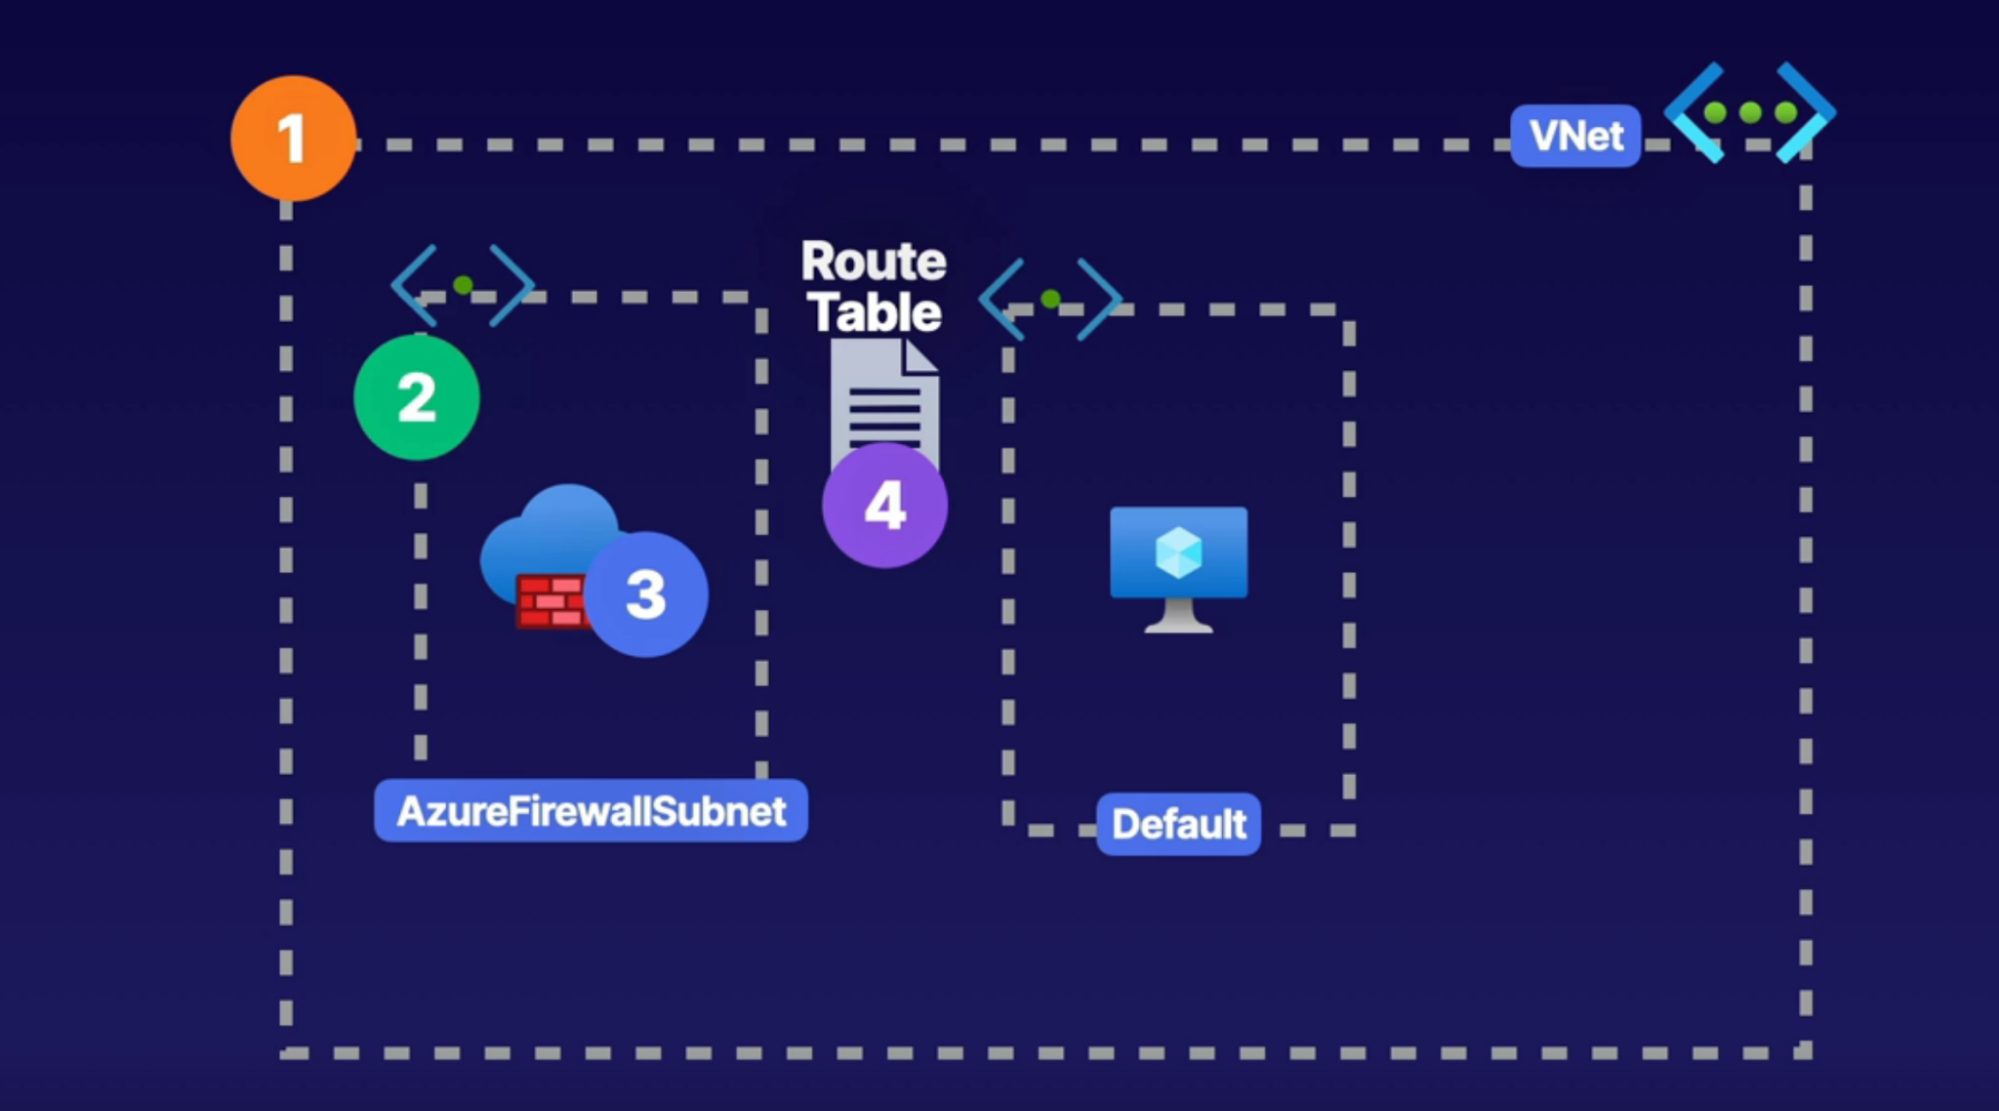
Steps:
- Create VNet with default subnet
- Create firewall subnet
- Create firewall into its subnet: this will create firewall IP
- Create a route table: to define route rules
- Create a route: route all traffic to firewall IP
- Route name and address: 0.0.0.0/0, next hope type, hope add: firewall private IP
- Associate route table with subnet
- In firewall configure firewall rule
- rules: NAT rules
- Configure it route traffic to VM
- Rule ex: allow RDP to firewall, which then translated to VM public IP // access RDP to VM via firewall
Connectivity
Routing
What: path for connectivity(for traffic)
- You define inbound and outbound route for traffic to communicate with VM
- Traffic scenarios
- Resources to Resources within same Vnet
- Resources to Resources with peer VNet
- Traffic with Internet
- Traffic with on-prem Network
- Type of route
- System route: default route built in to VNet, can’t modify
- Custom route: override system route,
- User defined route: firewall
- Broader gateway protocol(BGP): hybrid and Vnet peering
- Flow of overriding: Custom > BGP > System
When:
- You want to direct specific traffic to specific endpoints instead of default through route table
Examples:
- Block outbound internet traffic
- Why: because by-default in NIC’s effective route for system routes allows public connectivity via outbound traffic to internet - so there’s a need to block outbound internet traffic via route table
- With system round you have outbound internet access via a route, but with custom route block ththe outbound traffic
- How: give outbound traffic, next hop to none // cancel out that route
- User define route - firewall example
- If we want to route outbound internet traffic through firewall only
- How: give outbound traffic, next hop to firewall
- BGP route for integrated network - peering, VPN
- In VNet peering or hybrid scenario(on-prem to vnet), set up route between these network, override system route we have in VNet
Example Demo
- Block outbound internet connection
- Create route table
- Inside routes, add route
- Name
- Address prefix: destine traffic: 0.0.0.0/0
- Next hop type: None - kill the traffic
- Inside subnet, associate this route to your subnet
How:
- Rule: Any traffic destines to 220.20.2.0/22 range of IP address(can use any IP address) send them to followings
- VNet gateway
- VNet
- Internet
- Virtual appliances // firewall
- None: kill the traffic
- Associate rule to your NSG/subnet
Example - block internet access
- Create VM: you’ll get VM, Disk, NSG under subnet, NIC, Public IP
- Create route table and block internet access
- Associate subnet to this route table
Service Endpoint
Scenario
- PaaS service like Azure storage, app service as a public endpoint. To access it through your laptop/VM you need to use this public endpoint. And this happens over the public internet. It’s not a private connection.
What:
- It enables services(storage) to be accessible over the Microsoft backbone for private connectivity from resources inside of a subnet
- Only resources inside the VNet can access resources through the Microsoft backbone to PaaS service
- Although the connection is private, service won’t get private IP address. It provides source IP as private IP
- Not all service supported to use service endpoint with
- Has to be enabled per subnet
When
- When you want to access service privately. Ex: Storage account File Share
How:
- Inside your subnet, create a service endpoint(can also create service endpoint policy - for specific storage account) specifically for this subnet - Microsoft.storage
- See the service endpoint blade under subnet setting.
- So any connected devices connected to subnet has a route that allows private connectivity from subnet to storage through microsoft backbone
Example:
- Secure storage account access from internet traffic
- Secure database access from application traffic (web → app → database)

Private Endpoint
What: using Azure private link, you can connect your services as connected resources in your network with a private IP known as a private and point
- provide private endpoint via private IP for that service(azure service, customer service) that we are connecting as a resource inside of our virtual network
- it’s a direct mapping with the service you’re connecting to. Ex: you can connect to Azure blob, file directly inside the Storage account
How
- NIC inside your VNet, act as the private IP that is going to provide the connection for private connectivity over an IP to that service so that we can access that service inside of a virtual network via that private IP
Steps
Task: Create private endpoint for Azure file inside VNet
- In Azure, create private link
- Resource type: microsoft.storage
- Resource: your storage account
- Target sub resource: azure file on your storage account
Callouts
- if you have a NSG enabled for the subnet above it, it will be disabled for private and points on this subnet only. other resources on the subnet will still have NSG enforcement
VNet peering
Scenario:
- Say you have multiple VNets and resources inside these VNets need to be able to communicate.
- By-default these VNets are isolated and thus can’t communicate
What: Connection bw VNet to VNent in Azure
- Non-reciprocal: connection must be established in both direction
- Peering can be same region or cross-region(global)
- Non-transitive: if you have three Vnets, where V2 connected to V1 and V3, doesn’t mean that V1 can talk to V3
Steps:
- Under Vnet1, settings → peering
- Add peering
- Link name: VNet1toVNet2
- Peering link name: VNet2toVnet1
- VNet: VNet2
- Repeat step 1,2 in the VNe3 (conneting to VNet2)
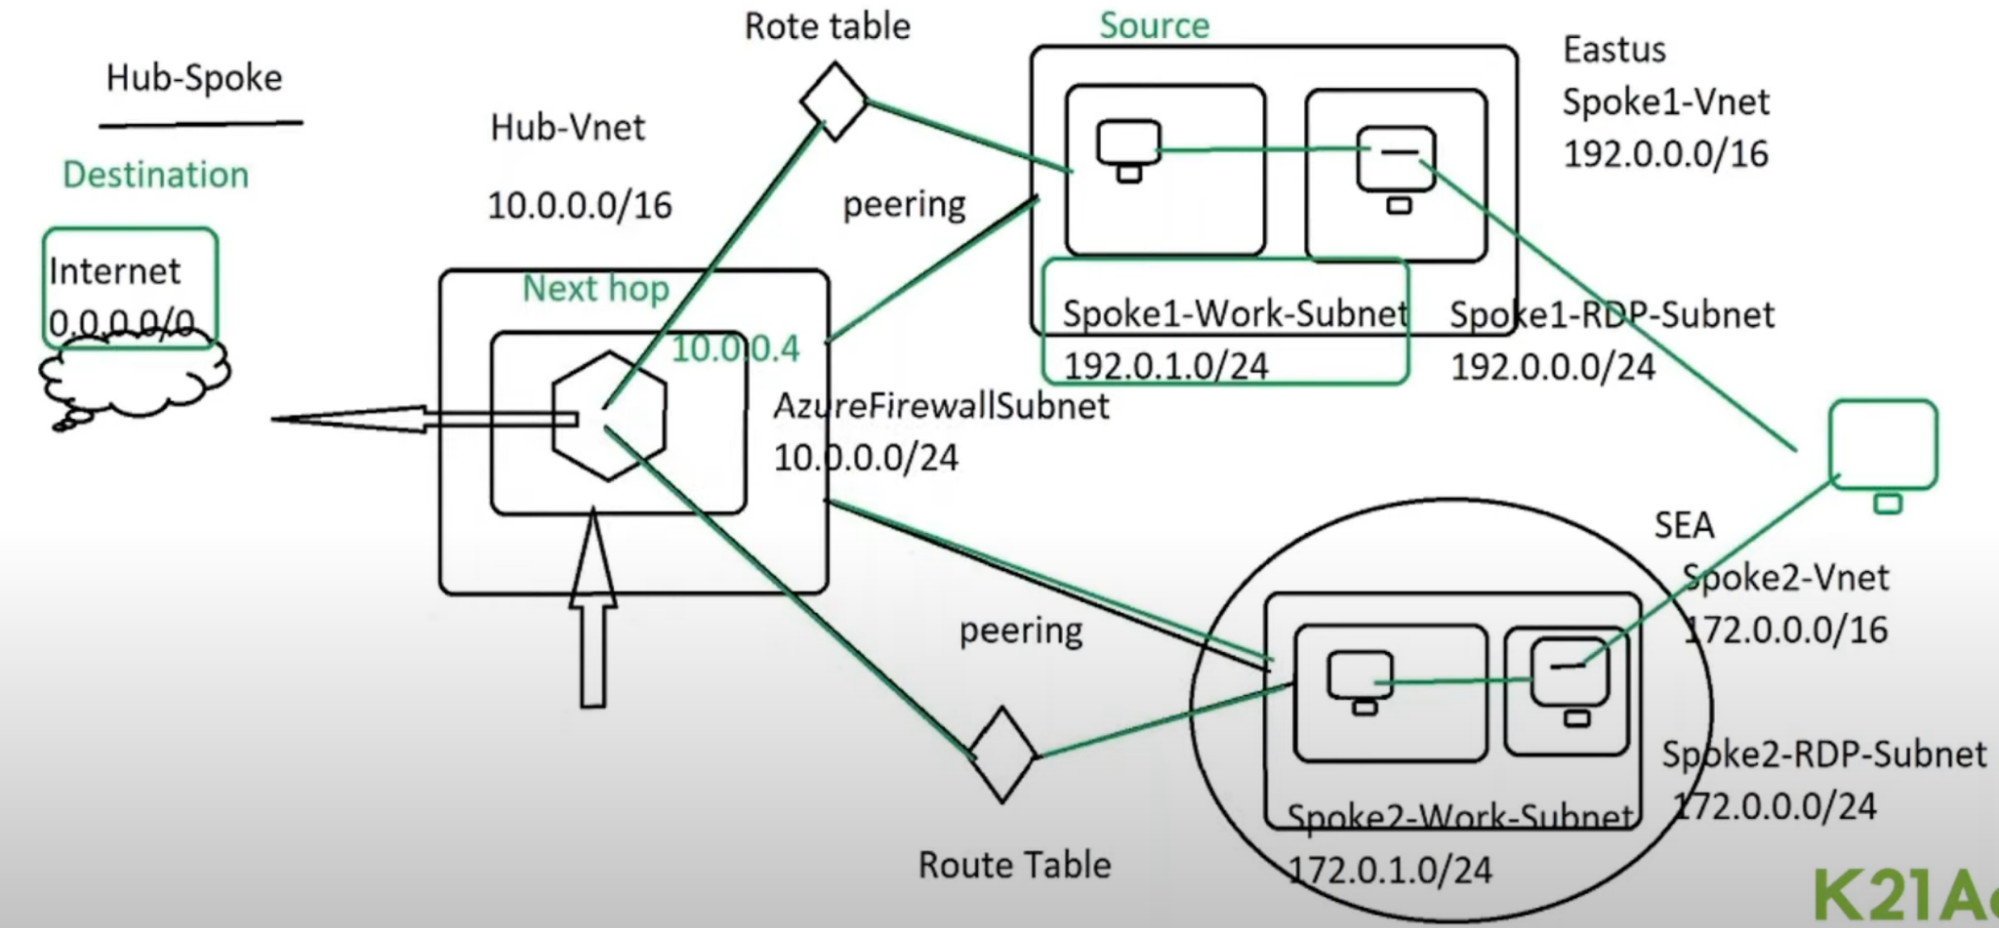
Design: Hub and Spoke Topology
How: This has 1 VNet in the middle and all of the satellite VNet connect to it
- if you want the spokes to be able to talk to each other, you can set up a route that allows traffic to flow from one spoke across the hub into another Spock
VPN & VPN Gateway
What: Connection bw Azure VNet to On-prem network over public internet
- Same as peering connection using Vnet peering
- Transitive: say you have VPN connection between On-Prem and Azure VNet1, now VNet1 is peered with VNet2. Connection from On-prem to VNet2 is allowed
Practical Example: connect your home device/entire office network to Azure network so that you can have access to Azure resources
How in Practical:
- It creates the encrypted channel between single machine/network and another network
- Access resources protected behind the firewall
- You have to install special software on your home computer or use reconfigured work laptop to connect to your office files from home. This happens over a VPN.
How:
- Create Gateway subnet required in VNet // small subnet that only contains the gateway device
- Add VNet Gateway device(in Azure, in Gateway Subnet) for VPN gateway // VNet gateway establish VPN gateway
- VNet gateway is the device that connects to the network on the Azure side and also performs the encryption and decryption of the traffic between it and the device connected to it on the other side
- Public IP per VNet gateway // because it’s internet connection
- IPSec tunnel for encryption
How 2:
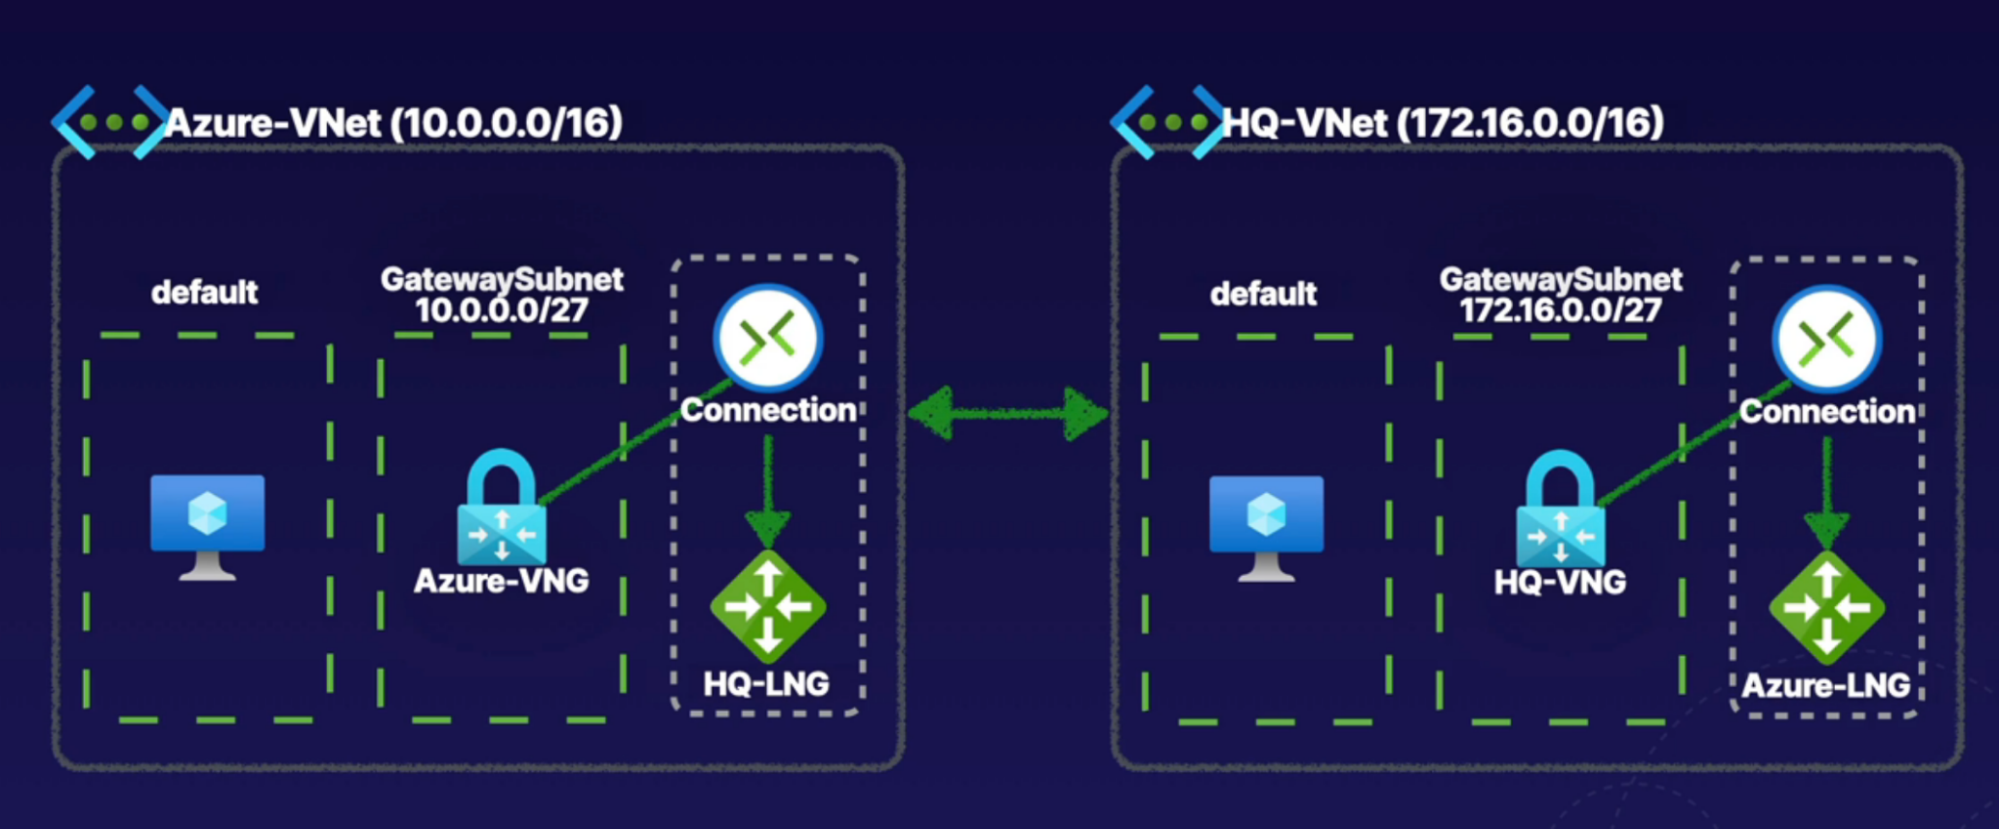
Local Network Gateway is the device outside of Azure, at your office (or remote site), typically a router or firewall capable of making a VPN connection to Azure. This device must have a Public IP Address.
Virtual Network Gateway is the device inside Azure in your Virtual Network. This appliance has a Public IP Address.
A VPN Connection is established over the Internet between a Local Network Gateway and a Virtual Network Gateway. They use their Public IP Addresses to 'connect' each other and establish the VPN tunnel.
A Real Example:
You have a Cisco Integrated Services Router (ISR) at your branch office in Brisbane and a Virtual Network Gateway in your Virtual Network in the Australia East region in Azure. Users in the Brisbane branch office can connect to the resources in the Virtual Network using a VPN connection established between the Brisbane Office and the Virtual Network in Australia East.
Types
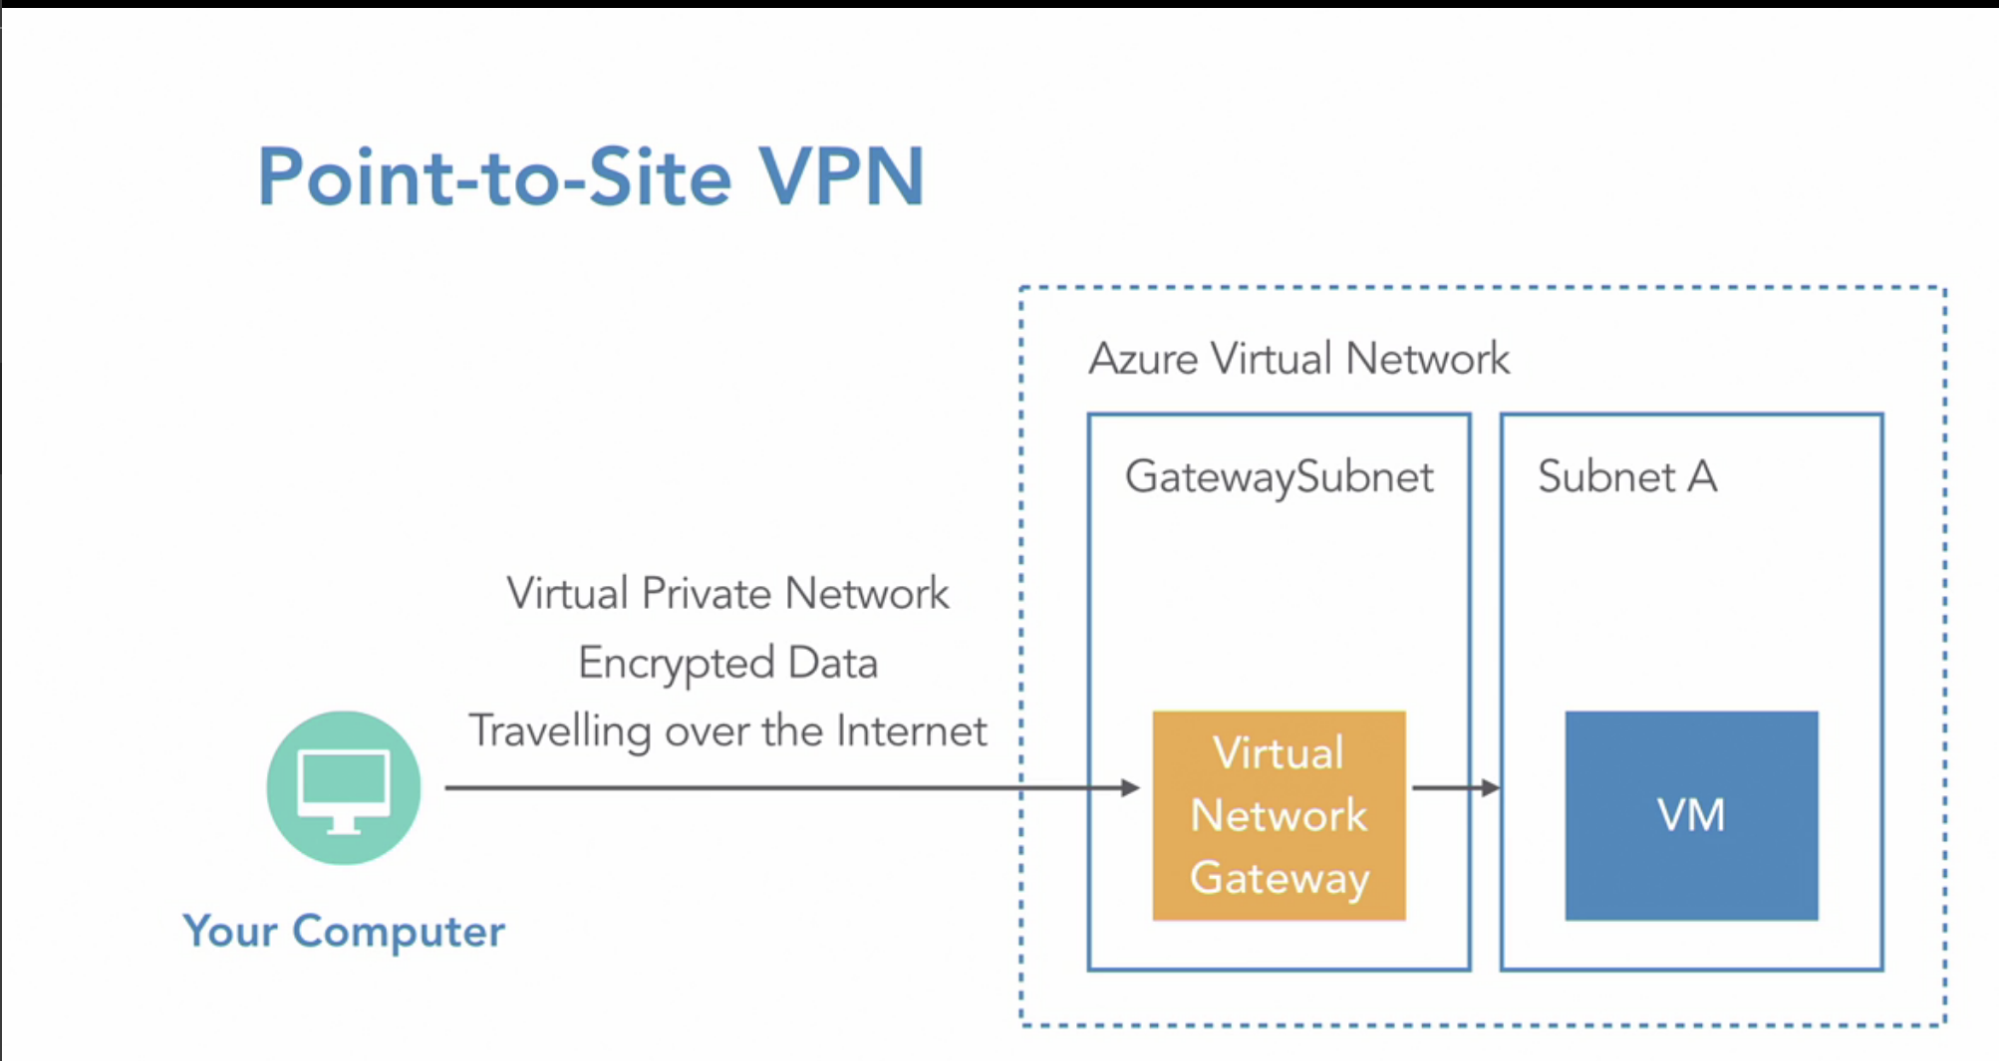
- Point-to-site VPN(computer to Azure network)
- add a single computer/server/your office device into an azure network, so using a VPN, your desktop can act like it’s on Azure private network and have access to resources normally protected behind the firewall
- Site-to-Site VPN(IT office network to Azure network)
- Entire office network connected to Azure network
- This requires a physical VPN gateway device - gateway to be installed on your side - to create an encrypted private channel into the Azure network
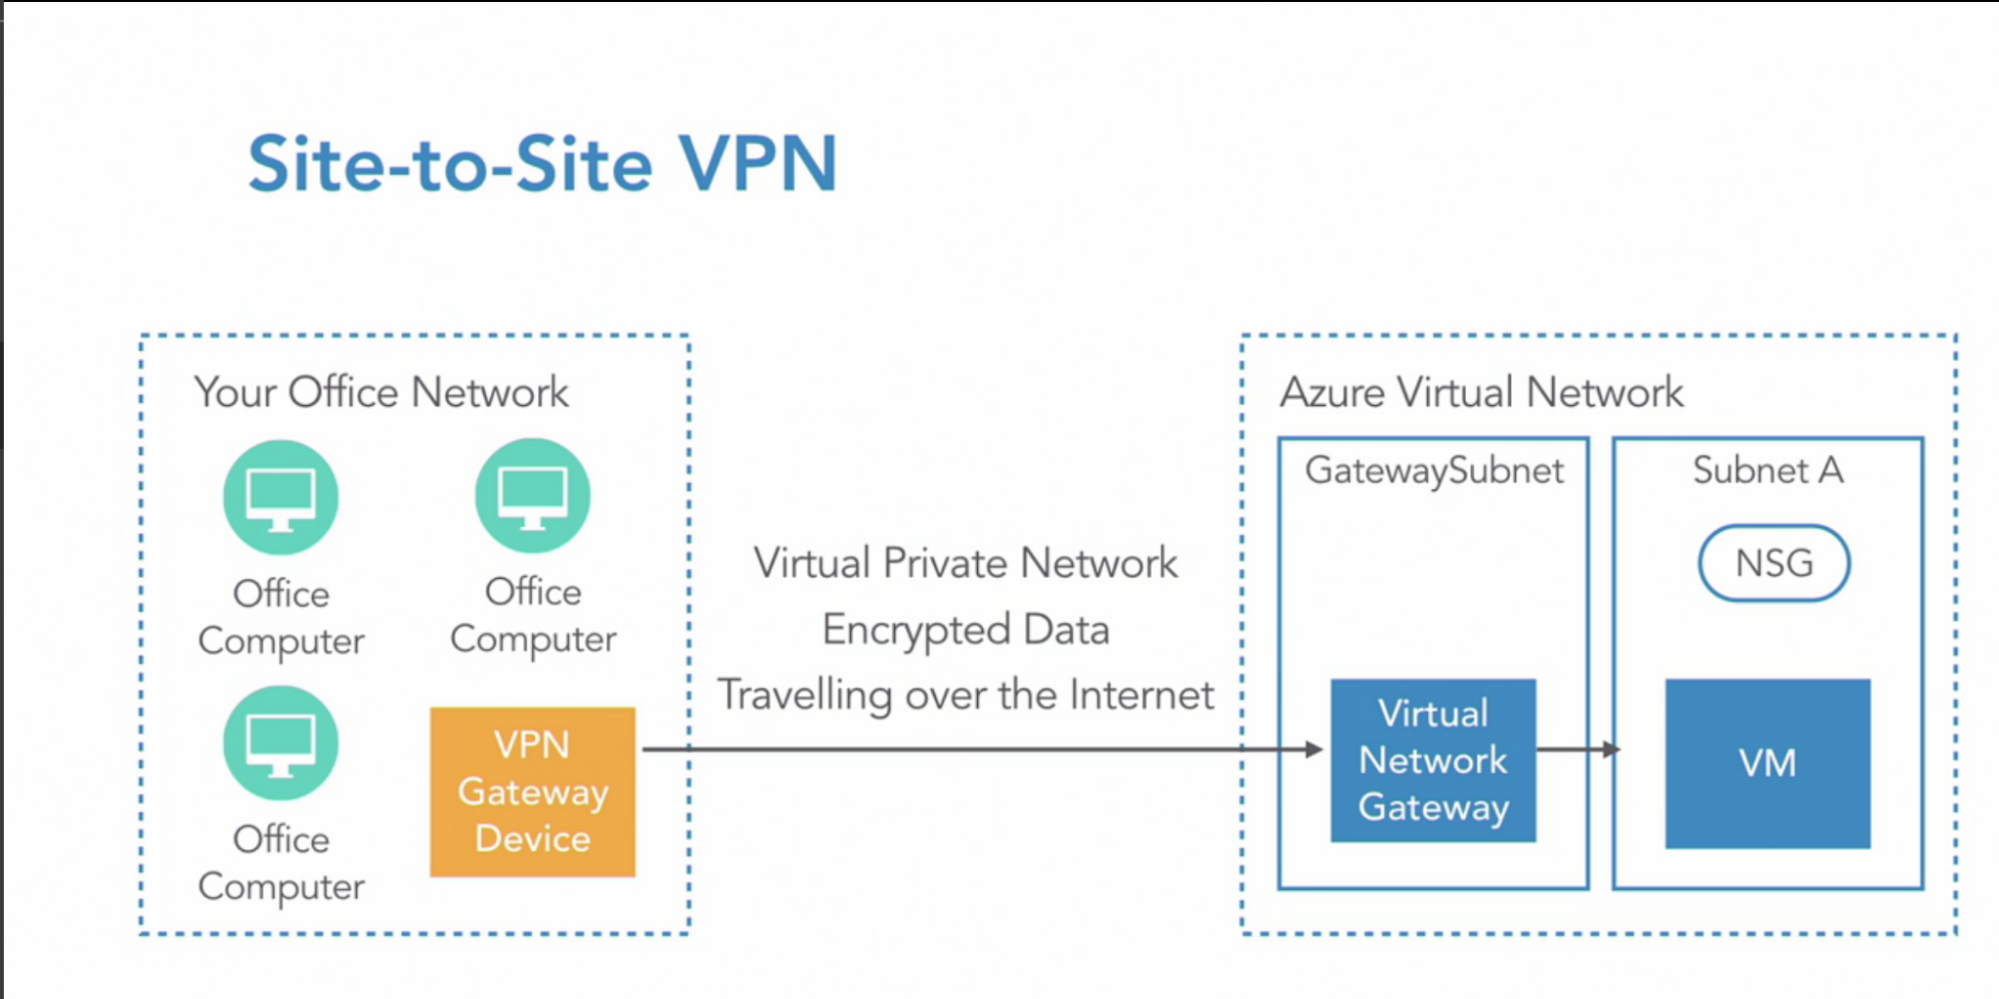
- Microsoft Azure only support certain type of gateways, so please check the device you have is on the list of supported ones
2 types of Gateways
- Static routing - policy based
- old style of VPN routing: fixed routing table
- you have a router table that has hard-to-find IP addresses that tell traffic where to go.
- so for a particular range of IP addresses, send traffic over this VPN connection to the other side
- Dynamic routing - route based
- BGP: It allows 2 gateway devices to exchange information with each other
- each device tells the other what network ranges it supports. So device A tells device B that it wants traffic from this range so that device B Will send it that traffic.
- no table contains a static list of addresses.
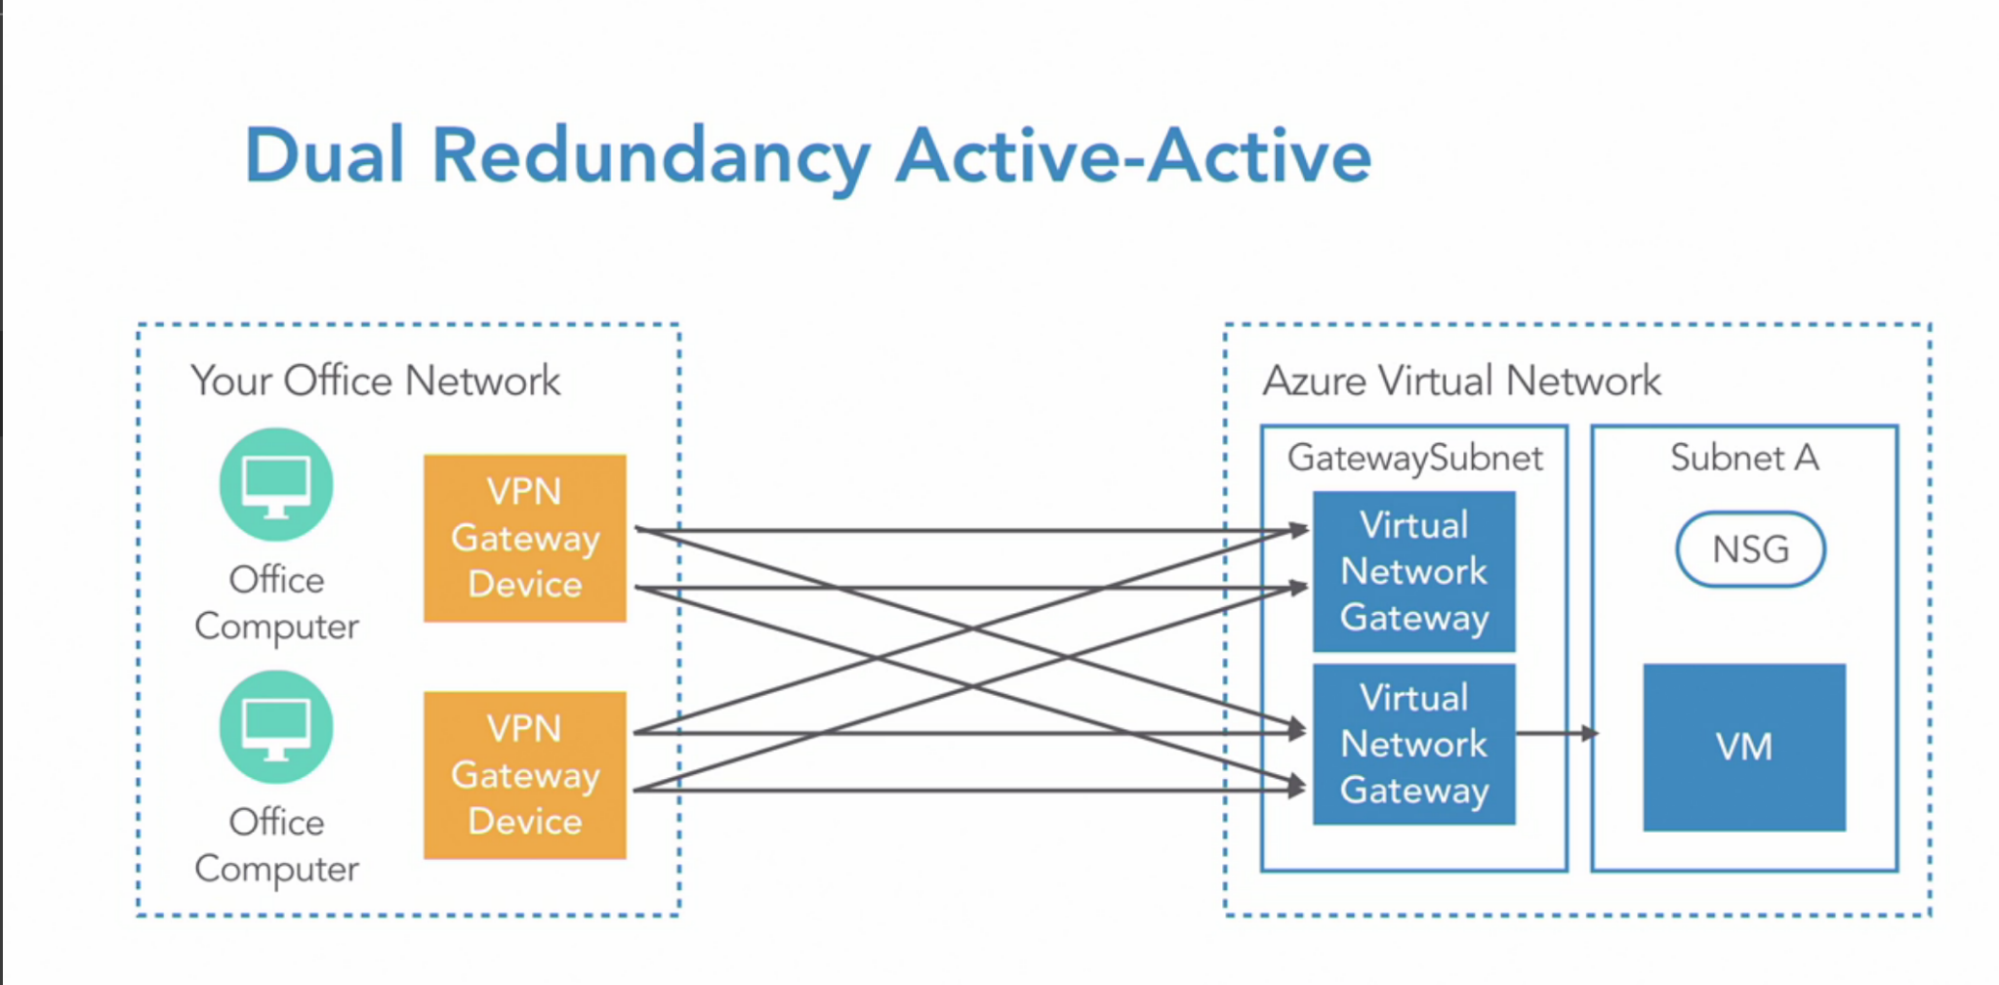
VPN Availability
- Redundant connection: if the connection between your office network, and Azure network fails, this will act as a single point of failure. So networks can’t talk to each other
- Azure gives two connections between the two devices. So if one connection fails, you could have it fall over to the other. few seconds of downtime at the time of failover happens
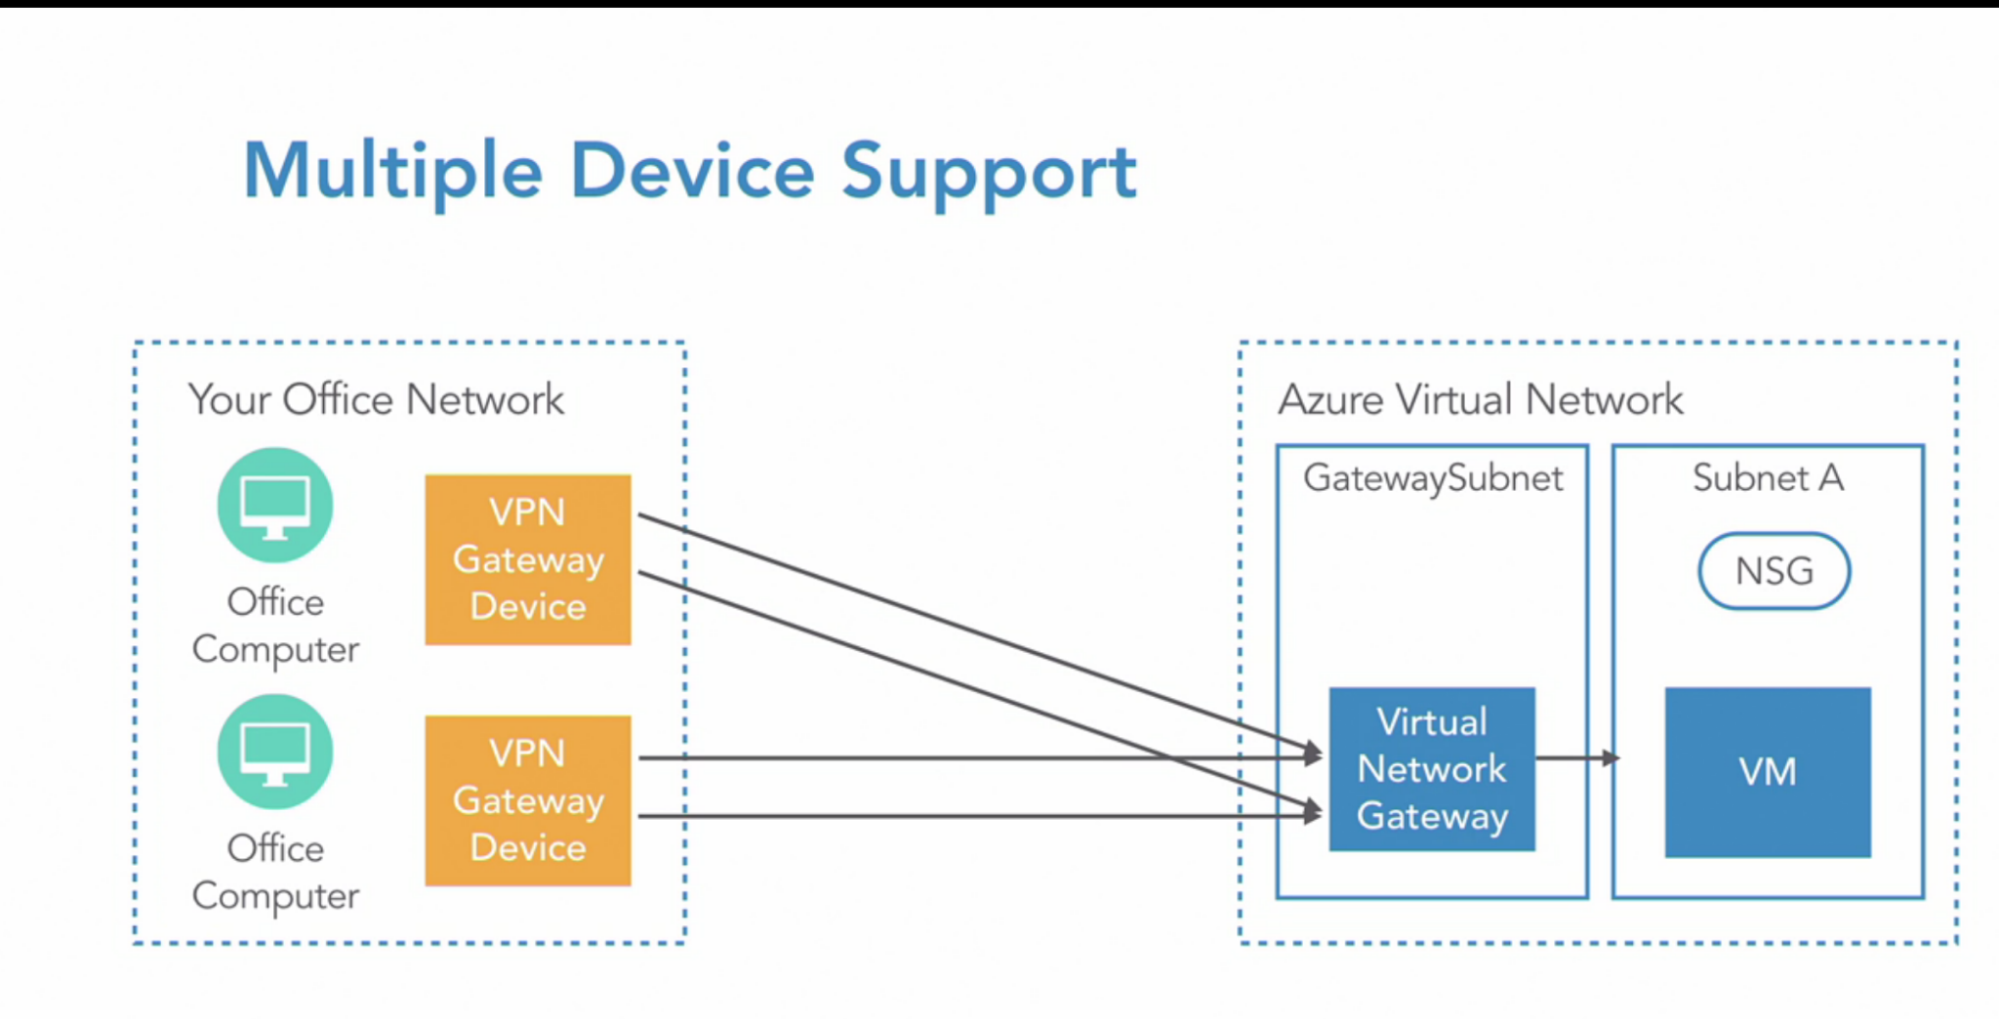
- Multiple Device support: if the gateway device itself failed in your office network
- you can have multiple VPN gateway device at your office network connecting to the same VNet gateway in Azure
- Active-Active configuration:
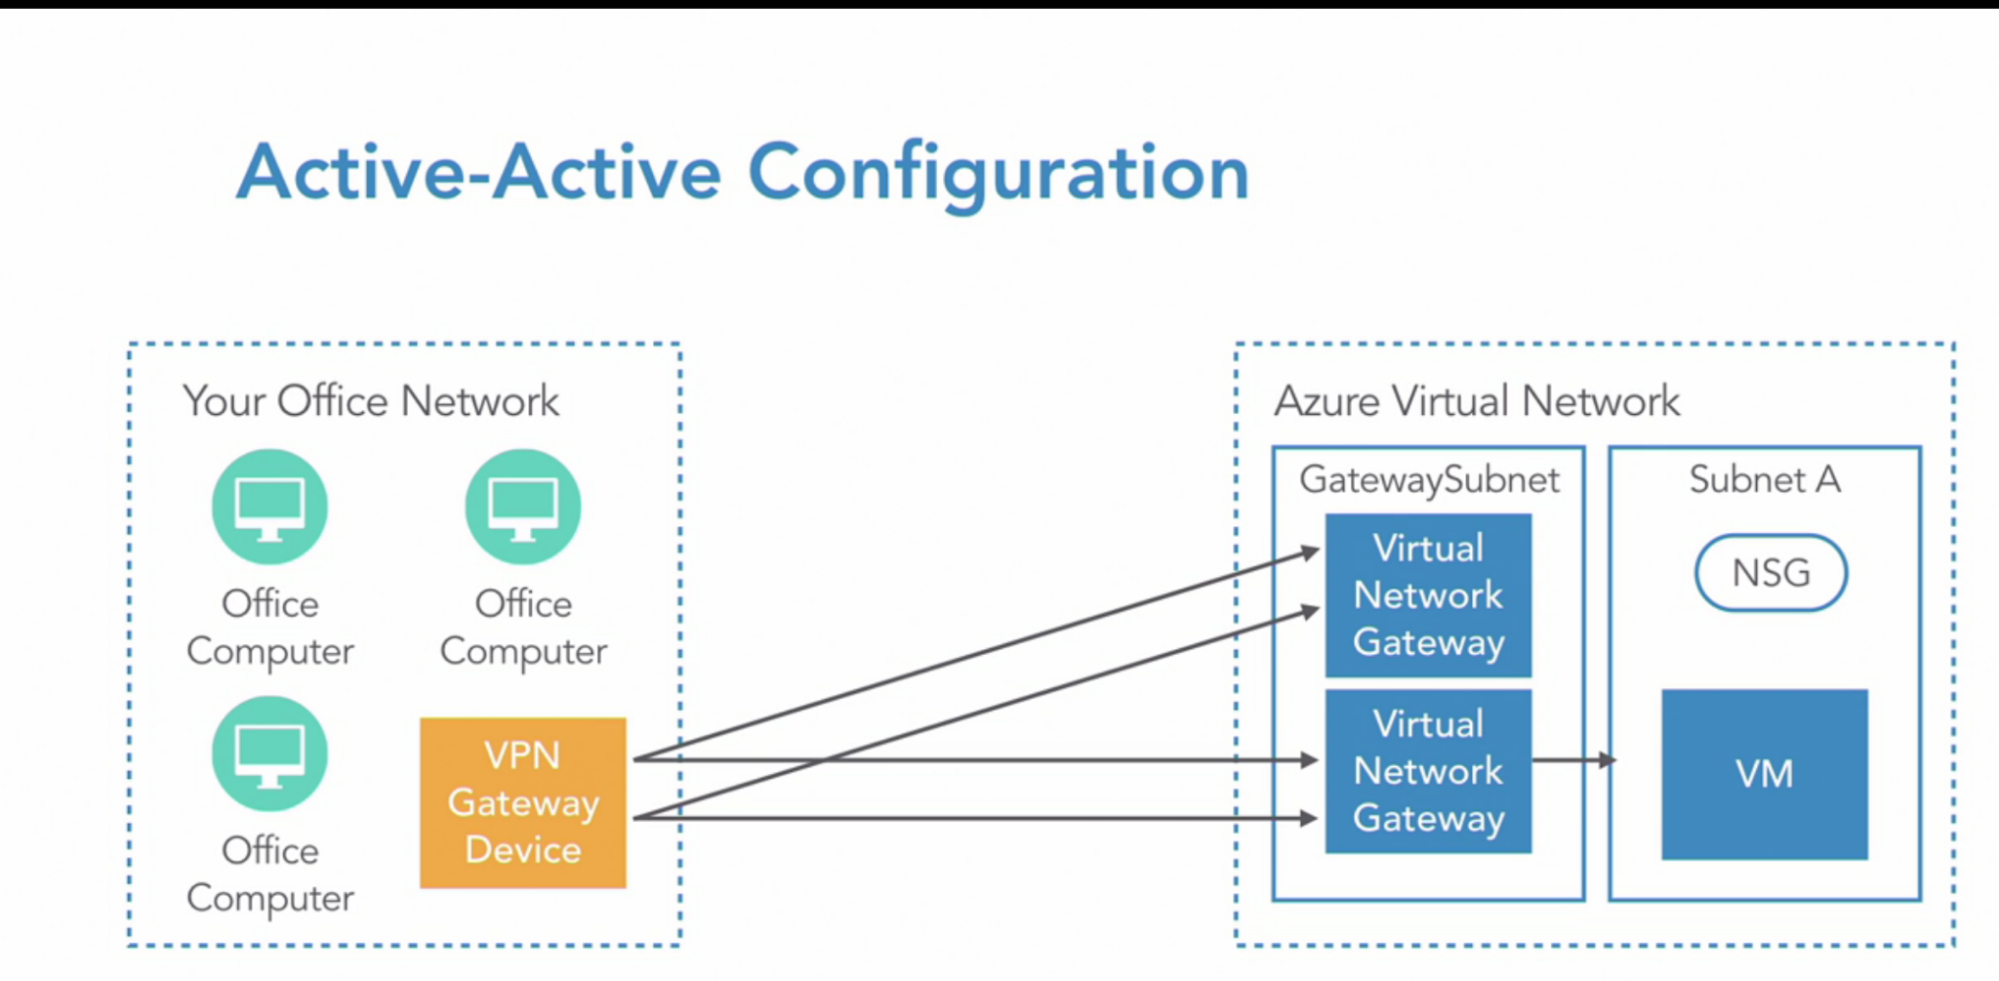
- Dual redundancy Active-Active
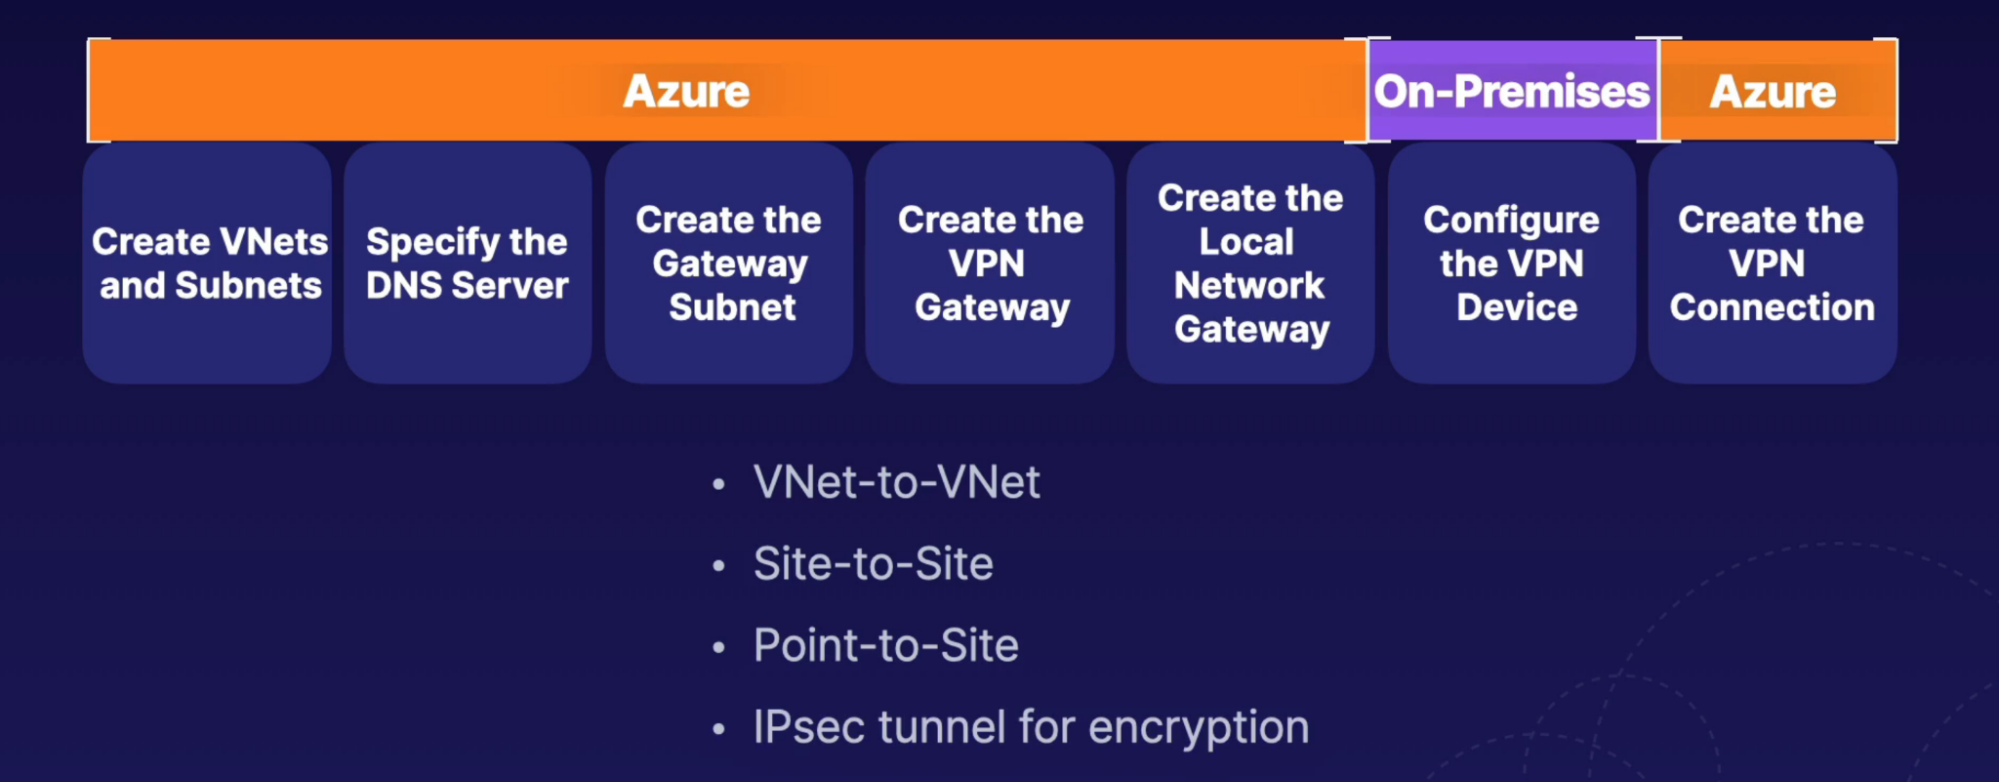
Architecture
- Setup VPN gateway
- Create a gateway subnet in Azure
- Create HQ local network gateway in Azure
- Create with the configuration details of the connection we have with on-prem network
- Setup VNet gateway in gateway subnet
- This will allows to communicate
- Create a connection from VNet gateway to HQ local network gateway
- Create gateway subnet in on-prem
- Create azure side local network gateway in on-prem
- HQ side VNet gateway
- Create connection from VNet gateway to Azure local network gateway
Steps
Both the steps must be performed for both network
- Create VNet gateway on Azure
- Gteway Type: VPN
- VPN Type: route-based // dynamic incase your VM increases
- Create gateway subnet
- 10.0.1.0/27
- Create public IP address
- Create local network gateway
- Need public IP of VNet gateway created in the above step
- Create local network gateway
- IP address: provide VNG IP
- Address space: Azure VNet IP CIDR
- Create connection bw local network gateway and VNet gateway
- In the VNet gateway, create connection
- setting —> Connection
- Add connection
- type: site to site
- Shared key: key has to be the same on both side
Test: ping VM from VNet 1 to VNet 2 as a part of VPN
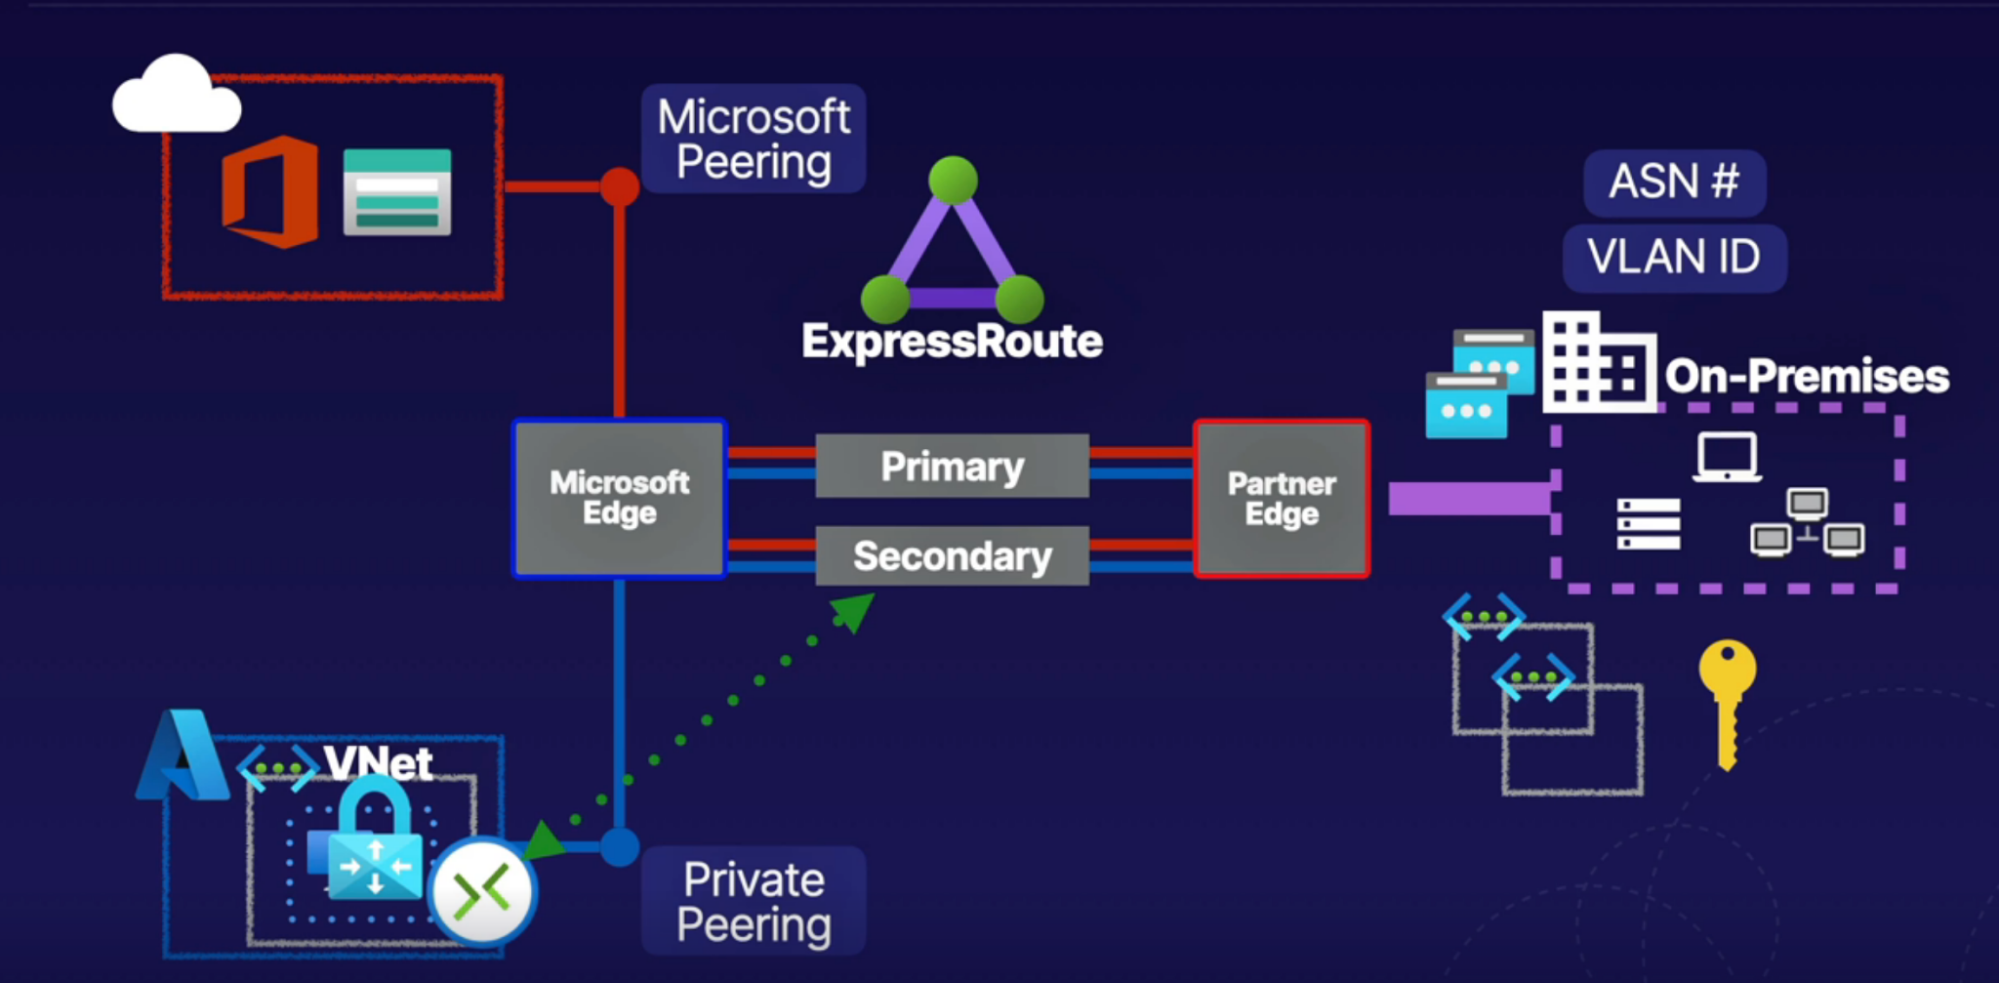
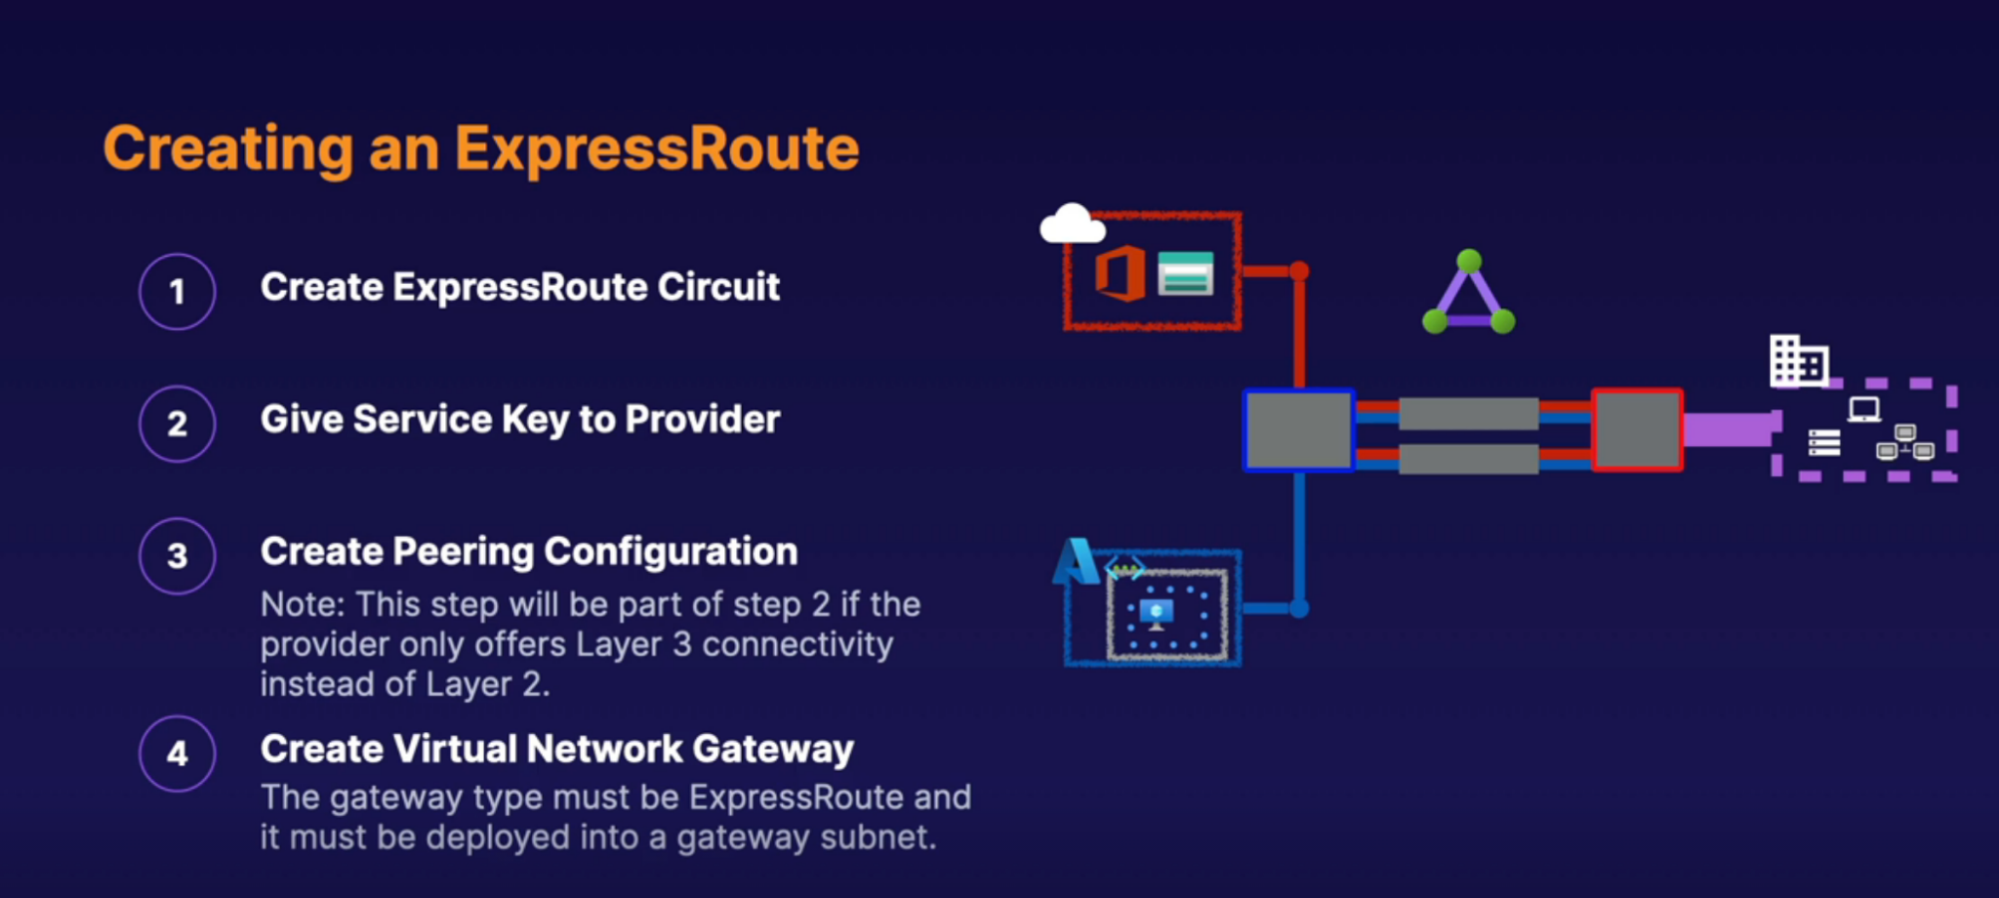
Express Route
What: make direct physical connectoon into Azure resources
- Private physical(over the wire) connection to Azure Network
Architecture
Implementation
Virtual WAN
What: allows single operational interface to be able to manage hub and spoke style network
- We can use Virtual WAN hubs, to create hub and spoke style networks, where we do things like VPN connection(S2S, P2S) both on on-prem and remote users, can connect express route, can make connection to our VNets inside this Hubs
- With this HUBs we have a single operational interface to manage all of these connections to create hub and spoke network
- Connect S2S,P2S, ExpressRoute, VNet to Vnet connection
- Ability to manage firewall and routes to manage entire network on single operational interface
- WANs Per region
How
- You are creating hubs inside WAN in each region
Types
- Basic
- Transitive connection not allowed
- S2S VPN connection only
- Standard
- Transitive connection allowed
- S2S,P2S, ExpressRoute, VNet to Vnet connection
Task: Create Virtual WAN, Virtual Hub to configure S2S,P2S, ExpressRoute, VNet to Vnet connection for that Virtual WAN through single operational interface
- Create virtual WAN // single operational interface to manage fully mash network(manage hubs that manages VNets inside region, for this region you can configure S2S,P2S, ExpressRoute)
- Type: standard
- Create hub // for specific region
- Basics
- Name
- Private address
- S2S
- P2S
- ExpressRoute
- Create hub
Hub And Spoke
Link: https://www.youtube.com/watch?v=QPoqttfCNgg
Scenario
- Your company has a lot of redundant IT resources in global locations in their environment.
- To alleviate the management burden, the IT department wants to centralize their services to a single location.
- Once they centralize, they can only manage one service for all the locations in the company.
- Set up a hub-spoke topology to simplify communication, centralize security, and share resources throughout the company.
VNet Strategy
VNet/Subnet Strategy
- Good naming policy
- Ex: ProjectName-Env-Component-Resource = tiffintouch-dev-root-vnet
- Tag your resources
- Useful for internal reports and billing
- In what region you’re going to deploy VNet
- Resources should be place inside Vnet region
- Design VNet and Subnet
- Don’t overlap VNet/subnet address with any other VNet/subnet in the same/diffrent subscription
- Separate layer of your application within subnet
- Web server can live on their own subnet
- Mid tier and Application tier has their won subnet
- Database tier has their own
- Leave room for IP address for the future
- Ex: VPN, virtual node, express route need their own subnet
- Which device need public address
- Ex: if the internet traffic to your azure resources(VMs) would only go for administrative purposes, Use Bastion or VPN to protect access
- Does this network need to directly communicate with any other network using peering
- They can’t communicate when you have overlapping IP addresses - this is non-issue if the both the VNet is under the same subscription - because azure deosn’t allow creating 2 VNet with overlapping IP address
- If the networks with a same IP address in separate subscriptions can’t talk to each other
Security Strategy
- Create small set of NSGs
- Reuse the same NSG instead of creating a new one for every network
- Use application security group - ASG to simplify your NSG
- Limit the people who can create VNet resources - principal of least privilege
- Use subnet to separate your application into logical security zones
- Subnet for web server and SQL kept separately along with their own NSGs
- Use Azure AD conditional access to add an additional layer of security
- Just in time access
- So that ports are closed, except when someone is actively using them for legit purposes
- Disable RDP and SSH access to resources, except for specific purposes
- Use a temporary permission tool instead of admin privilege when people need elevated privileges to perform authorized task
- Use Azure AD conditional access and PIM(privileged identity management) so that those permission are removed after a short time
- Use tool for the job
- Load balancer
- application gateway for WAF
- Azure firewall
- Third-party azure appliances
- Reduce the size of the attack surface
- Don’t leave ports open
- Disable programs and services from running that you don’t need
- Remove executable code from your web service like disabled WordPress plug-ins
- use a virtual network, service endpoints to cut off public access to App service, storage, and SQL databases
- use network routing to ensure traffic can only travel to, and from your corporate network, or a VPN and block direct access to the Internet
- consider DDoS protection if you are a potential target
- if your user can’t access your application because it’s too busy, that might not be a direct security threat but it’s a form of an attack - basic DDoS protection is provided free by Azure to protect against Denial of service attack
Performance Strategy
- Choose the VM with the right configuration you need
- Depending on the instance type you choose, more NIC cards generally correlate with an increase in the upper limits of performance speed.
CALLOUTS
- VNet with private IP Address
- Span within region and RG
- Subnet with segregation of VNet
- Span within region and RG
- VM NIC - Network Interface card
- VM is connected to NIC —> NIC is then connected to subnet
- Place/connect NIC in the subnet —> subnet pass IP to NIC —> which is then attached to VM
- flow: Subnet —> NIC —> VM
- VM can have multiple NIC. These NIC’s can connect to different subnet // both subnet can be part of the same VNet
- IP configuration (for NIC)
- Private IP: gets from subnet private IP. Can assign static IP if you want, by default it’s dynamic.
- why: Used to communicate bw resources privately over VNet
- Public IP: you don’t need Public IP for NIC. But you can get/create one and attach to
- Why: used to communicate bw internet traffic to your Azure resources(VM)
- ow: modify IP config in NIC for VM so that it has public IP
- 2 types are public IP.
- Basic: insecure and accessible by default, and allow traffic. Require NSG to deny traffic
- Standard: secure by default and not accessible by default. Require NSG to allow traffic
- what: Provides public connectivity for resources. Can connect to resource via internet
- Example flow: create standard public IP —> Create NIC —> configure Public IP in NIC —> Create VM with NIC —> SSH to VM with public IP // can’t make connection
Compute
VM
Core
- CPU and Memory
- Determine VM sizing, select based on VM Use case
- Networking
- VNet and Subnet: for giving private IPs to VM
- NIC: configure IP. Private or public
- Public IP: for public connectivity
- Network security rule: secure the public connectivity using NSG using security rules to control inbound and outbound traffic to our VM, NIC or subnet level
- Storage by Azure disk
What: Virtual disk/Azure Disk
- What: Virtual Hard Disk
- Why: VM uses this hard disk to store data; SSD storage optimized for I/O intensive read/write operations. For use as high-performance Azure virtual machine storage.
- Where: Azure disk use Microsoft storage infrastructure and store this disks as page blob inside the blob service
- OS disk: default with VM
- Stores OS
- Labels as the C: drive for Windows and mounted at “/” for unix system
- Max capacity: 4095 GiB
- Temporary disk: you get by default for non persistent data storage
- Data disk:
- you can additionally add to VM for persistent storage
- Use for persistent data storage like files or database
- Max capacity: 32767 GiB
- Type
- Managed
1. Azure managed storage account
2. Availability supported
3. RBAC control
4. Snapshot support
5. Backup support
- Unmanaged
1. Manually managed
2. Availability not supported
- Disk type
1. Ultra disk(SSD)
2. Premium(SSD)
3. Standard(SSD)
4. Standard(HDD)
Practice
1. Property
1. Name
2. Region
3. Size: Standard_B1s
4. Image: Linux/Windows
5. Disk: consist of OS disk and temporary disk by default. Can add additional Data disk
6. NIC: configure IP; private or public for this VM
2. Example
1. Create Linux VM
2. Configure Disk: add a data disk to VM
1. OS Disk: Premium SSD disk
2. Data disk:
1. Create new or attach existing disk
1. size: 1 GB
3. Configure networking: VNet, Subnet, NIC, PIP, NSG
4. Install web-server: install Nginx using custom data
5. Open NSG for HTTP: manage security rules for VM
1. Inbound rule: traffic will be allowed from public Internet on port 80
2. SSH on port 22
More on Compute
VM Availability and Scale Sets/Availability set
VM Availability
What: provide high availability of VM by deploying VM in multi-AZ
- So deploy 2 or more VM in multi-AZ
- Availability: 99.99
How: by using availability zone. So when one AZ gets down you have your VM up and running in another AZ
Practical: Multi-AZ Deployment: place your web VM and DB VM in multiple AZ. So each AZ will have both of your hardware. I.e. web VM and DB VM
Scale Sets/Availability set
What:
- This is for spreading your servers in different server racks within a single AZ. Ex: you have 3 VM in the ASet. So Azure spreads your VMs in a different server rack. You can choose how many server racks you want to spread your VMs into
- So deploy 2 or more VM in the same ASet
- Fault domain: you can spread your VM up to a number of servers (ex: 2)
- Update domain: reboot server due to security issue. So they update 1 server at a time. So if you have 3 VM, those get updated one after one
- Availability: 99.95
- This is to protect our resources inside each AZ. The idea is to within each AZ you deploy the app on multiple server racks. So if one goes down then we have another rack which runs our VMs
Example:
- Inside one AZ you have 2 server racks(default domain)
- You have the app running on both as part of the Availability set
- If server rack 1 goes down, we still good to go because we have the app running on another server rack in default domain 2
Why:
- Protect redundant VM
- Protect against underlying host failure: server rack going down
- Prevent outages due to maintenance
Steps
- Open Aset
- Create ASet
- Put VM inside ASet: you need to create new VM and select Set option
VMSS
What: scaling VM when traffic reaches to certain thresholds
Managing VM Updates
What: to update VM for patching, system updates(security)
How:
- Automation account —> this will manage VM
- Hybrid runbook worker
- Log analytic workspace
- Log analytics agent
- VM —> select Guest and host updates
- under guest OS updates —> click go to Update Management.
- enable the control and compliance of Update Management for this virtual machine
- This will create the Log Analytics workspace, put the Log Analytics agent on the VM
- click to go to Update Management —> schedule update deployments
- Update Such as any critical updates, security updates, any service packs, tools.
Azure Bastion
Scenario:
- If you have VM with public IP in Azure, you want to connect to it
- You’d have to set NSG rules to allow certain traffic via subnet
- What if you have 100’s subnet and machine to access over SSH?
- You don’t want to create 100 NSG rules
- What you need is to have one device that is connected to your VNet and allows connectivity to all your machines without exposing public IP of your machines
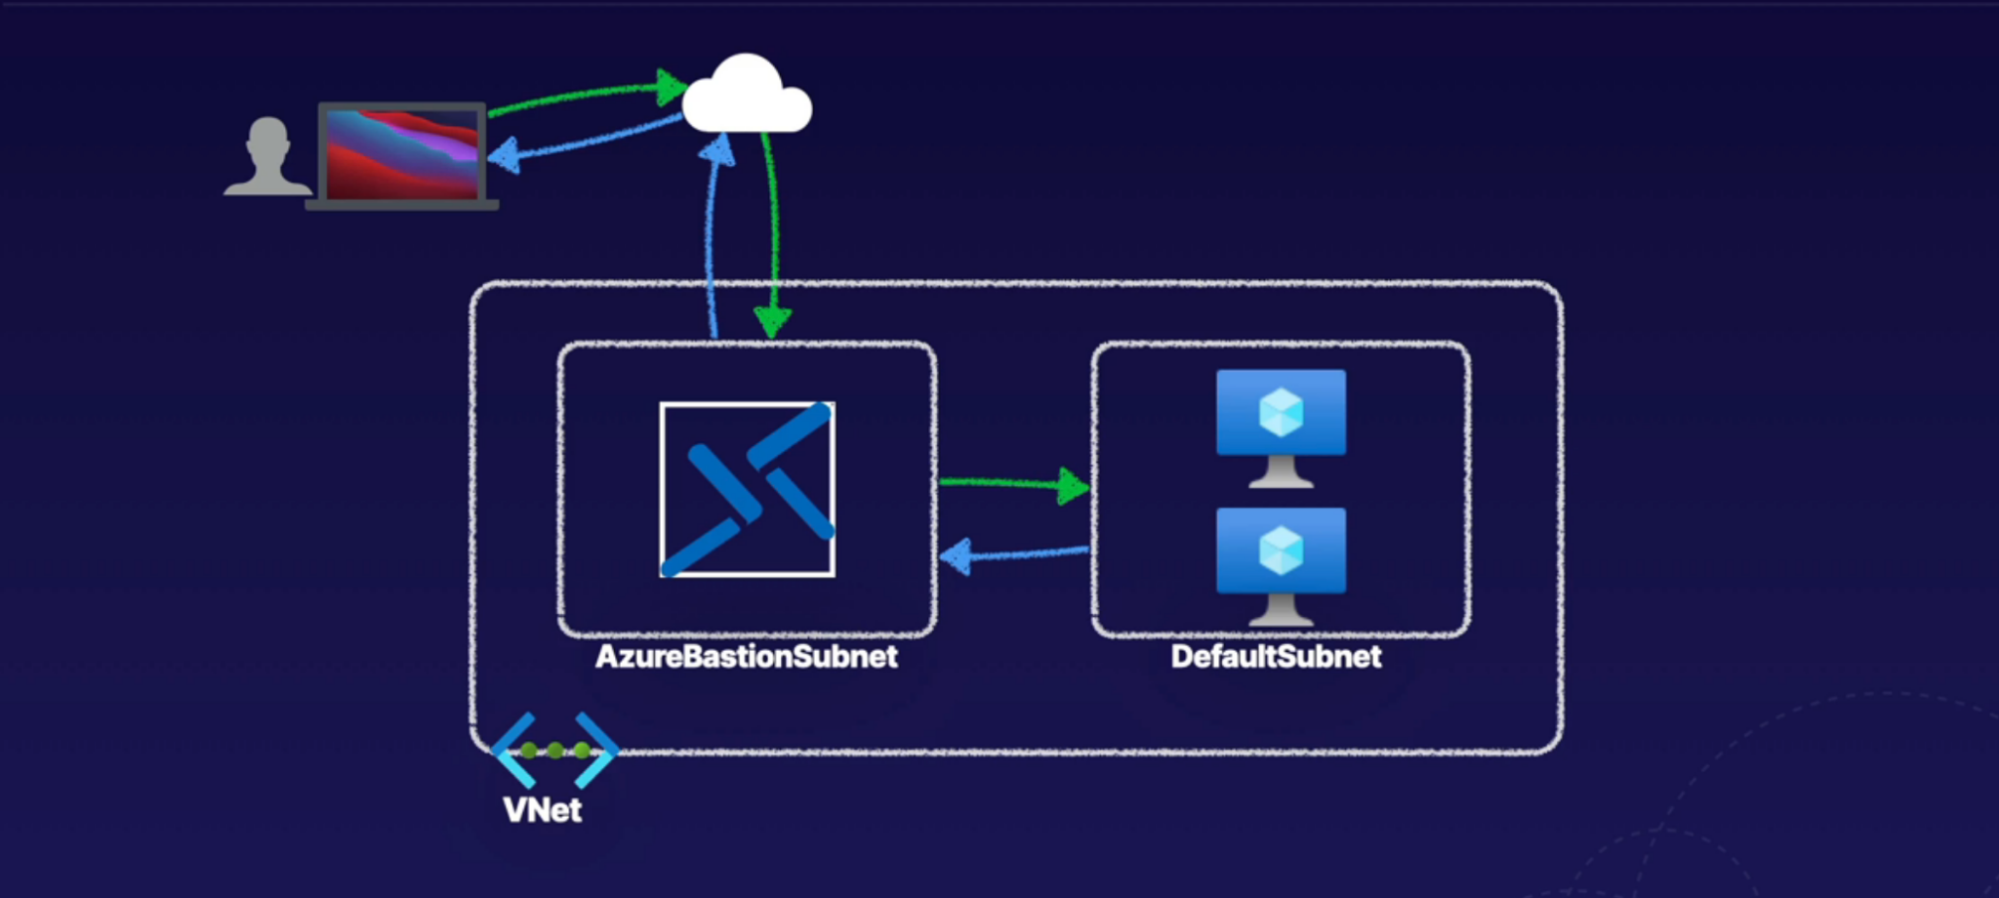
What: provides a way to securely connects to our VMs inside our VNets directly from your Azure portal
- PaaS service
- Jump box: to access other machines over RDP and SSH connection
- No public IP exposed because you connect via Bastion and not with VM’s IP
- SSH/RDP connectivity over SSL/TLS
- Deployed per VNet
- Connectivity to all VMs in VNet
- No public IPs needed for VMs, you use bastion’s public IP to connect
Scenario:
- let’s say you have 100 of VM deployed.
- how do you login to them securely?
- by providing IP of everyone of them?
How:
- create a dedicated subnet for bastion
- from the bastion machine, connect to your VMs (you don’t need IP of VMs)
What you don’t need
- no public IP is required on the Azure VM
- RDP and SSH directly in Azure portal over SSL/TLS - So secure
- no hassle of managing NSGs
- protection, against port scanning, and zero day exploits
- hardening in one place only
Steps
1. Create VM
1. Public inbound port: none
2. Networking
1. Public IP: none (no creation of public IP)
2. Create subnet for Bastion
3. Create Bastion
4. Navigate to VM
1. Connect: Bastion
2. Enter VM’s Username and Password
Callouts
- Create VMs without public IPs
- Bastion need its own subnet
Load Balanacer
What: is a networking solution for distributing traffic between backend compute that serves same website
- it can be public(internet) or private traffic(it can be internal within our own networks. We could have it balancing, say, a database solution as an internal load balancing solution for a application)
- Layer 4 LB(TCP/UDP): port 80, 443(https)
- highly availability
- backend resources must be redundant
- Pool can consist of VM and VMSS
How
- Frontend IP: Load balancer comes with IP address(private or public endpoint for accessing the LB solution)
- You create LB in VNet
- Health prob:
- check health of backend compute to make sure it’s running appropriately based on health check
- probe that periodically checks, the health of the backend pool to determine available nodes
- Rules: load balancing or NAT rules configured for allowing inbound, outbound access(to allow access over SSH from public IP and NATing that to inside LB)
Steps
1. create 2 NIC and 2 VM without public IP(we’ll access with LB’s PIP)
2. create LB
1. type: internal or public
2. sku: standard(production) or basic
3. tier: regional
4. PIP name
3. in the LB
1. backend pool: configure it
1. name
2. VNet
3. backend pool config: NIC or IP
4. VM or VMSS
2. health probe: create it
1. name
2. protocol: TCP (all general traffic)
- You could use HTTPS and give it a path like, index.html to see howmany times does it have a failure on this page
3. port: 80
4. interval: 5
5. threshold: 2
6. ex: every time it goes unhealthy for more than two times around the five seconds interval so 10 seconds total then our health Praby is going to let us know it is unhealthy
3. LB rules: how we want to balance traffic on LB
1. name
2. frontend Ip: LB’s Frontend IP
3. protocol: TCP
4. Port: 80
5. backend port: 80
6. backend pool
7. health prob
8. session persistence
4. Inbound NAT rules: to configure DNAT(inbound port forwarding) and SNAT(outbound traf.)
1. ex: if you want to be able to SSH into the back and compute, we can use inbound and80 rules to create that rule to allow that network address translation for over SSH traffic from the front and IP of the Loadbalancer
5. Outbound rules
Application gateway
What
- Layer 7 LB(HTTP/HTPPS)
- URL path-based routing
- Backend resources must be redundant
- Pool can consist of VM, VMSS, APP service
Difference between APP Gateway and LB is
- With APP Gateway you can route traffic based on URL and you can route traffic to App service along with VM and VMSS
Components:
- Frontend IP: Load balancer comes with IP address(private or public endpoint for accessing the LB solution)
- Backend Pool: VM, VMSS, APP service
- Listener: listen how to route traffic to our backend pool based on path routing
1. port, protocol, certificate config(SSL termination)
- Rules: LB rules, HTTP setting, health prob
Steps
1. Basic
1. Name
2. Tier: standard V2
3. Vnet
4. Subnet: create a subnet for App Gateway
2. Frontend
1. IP type: Public, private, or both
2. PIP: create new
3. Backend
1. Add 2 backend pool
2. name:
3. Target: add VM, App service
4. Configuration
1. Rule name: multipath
2. Listener
1. Listener name: listener1
2. Frontend IP: public
3. port: 443
4. Choose certificate: upload cert
3. Backend target
App Service Plan
What:
- Defines a compute resource (CPU + Memory) and available features for the web app
- It runs a web app which can host application workloads. The web app runs on App Service plan
Type:
- Shared: run the app on the same VM as another app, this App may run other customer’s app on the same VM
- Dedicated: run only apps using the same App service plan on a dedicated VM
- Isolated: run apps within dedicated VM and VNets
Category
3 Categories
- Web Apps: website/online app hosted on azure’s managed platform
- Run on both windows and linux platforms
- Supported a lot of languages: .net, java, node.js, PHP, ruby, Python
- Support auto scaling and load balancing
- Web apps for container:
- Can host your existing container images
- Deploy and run containerized applications in Azure
- API apps: expose and connect your data backend
- API apps: no GUI, Front End,
- It’s a interfact to connect other apps to programmatically
- Ex: company sell their data to clients
Steps
- Create “App Service Plan”
Web App
What: this is a resource that run on app service plan to host web application(linux or windows).
- This host our application
- PaaS: configure few details and provide application code. So no management of infra.
- Highly available: has virtual nodes running under app service plan
- Auto scaling In/Out: similar to scale set
- Development focused
- Deployment slots: prod-stage swap
- Has database support using connection string
Steps
1. Create “App Service(Web App)”
1. Select app service plan
2. Deploy zip application on app service
Custom domain
What:
- To provide a custom domain for web application rather than using web app default URL
- Add custom domain and validate
- Create A record and TXT record; put them in DNS zone
- A record: point domain name to our public IP address of our web application
- TXT Record: validate our domain ownership
- TLS/SSL setting: secure web application so app can accessible with https
- Upload certificate to SSL binding
- Scaling: scale up/out
- Scale up by upgrading app service plan
- deployment: deployment slot
- Stage a new version of the application by swapping (no cost associated)
- Network configuration using a hyper connection or CDN
- Backup
- Store backup to blob storage
- Backup type
- Full: store app configuration, file content, database connection settings, restore app using blob
- Snapshot: point in time recovery
ACI
What: to host container images or run contained application
- This is similar to docker host
Flow:
- Create docker file, create an image out of it
- Push image to ACR
- Based on the image, run the container on ACI
Difference between ACI and Web apps for container/Container Apps
- Azure Container Instances (ACI) provides a single pod of Hyper-V isolated containers on demand. It can be thought of as a lower-level "building block" option compared to Container Apps.
- Concepts like scale, load balancing, and certificates are not provided with ACI containers
Messaging
Links: https://lucid.app/lucidchart/8fd7f8ce-ddfa-405a-a46a-2551195187c8/view?page=RX.lQaoFgVxG#
Event Grid
What: is a publish subscribe, managed service for the distribution of event information.
Example:
- Let's say that you had some code that you wanted to run every time someone deployed a virtual machine. You had an app that was running, it needed to check some things, maybe it needed to configure some settings and so on.
- What you would do is your application sitting there, constantly polling and monitoring the environment for changes. Now, that's not really an effective use of your resources, your CPU, and so on
Solution
- Rather than have our application constantly polling a Azure subscription for any changes, we could have it associated with an Event Grid, that is monitoring that on our behalf.
- And then if anything does happen, Event Grid will notify our application, perhaps on this example via a webhook.
- In this way our application doesn't have to be constantly polling the Azure subscription for changes. Instead, it is actually just subscribed to Event Grid itself. // This how Event Grid is a publish subscribe solution.
How
- What we have is a range of different thing that can publish events to Event Grid. Event Grid will then send that information onwards, based on whether anyone has a subscription to that information.
- Source → Events → Topics → Subscriptions → Handlers
- Sources: can submit info; This can be Blob Storage, resource group, subscription
- Events: small info submitted about something has happened
- Topics: The endpoint where publishers sends event; this contain all the event information;
- Subscription: the endpoint to route event, sometimes to more than one handler
- Handler: will be responding in some way, to the event occurring; App or service reacting to event; ex: serverless code, logic apps, other apps like webhook
- So, handler don’t directly talking to and monitoring these different sources. They subscribe to a topic which will contain all of the event information they want.
- In this way, when the sources emit event information, it goes to a topic. Depending on the subscriptions, Event Grid will then transfer that information on to anyone, any of the handlers who are subscribed to that topic.
- So there is Azure service that creates events. Ex: when you upload files to Blob container, you create Topic to receive the Blob Events, now you have application like Logic App which subscribed to Topic and receive these events
- Events can be custom
When to use
- When you want to transfer of events and not the data
Demo
- Consuming built-in events: use logic app to consume built-in event in Azure to react to blob changes
- Sending custom event: use logic app to send custom events to our event grid topic
- Subscribe to custom event: use custom event topic and create subscription
Notification Hub
What: Notification Hubs is a fully managed, scalable solution for managing push notifications to various platforms (iOS, Android, Google, Windows, Kindle, Baidu, etc.).
An overview of the typical setup of push notifications using Notification Hubs is as follows:
- Push Notification System (PS) registration is typically required by each vendor/platform.
- Notification Hub is created & configured for the given vendor/platform push notifications.
- An application is registered/connected to the Notification Hub.
- Push notifications can then be submitted to registered applications/devices.
A summary of Notification Hub configuration is as follows:
- A namespace must first be configured, which includes:
- Name: Unique name of the namespace,
- Pricing tier, which currently includes Free, Basic and Standard:
- Pricing determines notification limits, monthly cost, features, and more.
- For more information on the different limits and features, refer to this Microsoft pricing link.
- Within a namespace, a hub can be configured, as follows:
- Typically a single hub is created for an individual application.
- Configuration is required for each vendor you wish to provide push notifications for, including:
- Some sort of registration (dependent on the vendor) typically including key and authentication
- Authentication is configured using Shared Access Signature Security (SAS):
- Two rules are automatically created with the Notification Hub:
- SAS rule with listen rights (for client app registration)
- SAS rule with all rights (for the application backend)
Event Hub
What: Azure Event Hubs provides a massively scalable solution capable of processing millions of events each second.
- A common example of Event Hubs is fraud detection for major banks. In this scenario Event Hubs can be used to ingest and process larde volumes ot transactions
- To get started creating an Event Hub, we must first create an Event Hubs namespace.
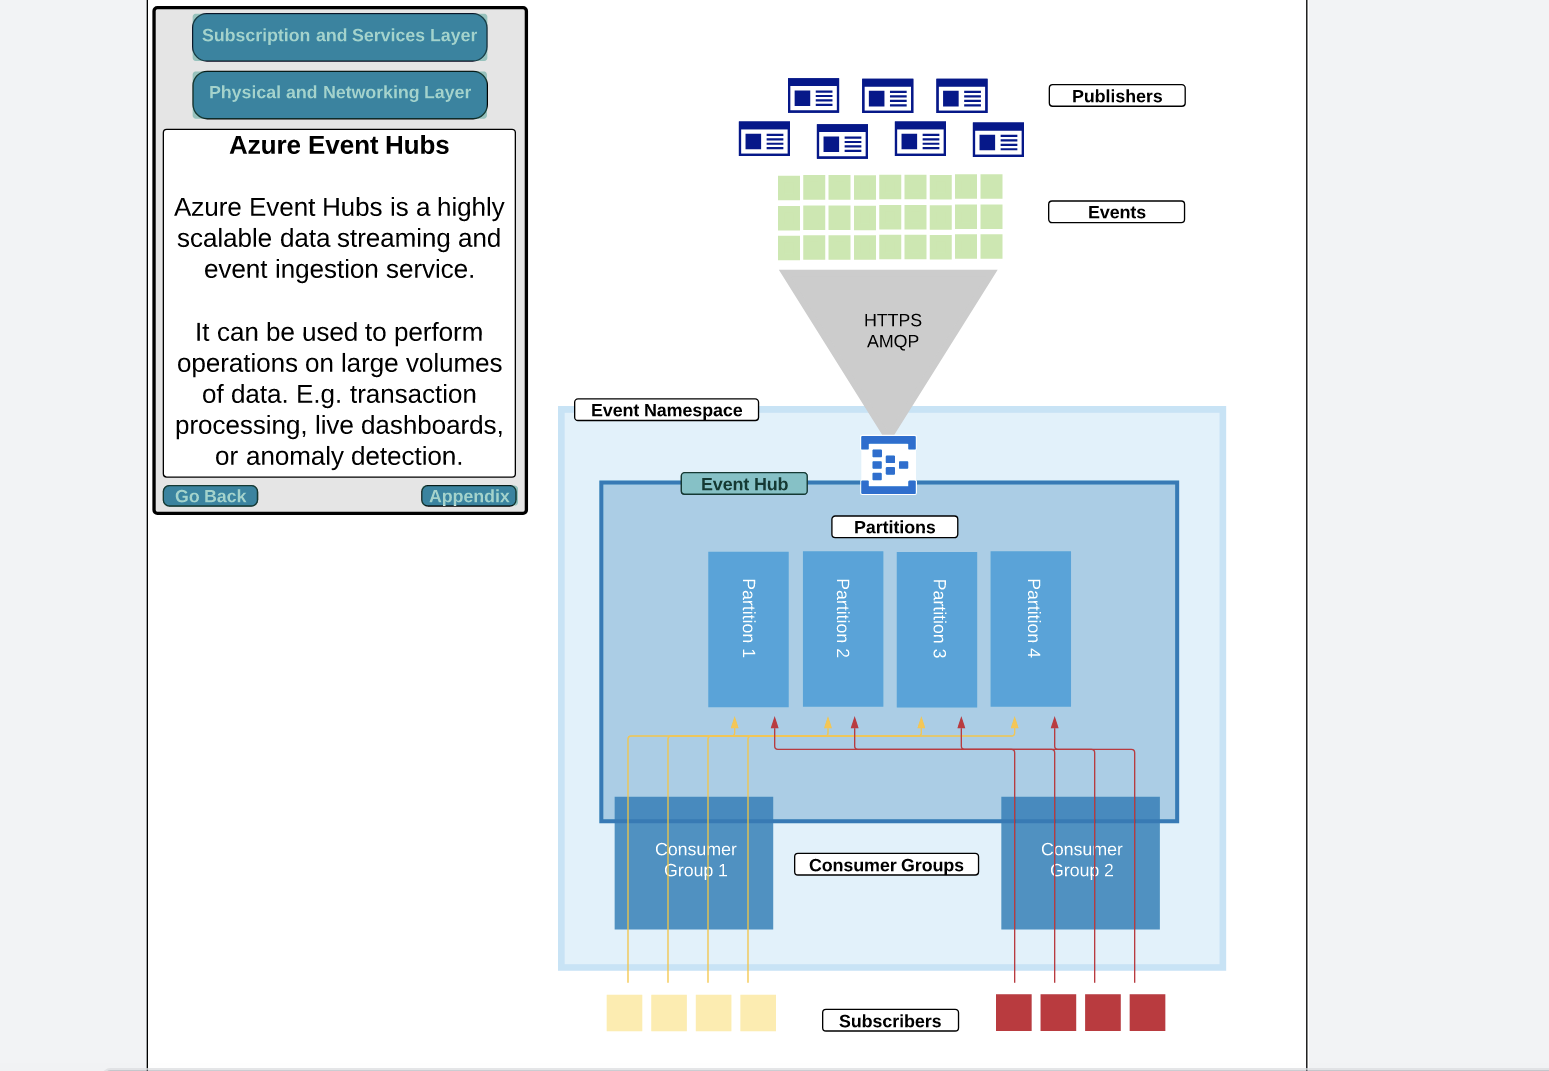
Important elements of an Event Hubs solution:
- Events: Small pieces of information about something that has happened:
- Often referred to as a datagram
- Can be published individually or in batches
- A single publication of events) cannot exceed 256 KB
- Publishers: An application, service, or device which emits an event:
- Publishers send event data using HTTPS or Advanced Message Queuing Protocol (AMQP) 1.0.
- Subscribers: Applications which receive data from an Event Hub using one of two methods:
- Event Processor Host: Simplified higher-level method receiver (depends on Event Hub Receiver)
- Event Hub Receiver: Lower-level method with greater complexity
Service Bus
What: Service Bus is a messaging broker designed to deliver messages between decoupled applications in a highly-available, highly-reliable way. Service Bus supports the "competing consumer" pattern
- To get started creating a Service Bus, we first must create a namespace.
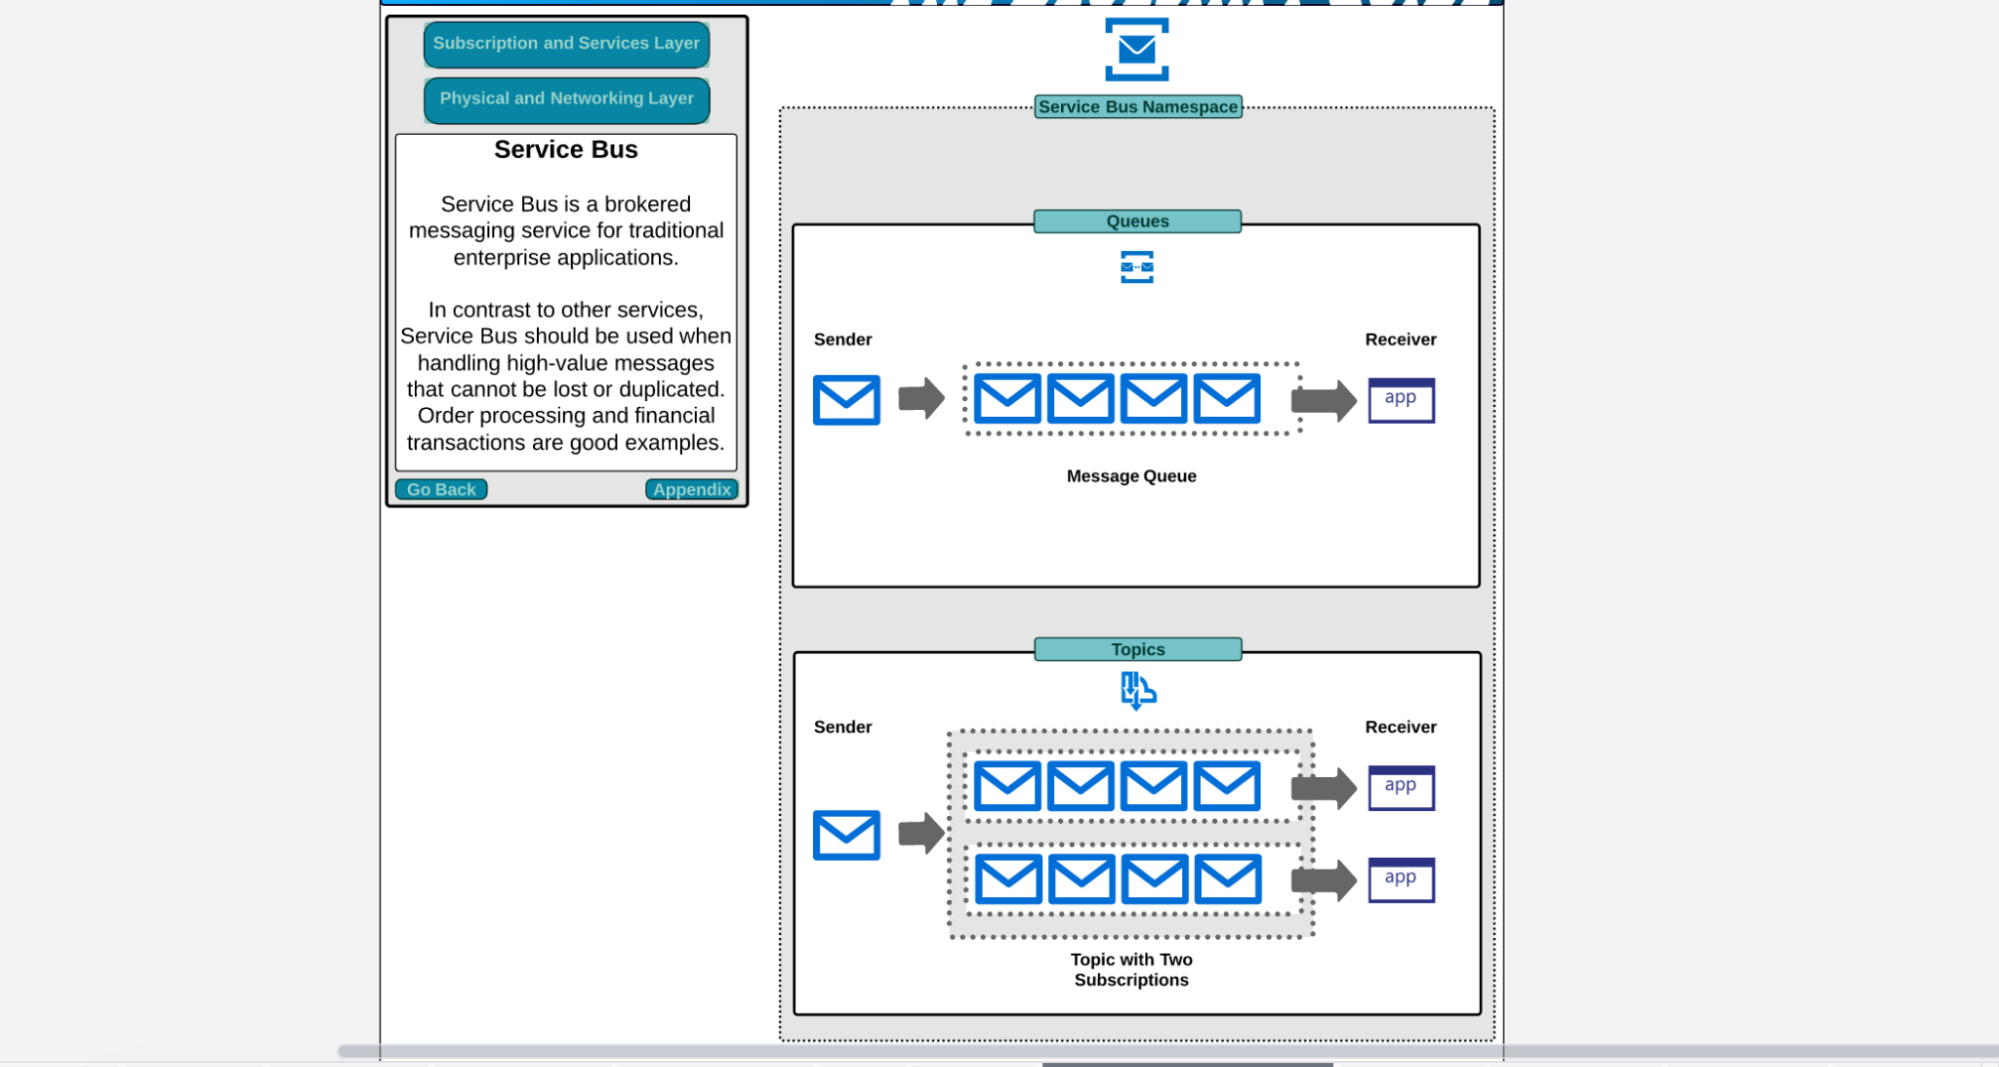
Important information about the Service Bus Namespace is as follows:
- A namespace is the parent container of any Service Bus Queues or Topics you wish to create
- Several important properties are configured at the Namespace level, including:
- The name, which also creates the DNS entry name.servicebus.windows.net
- The pricing tier which currently includes Basic, Standard and Premium:
- Only Standard or Premium currently support Topics and Subscriptions.
- For more information on the different limits and features, refer to this Microsoft pricing link.
- Whether any zone redundancy is required (currently only supported with Premium pricing tier)
- Authentication and authorization through shared access signatures (SAS) applies at this level.
Azure Relay
What: Azure Relay service provides a secure method for exposing on-premises applications over the public Internet, by allowing communication to be relaved via Azure to on-oremises enttes
An overview of the flow of data when using Azure Relay is as follows:
- An on-premises service establishes an outbound connection to the Azure Relay service
- Note: This is why onlv outbound connections are reauired although we are providing public access)
- The outbound connection establishes a bi-directional socket
- Clients can communicate with the on-premises service publicly, by communicating with the publicly accessible Azure Relay namespace address
- The Azure Relay service then utilizes the bi-directional socket to allow communication.
A summary of important information about Azure Relay:
- Using Azure Relay to provide public accessibility to on-premises applications:
- Does not require inbound firewall rules on-premises
- Only requires an outbound connection between on-premises and Azure Relay
- Supports bi-directional communication
- Does not require on-premises hardware
- Can be scoped to individual applications/services
- Authentication and authorization is supported using:
- shared Access signature authentication, for managing rights
Azure Relay supports both Hybrid Connections and WCF Relays, as summarized below:
- Hvbrid Connections: Supports open standard web socket communication
- WCF Relays: Only supports Windows Communication Foundation (WCE) communication using remote procedure calls (RPC)
Monitoring
Azure Monitor
What:
- General location to gather information from your applications, infrastructure, and Azure resources
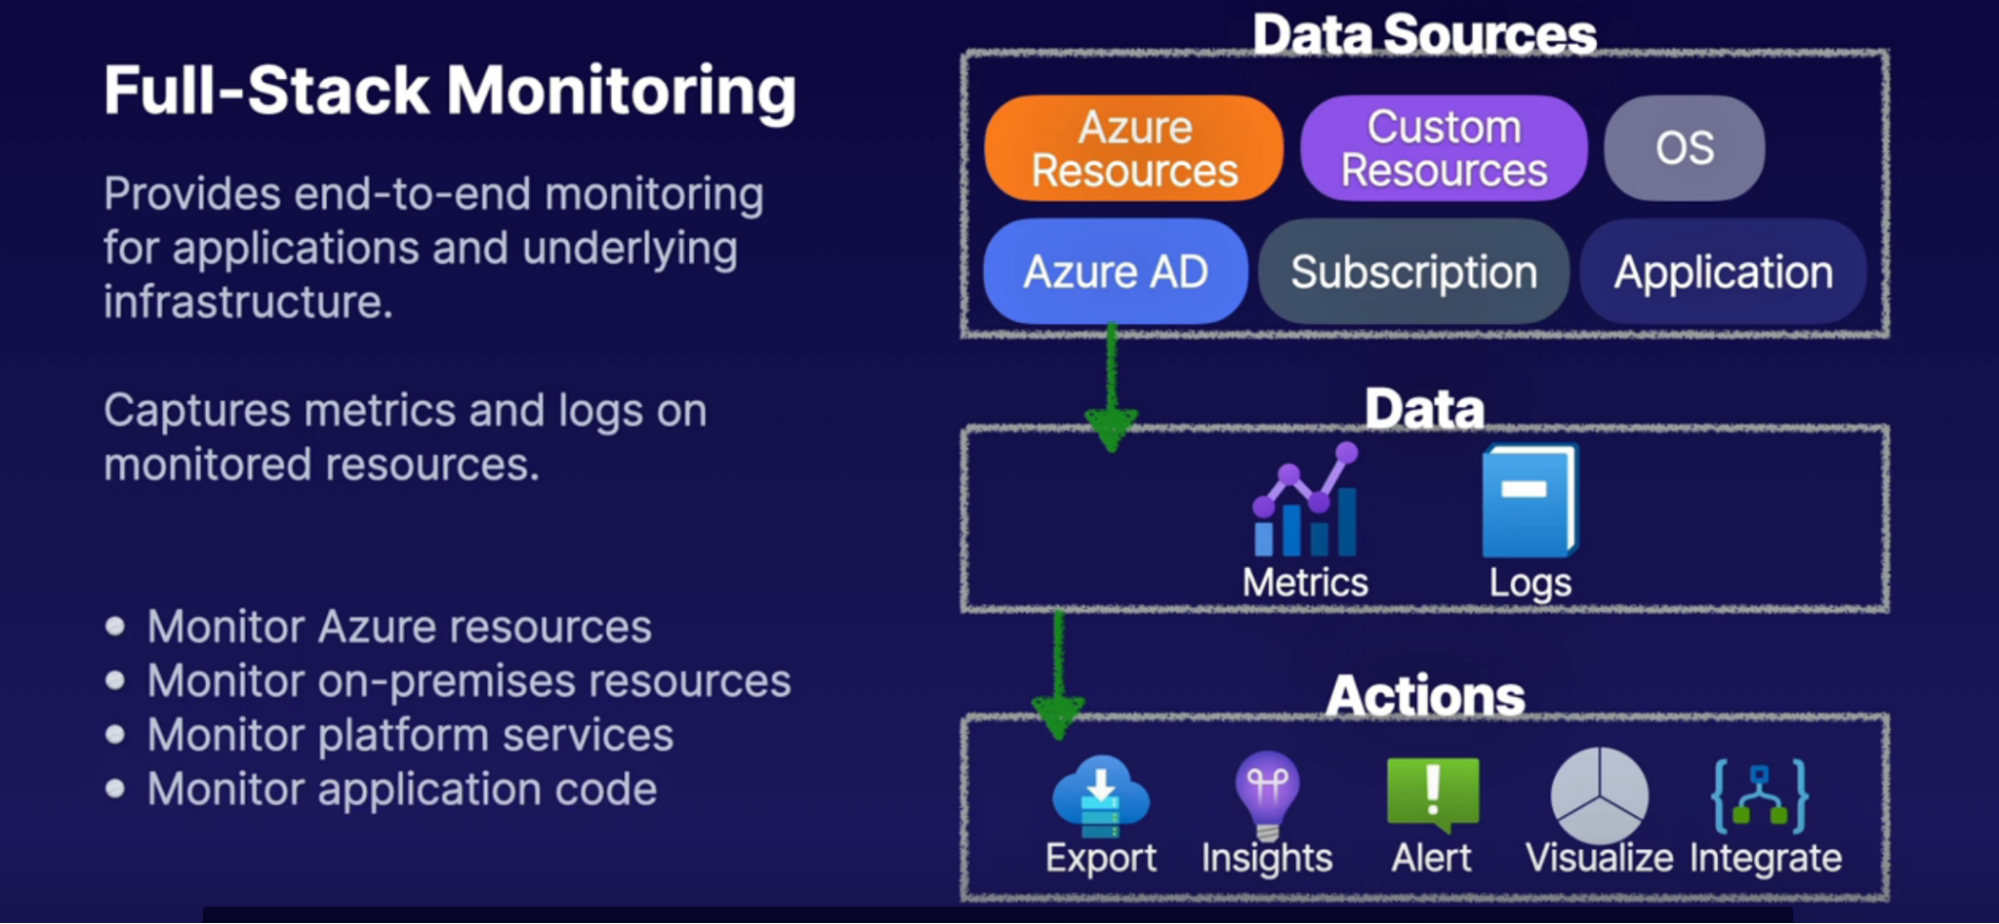
What to monitor
- Applications, infrastructure, and Azure resources, OS, Azure AD will act as a data source
- This collected data source will then be stored inside Log Analytics, SA, Azure Monitor, Event Hub
How
- Metrics: send metrics to Log Analytics, SA, Azure Monitor, Event Hub
- Logs: Log Analytics, SA, Event Hub
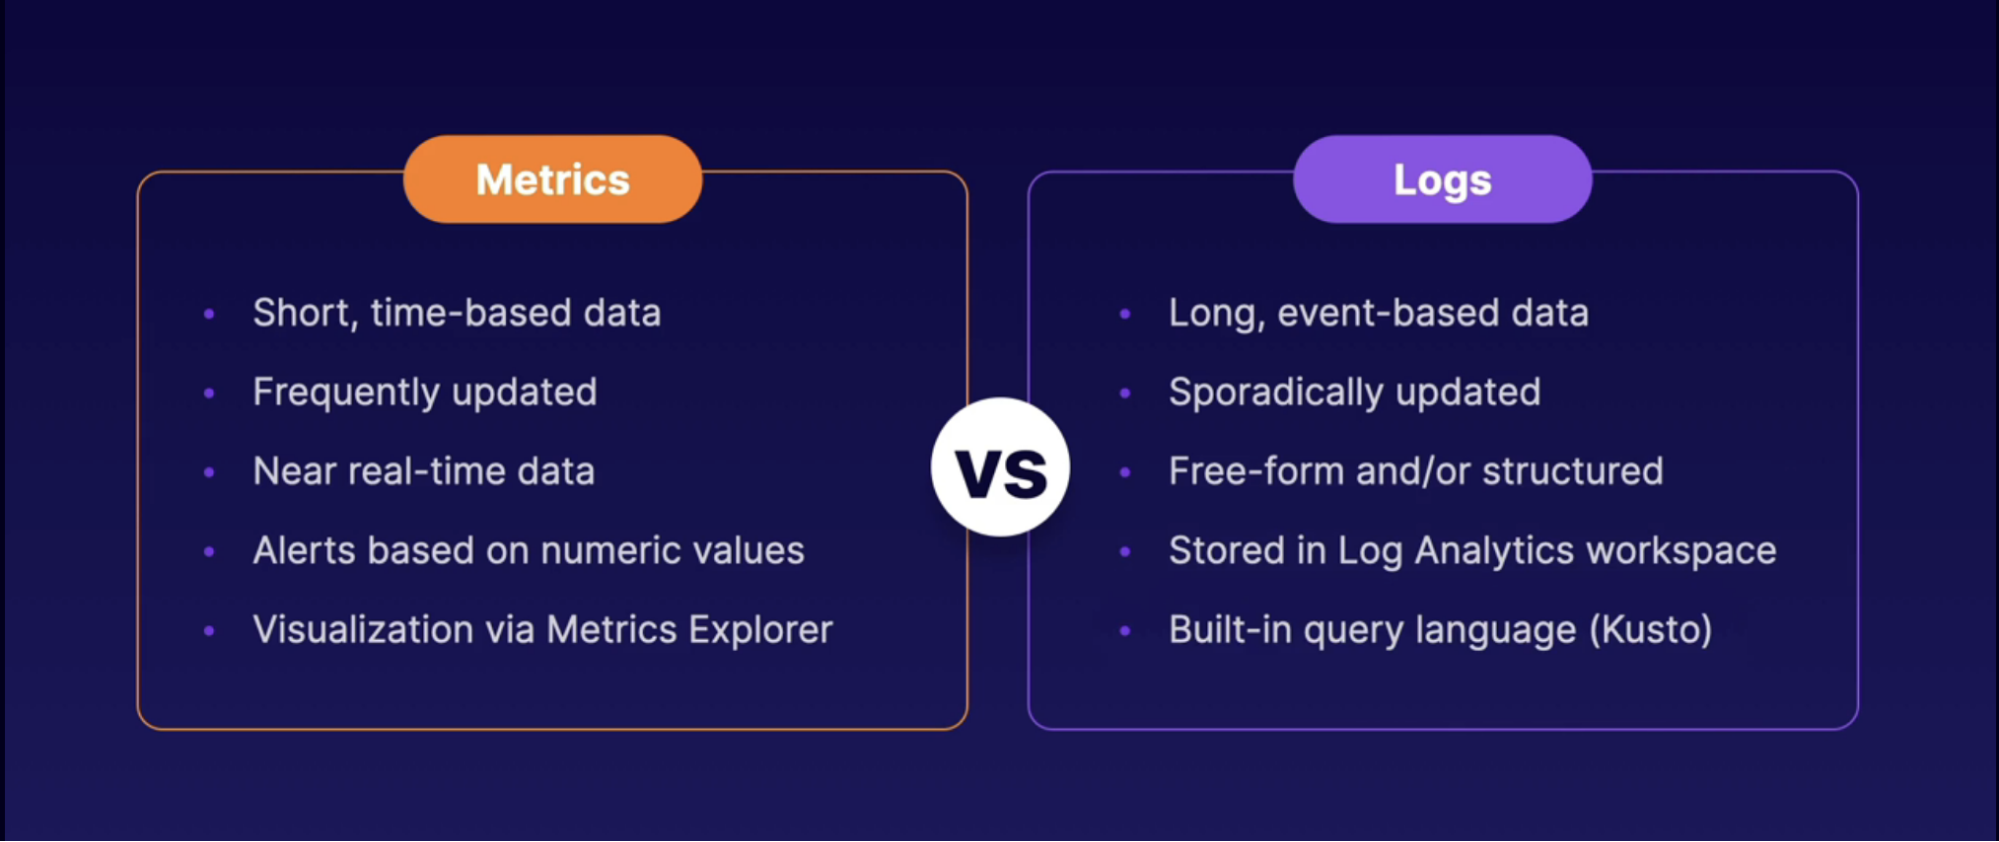
How to Monitor
- Use Metrics explorer in Azure to see/view the sent service metrics to Azure monitor
- Query logs using Log Analytics
- Use Azure Event Hub to send data out outside of Azure so other tool can better understand the data
Examples
- Monitor VM
- Metrics
- Inside your VM → Monitoring → Metrics
- Explor Metrics
- Logs
Enable diagnostic settings for SA
- Inside your SA → monitoring → diagnostic settings
- Choose SA
- Add diagnostic settings
- Select metric // translation
- Send this metric to LAW, stream them to event hub, Archive to SA
Callouts
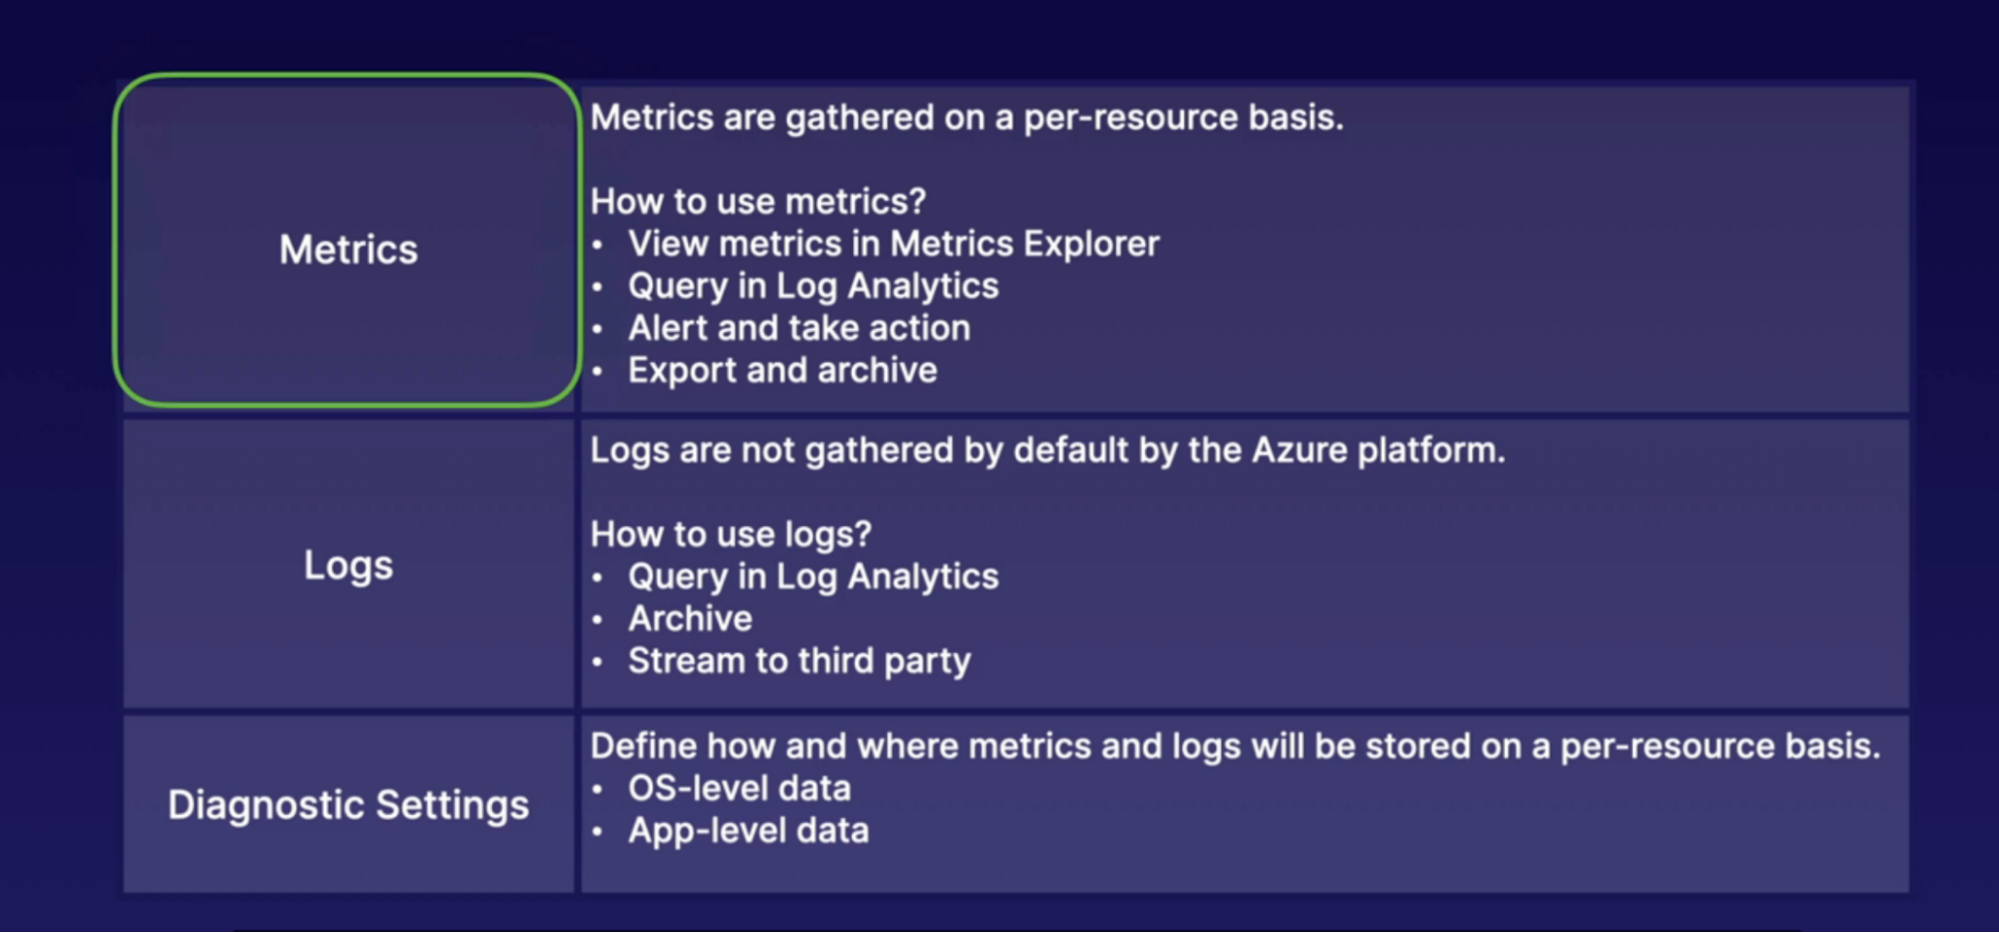
Setting up Alerts and Action Group
What
- Alert based on the service metrics, activity, log signals
How
- Action group: the action will take place when when an alert has been triggered
- Ex: when alert has triggered
- Send email notification to team
- Run Azure Function, logic Apps
- Run Azure automation account, Webhooks
Alert Example
Create alert against VM if it’s
- Inside monitor → alert
- Select resource → VM
- Add condition
- Signal type: activity log
- Signal name: deallocate VM
- whenever the activity log has an event with category= administrative, Signal name = deallocate virtual machine
- add action group
- create AG
- Notification Type: Email
- Action Type
- Automation Runbook
- Azure Functions
- ITSM
- Logic App
- Secure Webhook
- Webhook
- Create alert with Name
Configuring Azure Monitor Logs
Log Analytics
What: A service for aggregating log data in a single pen, where it can be analyzed, visualized and queried
How: capture this data from Metrics and Logs by enabling diagnostic settings to send the data to specifically log analytics workspace, which then act as a repository for our data
Data Source:
- Internet data: Azure resource, Azure AD, subscription
- External data: on-premises resources in hybrid environments
- Have to install Log Analytics Agent to gather data and dump into LAW
Task: Configuring LAW
- One connected to LAW
- Create another LAW to show how to connect VM to LAW
Steps
- Create Log Analytic Workspace
- Under workspace data sources → VM
- Connect your VM
- So this VM act as a data source into this LAW so that we can capture data from this VM and be able to query using Kusto Query
- Under LAW → logs
- Run Kusto Query
Monitor Insights
What: Service Monitoring
- Service-specific monitoring features built into Azure Monitor.
- This includes
- VM Insights: Monitoring service specific to virtual machines and virtual machine scale sets (VMSS).
• Requires Log Analytics workspace
• Requires Log Analytics agent (installed when connected)
• Also known as Azure Monitor for VMs
- Network Insights: Monitoring service specific to virtual network resources.
• No agent installation required
• Works in tandem with Network Watcher if enabled
• Also known as Azure Monitor for Networks
- Container Insights: Monitoring service specific to containers or AKS clusters.
• Requires Log Analytics workspace
• Requires Log Analytics agent
- Application Insights: Monitoring service specific to application code.
• App Insights resource
• Instrumentation of app code
Application Insights
What:
- A full-stack application monitoring solution that developers can use to monitor applications.
- Full-stack monitoring solution for our applications that allow us to gather data from the client-side, the server-side, and our dependencies, so that we have tons of telemetry data streamed into a single pane for developers to be able to view that data, so that it can drive the development of our applications in a positive direction that increases the performance and the user-base for our applications.
• Supports any application instrumented with Application Insights
• Repository for events and metrics data
• Telemetry data is streamed into an Application Insight resource
How
2 approaches
- Runtime instrumentation: codeless approach with Application Insights,
- where we don't have to use any specific packages inside of our application code to implement the Application Insights resource.
- provides us with not quite as much data that we're gathering as far as telemetry.
- Build-time instrumentation: is a coded approach with Application Insights,
- where we're going to implement the SDK for Application Insights into our application's code
- then we're going to pass the instrumentation key as an environment variable in our applications, so that we can use the application to gather as much data as possible,
- and this gives us access to other features that we don't otherwise get with a runtime instrumentation.
Features
- Metrics: Live Metrics Stream for near-real-time metrics data and Metrics Explorer for viewing how metrics vary over time.
- Alerts: Alerting on metrics or event data to notify application administrators of issues.
- Profiler: Determine how requests are delivered, such as page elements and their performance.
- Application Map: A topological view of applications and dependencies used to identify dependency issues such as bottlenecks.
- Usage Analytics: Analyze user metrics from client-side events like user interaction.
Architectural component
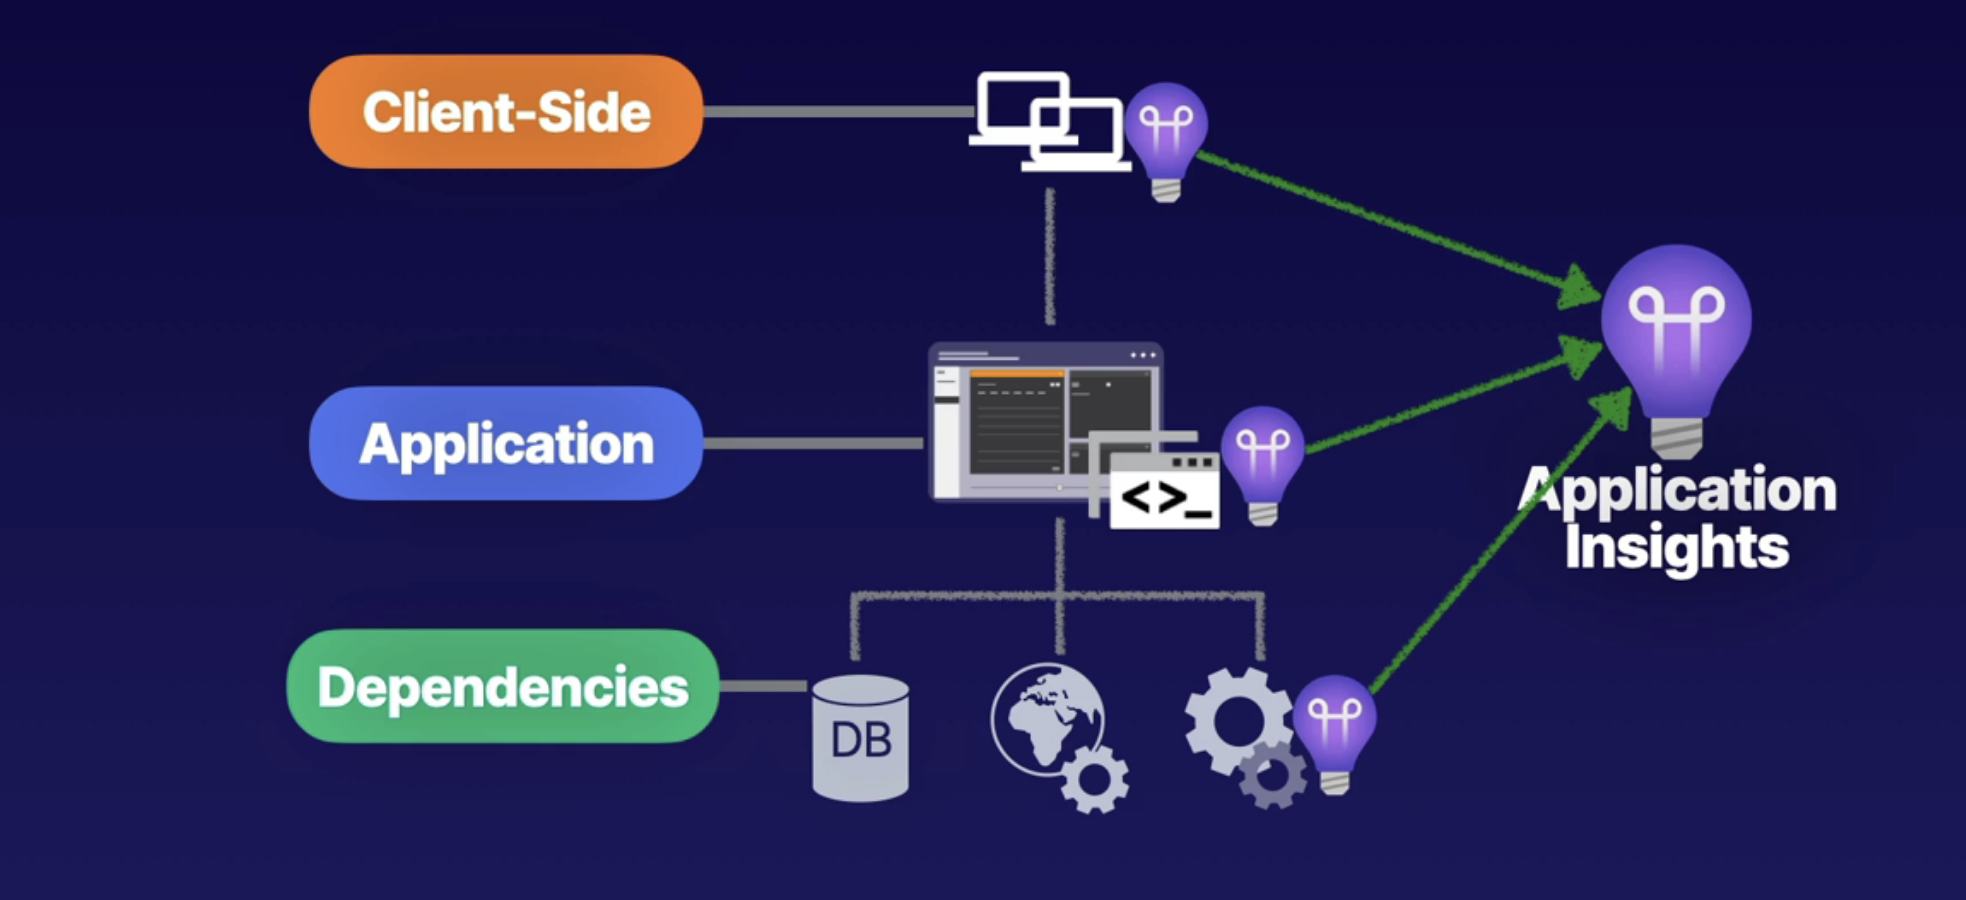
Network Watcher
What: Azure Network Watcher is a service comprised of networking tools for
monitoring and diagnostics.
• Overview of topologies
• Monitor connectivity in Azure
• Monitor connectivity in hybrid networks
• Troubleshoot connectivity issues
• Troubleshoot hybrid network solutions
• Enable per region in a subscription
Backup
Backup Concepts
Disaster recovery
What: The process of recovering from a disaster, such as a data center Power outage
- Every business needs business continuity and disaster recovery plan.
What to do
- Assess risks
- Determine critical workloads
- Determine back up technique
- Test disaster recovery
Recovery Point Objective VS Recovery Time Objectives
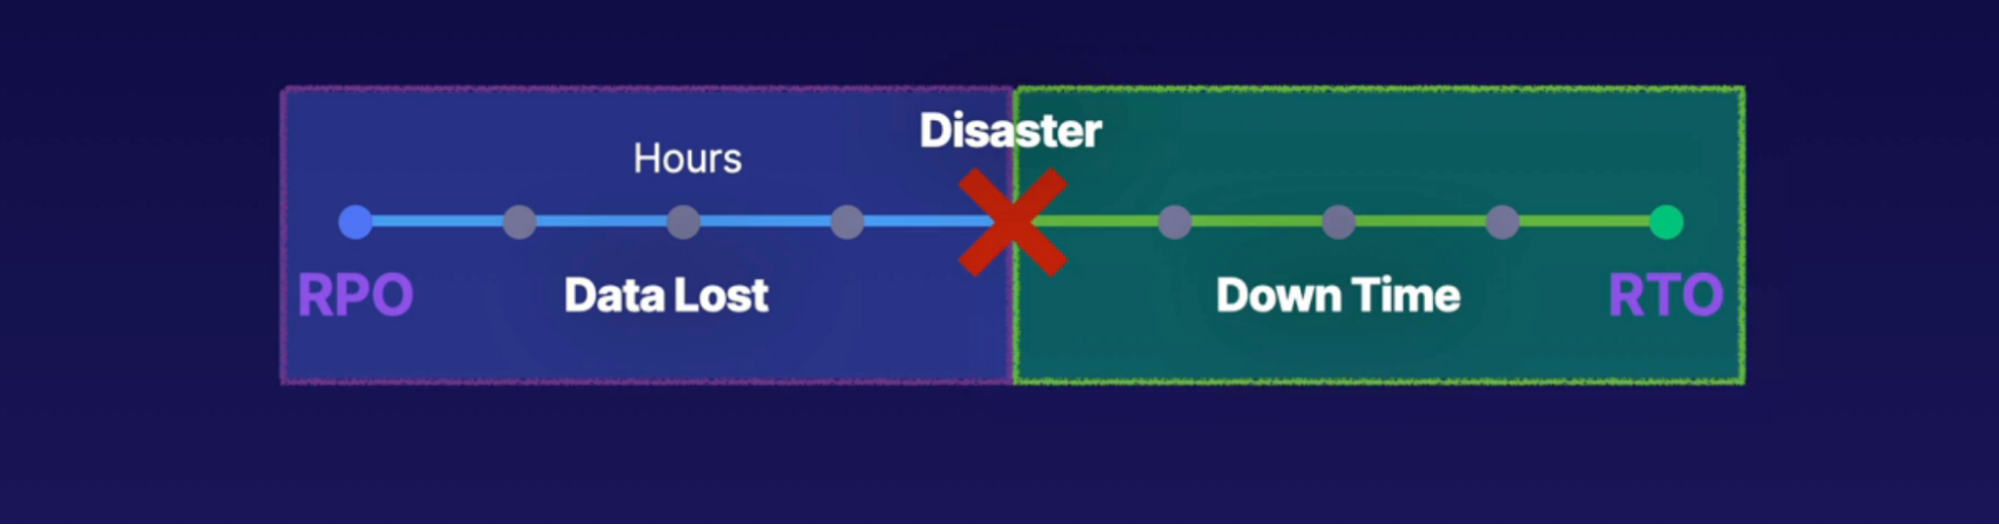
RPO | RTO |
What can we stand to lose in terms of data | How long does it take for us to recover |
Represents the hours from the last successful backup to the point of disaster in time | Represents the number of hours in time in representation between the disaster and full point of recovery |
Disaster recovery method
- Backup: copy of business-critical data
- Cold sites: A copy of critical infrastructure that needs preparation before a disaster recovery is complete.
- Hot site: A copy of critical infrastructure in data that is ready to be swapped in as the production workloads
Azure Backup
What: is a managed service for backing up and recovering workloads
How:
- Require an Azure Recovery Services Vault(RSV) to store backup data, where you can create the backup policy that you need.
- with this policy, you can take a backup of your VM data on a scheduled time, and in the event of a disaster, we can recover the VM from the data that we have backed up.
Idea
- Backup your VM in Azure recovery services vault
- with backup policy, recover VM
Supported workload
- Azure VM
- On-premises machines
- SQL Server workloads
- SAP HANA workloads
Flow
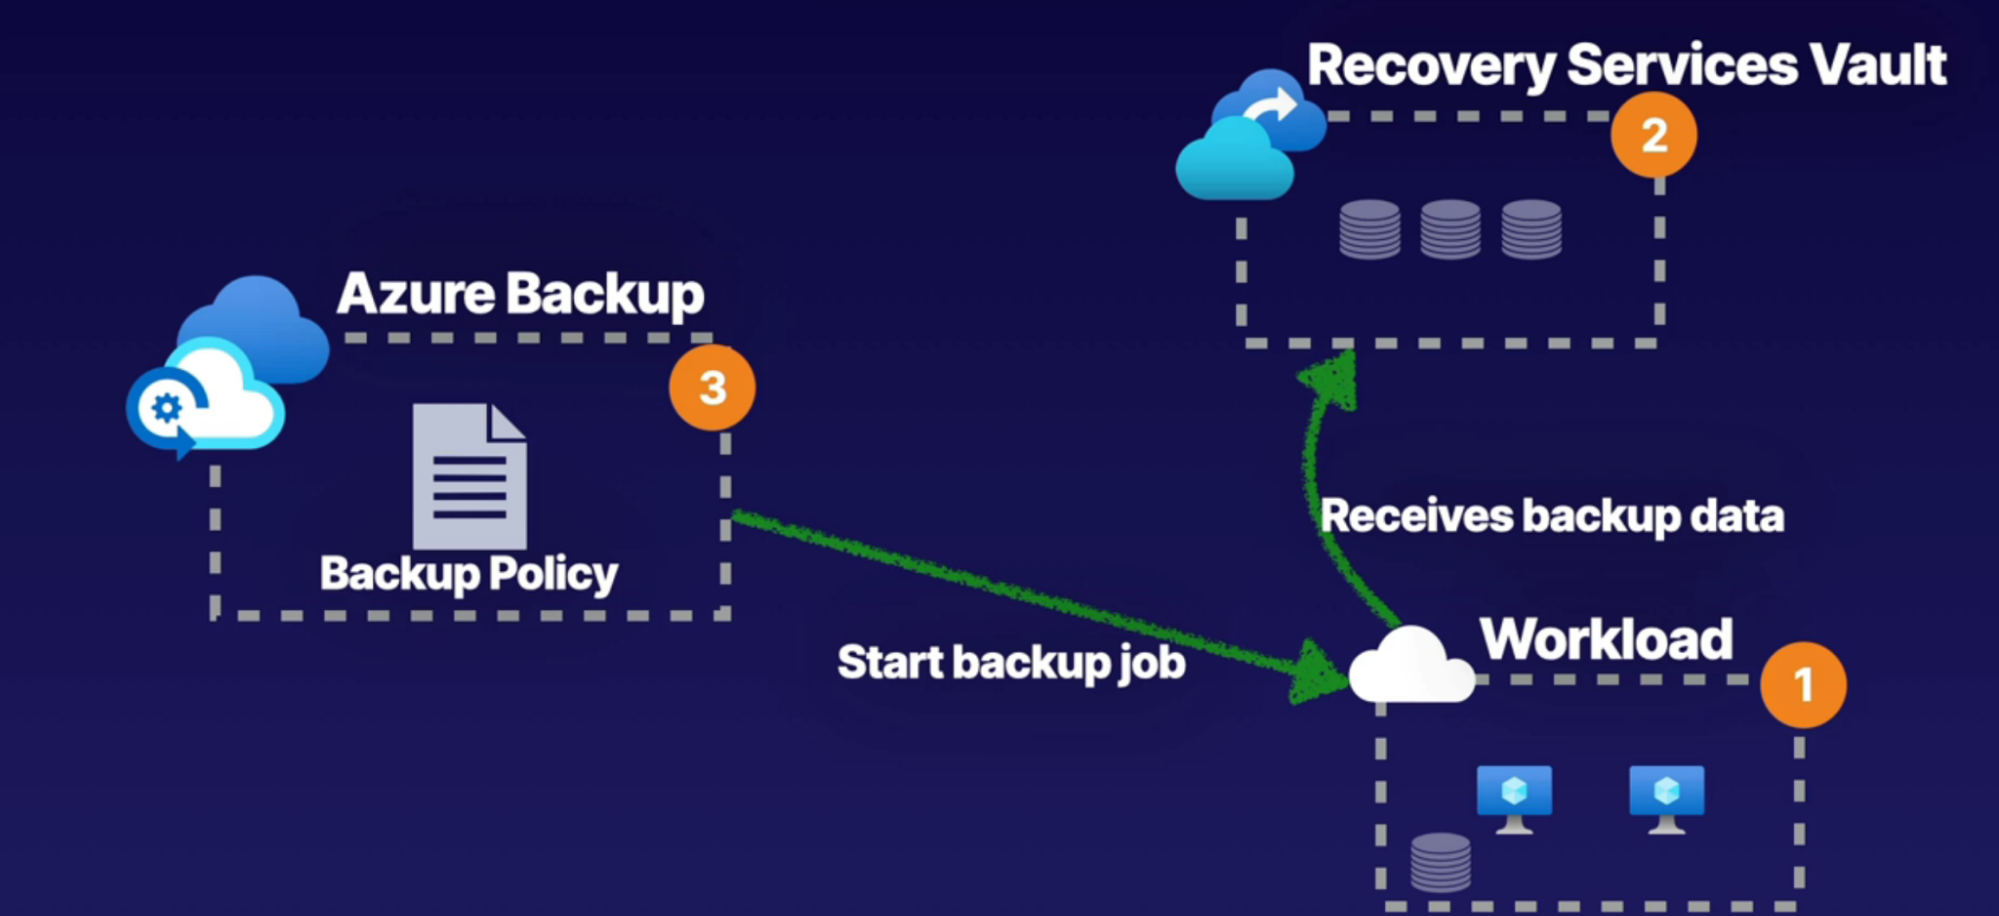
- You have your workload(VM, SQL)
- Create Recovery Services Vault(RSV)
- Create Azure Backup policy inside the RSV
- Backup Job: Run schedule backups (on VM, SQL)
- RSV receives backup data: providing us with data to recover from our workloads.
Scenarios
- Backup and restore Azure VM
- Backup File Share to another SA
- Lets say you have files in this File Share(within 1 SA) that needed to be backup and restore to the new SA
Task 1: Backup and Recover Azure VM workload.
- You have VNet with Subnet
- VM with Public IP
Steps
- In the VM → Operation → Backup
- Create new RSV
- Name
- Choose backup policy: set backup time, and frequency
- Enable backup
- This will create RSV and Backup Policy
- Inside the RSV, see the details
- Click on VM → Operation → Backup
- Select Backup Now
- Snapshot: file system consistent
- Restore VM
- Stop VM
- Create Storage Account: this will act as a staging location whenever we’re restoring our VM
- Restore VM under the VM → Operations → backup
- Select restore point from snapshot
- Choose restore configuration
- Create new VM
- Staging location: SA
Task 2: Backup and Recover Azure File Share to another SA
- Create a secondary SA with File Share where you want to store your backup
- You have RSV and SA with File Share containing files
- Under RSV enable backup
- Workload: Azure → File Share
- Choose SA you want to backup
- Add records inside the File Share
- Backup policy: daily
- Enable backup
- Create backup
- Click on RSV
- Under Backup Items → select Type of your backup
- Select your item
- Select backup now
- Retain backup till: default date
- Restore backup
- On the backup item
- Click on restore backup
- Select restore point you created in the 3rd point
- Select alternate location
- SA: secondary backup
- Select restore
Callouts
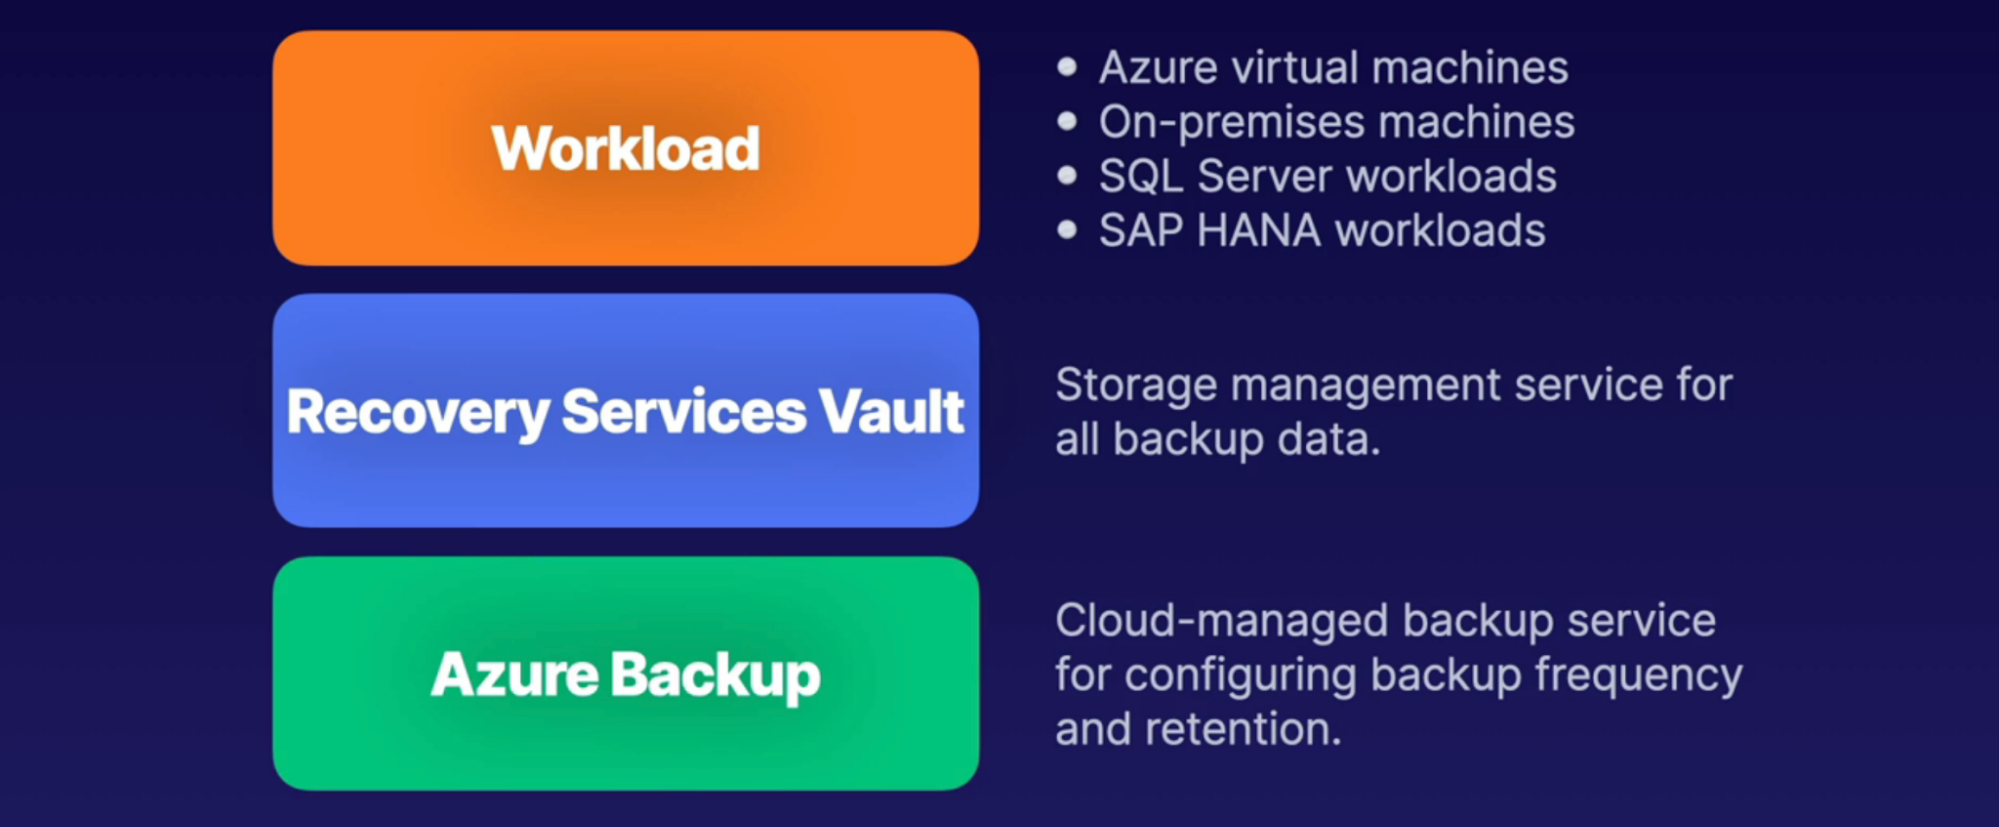
Azure Site Recovery
What: This is a disaster recovery solution that allows us to automate the process of recovering from a primary location into a secondary location.
How
- Requires an azure recovery services vault(RSV)
- Using RSV, we can make this recovery solution
- cross-zone
- cross-region
Idea
- You have VM data stored in disk storage.
- ASR caches VM data inside SA
- replicate this data to target location where we then have ability to failover and provide replication of data into target region
Task: Enable site to site recovery for VM
Steps
- Go to RSV → site recovery
- Enable replication for VM
- Select source location (East US)
- Select source VM
- Choose target location
- Select another region (WEST US)
- This will create new RG in that region with new VNet, SA(to cache the data), managed disk // so we can move that into the new region
- Replication policy: time frequency
- Enable replication
- Go to RSV
- Replicated items - see the replicated VM
- From there, you can failover, test failover
Recovery plan
- automate and run test failover events with protected items and pre - and/or post scripts
Backup Reports
What: Provides insight on backups from Azure backup, and those insights can be used to inform items such as
- forecasts for cloud storage consumption
- audits of backup and restore events
How
- Use Log Analytics as it’s logging service
- Configure RSV with Log Analytics to send logging events about Backup and Restore
Components
- Enable Azure backup
- this captures the data, generates reports from the backup
- Create Log Analytics Workspace
- to store logging data
- Configure diagnostics settings on RSV,
- to send all the backup data to LAW
Steps
- Create VM with Azure backup enabled
- Create RSV
- Backup item: to see which service is backup enabled
- Backup jobs: to see the data about backup, restore // when it happened
- Create Log Analytics
- On RSV → Monitoring → diagnostics settings
- Add diagnostics settings
- Enter name
- Select log data you want to capture
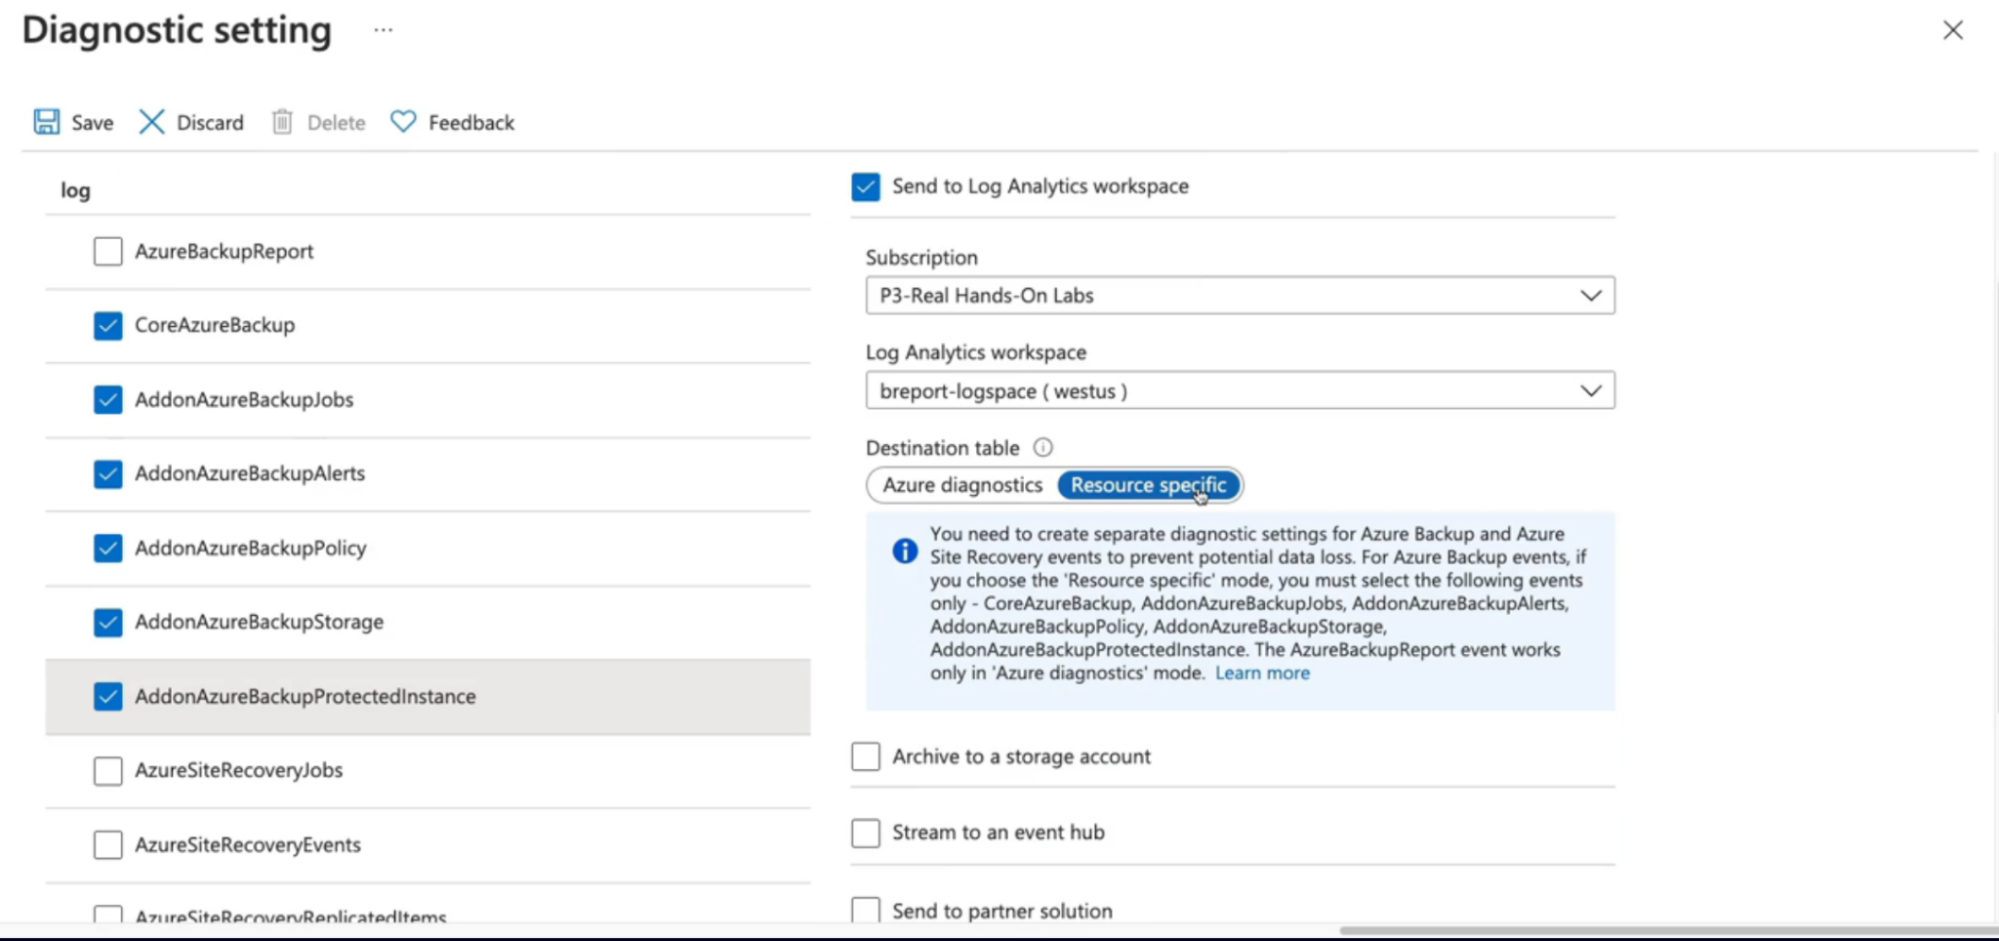
- Save
- On RSV, configure backup reports