AZ - 400 DevOps Engineer 17
The broad range of topic 17
Scenario 17
Chap -1: Developing an Actionable Alerting Strategy 18
SRE - Site Reliability Engineering 18
What is reliability: 18
Measuring reliability 18
What is SRE 18
Why do we need SRE 19
Key concepts 19
SRE vs. DevOps 20
Summary 20
Exploring metrics charts and dashboards 21
Intro to Azure monitoring 21
Azure Monitor metrics overview 21
Demo 21
1. Create a chart to view metrics 22
2. Add additional metrics and resources 22
3. Add charts to dashboards 22
Summary 22
Implementing application Health checks 22
Scenario 22
What is Application Insight 23
Availability 23
Demo 23
1. Configure URL ping test 24
2. Configure health alert 24
Summary 24
Discovering service and resource health alerts 24
Azure status 24
Service health 24
Resource health 25
Demo 25
1. Azure status page - https://status.azure.com/en-ca/status 26
2. View service health pages and create alerts 26
3. View resource health and create alerts 26
Summary 27
Self-healing alerts 27
Scenario 27
Vertical vs horizontal scaling 27
App Service vs. VMSS(Vitual machine scale set) 28
Autoscaling process 28
Demo 28
1. Configure autoscale notifications for App service and VMSS 28
Summary 29
Chap - 2: Designing Failure Prediction Strategy 29
Introduction 29
Exploring System load and failure conditions 29
Everything fail sometimes 29
What is failure mode analysis? 30
How to plan for failure 30
How can we reduce failure? 30
Performance Testing 31
Summary 31
Understanding failure prediction 31
You cannot prepare for everything 31
What is predictive maintenance PdM 31
How Microsoft used to do PdM 32
How does Microsoft do PdM now 33
Summary 33
Understanding baseline metrics 34
Scenario 34
Why create baseline 34
How to create baseline 34
Demo 35
1. Explore Azure monitor insight 36
Summary 36
Discovering Application Insight smart detection and dynamic threshold 36
Scenario 36
Dynamic threshold advantages 36
Application Insights smart detection 36
Smart detection categories 36
Demo 37
1. Create an alert which dynamic thresholds 37
2. Create smart detection alerts 37
Summary 38
Summary 38
Chap - 3: Designing and Implementing Health Check 38
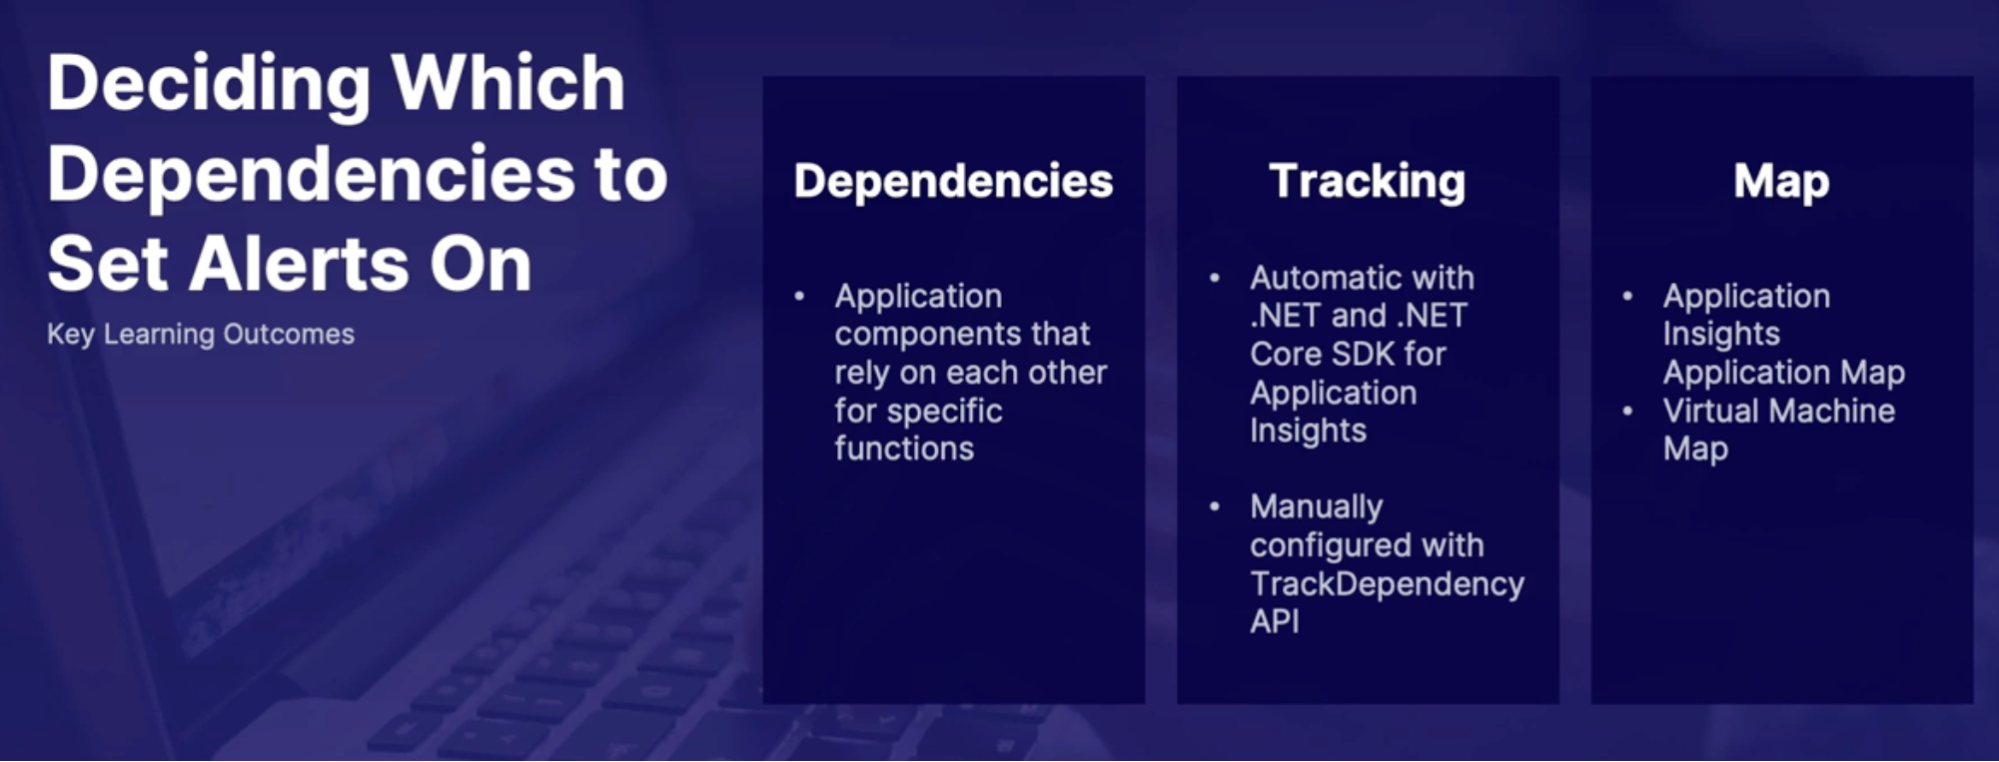
Deciding which dependencies to set alerts on 38
What is a dependency? 38
Application Insights dependency tracking 39
Which dependencies are tracked in Application Insights 39
Where can I find dependency data 40
Application dependencies on virtual machines 40
Demo exploring dependencies 40
Summary 41
Exploring service level objectives SLO 42
What makes an SLO? 42
How is an SLO helpful? 42
SLO’s and response time-outs 42
Demo: Configure Azure SQL to meet SLO‘s 43
Call outs 44
Summary 44
Understanding partial health situation 44
Health monitoring 44
Health monitoring data 44
Telemetry correlation 45
Application logs best practices 45
Endpoint health monitoring 46
Summary 46
Improving recovery time 46
Why do we need a recovery plan 46
High availability(HA) Vs disaster recovery(DR) 47
Recovery Point Objective(RPO) Vs Recovery Time Objective(RTO) 47
Business continuity strategies 47
RTO improvement options 48
Azure services that help reduce RTO 50
Summary 50
Exploring computer resource health checks 51
App service Health checks 51
Customize Web App health checks 51
VMSS Health extension 51
Container health check types 52
Liveness Check Example 52
Startup Check Example 53
Readiness Check example 53
Summary 54
Summary 54
Chap - 4: Developing a modern Source Control Strategy 56
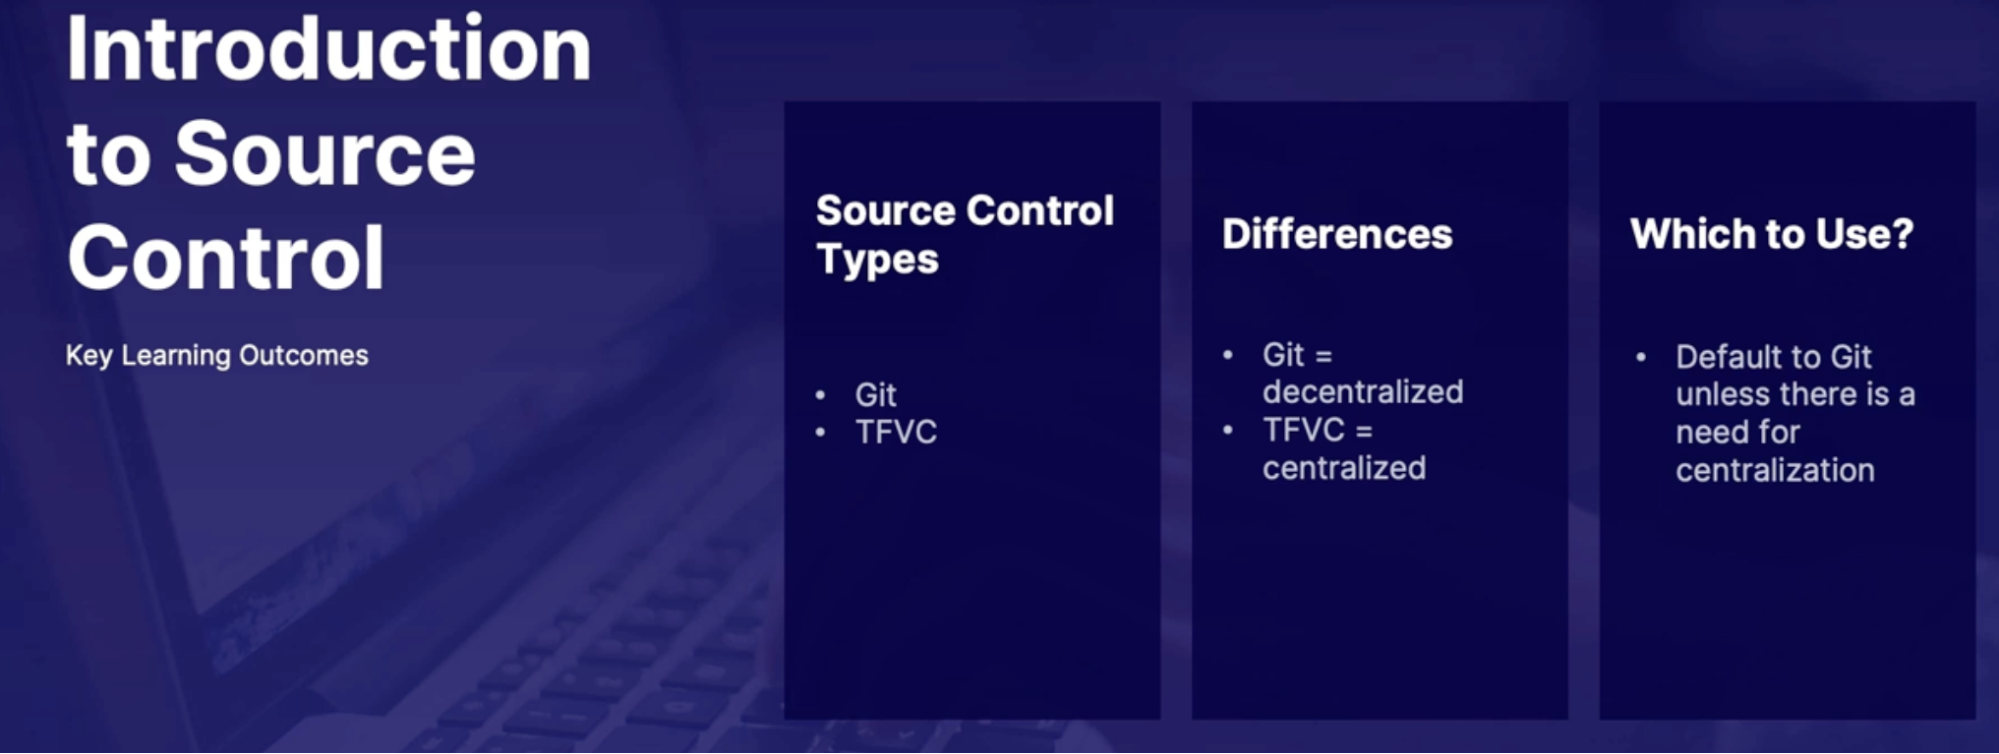
Introduction to source control 56
What is source control 56
Source control types 56
Which one to use? 57
Summary 57
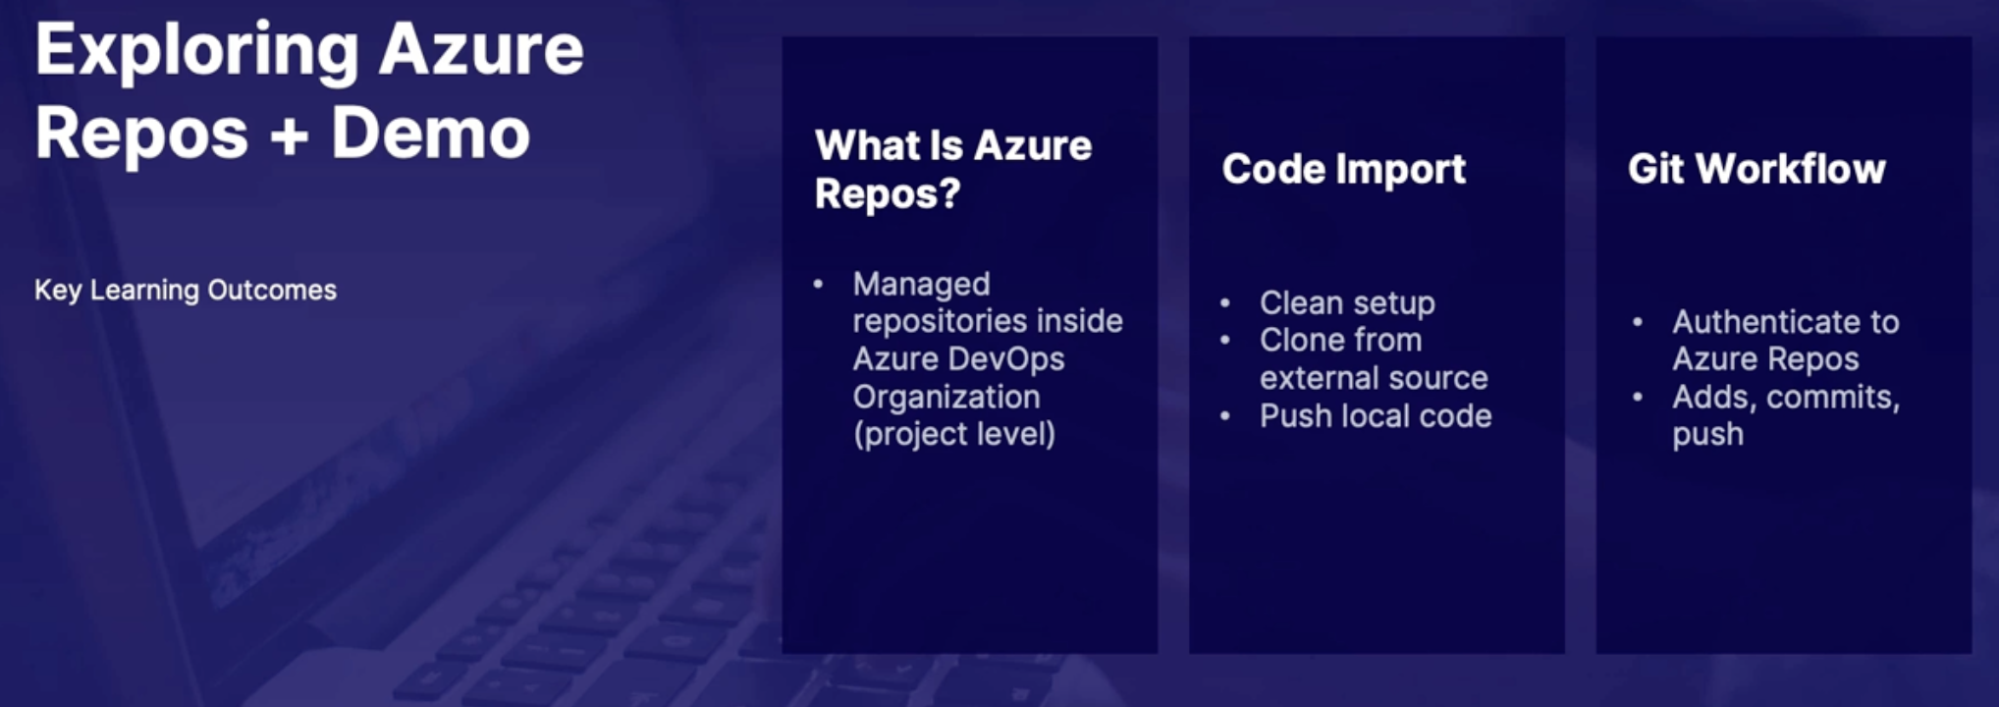
Exploring Azure repos 57
Azure repos at a glance 57
Setting up Azure Repos 57
Import options 57
Supported GIT features 57
Summary 58
Azure Repos demo and Git workflow 58
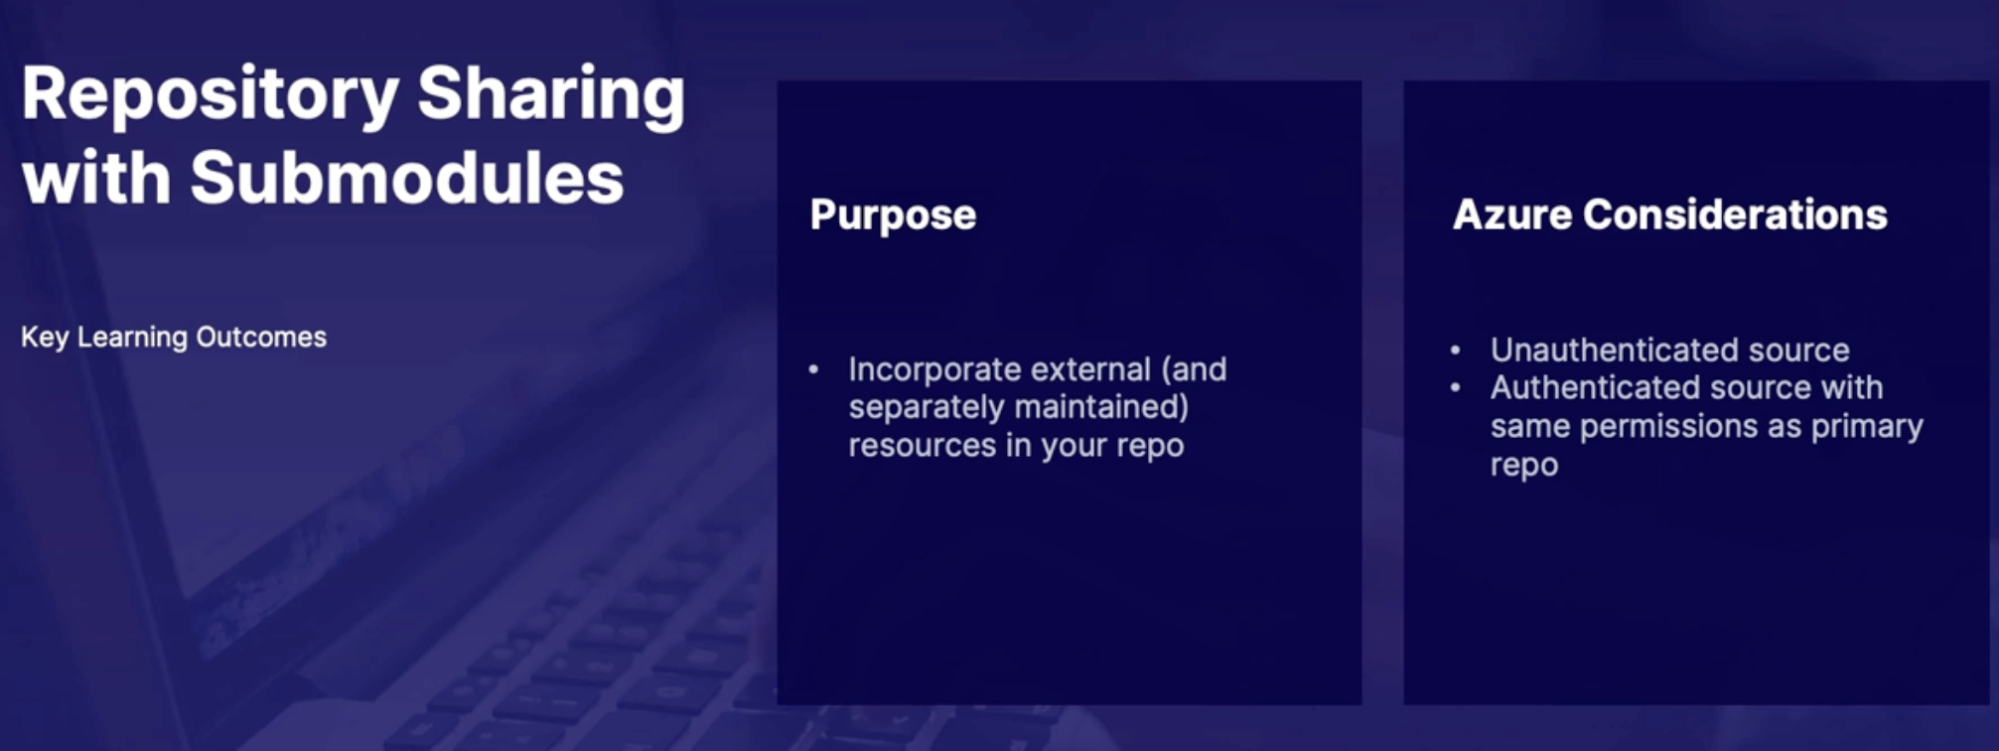
Repository sharing with submodule 58
What are submodules 58
How submodule works 59
Submodules in Azure DevOps 59
Demo: adding submodule to repo 59
Summary 60
Summary 60
lab: authenticate to Azure repose using an authentication token 61
Chap - 5: Planning and implementing branching strategies for the source code 62
Configure branches 62
What is a branch 62
Branch management 62
Summary 63
Discovering Branch Strategies 63
Branch strategies 63
● Trunk-based branching 63
● Feature(task) branching 64
● Feature flag branching 64
● Release branching 64
Summary 64
Pull request workflow 64
What is pull request 65
Goals 65
What’s in the pull request 65
Pull request workflow 65
Summary 65
Code reviews 65
How can you make code reviews efficient 66
1. Code review assignments 66
2. Schedule reminders 66
3. Pull analytics 66
Demo 66
Summary 66
Static code analysis 66
Guidelines for effective code review 66
Code quality tools 67
Demo 67
Summary 67
Useful requests with work items 67
The importance of relating work items 67
Demo 67
Summary 67
Lab: Configure branch policies in Azure Repos 67
Summary 68
Chap - 6: Configuring Repositories 70
Using Git tags to organize your repository 70
What are Git tags, and why do we care? 70
Tag types and how they work 70
Demo + Tags in Azure repos 71
Summary 71
Handling large repositories 71
Challenges of Large repos 71
Working with Git large file storage LFS 71
Best practices for working with large files 72
Clean up with git gc 72
Summary 72
Exploring repository permissions 73
Branch permissions in Azure repos 73
How branch permissions work 73
Branch locks 73
Demo: working with branch permissions/locks 74
Summary 74
Removing repository data 74
Challenges of removing Git Data 74
Unwanted file states 74
File removal scenario 74
Demo: Removing Unwanted files from Azure repo 75
Summary 75
Recovering repository data 75
Recovery scenarios 75
Revert to previous commit 76
Restore deleted branch from Azure repos 76
Restore deleted Azure repository 76
Demo: recover deleted branch 76
Summary 76
Summary 76
Chap - 7: Integrating source control with tools 78
Connecting to GitHub using Azure active directory 78
Advantage of AAD integration 78
Requirements for connecting to AAD 78
Azure AD SSO configuration 78
GitHub enterprise configuration 79
Summary 79
Introduction to GitOps 79
What is GitOps 79
Sample GitOps workflow 79
Exam perspective 80
Summary 80
Introduction to ChatOps 80
What is ChatOps 81
How to connect Chat apps to Azure DevOps 81
Demo 81
Summary 82
Incorporating Changelogs 82
What is GIT Changelogs? 82
Manually creating/viewing Changelogs 83
Automation options 83
Demo viewing Changelogs via command line 83
Summary 83
Summary 83
Chap - 8: Implementing a build strategy 84
Getting started with Azure pipelines 85
What are Azure pipelines 85
Importance of automation 85
Pipeline basic/structure/trigger 86
Summary 87
Azure pipeline demo 87
Integrate source control with Azure DevOps pipelines 88
Source control options 88
GitHub, Subversion 88
Demo 88
Summary 89
Understanding build agents 89
Role of agent 89
Microsoft and self-hosted agent 89
Parallel jobs 90
Demo 90
Exploring self hosted build agents 90
Self-hosted agent scenario 91
Self-hosted agent communication process 91
Agent pools 91
Demo 91
Summary 92
Using build trigger rules 92
Trigger types 93
Summary 94
Incorporating multiple builds 94
Multiple Build scenario 95
Demo 95
Summary 96
Exploring containerized agents 97
Why run a pipeline job in a container 97
Microsoft hosted agent configuration 97
Non-orchestration configuration(manual) 98
Orchestration configuration(AKS) 100
Summary 100
Summary 100
Lab: Use deployment groups in Azure DevOps to deploy a .net app 103
Lab: Integrate GitHub with Azure DevOps pipelines 104
Chap - 9: Designing a package management strategy 104
Introduction 104
What is package manager/software package 104
Discovering Package Management Tools 105
Development-related package managers (perspective) 105
How to manage packages 105
Package hosting service example 106
Summary 106
Exploring Azure artifact 106
Azure artifact 106
Feeds 106
Developer workflow with Visual Studio 106
Demo: Connecting to feeds in visual studio 107
Summary 107
Creating a versioning Strategy for Artifact 108
Proper versioning strategy 108
Versoning recommendations 108
Feed views 108
Demo 108
Summary 108
Summary 109
Chap - 10: Designing Build automation 109
Integrate external services with Azure pipelines 110
Scenarios for connecting external tools 110
External tool connection methods 110
Popular code scanning service/tools 111
Summary 111
Visual Studio Marketplace Demo 111
Exploring Testing Strategies in your build 112
Why test code? 112
Testing methodologies 112
Azure test plans 112
Summary 112
Understanding code coverage 113
What is Code Coverage 113
How code coverage tests work 113
Code coverage frameworks 114
Demo 114
Summary 114
Summary 114
LAB: Create and Test an ASP.NET Core App in Azure Pipelines 116
Lab: Use Jenkins and Azure DevOps to Deploy a Node.js App 116
Chap - 11: Maintaining a build strategy 117
Introduction 117
Discovering pipeline health monitoring 117
Scenarios for monitoring pipeline health 118
Pipeline reports 118
1. Pipeline pass rate 118
2. Test pass rate 118
3. Pipeline duration 118
Demo 118
Summary 118
Improving build performance and cost efficiency 119
Build performance and costs 119
Pipeline caching 119
Self-hosted agents 119
Agent Pull consumption reports 120
Summary 120
Exploring build agent analysis 120
Scenario: Troubleshoot Pipeline Failures 120
Viewing logs 120
Downloading logs 121
Configure verbose logs 121
Demo 121
Summary 121
Summary 121
Chap - 12: Designing a process for standardizing builds across organization 122
Implementing YAML templates 122
YAML template purpose 122
Inserting templates 122
Template location reference 122
Demo 125
Summary 125
Incorporating valuable groups 125
Variable group purpose 125
Pipeline variables 125
Creating variable groups 125
Using variable groups 127
Demo 127
Summary 127
Summary 127
Chap - 13: Designing an application infrastructure management strategy 128
Exploring configuration management 128
What is configuration management 128
Assessing Configuration Management Mechanism 128
1. Mutable infrastructure 128
2. Imperative and declarative code 129
3. Abstraction 129
4. Simplified code process 130
Centralization 130
Agent-based management 131
Summary 131
Introducing PowerShell Desired State Configuration (DSC) 131
Aspect of PowerShell DSC 131
Important consideration of PowerShell DSC 132
Anatomy of PowerShell DSC 132
Summary 132
Implementing PowerShell DSC for app infrastructure 132
Primary uses for PowerShell DSC 132
Demo: Setup PowerShell DSC for DevOps pipeline 133
Summary 133
Summary 133
Lab create a CICD pipeline using PowerShell DSC 134
Chap - 14: Developing Deployment Scripts and Templates 134
Understanding deployment solution options 134
Deploying code 134
Deployment solution 135
Aspects of a deployment 135
Topics for evaluating deployment solutions 136
Summary 136
Exploring infrastructure as code: ARM vs. Terraform 136
Comparison 136
Code differences 136
Demo: ARM template in Azure pipeline 136
Demo: deploying terraform in Azure pipeline 137
Summary 138
Exploring infrastructure as code: PowerShell vs. CLI 138
Code differences 138
Comparison highlights 138
Demo: Deploying with both PowerShell and CLI 138
Summary 139
Linting ARM Templates 139
What is linting 139
Demo 139
Summary 139
Deploying a Database 140
What is DACPAC? 141
Demo 141
Summary 141
Understanding SQL Data Movement 141
What is BACPAC? 141
Demo 142
Summary 142
Introduction to Visual Studio App Center 143
What is App Center 143
Demo 143
Summary 143
Exploring CDN and IOT deployments 143
Azure CDN deployment with DevOps pipeline 144
Azure IOT Edge deployment with DevOps pipeline 144
Demo 144
Summary 144
Understanding Azure Stack and sovereign cloud deployment 145
Exploring environments 145
Demo 145
Summary 146
Summary 146
Lab: Build and Distribute an app in App center 146
Lab: Linting your ARM templates with Azure pipelines 150
Lab: Building infrastructure with Azure pipeline 151
Lab: Deploy a python app to an AKS cluster using Azure pipeline 151
Chap - 15: Implementing an Orchestration Automation Solution 152
Exploring release strategy 152
Canary deployment 152
Rolling deployment 152
Blue/Green deployment 152
Summary 153
Exploring stages, dependencies and conditions 153
Release pipeline stage anatomy 153
Stages 153
Dependencies 154
Conditions 154
Full stage syntax 154
Summary 154
Discovering Azure app configuration 155
The INI File 155
How can you deploy app configurations? 156
What is Azure app configuration 156
Azure app configuration benefits 156
Demo 157
Summary 157
Implementing release gates 157
What are gates 157
Scenarios for gates 157
1. incident and issues management 157
Manual intervention and validations 158
Demo 158
Summary 158
Summary 158
Lab: Creating a multi-stage build in Azure pipeline to deploy a .NET app 160
Chap - 16: Planning the development environment strategy 160
Exploring release strategies 160
Deployment strategies and steps 160
Deployment representations 161
Deployment releases using virtual machines 162
Deployment jobs 163
Summary 163
Implementing deployment slot releases 163
What are deployment slots 164
Demo 164
Summary 164
Implementing load balancer and traffic manager releases 164
Load balancer and traffic manager 164
Demo 164
Summary 165
Feature toggles 165
Feature flag branching 165
Demo 165
Summary 165
Lab: Deploy a node JS app to a deployment slot in Azure DevOps 167
Chap - 17: Designing an Authentication and Authorization Strategy 167
Azure AD Privileged Identity Management(PIM) 167
Why use Privileged Identity Management? 167
What is PIM? 167
What does it do? 168
How does it work? 168
Summary 168
Azure AD conditional access 169
Why use conditional access 169
What is Azure AD conditional access 169
What does it do 169
How it works 169
Summary 169
Implementing multi factor authentication(MFA) 170
What is MFA 170
How it works & Available verification methods 170
Enabling multifactor authentication 170
Demo 170
Summary 170
Working with service principals 170
Using service accounts in code 170
What are Azure service principles 171
How to access resources with service principals 171
Summary 171
Working with managed identities 171
What is managed service identity (MSI) 171
Demo 172
Summary 172
Using service connections 172
What is it 173
Demo 173
Summary 173
Incorporating vaults 173
What are key vaults 173
Azure key vaults 173
Azure key vault using a DevOps pipeline 173
Using HashiCorp Vault with Azure Key vault 173
Demo 173
Summary 173
Lab: Read a secret from an Azure key vault in Azure pipelines 174
Summary 174
Chap - 18: Developing Security and Compliance 177
Understanding dependency scanning 177
Dependencies 177
Type of dependency scanning 177
Security dependency scanning 177
Compliance dependency scanning 177
Aspects of dependency scanning 177
Summary 177
Exploring container dependency scanning 178
Aspects of container scanning 179
Demo 179
Summary 179
Incorporating security into your pipelines 179
Securing applications 179
Continuous security validation process 179
Secure application pipelines 180
Summary 180
Scanning with compliance with WhiteSource Bolt, SonarQube, Dependabot 181
Summary 182
Chap - 19: Designing Governance Enforcement Mechanisms 184
Discovering Azure policy 184
Scenario 184
Azure policy 184
Azure policy Access 184
Demo 184
1. Explore Azure policy 184
2. Explore Azure policy integration with Azure DevOps 185
Summary 185
Understanding container security 185
Azure defender for container registry 185
AKS protection 185
Summary 186
Implementing container registry tasks 186
Azure container registry 186
Tasks (Quick, Automatic, Multi-step) 187
Summary 187
Responding to security incidents 188
Emergency access accounts 188
Best practices 189
What to do after the accounts are configured 189
Demo emergency access account monitoring 189
Summary 189
Summary 189
lAB: Build and Run a Container Using Azure ACR Tasks 191
Chap - 20: Designing and Implementing Logging 191
Discovering logs in Azure 191
What are logs 191
Sources of logs in Azure 191
Log categories 192
Diagnostic log storage locations 192
Demo exploring logs and configuring diagnostics 192
Summary 192
Introducing Azure monitor logs 193
Azure monitor logs 193
Log analytics agent 193
Demo: 193
1. Build and log analytics workspace 193
2. Configure storage retention 194
3. Assemble log analytics queries 194
Summary 194
Controlling who has access to your logs 195
Scenario 195
How many workspaces to deploy 195
Access Modes 195
Access control modes 195
Built-In roles 195
Custom roles table access 195
Demo: configuring access control 197
Summary 197
Crash analytics 197
Crash analytics 197
Visual studio App center diagnostics 198
What happens when a crash occurs? 198
Google firebase crashlytics 198
Demo 198
1. explore visual studio App Center crashes 198
2. explore Google firebase crashlytics 199
Summary 199
Summary 199
Chap - 21: Designing and Implementing Telemetry 200
Introducing distributed tracing 200
Scenario 200
Monolithic application/NTier architecture 200
Microservices/Service-based architecture 201
What do we monitor 201
Distributed Tracing 202
Demo: Application Insights tracing 202
Summary 202
Understanding User Analytics with Application Insight and App Center 202
User analytics 202
Application Insights user analytics 203
Visual studio App Center analytics 203
Export App Center data to Azure 204
Demo 204
1. Explore App Center analytics 204
2. Export data to Azure 204
3. Explore Application Insights User Analytics 204
Summary 204
Understanding User Analytics with TestFlight in Google Analytics. 204
Google Analytics 204
How to start collecting Analytics 205
Demo: Explore Google Analytics 205
Summary 205
Exploring infrastructure performance indicators 206
Performance 206
High-Level performance indicators 206
Example data correlations 207
Low-level performance indicators 207
How to collect helpful data 207
Summary 207
Integrating Slack and teams with metric alerts 208
Action groups 208
Notification types 208
Action types 208
Demo: trigger logic apps to send notifications to Teams and Slack 208
Summary 209
Summary 209
LAB: Subscribe to Azure Pipelines Notifications from Microsoft Teams 209
Chap - 22: Integrating Logging and Monitoring Solutions 211
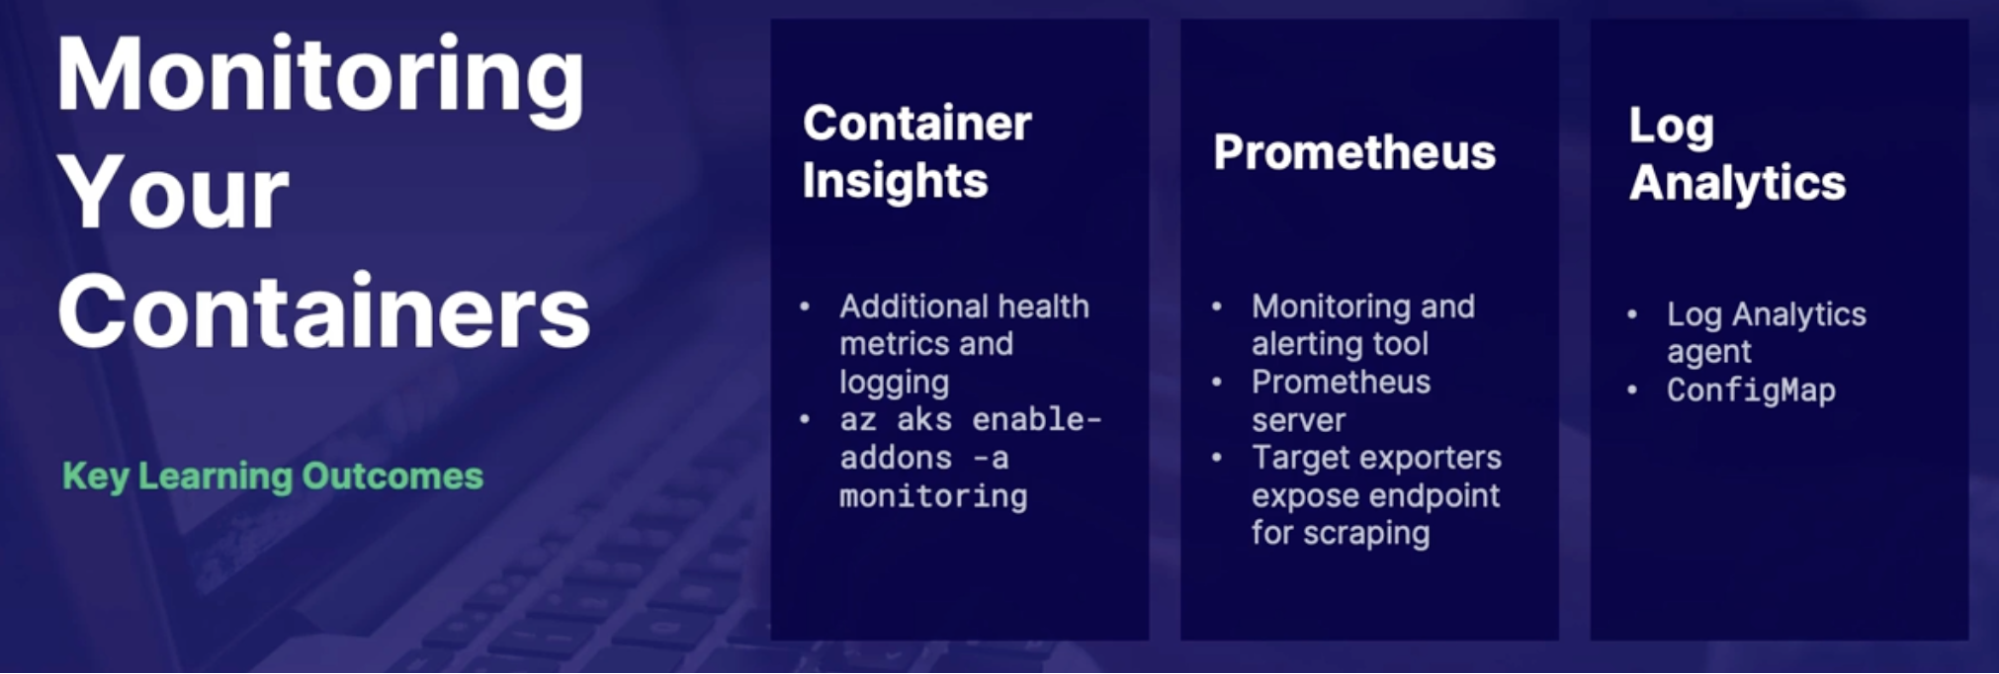
Monitoring containers 211
Azure monitor container insight 211
Azure Kubernetes service(AKS) 211
AKS Container insight configuration options 211
Prometheus 212
How do Prometheus work 212
Prometheus and Azure monitor integration. 212
Demo: 212
1. Enable container insights using the portal 212
2. Explore container health metrics 213
Summary 213
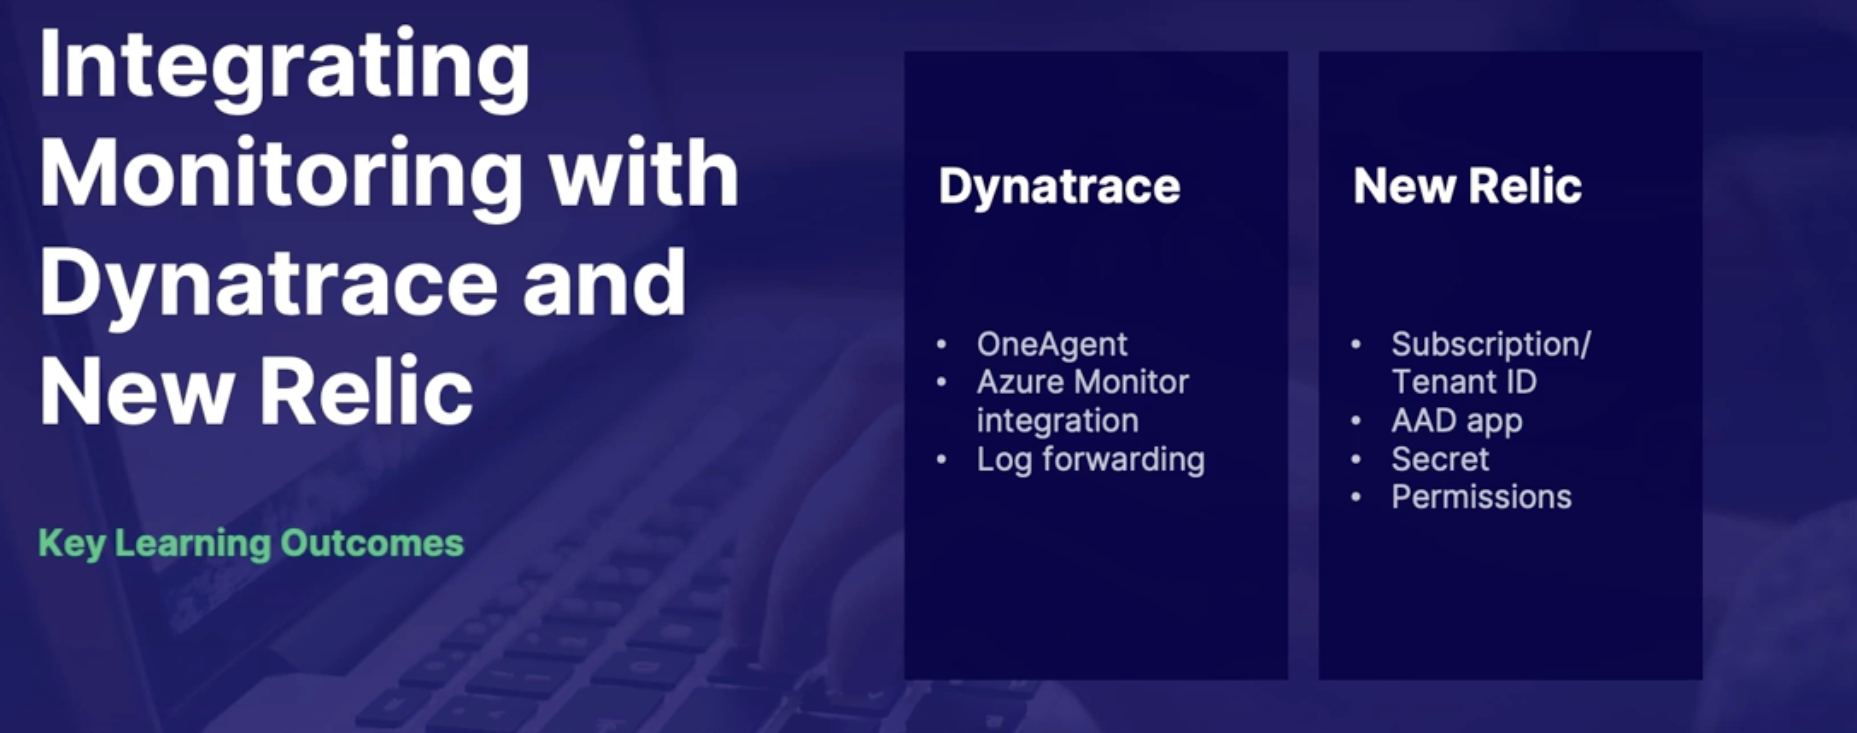
Integrating monitoring with Dynatrace and New Relic 213
Dynatrace 213
Dynatrace Integration 213
New Relic 213
Other third-party monitoring alternatives 214
Demo 214
1. Azure integration with Dynatrace 214
2. Azure integration with New Relic 214
Summary 214
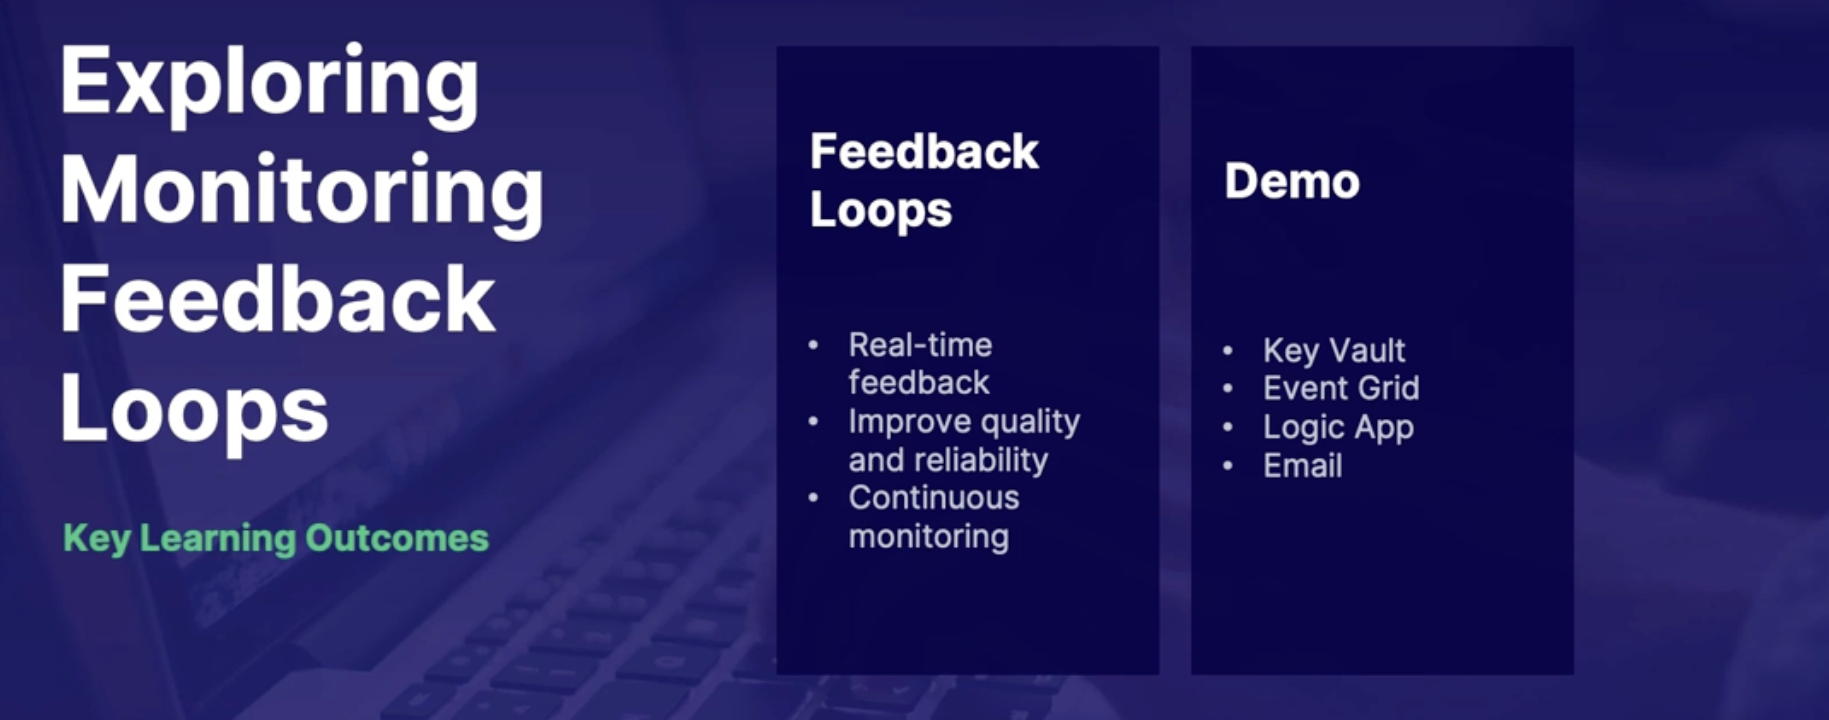
Monitoring feedback loop 214
Feedback loops 214
Scenario 214
Demo: implement feedback loop using a logic app 214
Summary 215
Summary 215
AZ - 400 DevOps Engineer
The broad range of topic
- SRE
- DevOps security and compliance
- Source control
- Azure Pipeline
- CI/CD on Azure DevOps
- Communication and Collaboration
- Monitoring and Logging
- Alerting policies
Scenario
- A company wants to migrate its workload from on-prem to the cloud - eCommerce website.
- Teams are siloed (system database, networking, etc.)
- Developer
- Operations
- Test/Qa
- Security
- New focus on changing to a DevOps approach
Chap -1: Developing an Actionable Alerting Strategy
SRE - Site Reliability Engineering
What is reliability:
- The application can be used when and how it is expected to
Concepts
- Availability: should be up anytime with no error(peak hours)
- Performance: should perform basic functionality without using multiple resources
- Latency: click should take minimum time to access/Respond
- Security
Measuring reliability
- Service level agreement(SLA):
- A service provider(Azure) says how much their service will be available.
- defines the financially backed reliability commitments from a service provider
- For example, the Azure App Service has an SLA of 99.95% for paid subscriptions,
- Service level objectives(SLO):
- The Goals that the service wants to reach to meet the agreement
- These are the various goals within the SLA that the service provider is promising.
- It’s an agreement within an SLA about a specific metric like uptime or response time.
- SLOs are what set customer expectations and tell IT and DevOps teams what goals they need to hit and measure themselves against.
- Service level indicator(SLI):
- which are the actual specific metrics coming from the service that are used to make the goals and the agreements.
- Actual service metrics behind the commitment
What is SRE
The approach was created at Google in 2003 by Benjamin Treynor Sloss, who described it in an interview as, "What happens when you ask a software engineer to do an operations function?"
What:
- Developers that usually develop the software, but are not included in the support, are being brought in to use software engineering practices to solve problems.
Why/Goal:
- The goal being to remove as much manual labor as possible using automation, which will help rescue time and effort spent on fixing production issues.
- This also creates a healthy feedback loop because the same people that are developing the application are supporting it so that they can learn from the production issues and hopefully prevent them in the next deployment from happening again.
Why do we need SRE
What
Generally, in traditional environments, reliability is not focused on.
Product managers don't view it as part of their concerns and will often categorize reliability
as a nonfunctional requirement.
issue
The result is that work gets siloed.
Software engineers focus on development and then throw it over to the wall to the operators
who end up supporting an application that they're not very familiar with and then perform inefficient and manual fixes.
Resolve
So with site reliability engineering, you have engineers working the full stack. Often, production issues are software problems, so the same developers that wrote the code
are also supporting the application, and they can go back and edit the code to increase performance and develop automation to reduce errors and save time.
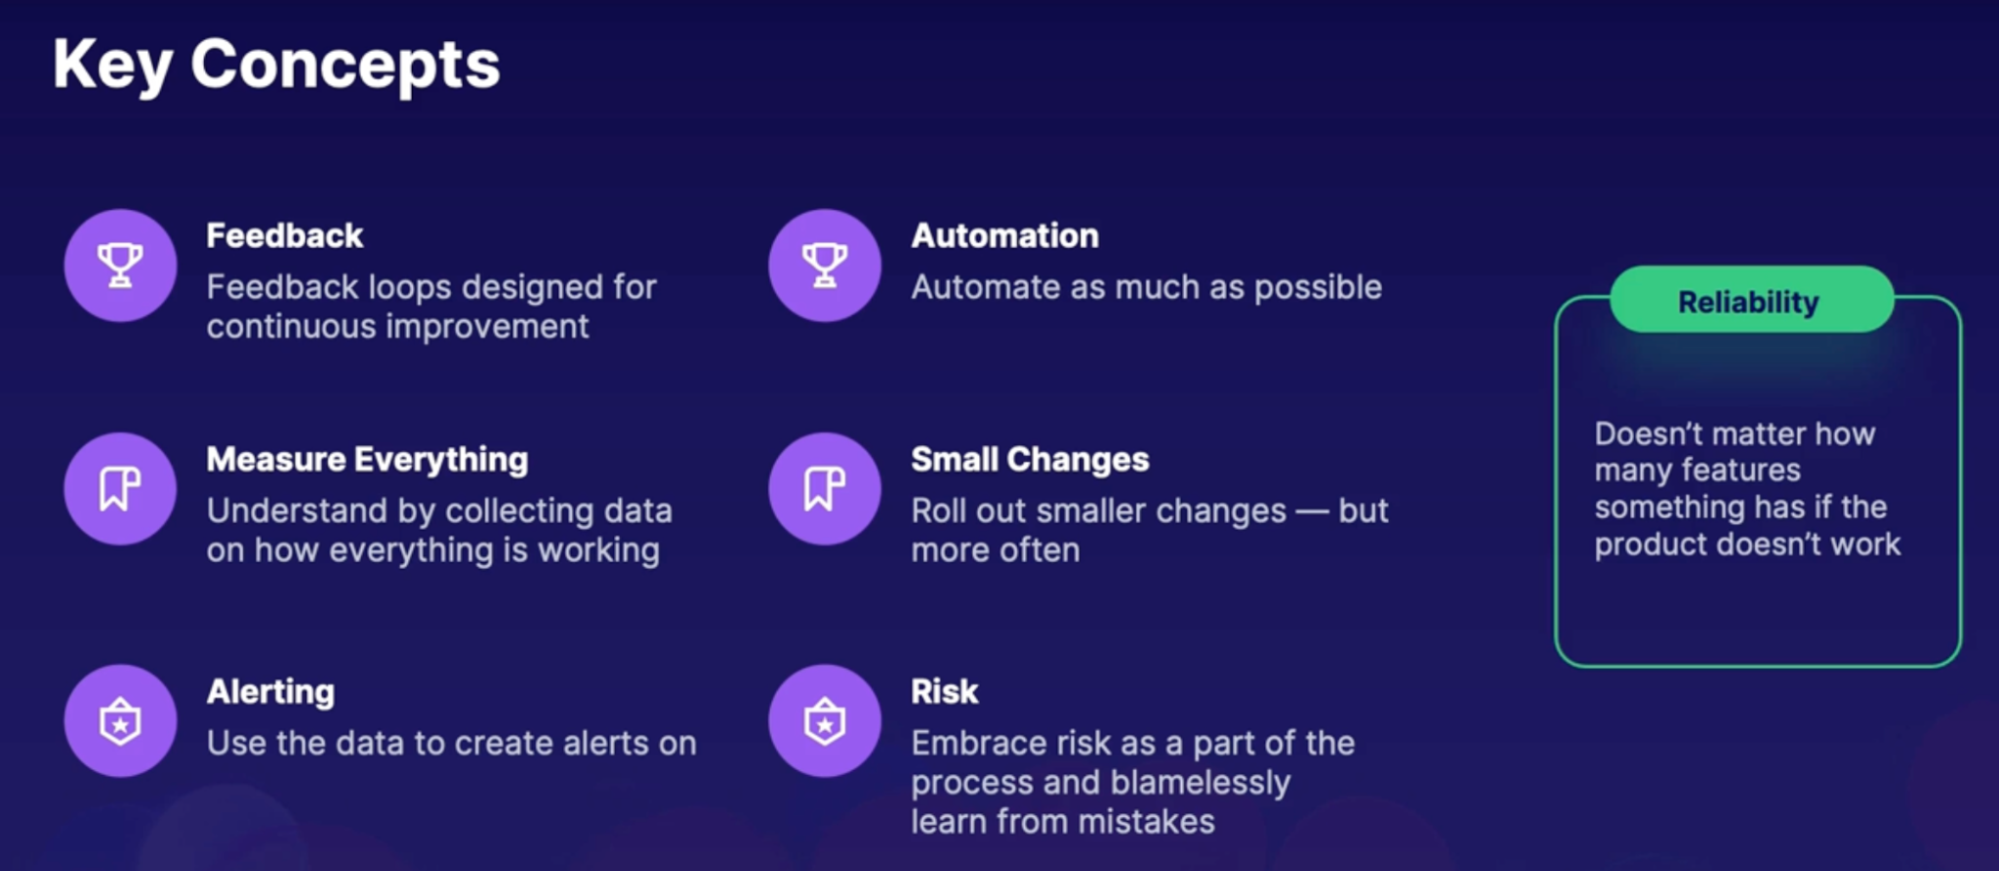
Key concepts
- Feedback
- Measuring everything
- Alerting
- Automation
- Small changes
- Risk
SRE vs. DevOps
DevOps | SRE |
DevOps is more of a culture of a group or a company where the roles of the developer and operators are brought together. | SRE is more of an engineering discipline that uses DevOps principles. |
if there's a problem, the operators will bring in a developer to help solve the problem.
| if there's a problem, the operators will bring in a developer to help solve the problem.
|
focus is more on development and deploying faster,
Focus- development → testing → production | Focus- development ← testing ← production |
Summary
- Reliability can be described in availability, performance, latency and security
- SRE takes development practices to solve operations problems
- site reliability engineers are effective because they can edit the code across the stack
- SLA is the agreement made with the customer on how reliable their system or service will be
- SLO defines those goals for the agreement
- SLI comes from the actual metrics and data from the system to be used to create goals
- SRE focuses on production and then looks back, whereas DevOps focuses on development and deployment to the next stage
Exploring metrics charts and dashboards
Intro to Azure monitoring
General location to gather information from your applications, infrastructure, and Azure resources
For the most part, this information is stored in 2 ways.
- Metrics:
- Metrics are various pieces of numerical data that describe/measure how something is performing at a certain period of time, as well as what resources it is consuming // performance counters
- Data points that describe system performance and the resources consumed at a certain point in time
- Examples like CPU, memory, or network traffic.
- Logs:
- are messages that are generated by certain events in your system.
- examples like errors or traces.
Azure Monitor metrics overview
what you can do with metrics?
- Visualize
- the data in various charts and graphs using Metrics Explorer.
- can save them to a dashboard or use them in a workbook.
- Analyze
- the data in the Metrics Explorer to see how systems are performing over time or compare it to other resources.
- Alert
- create alerts based on metrics data
- Example: VM reached a certain CPU threshold
- Automate
- implement autoscaling based on a certain level of traffic.
Demo
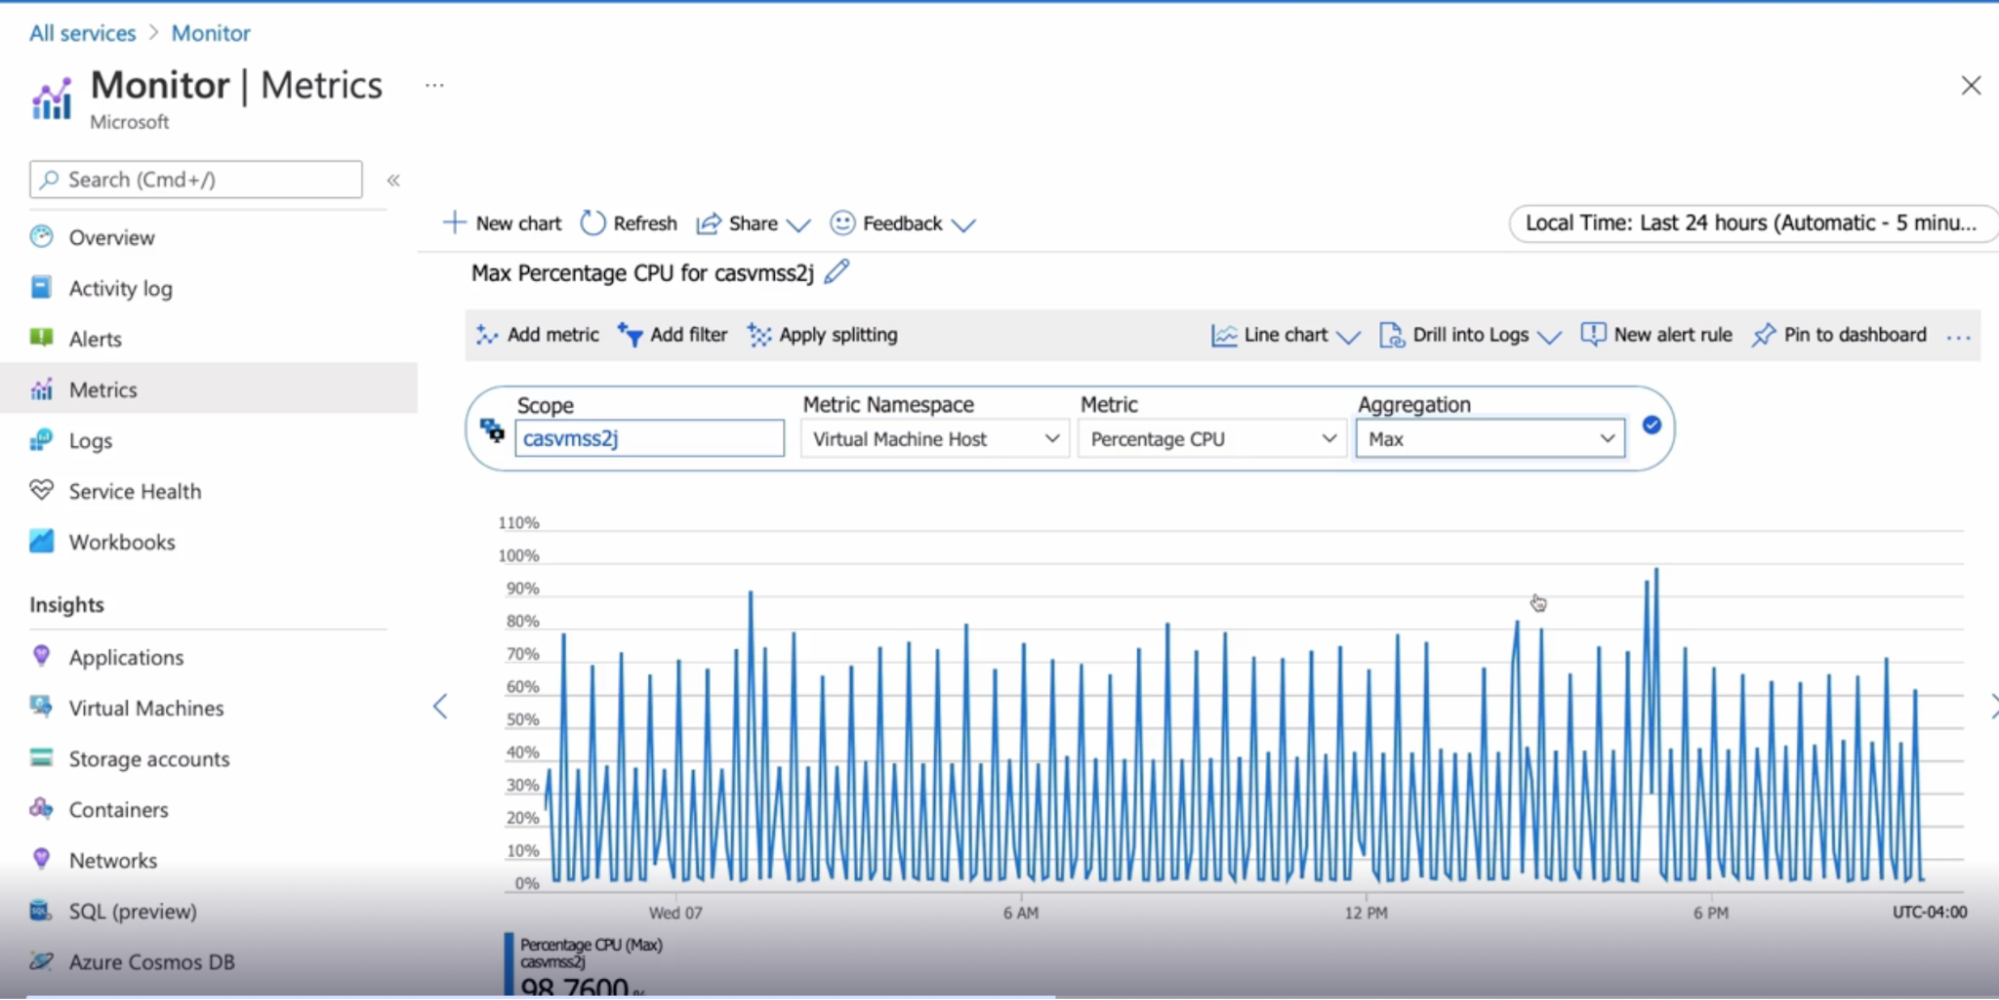
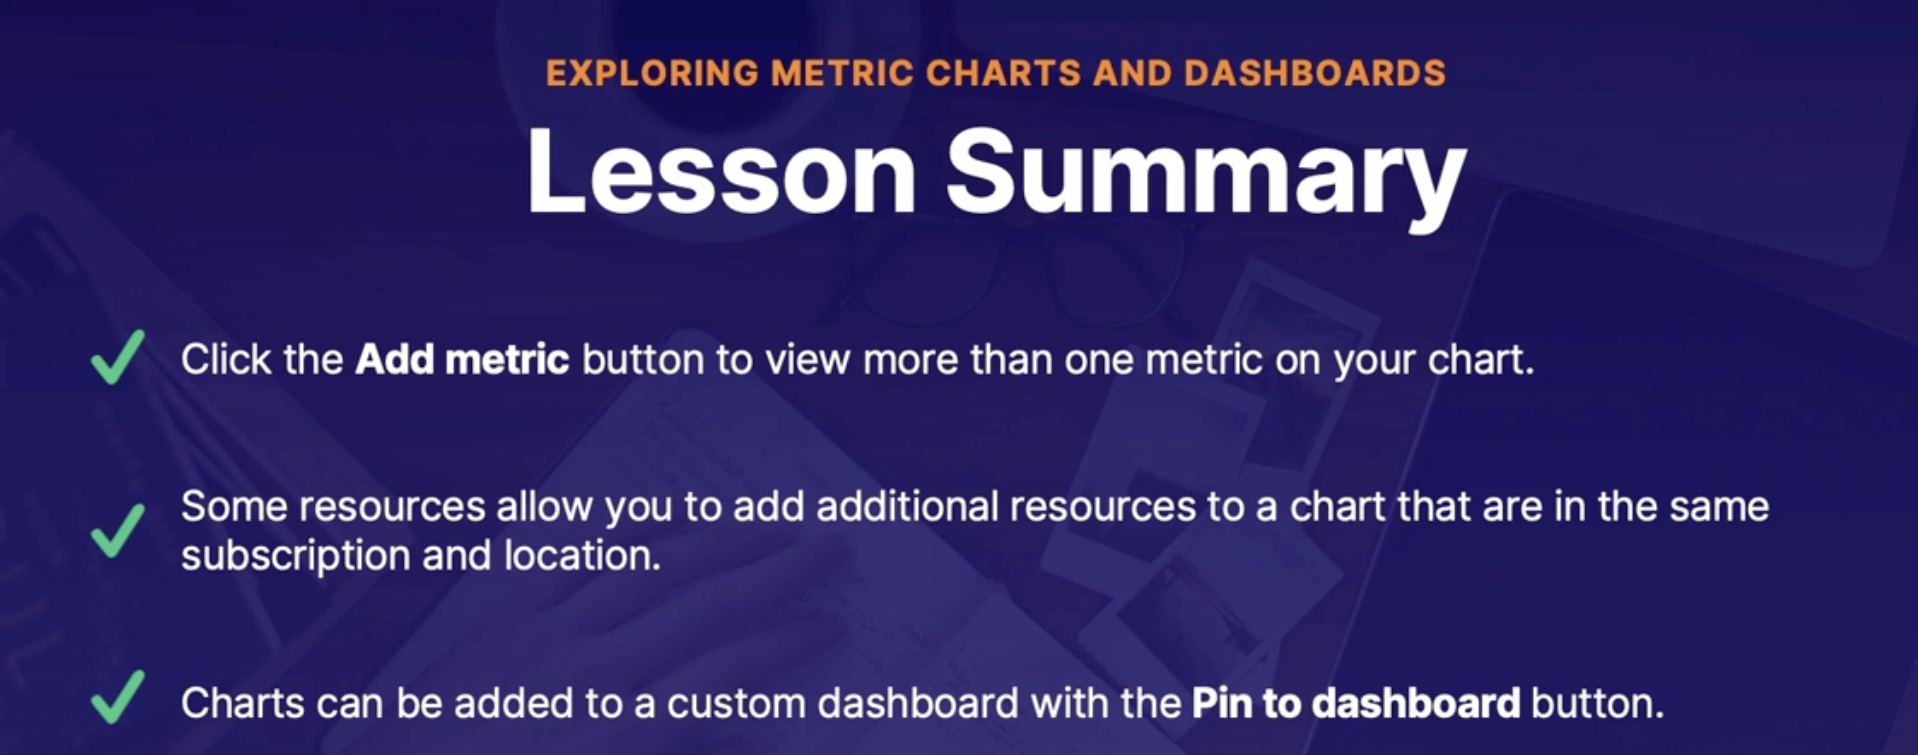
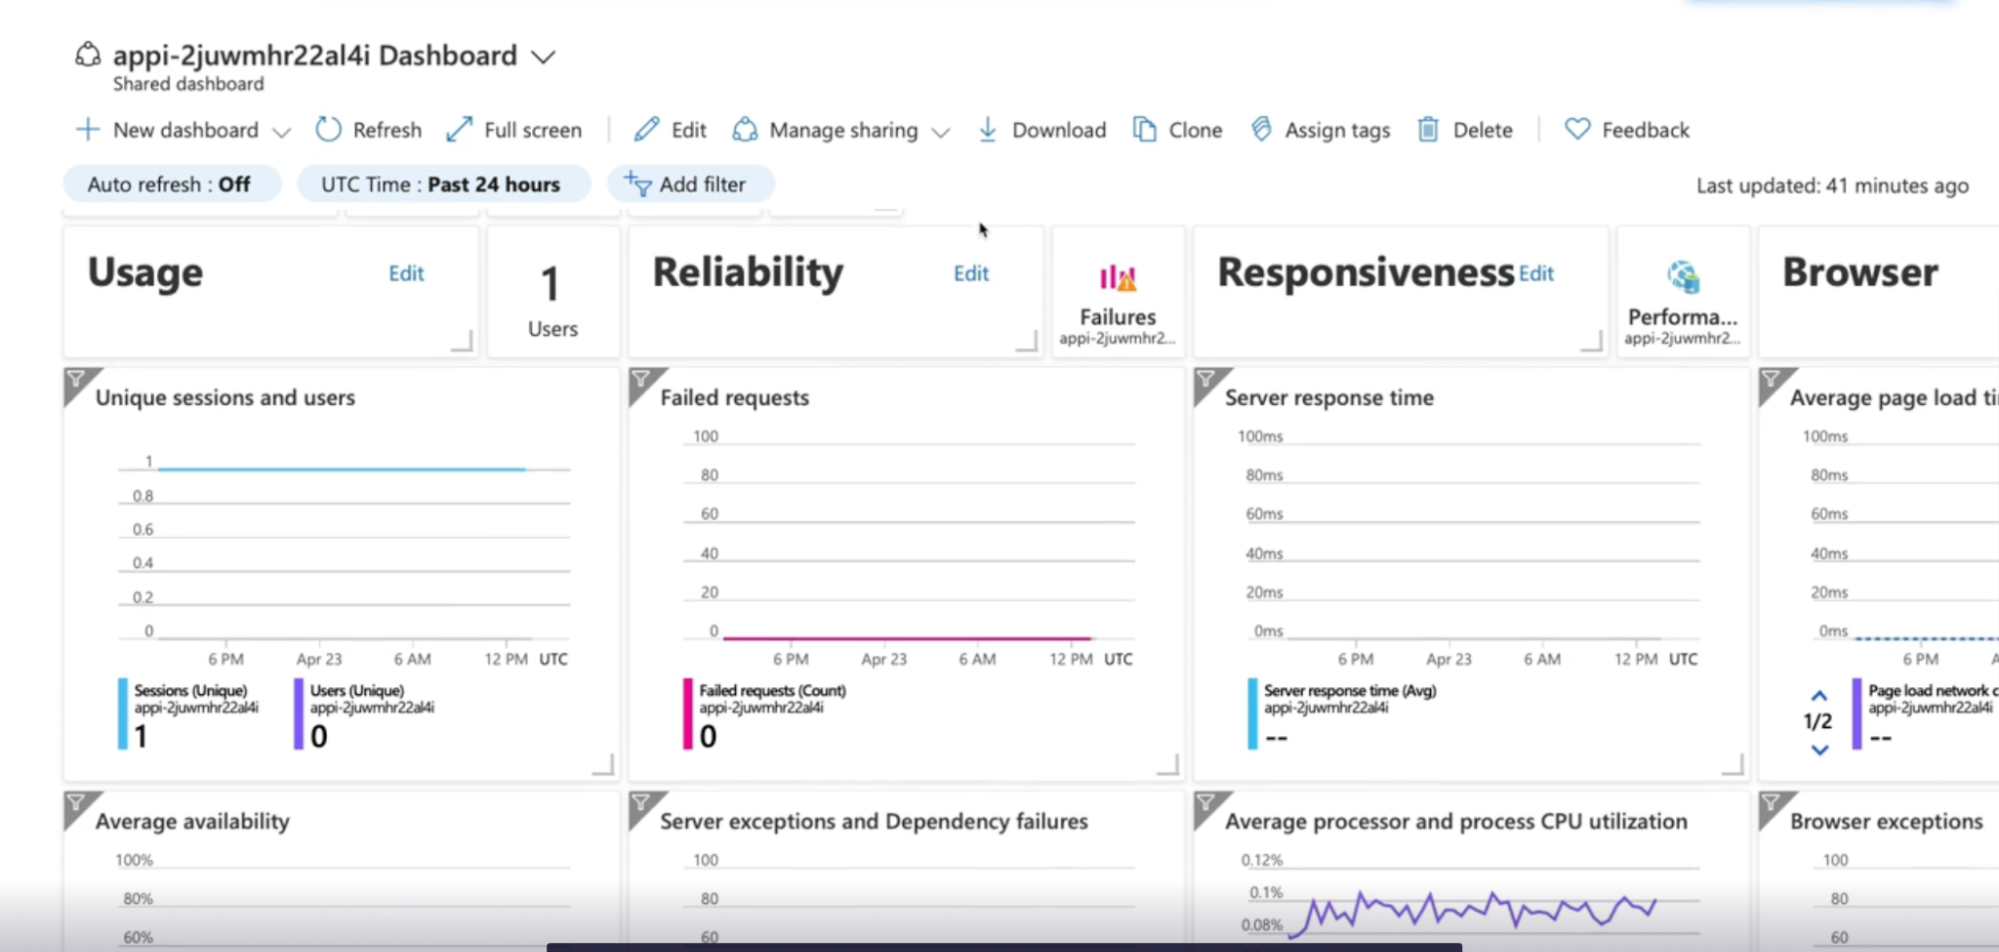
Create a chart to view metrics
Add additional metrics and resources
Add charts to dashboards
Summary
Implementing application Health checks
Scenario
A company using Azure monitors metrics for infrastructure health
Problem is this does not necessarily show the health of their actual applications.
So far, we've been doing manual checks to ensure the application is up.
Need: We are looking for a more automated process
Solution: Application Insights
What is Application Insight
Comes under Azure monitor service
Application Insights is a robust solution in and of itself
What
- It's designed to help you understand the health of your application.
- It tells you how the applications are doing, and how they are being used.
Features
It will give you information about
- Performance, user engagement, and retention
- will track things like request and failure rates, response times, page information like page views, or what pages are visited most often and when
- user information, such as where the users are connecting from, and how many users there are.
- will give you data on application exceptions where you can drill into the stack traces and exceptions in context with related requests.
- show you application dependency map
Availability
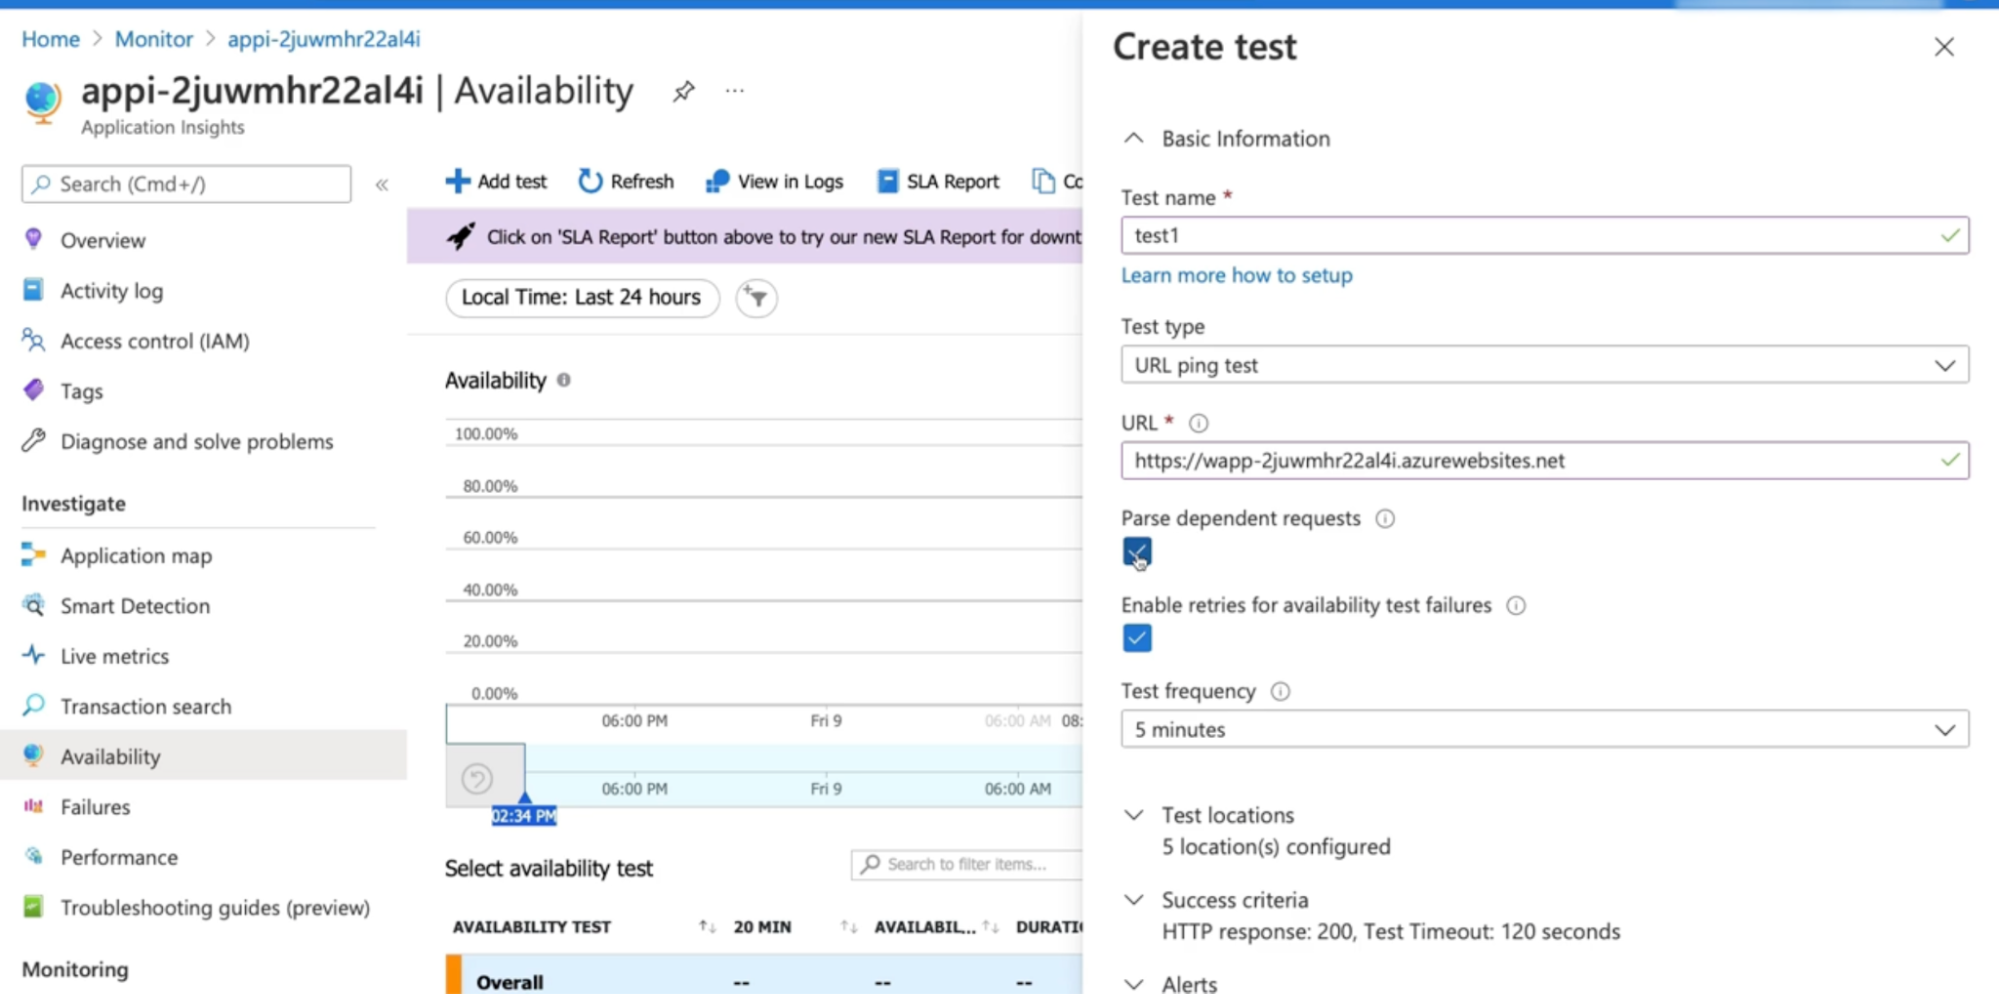
With Application Insights, you can configure a URL ping test, and this will send an HTTP request to a specific URL(your website URL) to see if there's a response.
- let you know how long it takes to make the request and the success rate.
- The ability to add dependent requests, which will test the availability of various files on a webpage, like images, or scripts, or style files.
- Enable retries recommended
- Test frequency: set how often you want the test to run and choose where you want to request to come from. // run test every 5 mins
- can select a minimum of 5 locations and a maximum of 16 locations to run the test from. // these are the location from where your website availability are checked to ensure your website is available across whole locations
- ability to set alerts on any failures.
Demo
Configure URL ping test
Configure health alert
Summary
- App insight gives information on your applications, such as how it's doing and how they are being used.
- provides availability tests, such as a URL ping test, which sends an HTTP request to a URL that you specify, and lets you know if there's a successful response.
- URL ping test can be found in the Availability section in app insight
- can add dependent requests to test the availability of certain files on a webpage, as opposed to just testing the entire webpage itself.
- Microsoft recommends enabling retries because many times, a site will come back up, and it's just a blip.
- can configure alerts based on those tests.
Discovering service and resource health alerts
Azure status
https://status.azure.com/en-ca/status
public-facing website that displays
- the health of all the services in Azure in all the different regions.
- if any outages or issues are going on.
- View a history of all the previous incidents.
Things that are out of your control but can affect your resources in Azure.
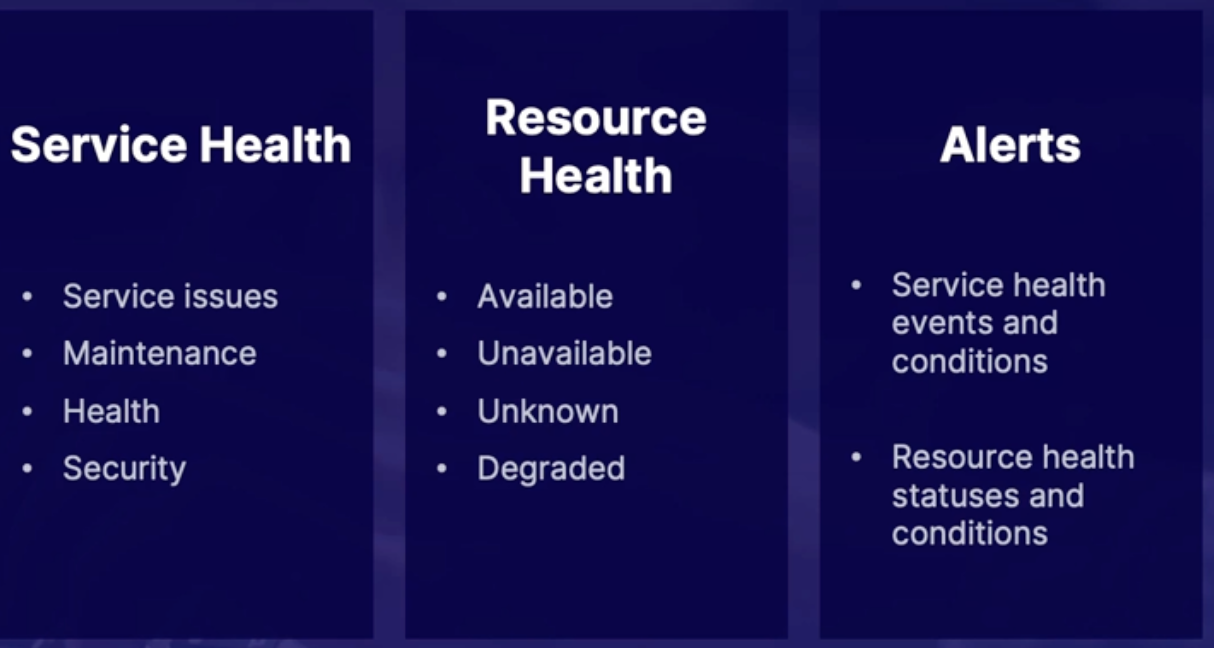
Service health
- Service health is under the Azure Monitor umbrella
- Use it for a more personalized experience
- only shows you information that affects you // from Azure side
- service issues: provide different types of messages such as service issues, which tells you information about any problems with services and regions that you have resources in.
- Planned maintenance: Any work that Azure will be doing that may affect the availability of your resources.
- Example: like implementing fault and update domains from Azure
- Health advisories: are if there are any changes to Azure services that you're using.
- Example: if there are any features that are not going to be available anymore or if any changes in the Azure service require you to update a framework or something like that.
- security advisories: provide notifications on things like platform vulnerabilities or security and privacy breaches at the Azure service level.
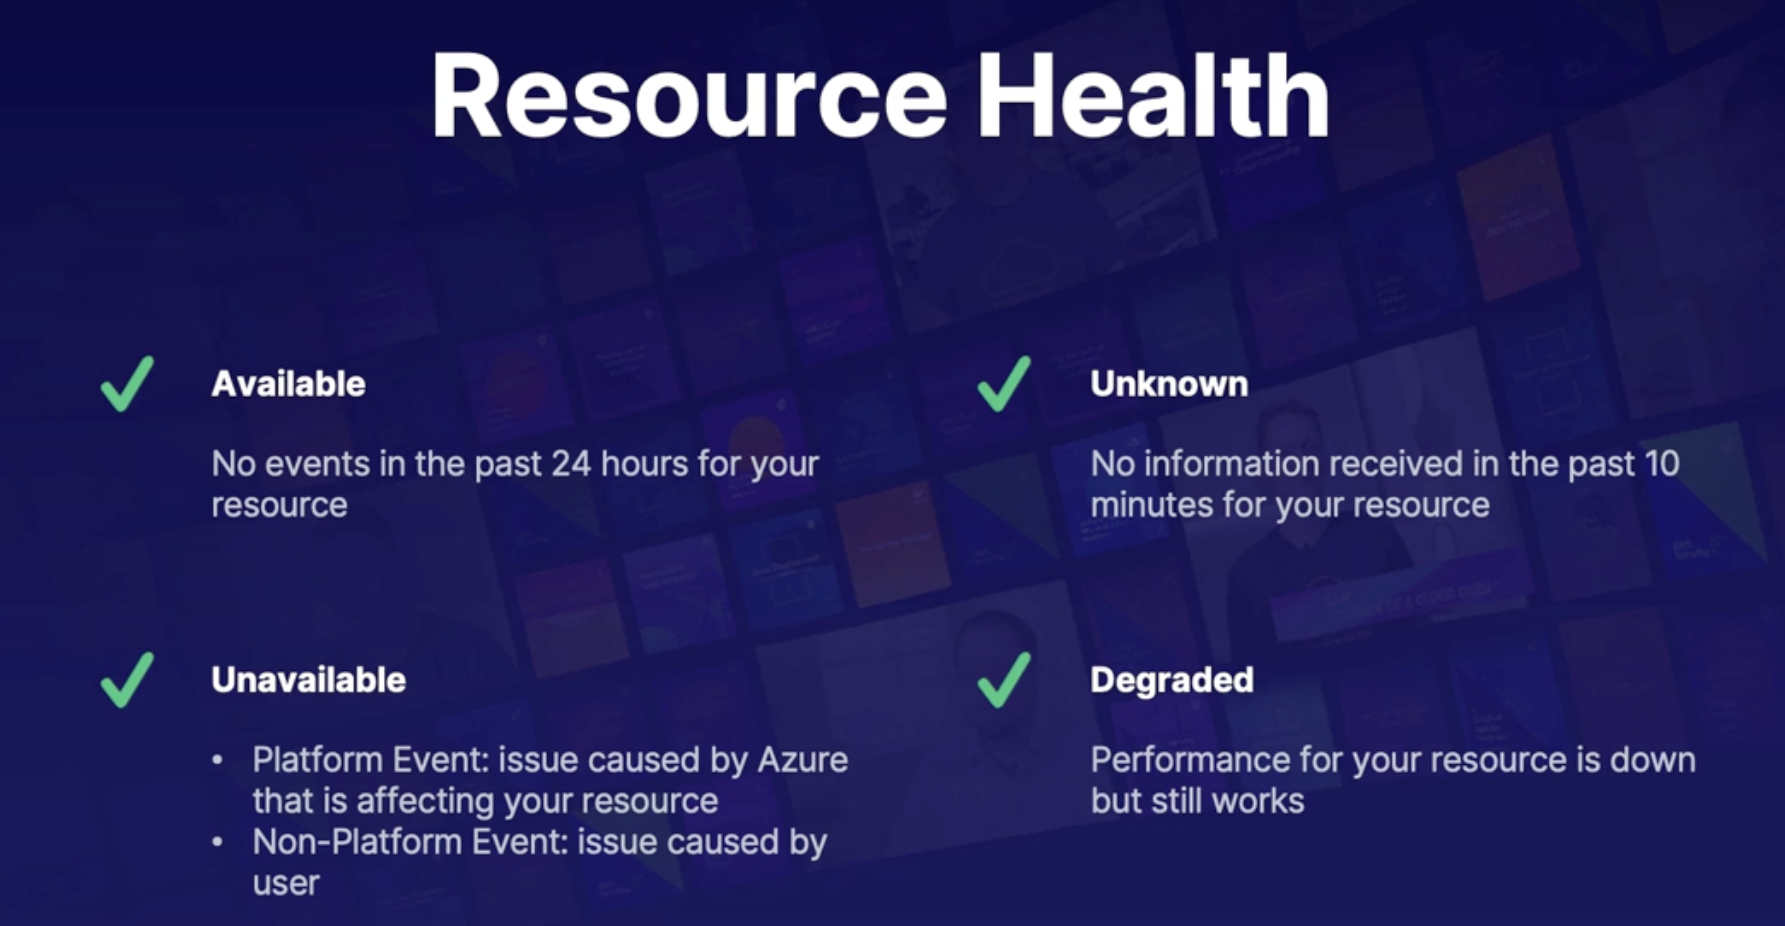
Resource health
What: shows you health information about your individual resources.
How: by using signals from other Azure services to perform certain checks.
Demo
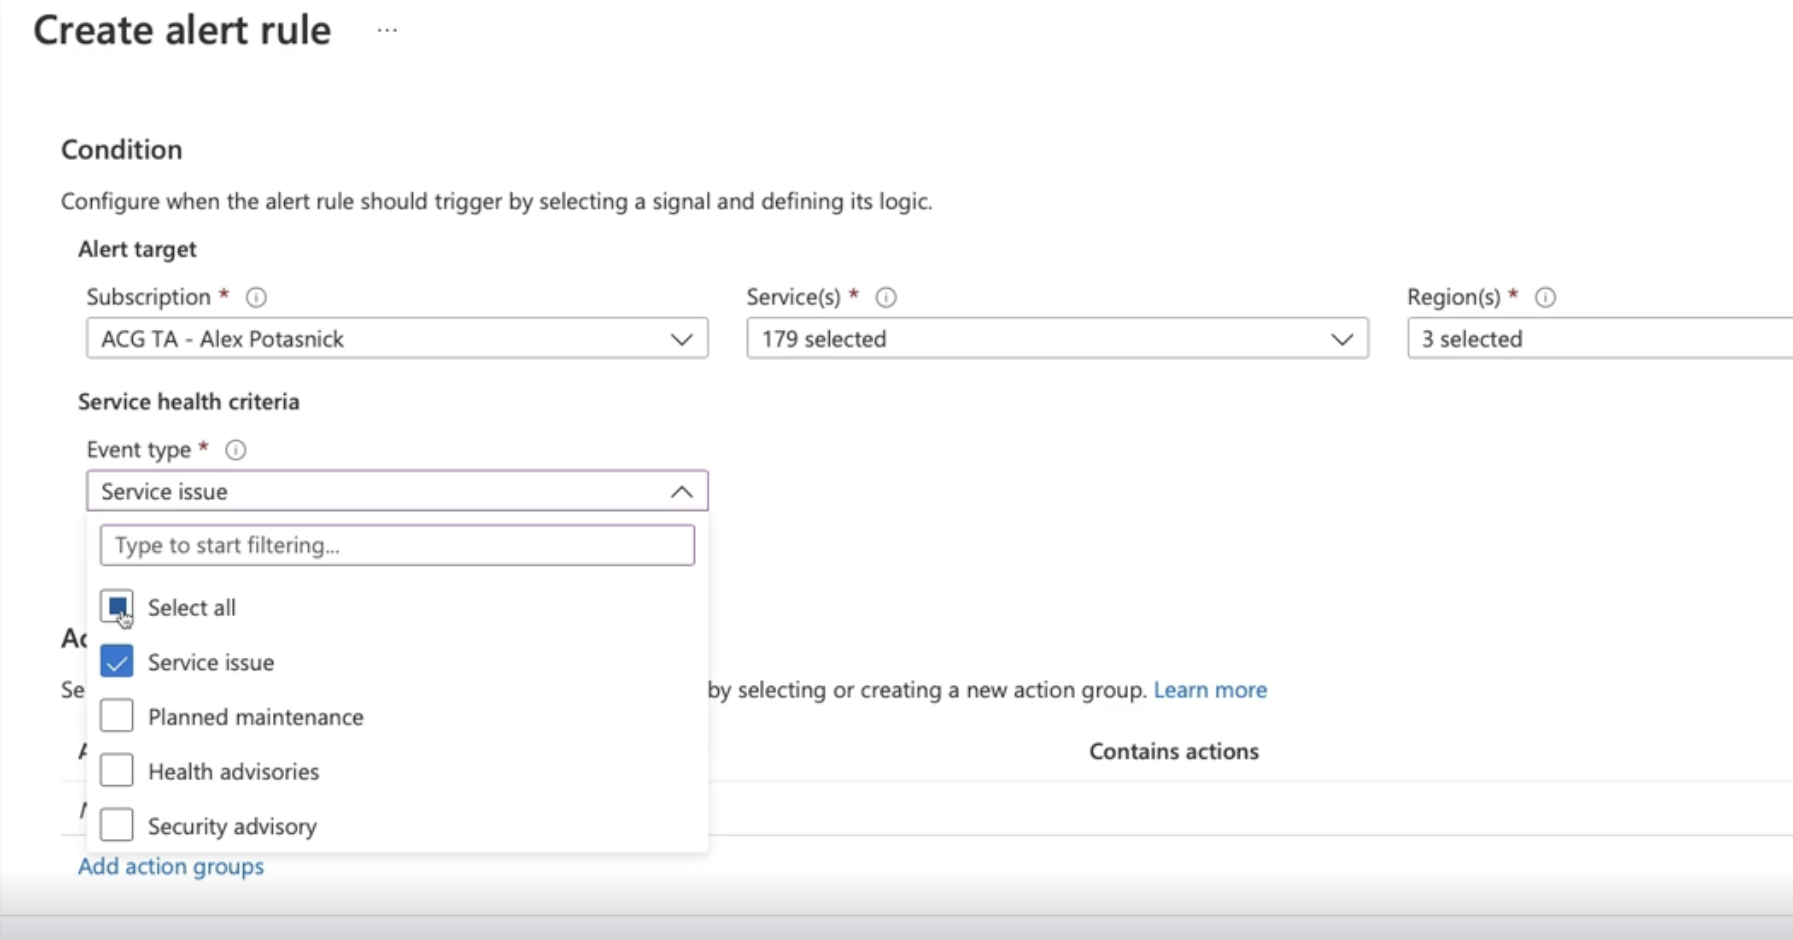
Azure status page - https://status.azure.com/en-ca/status
View service health pages and create alerts
Monitor → resource health → add service health alert
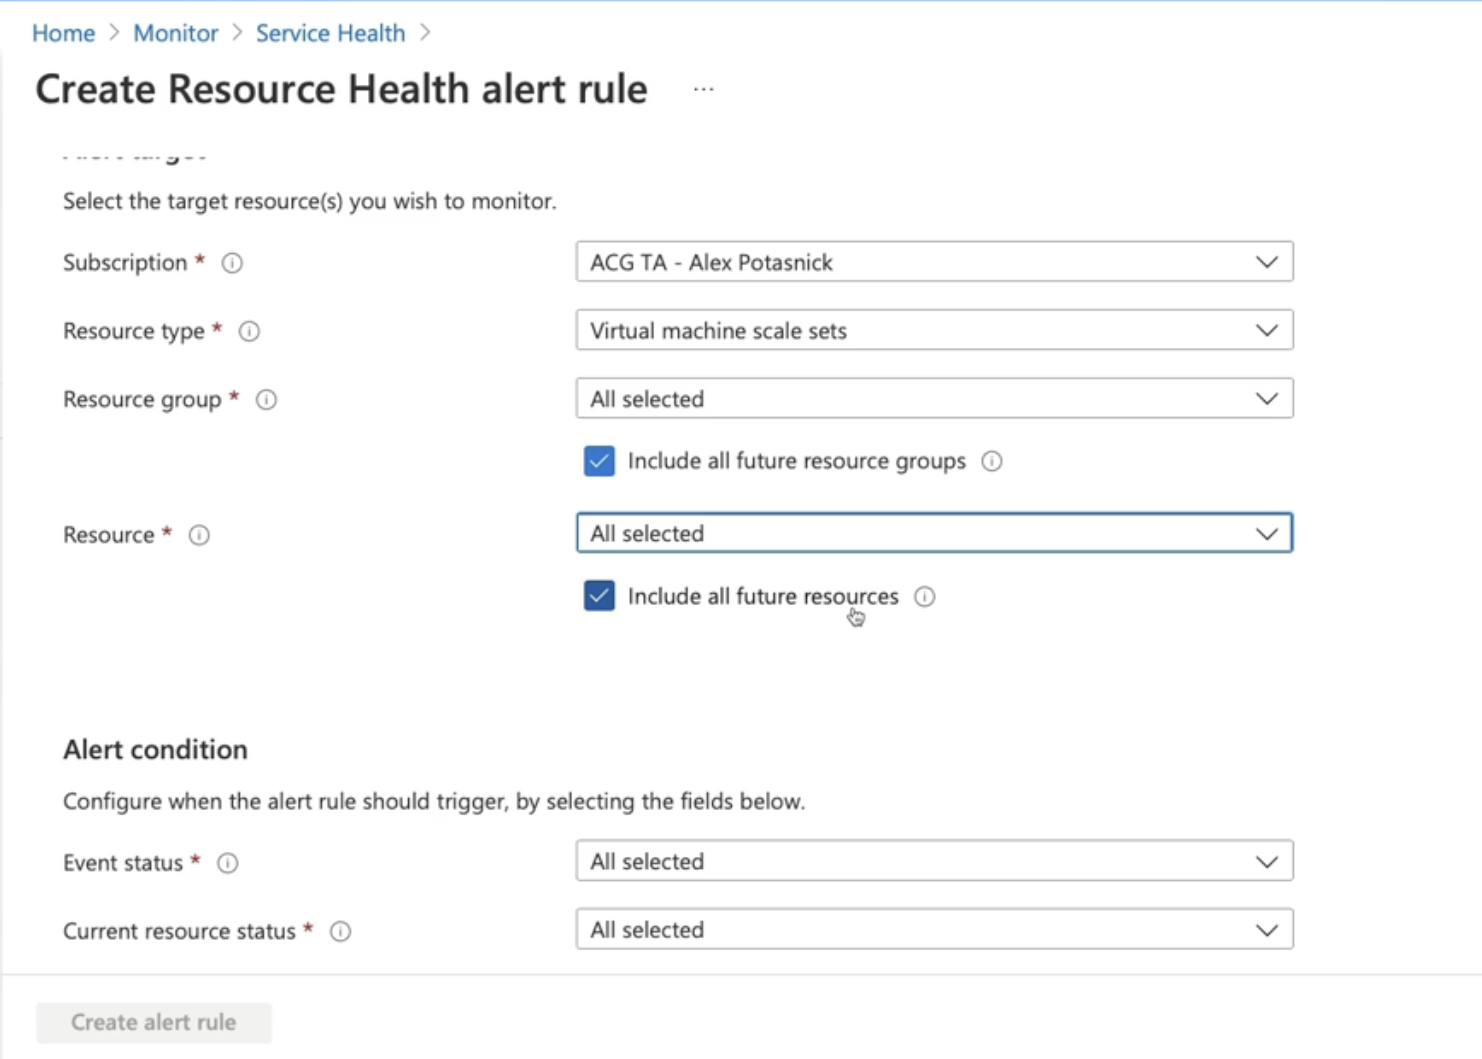
View resource health and create alerts
- Can filter resource group, resource, future resources
- Active resources
Monitor → resource health → add resource health alert
Summary
- Azure status page provides data for all services and regions
- Service health page provides data for the services and region you are using
- Service health alerts can be configured to notify an action group based on configurable events and conditions
- Resource health provides data for individual resources
- you can create alerts on specified resources based on certain resource health statuses and conditions
Self-healing alerts
Scenario
What
- they have created alerts on availability, service, and resource health
- Currently only notified when things go wrong
Need
- They wanted to know when the environment changes // want notifications
- Ex: wants to notify when scaling up and down
Vertical vs horizontal scaling
Vertical scaling | Horizontal scaling |
Change the size of the VM | Change the number of VM |
Still have 1 VM | Can have multiple VM sharing the load equally |
App Service vs. VMSS(Vitual machine scale set)
Horizontal scaling on PaaS(App Service) & IaaS(VMSS)
App service - PaaS | VMSS - IaaS |
No access to underlying machine → you just manage the code → worry about code not hardware | Full access to VM |
Higher flaxibity and less management // worry about code not hardware
| lower flaxibity and higher management // ability to manage VM and have access to environment variables, registry, file system, local policies |
Built in load balancing | Require separate load balancer |
Auto scaling - scale up | Auto scaling - scale out |
Autoscaling process
How:
- decide on the data input
- Option 1: Autoscaling could be configured based on a specific time, like if you know that at certain times you'll need more computing power. // sale time
- Option 2: configure autoscaling based on certain metrics.
- create rules like, if the CPU percentage is over 70% , to trigger an action,
- and that action would either increase or decrease the number of instances.
- Other actions can be triggered, such as sending notifications or sending a webhook that could be used for automation activities like a runbook, a function, or a logic app.
- Summary: a rule could be created to trigger a scaling action when certain metrics or time is reached.
Demo
Configure autoscale notifications for App service and VMSS
Auto scaling on app service
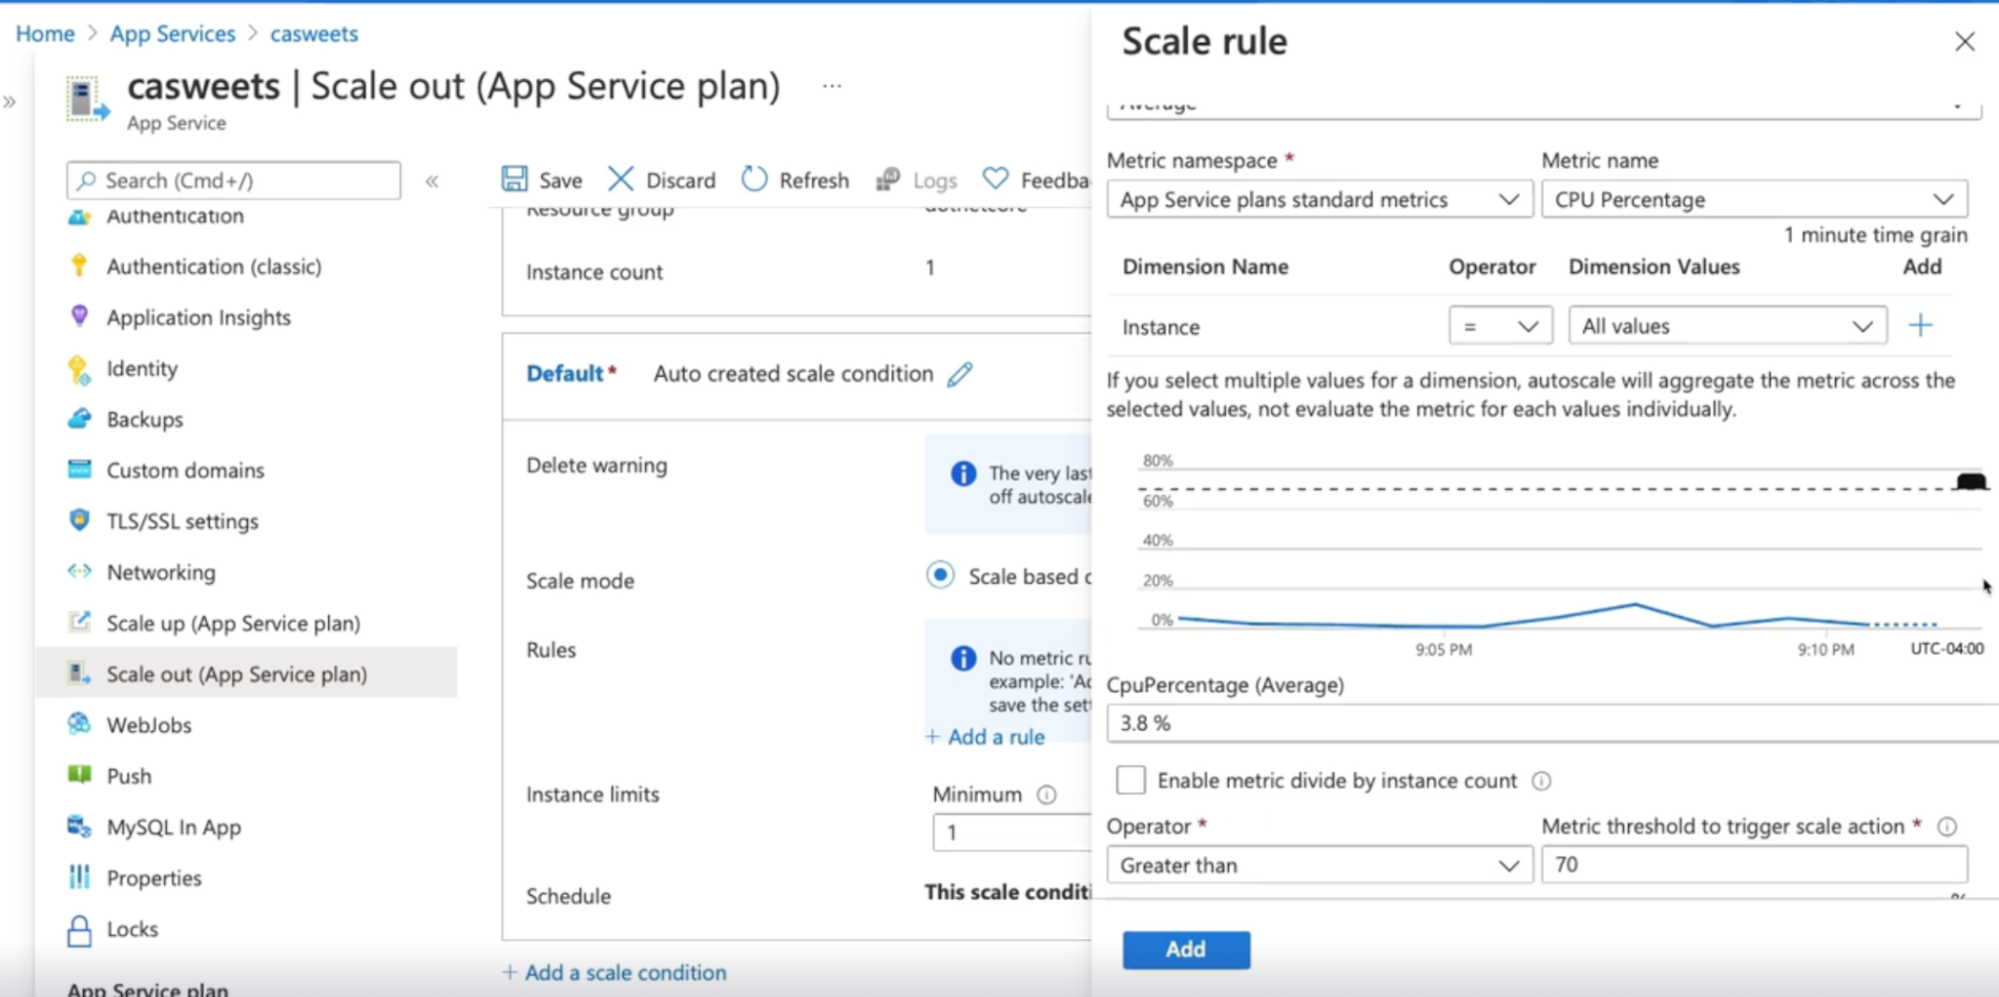
Auto scaling on VMSS
- Click on Virtual machine scale set
- Click on scaling under setting
- Click on custom auto-scale
- Choose scale based o metrics
- Configure rest steps
Summary
- Vertical scaling is changing the size, and horizontal is changing the number of VM
- Autoscaling can be configured by matrix or scheduled to a specific time
- autoscaling settings can be found in scale out section of a web app
- autoscaling settings can be found in the scaling section of a VMSS
- Notification can be set in the notify tab once autoscaling is configured
Chap - 2: Designing Failure Prediction Strategy
Introduction
What: analyzing a system with regards to load and failure conditions.
Exploring System load and failure conditions
Everything fail sometimes
What: everything fails whether it is hardware or software it will eventually fail at some point.
Need: goal is to be prepared for any eventuality before being notified by the end-user
Solution: collecting logs and metrics is so important so that we can analyze them and notice patterns to identify even if a failure is likely to happen.
What is failure mode analysis?
What: identify and prevent as many failures as possible
- Fault points: happens as part of the design phase when you try to determine any single point of failure
- fault points: any place in the architecture that can fail
- fault modes: all the ways a fault points can fail
- Rate risk and severity: by asking how likely it will fail and what is the impact
- would there be any data loss and if so can we afford that data loss or will there be any financial or business loss
- Determined response: how the application will respond in recover from a failure
How to plan for failure
Important questions to ask when making your analysis
- Understand the application
- what is application, what it does, how it does?
- what are the components and resources that are being used?
- are there any SLA for those component resources or are there SLAs for certain pricing tiers like standard or premium resource or performance limit in Azure
- determine if the system is critical or not critical
- If yes, the system should be running all the time, if no you could afford downtime
- know what are the components are connected to it and dependencies
- If the dependencies fails then it might cause the connected components to fire
- How are the users connecting to the system (if users are in AD then and an AD outage will cause a failure)
- external dependencies like third-party services
How can we reduce failure?
- Faulty domains: implement for domains where applicable
- make sure that your resources are hosted on a separate rack within the data center
- Zones: use zone-redundant storage, data, and availability zones where applicable
- Cross region: use geo-redundant storage and have a read access data replica and site recovery plan in another region(when the entire region is down)
- Scaling: use auto-scaling
Performance Testing
What: important way to understand our application are capable of, so that we can plan to prevent any situation that cannot handle
Types
- Load testing: test application can handle normal to heavy load
- You would know what the normal load is by gathering metrics and telemetry to understand what the normal numbers are
- Stress testing: attempt to overload the system to see the actual upper limits are
- Spikes: a best practice is to include a buffer to account for random spikes
Summary
- failure mode analysis is a part of the design phase to identify any possible failures that may occur
- to plan for failure, understand the whole environment, and uptime expectations(Front and back and dependencies everything)
- When it comes to performance testing, load testing makes sure the application can handle a normal too heavy load
- stress testing is used to find the upper limits of what the application can handle
Understanding failure prediction
You cannot prepare for everything
- Some failures can only be protected by analyzing trends from the historical usage Data and metrics after an application has been deployed
- Sometime something needs to be filled before we can learn from it
- Post Mortem sessions are for learning not blaming
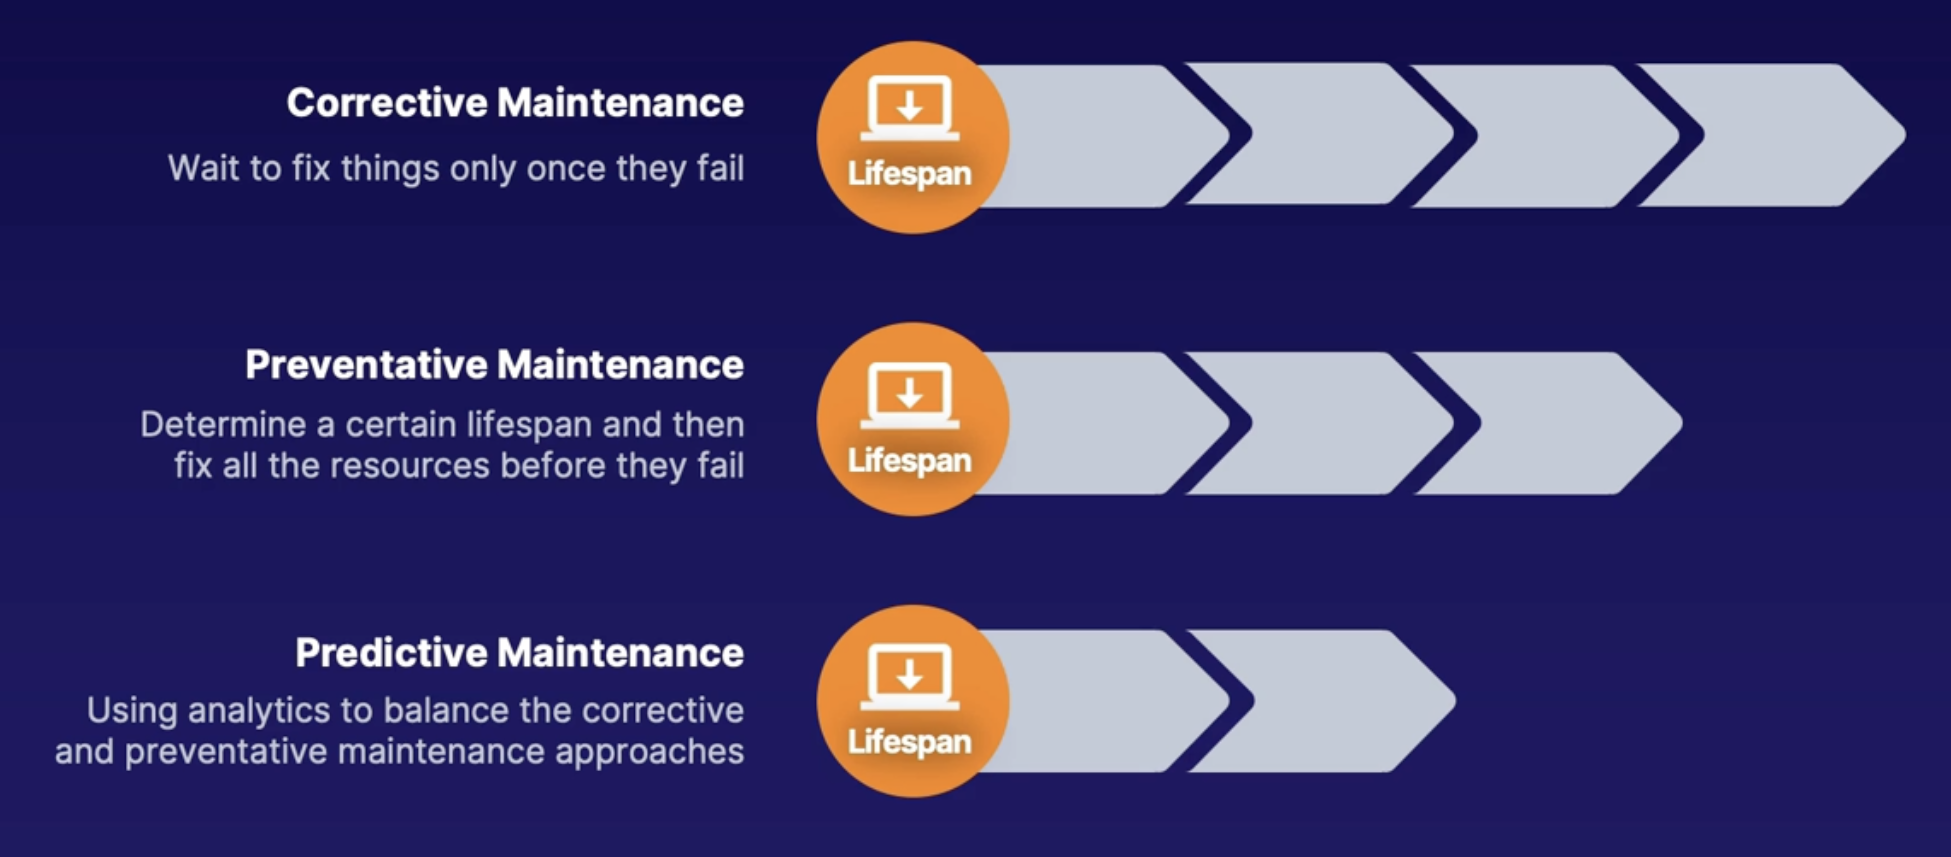
What is predictive maintenance PdM
Different approaches you can take when it comes to maintenance.
- Wait to fix things once they fail
- Example: Let's say we have a few VM with various lifespans. This approach will wait until each and every virtual machine will fail and only then fix the issue.
- this approach allows you to maximize the use of your resources up until they fail.
- The downside to this approach is that this will cause downtime and unscheduled maintenance.
- And this can be hard for the team that's doing the maintenance because it might mean that they have to schedule off-hours work or on the weekends.
- you try to come up with how long it will take before the resource fails, and then try to fix or replace all those resources at the same time before they fail.
- Or alternatively, once 1 resource fails, go ahead and fix or replace all the others, because once 1 resource fails, that's the new lifespan.
- So for example, even if one resource has a shorter lifespan, we now set that lifespan for all the other virtual machines. And then we go ahead and fix all the other virtual machines at that point so that we know that we're fixing it before it will actually fail.
- helps solve the problem with unscheduled maintenance and can prevent many things from failing at once.
- you won't be getting the full usefulness of the resource because you're fixing or replacing it before it fails.
- hybrid approach between corrective and preventive maintenance
- using analytics like matrix elementary and alerts to understand when a failure occurs
- this helps utilize the resources in the most optimal way by fixing or replacing each resource just before they are going to fail
- important on mission-critical systems expectation is running the system all the time with no downtime
- this approach also encourages capturing KPI’s(key performance indicators) which determine the health of the components of the system
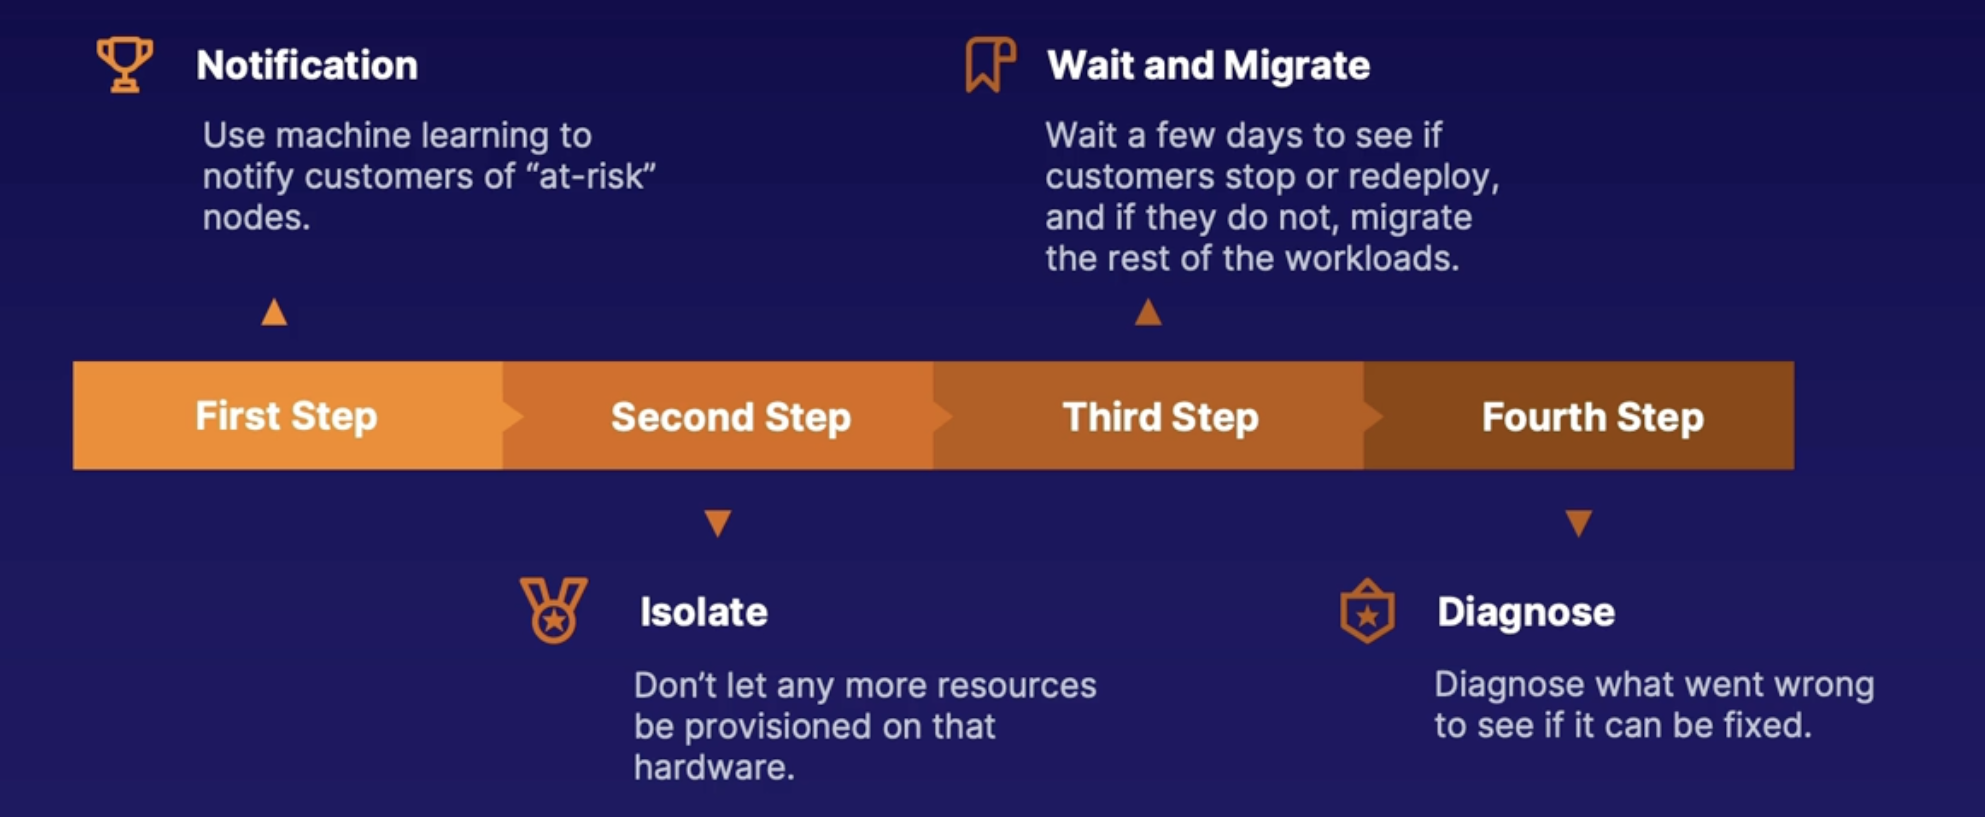
How Microsoft used to do PdM
Approach to predict and mitigate host failures
Previous approach
- Notification: use machine learning to notify customers of at-risk nodes
- Isolate: don’t let any more resources be provisioned on that hardware
- Wait and migrate: wait a few days to see if customers stop or redeploy, and if they do not migrate the rest of the workload
- Diagnose: what went wrong to see if it can be fixed
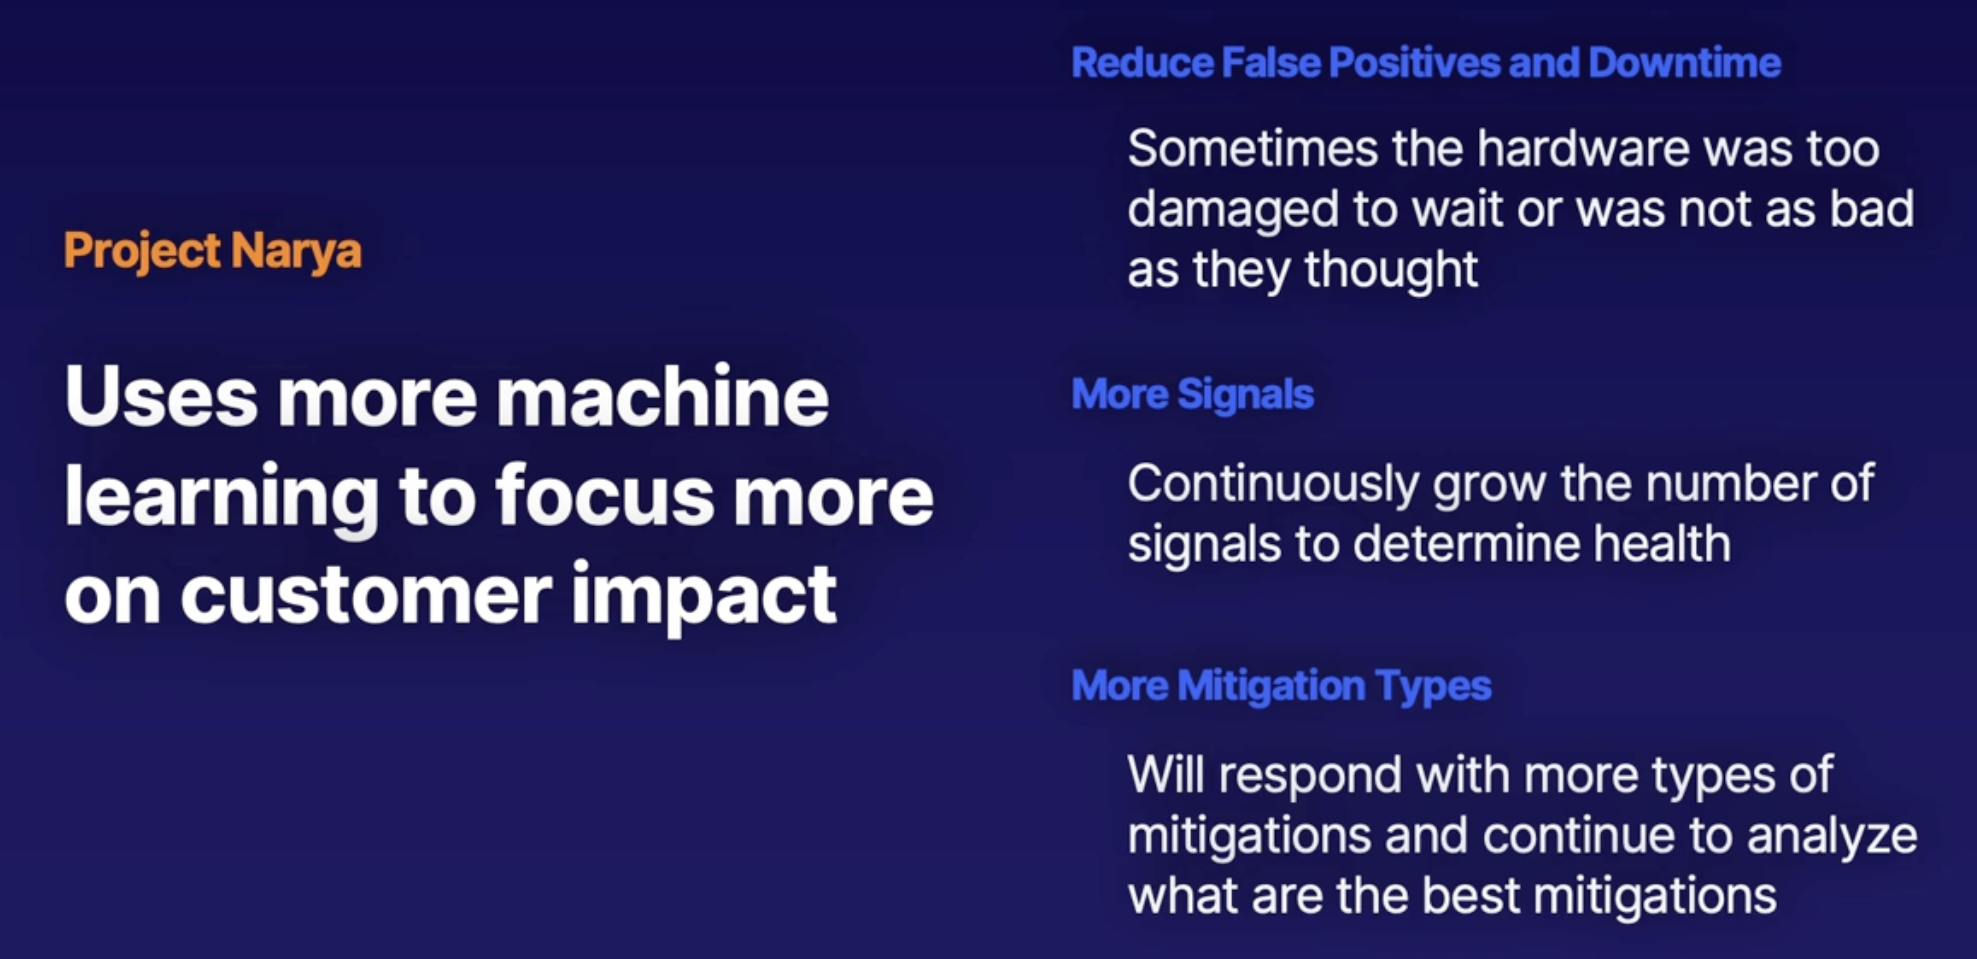
How does Microsoft do PdM now
New approach: Project Narya
uses more machine learning to focus more on customer impact
Reduce false positives and downtimes: sometimes the hardware was too damaged to wait or was not as bad as they thought
More signals: continuously grow the number of signals to determine health
More mitigation types: will respond with more types of mitigation and continue to analyze what are the best mitigations
Summary
- preventive maintenance establishes a productive lifespan and tries to fix things before they break
- predictive maintenance uses data and analytics to combine the corrective and preventive maintenance approaches
Understanding baseline metrics
Scenario
Performance testing is hard since each environment has a different load(dev, test, prod)
- Normal system behavior is different for each environment
Hence it’s difficult to do performance testing without proper baseline(what the normal load is?)
Why create baseline
Baseline
- tells us what are the normal conditions and expected behaviour
- Once it’s established you understand what a healthy state is, when there is a change in the state, create an alert
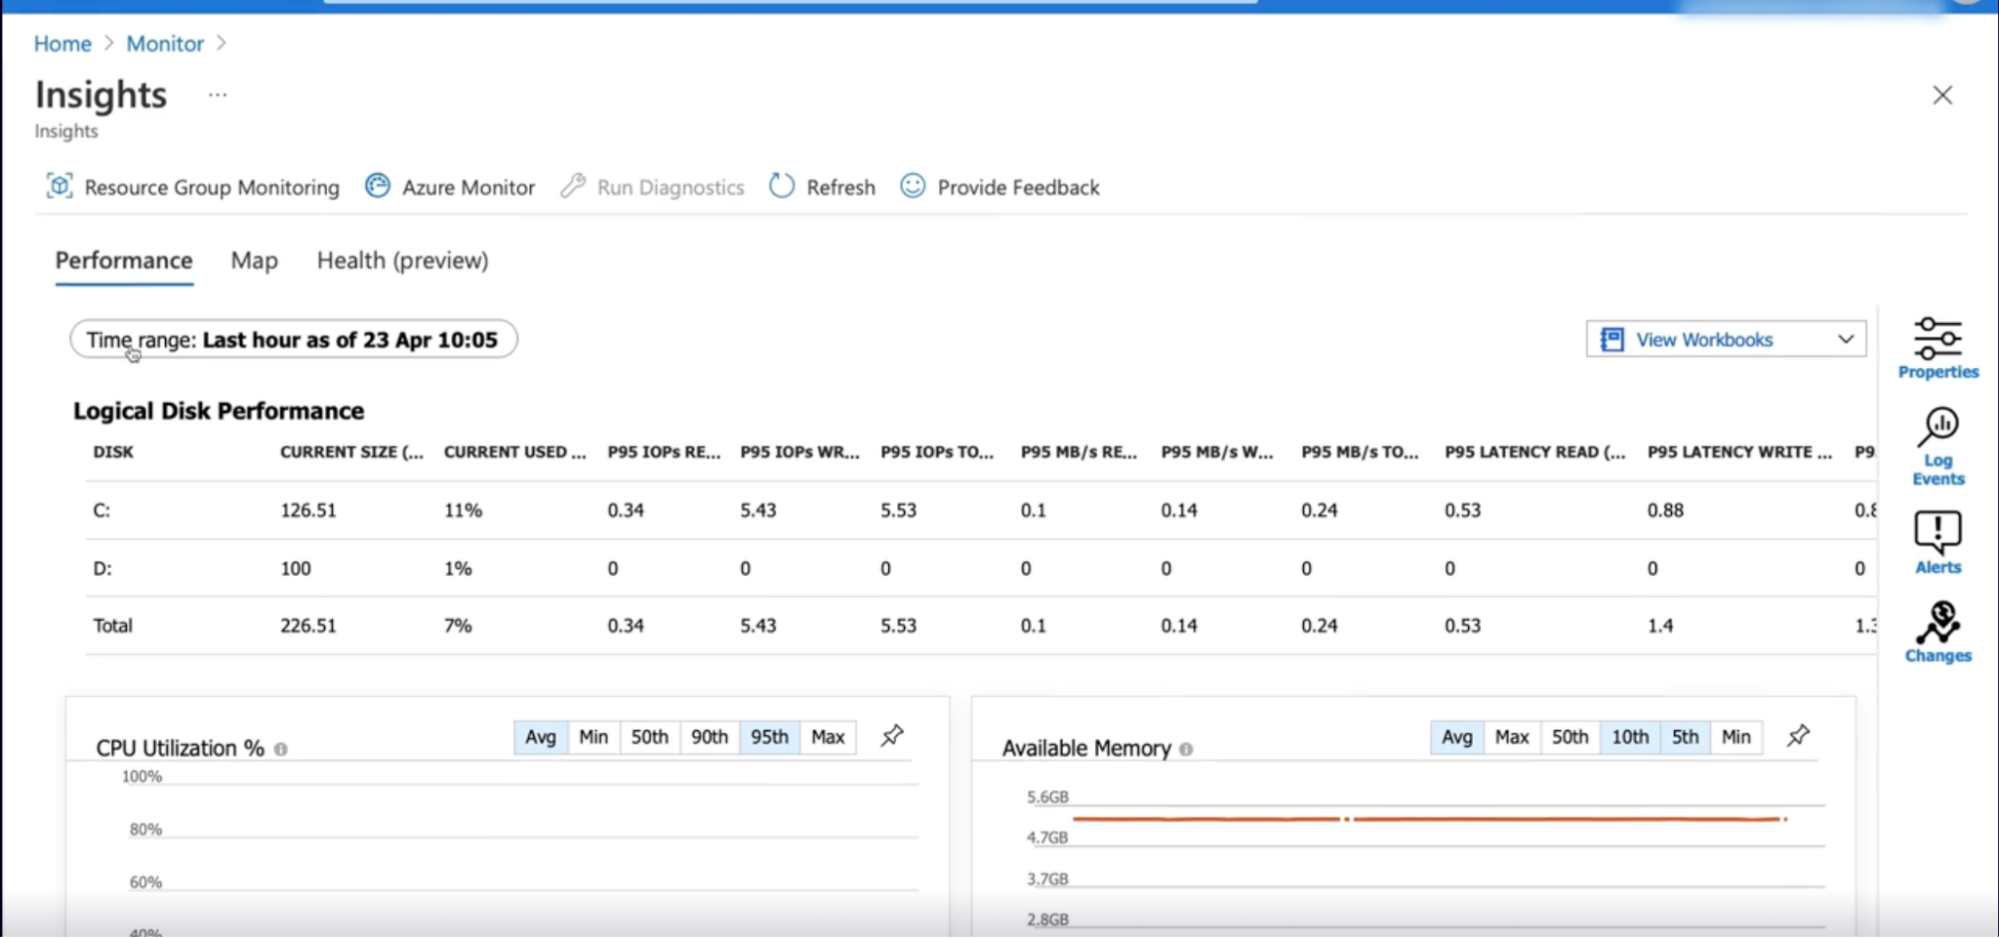
How to create baseline
Azure provided tools to create baseline metrics and workloads
- Log analytics and Metrics explorer: Create queries and charts to capture and analyze data
- Azure monitor insights: provides recommended metrics and dashboards for several services
- Click on monitor
- Navigate to middle section insights
- Insight for services includes VM, storage account, containers, network etc
- Click on one of that services and will give you a resource map
- Click on the performance tab: to see metrics and chart
- Disk performance
- CPU Utilization
- Available memory
- IOPS
To set the baseline
- Change the time range to a week or 2 weeks
- See the trend
- Set the baseline based on trend
- Application Insights: provides recommended metrics and dashboard for an application
- ex: Your function is taking too long // normally takes 20 ms to call database, not it’s taking 50 ms
Steps
- Click on app insight
- See all the charts pre-configured by Azure
- Click on Application dashboard to see preconfigured application dashboard
Demo
Explore Azure monitor insight
See the pictures above for each Azure services
Summary
- A baseline can help you identify when a system is not in a healthy state so that alerts and improvements can be implemented
- Setup baseline
- Create alert
- Azure monitor insights provide recommended charts and metrics for Azure resources
- Application Insights provides recommended charts and metrics for applications
Discovering Application Insight smart detection and dynamic threshold
Scenario
- now using baselines for their performance testing
- looking into using that health baseline to create alerts
- want alerts to be adaptable to future changes that might alter the baseline(because in future baseline will change, so they want to automatically adjust the alert to the new baseline as things evolve or will they have to review the baselines every quarter or something to decide if they are still relevant)
Dynamic threshold advantages
Advantage over static threshold alerts Machine learning:
- Machine learning: is applied to analyze historical data to understand when there are anomalies
- less manual work: don’t have to manually figure out what the threshold should be
- set it and forget: can be set to apply to any future resources and will continue to analyze data and adapt to changes
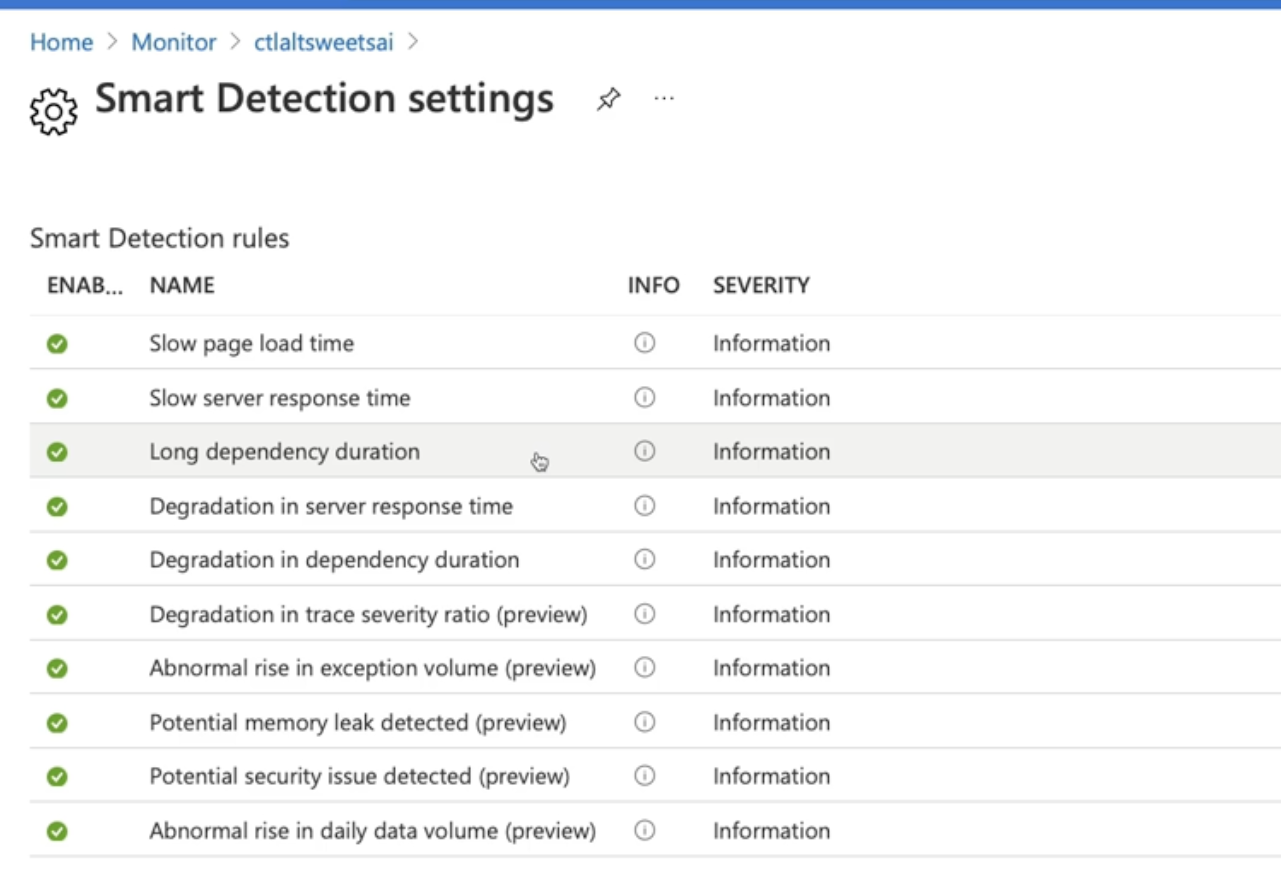
Application Insights smart detection
- Machine learning: analyze telemetry data to detect anomalies
- Built-in: once There is enough time in data to analyze it will be configured automatically
- Alerting: provides information based on findings as well as information as to why there might be an issue
Smart detection categories
- Failures
- failure rates: figure out what the expected number of failures should be
- continuous monitoring: alerts in near real-time
- alert context: provides information as to why it might have failed.
Needs:
- Minimum amount of data and 24 hours to start
- Performance
- page responses: if Beach takes too long to load or if operations or responses from dependencies are too slow
- daily analysis: sends a notification once a day
- alert context: provides information as to why it is running slow
Needs:
- The minimum amount of data and 8 days to start
Demo
Create an alert which dynamic thresholds
- With high threshold sensitivity, you’ll get more alerts (ex: max-14%, min-4% of VM CPU utilization) - because it’s likely that your CPU utilization will reach 14% more frequently than 17% - hence more alert
- With low threshold sensitivity, you’ll get less alert (ex: max-17%, min-2% of VM CPU utilization)
- Hight threshold takes the lowest
Create smart detection alerts
Steps:
- Navigate to your Application Insight instance
- Under investigate, click on smart detection
- Click on settings to see details
Summary
- Dynamic threshold apply machine learning to determine the proper appropriate metrics to be used as a threshold
- Smart detection applies machine learning towards application telemetry to notify you of anomalies
- Smart detection will continuously monitor failures and provide contextual information as to why it failed
- Smart detection will analyze performance once a day to let you know about slow response times
Summary
Chap - 3: Designing and Implementing Health Check
Deciding which dependencies to set alerts on
What is a dependency?
is one component that relies on another component to perform some function
each dependency exists because each component brings something unique. ex: HTTP calls, database calls, file system calls
Types of dependencies
- Internal: which are components that are within the application itself
- External: components that are not part of the application but our component that the application uses like third-party services. ex: when an application uses location service and utilizes the Google map API
- Dependencies in terms of setting up alerts - Strong vs weak
- Strong: strong dependency is a situation where when an application fails and the application doesn’t work at all
- Weak: it’s a situation where dependencies fail but the application still runs
Application Insights dependency tracking
- Track and monitor:
- helps identify strong dependencies by tracking and monitoring calls.
- this tells us if things are failing or not. Once we know if things are failing or not then we can observe how the application reacts to that dependencies
- if the application doesn’t work at all with those dependencies failing then this will be a case of a strong dependency
- Automatic tracking with .NET/.Net core: tracking is configured by default/automatically if using .NET/.Net core SDK for Application Insights
- Manual dependency tracking: configured using the TrackDependency API
- AJAX from webpages: application inside JavaScript SDK will collect AJAX call automatically
Which dependencies are tracked in Application Insights
Automatic | Manual |
HTTP and HTTPS calls | Cosmos db with TCP // configur using TrackDependency API |
WCF if using HTTP bindings | Radis |
SQL calls using SqlClient |
|
Azure storage with Azure storage clients |
|
EventHub client SDK |
|
ServiceBus client SDK |
|
Azure Cosmos DB with HTTP/ HTTPS |
|
Where can I find dependency data
Gives you application focused dependency information
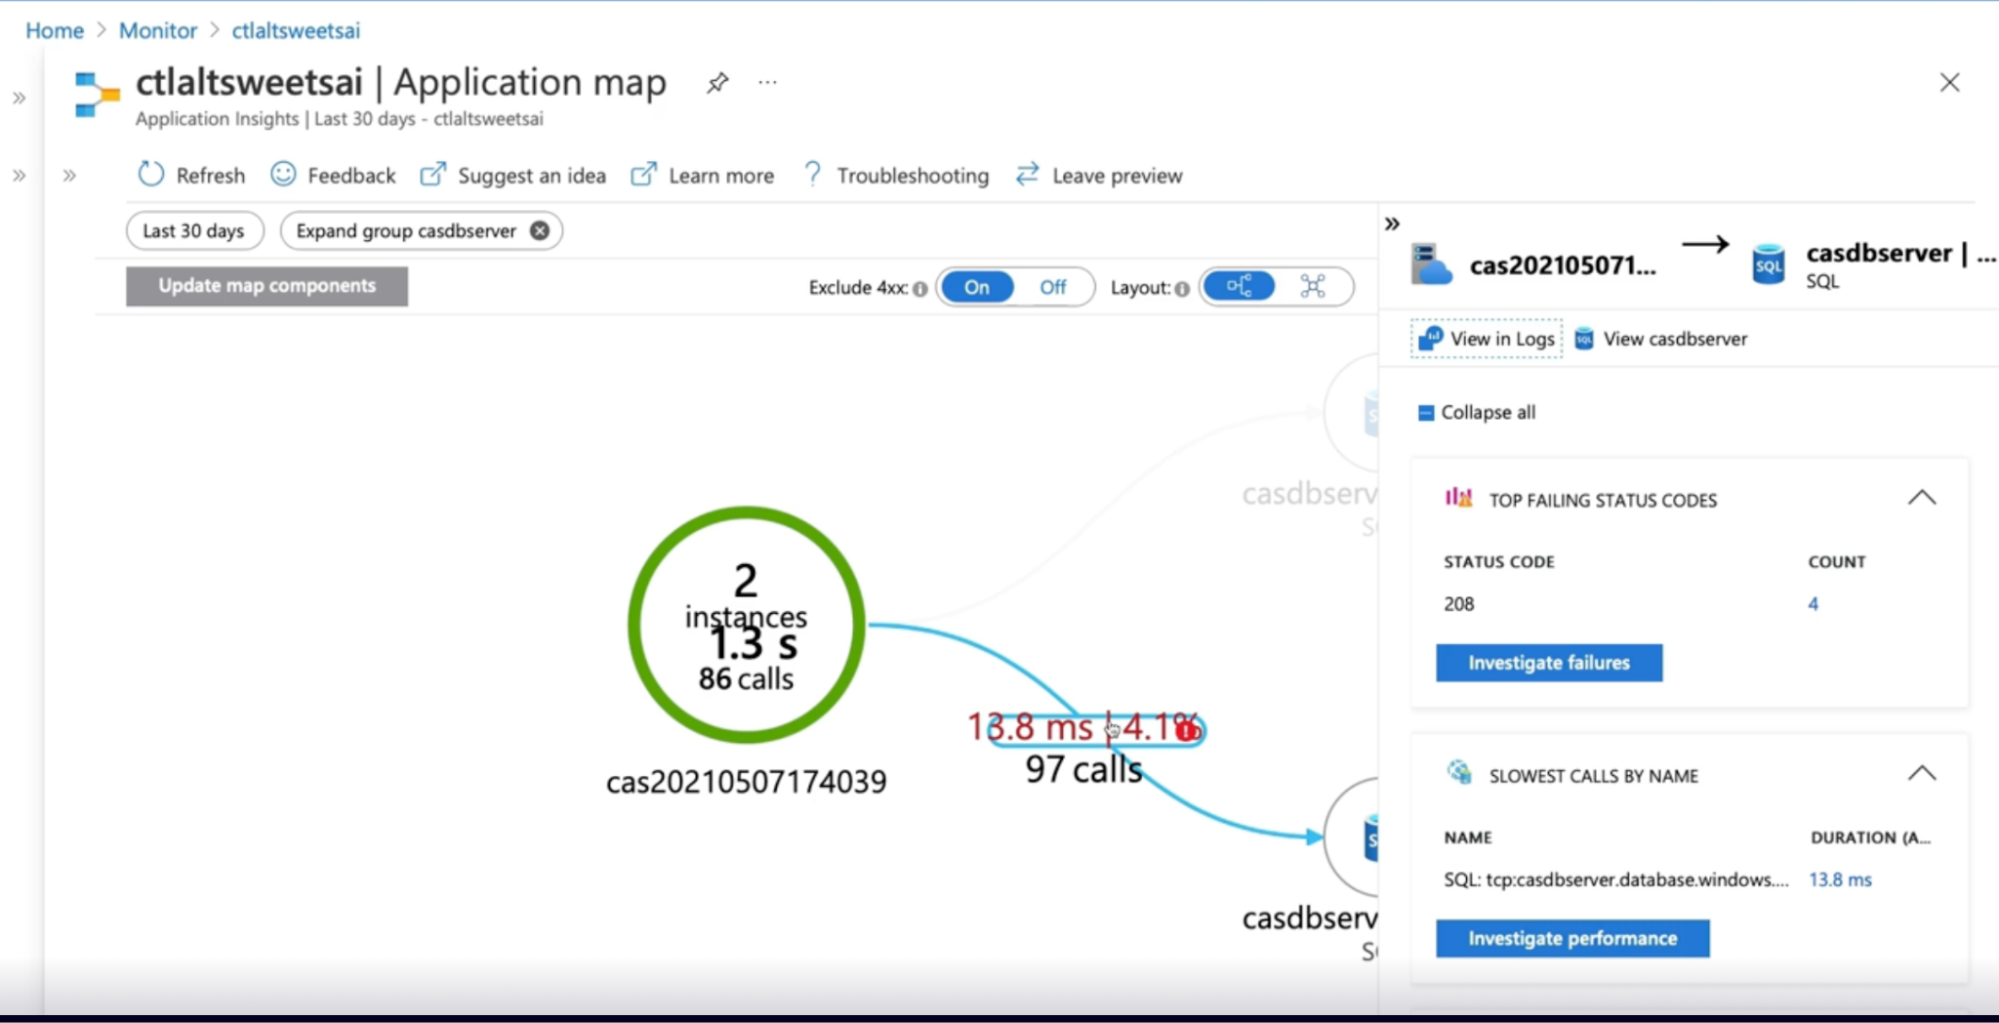
- Application Map(Application Insight): Provides handy visualization of all the components in your application
- Transaction diagnostics: which you can use to track the transactions as they pass through all the different systems
- Browsers: Browser information so you can see Ajax calls from the browsers and users
- Log analytics: used to create custom queries against dependency data
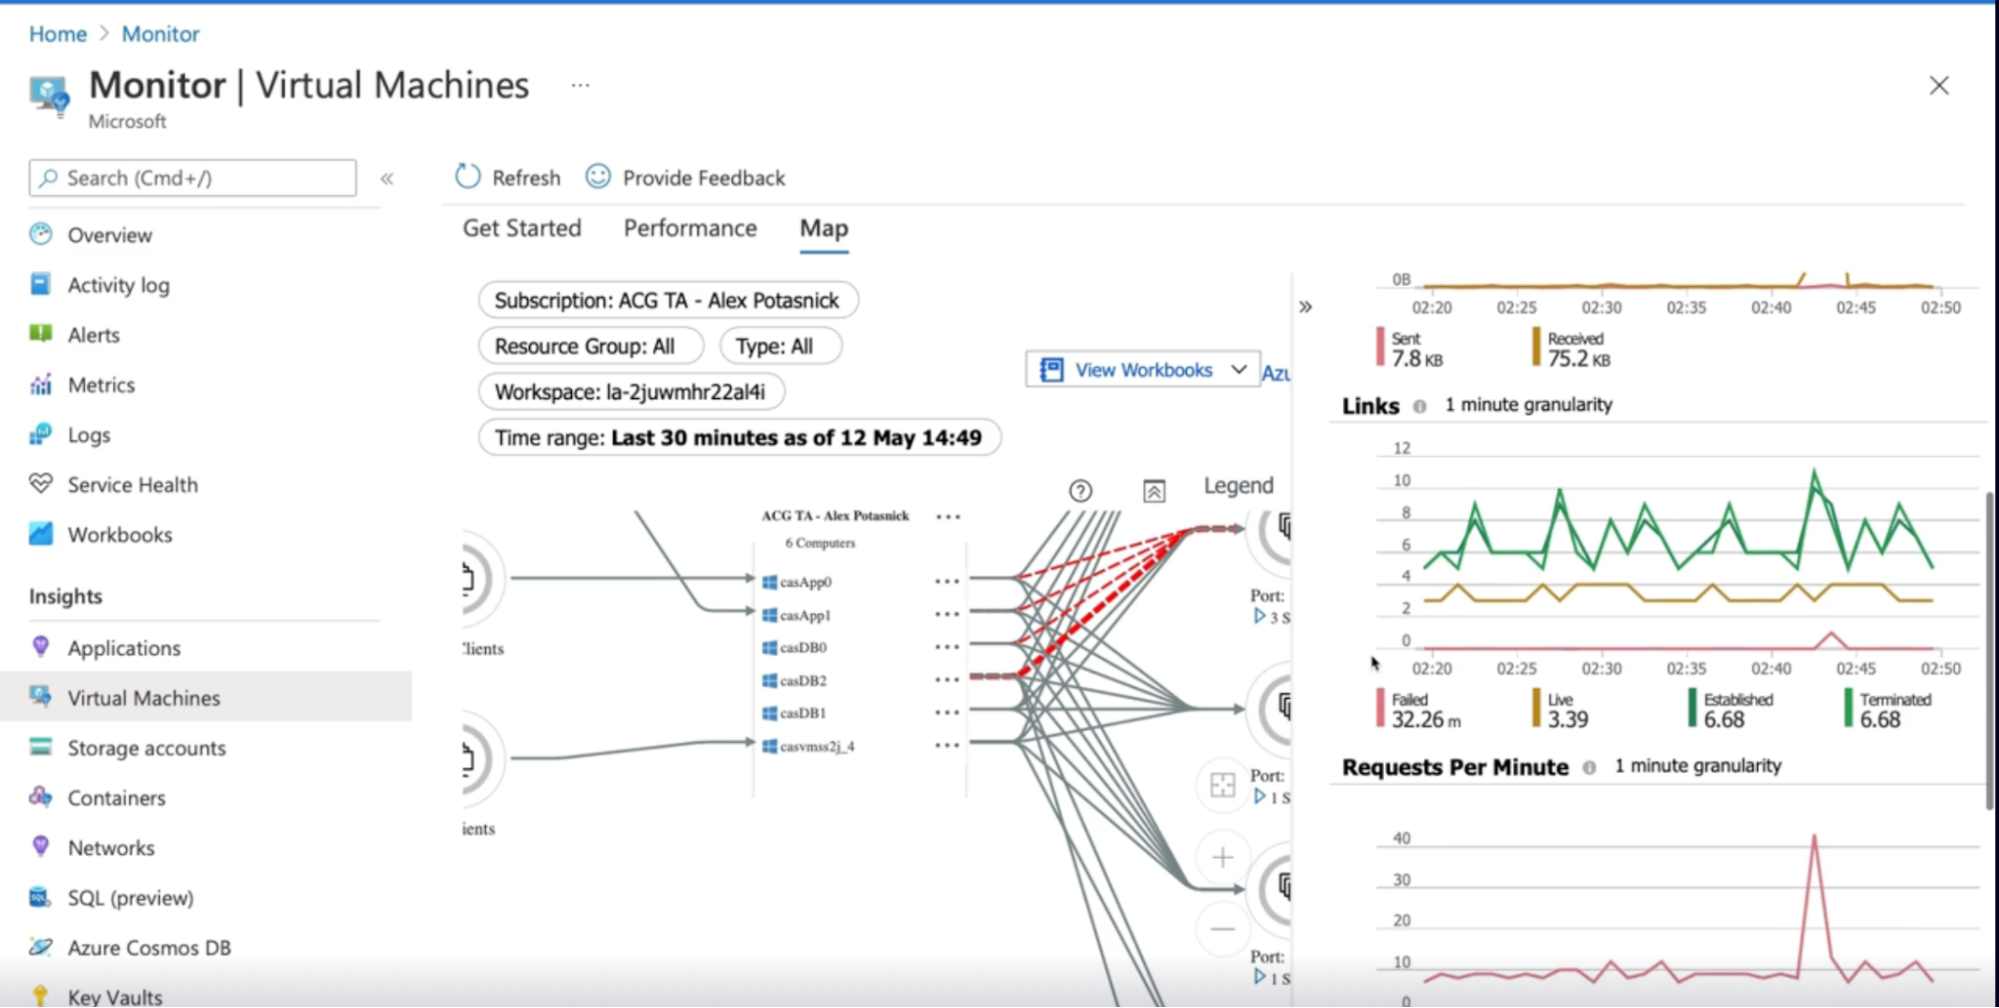
Application dependencies on virtual machines
Gives you VM-focused dependency information.
In order to see the dependencies information, you’ll need to install
- Agent: dependency agent needs to be installed
- Processes: shows dependencies by looking for processes that are running with
- connections between the servers that are active
- any inbound outbound connection latency
- TCP connected ports
- Views: from the VM it will show you information just local to that VM, VMSS or from Azure monitor(all components or cluster)
- Connection metrics:
- response time
- how many requests
- traffic
- links
- fail connections
Demo exploring dependencies
- Dependencies data in app insight
- Click on app insight instance
- Under investigate, click on application map
- Click on investigate failure and performance to drill down to details
- Dependencies data in VM
- Under monitor → Insights → VM
- Click on Map tab // to see the info on scale set
- Use this info to see what happened, when and why
Summary
- dependencies are components in an application that rely on each other for specific functions
- Dependency tracking is automatically configured with the.net and.net core SDK for Application Insights
- Manual dependency tracking can be configured using the track dependency API
- The application map provides visualization of application dependencies and correlated data
- A virtual machine application dependency map can be found in Azure monitor with system information and connection metrics
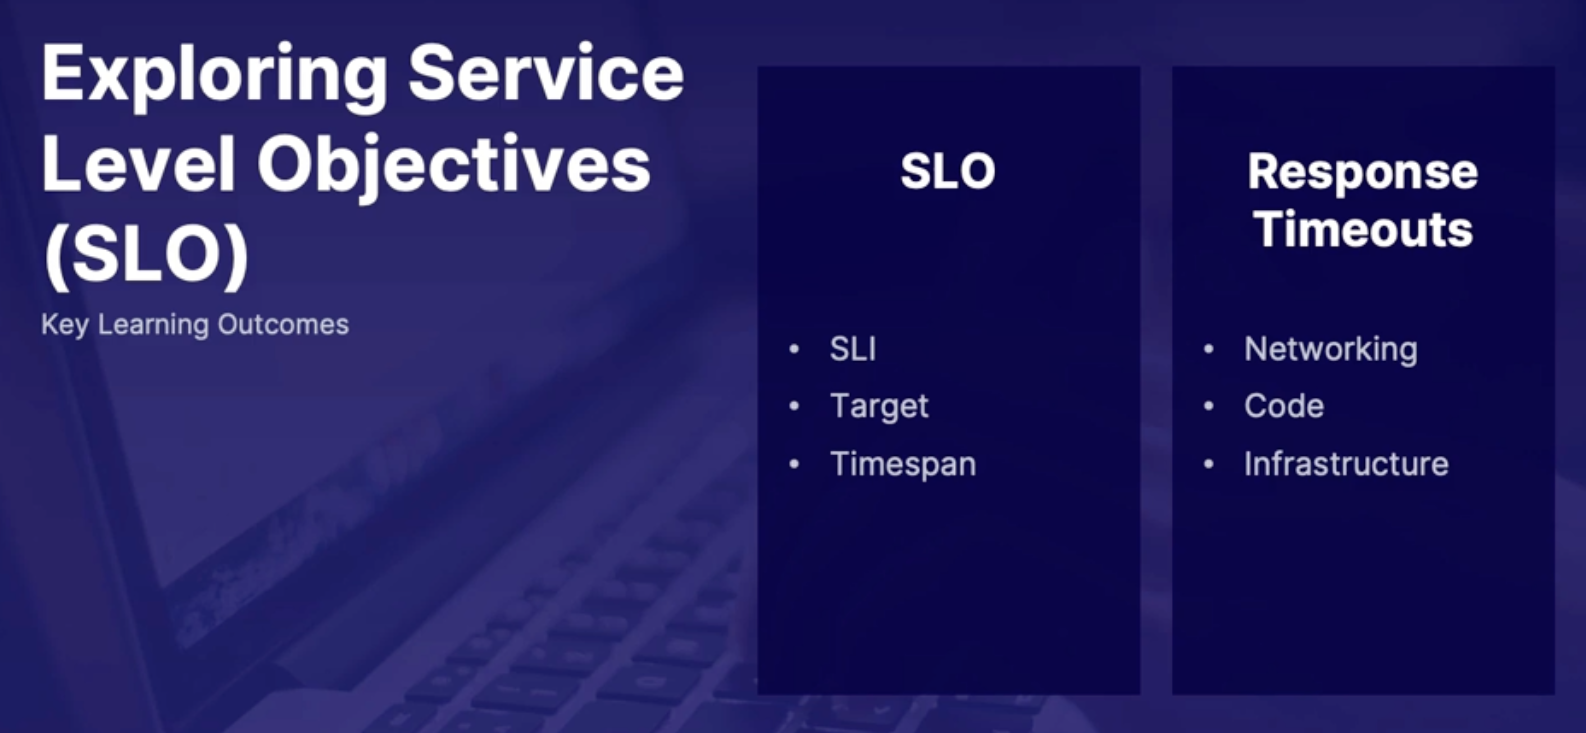
Exploring service level objectives SLO
with SLO, Configure our services based on the response times
What makes an SLO?
First, gather
- SLI: actual metrics from the system which tell us how the application is performing. Use those metrics to create targets.
- Target: which is the upper limit of how we want the system to perform, How reliable and available it is. once you have SLIs and targets, include Timespan
- Timespan: The amount of time/time range for SLI to reach to target (acceptable time for the SLI to reach the target limit)
Example: CPU should not exceed 70% over one hour; if so trigger alert
Idea is that we just want to make sure that the system can handle that load.
How is an SLO helpful?
Once SLO is established, how it can help us
- Once we have the SLOs in place, then we have an idea of what compute options we should be choosing when configuring our system. // hence make an informed choice on compute options
- They also help set the customer expectations
- on things like how fast an application will be and how reliable it is.
- gives the customer an idea of what the system or application can handle.
Callouts
- The SLO should be re-evaluated from time to time because things change.
- for example, if originally, when a company was first starting, there was an SLO where an application can handle 100 SQL transactions per minute,
- and now that the company has grown, they need to handle 500 SQL transactions per minute, then those SLOs will be reevaluated, and they would configure their SQL databases accordingly.
SLO’s and response time-outs
Questions: why is my app running so slow?
Answer: number of reasons
- First, it could be a networking issue, where the network requests are taking longer than they really should.
- it could be something in the code where the application logic or database queries aren't written as succinctly or optimized to be as efficient as they can be.
- This can also be an infrastructure problem, where the infrastructure in place isn't designed to handle the amount of load that the application is bringing in.
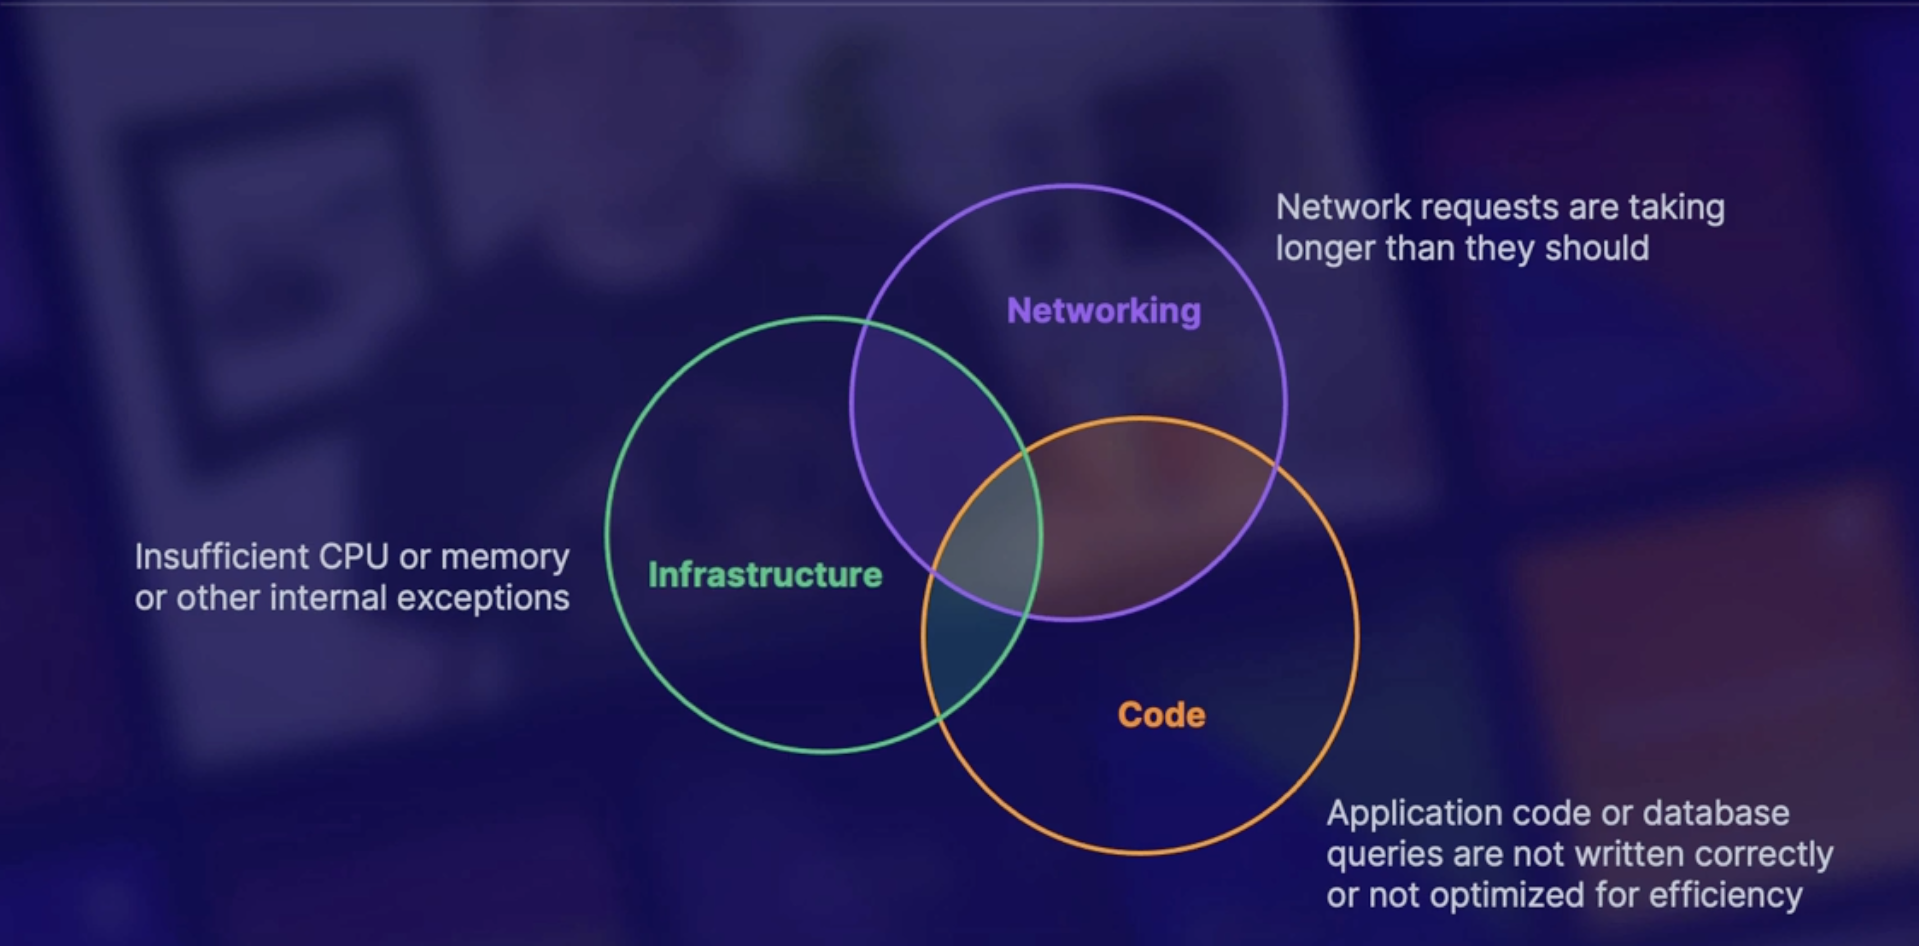
So once we have our SLOs, it gives us an idea of what we want our application or system to look like. And then we can adjust any of the things in these categories to meet those expectations.
Demo: Configure Azure SQL to meet SLO‘s
Steps:
- You have Azure SQL database. it hasn't been used in the past hour or so.
- Click on Compute and Storage to see database was deployed to be a general purpose database
- hardware configuration, it's a Gen5, with up to 80 vCores, and up to 408 gigabytes of memory.
- we only have 2 vCores provisioned
- we have a summary of what we just said, and it shows us a performance graph to let us know if we're optimizing our hardware.
- run a workload to see how it handles.
- logged into a virtual machine that's connected to the Azure SQL database, and run a workload.
- it's creating 20 threads to process queries. And we're going to see how the hardware performs while this workload is running.
- navigate down to the Metrics section under Monitoring
- choose a CPU percentage metric with your database
- change the scope here from 24 hours to let's say the last hour.
- And as we can see here, we've reached 100% CPU. // repose time is slow as it’s maxing out 100%
- Compute and storage → change vCores to 6
- Repeat the step 6,7,8 to see it’s running 20 threads as usual
- Cpu percentage hit 54% as compare to 100% previously
Call outs
- Run the database workload(see how many threads are created/running)
- Check the metric whether your workload causes the database to reach 100% CPU utilization
- If so increase the CPU Core
Summary
- An SLO is made up of an SLI, along with limit and timespan
- Once the SLO’s published we can choose a computer option to meet those expectations
- networking, code and infrastructure can all create situations where the system does not meet the SLO.
Understanding partial health situation
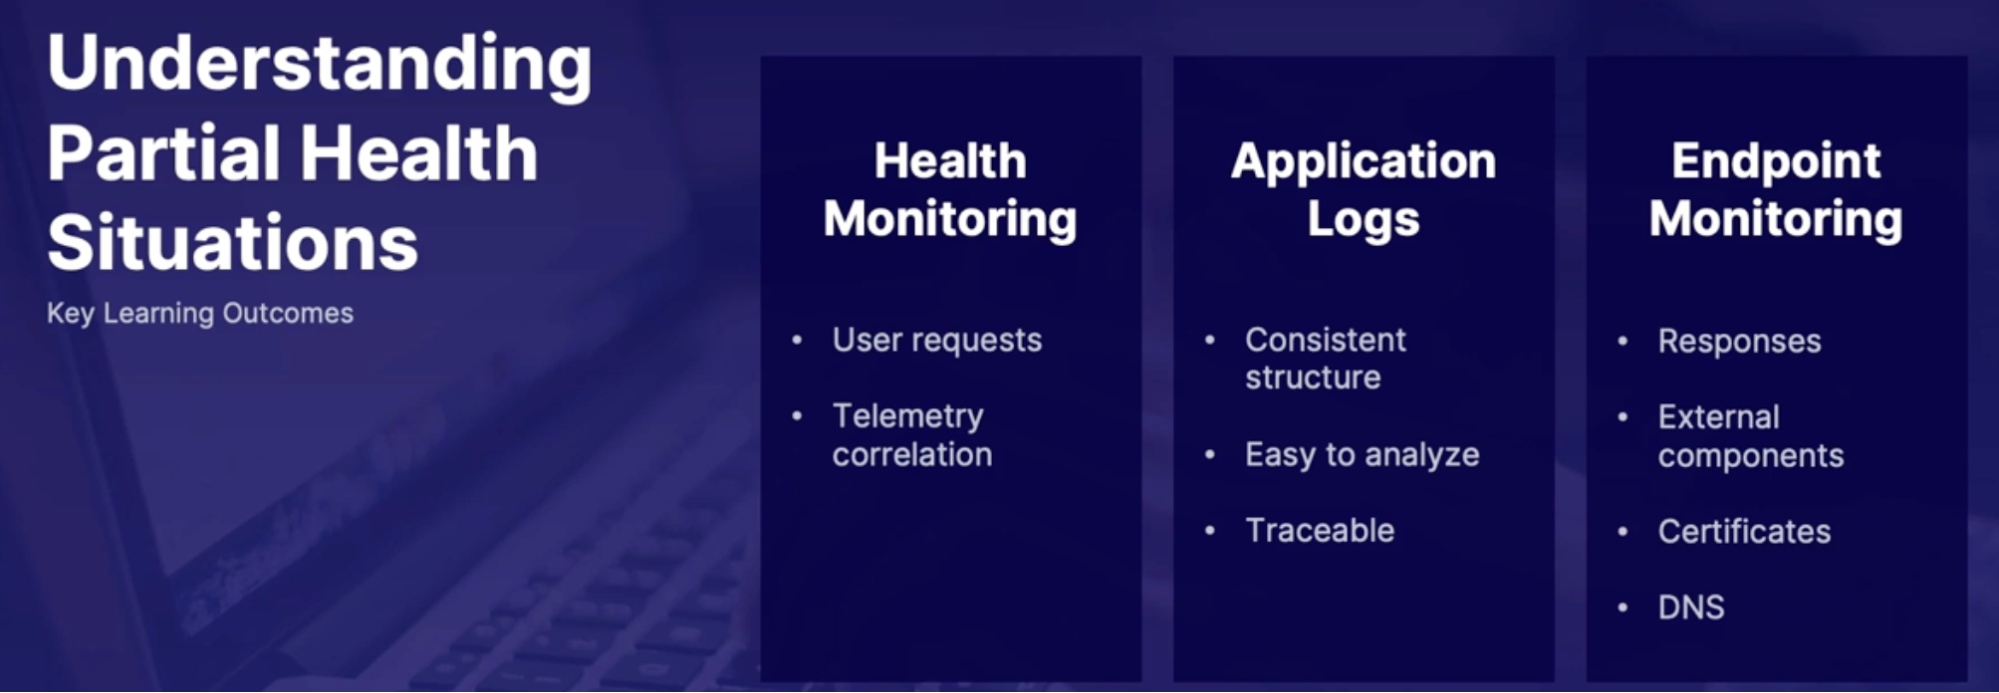
Health monitoring
What? - How can we design our environment to handle partial health situations?
TODO -
- The most important thing we can do is to understand when, how, and why those situations are occurring.
- Therefore, we need health monitoring, which gives us insight into the system’s health.
- System health: the system is healthy when it is up and performing the functions it is designed for
- Alerting: There should be an alerting system in place to notify when something is failing as soon as possible
- Traffic light system: Red(unhealthy), yellow(partially healthy), green(healthy) // by dashboard
Health monitoring data
- When configuring your health monitoring, it should be clear which parts of the system are healthy and which parts are unhealthy.
- And also to distinguish between transient and non-transient failures.
In order to do this, we can utilize things like
- User request tracing: which requests from the user has passed or failed and how long did they take
- Synthetic user monitoring: emulates the steps that a user would take when they are using an application
- this will show you how your application responds to typical user behavior, which can help predict when a system is going to fail, and then you can take precautions to prevent that situation from happening.
- Trace and event logs: We also need to make sure that we're capturing trace and event logs.
- Trace logs come from the application,
- event logs come from the system that's hosting the application.
- Logs generated from the application and the hosting infrastructure
- Endpoint monitoring: system or application endpoints that are exposed for use as a health check
Telemetry correlation
What
- Application Insights uses telemetry correlation to find out which component is causing the failures or is causing the performance to go down.
Why
- the idea behind this is to track the transactions from end to end to make sure that there are no issues in the application and system-critical flows.
- The idea is that if, let's say a dependency is down, then we can see how the other components will also go down as well.
- And within each of those components, we want to correlate any application events with platform-level metrics to get a full picture of what's going on.
- platform-level metrics: CPU, network traffic, disk operations per second with any application errors.
- Example: So for example, if let's say a certain function is looping continuously, and at the same time, we see that there's a high disk operation per second, those are probably related.
Application logs best practices
What: we also want to make sure that our logs are written in a way that's most helpful and actionable to us.
Some best practices are
- production log data: log data should be coming from the production environment to get an accurate picture of the production state
- Symantec/Structured logging: consistent log structure that helps simplify their consumption and makes them easier to analyze (situation where application generates a text file with all the logs in it and it’s impossible to find anything in the chain file)
- log events and service boundaries: using IT to help track transactions through various components(use a correlation ID to track the transaction and find out where and why it fails)
- Asynchronous logging: logging operates independently(because if we use synchronous logging, it can fill up and block the application code)
- Separate application logging and auditing: keep application Auditing logs separate so no transactions get dropped
- Azure policy: to enforce consistent diagnostic settings
Endpoint health monitoring
What
- Endpoint health monitoring provides functional checks in an application to let you know that each part of a system is healthy.
- help us determine partial health situations because it checks certain endpoints in the application to see if there's a successful response.
Examples
- response code: looks to see if there is a 200 response indicating there are no errors
- response content: analyze response content to determine if there are parts of the page that are failing even if you have 200 responses
- response time: Measure how long it takes to get a response
- external components: checks third-party and external components like CDN
- certificates: check to see if any SSL certificates are expiring
- DNS lookup: make sure DNS lookup is configured correctly and that there are no missed directs
Summary
- The system is considered healthy when it is up and running and performing the function that it was designed to do
- when monitoring is held it should be clear what the failure is happening
- telemetry correlation takes application in system event logs into account to provide a full picture across the stack
- Application logs should be consistently structured, easy to analyze, and traceable across service boundaries
- Endpoint health monitoring can be used on multiple endpoints to determine health and partial health status
Improving recovery time
Why do we need a recovery plan
Why do we need to make sure that we have a Disaster Recovery plan?
What are the things that can happen that can affect our business continuity?
Recovery situation includes
- Ransomware: type of malicious software that's designed to block access to your system until you pay them a certain amount of money.
- Data corruption or deletion:
- VM was doing some updates and it crashed, and the data on that machine got corrupted,
- or maybe somebody accidentally deleted something from a database or a storage account, and they weren't able to recover from it.
- Outages
- Networking, DNS issues, natural disaster
- Compliance
- Organization that you're working for requires you to have a business continuity plan to be compliant with their security policies.
High availability(HA) Vs disaster recovery(DR)
HA | DR |
Goal is to keep the application up and running in case of a local failure | goal is to make sure that the application can be recovered in an alternate site in a case of a regional failure // failover to secondary region |
| failover to secondary region against planned(planned outages) - we try best to prevent data loss unplanned events(natural disaster) - need to determine howmuch data we are willing to lose |
Recovery Point Objective(RPO) Vs Recovery Time Objective(RTO)
What:
- there will be some data that's lost. So we need to determine how much data we're willing to lose.
- in order to make that determination, we need to establish an RTO and an RPO.
RPO | RTO |
In case of an outage, how much data are you willing to lose | In case of an outage howlong can you afford to take to get your system back up and running // this is the measurement that you would use to determine how long your system could be unavailable.
|
EX: company is willing to lose 30 mins of data loss | EX: we want our system back up and running within an hour. |
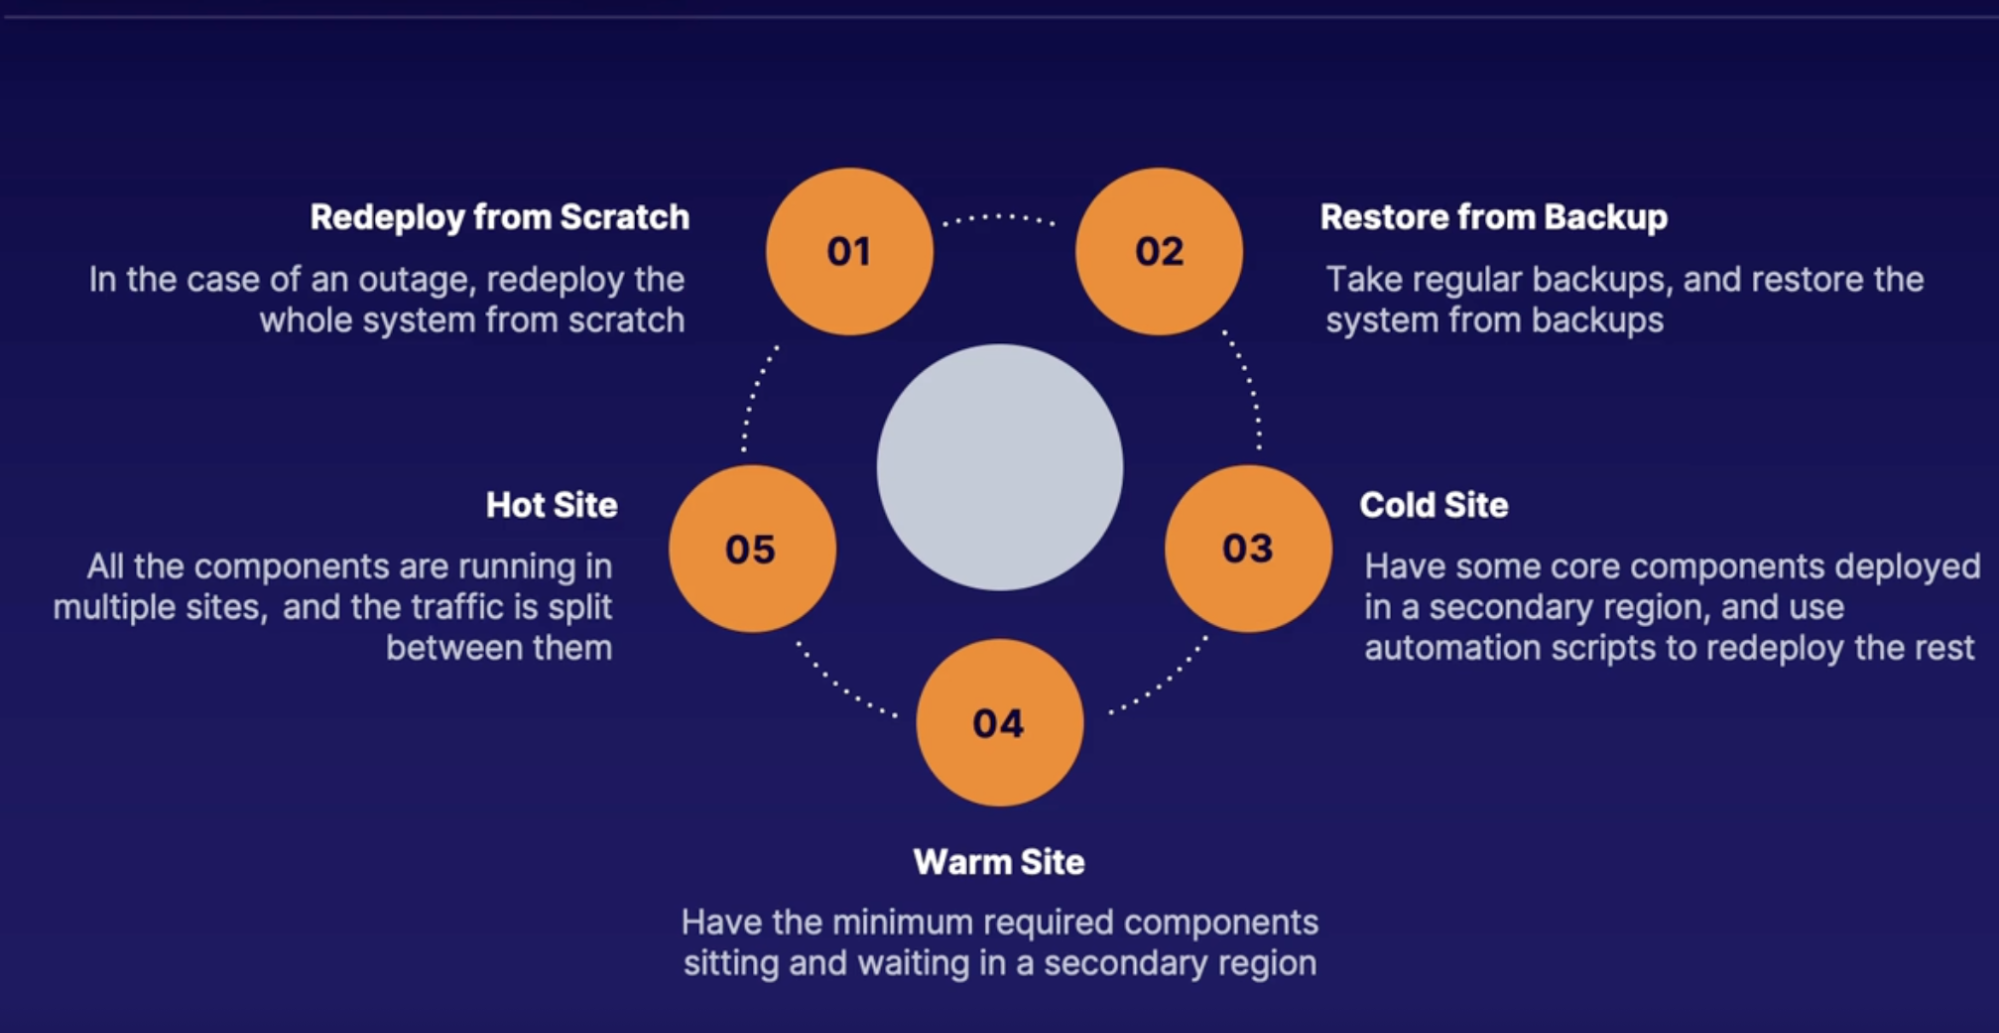
Business continuity strategies
Strategies we can employ to make sure that we meet our RPO and RTO?
First of all, we need to ensure that we don't just protect the application because there might be dependencies in your environment that are just as important, which we refer to as strong dependencies meaning that without these dependencies, your application can't run.
And it's also important to remember that different situations require different strategies.
- Redeploy from scratch:
- incase of an outage
- for a noncritical system that you don't need a guaranteed RTO because using this strategy would take the highest Recovery Time Objective(RTO) because you're starting from scratch.
- Restore from backup
- Take regular backups(of various parts of the system like the databases, the files, the virtual machines) and restore the system from backups.
- So when outage, you would just restore the components from the most recent backup, and depending on the Recovery Point Objective, how much data you're willing to lose, that will determine how often you take those backups. // Meaning, the more frequently you take backups means a lower RTO.
- Cold site
- this is where you keep some of the core components of a system deployed in a Disaster Recovery region in case there's an outage.
- Then you have the rest of the components deployed using automation scripts.
- Warm site
- active passive or standby
- this is where you have a scaled down version with the minimum required components needed to run deployed in a DR region, but just sitting there and waiting in case of an outage, meaning that there's no production traffic being sent to this DR location.
- this would be used in a case where a system is not designed to be spread across multiple regions.
- The RTO would be the time it takes to turn on any of the components if they're off or how long it takes to switch traffic to this second location.
- Hot site
- active/active, or hot spare, or multi-site
- this is where you have a full environment running across multiple regions with traffic being split to both of those regions.
RTO improvement options
So when trying to figure out what option you should use to improve your Recovery Time Objective,
- you need to assess your current environment and the situation that you're in, and decide how you want to balance RTO and RPO versus the cost because these things have an inverse relationship.
- So for example, were you to decide to use the
- hot site strategy - that would have the highest cost because you have your full environment deployed and running in multiple regions but it would also give you the lowest RTO and RPO because there would be virtually no recovery time;
- whereas, if we were to redeploy from scratch - that would be the least expensive option because you don't have anything running or deployed in anywhere else besides for your current region, but the RTO and RPO would be the highest because it would take the longest time to recover from an outage in that situation.

Azure services that help reduce RTO
- Azure Site Recovery:
- Azure front door
- Azure traffic manager
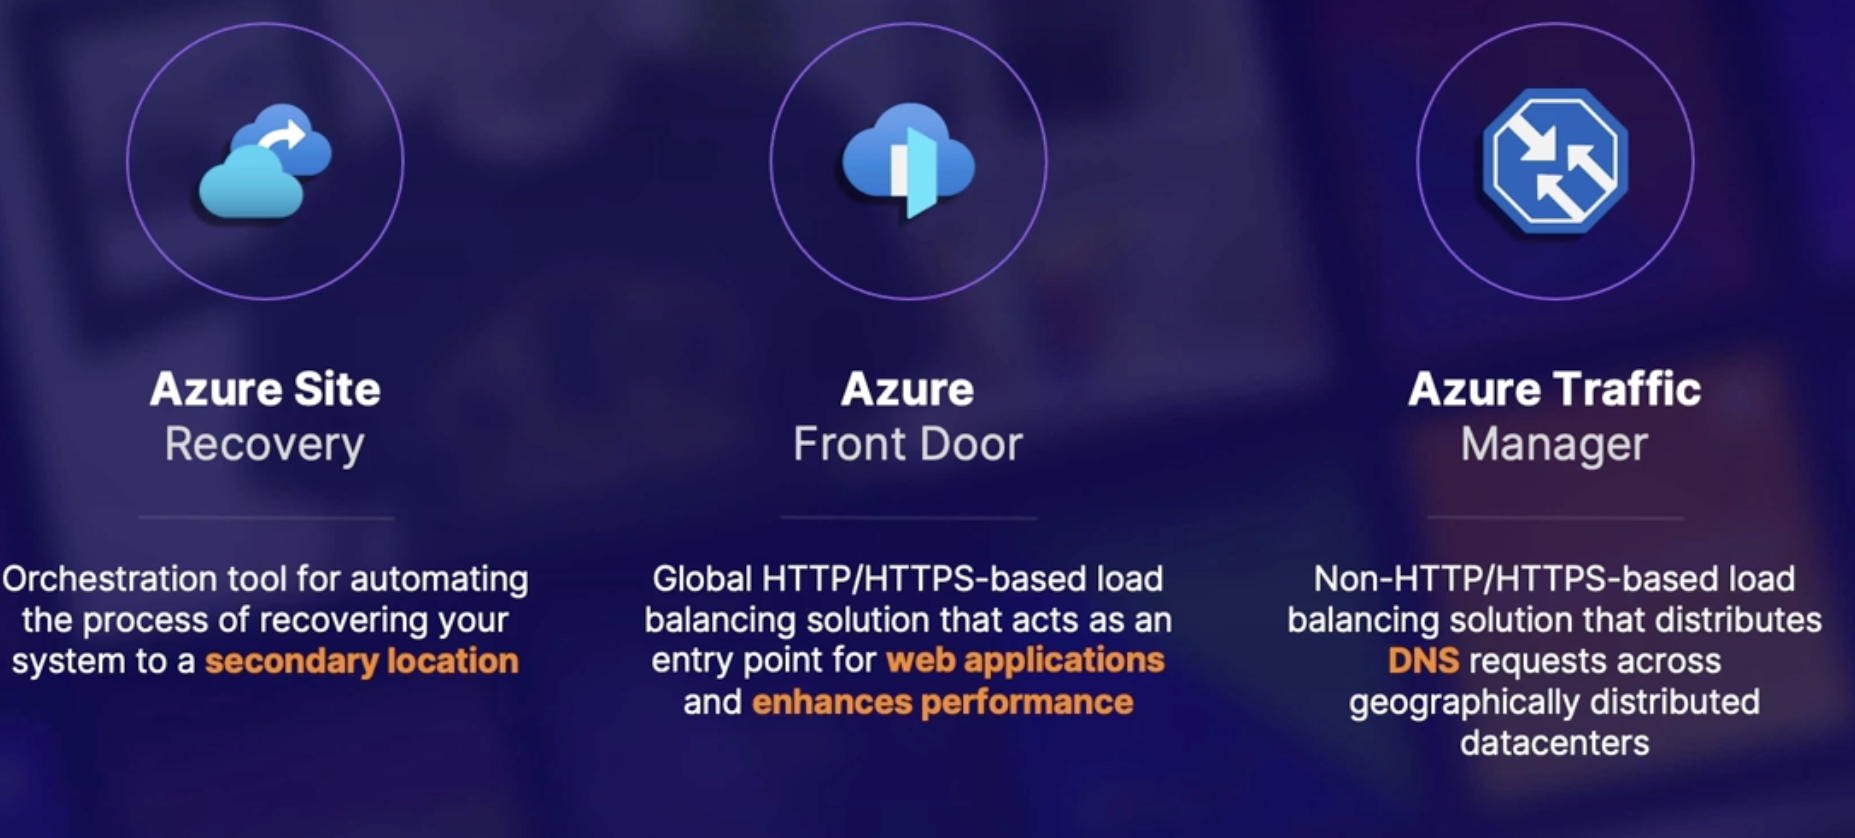
Summary
- High availability focus on local failure
- Disaster recovery focuses on regional failure
- recovery point objective RPO quantifies acceptable data loss
- recovery time objective RTO determines how long a system can be unavailable
- as we move down this list of DR & HA strategies, we reduce the RTO but the cost of the solution increases
Exploring computer resource health checks
App service Health checks
Azure App Service has a built-in health check where it routes traffic only to healthy instances.
in order to configure this, you need to present a path to verify the health. this can be something like
- Endpoint Check:
- If the specified path returns a status code of 2XX within 60 seconds it is healthy. this could be an endpoint of database or application itself.
- if a response is longer than 60 seconds and returns a 500 status code then it’s deemed unhealthy
- it will ping the instance twice and remove it after two unsuccessful pings
- Reboot after removal: after removal the instance will continue to ping and then reboot
- Replace: if the instance remains unhealthy after one hour it will be replaced with a healthy instance
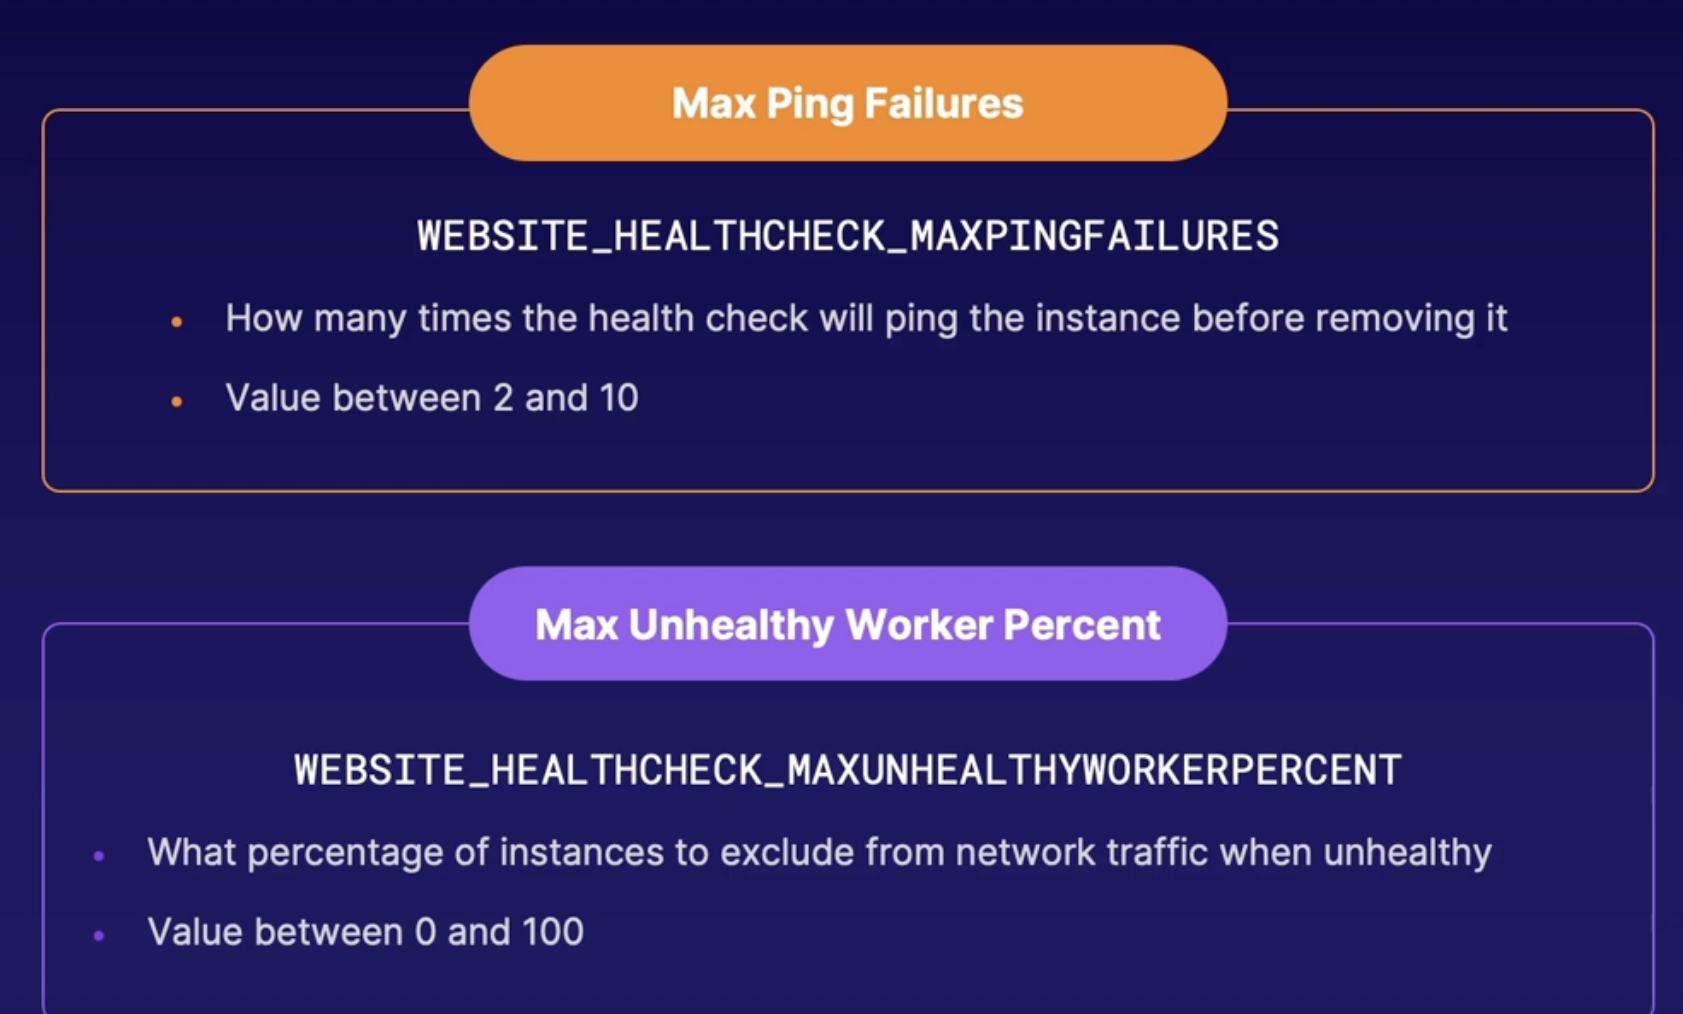
Customize Web App health checks
How?
- this health check can be customized in the app settings by using the WEBSITE_HEALTHCHECK_MAXPINGFAILURES app setting
- where you can specify how many times the health check will ping the instance before removing it.
- And you can choose between 2 to 10 times.
- You can also configure the EBSITE_HEALTHCHECK_MAXUNHEALTHYWORKERPERCENT setting
- where, by default, if the health check deems an instance to be unhealthy, it will only exclude network traffic to up to 50% of the instances to try to avoid the remaining instances getting overwhelmed.
VMSS Health extension
What: this let you know if any of the VMs in the scale set are unhealthy,
How: and it does this by checking an endpoint to determine its health.
- you can deploy this by PowerShell, CLI, an ARM template.
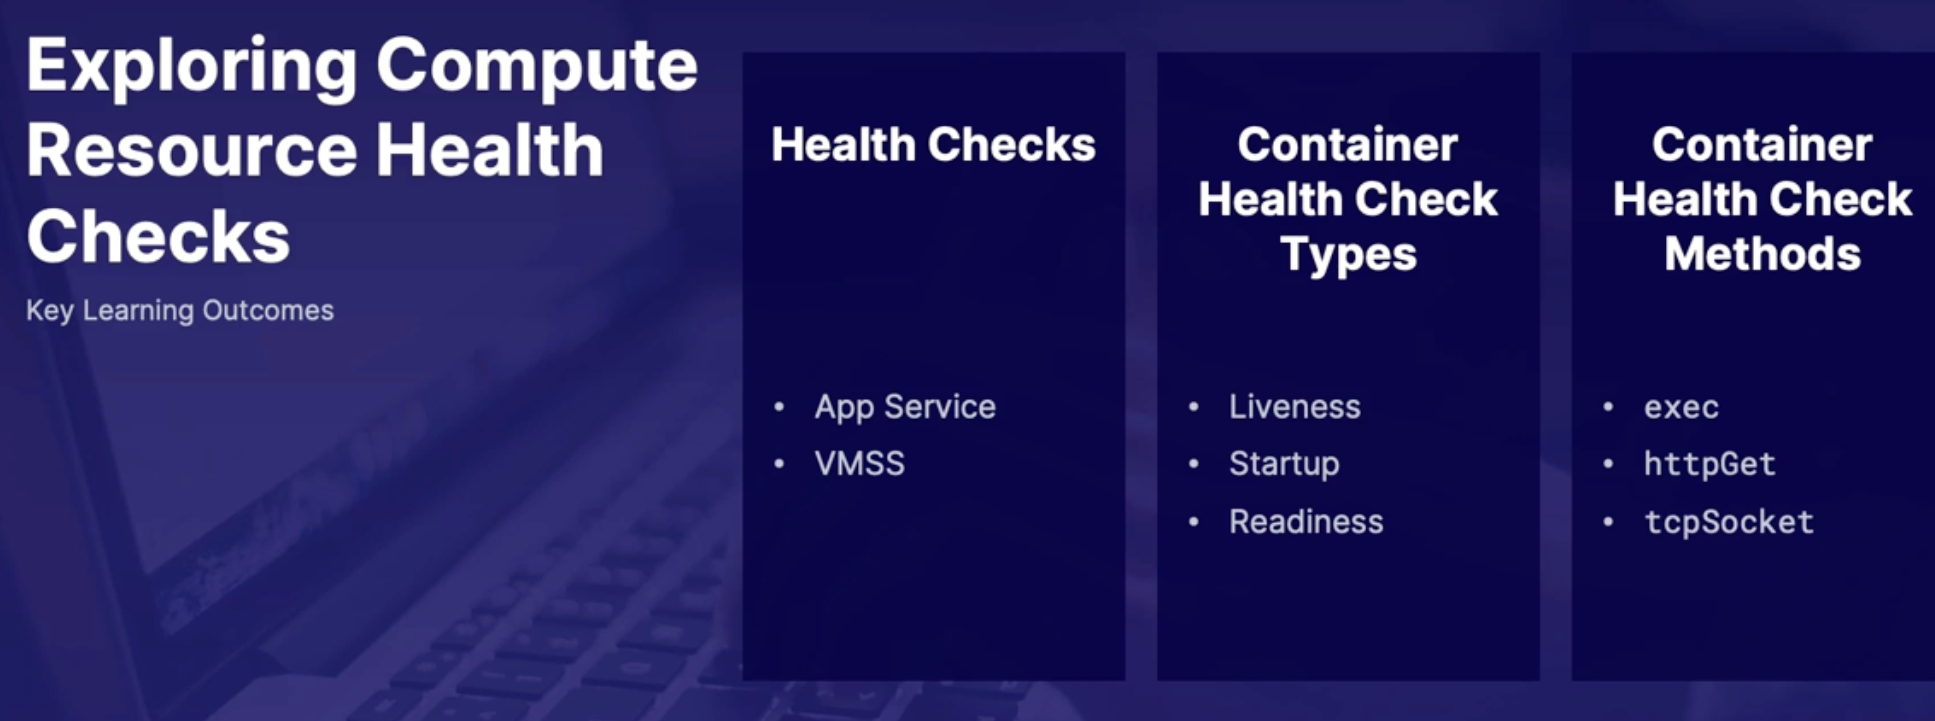
Container health check types
Kubernetes can automatically restart unhealthy containers, but by default, Kubernetes will only consider the container to be unhealthy if the container process stops.
And this is where liveness probes come in.
- Liveness
- customize how to determine if the container is healthy
- runs continuously on a schedule
- Startup
- checks held in container is starting up
- Use case : legacy app that takes a long time to startup
- no support by an ACI. only in AKS
- Readiness
- checks when a container is ready to accept request as it starts up
- prevent traffic to pods that are not yet ready

Liveness Check Example
https://kubernetes.io/docs/tasks/configure-pod-container/configure-liveness-readiness-startup-probes/
Type: LIVENESS
Method: exec
livenessProbe:
exec:
command:
- cat
- /tmp/healthy
initialDelaySeconds: 5
periodSeconds: 5 |
Startup Check Example
Type: startup
Method: HTTPGET
startupProbe:
httpGet:
path: /healthz
port: liveness-port
failureThreshold: 30
periodSeconds: 10 |
Readiness Check example
readinessProbe:
tcpSocket:
port: 8080
initialDelaySeconds: 5
periodSeconds: 10 |
Summary
- App service Web Apps have a built in health check that can be configured to check a specified in point for health status
- web apps are healthy if the response returns eight 200 response code with 60 seconds
- an application health extension can be deployed to check the health of VMs in a virtual machine scale set
- You can determine container health by executing a command, sending an http request, and attempting to open a TCP socket
- container liveness probes allow you to configure custom health checks that run continuously
- container startup probs provide health checks only when the container start up
- container readiness probes will let you know when the container is ready to receive requests
Summary
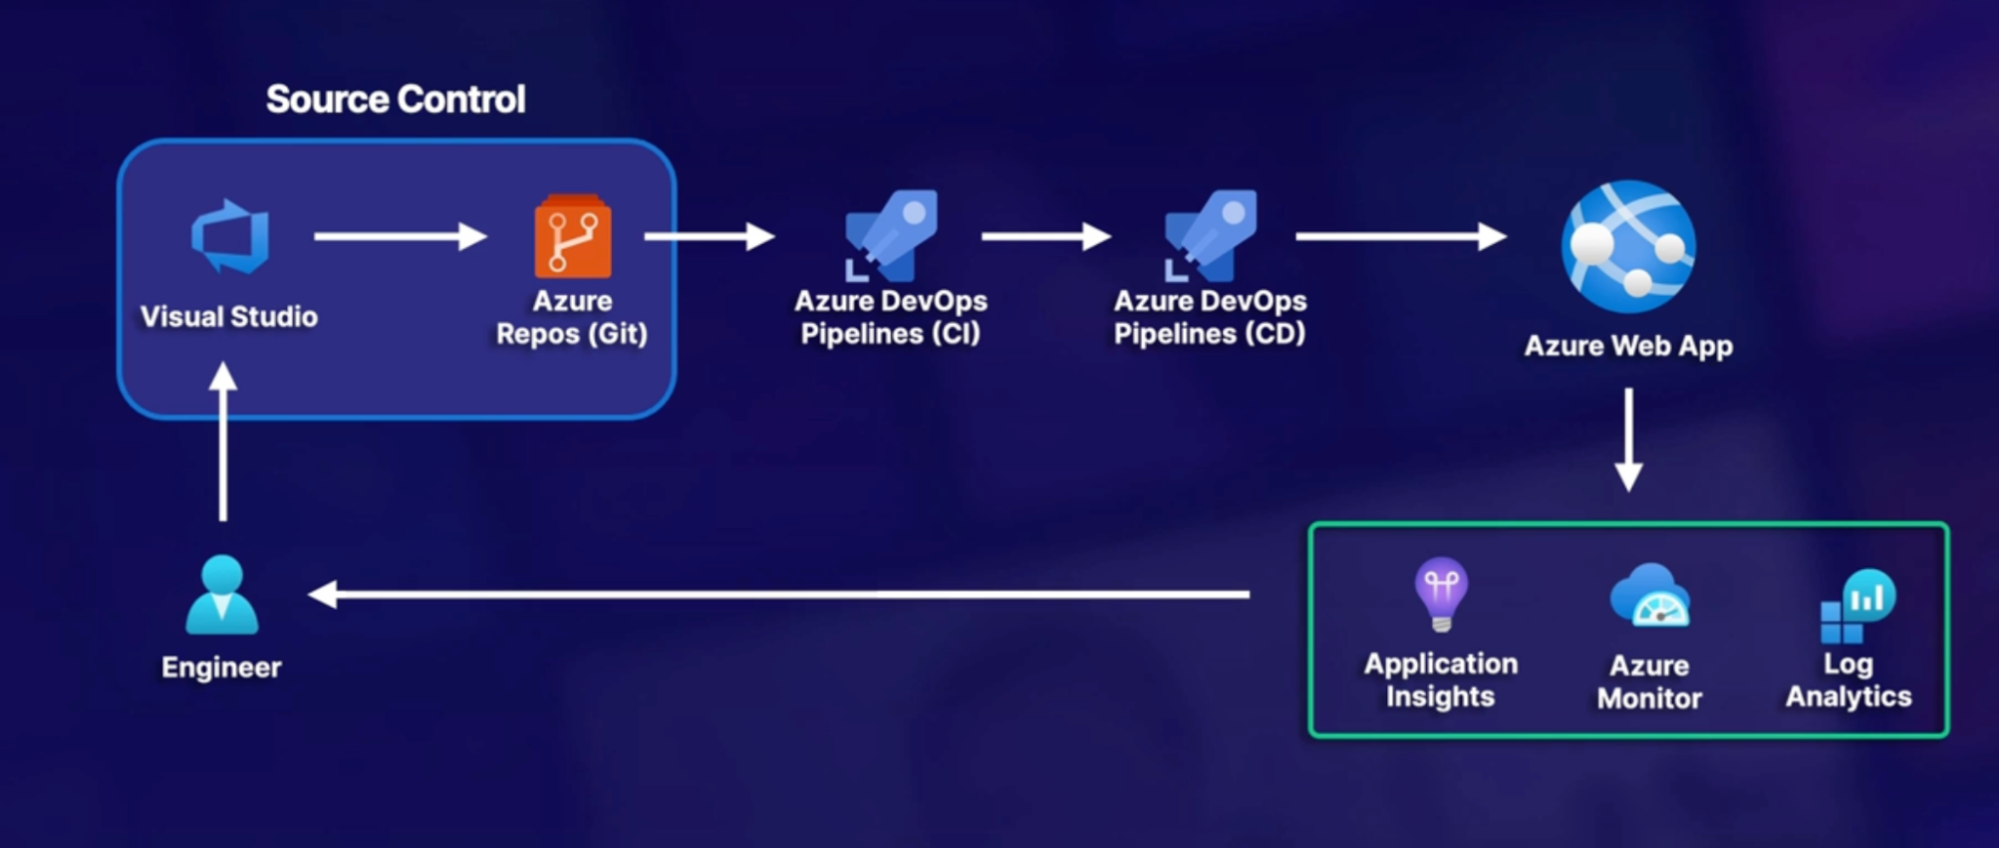
Chap - 4: Developing a modern Source Control Strategy
First step of CI/CD process of source control
Introduction to source control
What is source control
- Also known as source repository/version control (Central source of truth for group code base)
- allows multiple developers to collaborate on code and track changes (critical for any multi developer project)
- example Azure repos, GitHub, BitBucket
Source control types
- Git
- distributed/decentralized
- the deafult preferred option
- Each developer has a copy of the repo on their local machine
- includes all branch and history information
- Each developer checks in the local portion of the code and changes are merged in a central repository
- Team Foundation version control - TFVC
- Centralized /Client-Server
- the non-default option
- developers checkout the only version of each file on local machines(instead of an entire copy of code base)
- checked in code is then pushed to everyone else
Which one to use?
- Git is preferred unless there is a specialized need for centralized version control in TFVC
Summary
- What is source control? the central source of truth for group development
- source control types: Git and TFVC
- primary focus on GIT both inside and outside of Azure repos
Exploring Azure repos
Azure repos at a glance
- Exist inside of Azure DevOps organization
- Project level
- Supports Git and TFVS
- An optional component for Azure pipelines
- can use external referrals in pipelines
Setting up Azure Repos
- all options involve getting code from somewhere else into Azure repos(Azure repo then becomes the source of truth)
Import options
- set up empty repo from scratch
- clone existing repo into Azure repo(GitHub, another Azure repo)
- push local code base into Azure repo
Supported GIT features
- branching methods
- history
- tagging
- pull request
- and much more // if it works in Git, it works with Azure repo
Summary
- Azure repo overview: managed repositories inside Azure DevOps organization
- import options: start from scratch, import external repo, push local code base
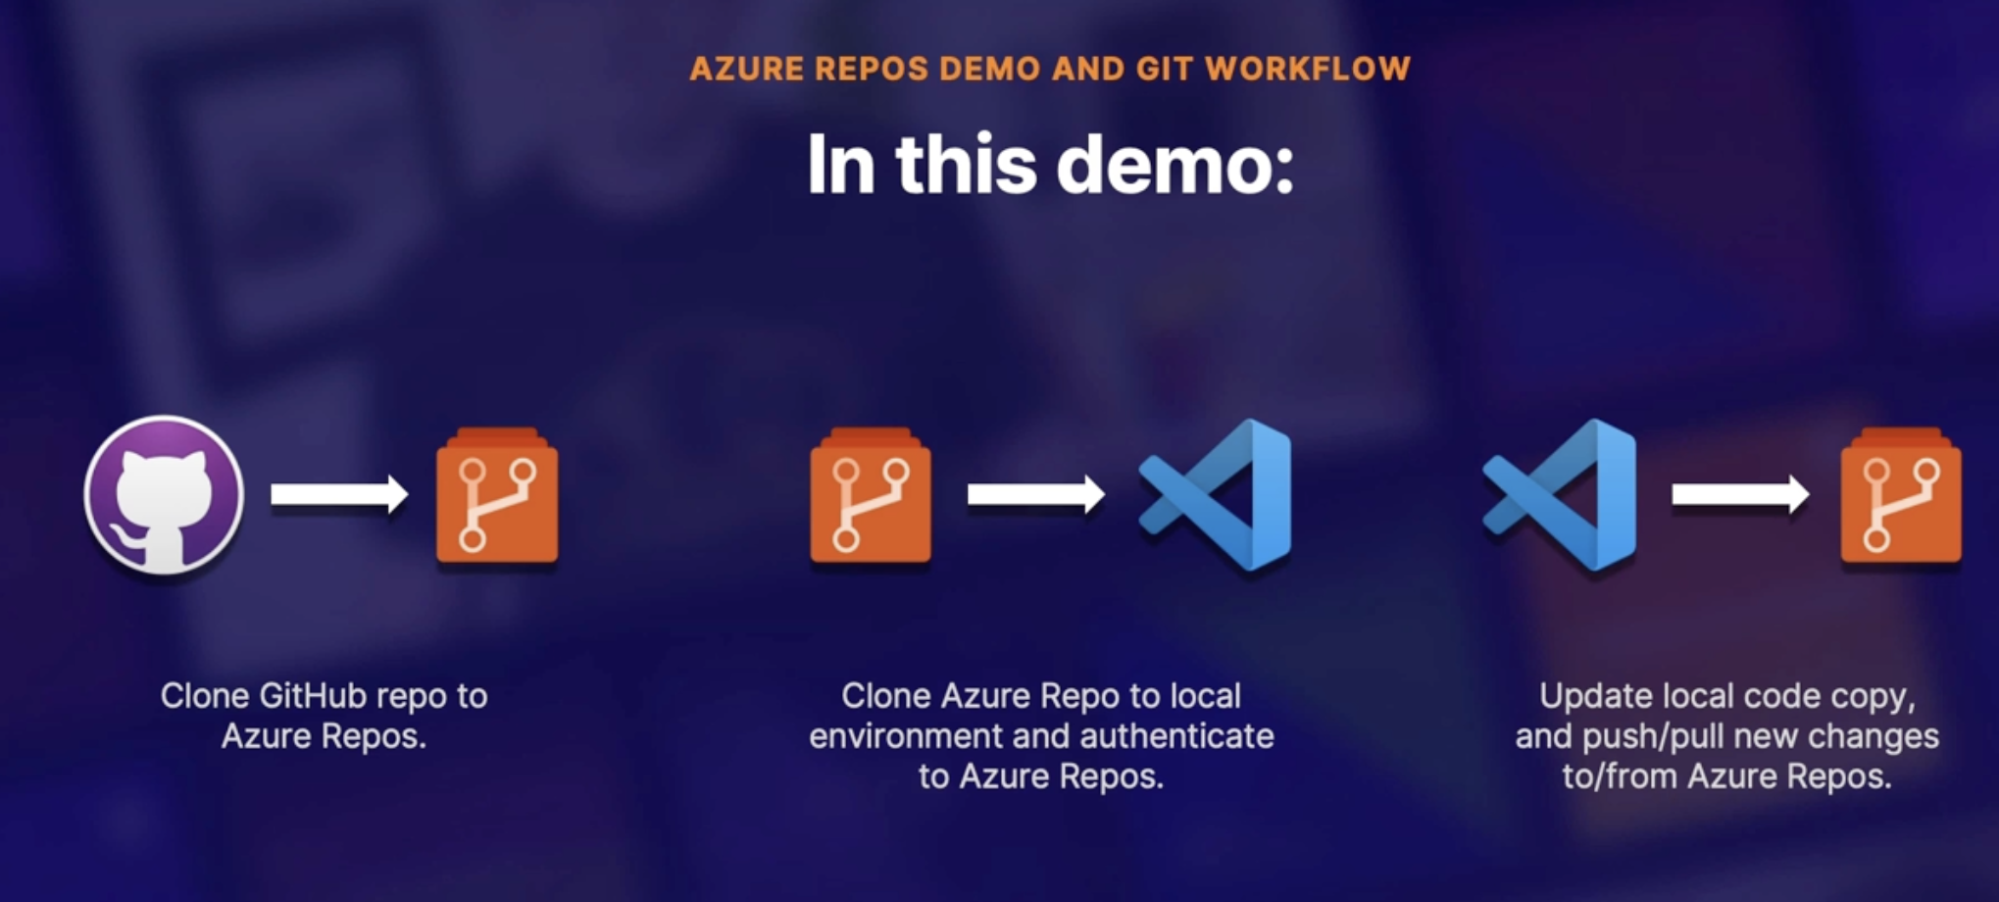
Azure Repos demo and Git workflow
- clone GitHub repo to Azure repo
- Import any public Git repo into Azure repo
- clone Azure repo to local environment and authenticate to Azure repos
- Clone repo
- Generate Git credentials // copy the password
- Clone in VS Code
- Enter password from step
- Update local code copy, and push/pull new changes to/from Azure repos
Repository sharing with submodule
Share repository using submodules
What are submodules
scenario
- challenge: Need to incorporate resources from a different GIT project in your current repo
- Examples: third-party library used in your projects
- need to treat external resources as separate entities yet seamlessly included within your project
- Solution: submodules
- not limited to Azure repos, core GIT feature - with an Azure twist
Callout
- contents of the code is maintained by another party, you are simply embedding that code into your own depository, however the updates are being handled by another party
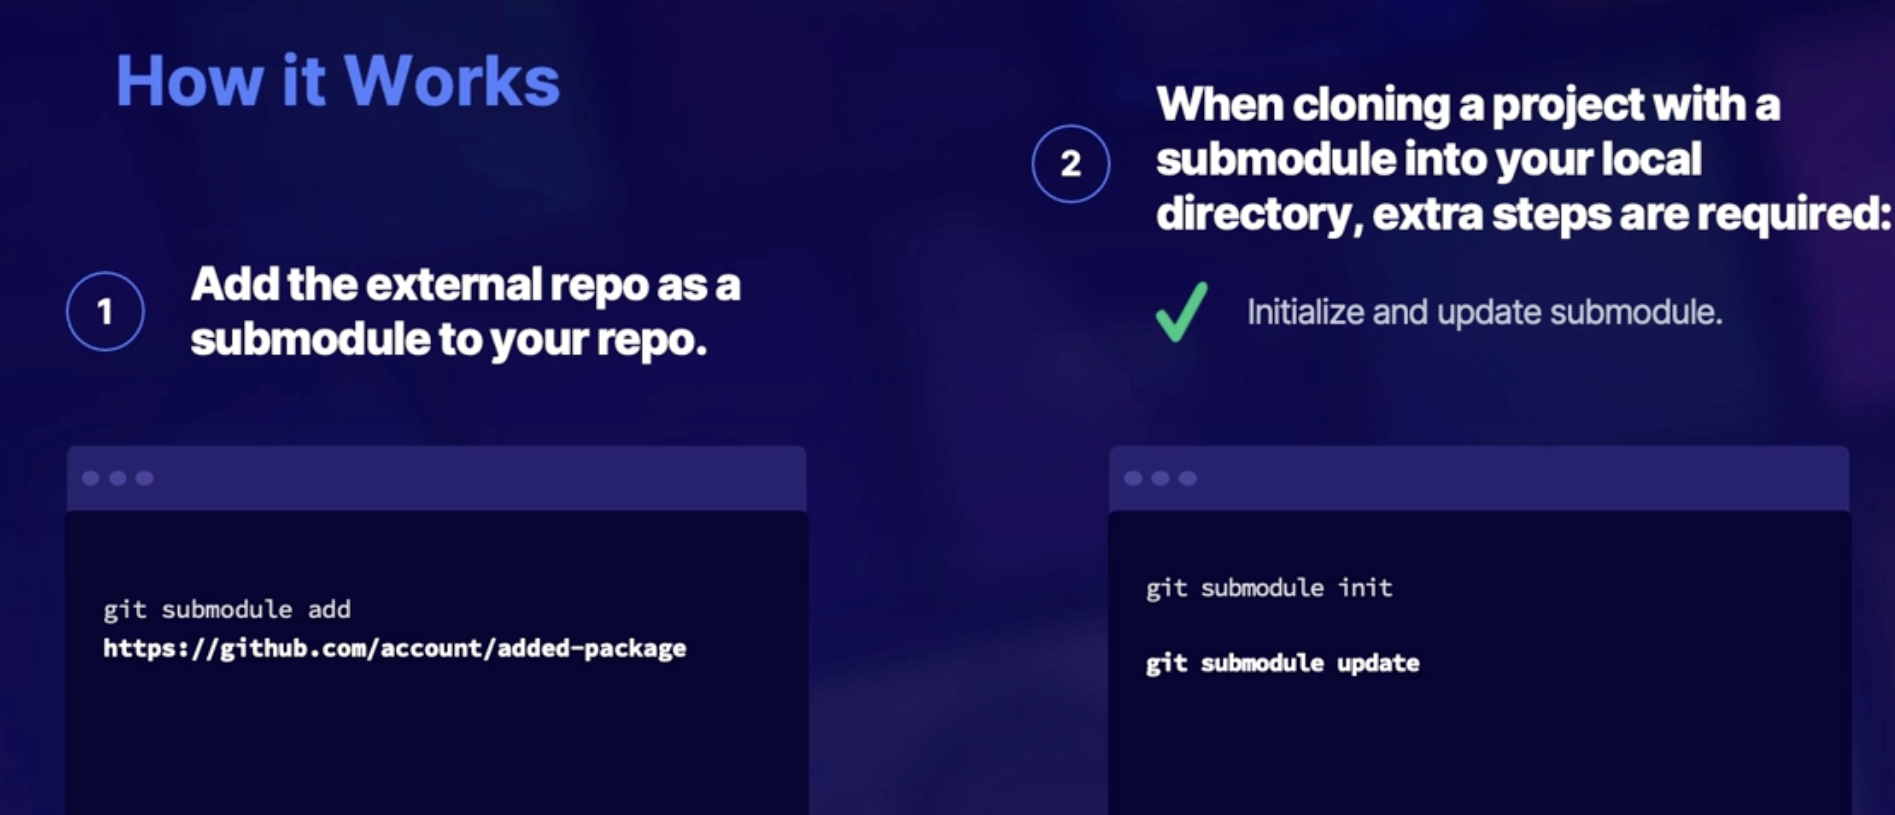
How submodule works
- add the external repo as a submodule to your repo
- when cloning a project with a submodule into your local directories extra steps are required
- initialize an update submodule
Submodules in Azure DevOps
- requirements to include in build pipelines
- Unauthenticated - i.e, publicly available
- Authenticated within your main repository account
- same GitHub organization, Azure organization, etc
- same account to access the primary repo must also be the same one to access the submodule repository
- submodules must be registered via http - not Ssh
Demo: adding submodule to repo
- Add a submodule to our locally cloned repo
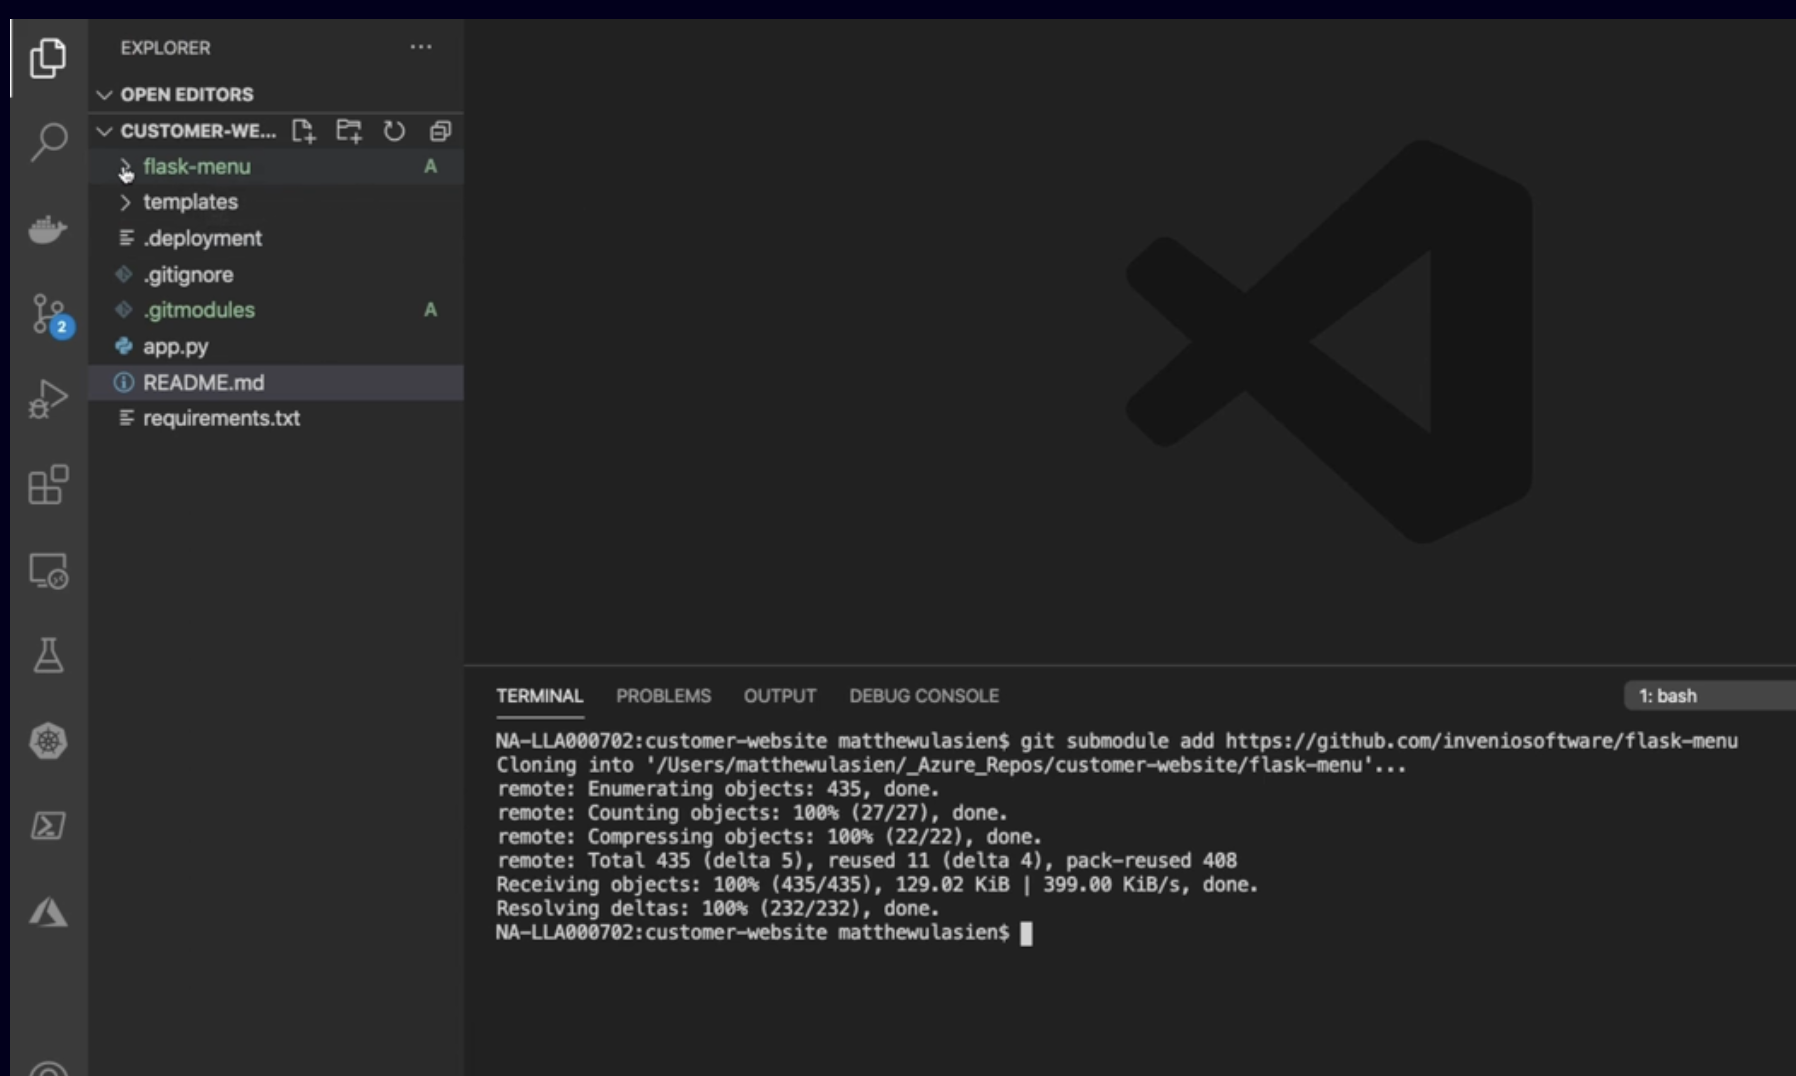
- push updates to Azure repos and view the results
- Once you push changes the file turns to blue and we have S next to it, notifying that its submodule
- if we were to clone and work with this repository onto a new machine, or even to our existing environment,
- we would need to manually update and initialize those submodules on the machine using the submodules init and update commands that we talked about earlier in this lesson.
Summary
- what are submodules? - nested resources posted from external repos
- how do you use submodules - adding new | initializing clone
- authentication with Azure pipelines: unauthenticated or authenticated with the same organization and rates as primary repository
Summary
lab: authenticate to Azure repose using an authentication token
Objectives:
- You have just created your first Git repo in Azure DevOps and need to clone that repo down to your local machine.
- You decide the easiest and most secure way to clone the repo is by using an authentication token. After you've created the token, push your code to Azure Repos.
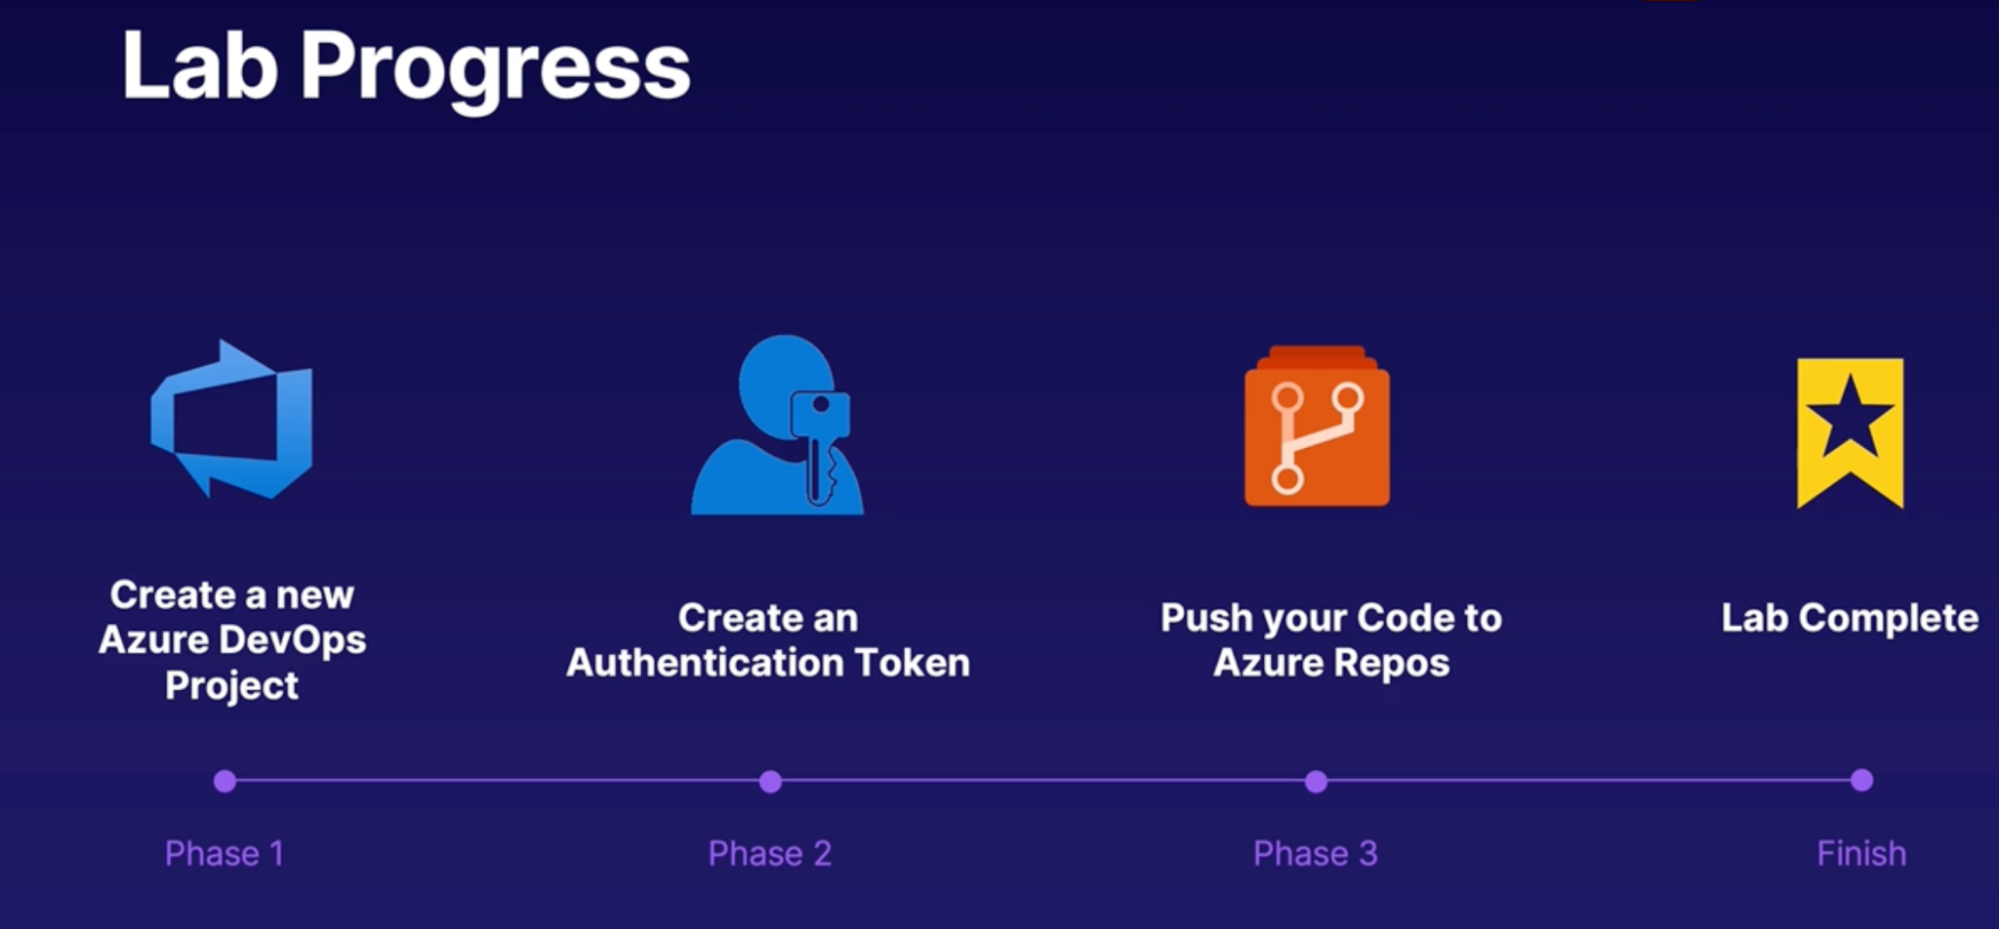
Steps
- Create a new repo from Azure DevOps
- From Repos → Files → Initialize master ranch with README and gitignore
- Add a gitignore: visual studio // will create new repo
- Create personal access tokens
- Create new token
- Set expiration
- Select scope
- Copy token
- Clone repo from Azure repo
- In your local env: use the cloned URL
- Enter password/PAT
Chap - 5: Planning and implementing branching strategies for the source code
Configure branches
What is a branch
branch is a way in order for you to isolate code, work on it, and bring it back to the main source code.
Branch management
- Branch policies
- Initial safeguard
- Require a minimum number of reviewers: require approval from a specified number of viewers on a pull requests
- Check for linked work items: encourage traceability by checking for linked work items on pull requests
- Check for comment resolution: check to see that all comments have resolved on pull requests
- Limit merge types: Control branch history by limiting the available types of Merge when pull requests are completed
- Branch restrictions
- Advanced safeguard
- Build validation: Validate code by pre-merging and building pull request changes
- Status checks: requires other services to post successful statuses to complete pull requests
- Automatically included reviewers: designate code reviewers to automatically include when pull request change certain areas of code(manual approvals)
- Restrict who can push to the branch: use the security permission to allow only certain collaborators the ability to push to the branch
- Branch protections
- Minimize catastrophic actions
- prevent deletion: accidentally or intentionally
- prevent overwriting: the branch commit history with a force push
Summary
- branch copy of a codeline helping development team work together
- branches are managed by policies, restriction and protections
- initial safeguards: reviewers, work items, comments, merge types
- Advance safeguards: build validation, status checks, manual reviewers, push restrictions
- catastrophic protection: prevent deletion, prevent overwriting commit history
Discovering Branch Strategies
Branch strategies
Why do you need branch strategy
- Optimize - productivity
- Enable - parallel development
- Plan - set of structured release
- Pave - Promotion parts or software changes through production
- Tackle - Delivered changes quickly
- Support - multiple version of software and patches
- Really quick branch
- developers push directly to the main code line as it works through bug fixes, releases, and feature requests // every single time that you make a change, it goes right back into the main code.
- Advantages
- easier for a really small number of developers
- large code review process
- Branch per story
- creates a branch for each feature or task.
- Advantages
- enables independent and experimental innovation
- easy to segment
- easy to implement CICD workflows
- Small and medium size team
- older features difficult to Merge
- you can use flags inside of your code to say it's enabled or disabled for that particular feature. That way, you can continue merging the code in, and if it's disabled, nothing happens.
- All applicable per story
- Benches are created for all features per release.
- How: This is a release branch between the Development and Main branch, that way all of the different features and bug fixes that we create work into a release branch, and therefore it can be managed separately from the main branch and development branch
- Advantages
- supports multiple versions in parallel
- customizations for a specific customer
- difficult to maintain as you get more versions or customizations
- cannot have many changes or contributors
- potentially create more work for teams per version
Summary
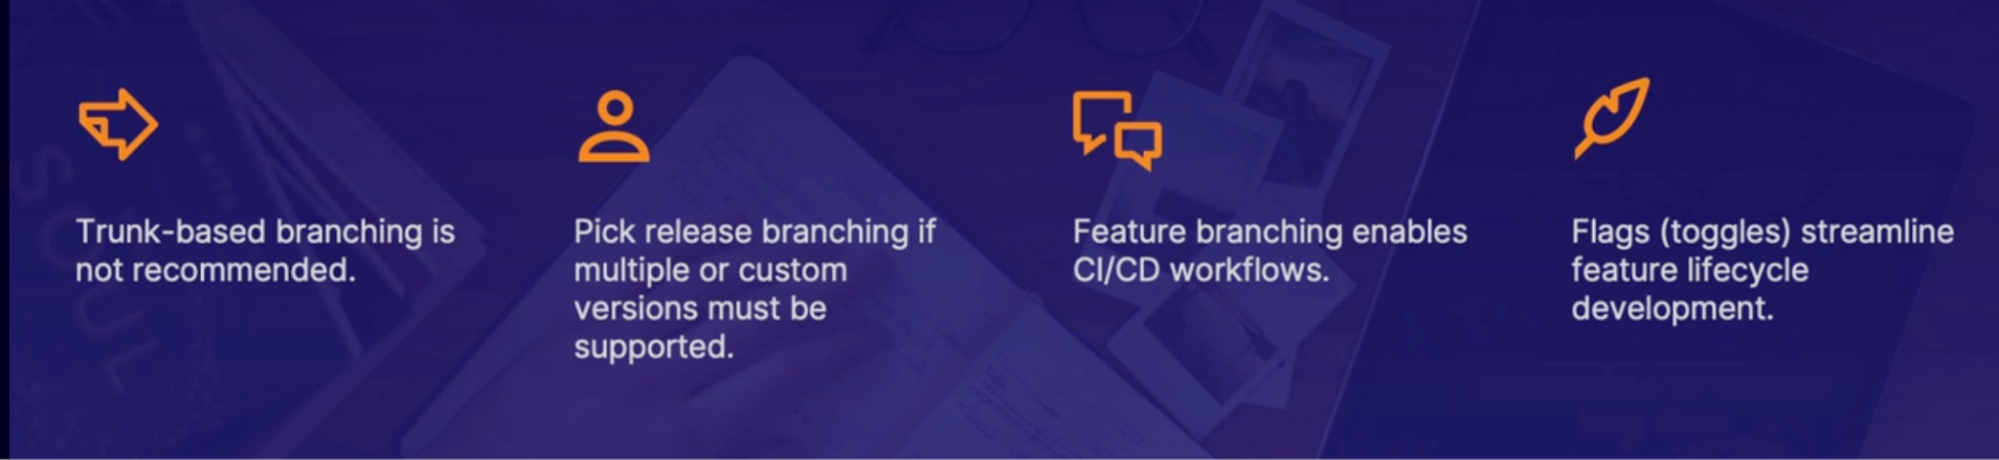
Pull request workflow
What is pull request
Goals
- Reduce bug introduction: documentation in full transparency enable team to verify changes before merging
- Encourage communication: feedback and voting in a collaborative atmosphere even in early development
- Speed product development: faster and more concise process ensures speedy and accurate reviews
What’s in the pull request
- what: an explanation of the changes that you made (context)
- why: The business or technical goal of the changes (the bigger picture)
- how: design decisions and rationale on code changes approaches (reasoning)
- tests: verification of test performed and all results (verification)
- references: work items, screenshots, links, additional downloads, or documentation (validation)
- rest: challenges, improvements, optimizations, budget requirements (other)
Pull request workflow
- Assign request
- Review code
- If good: approve the request: merge
- If no: Request change
Summary
- pull requests encourage collaboration and verification of valid code
- they contain the what, why, and how of the code changes
- they are used on a branch prior to merging
Code reviews
How can you make code reviews efficient
Code review assignments
Schedule reminders
Pull analytics
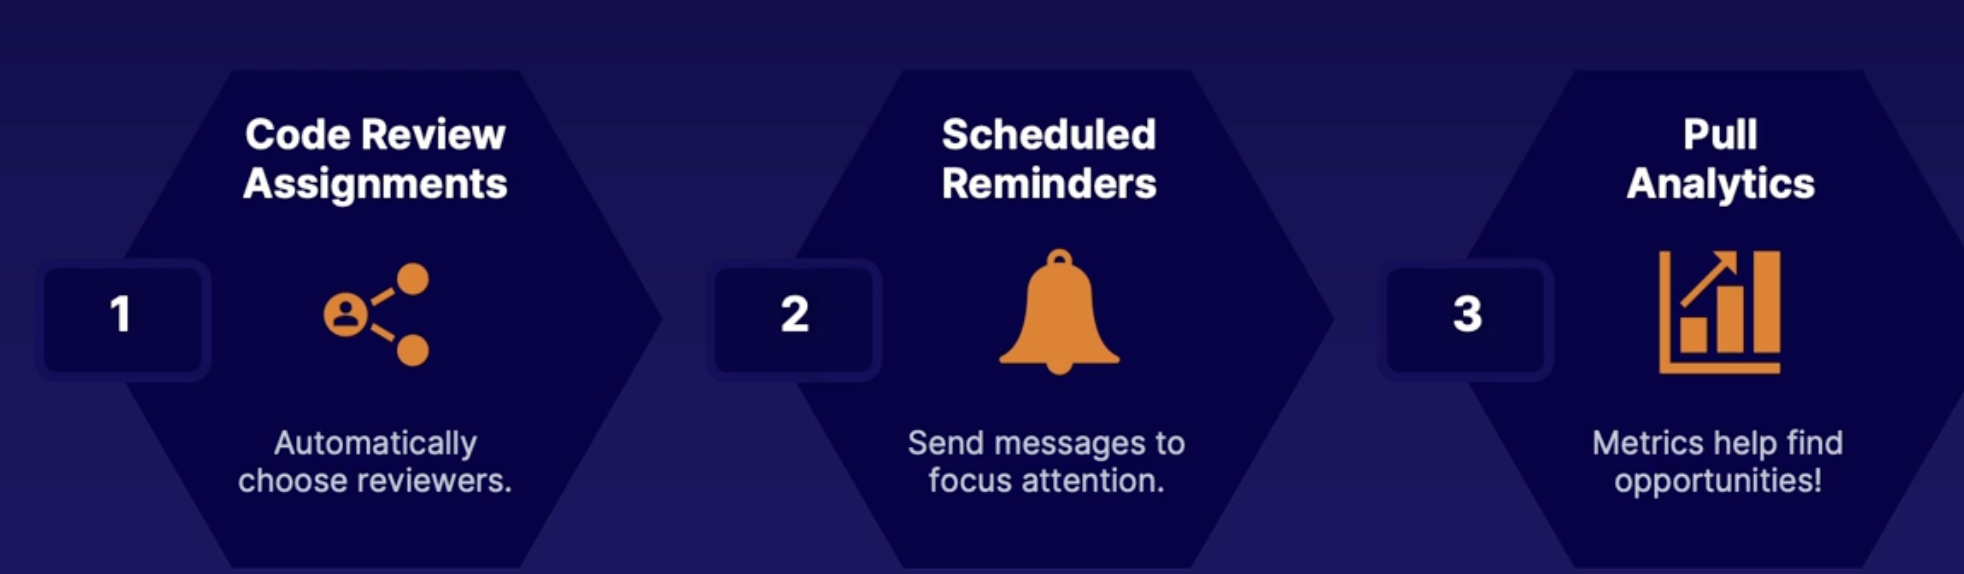
Demo
Objectives: review the following in GitHub
- Code review assignment
- Schedule reminders
- Pull analytics: pay feature in GitHub
Summary
- code review assignments: round-robin and least recent review request
- scheduled reminders: can have integration with slack or other tools
- pull analytics: decide how the teams will measure the effectiveness of peer reviews (smart goals)
Static code analysis
Static | Dynamic |
If you are reviewing code as it sits | Code that is currently executing/running |
Guidelines for effective code review
- Size limit
- less than 400 lines of code
- less than 60 minutes of review at a time
- Annotations
- authors should guide reviewers
- provide more in-depth context
- Checklists
- People make mistakes the same ones a lot
Code quality tools
Code scanning tools that help you weed out common issues like
- Coding errors
- Security vulnerabilities
- Find triage prioritize
Demo
Review the following and GitHub
- GitHub marketplace
- Code review
- Code quality tools: DeepSource(free)
- for pull request, you can use an application to automatically scan in addition to having a review or check the static code and dynamic state
Summary
- code analysis approach combination of both static and dynamic
- Integrate code scanning tools to automatically test quality and security
- use annotations and checklists to speed up code reviews and analysis
Useful requests with work items
The importance of relating work items
- Provide audit trail in the event of a catastrophic failure or legal issue
Demo
Objectives: review the following in GitHub
- pull request guidelines
- enforcing work item correlation
- Setting → repo → Branch policies → ON Checked for linked work items
Summary
- Use # to add work item references in a pull request
- It’s recommended to always correlate work items with pull requests
- it’s possible to close a work item with completed pull request
Lab: Configure branch policies in Azure Repos
- Create a New Azure DevOps Organization and Project
- Pull Code and Remove Remote Origin
- Add a New Member and Branch Policy to the Project
- Create a Branch, Pull Request, and Merge
- Import GitHub repo to your local environment OR Write your code in your local environment
- Add the remote location of Azure repos
- Push and existing repo from the command line to Azure repo
- Copy command
- Git Push
- On Azure repo
- Setting → repo → Branch policies → ON require a minimum number of reviewers
- allow requesters to approve their own changes
- Setting → repo → Branch policies → ON Checked for linked work items
Summary
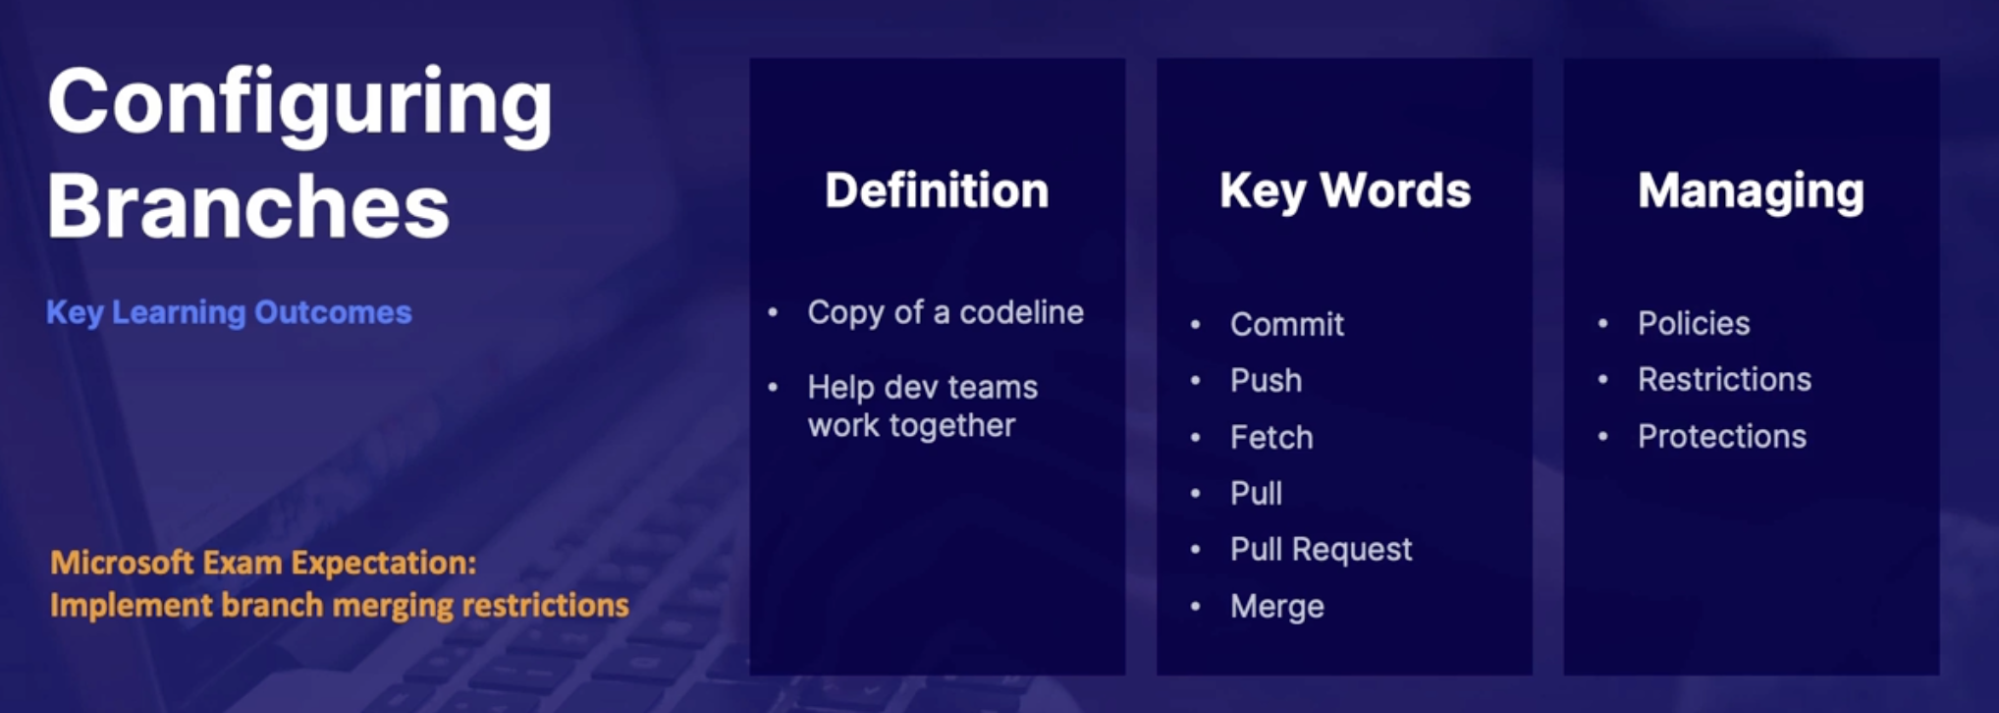
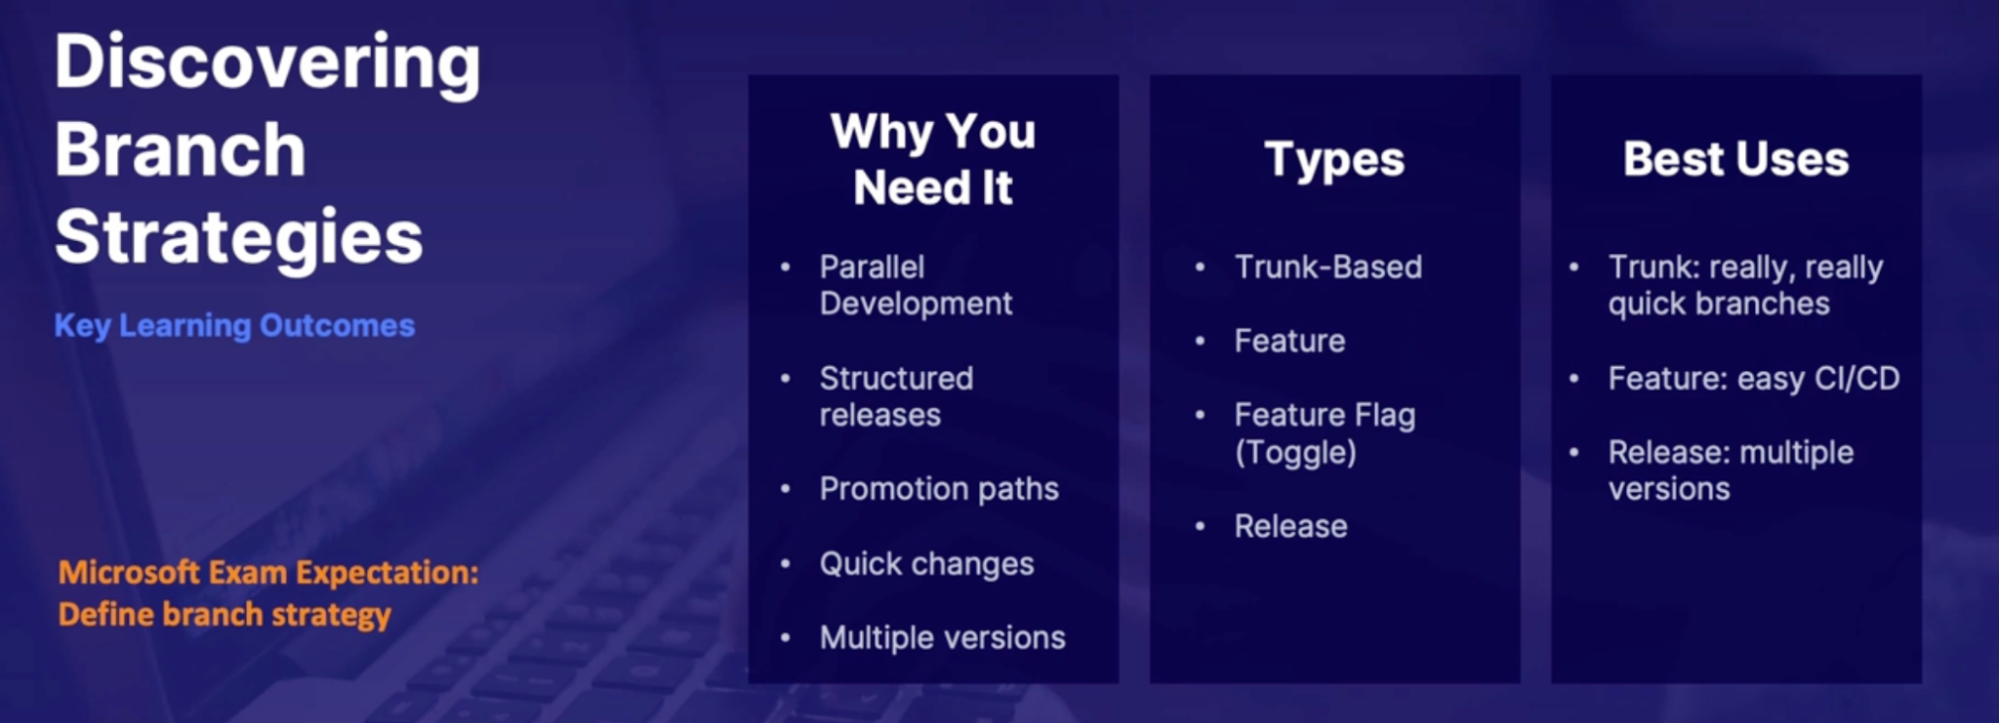
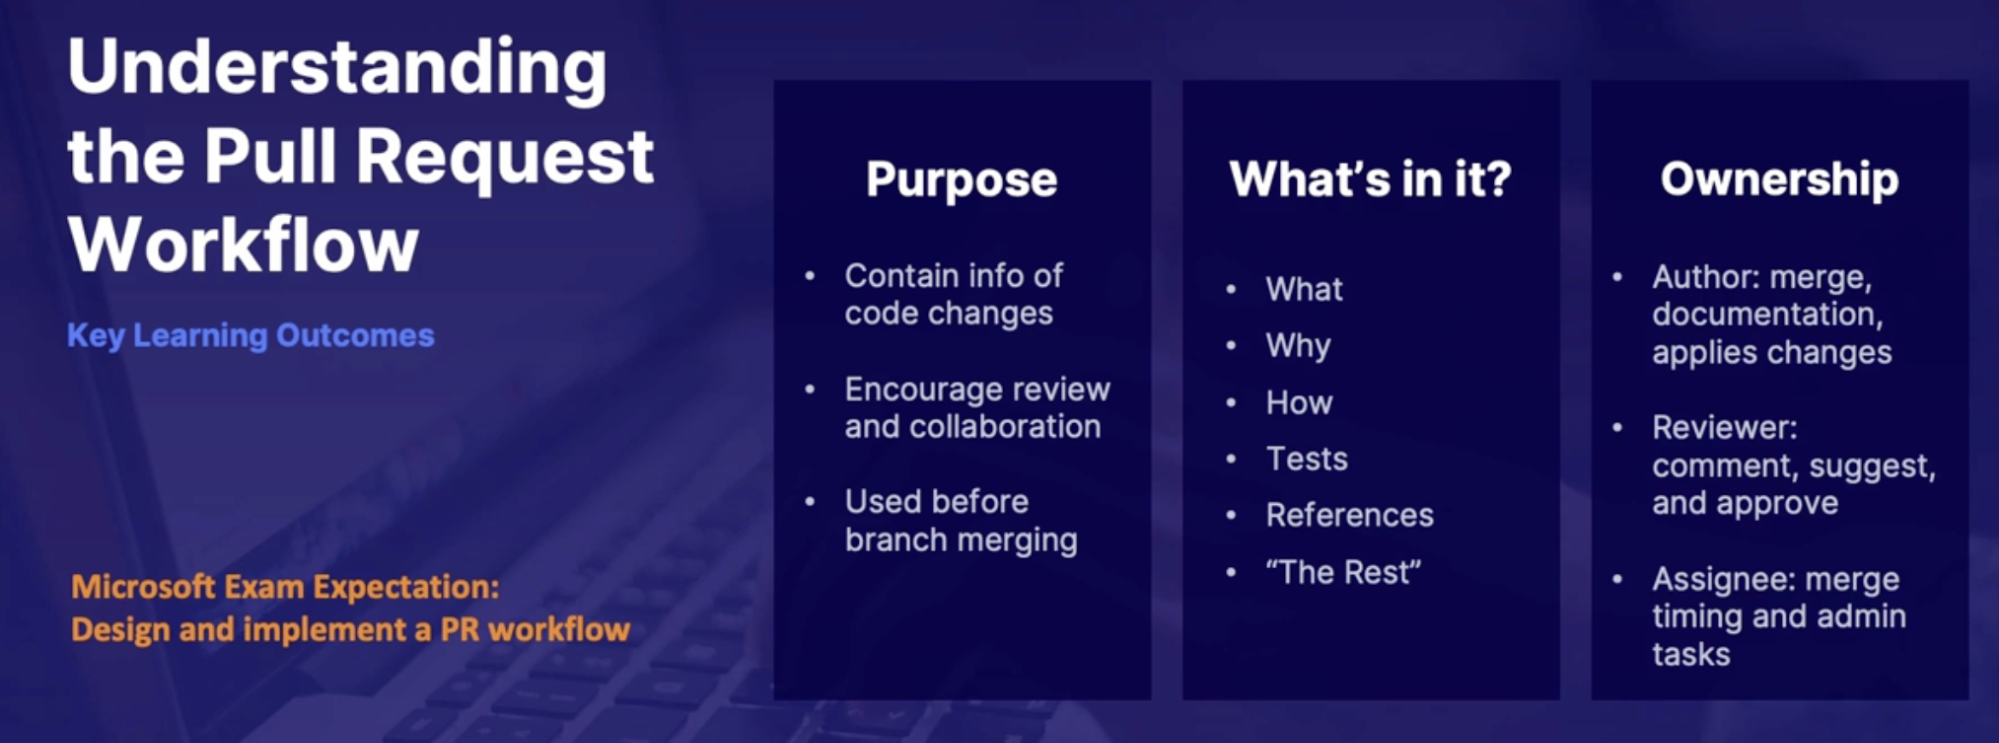
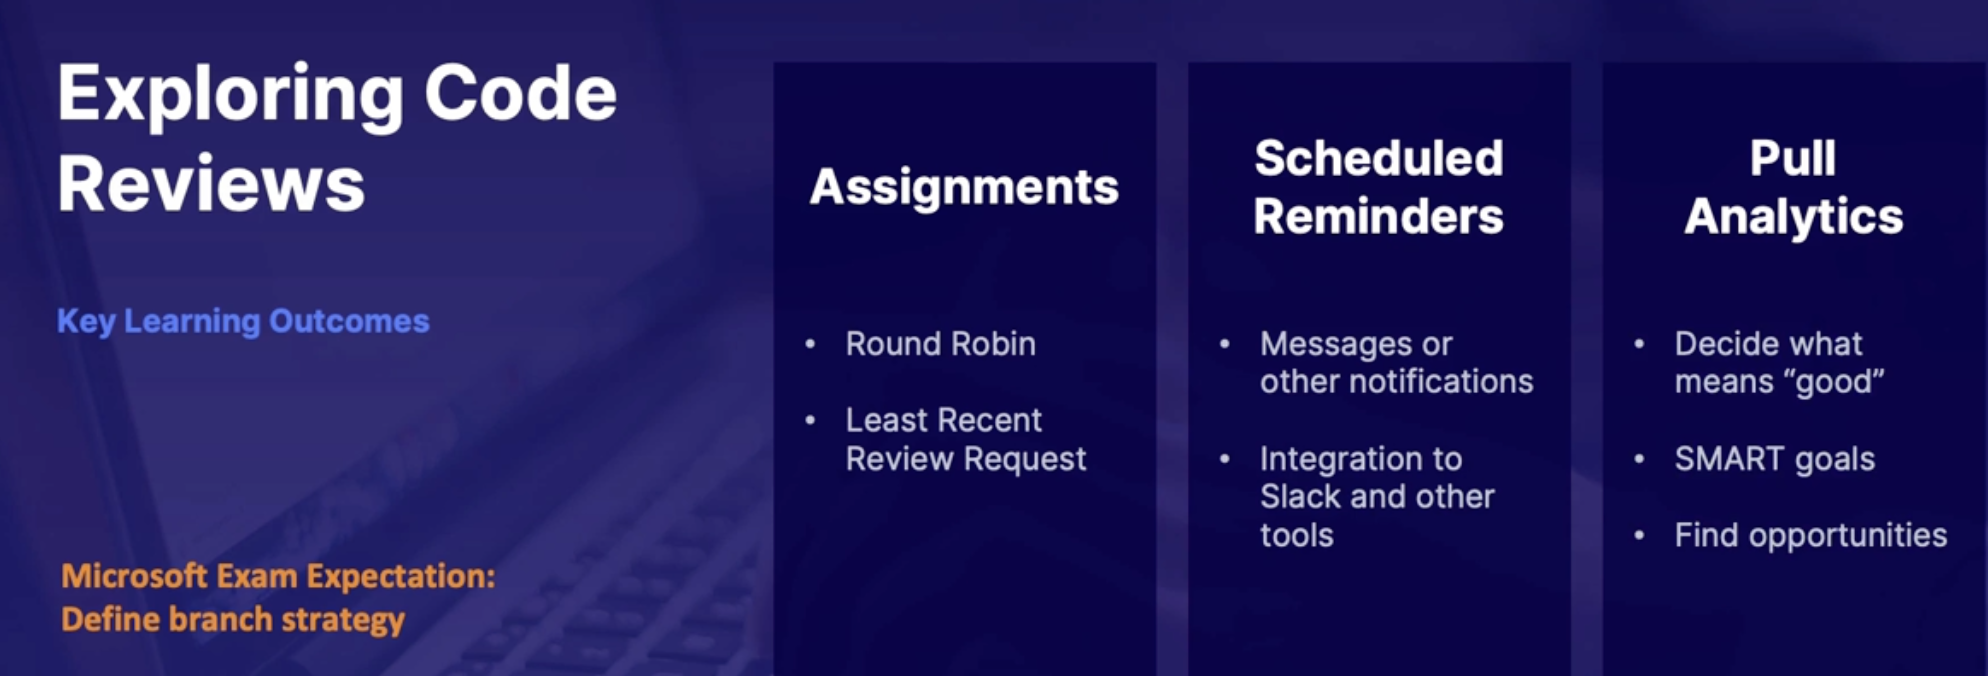
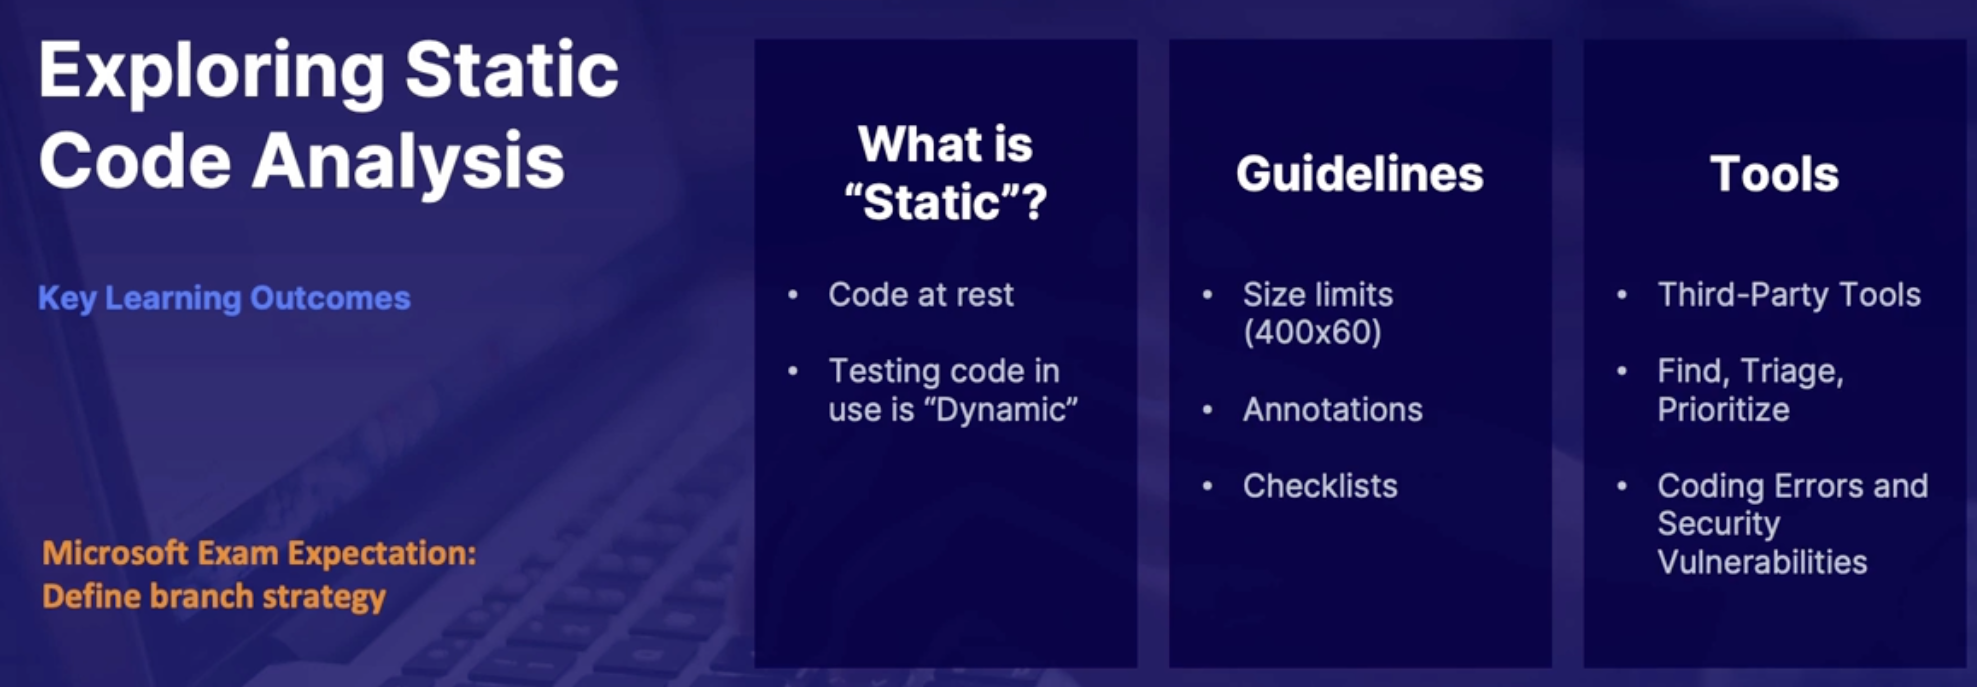
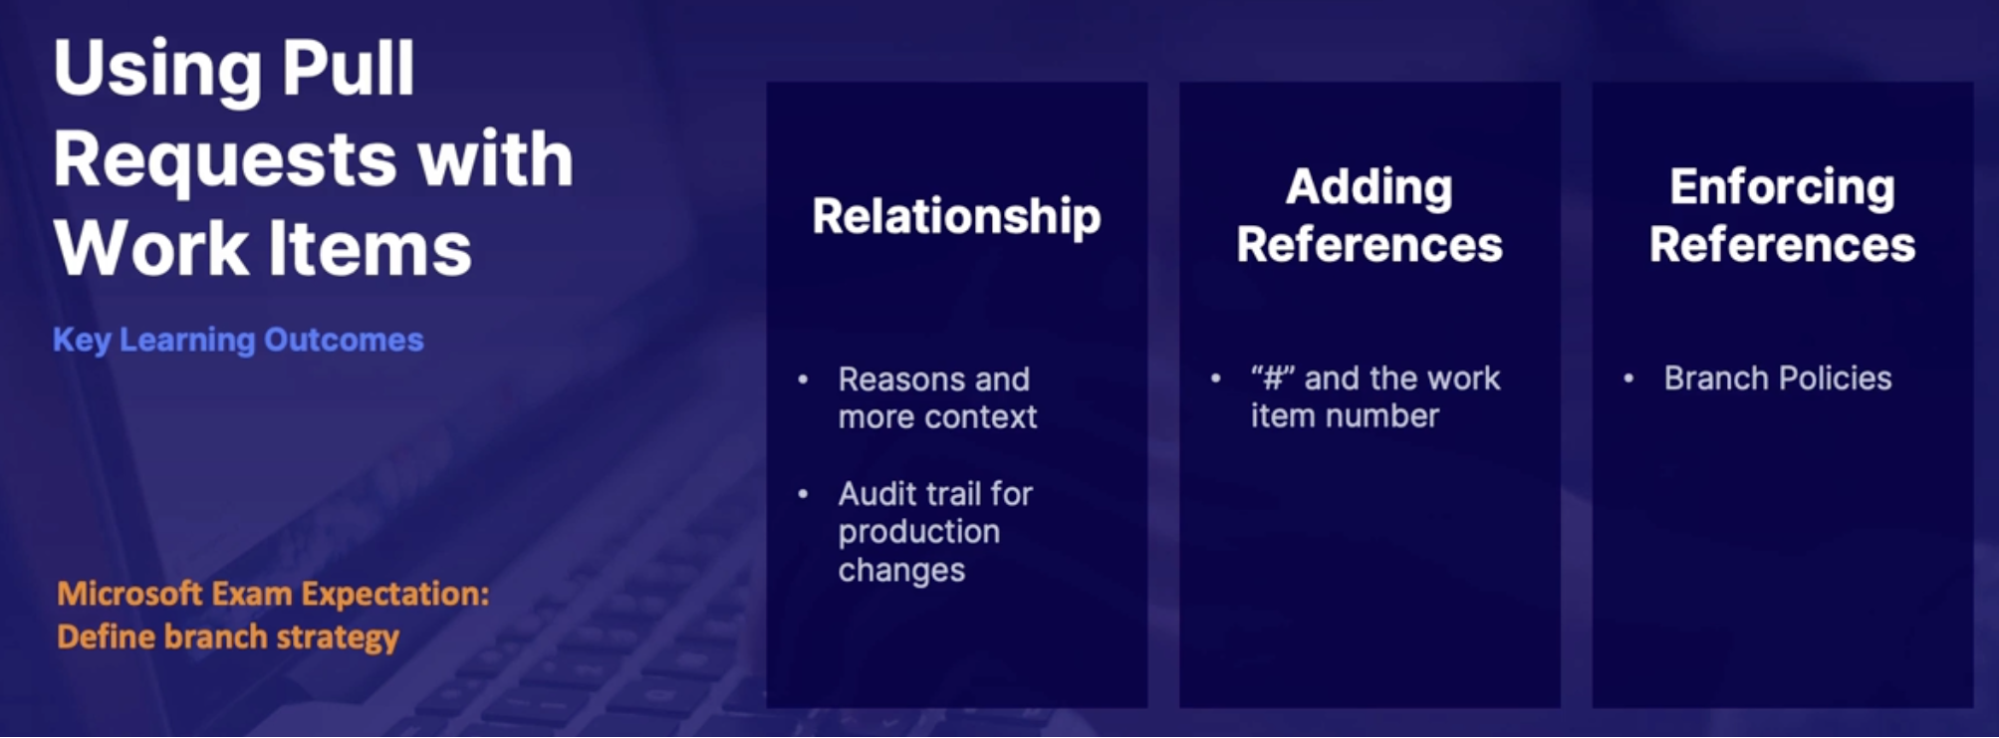
Chap - 6: Configuring Repositories
Using Git tags to organize your repository
What are Git tags, and why do we care?
Git tags are a built-in Git feature, which allows you to
- mark a specific point in a repository's history.
- notate specified versions - v1.1, v1.2, etc
- can add notes(annotations) on commit details
tags = special name applied to a commit
How to create tag
- Web portal
- Can view and create tag via a web portal
- Create annotated tags only
- Tag requires separate push in remote repo
- Local
- Add and commit changes
- Tag your commit by // git tag -a v1.2 -m “Updated html content”
- Git push your commit
- Git push your tag // git push origin v1.1
Tag types and how they work
Lightweight | Annotated |
No notes, just a tag name | Attach a note on tag details |
Simply a pointer to specific | Stored as a full object in Git database |
Ex: git tag v1.2 | Ex: Git tag -a v1.2 -m “Updated html content” |
Demo + Tags in Azure repos
- take over local repository and push to Azure repos
- Add and commit changes
- Tag your commit by git tag -a v1.2 -m “Updated html content”
- Check tag by // git tag
- Git push
- view tagging in Azure repos, and apply the tag via the web portal
Summary
- Git tags: special notes on importance of specified commits
- Tag types: lightweight, annotated
- Azure repos: annotated tags only
- Working with remote repositories: separate tag push required
Handling large repositories
Challenges of Large repos
- Challenge: Git repos are not bulk file storage
- small footprint intended
- some file types should not be used in repos
- however some large binaries must be included
- Why is Git footprint size important?
- cloning repo copies full history of all final versions
- frequently updated large files = serious performance issues
Solution
- use best practices to avoid size bloat
- know what not to include
- use gitignore file
- for unavoidable large files use git LFS
- clean up accumulated clutter with git gc
Working with Git large file storage LFS
- large file management built into Git
- Open source extension(separately installed)
- supported by popular remote repos(GitHub, Azure repos)
- Tagged large files stored by remote repo but as a placeholder in actual source code
How Git LFS works
- Install Git LFS for your OS
- Initiate LFS on your local environment // git lfs install
- Tag files to be added to LFS before committing them // git lfs track “*.psd”
- this result in a .gitattributes file
- Commit as usual. the remote repo will store tag to file separately
- text file will be marked in line with source code
Best practices for working with large files
what type of file you don’t want to include in LFS
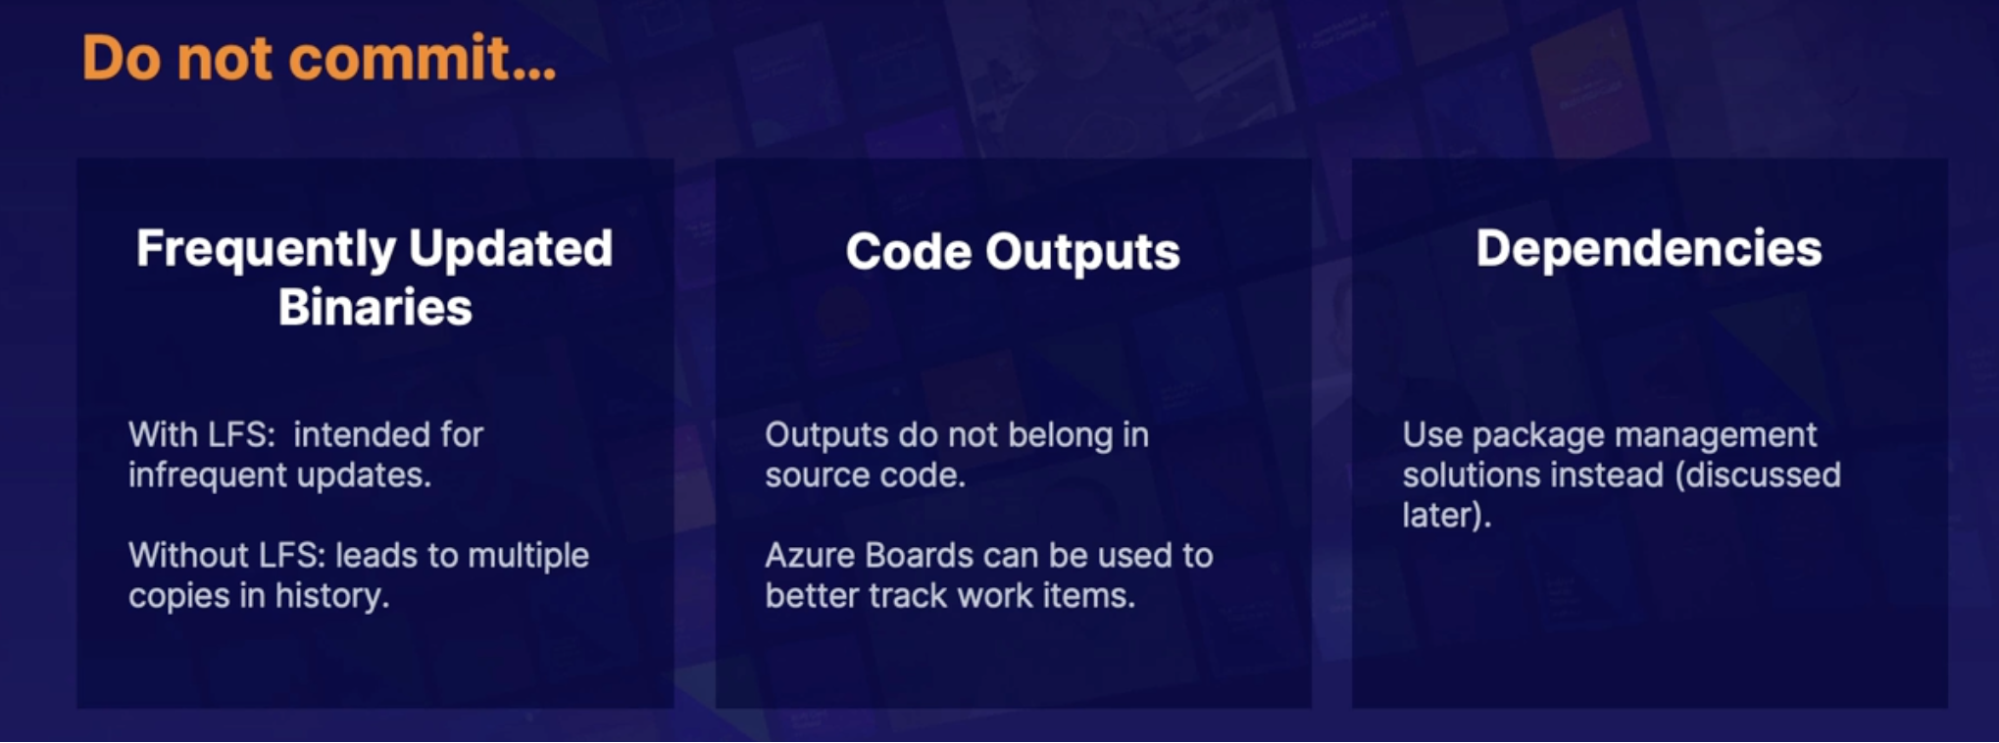
Clean up with git gc
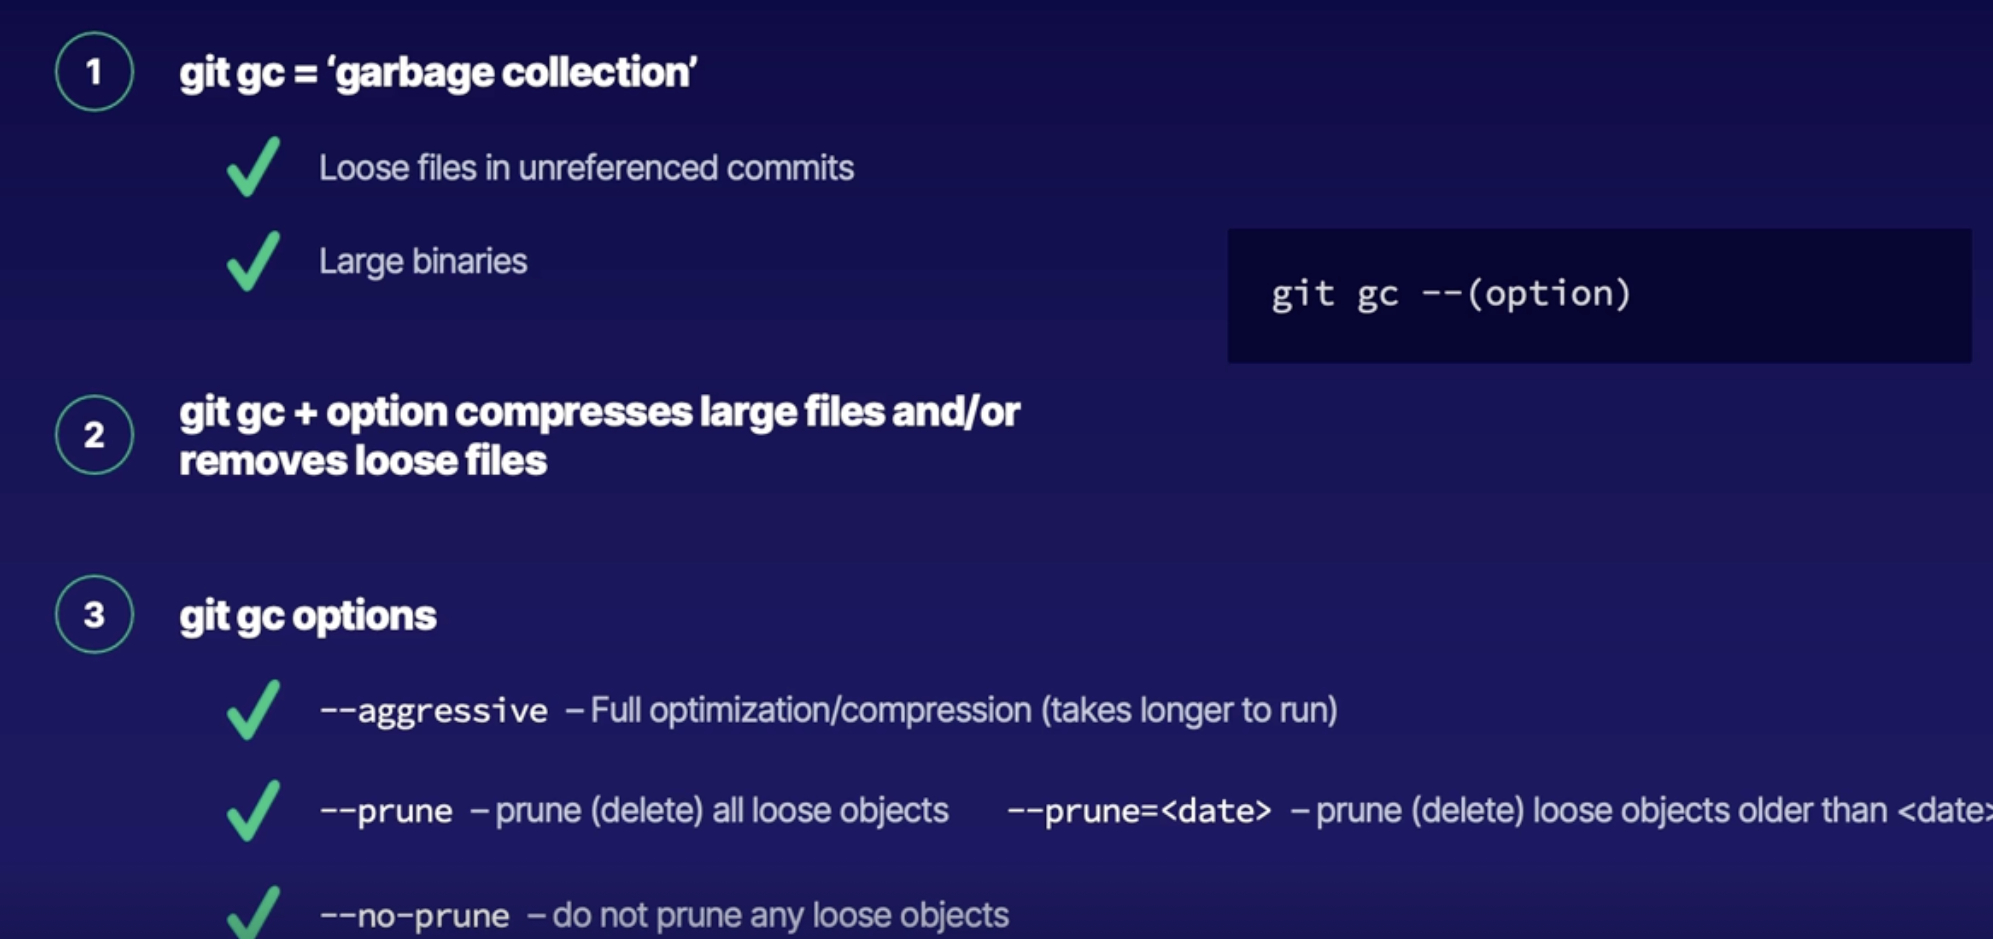
Summary
- Avoid large file bloat: large files in history drag down performance
- Git LFS: Open source large file management | remote repo markers
- Best practices: keep unnecessarily large files out of source code - alternative solutions
- git gc - garbage collection- know flag to keep/prune loose files
Exploring repository permissions
Branch permissions in Azure repos
- Branch level permission access
- provides users different access to different branches
- by default inherited from organization project level roles
- provides access to main branch but not sub brand or vice versa
How branch permissions work
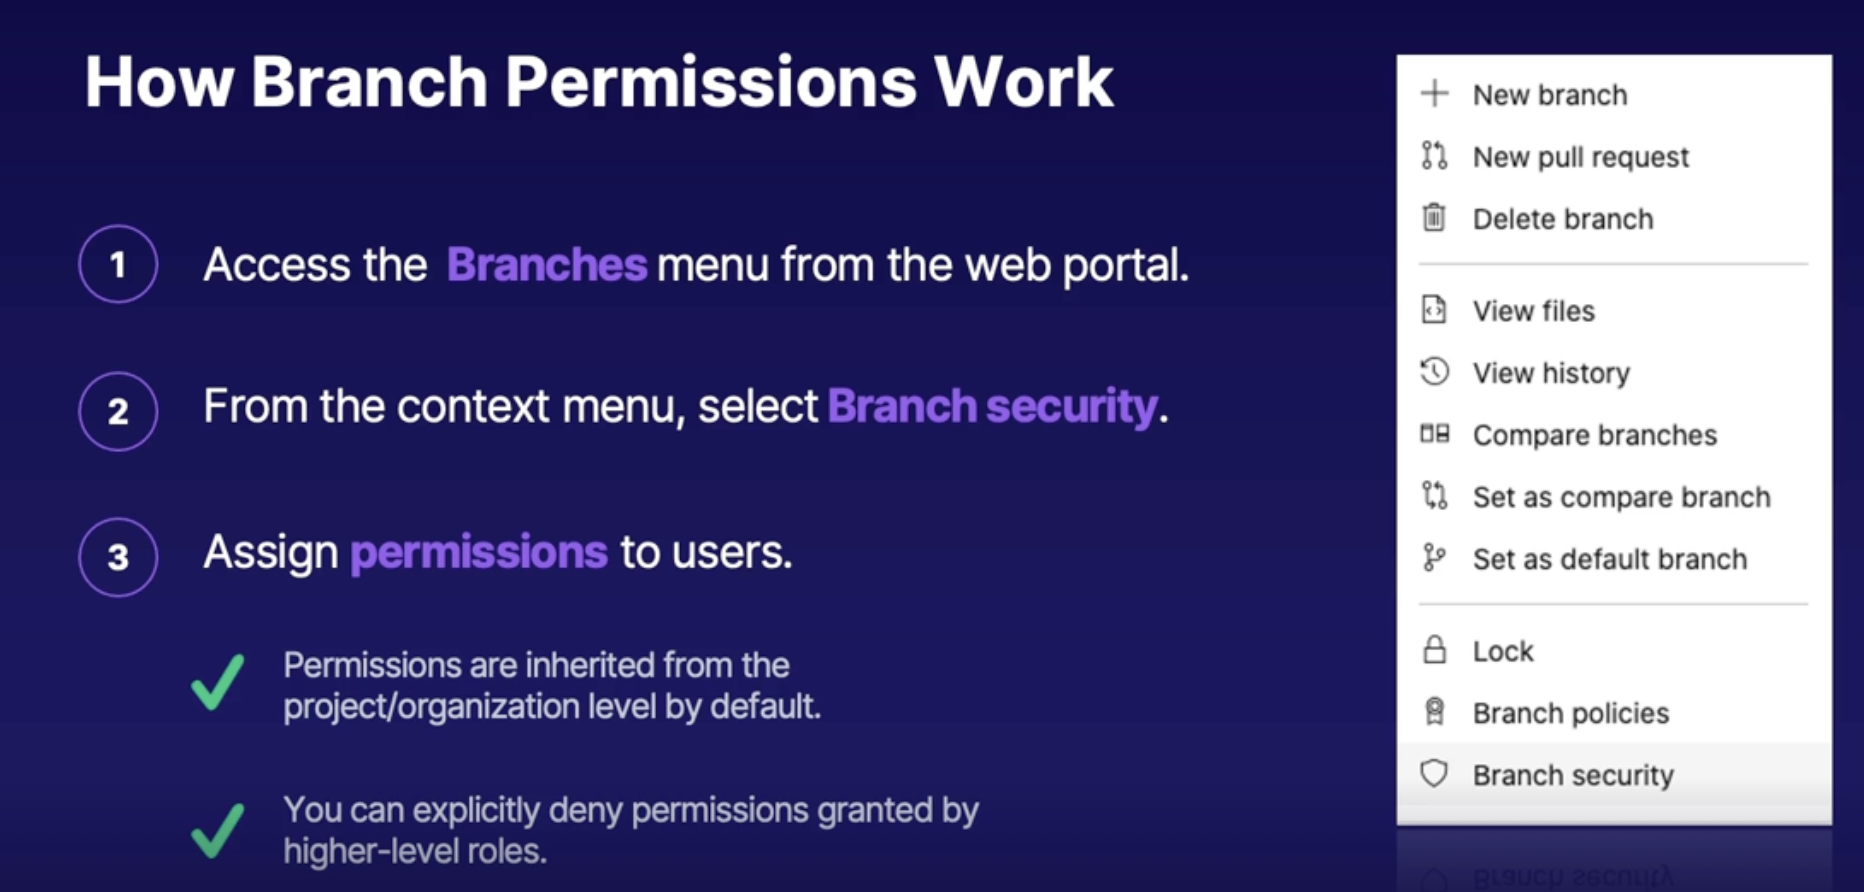
Branch locks
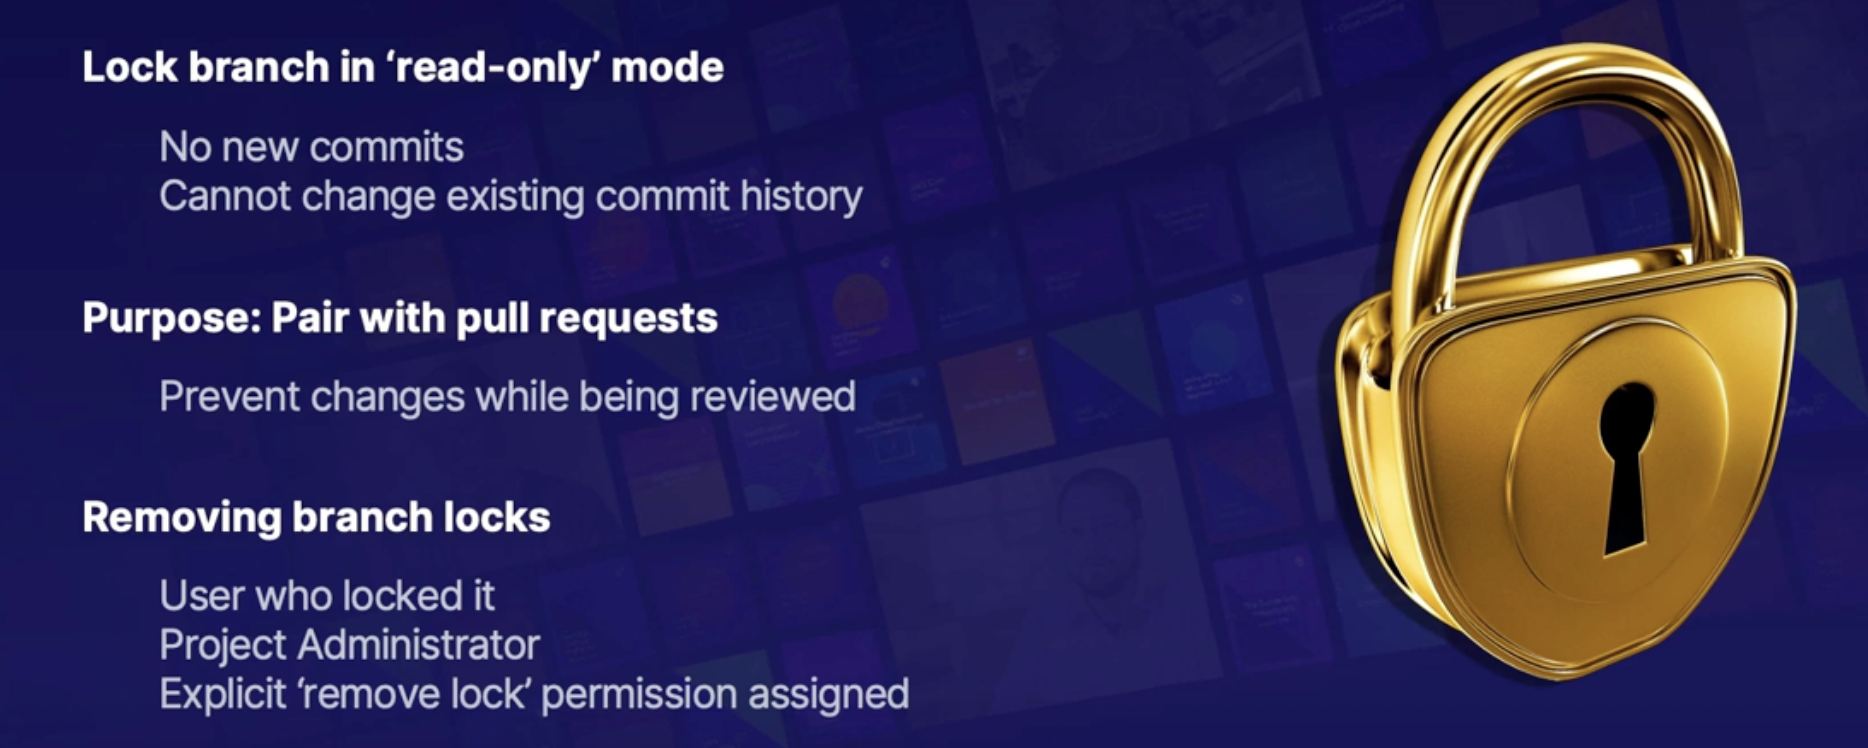
Demo: working with branch permissions/locks
- View new feature branch permissions
- view inherited permissions
- set new one
- explore branch locks
Summary
- Ability to manage branch level permission in Azure repos
- Inheritance: pull from organization/project groups | can add/override inherited roles
- Branch locks: lock a branch in read-only mode for pull requests.
Removing repository data
Challenges of removing Git Data
unwanted files in git
scenario: you mistakenly commit and/or push files that you should not included
- very large files
- Sensitive data( password,SSH Keys, secrets)
problem: deleted files from gnu commit still exist in the repo’s history
- still discoverable by searching through history
Solution: remove bad comments before or after pushing to a remote repo
- can also remove files from history with caveats
Unwanted file states
Local commit but not yet pushed | Pushed to remote repo |
Bad comment on local environment but not yet post to remote repo | Bad commit post to remote repo |
solution: remove/amend bad local commit | solution: delete remote commit |
| alternatively remove: unwanted file history with caveats |
- removing/amending local commit before push
- delete unwanted file
- remove file from git tree/index // git rm –cached <filename>
- delete or amend previous commit depending on what other data changed
- Entirely delete commit - git reset HEAD^
- Amend commit - git commit –amend -m “comment”
- Remove already pushed commit
- Reset back to last good commit // git reset –hard #commitSHA
- Force push to remove comments past the last good one // git push —force
- all branch commits past the recent one will be deleted.
File removal scenario
Remove unwanted files from past commit’s history
- there are multiple tools to remove files from past history some are official other community created
- git filter-branch: built-in method
- git filter-repo: officially recommended community solution
- BFG repo cleaner
- even after successful removal you can still view file history in the Azure repo’s web portal // in GitHub you’ll have to reach out support to see deleted file
Demo: Removing Unwanted files from Azure repo
- create and commit password file but remove before pushing
- add and commit changes
- delete unwanted file
- remove file from git tree // git rm —cached <filename>
- entirely delete commit // git reset HEAD^
- push bad commit then delete commit from Azure repos
- add, commit, push commit
- roll back to previous good commit
- get previous commit SHA // git log —oneline
- git reset —hard SHA-ID
- git push —force
Summary
- know removal methods for unwanted files
- removal methods:
- amend commit before pushing
- remove unwanted commit from remote repo
- remove unwanted files from history
- demo: fixing bad commits before and after pushing to remote repo
Recovering repository data
what do you need to do when you accidentally remove data from your repository
Recovery scenarios
mistakes happen
Scenario: You accidentally may delete something and you need to know how to get that data back.
- push the commits containing errors
- mistakenly deleted a branch in Azure repos
- mistakenly deleted entire Azure repo
what: Need to know how to recover or ‘rewind time’ in the above scenario
Revert to previous commit
scenario: commits contains errors - need to roll back
- reset back to last good commit and resume development from there // git reset —hard #commitSHA
- coordinate with development team members to merge changes to reverted code
- known as rebase
Restore deleted branch from Azure repos
- in Azure repos, from the branches view search for the deleted branch
- branches —> search branch name(menu)
- at bottom you’ll see deleted branch
- from the deleted branches search, click restore branch
- from context menu click on restore branch
Restore deleted Azure repository
- despite warning repo is in a soft delete state and can be restored
- Restore via an authenticated API call
Demo: recover deleted branch
Summary
- Be familiar with multiple repo recovery scenarios/resolutions
- Revert to previous commit
- Restore deleted branch
- Restore deleted Azure repo
Summary
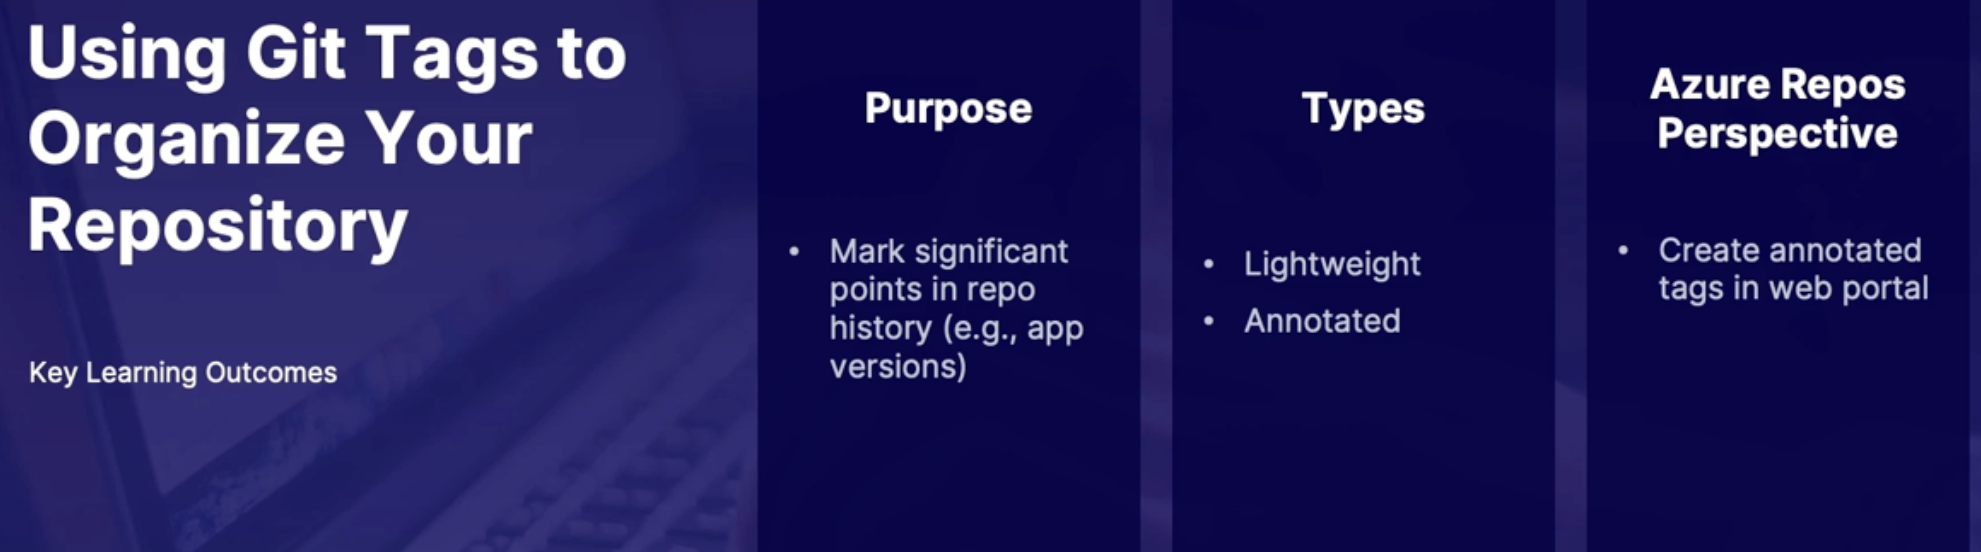
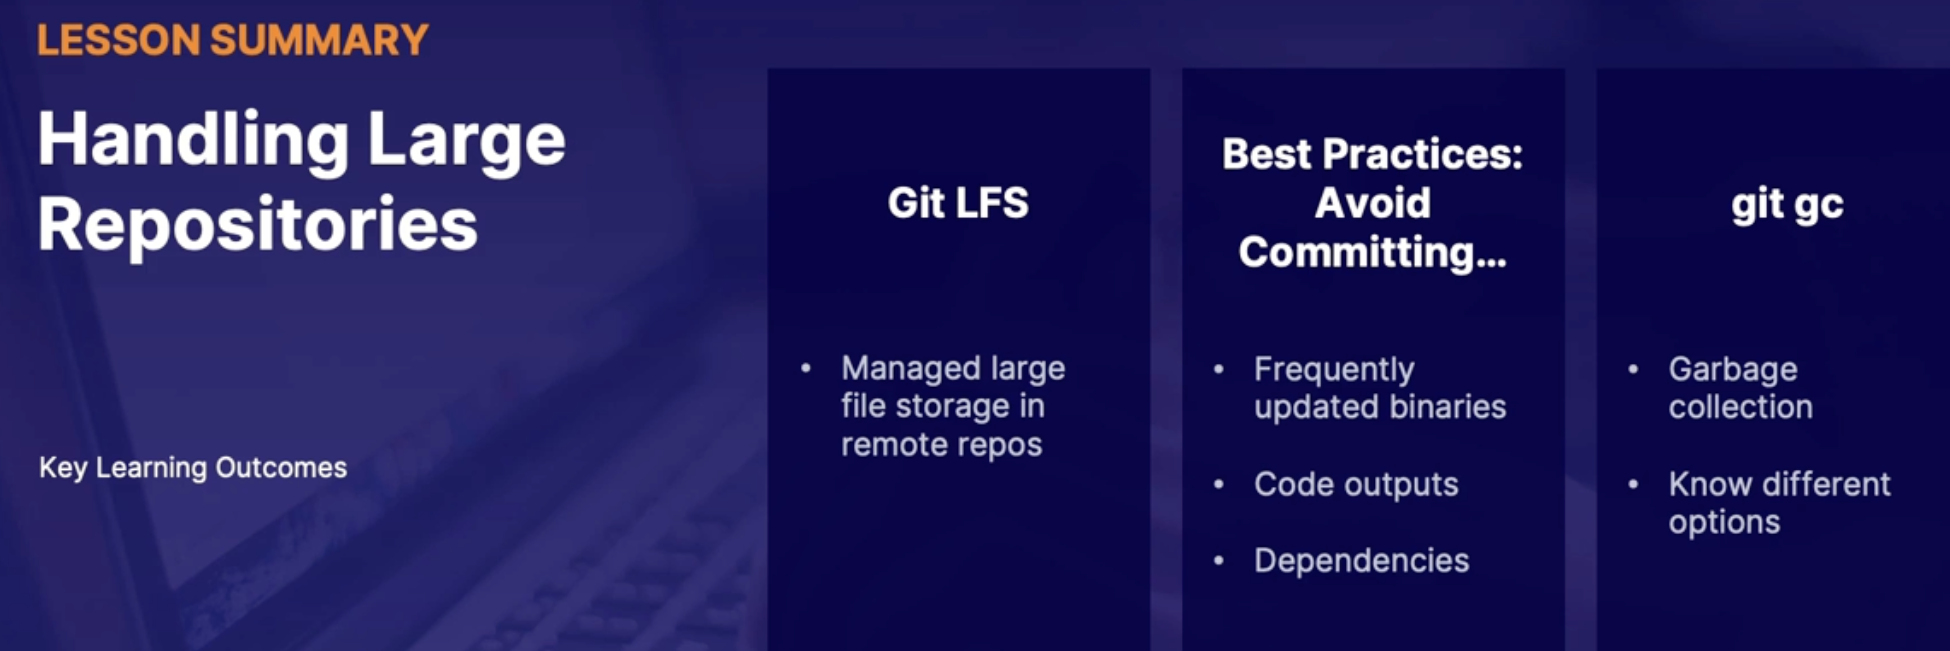

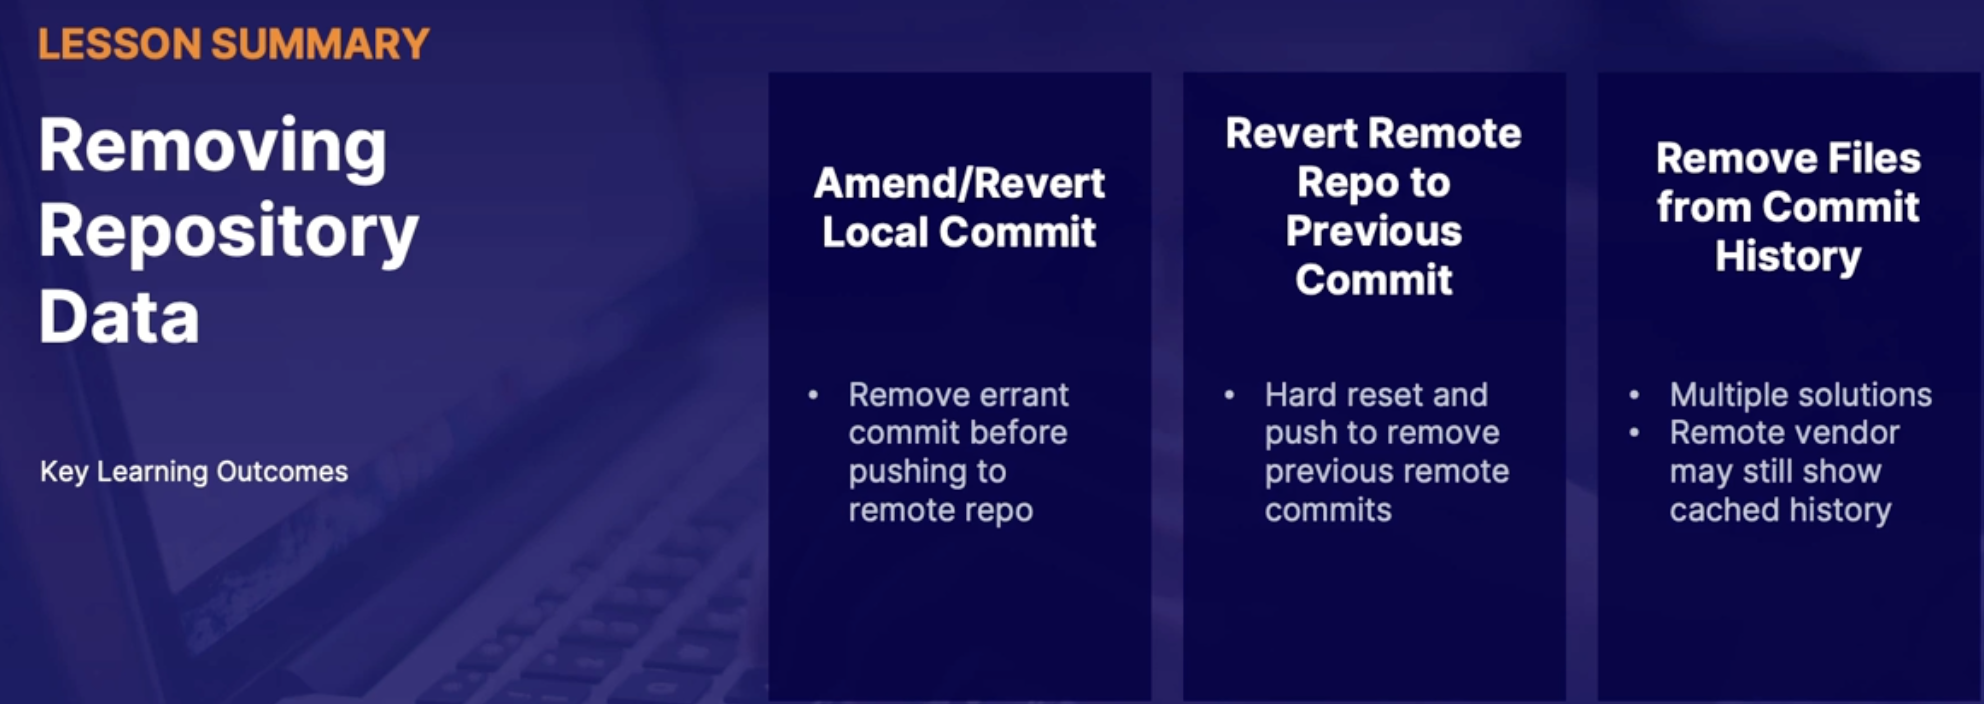
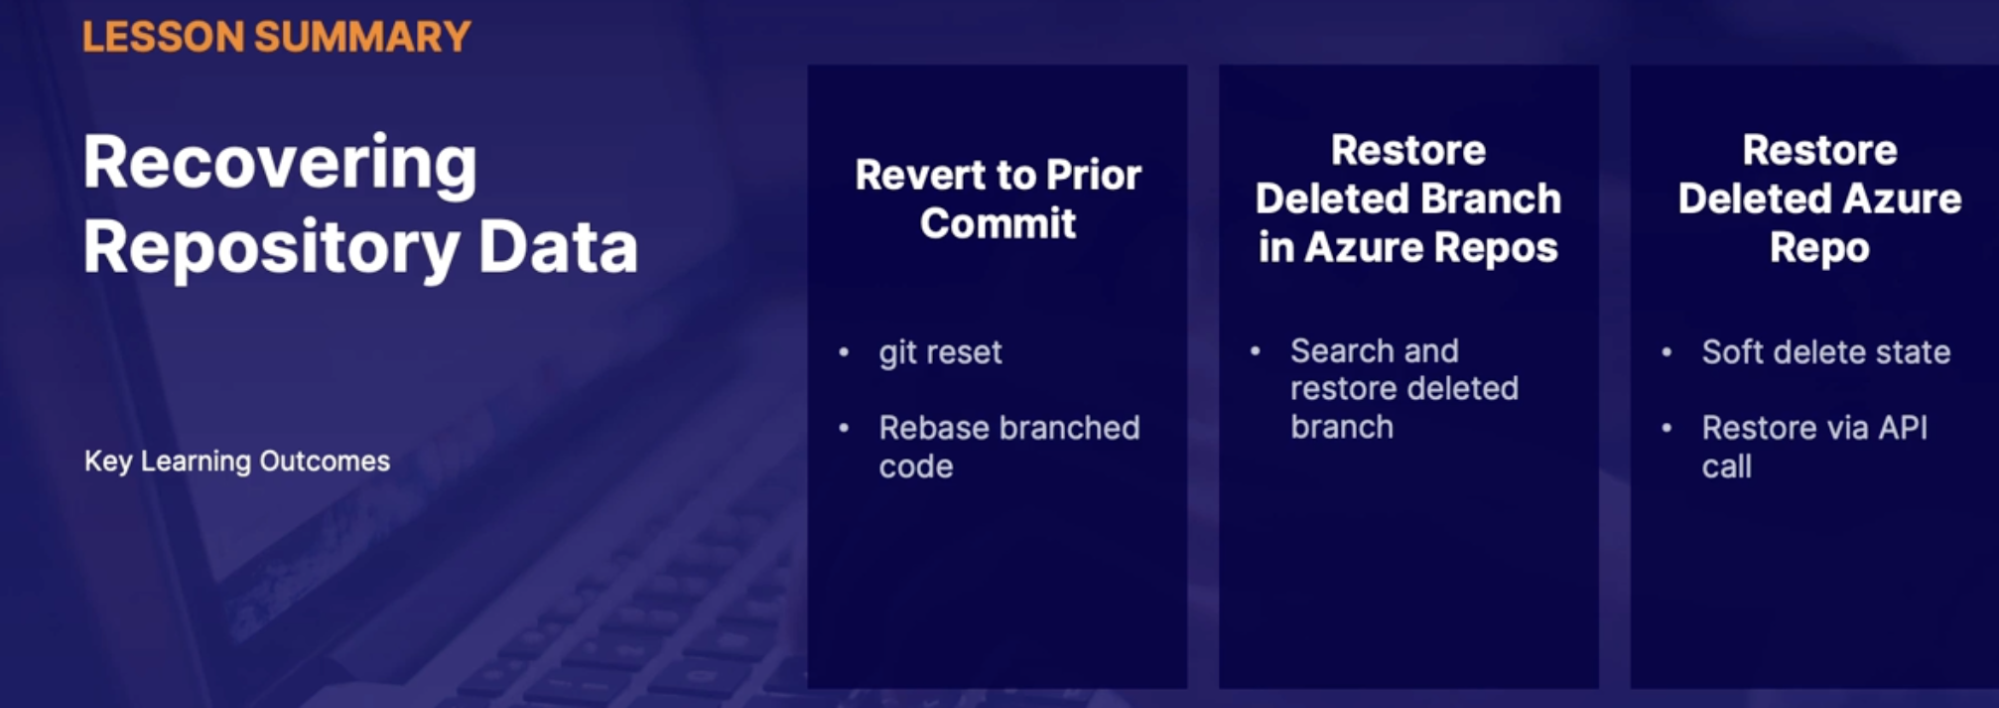
Chap - 7: Integrating source control with tools
Connecting to GitHub using Azure active directory
What: how to connect a GitHub Enterprise account to Azure Active Directory using single sign-on.
Link: https://docs.microsoft.com/en-us/Azure/active-directory/saas-apps/github-enterprise-managed-user-tutorial
Advantage of AAD integration
- Why this matters
- by default GitHub and AAD identifies are separately maintained // different passwords for different applications
- however we can integrate GitHub identities with AAD using single sign-on(SSO)
- advantages of GitHub/AAD integration
- manage GitHub account from a central location Azure active directories
Requirements for connecting to AAD
- must have GitHub Enterprise cloud organization from GitHub side in order for SSO to work
- GitHub team plan unable to use SSO // won’t work on team plan
- permissions
- GitHub: administrator
- Azure: create SSO - Global admin, cloud application administrator, application administrator
Azure AD SSO configuration
- add GitHub in enterprise application
- Configure SAML SSO configuration with GitHub enterprise account
- like to GitHub Enterprise organization: GitHub org identifier, reply URL, sign on URL
- set User attribute: don’t need to edit default settings
- download base64 signing certificate for GitHub side
- add AAD user to GitHub SSO
GitHub enterprise configuration
- enable SAML authentication
- configure link to AaD tenant
- Login URL —> sign on URL
- AAD identifier —> issuer
- Open and copy/paste sign in certificate from AAD
- set signature digest method to RSA-SHA256/SHA256
Summary
- Configure SSO to manage GitHub enterprise users from a single AAD location
- Requirements: GitHub enterprise cloud
- high-level process: Azure AD and GitHub linking steps
Introduction to GitOps
automation process
What is GitOps
- DevOps approach to deploy infrastructure as opposed to deploying applications
- automation pipelines for deployment
- tracking of updates/changes with source control
- Git = Single source of truth for infrastructure version control
- GitOps management example
- kubernetes manifests
- infrastructure as code: terraform, ARM Template
Sample GitOps workflow
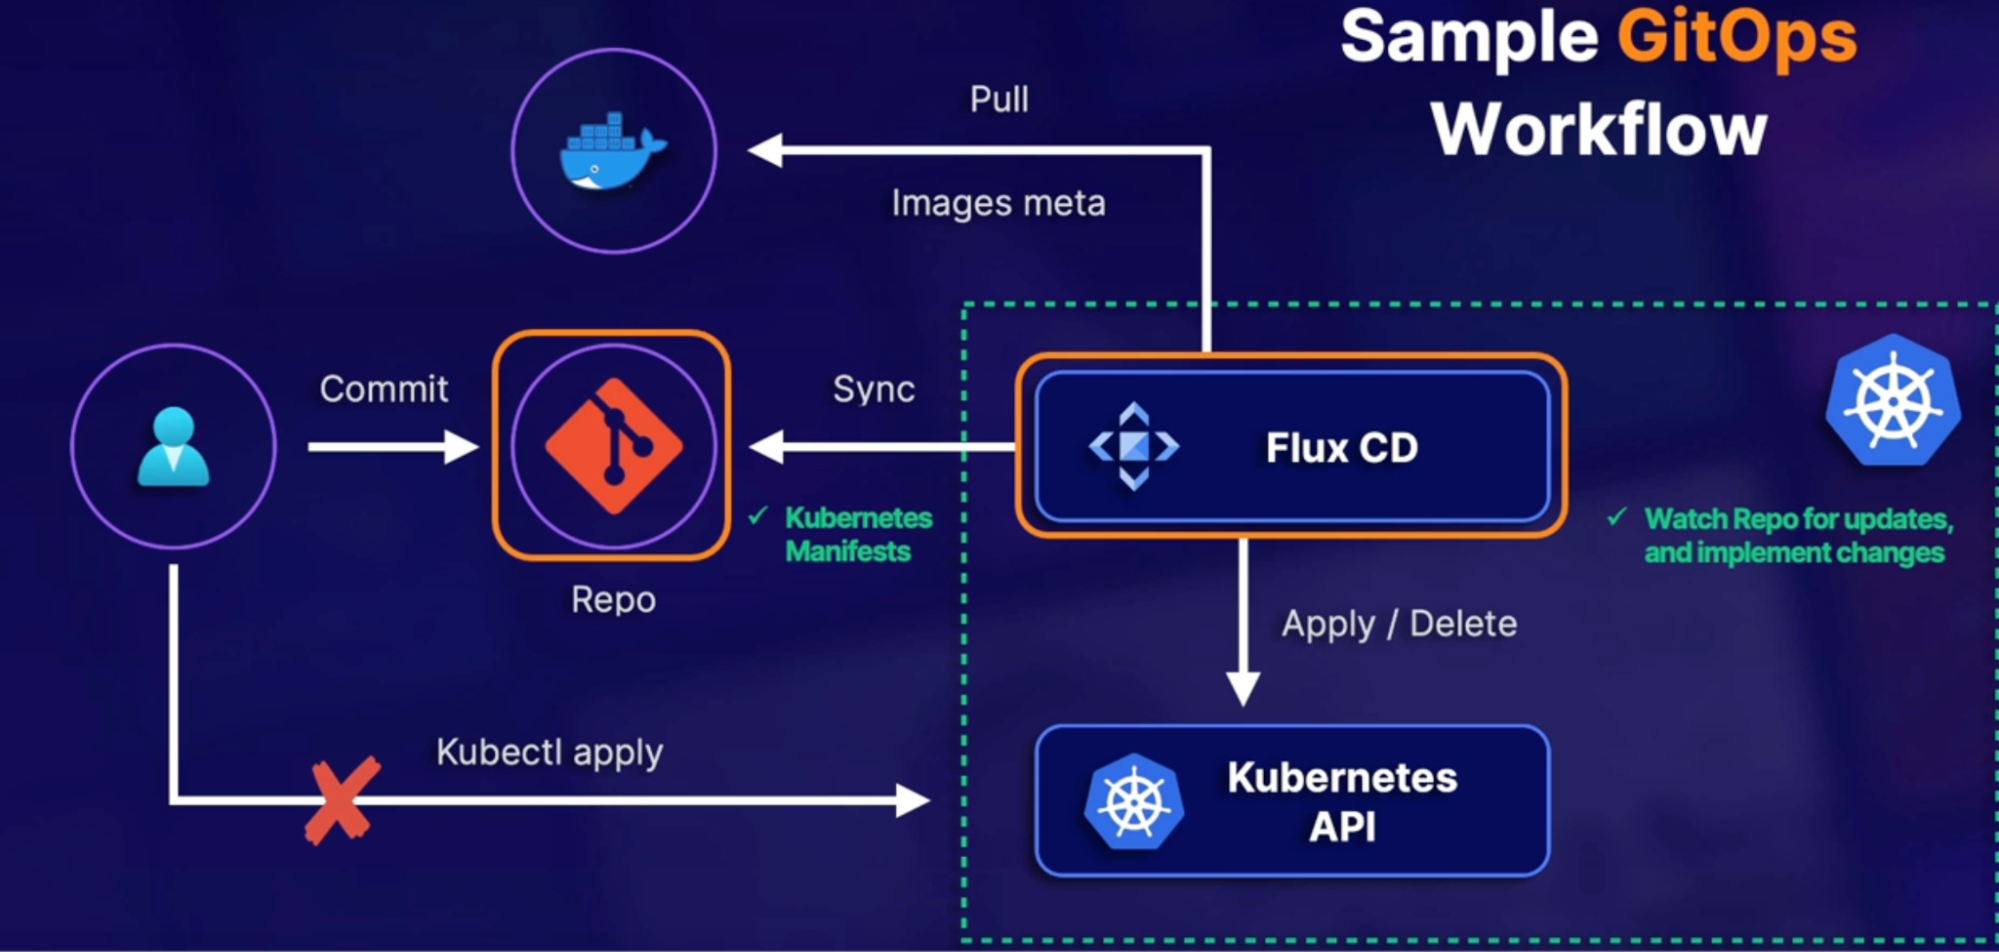
- flux CD: tracks the infrastructure changes and deployed to Kubernetes environment
- repo: stores kubernetes manifests (deployment, replica)
- Every time you make changes to manifest files in repo, flux CD will take those new changes and automatically applied to Kubernetes cluster
Why:
- if we did not have an application automatically deploying these changes for us,
we would instead be using kubectl commands, like kubectl apply, to mainly take container images, and apply it to our Kubernetes cluster.
- However, using a GitOps workflow, Flux CD will automatically view new and updated manifests in our source repositories, and it will automatically carry out those Kubernetes changes on our behalf / we do not have to manually update our Kubernetes cluster every time we update a manifest.
Exam perspective
Understand scenarios that call for GitOps
- need for automation for deploying infrastructure(Kubernetes, Terraform)
- manage our infrastructure deployment using version control, or source repositories.
Summary
- Understand role off GitOps for automated infrastructure management
- Role of source control: host infrastructure manifests/changes automatically deployed
Introduction to ChatOps
What is ChatOps
All about automation
- ChatOps is automating event communication to collaboration tools
- new commit pushed to repo, new pull request
- build pipeline success/failure
- integrate collaboration tool with Azure DevOps
- ongoing topic throughout course
How to connect Chat apps to Azure DevOps
Connect various collaboration or chat applications with Azure DevOps working with both portion control and pipeline
- depends on the application
- some apps support native integration(MS Teams)
- generally, service hooks publish events to subscriptions (applications)
service hook: feature within Azure DevOps that is able to published events that take place inside of your pipeline to different subscribed applications
- configure service hope to publish requested events to application
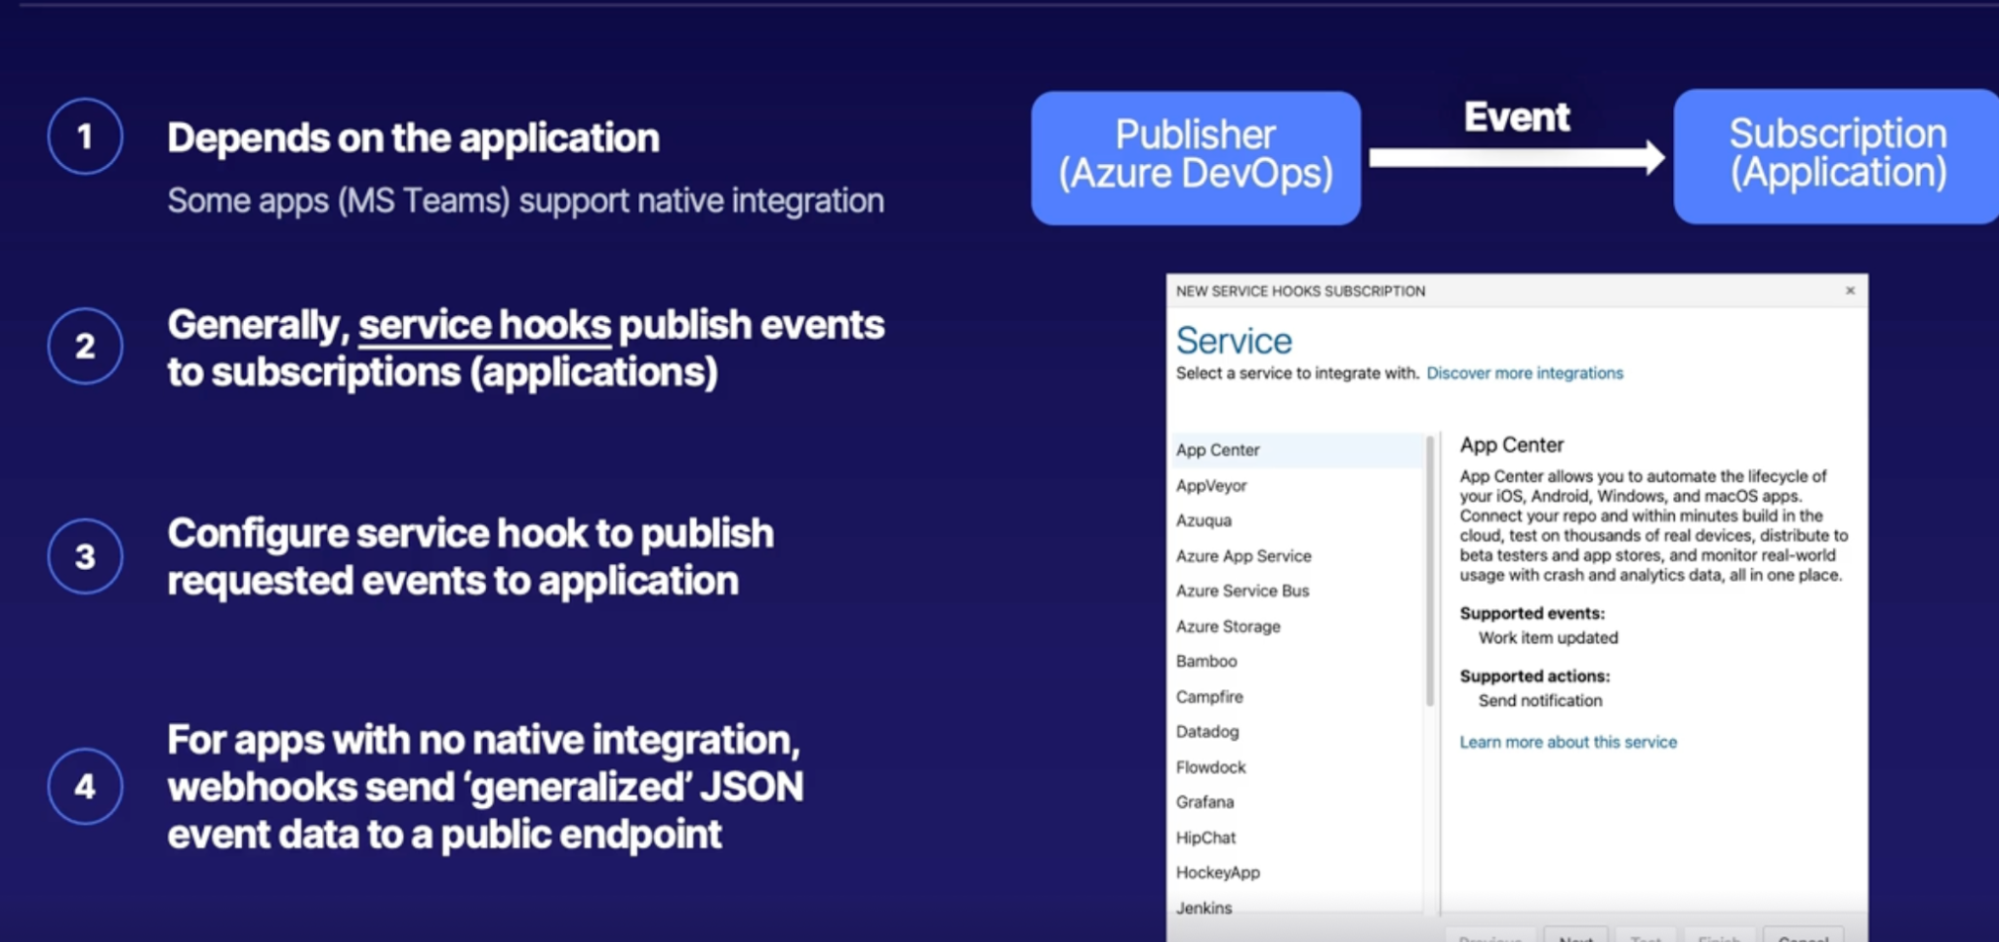
Demo
- explore service hooks/webhooks in DevOps project
steps
- Azure DevOps —> project settlings
- general —> service hooks
- create subscription
- select your service
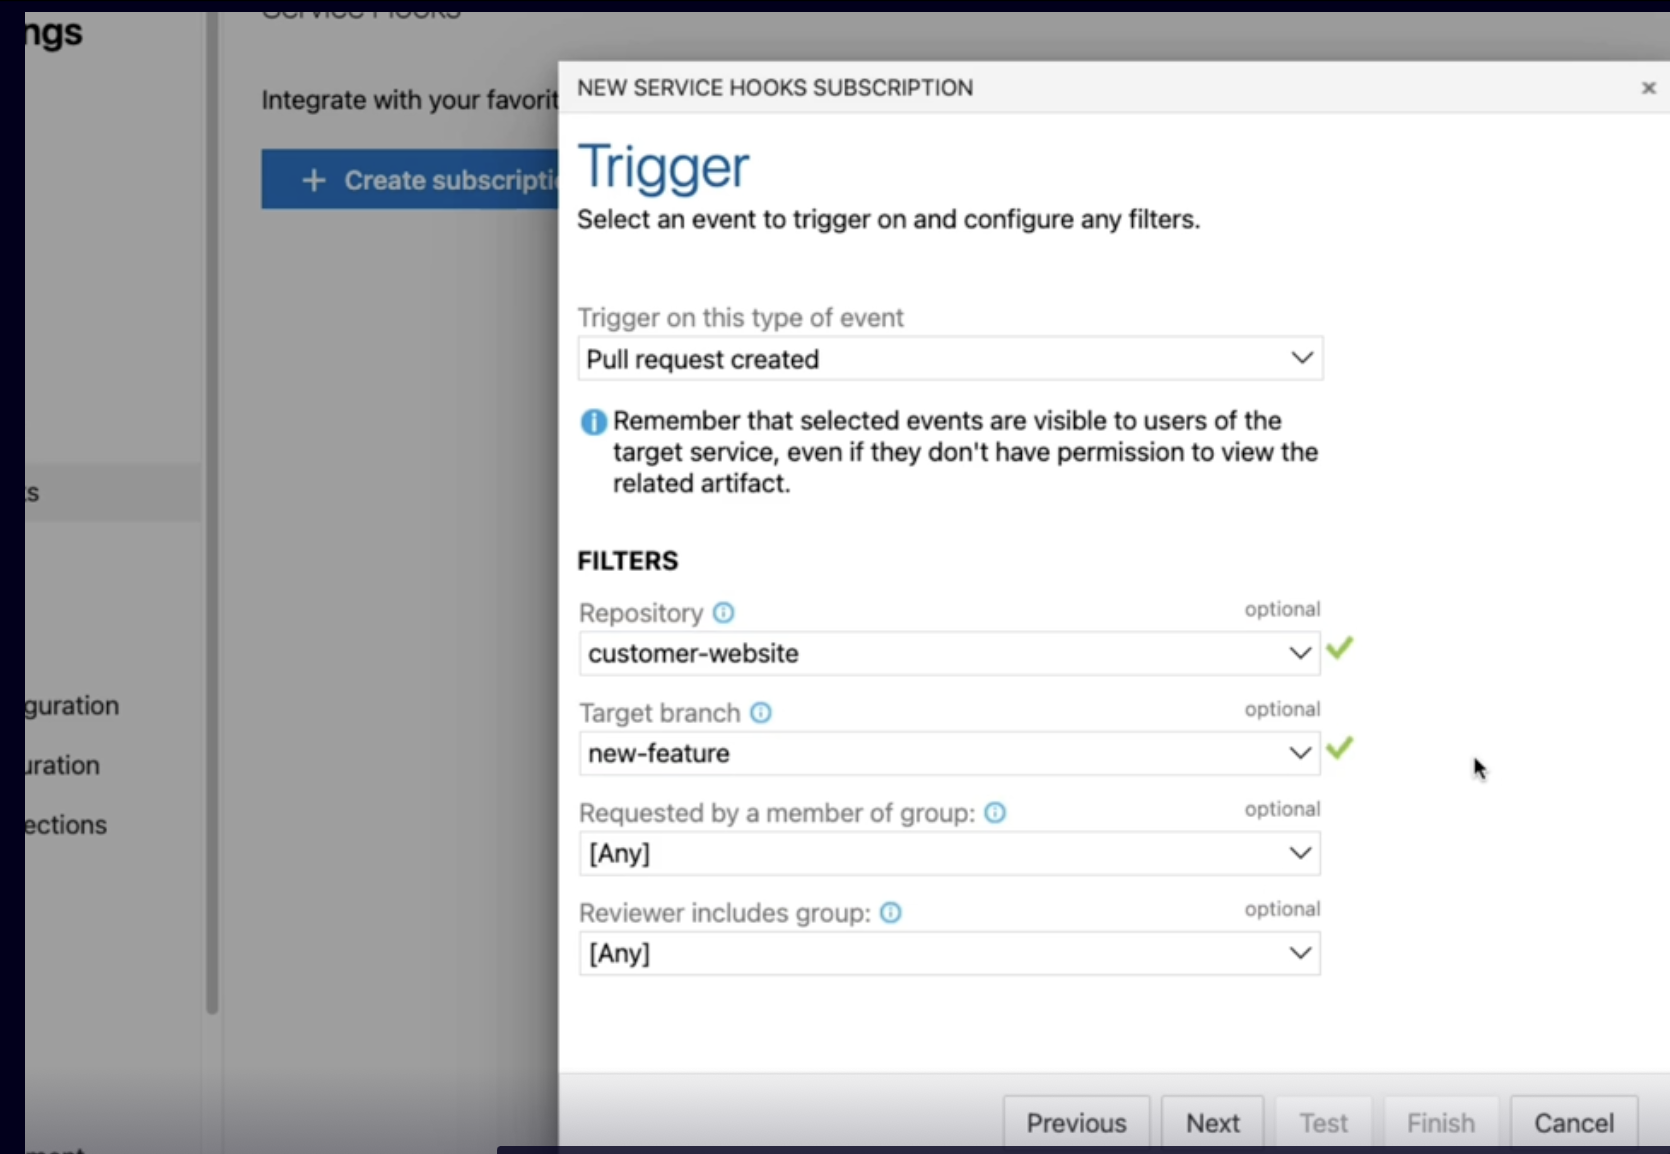
Summary
- understand the importance of ChatOps for DevOps event communication
- general ChatOps Configuration: Service hooks publish event data to subscribed applications
Incorporating Changelogs
How to work with logs generated about what happened in source repo within a DevOps pipeline
What is GIT Changelogs?
- Record of changes(commits) in a project lifetime
- who did what and when
- why do we care about Changelogs
- keep running list of changes/updates
- useful for teams working on a single project
Manually creating/viewing Changelogs
- git log command - git log
- options to clean log output
- one line summaries - git log —online
- remove commit ID, custom elements - git log —pretty=“- %s”
Automation options
- third party applications
- GitHub Changelog generator Auto Changelog
- IDE Plugin
- visual studio Changelog plugin
- pipeline plugins
- Jenkins has a Changelog plugin
Demo viewing Changelogs via command line
- view and create Git Changelog
- View formatting options
- Export to text file
steps
- git log to see common logs
- concise logs // git log —oneline
- customize output - input dash as a header —> git log —pretty=“- %s”
- Export to text file // git log —pretty=“- %s” > txt.file
Summary
- Git Changelog provides a history of project updates
- IDE & pipeline plugins
- Manually viewing/creating Changelogs with formatting options
Summary
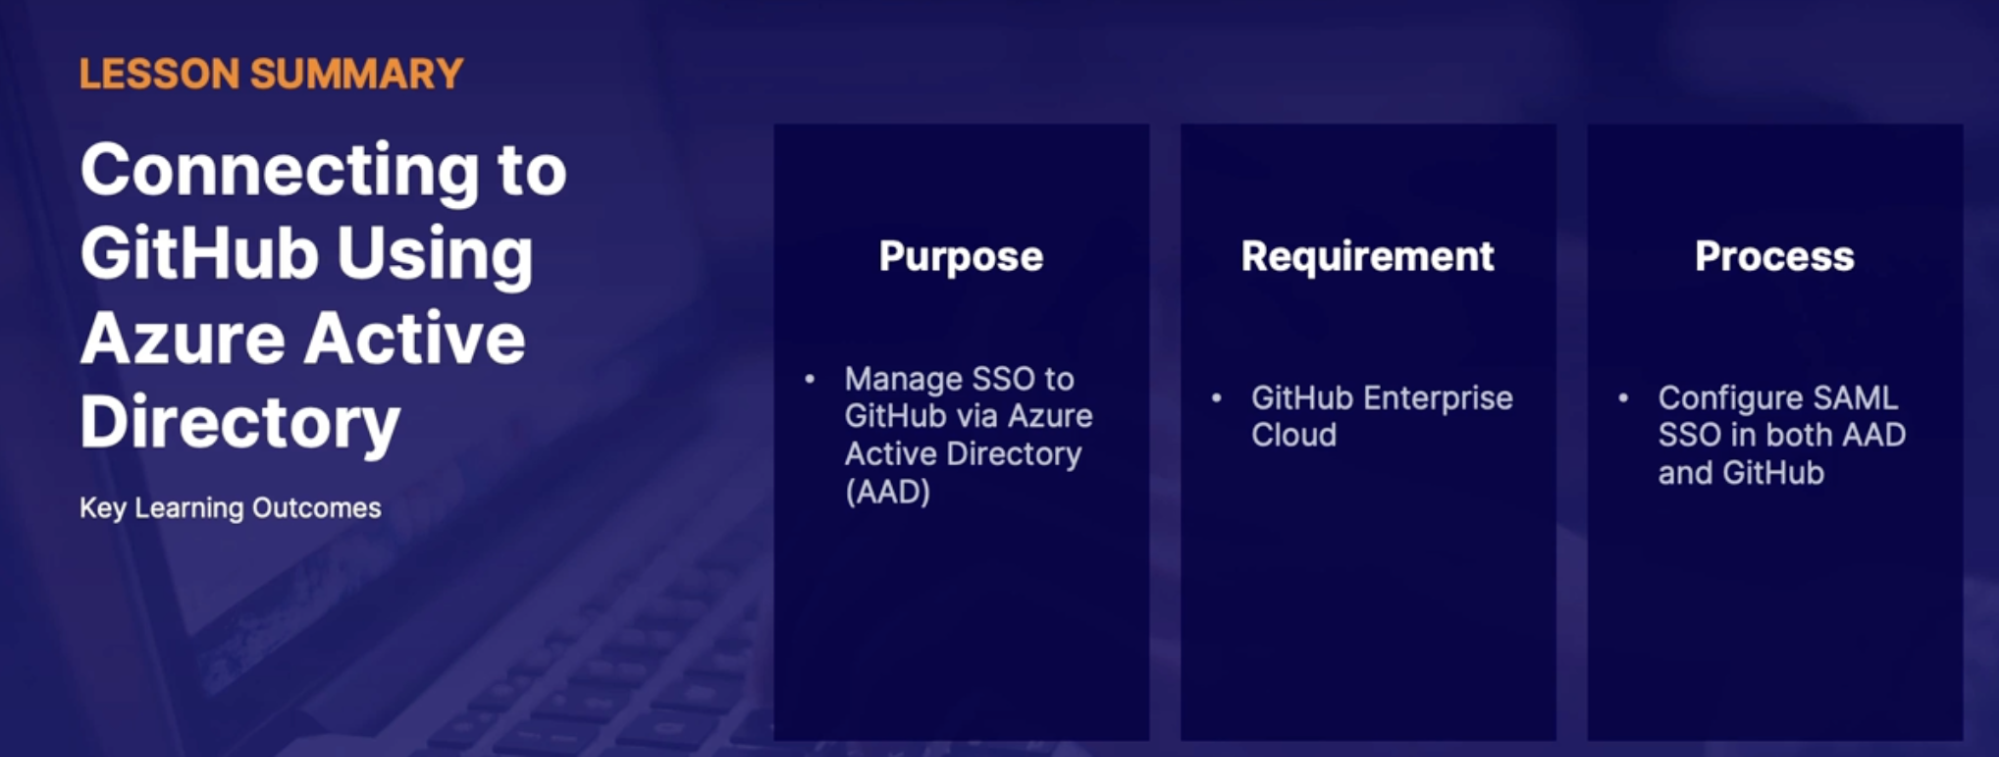
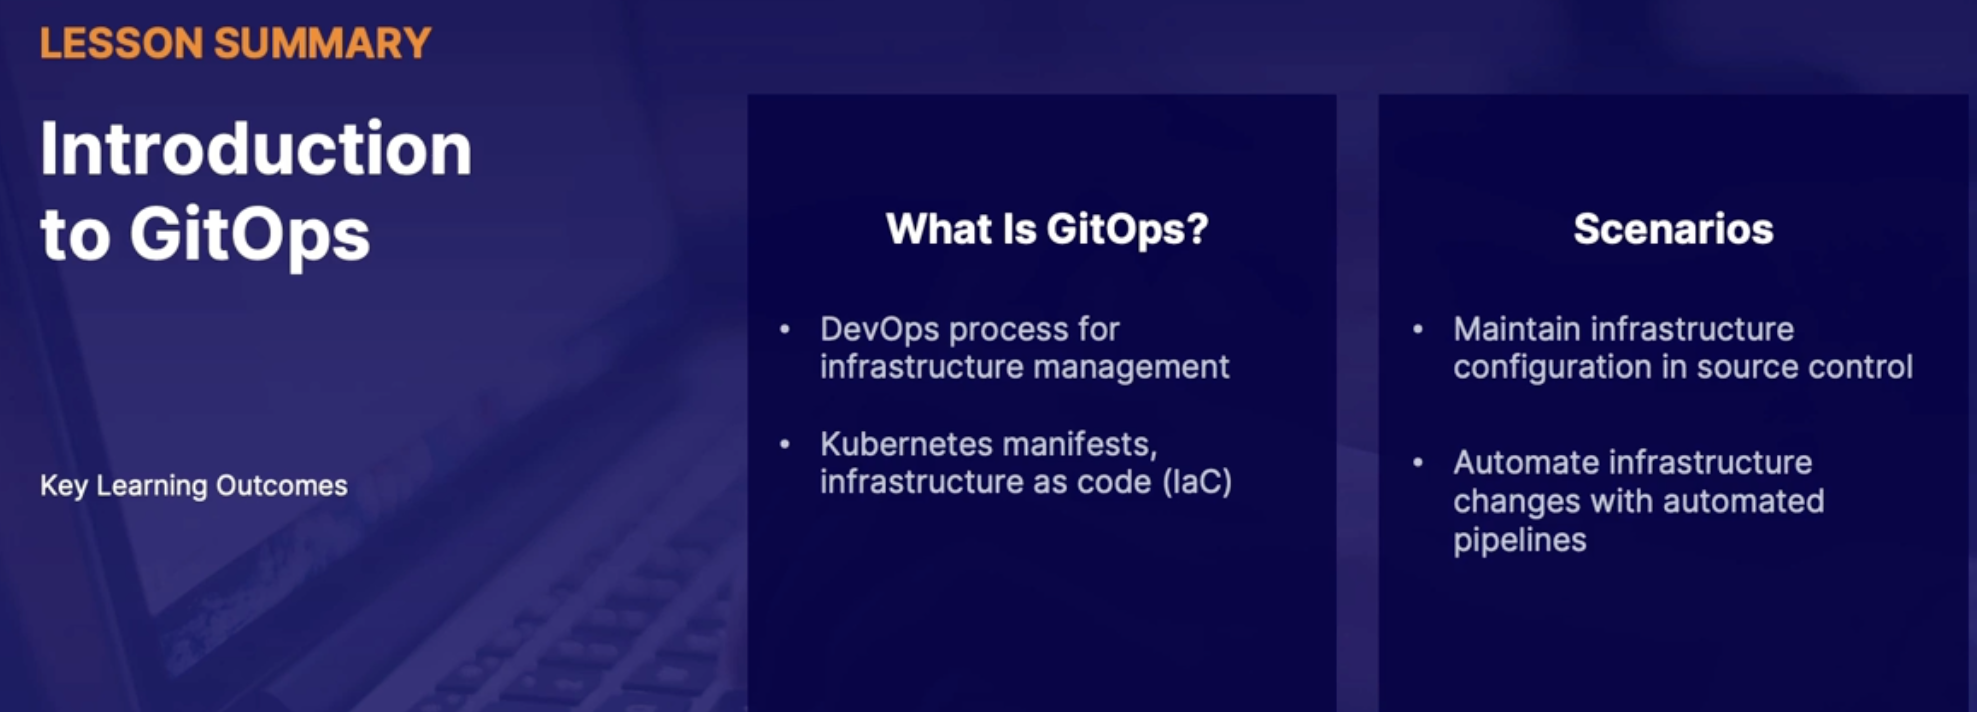
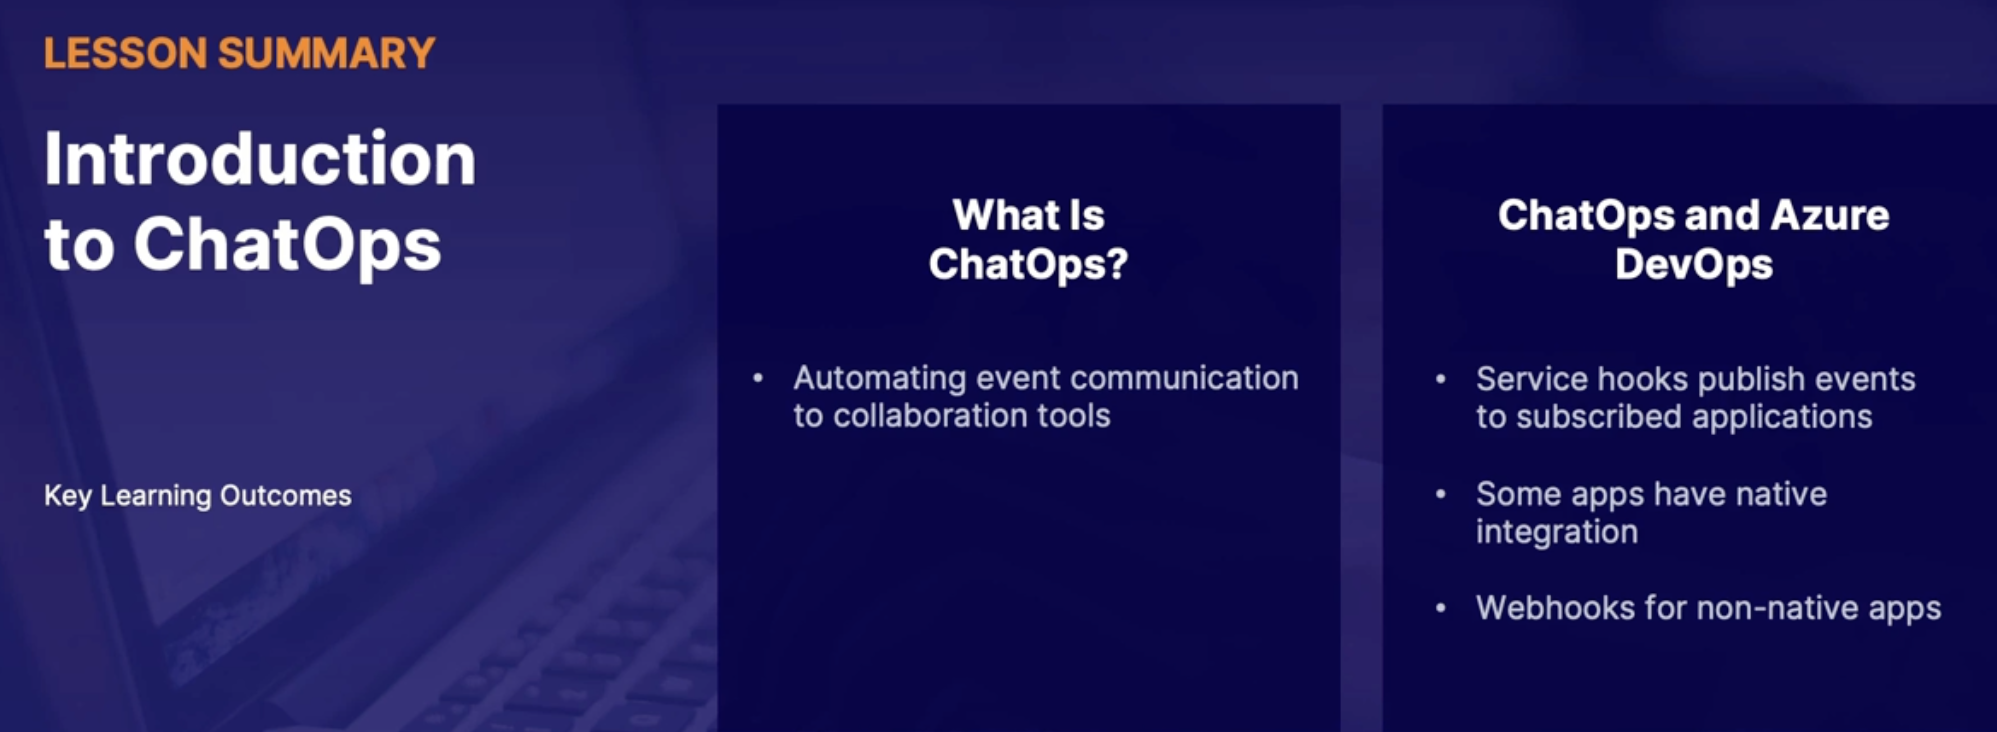
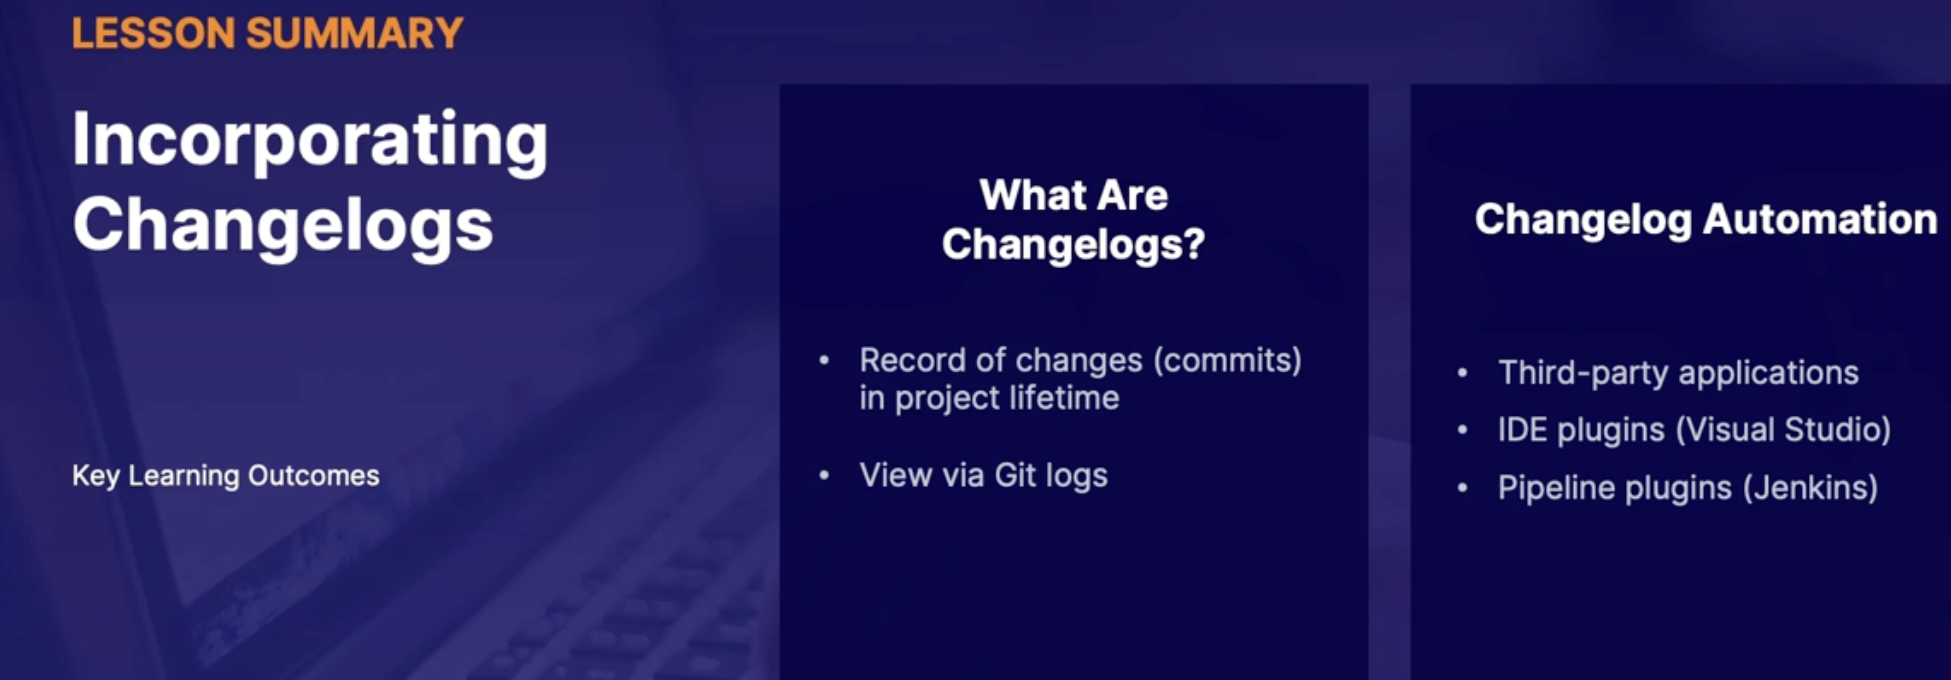
Chap - 8: Implementing a build strategy
Pipelines: automating build and release of application
Getting started with Azure pipelines

Pipeline
- Primary engine of both CI/CD
Key
What are Azure pipelines
Build and Release pipeline
- It can be as a part of 1 pipeline
- It can be separate pipeline
Continuous integration
- Automatically build and test code
- Create deployable artifact
Continuous delivery
- Automatically deploy to environments/end users(VM, Container instances, kubernetes clusters, app service)
Importance of automation
Scenario: life of kubernetes container deployment
Task:
- continuously deploy containers to the kubernetes cluster
- Raw source to deploying the container to cluster
Issue
- Below are the Manual steps you go through on code changes
Steps:
- Update code
- Build a docker container(docker build)
- Push container to registry(docker push)
- In Kubernetes, update the deployment YAML file
- Apply deployment YAML(kubectl apply)
- Make sure nothing’s broke and it’s working properly
- Do it all again on every code update
Danger of repetitive, manual actions
- Mistakes are likely
- Time is better spent elsewhere
- Solution: automation
SRE perspective
- Automation = less manual work + less mistakes
- Manual work referred as toil
Pipeline basic/structure/trigger
Azure pipeline
- Is the automation engine to automatically carry out Repetitive application building and deployment steps
pipeline = automated sequence of steps to build/test/release code
- build a docker container, run a script, push container to Azure container registry
- sequence of steps declared in YAML format
- Give this steps to a managed VM that will then carry out the steps for us // Agent
- agent can be microsoft managed VM or our own machine
pipeline structure
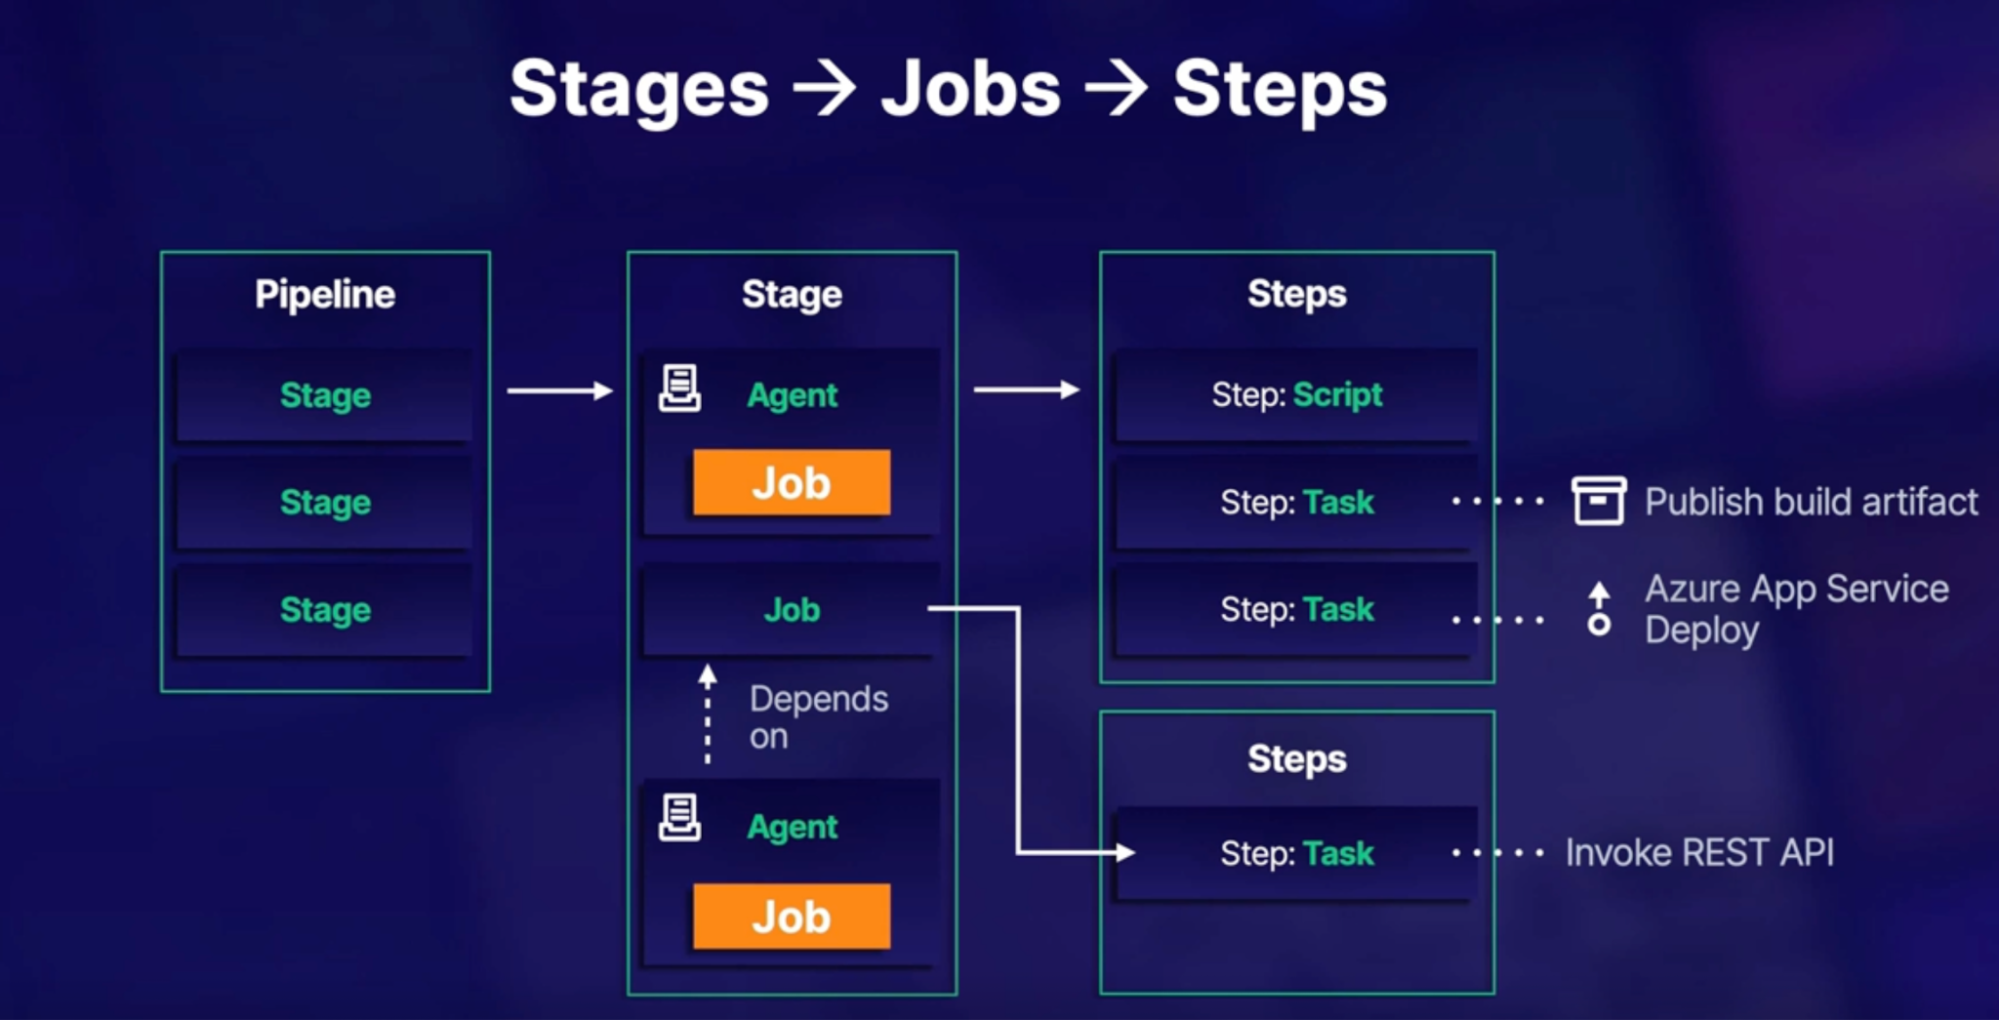
stages —> jobs —> steps
Stage = can have multiple stages
Jobs
- Can have multiple job
- Each job requires agent(VM) to run
Steps
- Can have one steps containing multiple task or script
Trigger
- Automatically start pipeline in response to event
- Can run pipeline manually
- Event can be a Git commit to repo
- Trigger is defined in pipeline YAML file
Summary
- Automate the application building and deployment process
- with steps defined in YAML files
- organized by stages → jobs → steps
- get it out by agents(managed VMs)
- and is automatically started based on defined triggers
Azure pipeline demo
- Deploy python flask application using Azure app service
- Build, Package and deploy it to AppService
Steps
- On Azure DevOps, click on pipelines
- Create a new pipeline
- Select your source control → repo
- Configure your pipeline: python to Linux web app on Azure
- Connect DevOps Project to Azure subscription
- Web app name
- YAML will be created automatically
- Trigger: master
- Web app name:
- Agent VM: Ubuntu
- Environment name
- Project root folder
- Python version
YAML pipelines contain
- 2 stages
- Build
- Deploy
- 1 job per each stages with multiple steps
- Pool: designates which agent we will be used to build and deploy application for us - microsoft hosted agent - ubuntu latest
Integrate source control with Azure DevOps pipelines
Source control options
Code can be live at
- Azure repo
- GitHub
- BitBucket
- Subversion
Connect this souce control to pipeline to automatically start building and deploying code into production

GitHub, Subversion
Connect GitHub repo to Azure pipeline
- Preferred method: install/configure Azure pipelines app and associate it with your GitHub repo(in GitHub repo)
- Authenticate via OAuth or personal access token(PAT)
Connect Subversion repo to Azure pipeline
Configure access with service connection
- Connect DevOps project to external resources
Configure Subversion repo URL/Authentication
Demo
- Connect Azure pipeline to GitHub repo
- On Azure pipeline → create a new pipeline
- Where is your code → GitHub
Options 1: OAuth
- This will kick us over to GitHub page prompting us to authenticate via OAuth from individual user account
Option 2: marketplace app authentication method
- Click on marketplace
- Search Azure Pipelines and install it
- Choose repo will setup with Azure pipeline
- All repo
- Single repo
- Click install
- Sign in to your Azure DevOps account
- Select your org and project
- On GitHub, authorize Azure pipeline
- Explore service connection:
- to connect things(products) to pipeline which are outside if your Azure DevOps Org
- Explore source control connection option
Summary
- understand source control connection options depending on repo location
- GitHub connection options: configure GitHub app | OAuth/PAT Authentication
- subversion connection option: configure service connection
Understanding build agents
Role of agent
Pipeline: act as the automation engine to carry out a series of manual repetitive steps on our behalf so we don't have to.
How Pipeline works
Agent
- Pipelines have to assign lists of tasks to a computer somewhere in order to carry those tasks out.
- That computer that carries out these pipeline steps or a pipeline job is referred to as an agent.
- in pipeline, the agent configuration is included in the Pipeline YAML file,
- Example: pool: VmImage: ‘Ubuntu-latest’ # Microsoft host agent
Microsoft and self-hosted agent
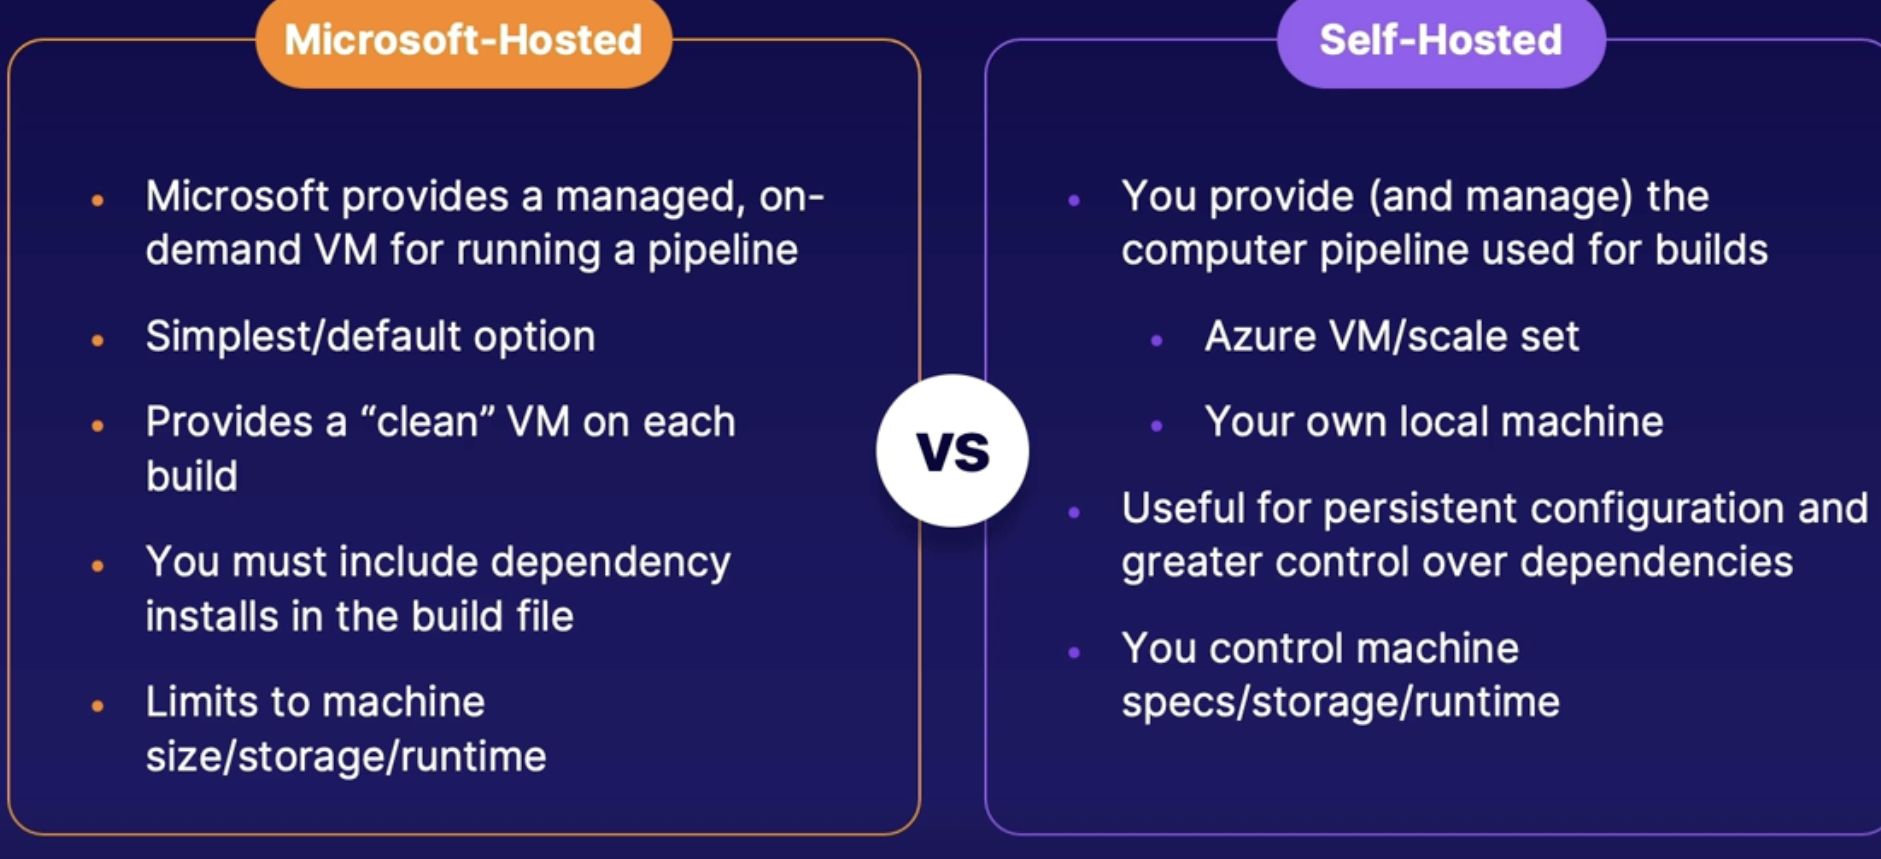
Parallel jobs
What - Parallel jobs are simply how many agents are allowed to run in your Azure pipelines environment or your organization at the exact same time.
MS Hosted agent charges - $40 p/month
Self-hosted agent charges - $15 p/month
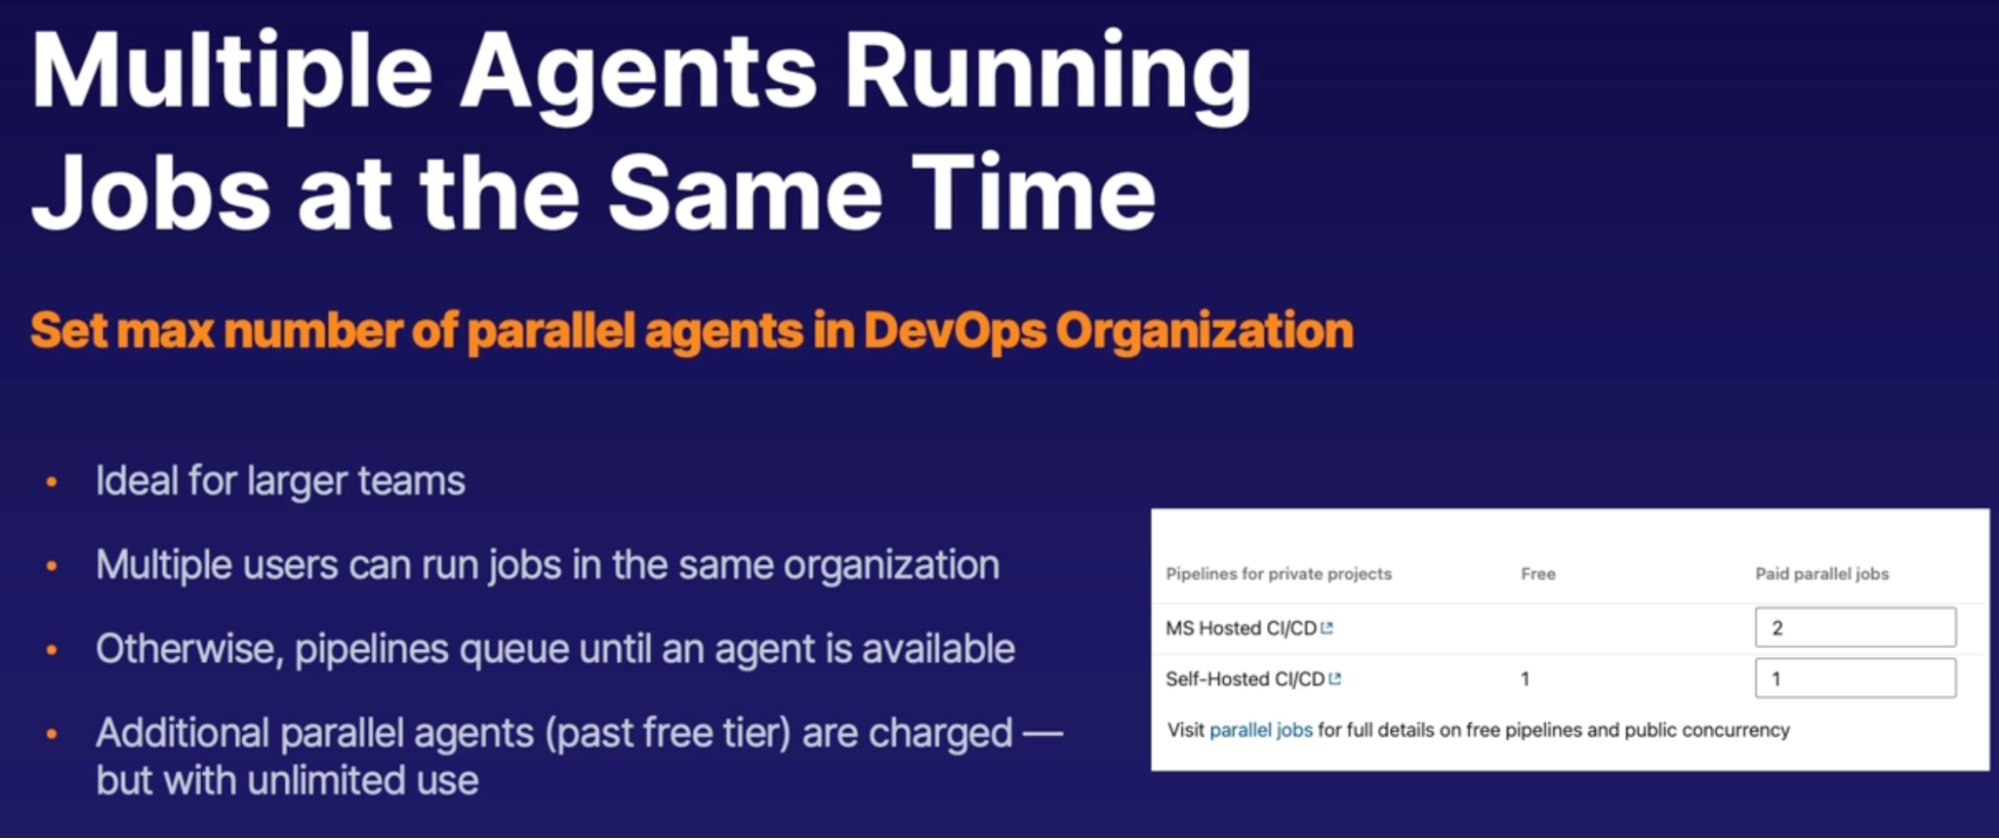
Demo
- See agent billing section on org level
Exploring self hosted build agents
Self-hosted agent scenario
Why use self-hosted agents
- Hardware customization
- Use self-hosted agents - If you need more processing power, storage, GPU
- Because MS hosted agents are limited to
- they come in the standard DS2_v2 VM size
- which comes as two virtual CPU and 7 gigabytes of memory
- limited to 10 gigabytes of storage
- no GPU option
- Pipeline builds using hybrid non-Azure resources
- maintain machine level configuration/cache
- desire to not have a clean slate between your builds but instead to keep the same configuration or the same hardware cache between individual builds.
- more control over software configuration
Self-hosted agent communication process
- Install self-hosted agent
- install your self-hosted agent on whatever machine you want that pipeline to run on(this could be an on-premises machine, an Azure virtual machine, or really anywhere else)
- register and authenticate agent
- add to agent pool
- agent will watch agent pool for new jobs
- Pipeline jobs sent to agent pool
- Job assigned to agent in pool
Agent pools

Demo
Assign job to agent pool
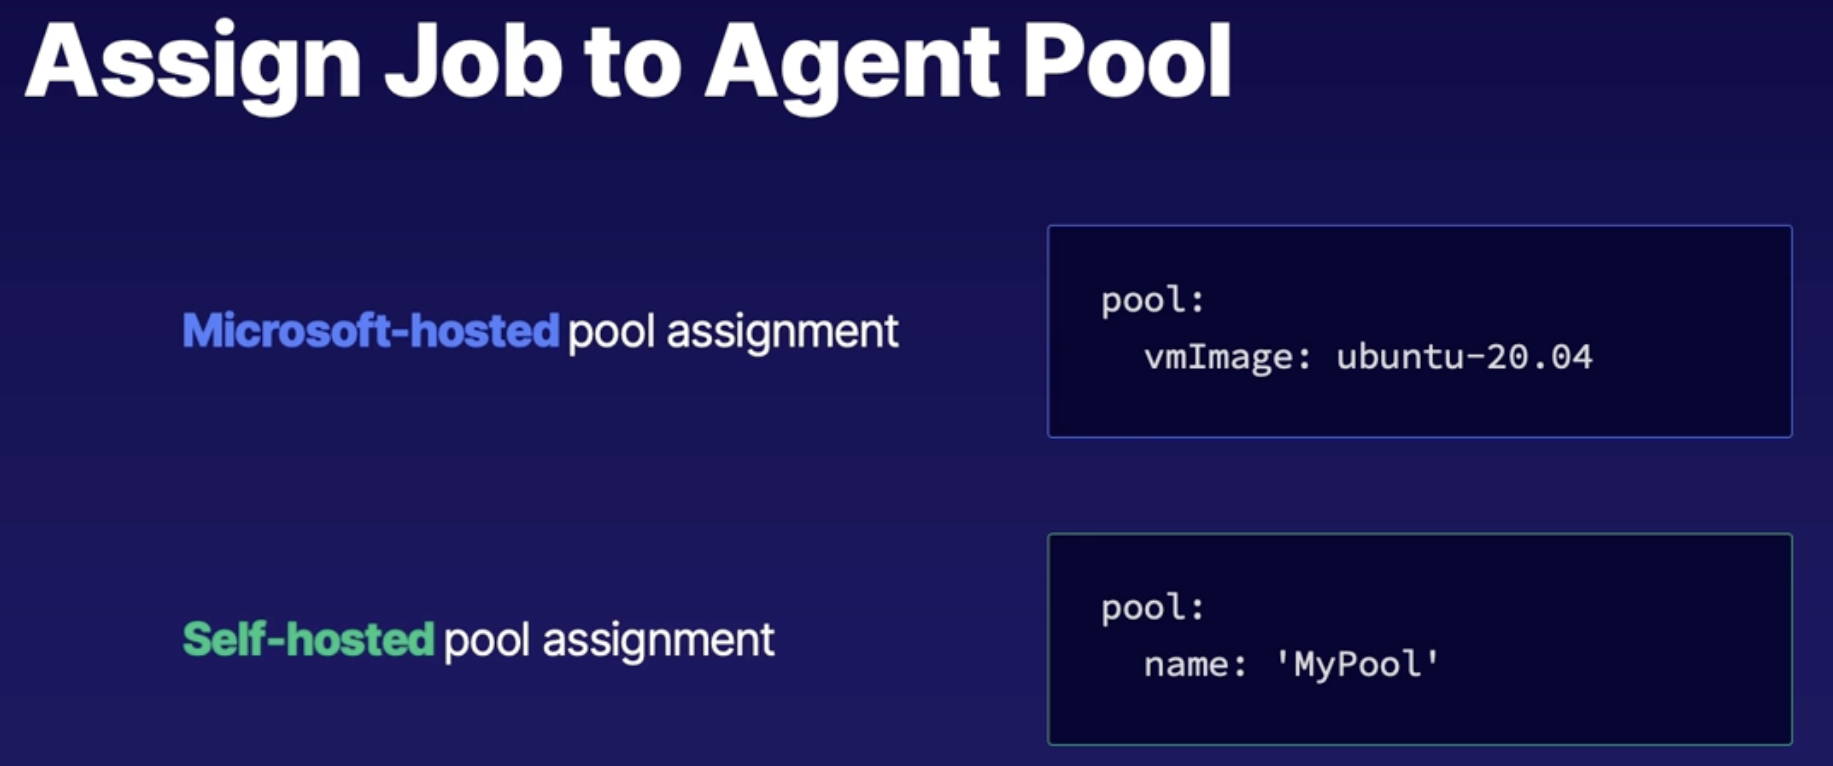
- install and configure self hosted agent on a Windows virtual machine in Azure
- create personal access token for agent authentication
- from Azure DevOps org, click on User settings —> click on personal access tokens
- new token
- name: self hosted agent
- org: if more than one
- scopes
- agent pool: read & manage
- create
- copy/paste token somewhere safe
- install and configure self hosted agent on windows VM
- org setting —> pipelines —> agent pool
- Azure pipelines: MS hosted agents
- default
- click on default
- new agent (windows, MacOs, Linux)
- download agent
- follow steps
- post install, view agents in agent Pool
Summary
- Know scenarios calling for self hosted agent
- agent registration process: configure agent and assign to agent pool
- YAML Schema: assign job to self hosted agent pool vs ‘vmImage’
Using build trigger rules
Trigger types
Tigger = automatically start pipeline in response to an event
Where: trigger defines in YAML
Trigger type
- CI Trigger
- When: you update repo or branch of that repo
- Example:
- Specify which branch to watch for update
- Optional inclusions/exclusions: more granular with what branch to include/exclude
- Wildcard // If you have sub-folder/tree of branch
- Exclude branches in wildcard grouping
- Tags to included in your trigger
trigger:
branches:
include:
- master # Specify which branch to watch for update to run pipeline
- releases/* # If you have sub-folder/tree of branch - refs/tags/{tagname}
exclude:
- releases/old* |
- Schedule trigger
- When: run pipeline at a specified time
- Example: run pipeline every night whether or not your repo is updated
- Scenario: pipeline run weekly sunday
- Trigger independent of repo
- Define schedule in cron format
- Can choose to run only if targeted repo has changed: if your repo has updated since your last schedule trigger
schedules: - cron: "0 12 * * 0"
displayName: Weekly Sunday build
branches:
Include: new-feature
always: true # whether to always run the pipeline or only if there have been source code changes since the last successful scheduled run. The default is false. |
- Pipeline trigger
- When: pipeline runs when another pipeline runs first
- Scenario: When upstream component (library) changes downstream dependencies must be rebuild
- include:
- triggering pipeline and pipeline resource
- trigger filter: trigger pipeline when any version of the source pipeline completes
- Optional: branch/tag/stage filters for referenced pipeline
- Optional: pipeline project if in a separate DevOpsproject
resources:
pipelines:
- pipeline: upstream-lib # Name of the pipeline resource.
source: upstream-lib-ci # The name of the pipeline referenced by this pipeline resource.
project: FabrikamProject # Required only if the source pipeline is in another project
trigger: true # Run app-ci pipeline when any run of security-lib-ci completes |
- Pull Request trigger
- WHEN: Run pipeline on pull request
- scenario: validate/test code upon pull request (This pull request can run a new pipeline to test our code to make sure it works)
- configuration depends on repo location
- Azure repos: configure in branch policy (not in YAML)
- if not in Azure repo then specified this trigger in the YAML pipeline by example shown below
Summary
- no the main trigger types: CI/scheduled/pipeline/pull request
- filter methods: wildcard/inclusion/exclusion/tags
- configuration method: pipeline YAML file, except for Azure Repo pull request(branch policy)
Incorporating multiple builds
Multiple Build scenario
When: Need to run multiple build/jobs in different environments
Scenarios: where you need to run multiple builds/jobs within a single pipeline with different environments
- run unit tests against different versions of python(python 2.7, 3.5, 3.6, 3.7)
- test builds against multiple OS(Windows, Mac, Linux)
How
- Create multiple pipelines
- multiple jobs inside of a pipeline
- Best way: duplicate the same job with slightly different inputs in the same pipeline
Solution
Strategy → Matrix Schema
Strategy: Strategies for duplicating a job
Matrix: generates copies of a job each with different input
- provides different variables a job will cycle through with it’s own unique input on every pass of that job
- each occurrence of a matrix string will create a job copy with different inputs
- steps that call on the matrix variable will generate copies of jobs of a different variable inputs
Example:
- Run pipeline, testing multiple Python version
- Run pipeline, testing against multiple OS
Demo
- Run pipeline, testing multiple Python version
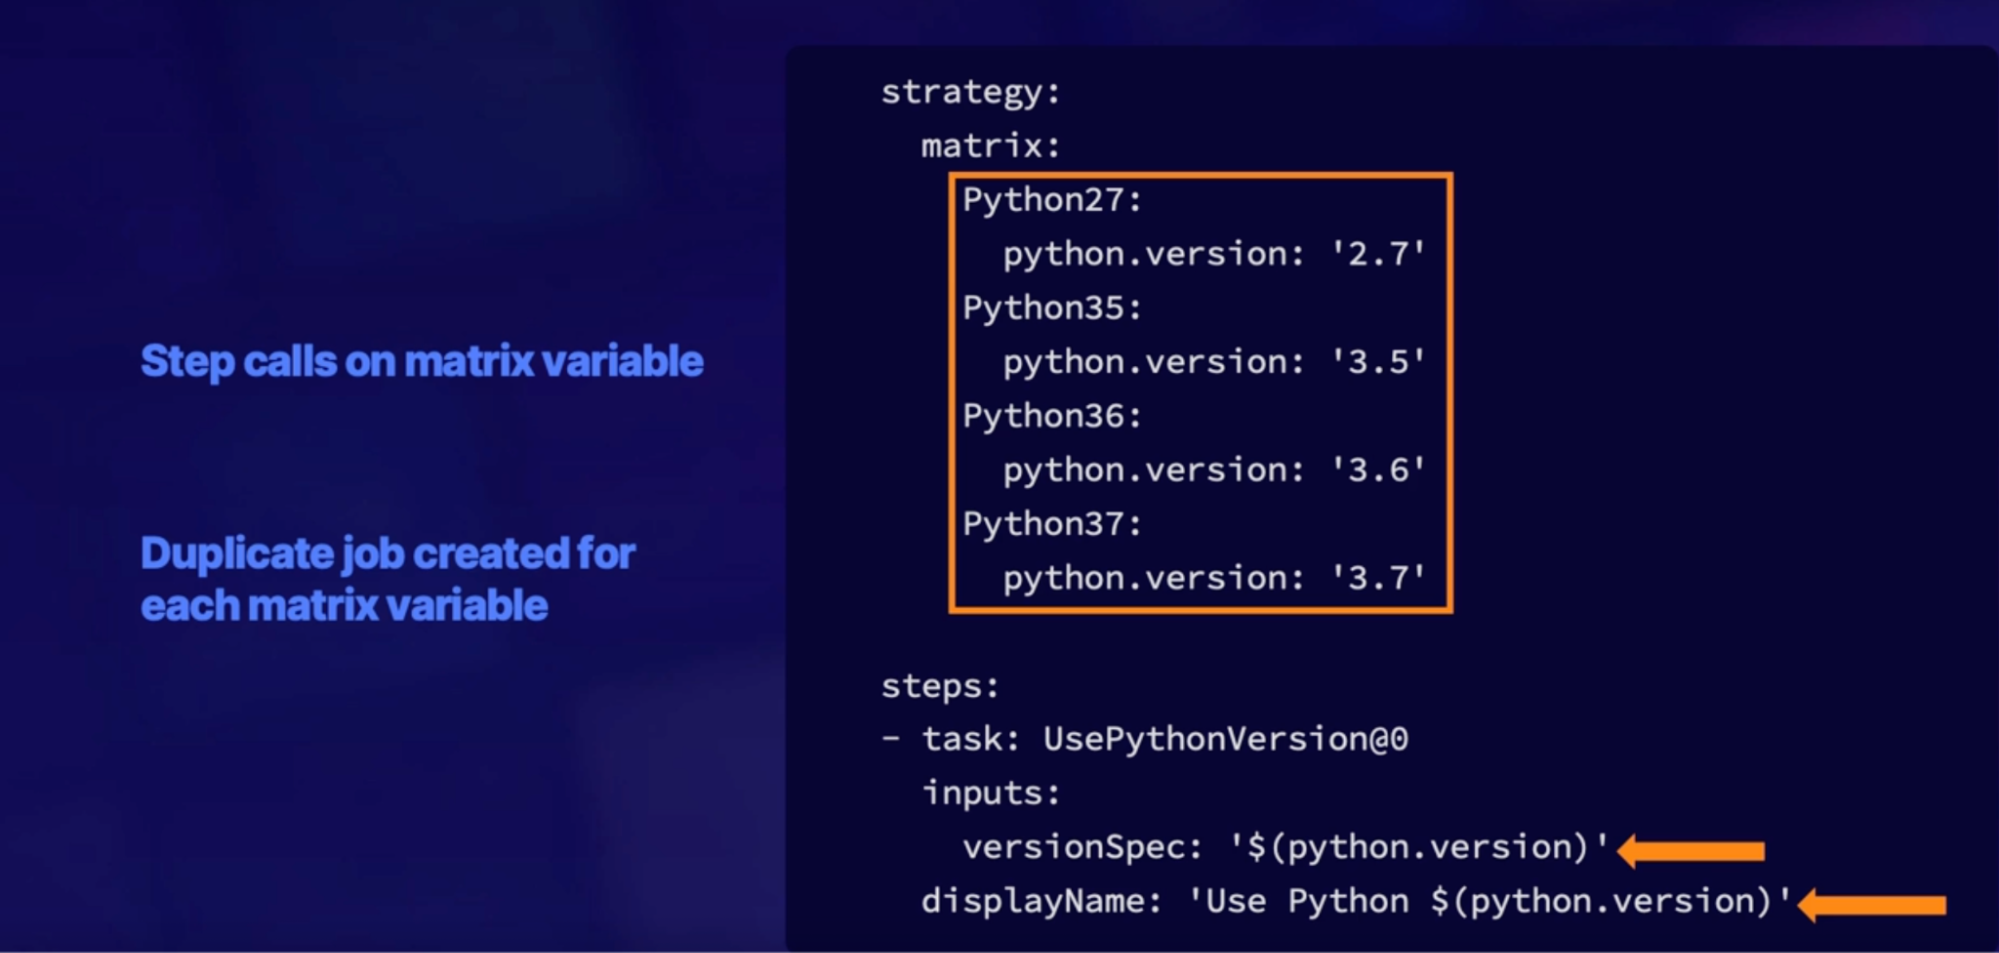
- Run pipeline, testing against multiple OS
strategy:
matrix:
linux:
imageName: 'ubuntu-latest'
mac:
imageName: 'macOS-latest'
windows:
imageName: 'windows-latest'
pool:
vmImage: $(imageName)
steps:
- task: NodeTool@0
inputs:
versionSpec: '8.x'
- script: |
npm install
npm test |
Summary
- know how to corporate multiple input builds in a single pipeline
- pipeline YAML schema: strategy providing matrix variables of multiple inputs
- steps of configuration: call on matrix variable to create duplicate jobs with different inputs
Exploring containerized agents
What:
- Running self-hosted agent inside a docker container.
- Idea is that everything happens(downloading/building) inside of the container rather than the host machine(VM).
Why run a pipeline job in a container
Why exactly would we want to run a pipeline job in a container to begin with?
Why:
- Isolate from host - when you need to isolate your build environment from the underlying host
- use specific versions of tools and dependencies: need to use different versions of tools, operating systems, and dependencies than those that exist on the host operating system itself.
Links
https://docs.microsoft.com/en-us/azure/devops/pipelines/agents/docker?view=azure-devops
https://docs.microsoft.com/en-us/learn/modules/host-build-agent/
3 scenarios
Microsoft hosted agent configuration
What: Microsoft is going to provide the agent for you. And inside of that Microsoft-hosted agent, your job is to run container on that agent.
ability to run community images(docker hub) or your own private containers(Store in Azure container registry).
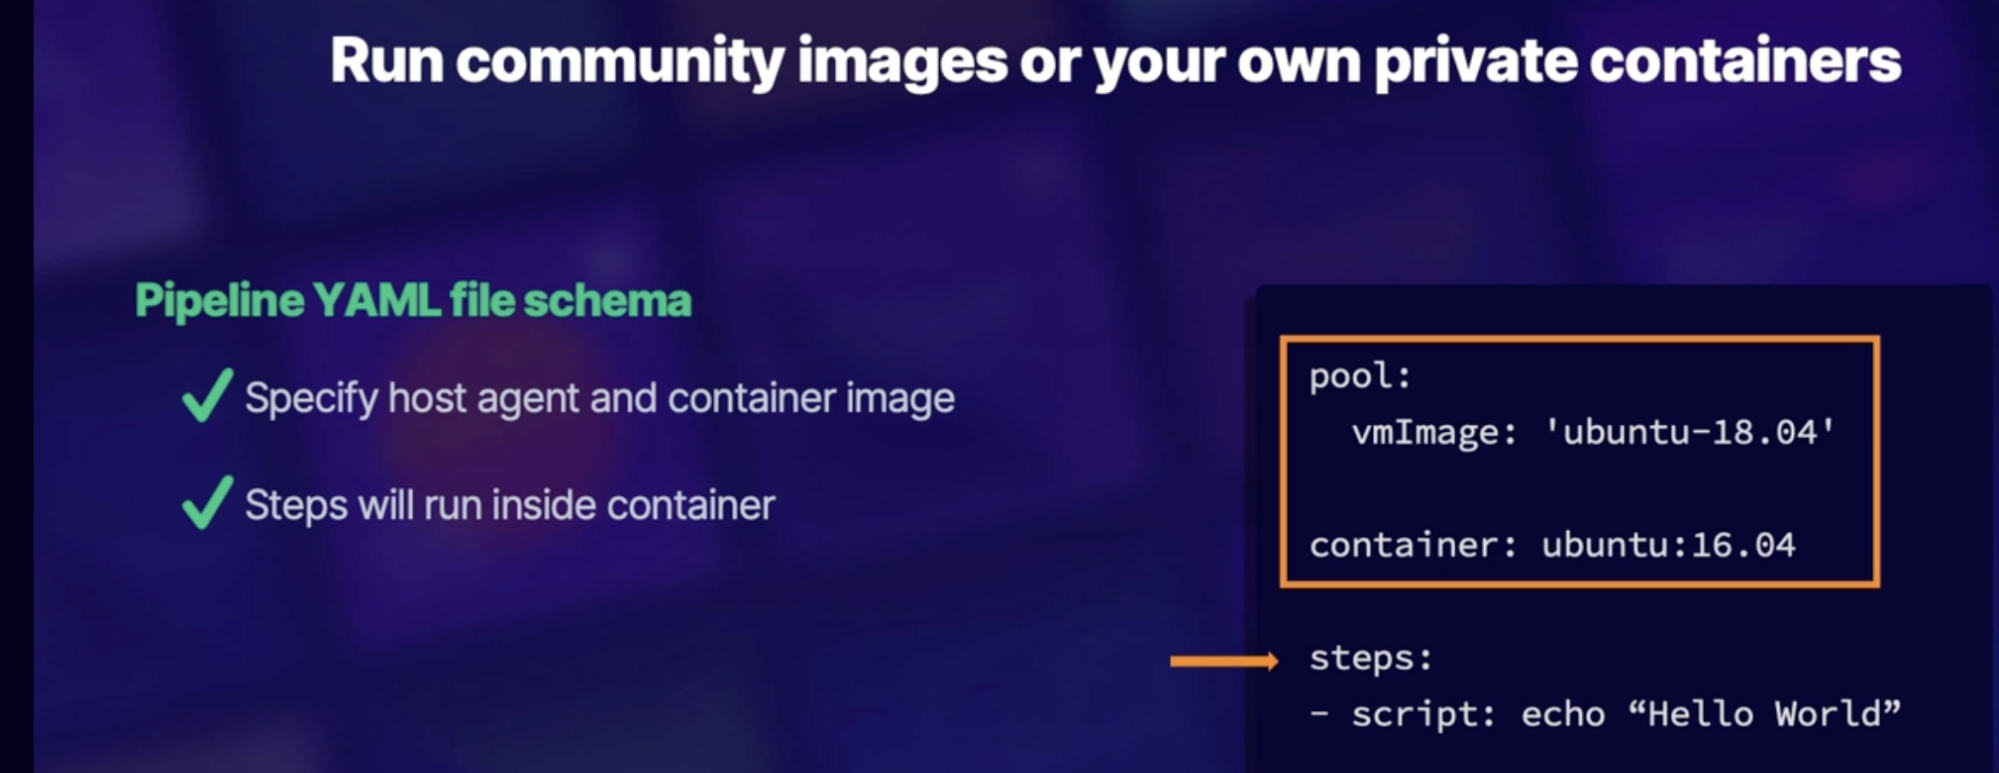
Callouts
- we will be running a script of "Hello World" inside of our Ubuntu 16.04 container hosted on the Microsoft-hosted image of Ubuntu 1804.
- Idea is that everything happens(downloading/building) inside of the container rather than the host machine(VM)
Non-orchestration configuration(manual)
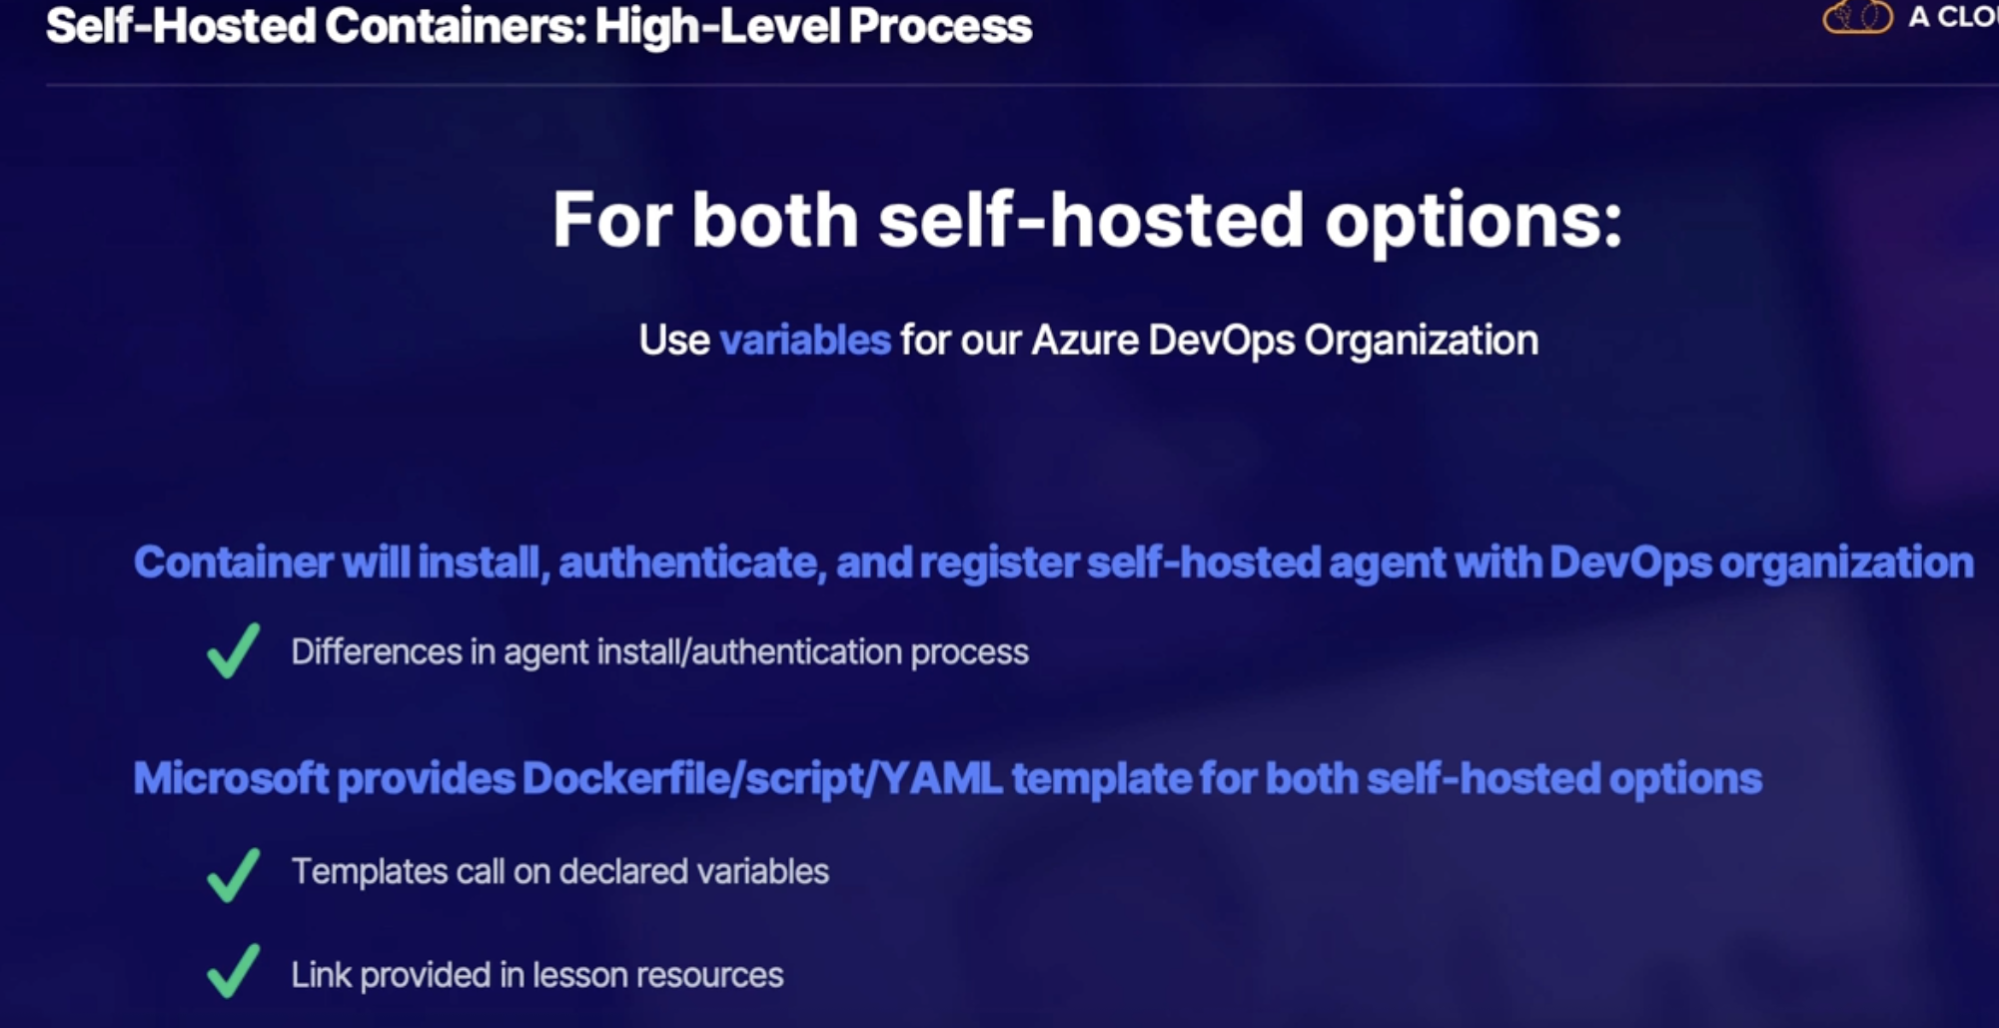

What: manually run docker container without using an orchestration engine like Kubernetes
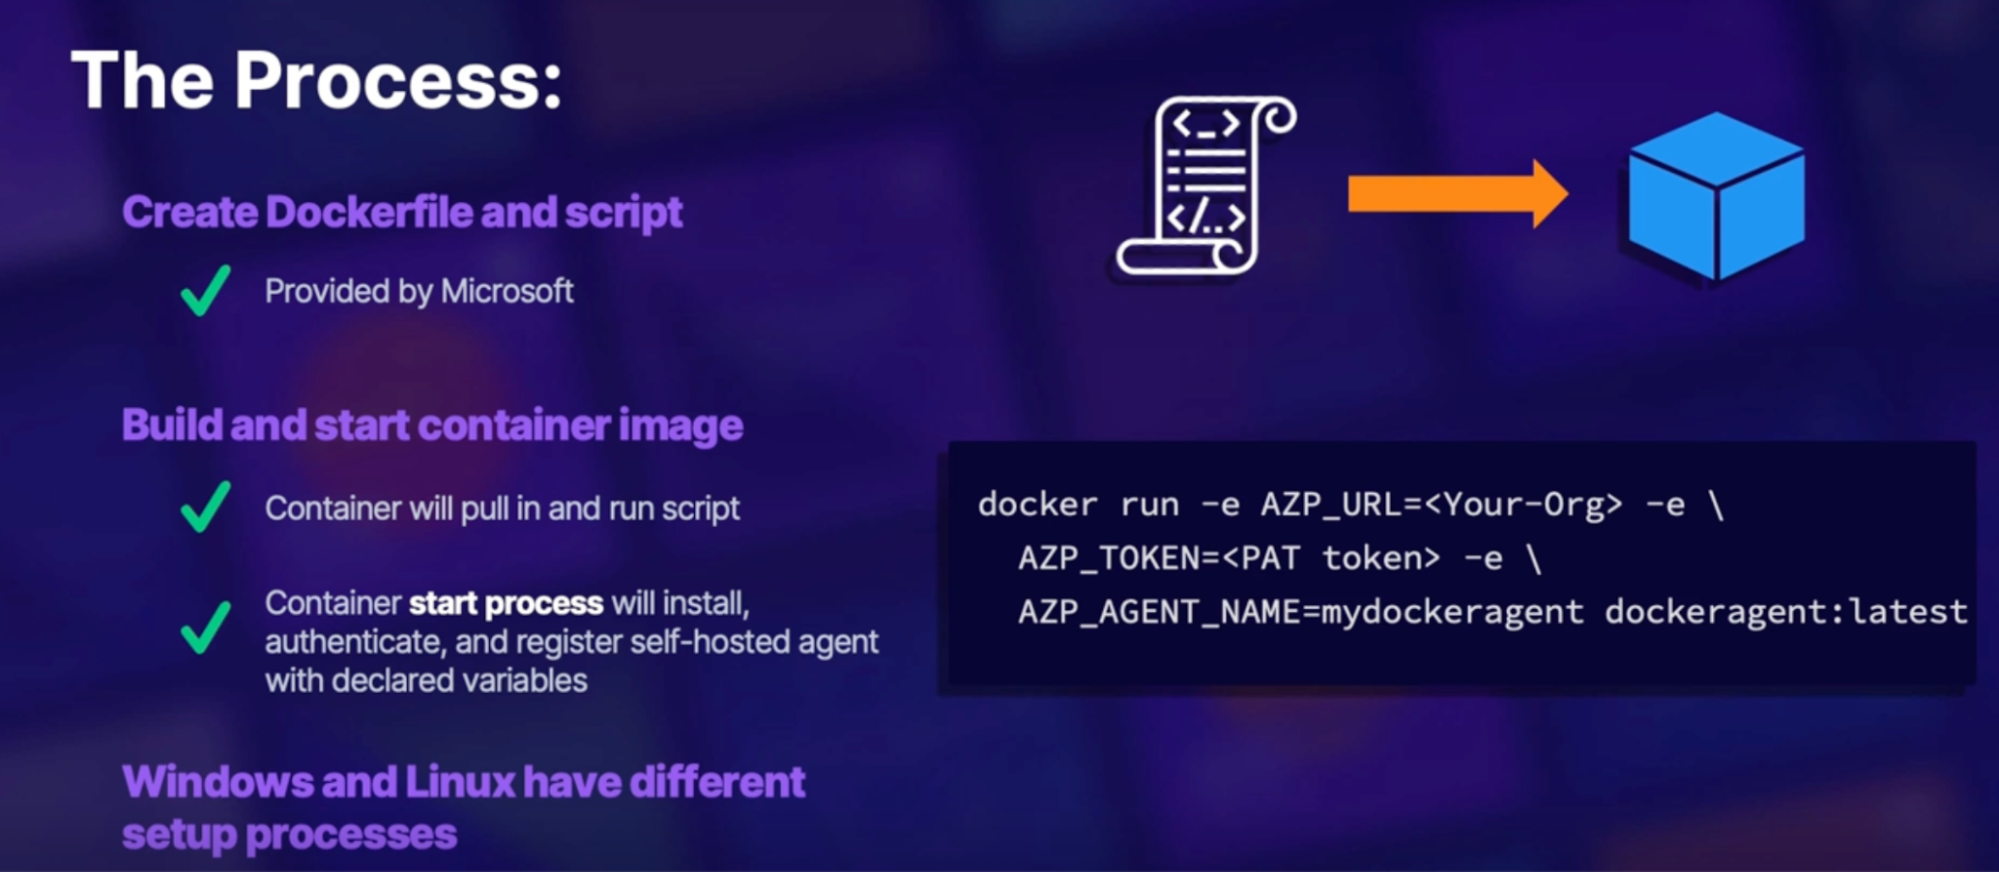
Orchestration configuration(AKS)
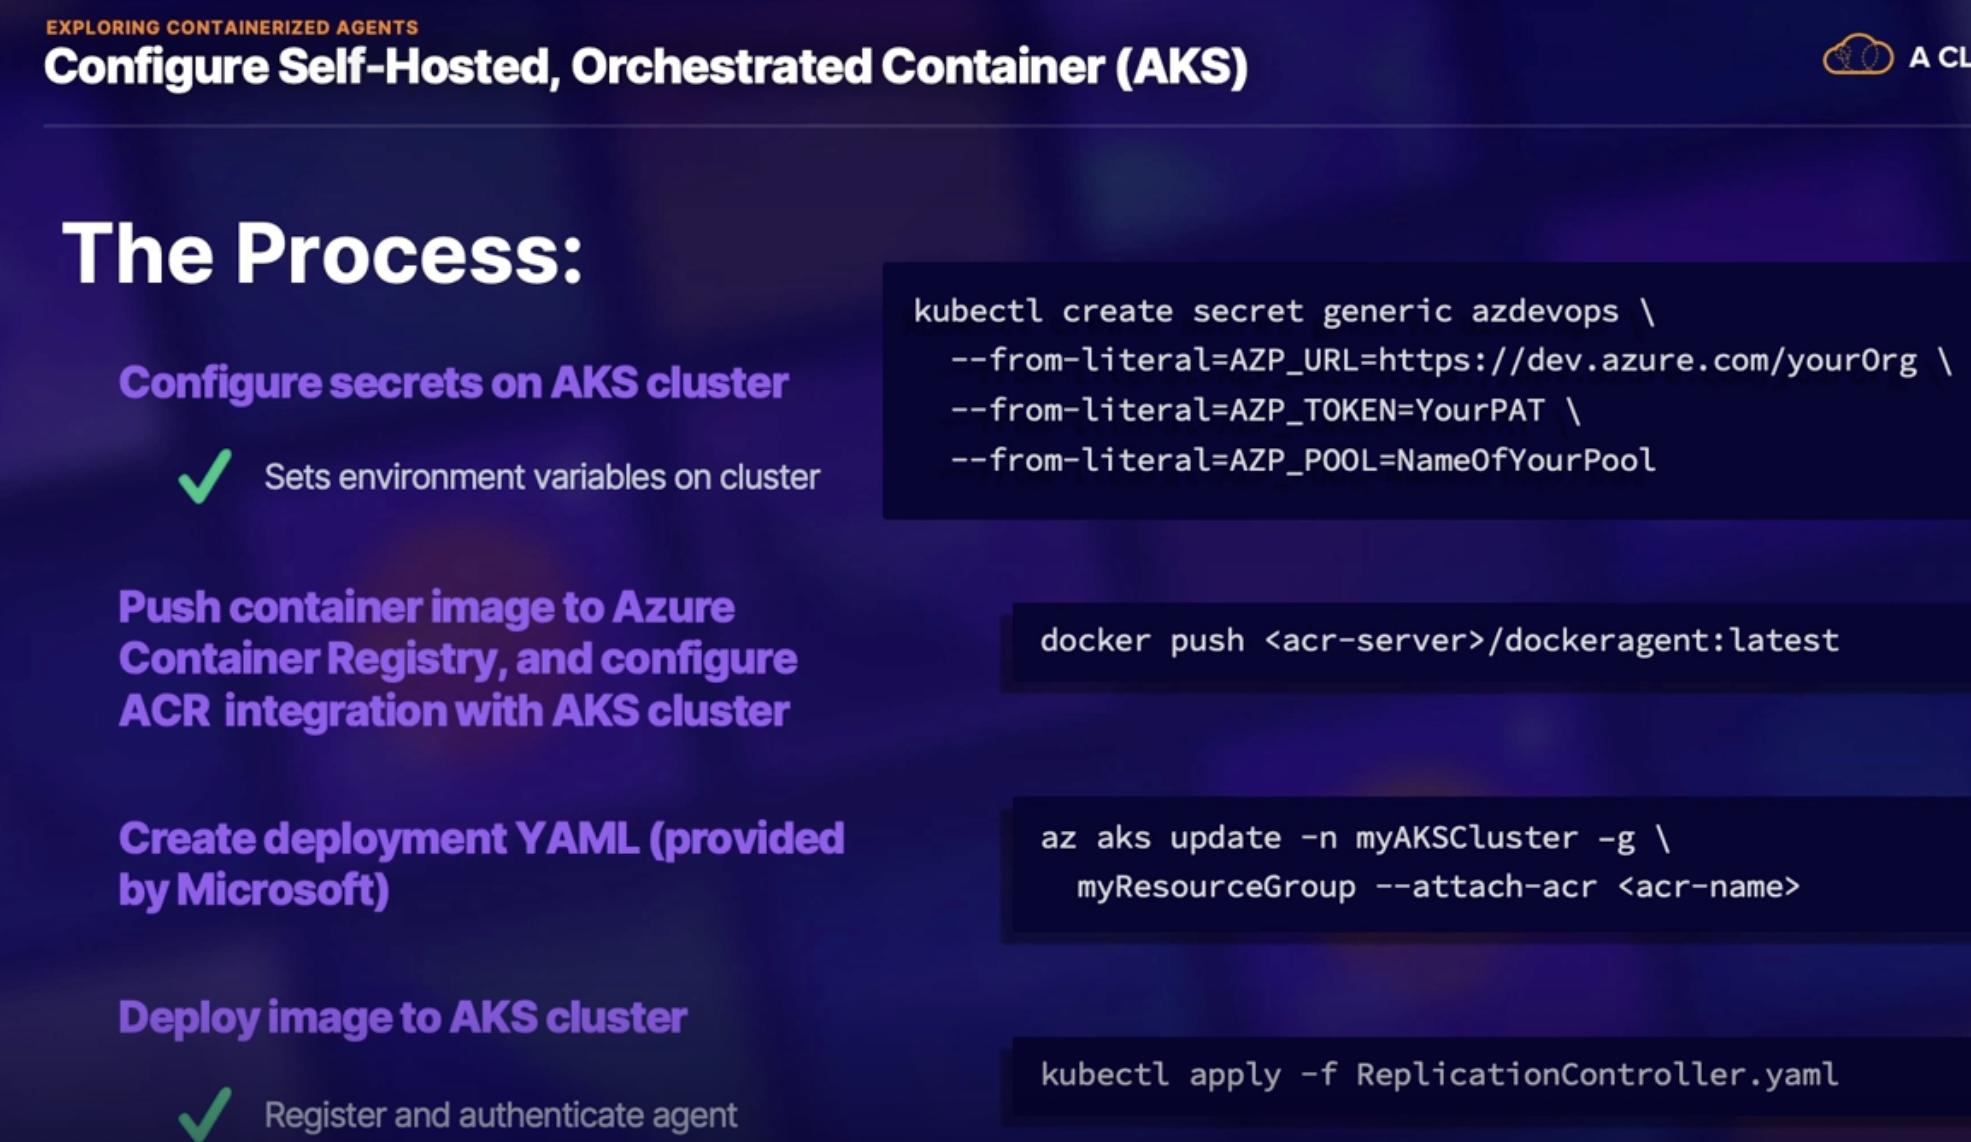
Summary
- Know basic process for Microsoft/self-hosted containerized agents
- Microsoft hosted YAML schema: declare host in container image
- self-hosted agent process: Create docker file and registration/authentication script | start/deploy an image with DevOps organization variables
Summary
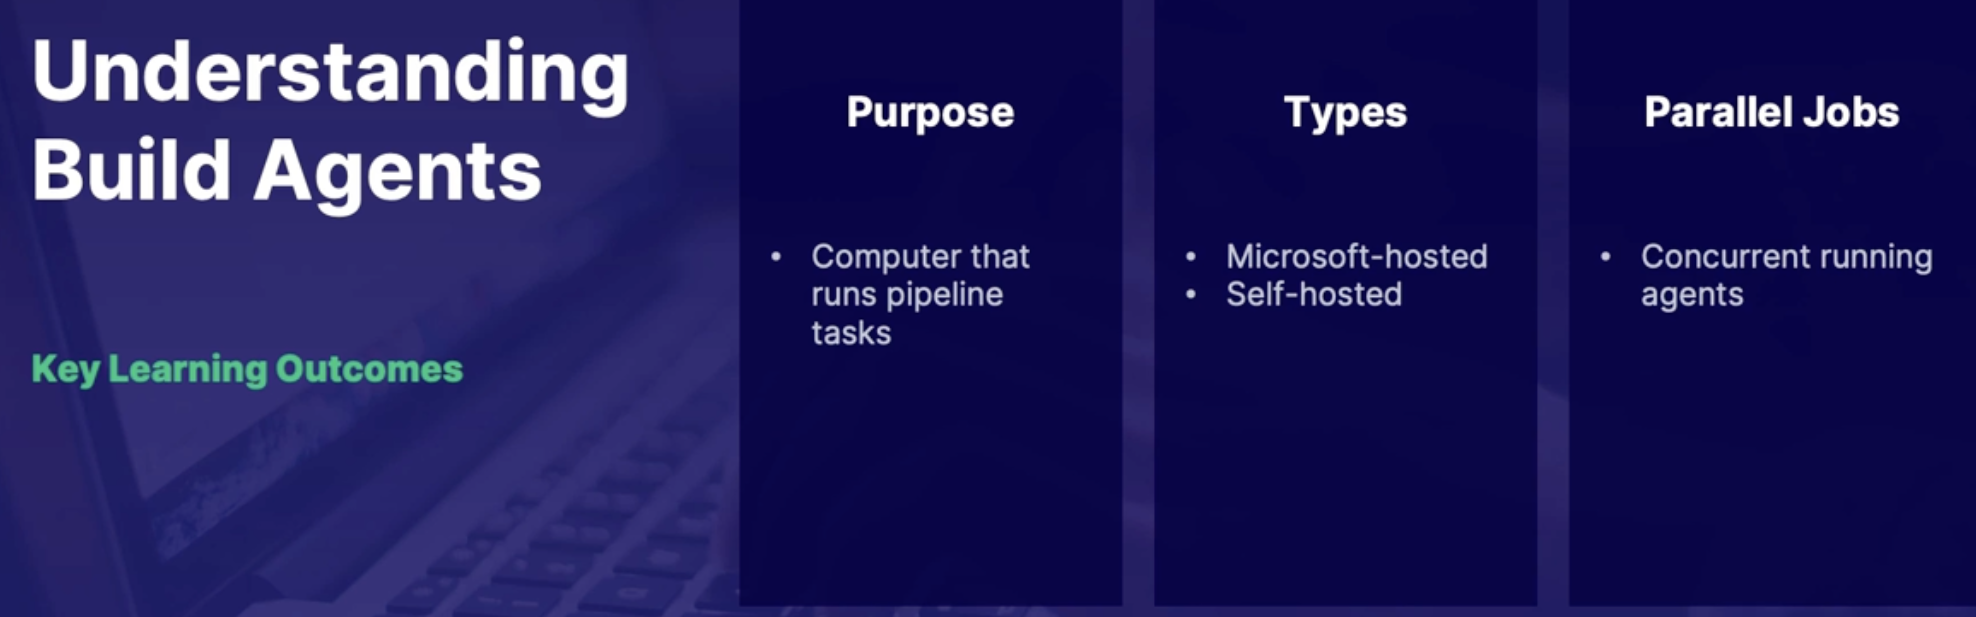
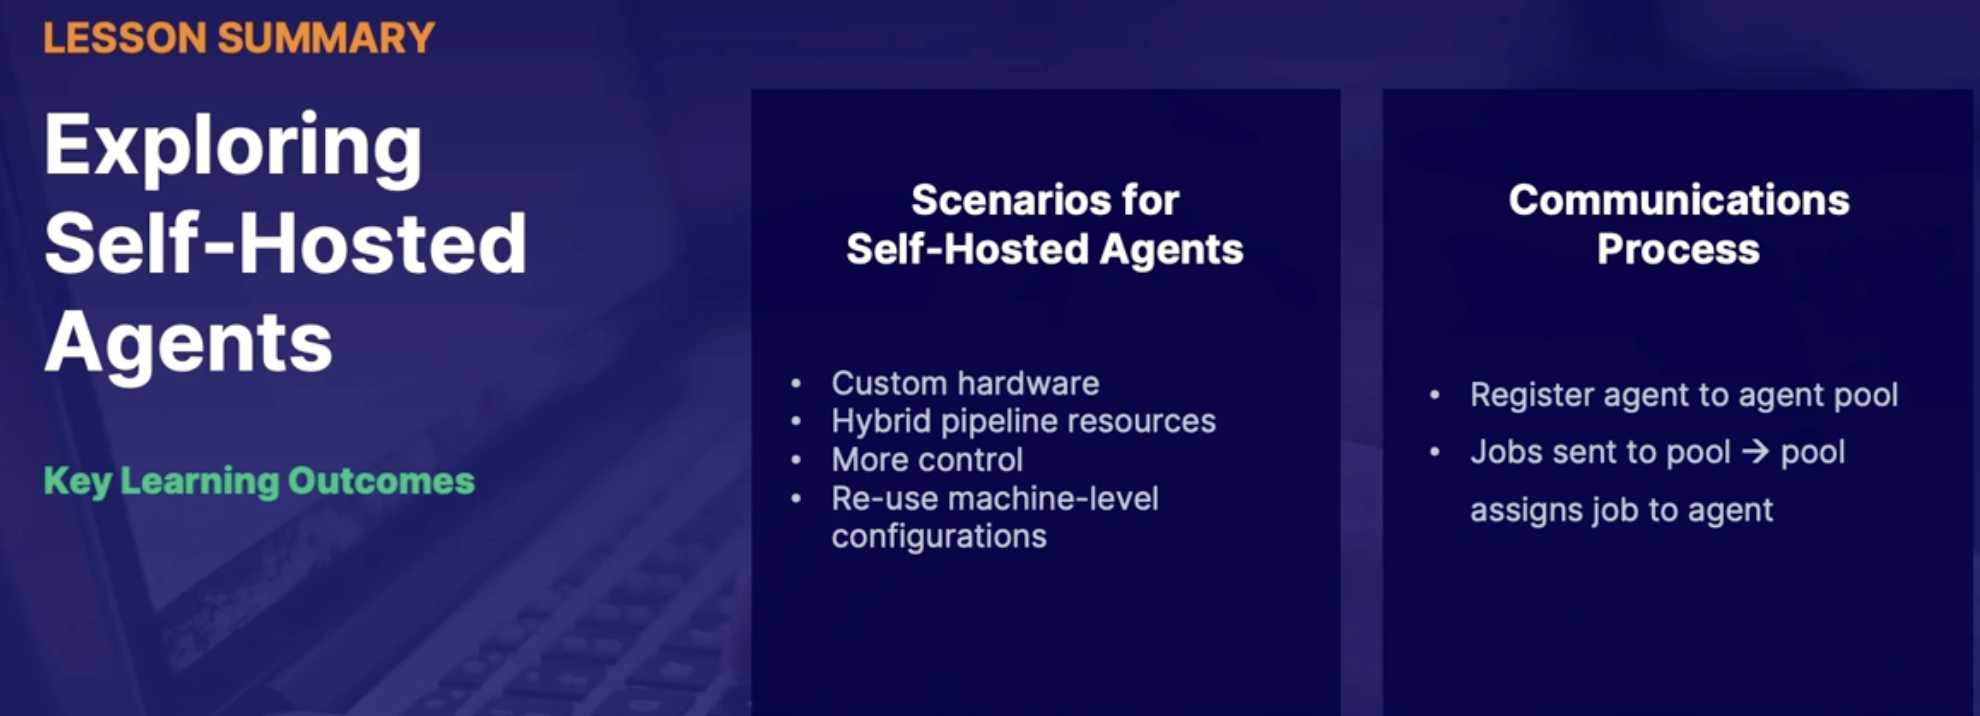
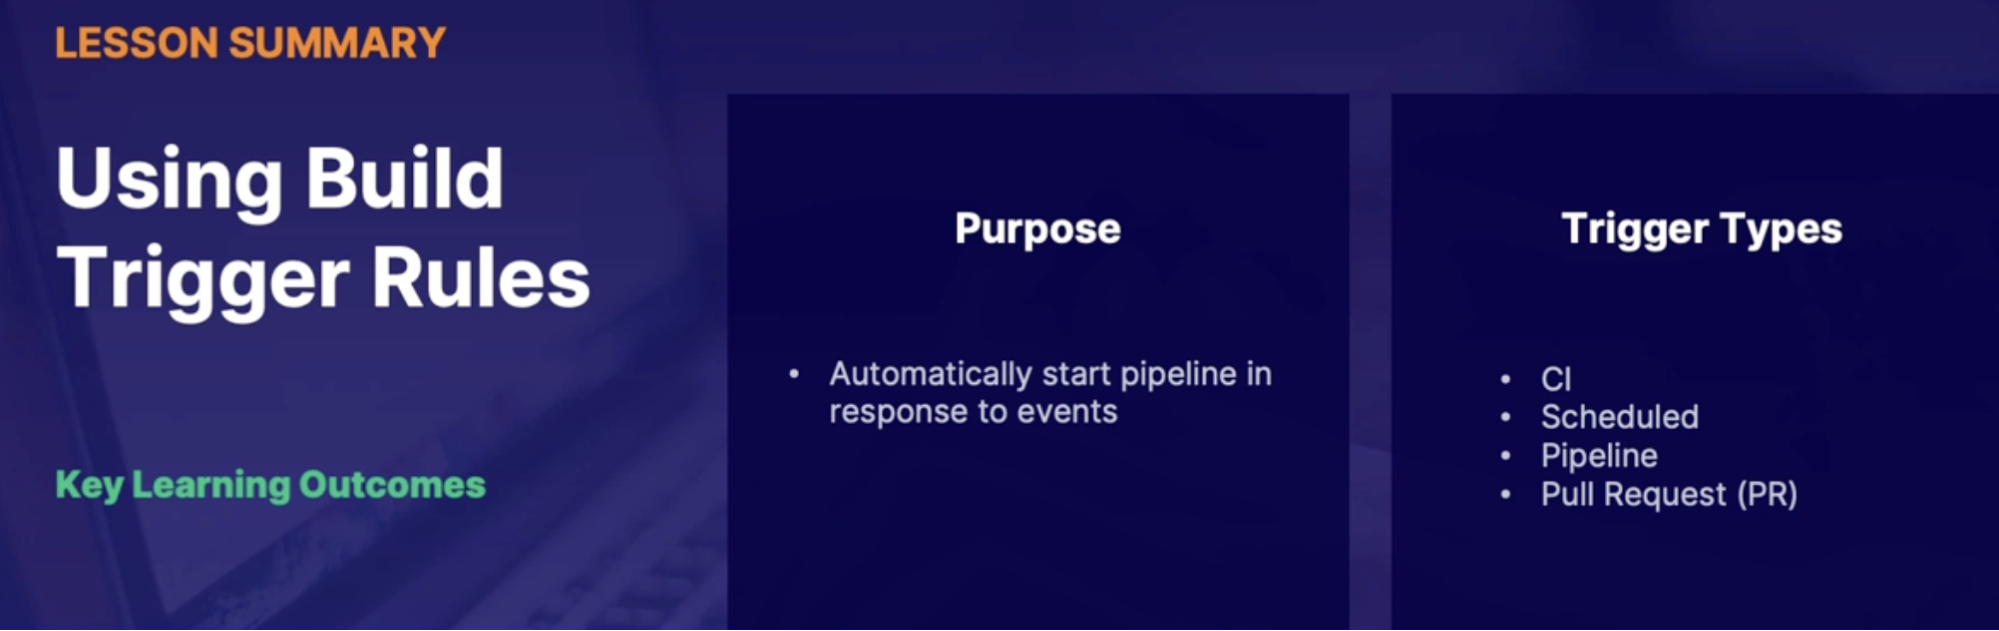
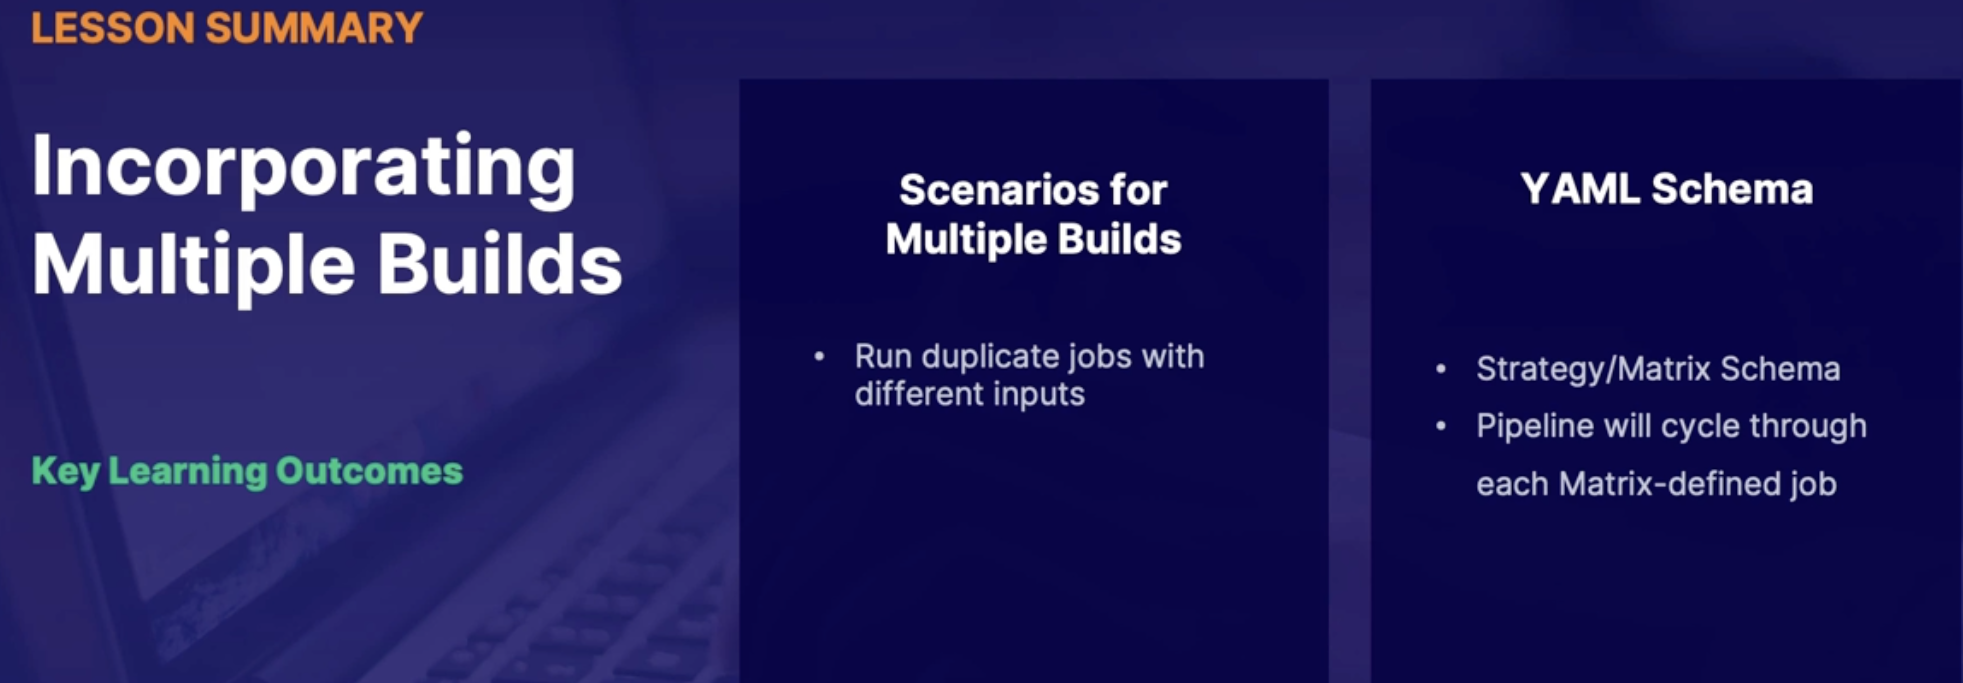
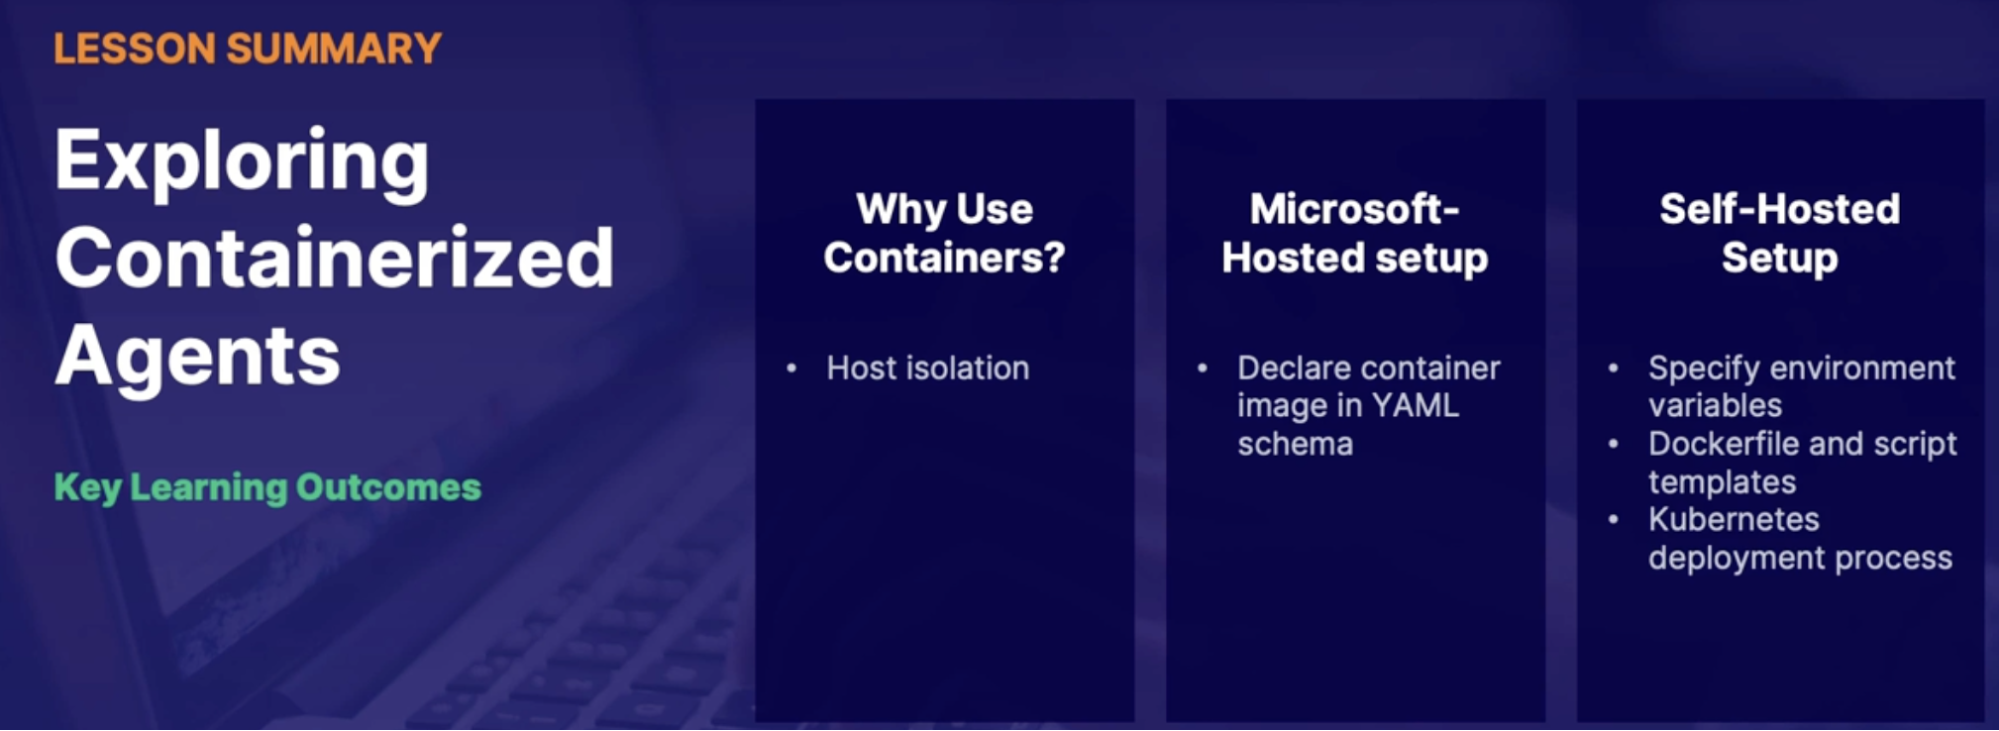
Lab: Use deployment groups in Azure DevOps to deploy a .net app
Objective:
- You have a .NET application with a database, you need to deploy to a specific Azure virtual machine via ARM template.
- You must use Azure DevOps to create a CI/CD pipeline and deploy this application using deployment groups to target that Azure VM.
Solution
Steps
- Create a build pipeline and build the solution // to get the artifact, ARM template and application file, DACPAC file
- Create release pipeline
- Left blade, click on release
- Select template window → Click on empty job
- Add an artifact
- Source type: build
- Enter Devops project, source
- Clink on stage 1 (1 job, 0 task)
- Unser agent job click +
- Search ARM template deployment
- Create Azure service connection
- Azure resource manager
- Service principal manual
- Azure resource manager connection: enter Azure service connection
- Enter template
- Add a new task to Deploy sql database
- Task: azure sql database deployment
- Service connection
- Authentication type: sql server
- Azure sql server: database server name.database.windows.net,1433
- Database
- Login
- Password
- DACPAC file: from artifact
- Create release
Note: up till now, you have all your resources(VM, database, storage, network) created in the resource group and now create the deployment group to deploy application
- Create deployment group from azure DevOps
- Name: prod
- Use a PAT in script for auth
- Copy script to clipboard button
- In VM, PowerShell, paste the script
- On deployment group → target → you’ll have VM
- On release pipeline → edit pipeline
- Add a job: deployment group job
- Task: manage IIS website
- Task: deploy IIS website
Lab: Integrate GitHub with Azure DevOps pipelines
Chap - 9: Designing a package management strategy
Introduction
What is package manager/software package
What: is a software package from the perspective of the end-user and development
- it is an archived file, which contains your application code and the metadata built into it, to easily deploy or install that application.
- Different examples of end-user software packages rely mostly on the operating system that the application is on.
- For example, APK package files(Android), DMG (Macs), RPM(Red Hat Linux distributions), and DEB (Debian based distributions). // software package made for the OS which makes the process of deploying or installing applications a lot easier
- Think of it as all your application data all rolled up into one neat package.
Discovering Package Management Tools
Development-related package managers (perspective)
- Package managers, which make working with different types of programming languages, a lot easier.
- Ex: if you're working with node.JS, You may have often used NPM to package and use your node.JS application. = end result is an artifact which is packaged code consumed by App service/Container
- Maven(Java), NuGet(.net), python packages
Package management
- package managers as different types of tools like NPM, Maven, etc, that simplify the process of installing, using, updating, and removing various applications.
How to manage packages
DevOps perspective
Packages integrated into broader applications
When we are working with package managers within a DevOps application that just
Maven, NuGet, etc, you want to start thinking about those packages of code integrated into much larger applications or bundled in-package dependencies to your code that are stored in an upstream format.
- Upstream packages = application dependencies
- you may have a Maven package that you need to refer to, which will be plugged into your broader application, and in addition to working with upstream packages and dependencies packages,
- Packages are also directly deployed to the end-user
- when you're deploying an application to Azure App Service or a containerized application that container or that application running an app service is itself a type of artifact.
Upstream packages hosted in package hosting service
- version storage for software packages // this is where packages and artifacts will live
- integrate with build pipeline using feeds
Package hosting service example
Package hosting service = pipeline artifact single source of truth(for storing managing and providing access to artifact in packages within your organization)
- Azure artifact
- natively integrated into Azure DevOps
- External tools
- GitHub package (GitHub)
- Jfrog Artifactory
Summary
- Software packages: application deployment tool(bundled set of tools to make deploying your application a lot easier)
- DevOps perspective: Upstream dependency/deployment(software packages that act as dependencies to our broader application)
- package hosting service: package artifact source of truth(where’s your package and artifact live)
Exploring Azure artifact
Azure artifact
What:
- package management hosting service built directly into Azure DevOps org
- Integrate files between pipeline stages using Azure artifact features
- Control artifact management/access with feed
- Support private and public registry
- Public registry in public DevOps project
- Currently supports Maven, nuGet, NPM, Python packages
Feeds
To Store, manage, group and share packages
- pipelines publish artifacts packages to feed in Azure artifacts
- share internally or publicly
- feeds scoped to organization or project
- public feed always scope to public project
- developers can connect to feed for upstream packages
- process varies by languages/tools
Developer workflow with Visual Studio
Build pipeline: publish artifact into Azure Artifact feed
Azure artifact feed: from feed, our developers are going to access and push down artifact to their own local development environment in order to work with publish upstream dependencies
Visual Studio Upstream packages: authenticate and connect to that feed via visual studio before the developer can go ahead and pull those published packages down to their own environment to go ahead and develop their broader application.
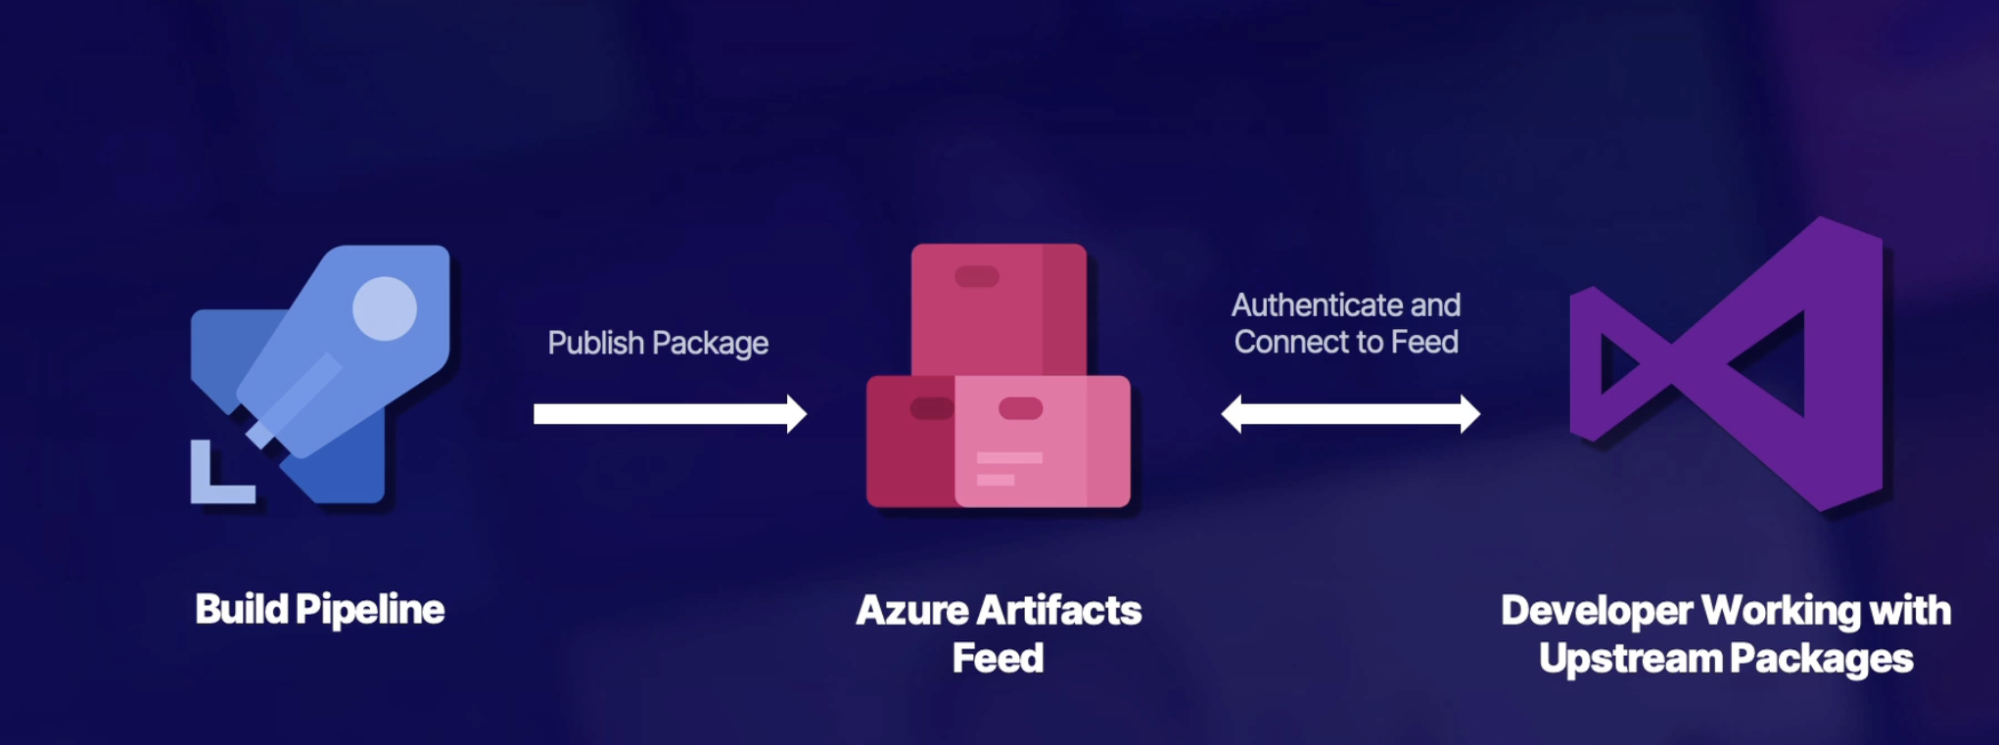
Microsoft is expect that you're familiar with the process of working with Visual Studio to authenticate with an Azure Artifact feed,
Demo: Connecting to feeds in visual studio
Authenticate and connect to NuGet feed
- From VS authenticate with credential provider
- Natively built into visual studio
- no need to use API keys or access tokens
- OAuth authentication
- Add packages URL to NuGet package Manager in VS
- Other languages/workflows may use personal access tokens(PAT)
Steps:
- publish demonstration code to an artifact (by running the build pipeline)
- create a new feed
- visibility: members of your org
- pipeline file will publish NuGet package/artifact to this feed
- run pipeline (pipeline file in GitHub repo)
- In YAML: Feed the name in our pipeline file needs to match our feed name in Azure artifact
- View feed connection options
Summary
- Azure artifact: Azure native package management
- feeds: package access management | connect to local development environment
- Visual studio feed authentication: use credential manager | other development methods use PAT
Creating a versioning Strategy for Artifact
Proper versioning strategy
why do we care about versioning strategy
- As the application develops multiple versions of artifact/packages will be created
- well developed versioning strategy = better management
- packages are immutable
- cannot be edited or changed after creation
- Version number permanently assigned with your package - that cannot be edit/reused
Versoning recommendations
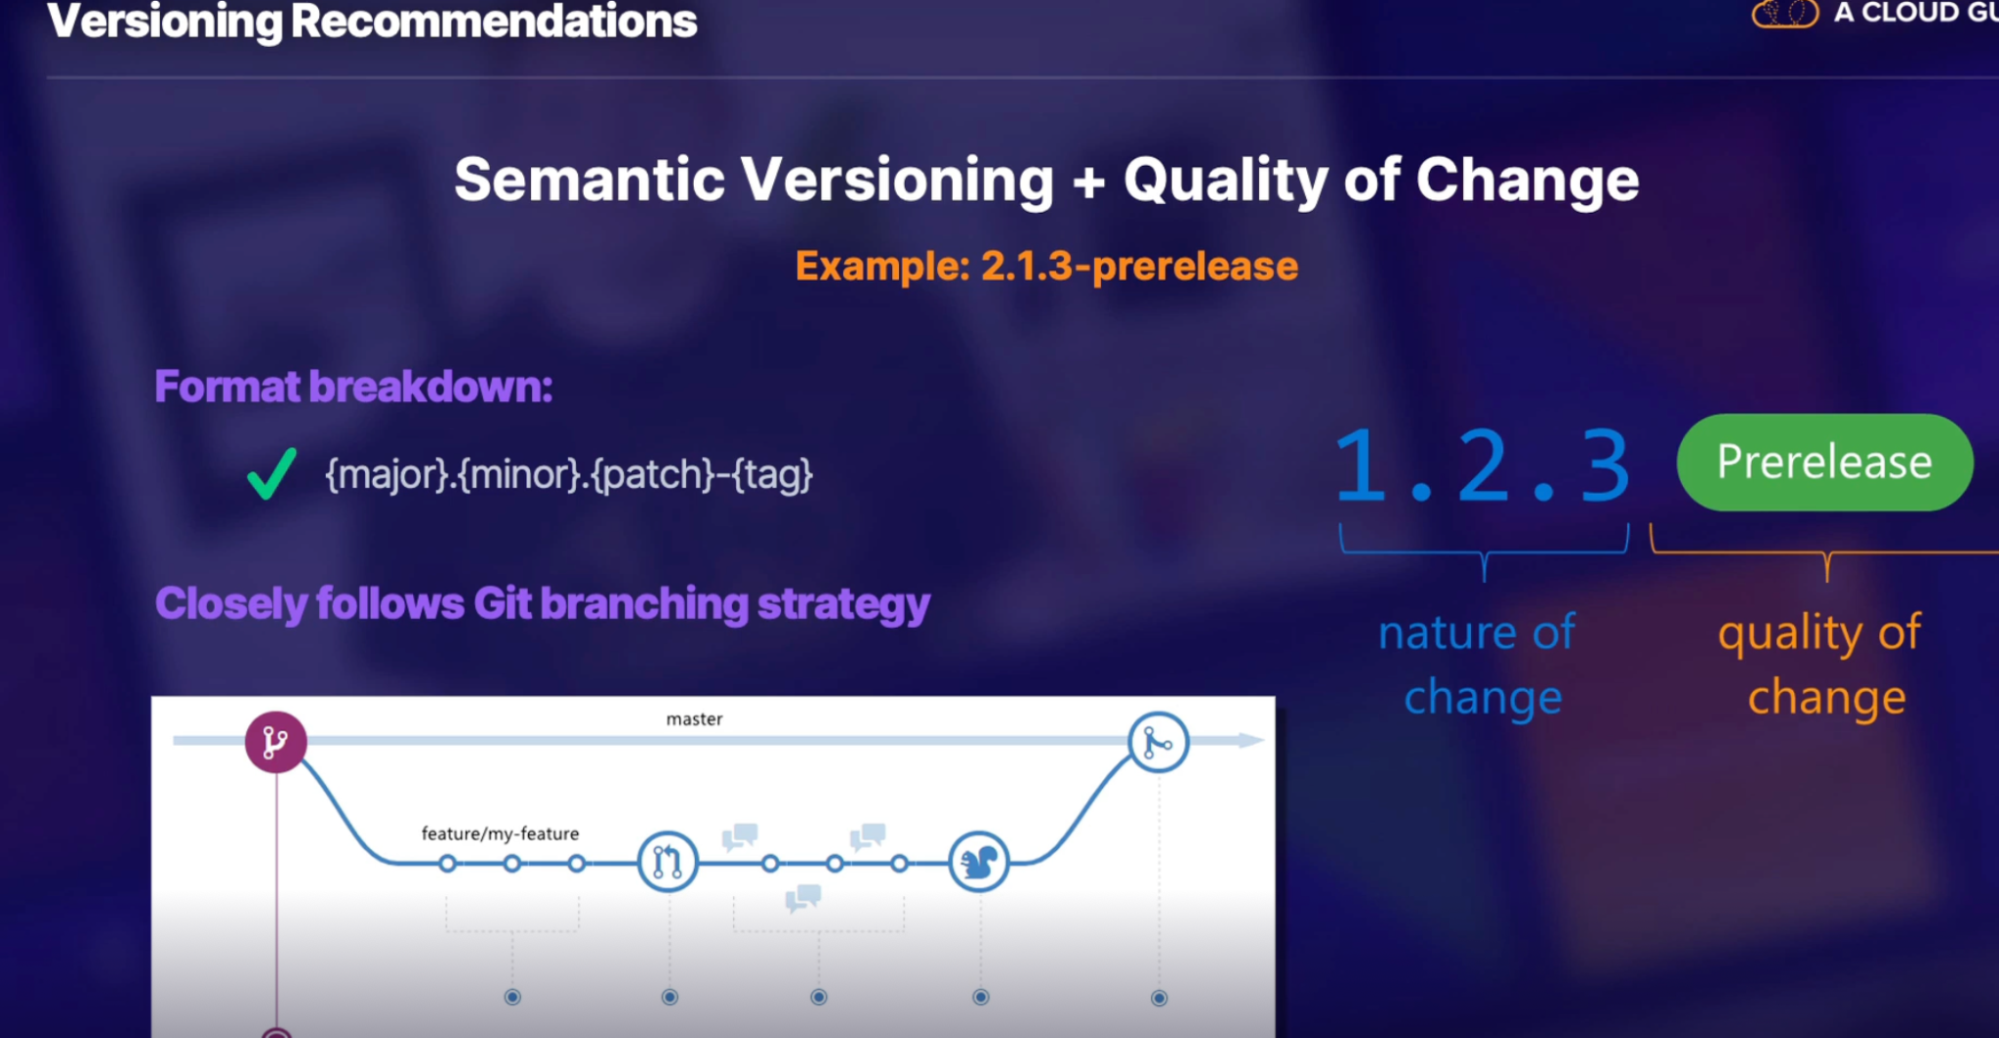
Feed views
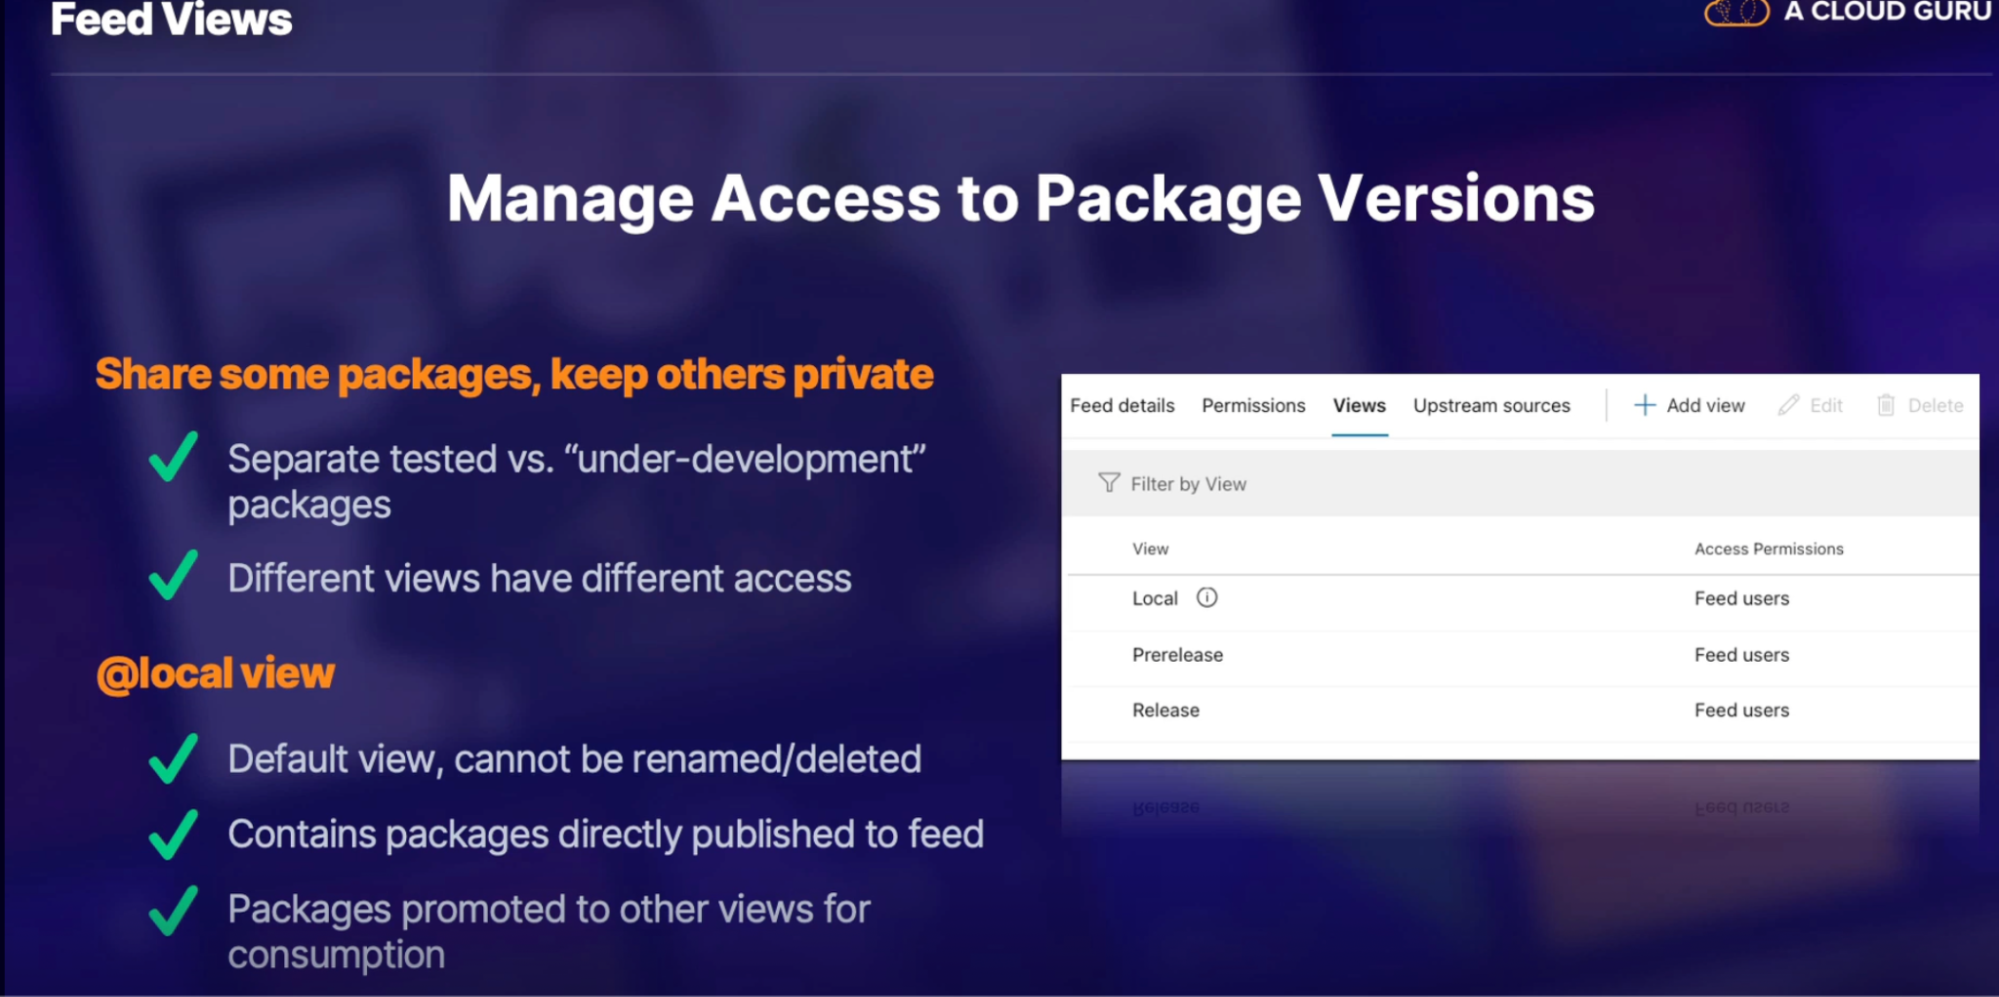
Demo
Summary
- importance of versioning strategy: necessary for large multi-version application
- recommended versioning format: semantic + quality of change. Ex: 2.1.3-release
- Azure artifact feed view: manage access to packages in multiple state of readiness
Summary
Chap - 10: Designing Build automation
Integrate external services with Azure pipelines
Scenarios for connecting external tools
Why do you need external tool
- Scan open source code/package vulnerabilities
- Flag for known security risk
- Test code coverage
- Is all your code being used
- Monitor code dependencies
- Integrate with other CI/CD products
- Jenkins
- CircleCI
External tool connection methods
Depend on Service/Purpose
- Visual marketplace
- Service hooks
- Service connector
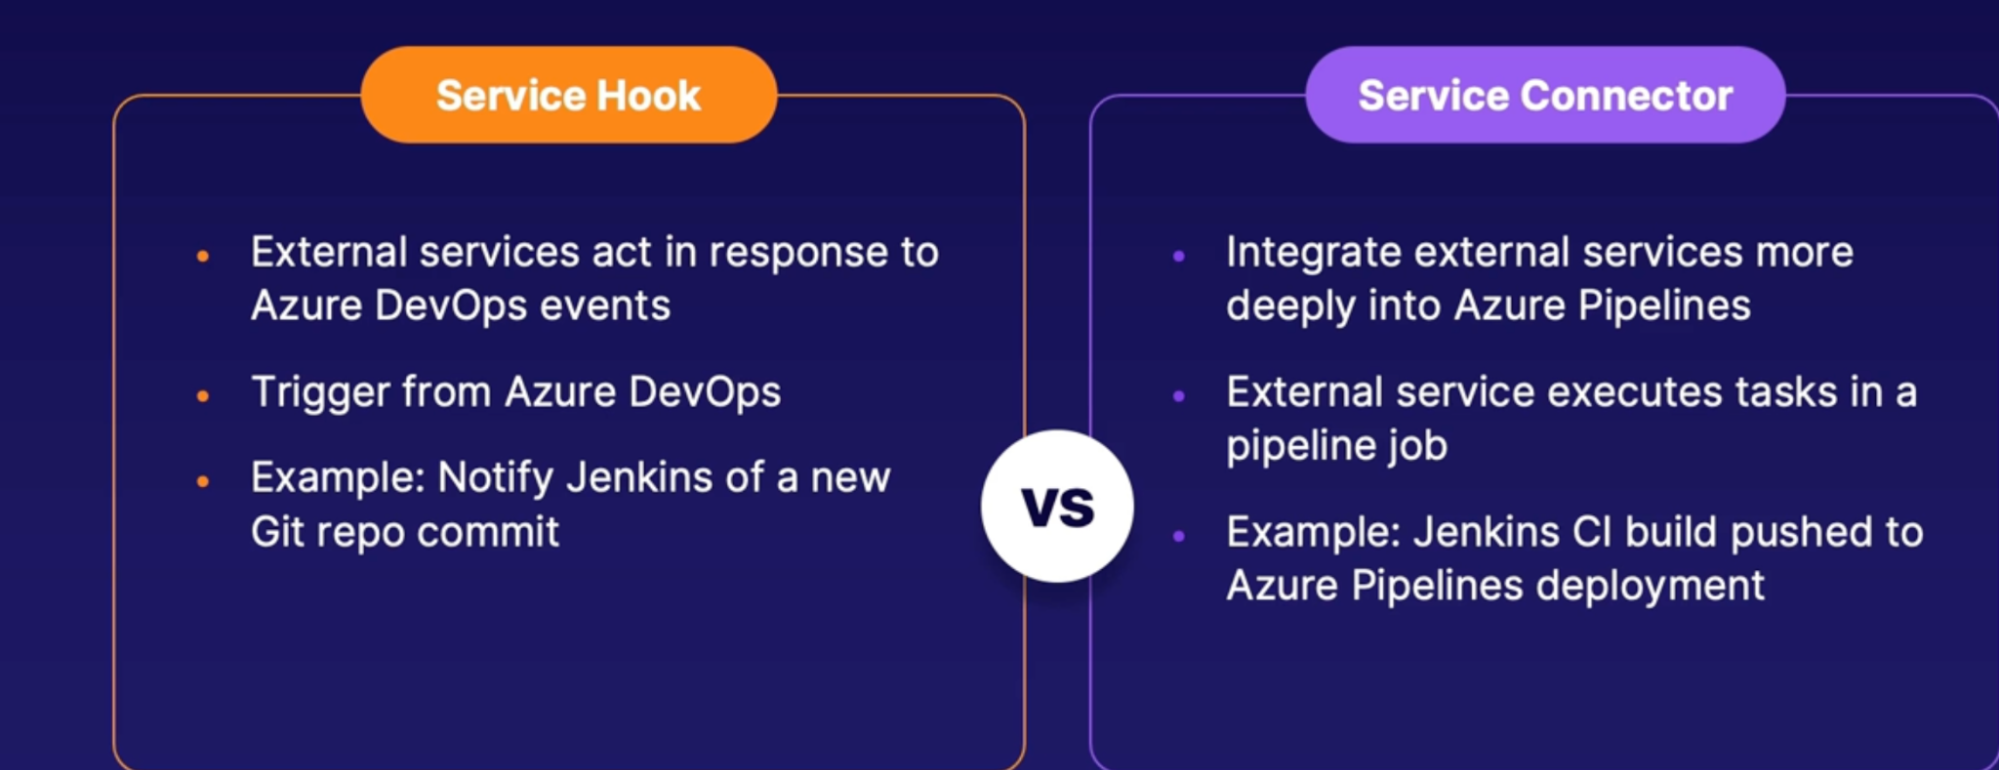
External service authentication
- Personal access token
- Azure side authentication
- API token (authorization token)
- External service authentication
Popular code scanning service/tools
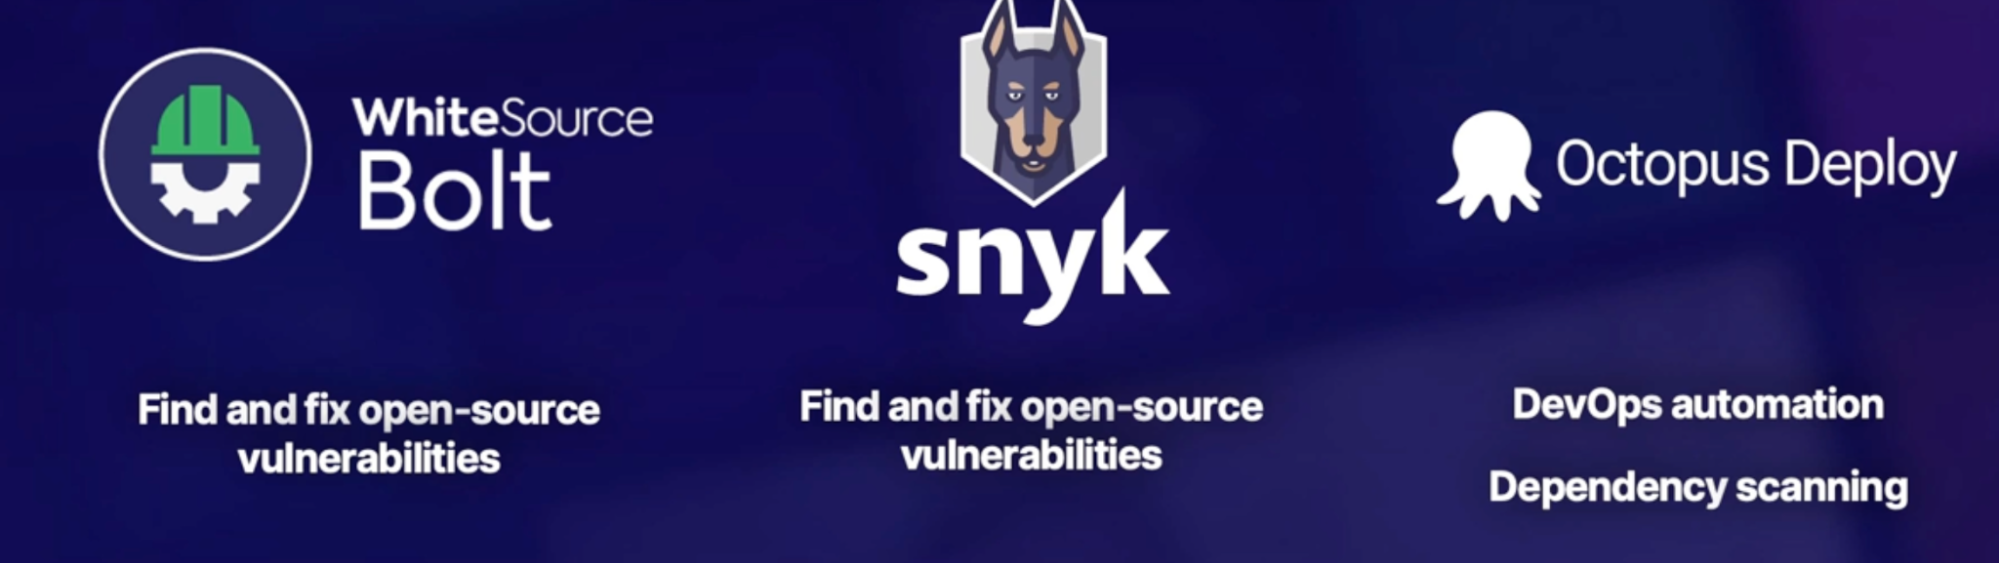
Summary
- Why Use external tools? - to scan code and integrate with external services
- External connection methods: marketplace | service hook | service connecter
- Authentication methods personal access token | in-app authorization
- Popular code scanning tools: WhiteSource Bolt | Synk | Octopus Deploy
Visual Studio Marketplace Demo
VS marketplace feature built into Azure DevOps to install and use external service
Demo
- add the WhiteSource Bolt extension via visual studio marketPlace
- browse marketplace from Azure DevOps
- find WhiteSource Bolt and install it
- select Azure org
- Navigate to pipeline and find the WhiteSource Bolt option
- register for free trial - 30 days
- add WhiteSource Bolt task into your YAML pipeline
- run extension as a task and check vulnerabilities
Exploring Testing Strategies in your build
Why test code?
- Good quality assurance process
- find bugs, fix errors, improve quality
- manual or automated process
- automatic test built into pipeline
- multiple testing methods
- test at a granular or wide scope
Testing methodologies
range in scope
- whether we are testing just a little bit of code or the entire end to end application
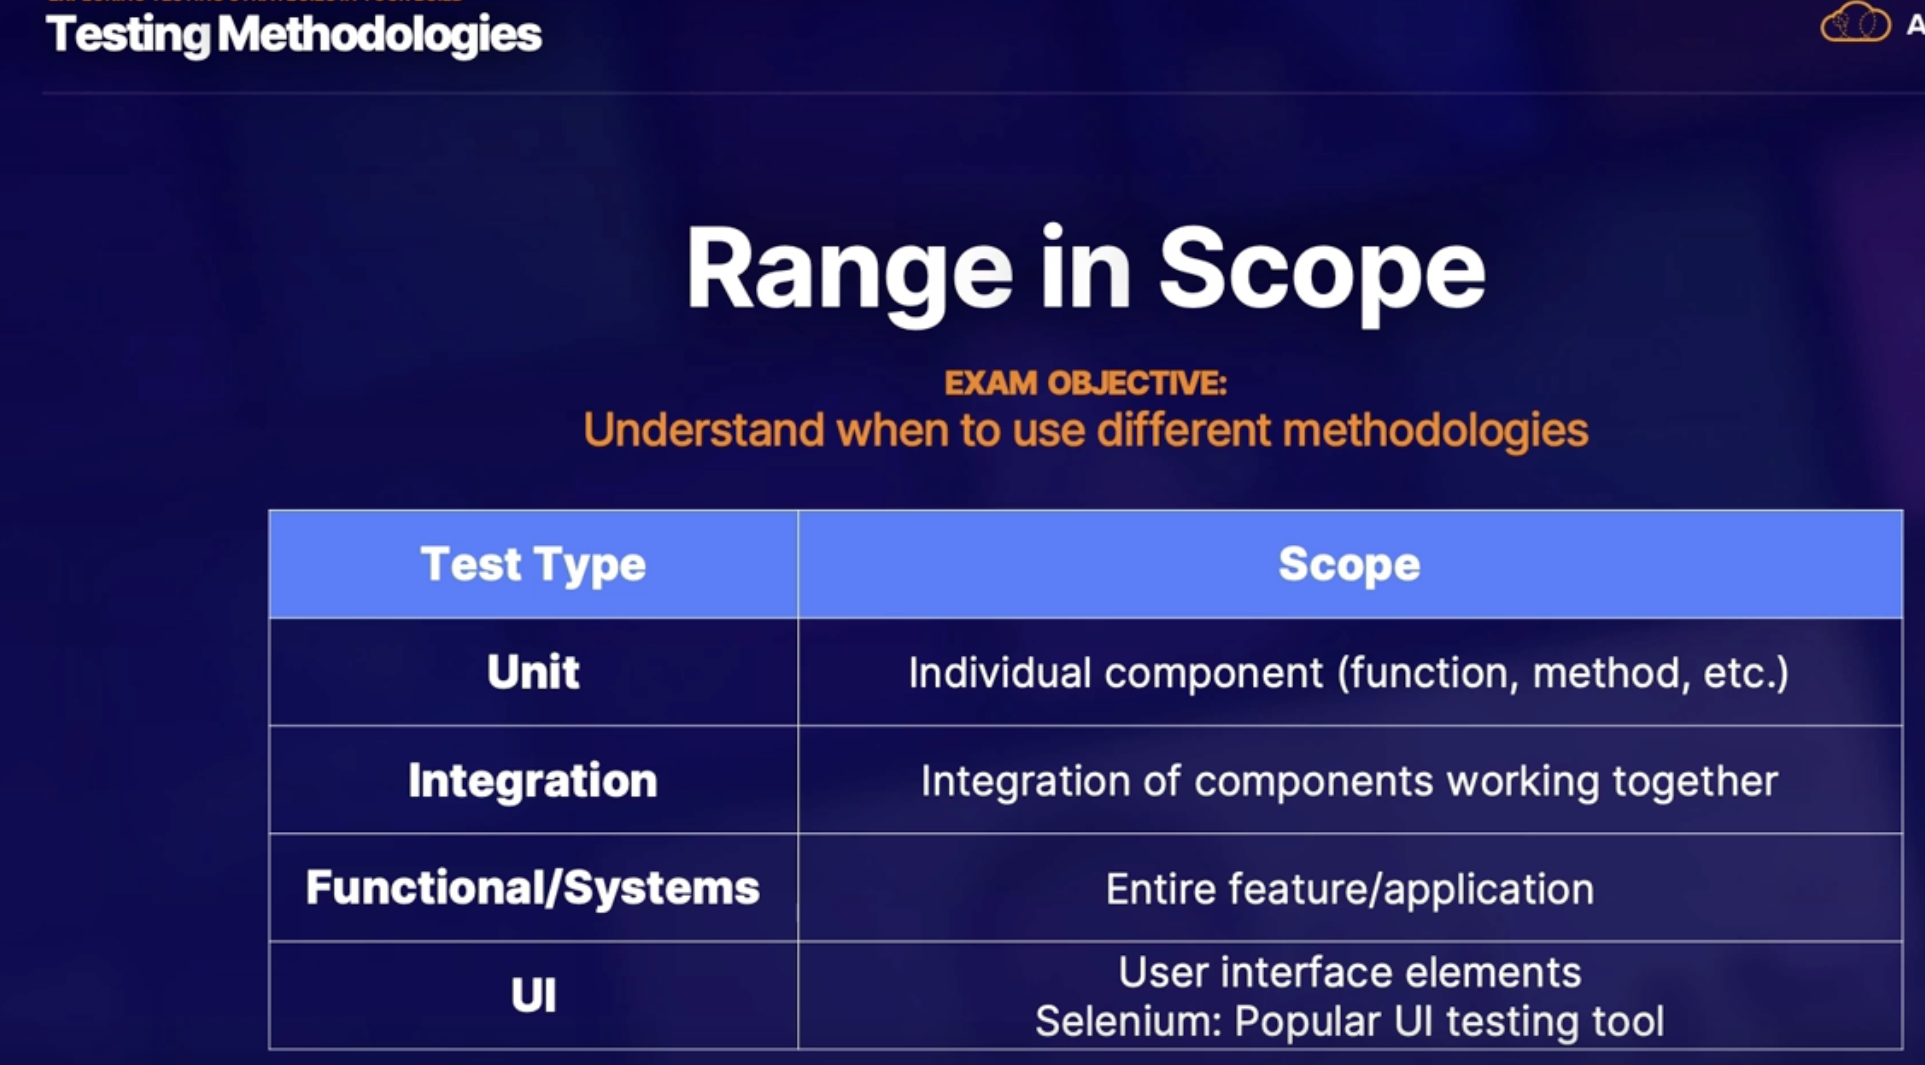
Azure test plans
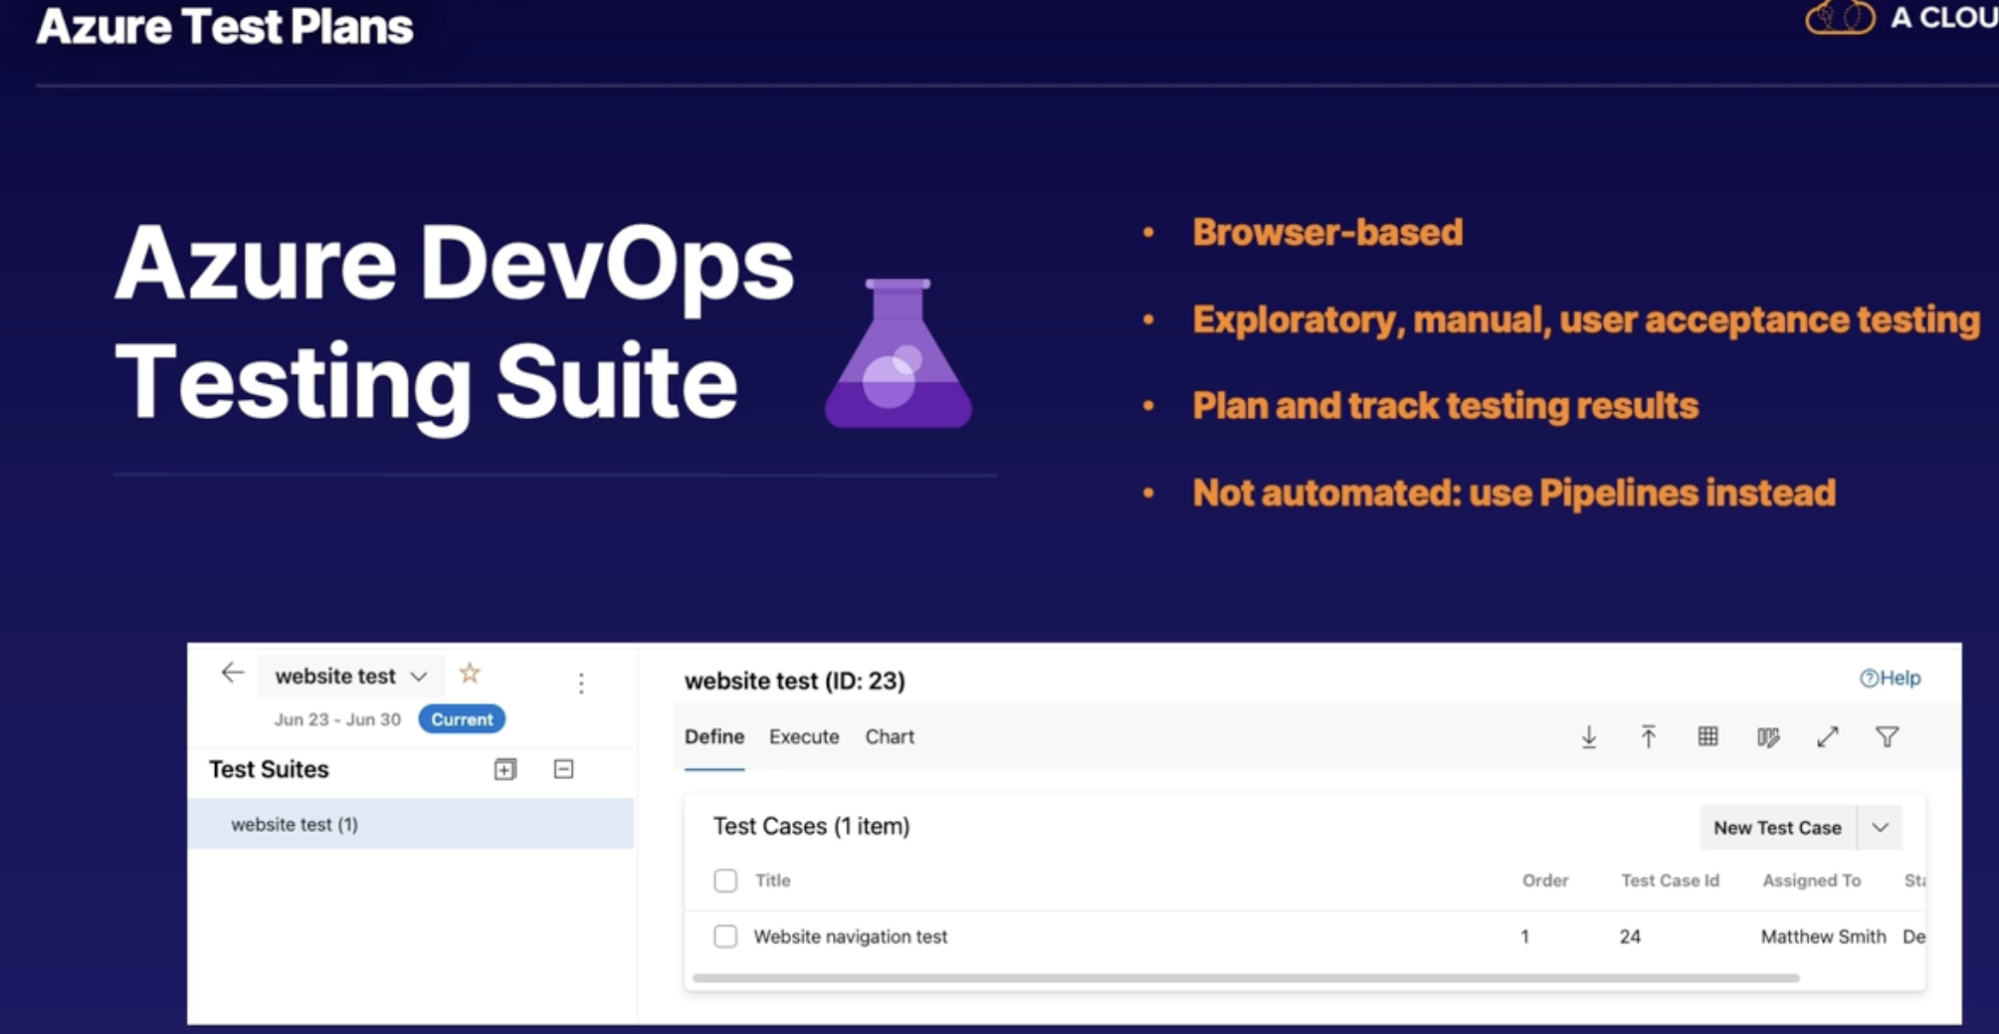
Summary
- Why test code?: Quality assurance process
- Testing methodologies/scope: unit | integration | functional/system | UI
- Azure test plans: Browser-based, manual/explanatory test management
Understanding code coverage
What is Code Coverage
How much code is used
More in-use code
- Less chances of bugs
- easier to maintain // you don’t want a bunch of code sitting around that’s unused → it could lead to unexpected consequences
How code coverage tests work
How a code coverage test is set up?
- test it in a local development environment, such as working within Visual Studio.
- The Visual Studio application itself has its own built-in code coverage tests that you can run on various different code basis.
- Azure pipeline job
- Built into pipeline task
- Schema varies by language/framework.
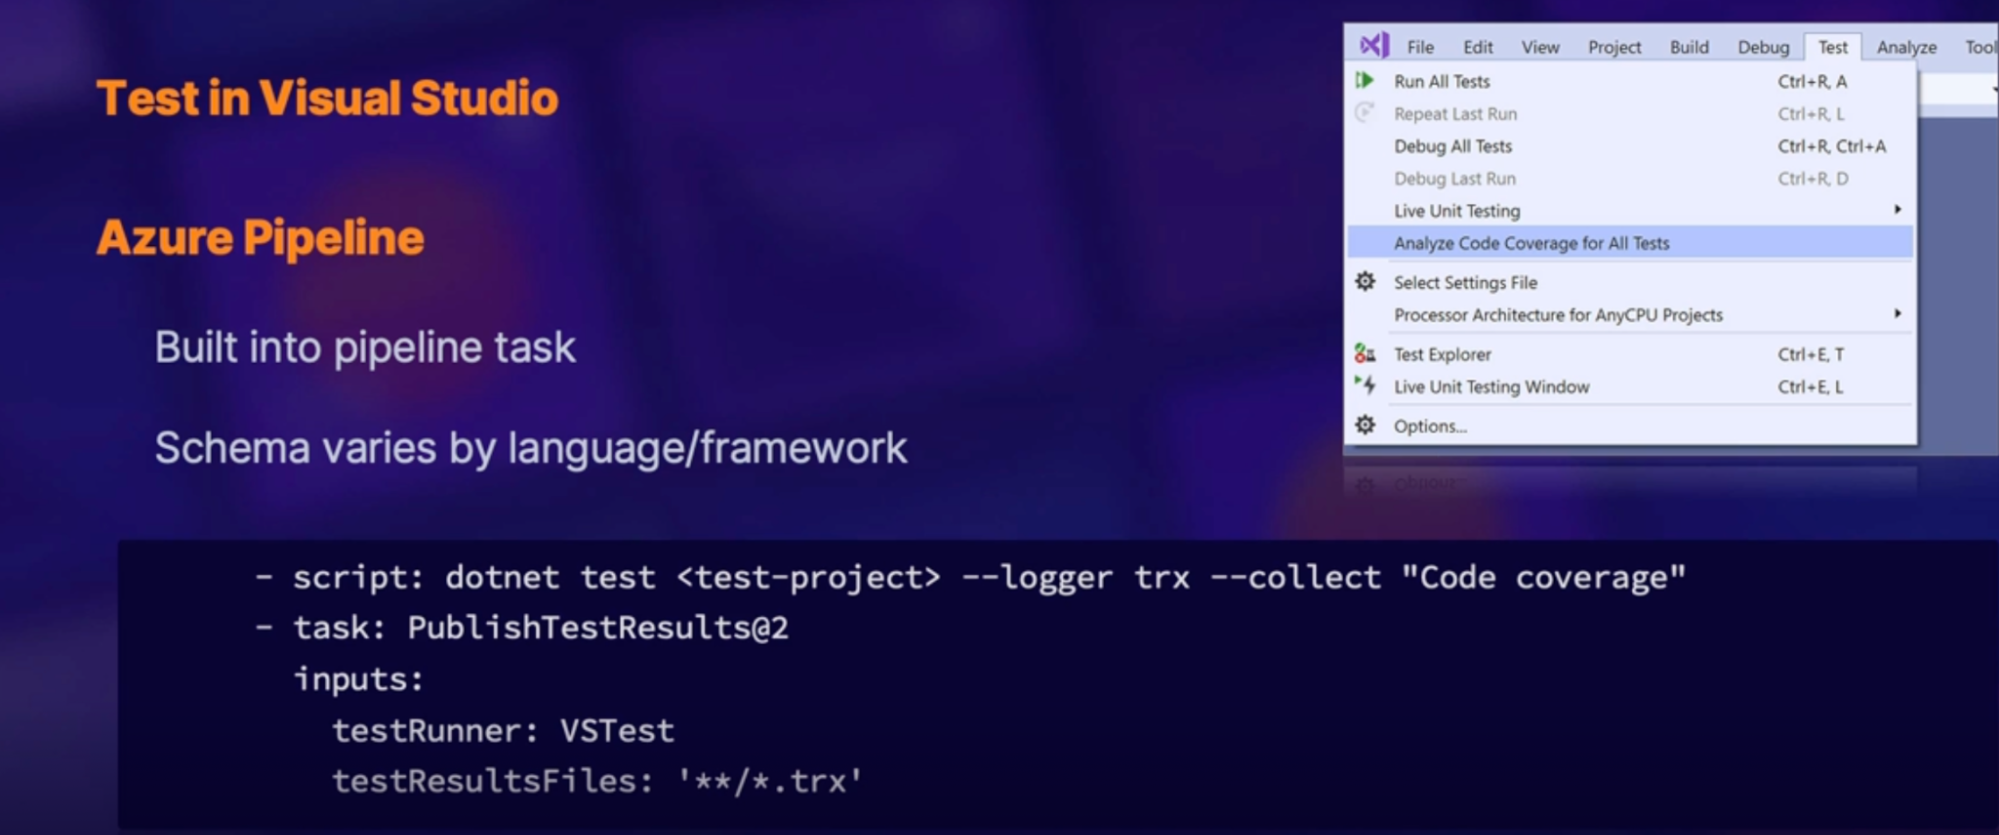
Code coverage frameworks
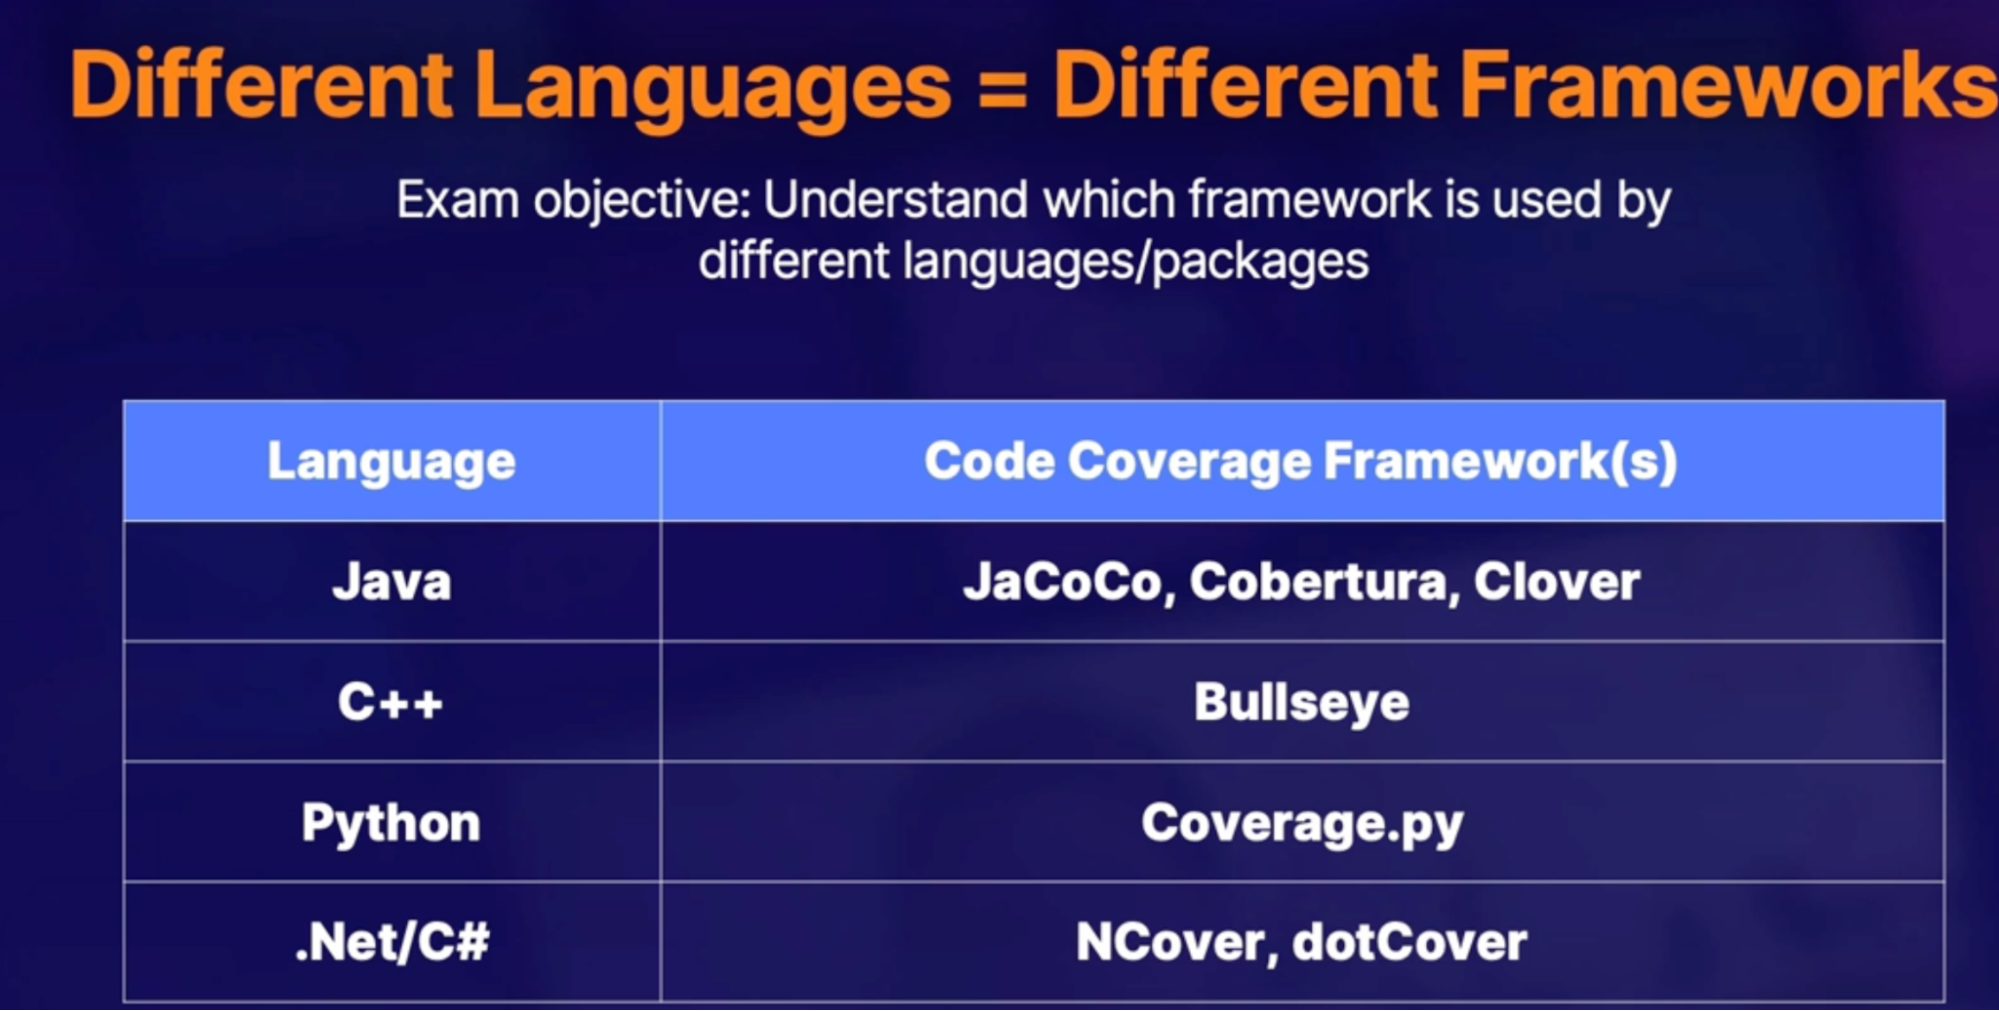
Demo
- Run demo pipeline configured to publish code coverage results
- review court coverage results
Summary
- what is code coverage? - measure code usage // more code in use = Les bugs
- code coverage frameworks: based on language/package
Summary
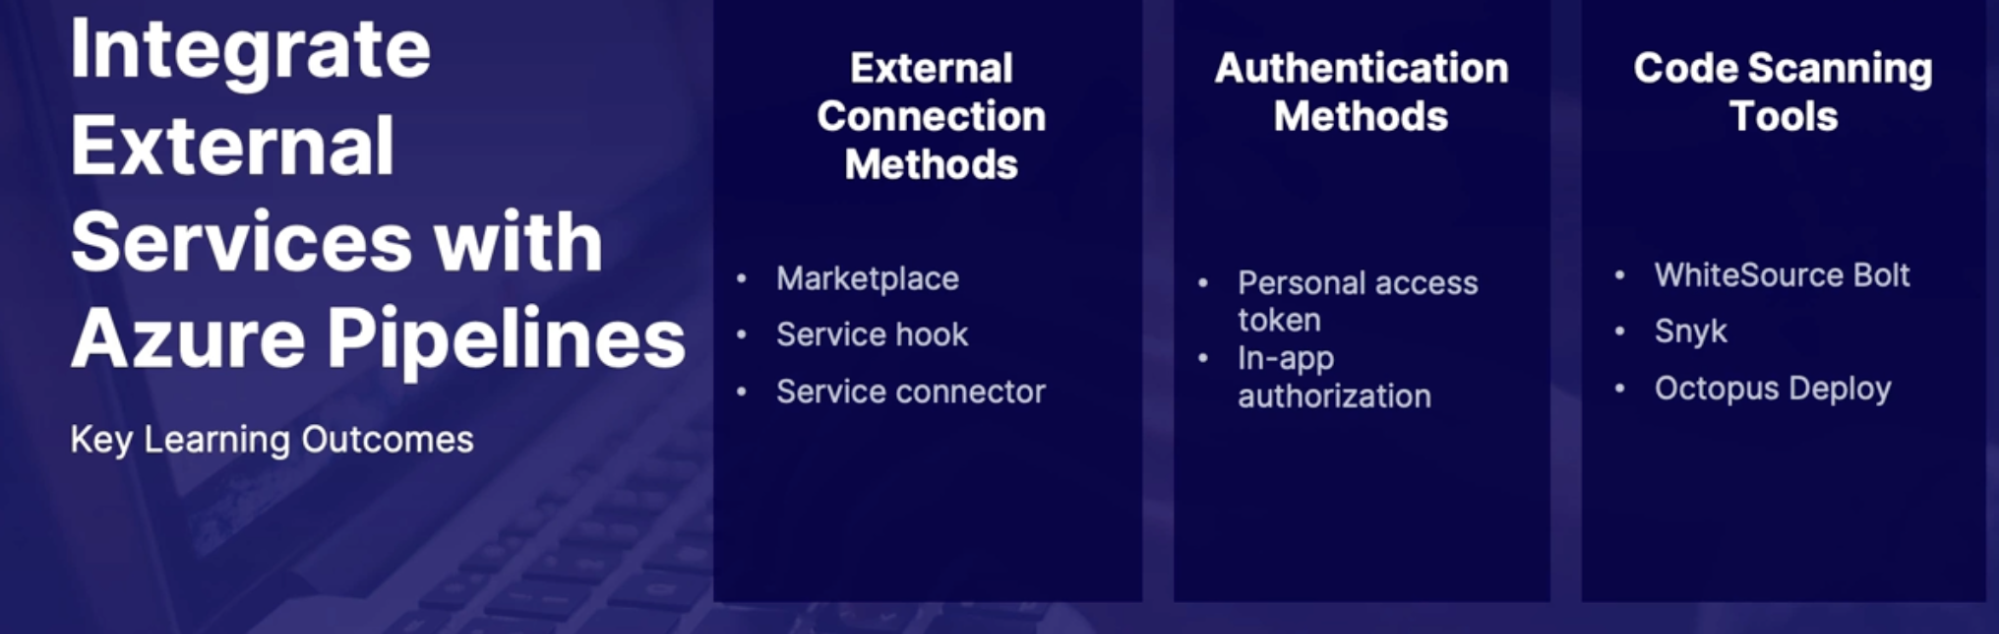
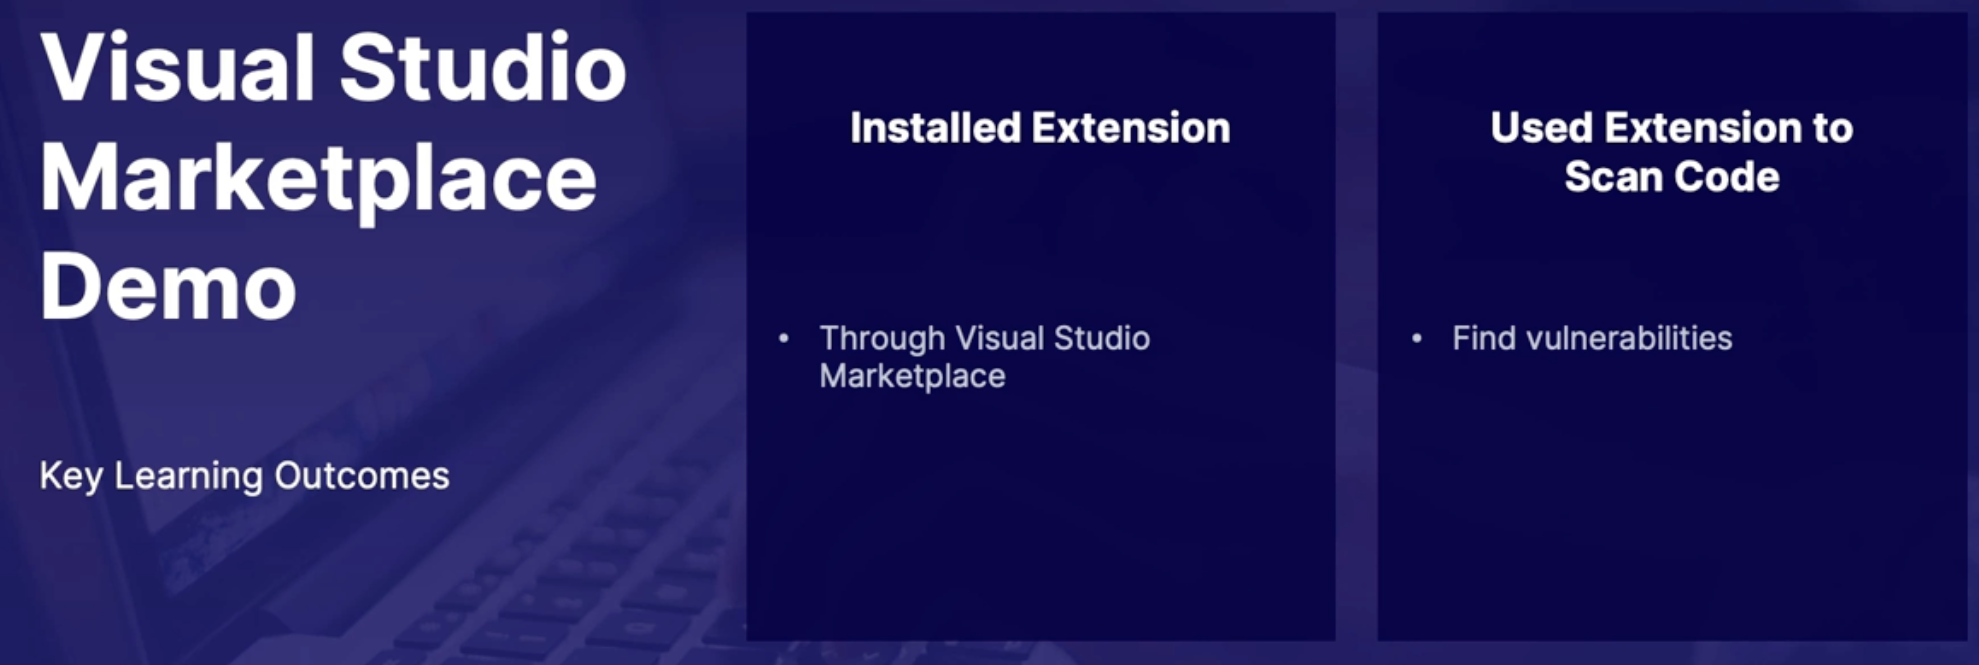
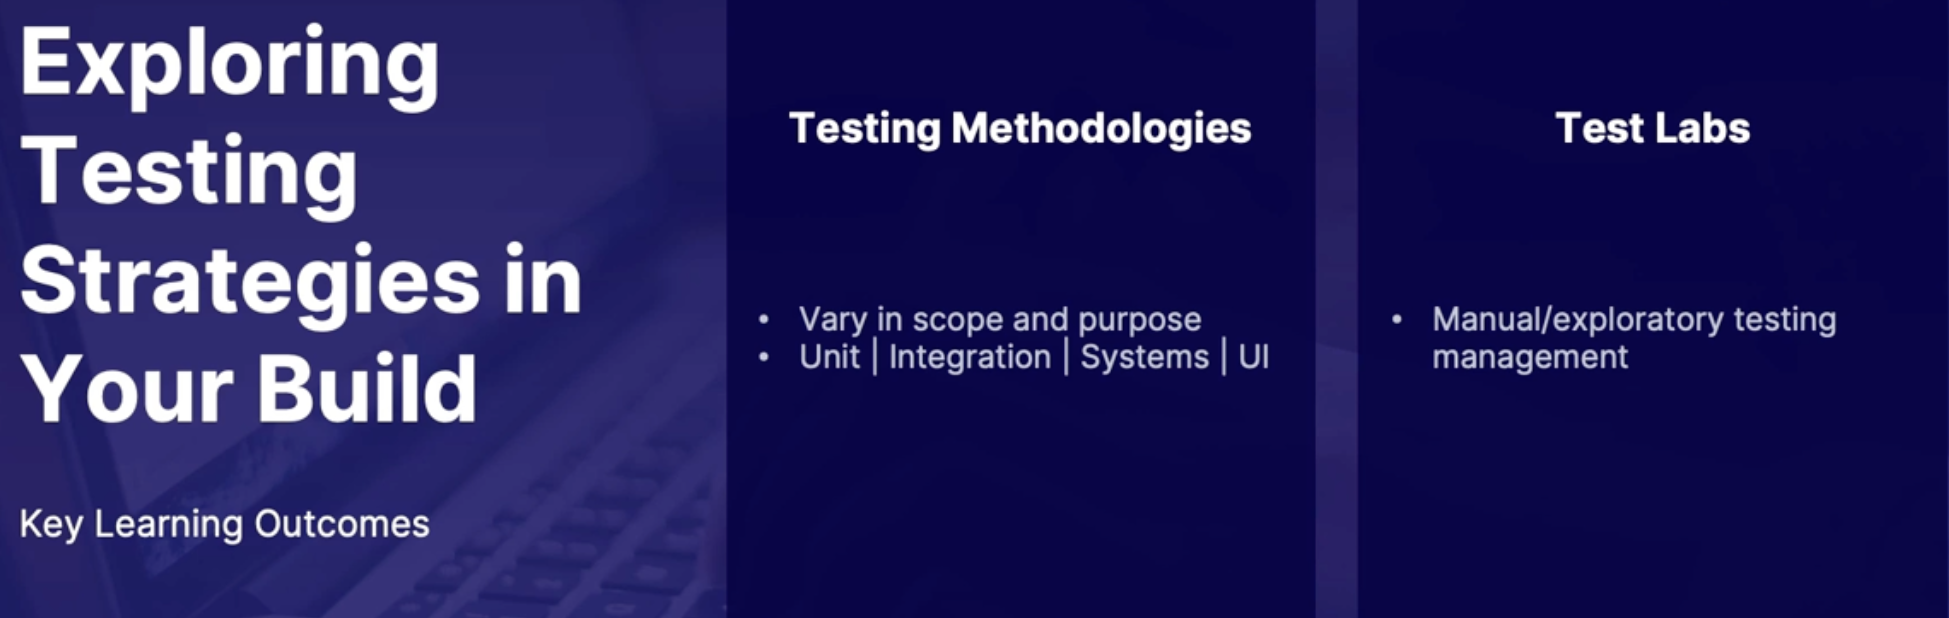
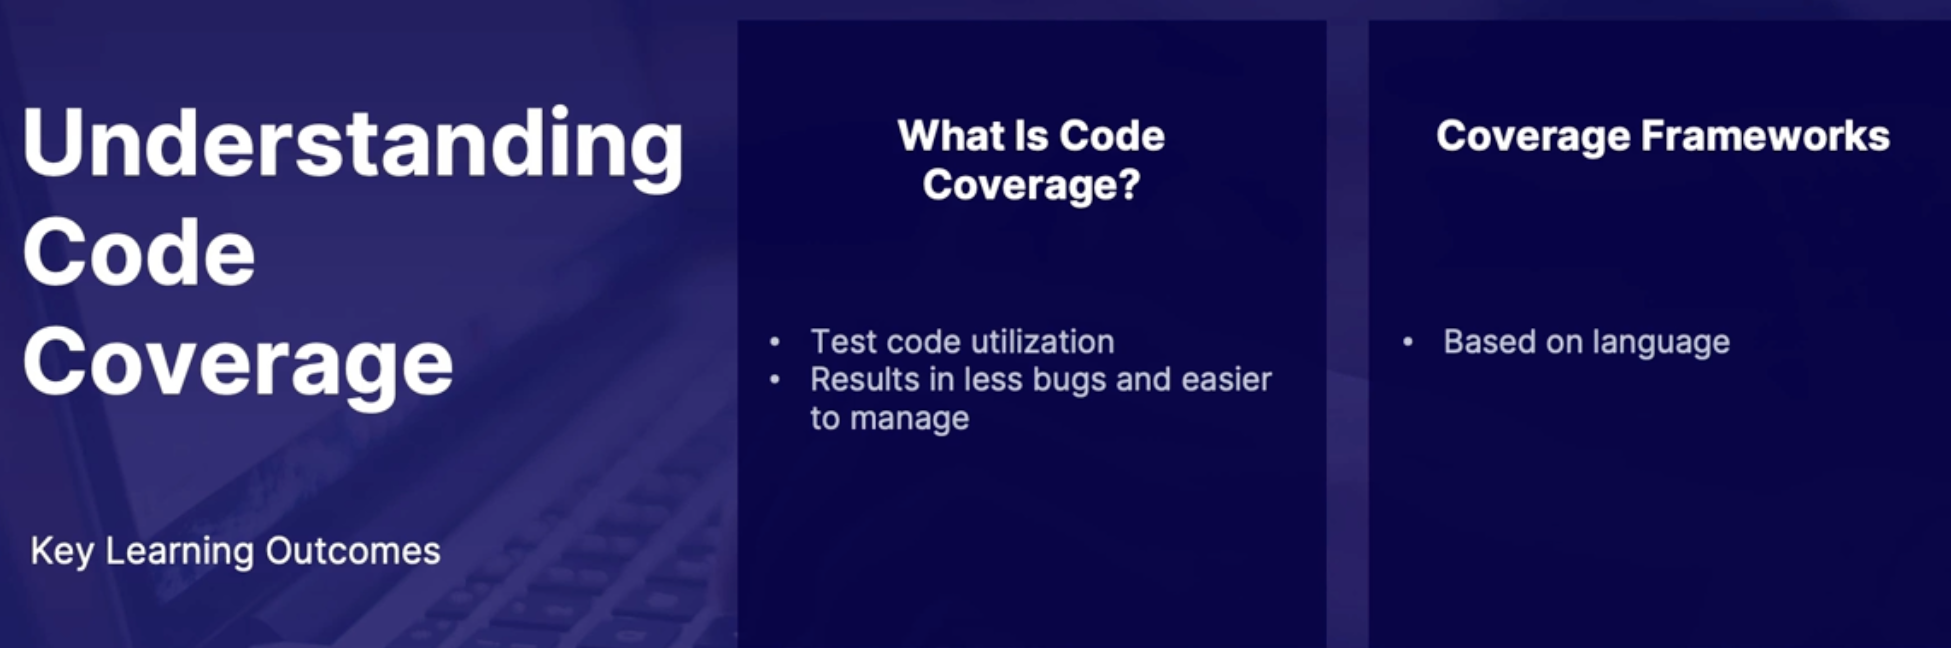
LAB: Create and Test an ASP.NET Core App in Azure Pipelines
scenario[a]
- you have a .net core sample app that you must push through Azure repos
- create a pipeline to integrate the code in Azure repos
- include a build and test stage in your pipeline and verify success
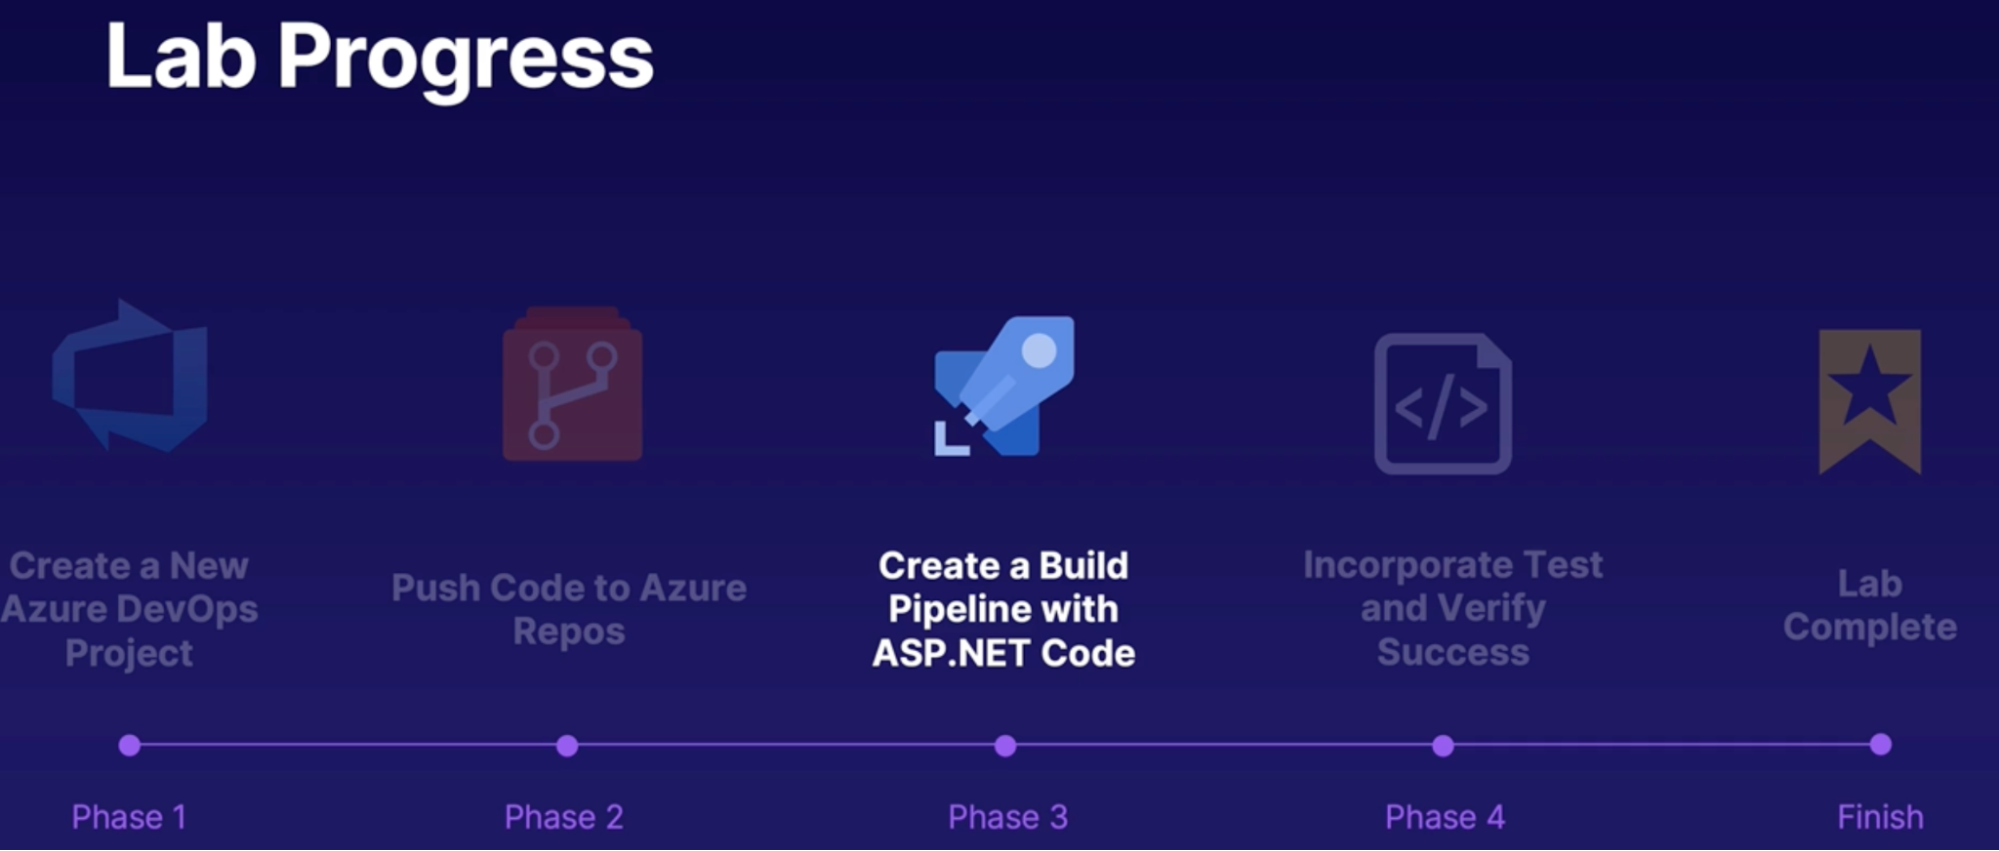
Lab: Use Jenkins and Azure DevOps to Deploy a Node.js App
Scenarios:
- you have an node JS application that you must apply to Azure web app
- you must use Jenkins for the integration and Azure for the deployment
- Create a Jenkins VM, build your pipeline, and verify app is present
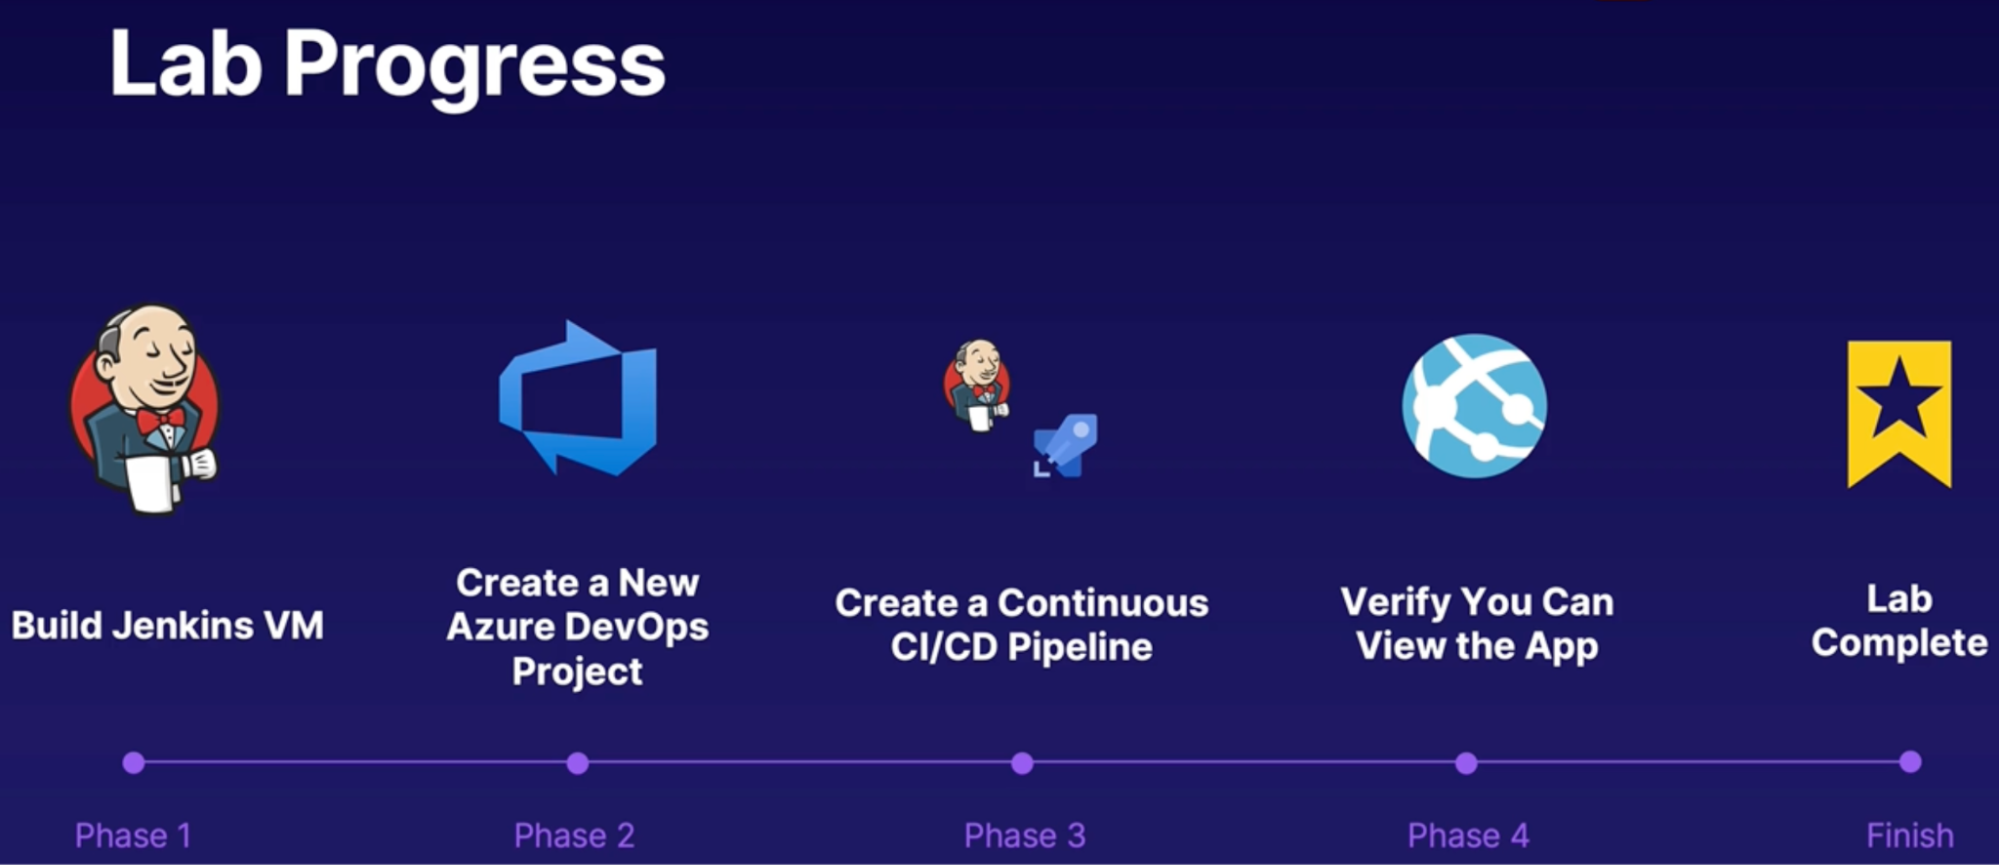
Steps:[b]
- You need a VM which has Jenkins installed
- Unlock the jenkins
- Create a username and password
- In Jenkins configure build steps
- From Azure side
- Create service connection:
- Azure resource manager → service principal manual
- Create service connection
- Jenkins
- Server URL
- Username & password
- Create pipeline
- Add artifact: jenkins
- Add service connection: jenkins
- Jenkins job
Chap - 11: Maintaining a build strategy
Introduction
Overall tips and best practices to
- troubleshooting issues with pipeline
- Improve pipeline performance
- Keeping cost under control
Discovering pipeline health monitoring
Tools to troubleshoot pipeline issues
Scenarios for monitoring pipeline health
Pipeline issues
- Failing builds
- Failing Tests
- Long build times
Pipeline reports
Solution: to use to troubleshoot pipeline issues. Which is divided into 3 sub-modules
Pipeline pass rate
What: whether pipeline successfully completed or not(without any stage failure)
Detailed pass rate breakdown
- View trends
- Breakdown of failed tasks
- Top failed task
Test pass rate
What: detailed test report(just like pipeline but it’s a test report)
- Percentage of passed/failed tests
- Breakdown of failed tests
- Top failed test
Pipeline duration
what: gives detailed breakdown of the build time for each individual step or task in our pipeline
- useful when some builds are taking abnormally longer than we expecting to
- view to build time trends
- build time for task
Demo
- View analytics in pipeline with both successful and failed runs
Steps
- pipelines —> select your pipeline
- click on analytics
- see all 3 options to see the summary report
Summary
- how do you troubleshoot pipeline problems? - pipeline reports
- Pipeline reports features - pipeline pass rate | test pass rate | pipeline duration
Improving build performance and cost efficiency
improving performance and managing the cost of your different build pipelines
Build performance and costs
Perspective: parallel agent pool increase
- unlimited build time for a flat monthly fee
- Slower builds + heavy usage = more agent required
Perspective: longer queue time for same agents
- Slower builds = more time waiting for available agents // save money on less agent but have to wait once the new agent become available
- time = money
faster builds = lower costs
Pipeline caching
Reuse outputs between jobs
- by default MS hosted agents = clean state(each agent running new job starts off clean state)
- Rebuilding/Redownloading components for every job takes time
- Pipeline caching: reuse outputs dependencies between jobs(for a job 2, instead of downloading and rebuilding the package received from job 1, job 1 produces the output and then pass it on to job 2 agent to go ahead and pick up where it left off) // job 2 doesn’t need to create those outputs from scratch // shorten build time
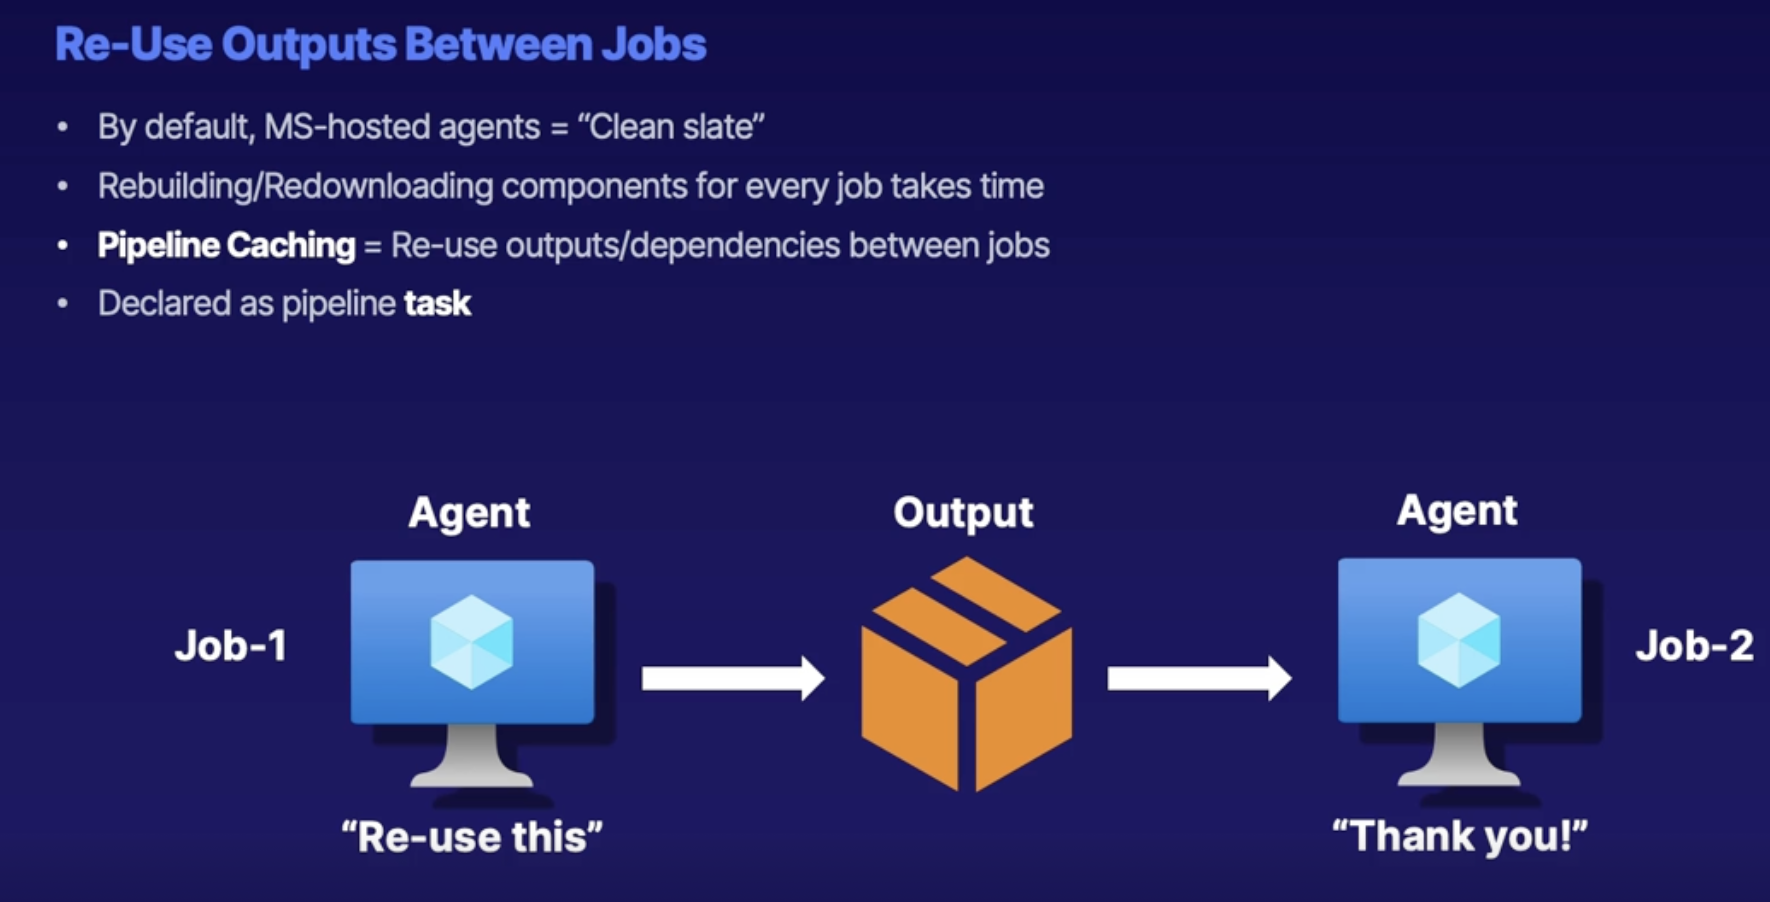
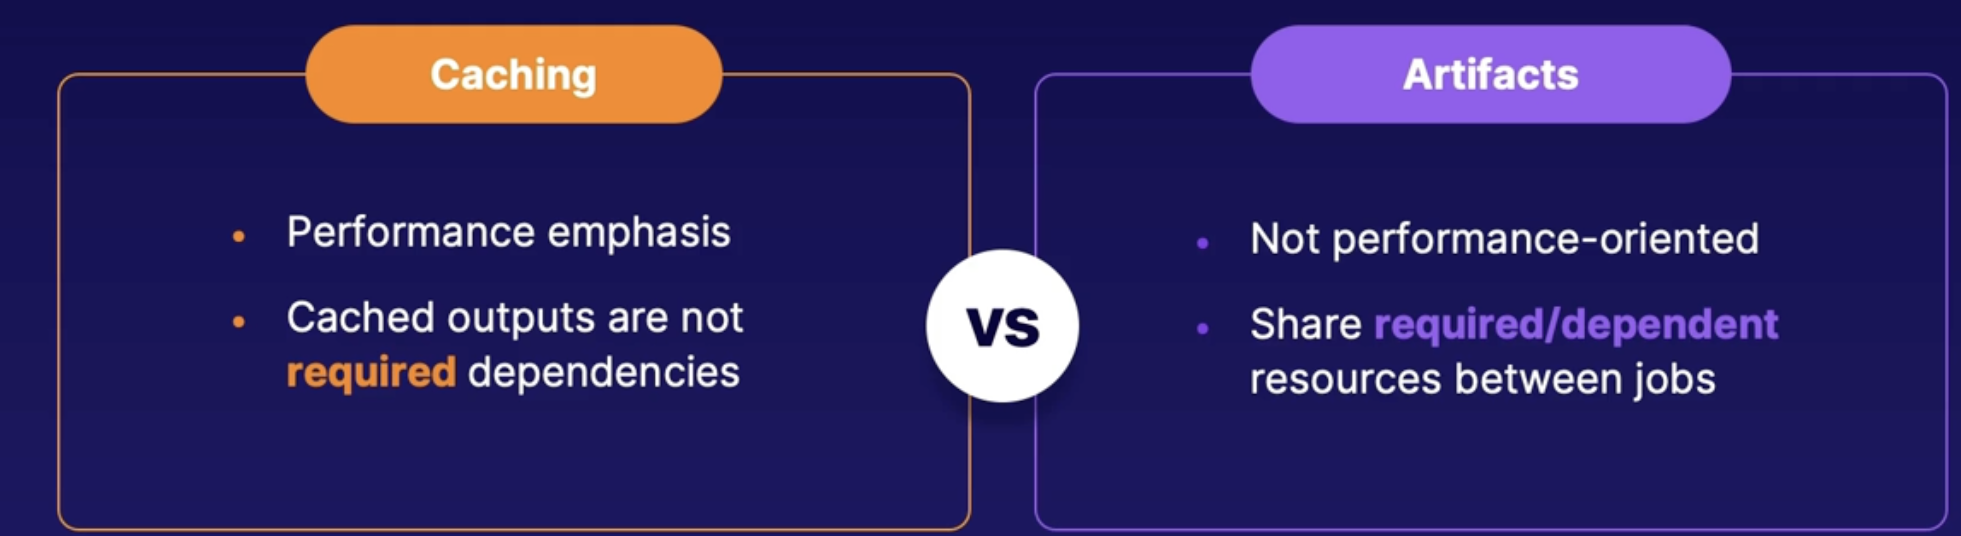
Self-hosted agents
Use to reduce cost
- customize to hardware
- more power for bigger builds
- lower money cost
- self-hosted: $15/mo
- MS-hosted: $40/mo
- reuse assets between builds = shorter build times
Agent Pull consumption reports
answers/forecast how many build agents to we really needed
- consumption report of agent usage
- goldilocks: get parallel agent number just right
Summary
- shorter build time = lower costs
- Pipeline caching: share outputs between jobs
- self-hosted agent: custom hardware | lower cost | reuse assets
- Pool consumption report: view past agent usage
Exploring build agent analysis
how to get detailed log output from our build agents in order to more properly troubleshoot successful and failed builds
Scenario: Troubleshoot Pipeline Failures
Jobs failing due to error
- Codebase doesn’t support tests
- Necessary file doesn’t found
Watch pipeline logs
Viewing logs
Expand job summary to view logs
Downloading logs
Download logs from pipeline
Configure verbose logs
To get more detailed logs
How:
Before pipeline run, enable system diagnostics
Purple logs are verbose logs that you won’t get with default pipeline run
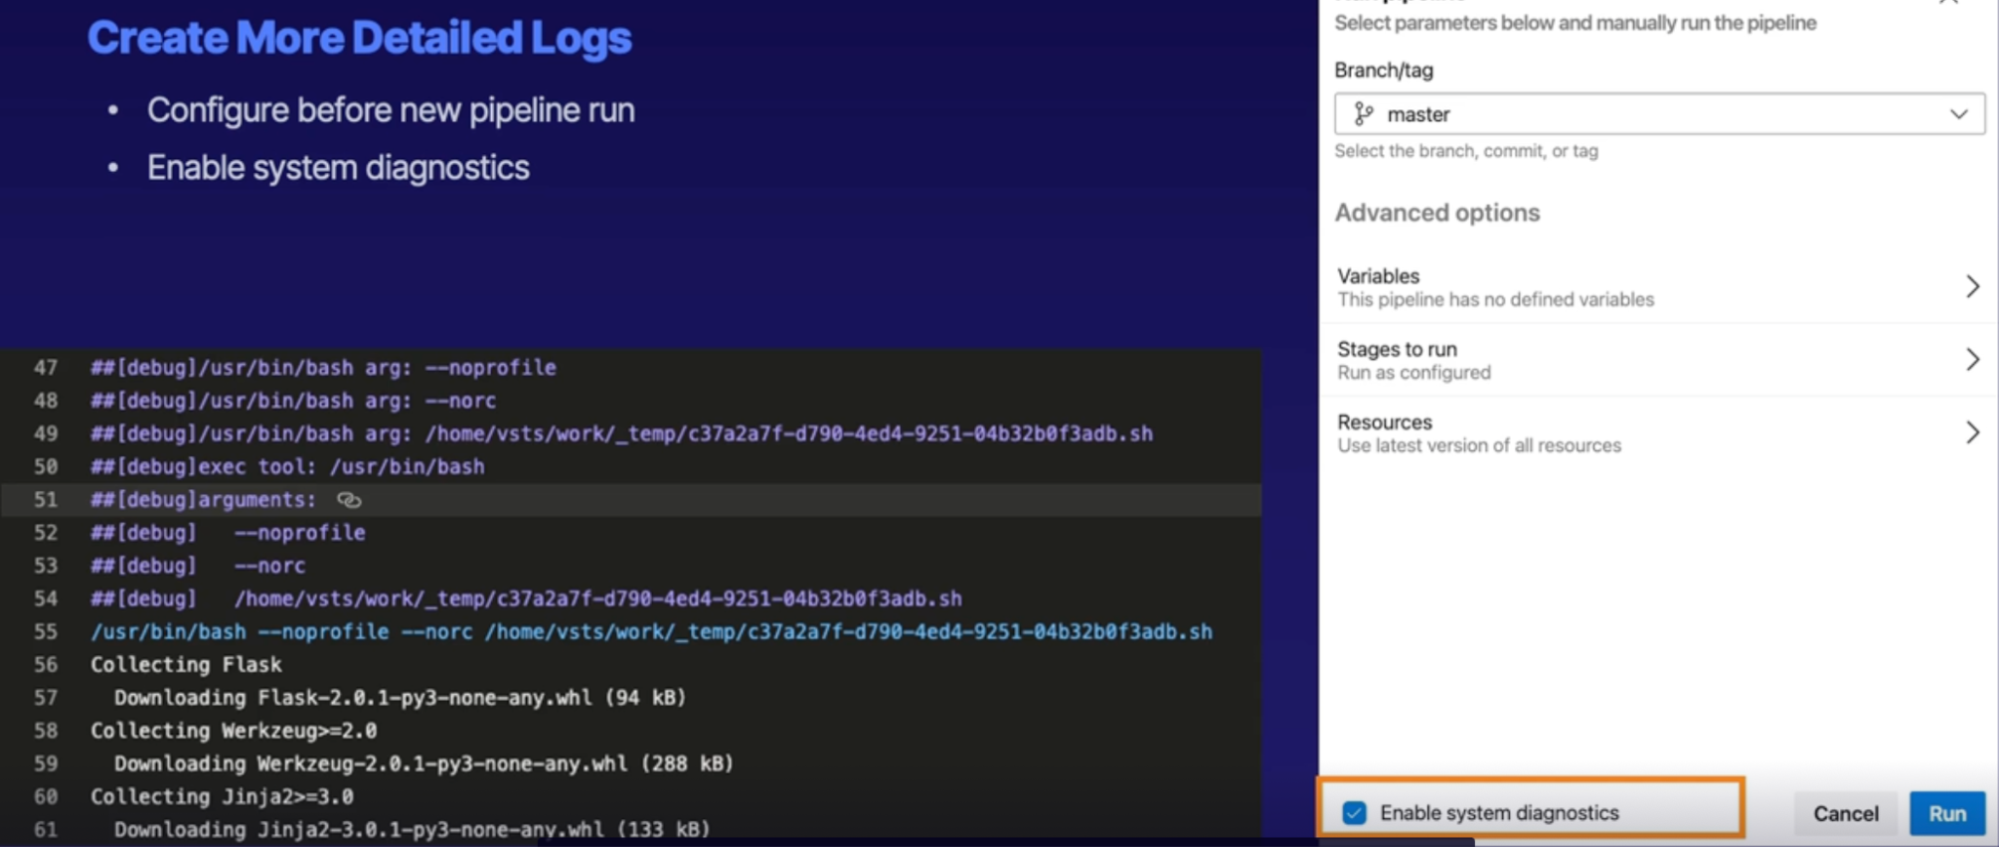
Demo
Summary
- View pipeline logs to troubleshoot pipeline errors
- viewing and download logs: pipeline run information
- verbose logs: detailed logs for further analysis.
Summary
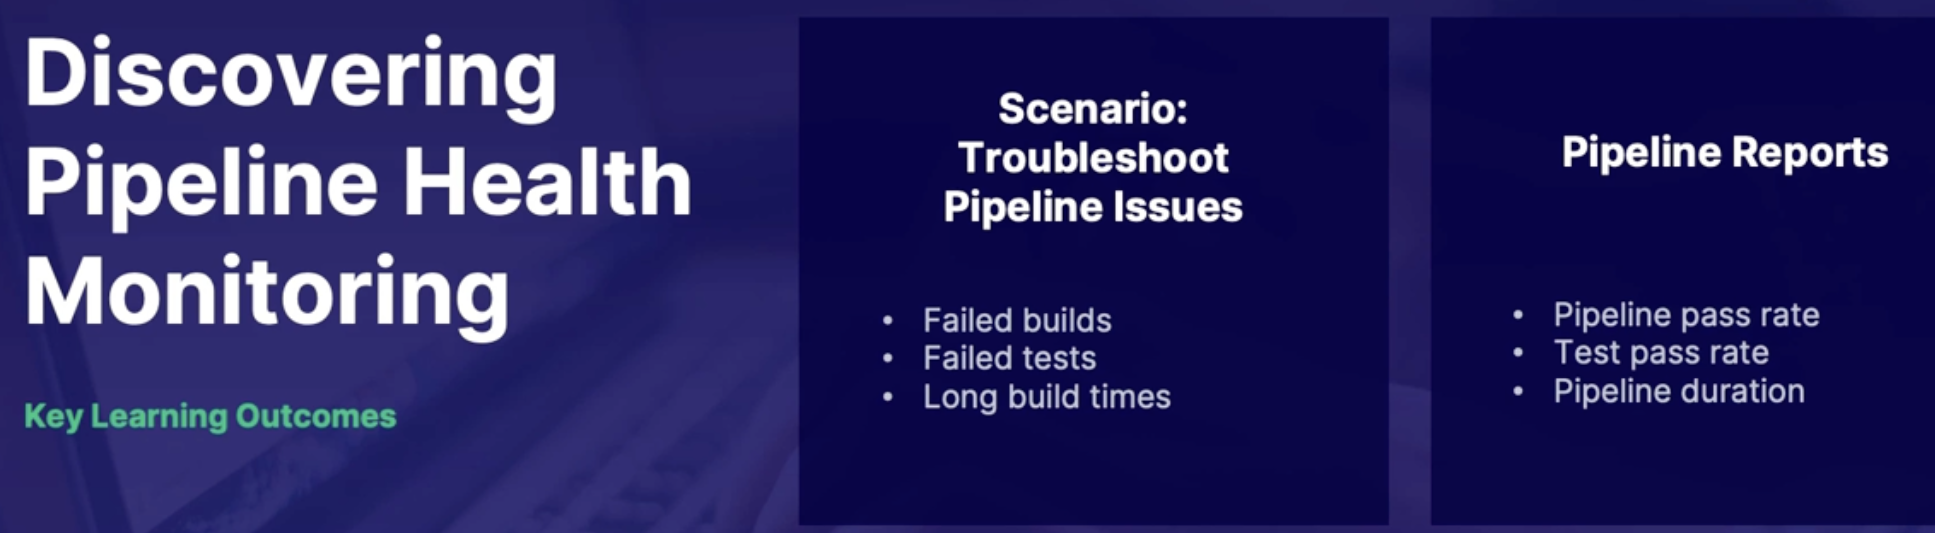

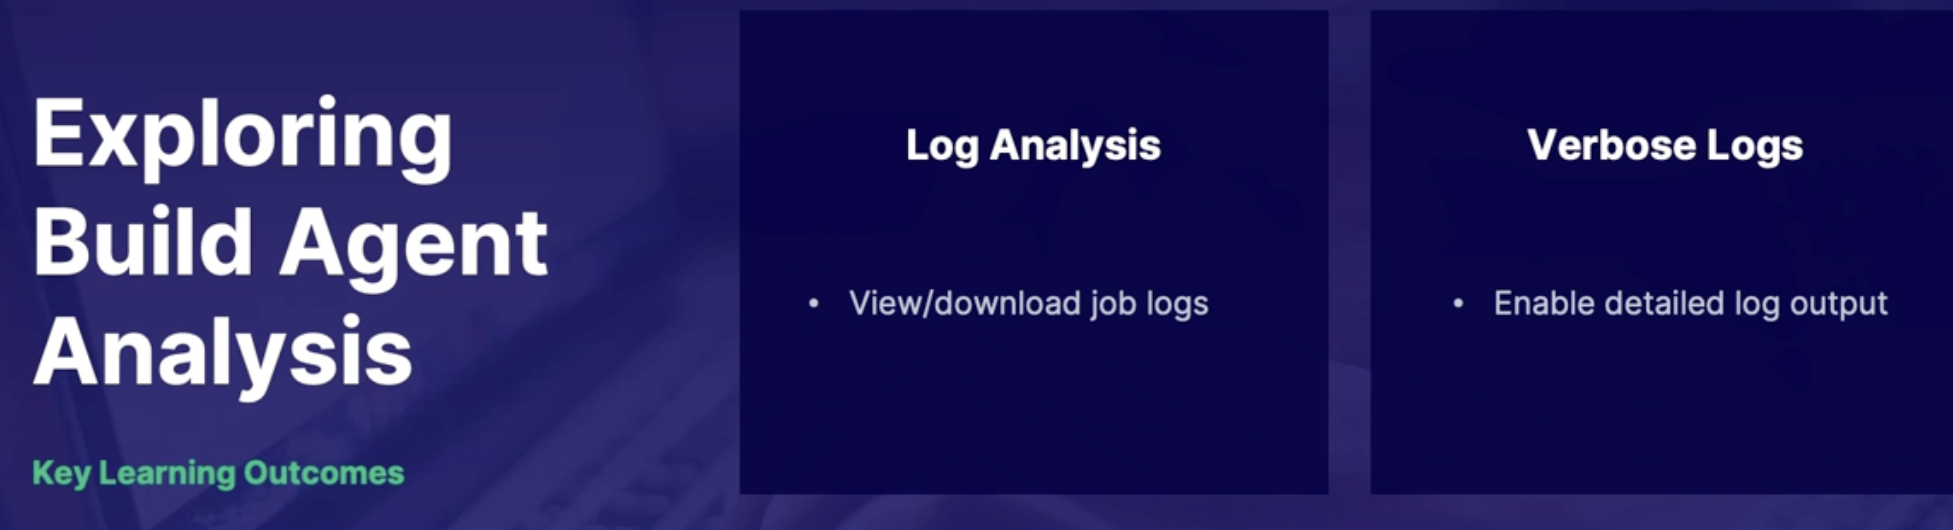
Chap - 12: Designing a process for standardizing builds across organization
What: modify once, update everywhere.
Implementing YAML templates
YAML template purpose
Idea: create a generic YAML template and insert into other pipeline files
Why: so you don’t have to write everything again, rather you can use the template that has common tasks that can be used in othe pipeline files
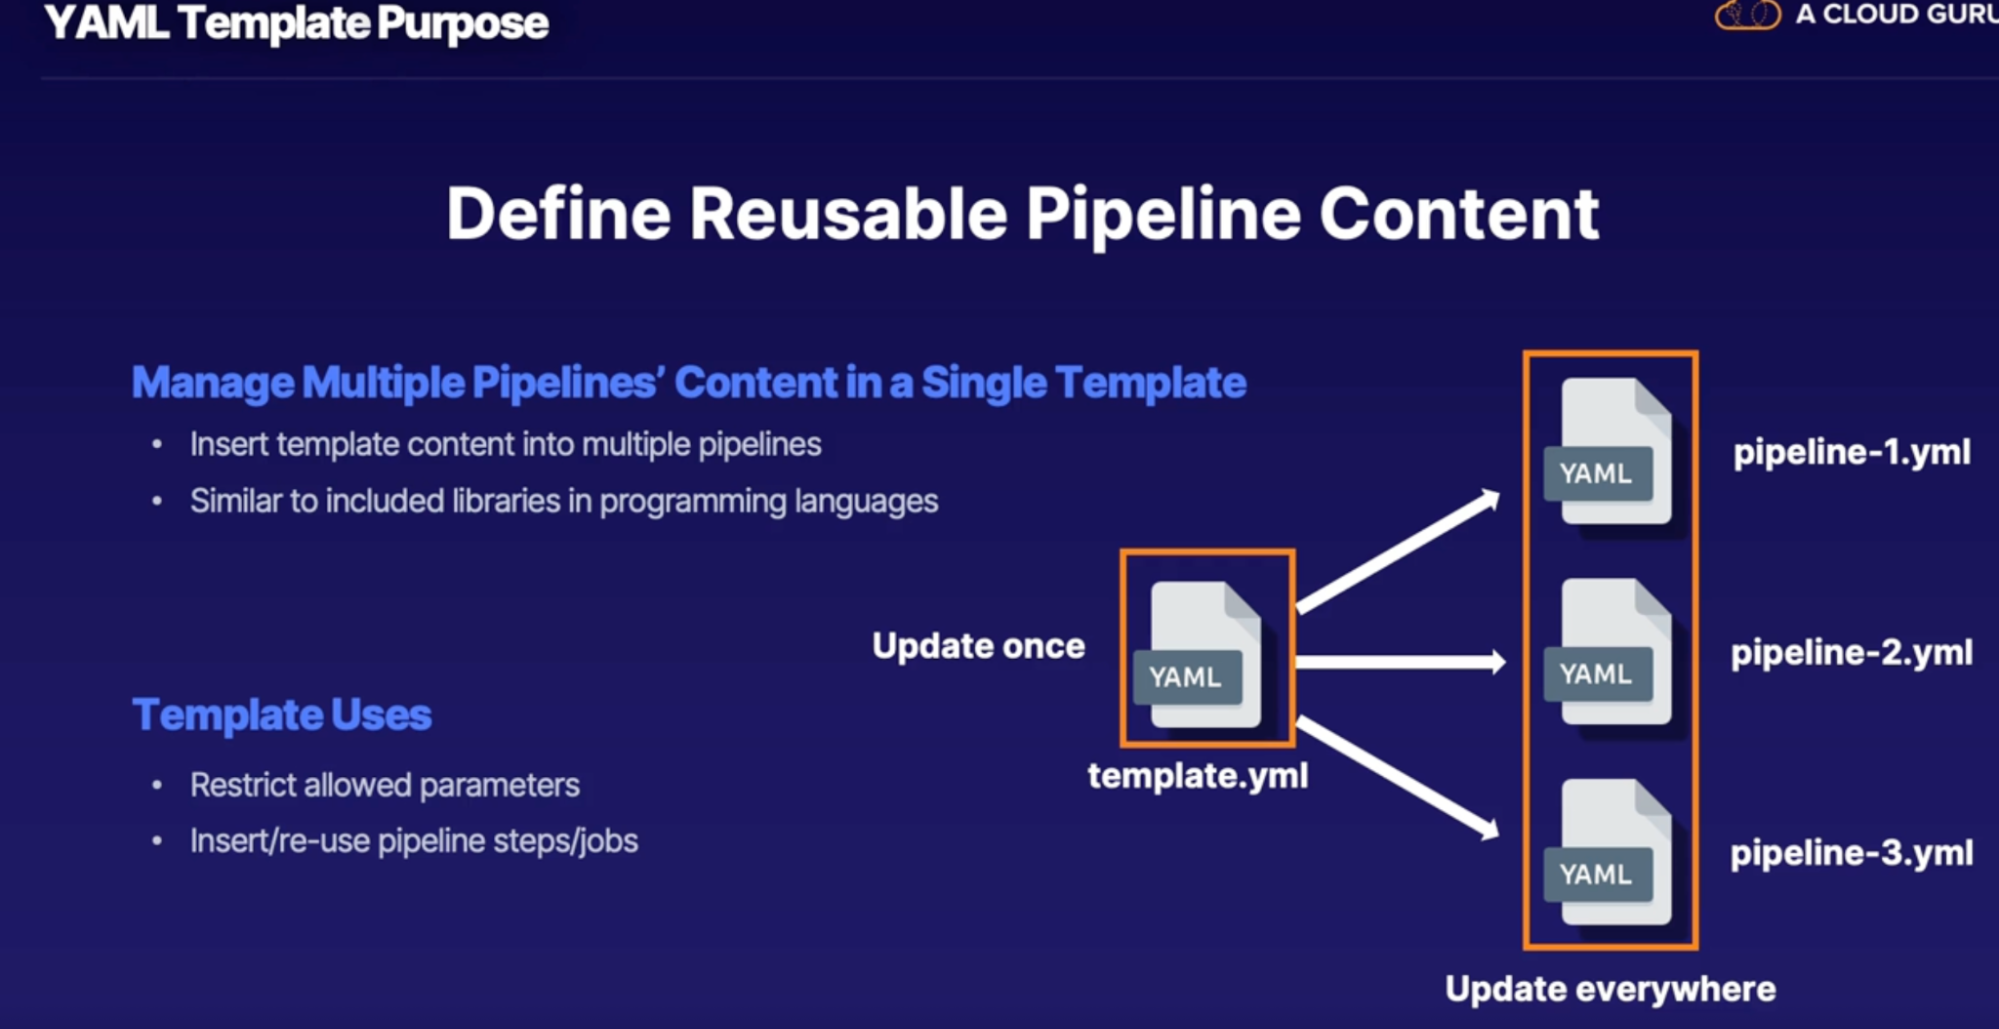
Inserting templates
- Create a template
- Insert template into other pipeline
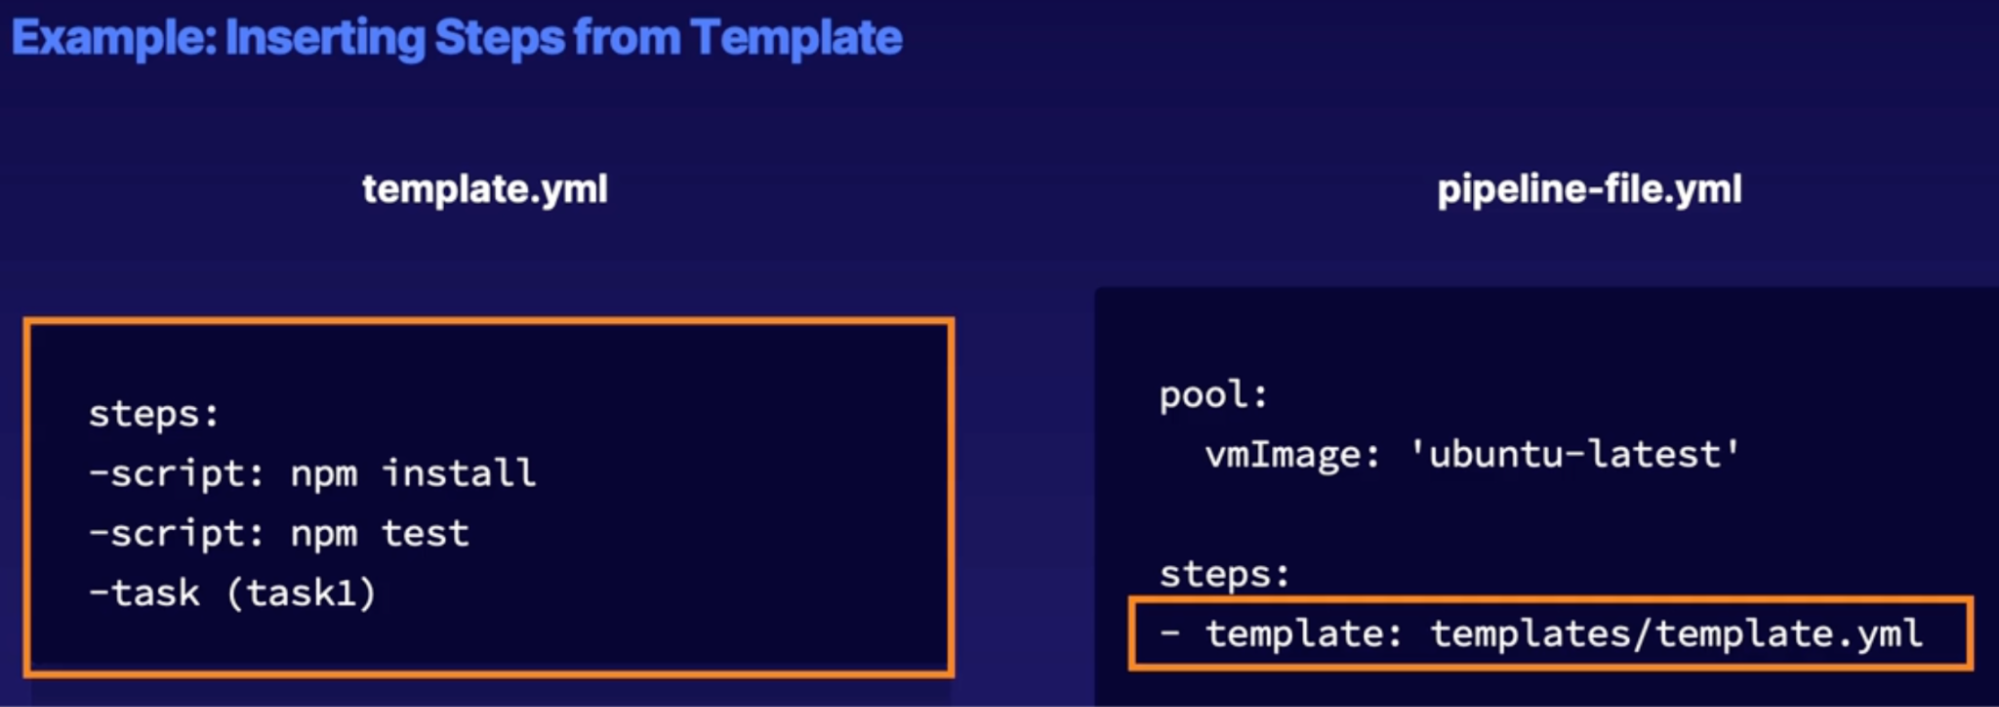
Template location reference
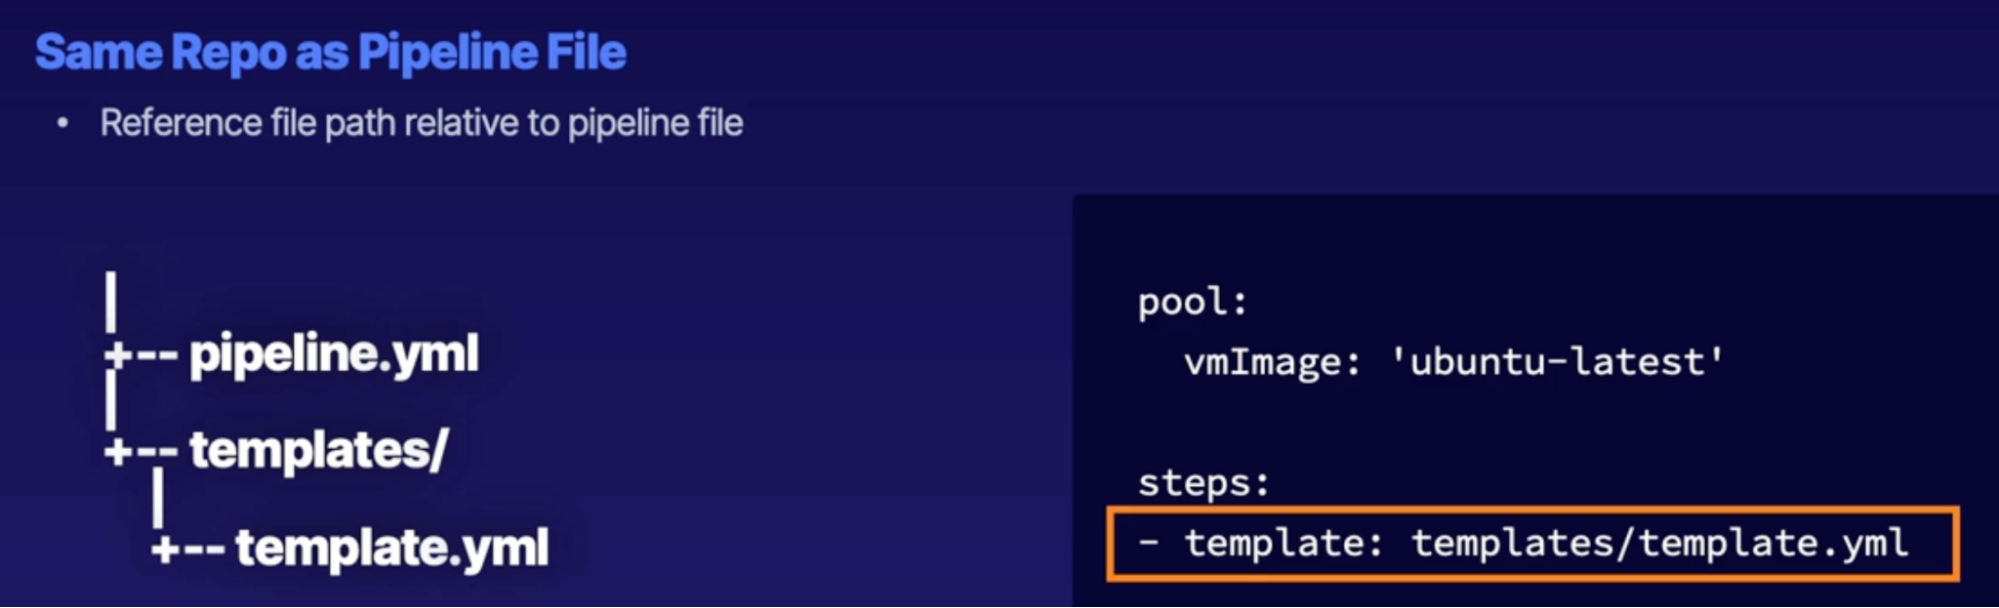
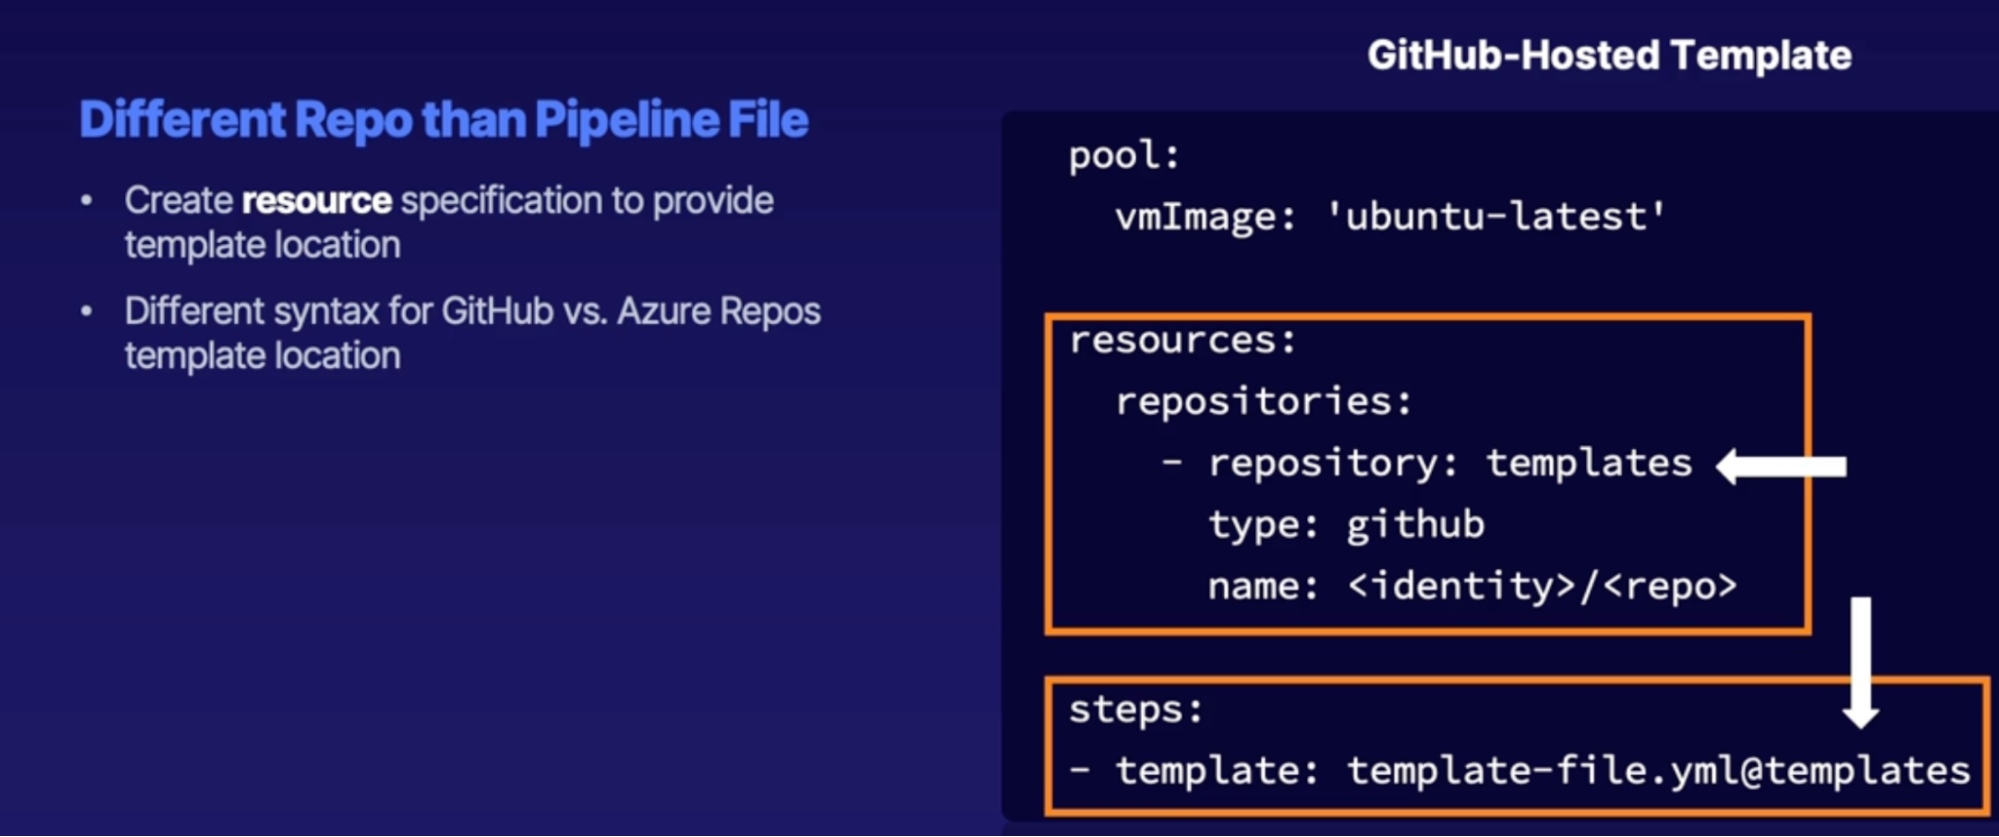
- template: template file name @ Repository
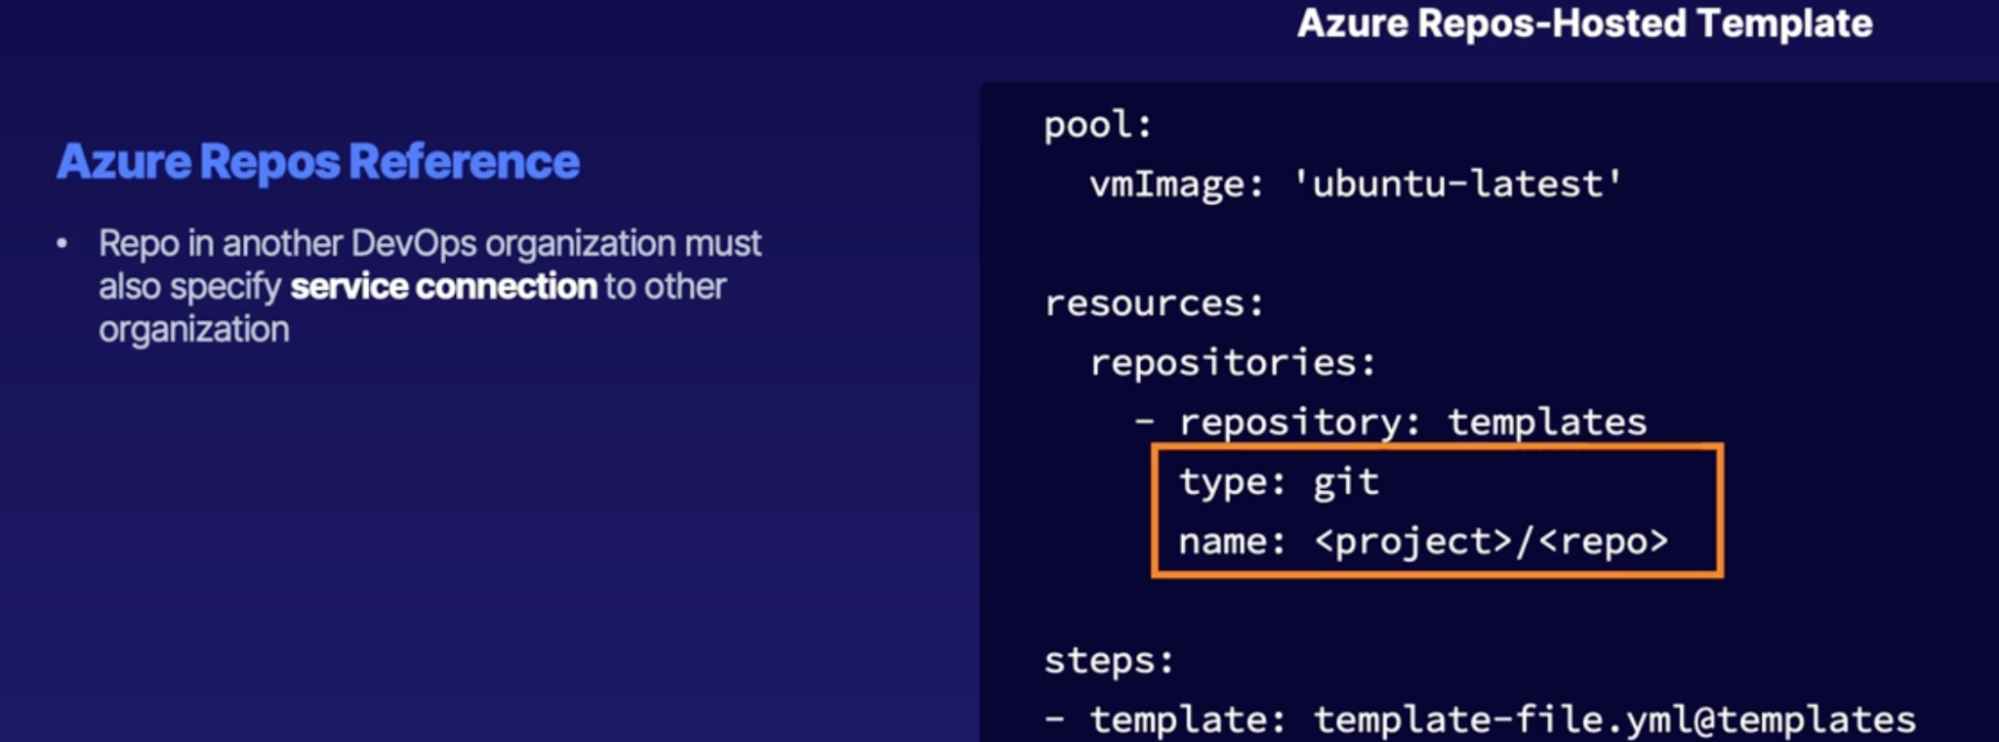
Task Groups
- Same as YAML template, a mechanism for using pipeline content in classic Azure pipelines as opposed to YAML pipelines
Task group is to classic pipelines
YAML templates are to YAML pipelines in which task groups allows us to bundle and manage a set of multiple steps for a classic pipeline in a single place and then insert or import that into multiple other pipelines
Demo
- create a template file with build steps
- modify pipeline Yaml to reference template
- Run pipeline
Summary
- template purpose: reusable pipeline content
- inserting templates: call template reference
- Template location reference: same repository | separate repository
Incorporating valuable groups
Variable group purpose
Apply variable group and apply same variable groups to multiple yaml pipelines which will call upon that variable group
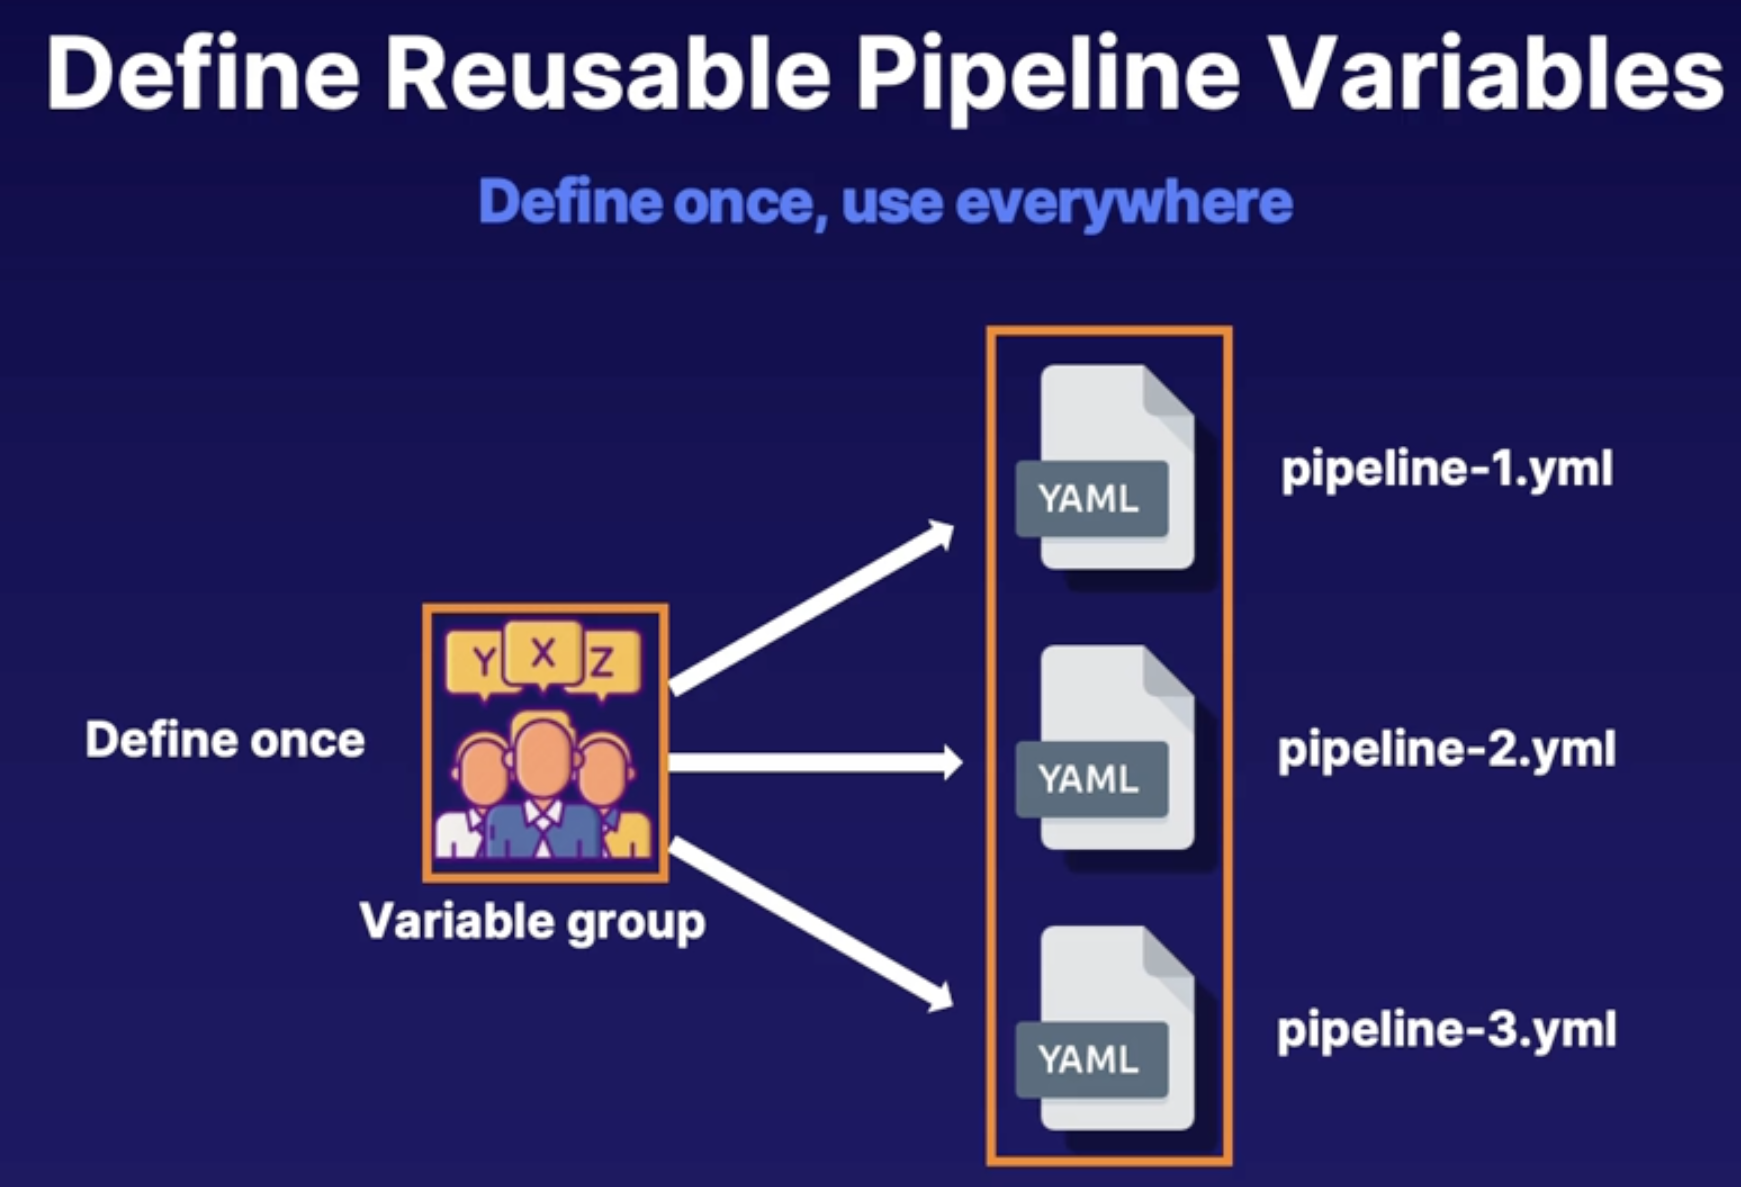
Pipeline variables
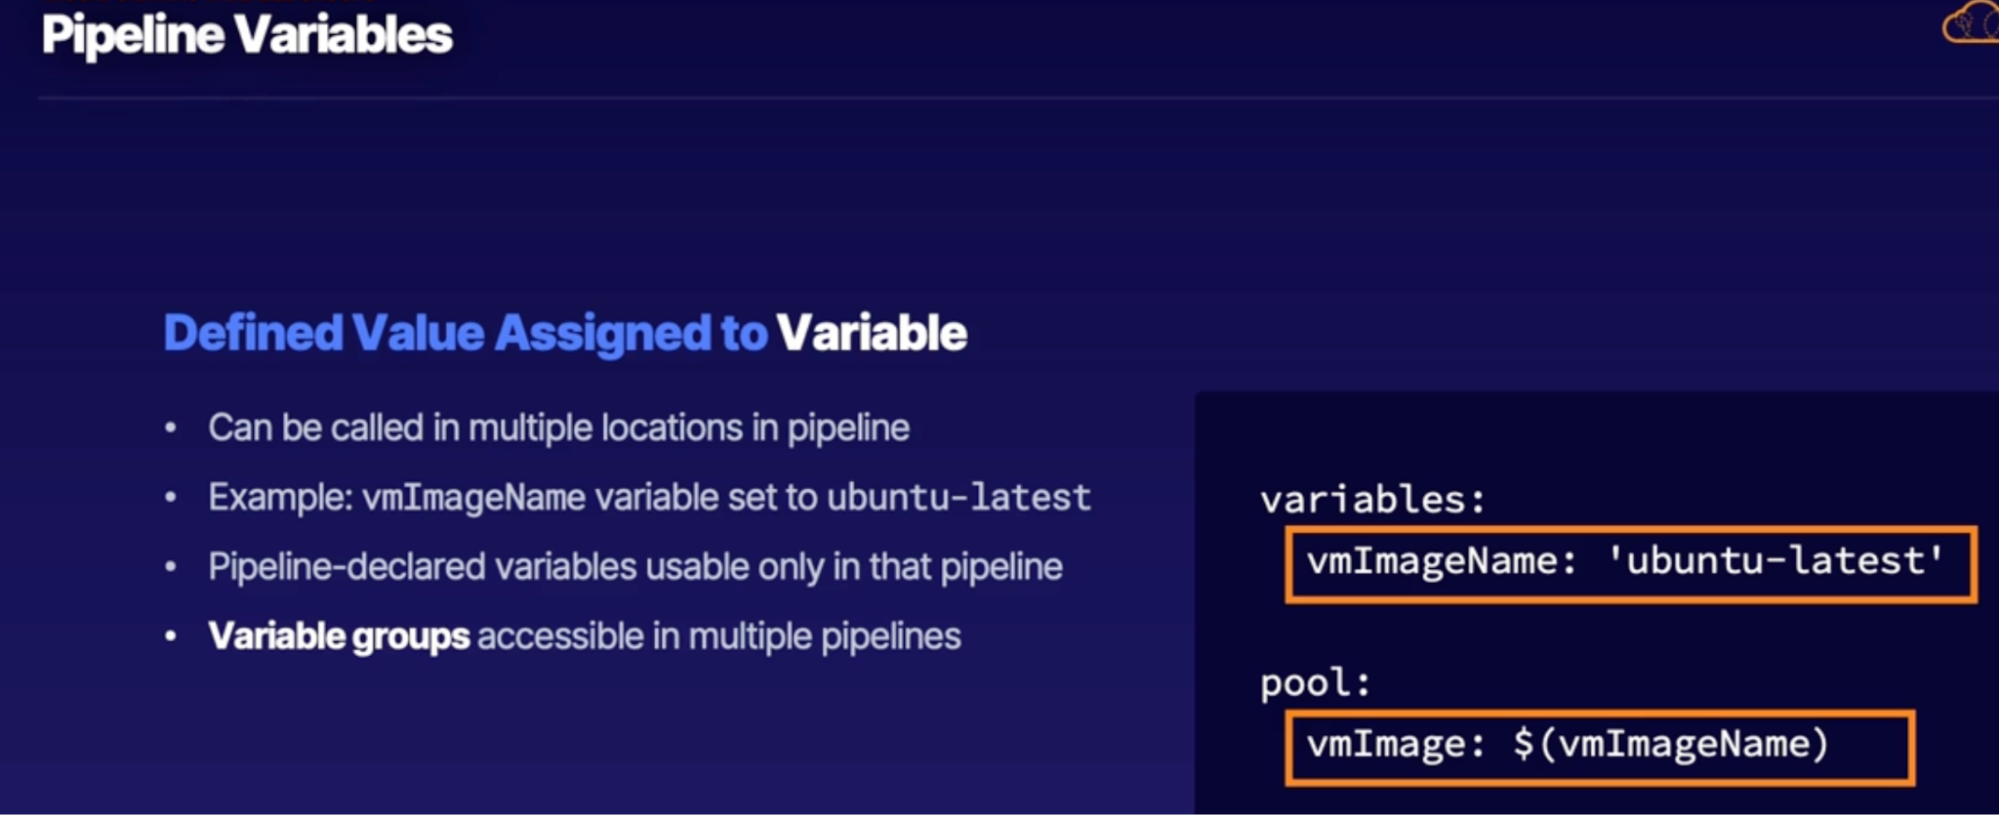
Creating variable groups
Pipeline variables only accessible to that pipeline
Whereas variable group are accessible in multiple pipeline. Just need to insert variable groups in the given pipelines
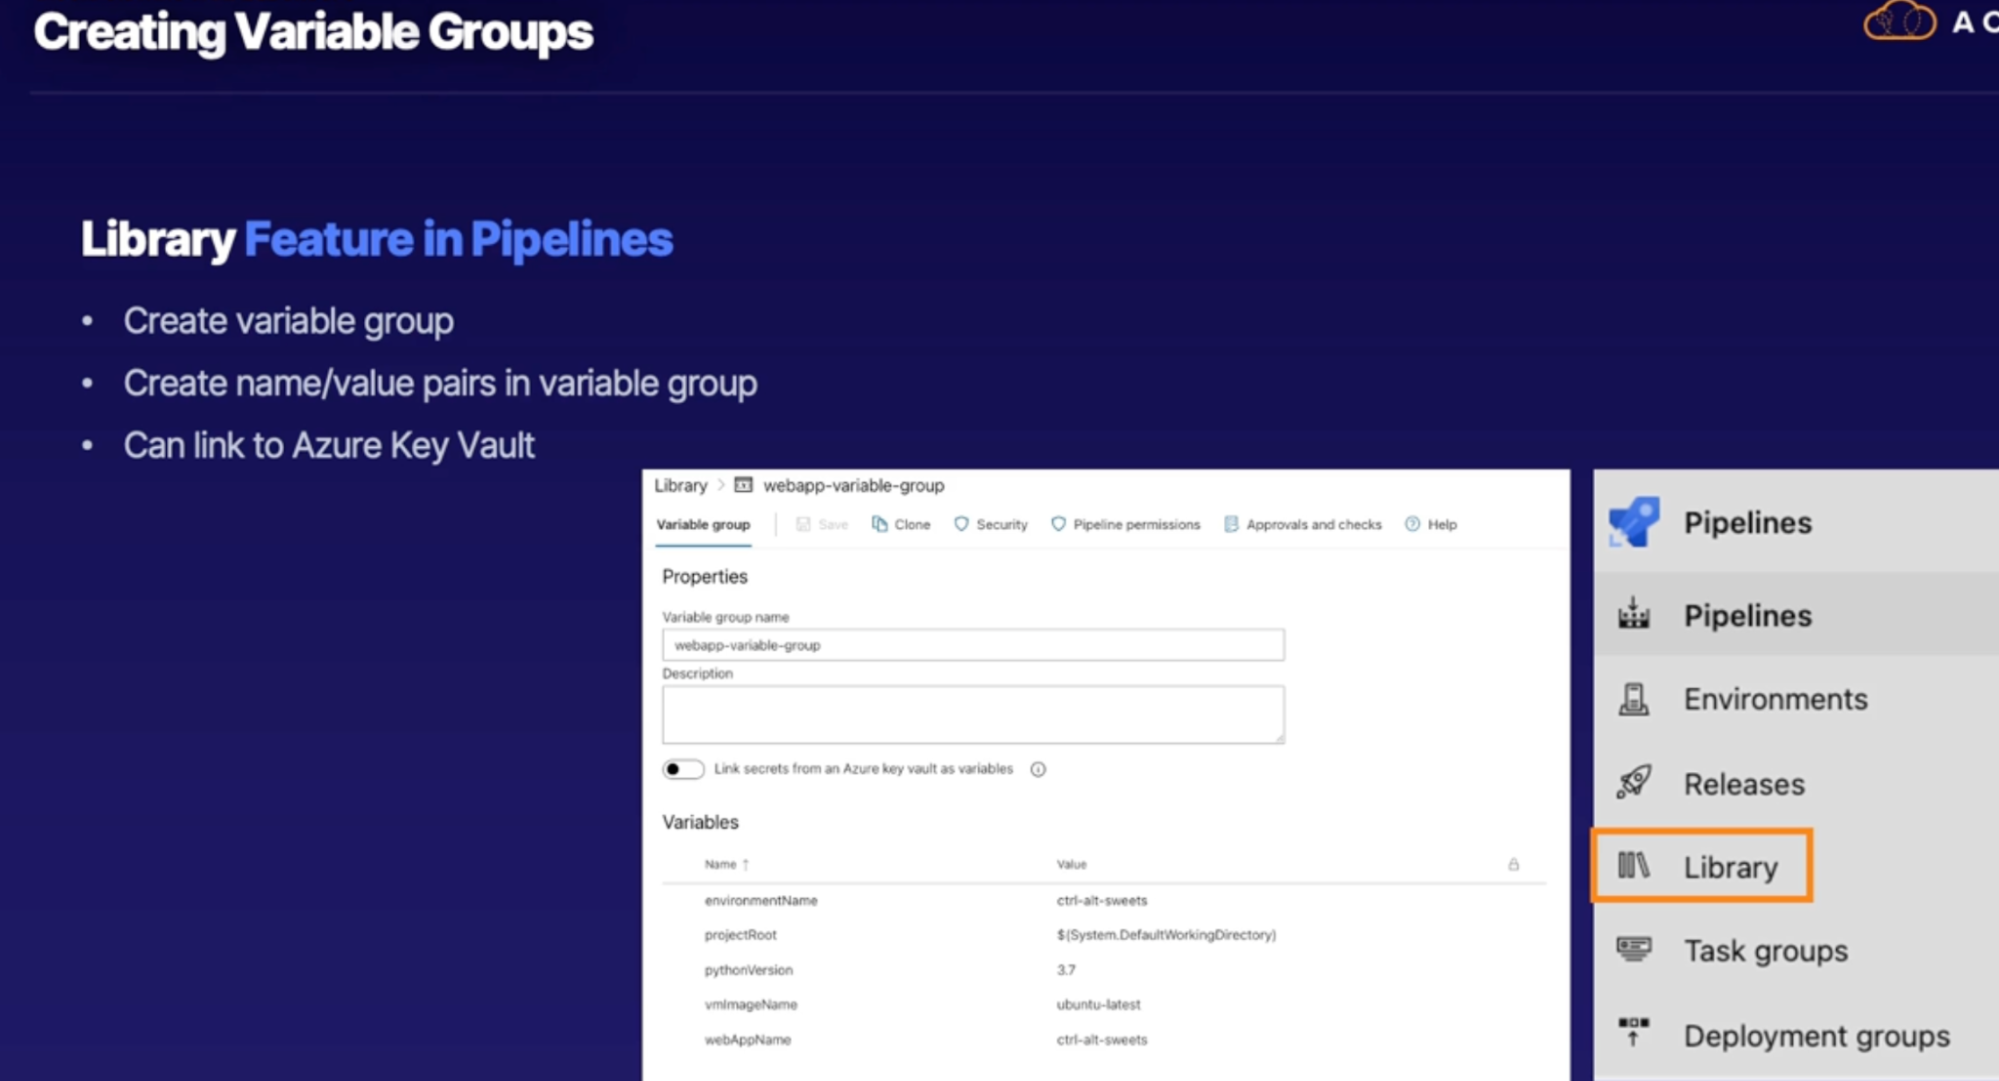
If you’re mixing variable group and pipeline variable, while defining pipeline variable, name and value filed is requires(whereas if you’re only using pipeline variable it takes direct name and value of the variable and don’t need to define name and value and then assign both field)
Using variable groups
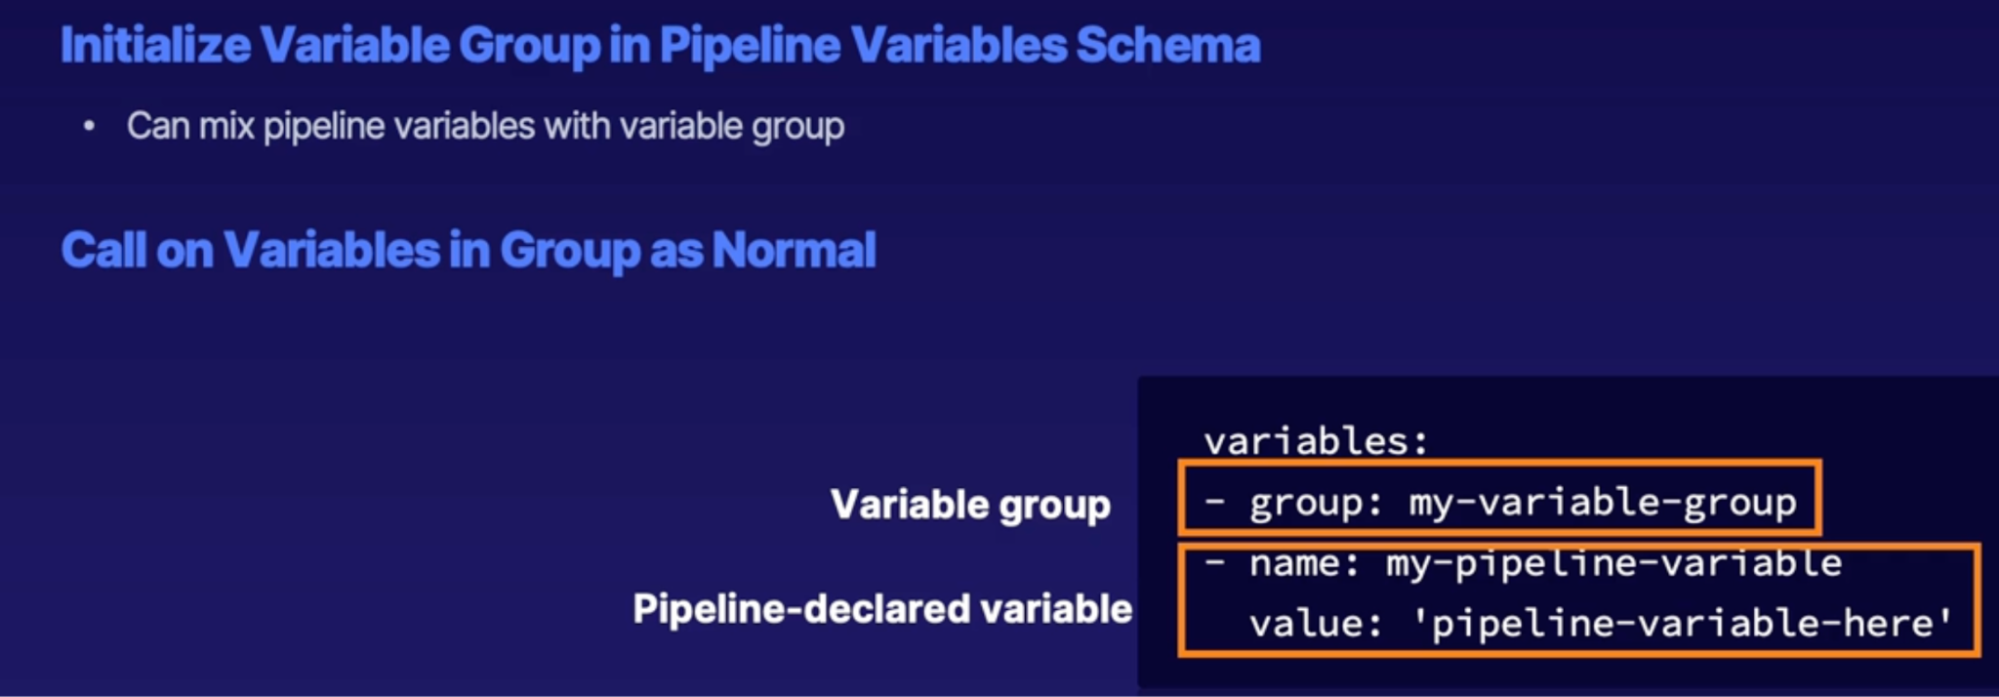
Demo
- create a variable group
- modify customer website pipeline to use variable group
Summary
- Variable group purpose: reusable variables
- creating a variable group
- using a variable group in pipeline YAML
Summary
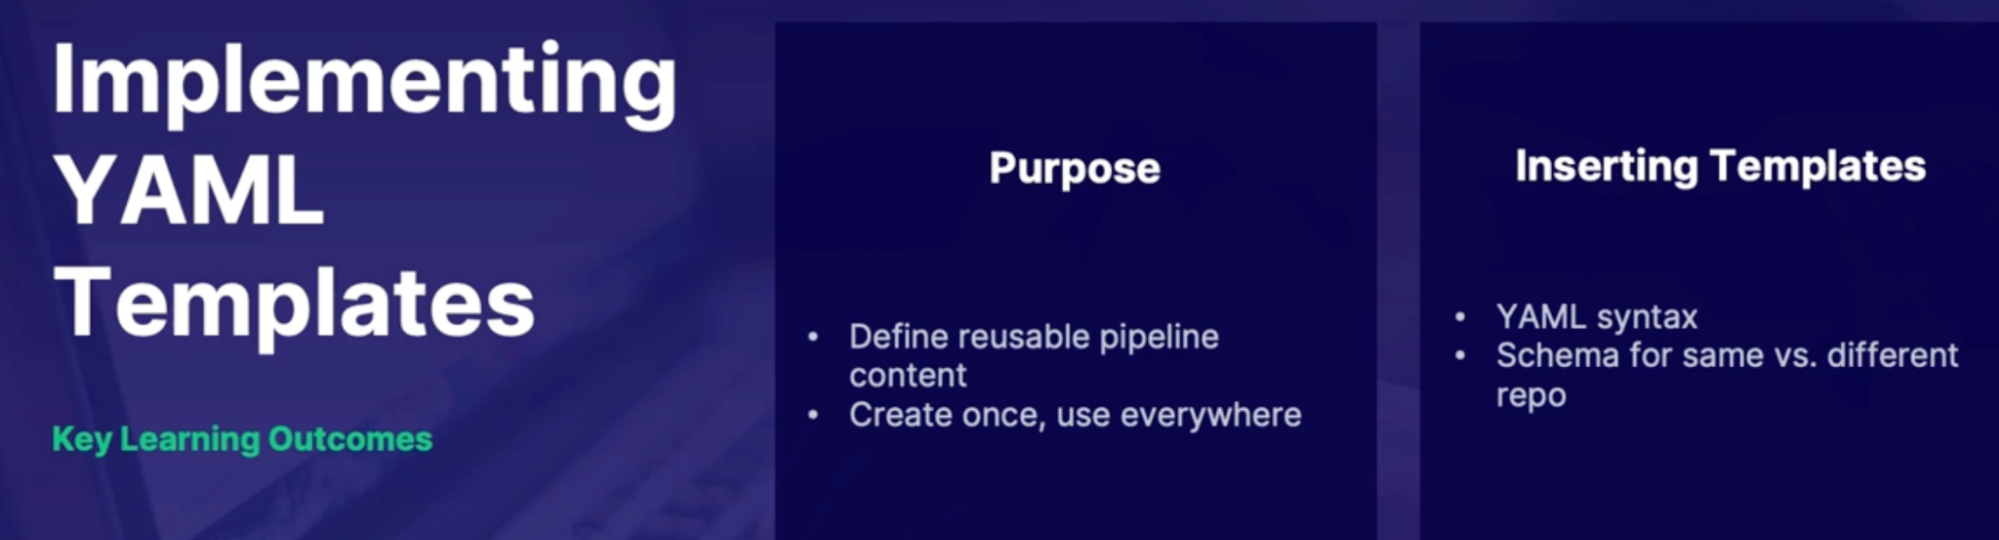
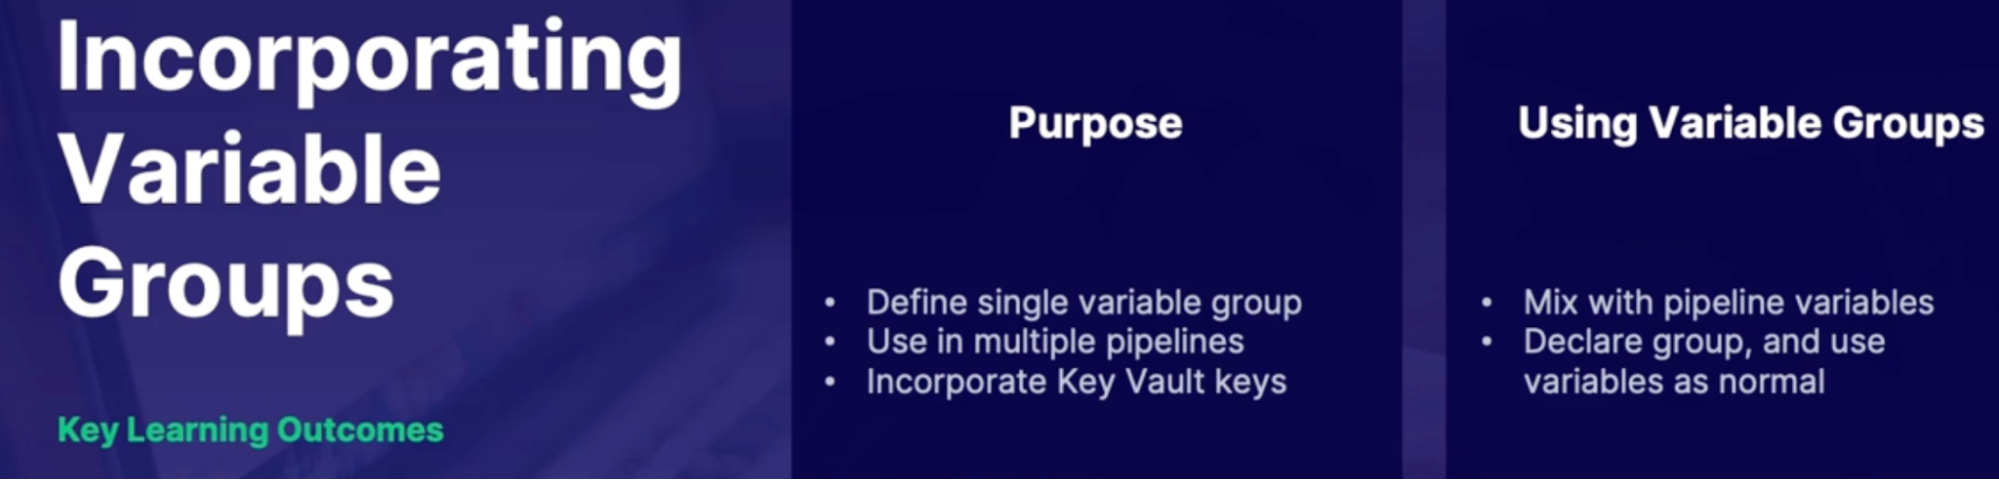
Chap - 13: Designing an application infrastructure management strategy
Exploring configuration management
What is configuration management
What:
- For purposes of DevOps, it's a system that's used to automate, monitor, design or manage otherwise manual configuration processes.
- This includes things like operating systems, security patching, network, dependent software, and applications.
- The primary goal is to define the state of the system that you're wanting to manage.
Assessing Configuration Management Mechanism
4 categories
Mutable infrastructure
What: what is the difference between a mutable and immutable infrastructure?
Scenario: Let's say I have a server that needs to be changed.
Mutable infrastructure: to make that change, we only need to make that change to that particular system in order to get our desired result.
Immutable infrastructure: you are not making changes to the system, you are reconfiguring the entire system every single time.
Mutable | Immutable |
in place updates | always zero configuration drift |
Keep existing servers in services | easy to diagnose |
easier to introduce change | Easy horizontal scaling |
Quicker to manage | simple roll back into Recovery |
Callouts:
- Immutable is the best option
Imperative and declarative code
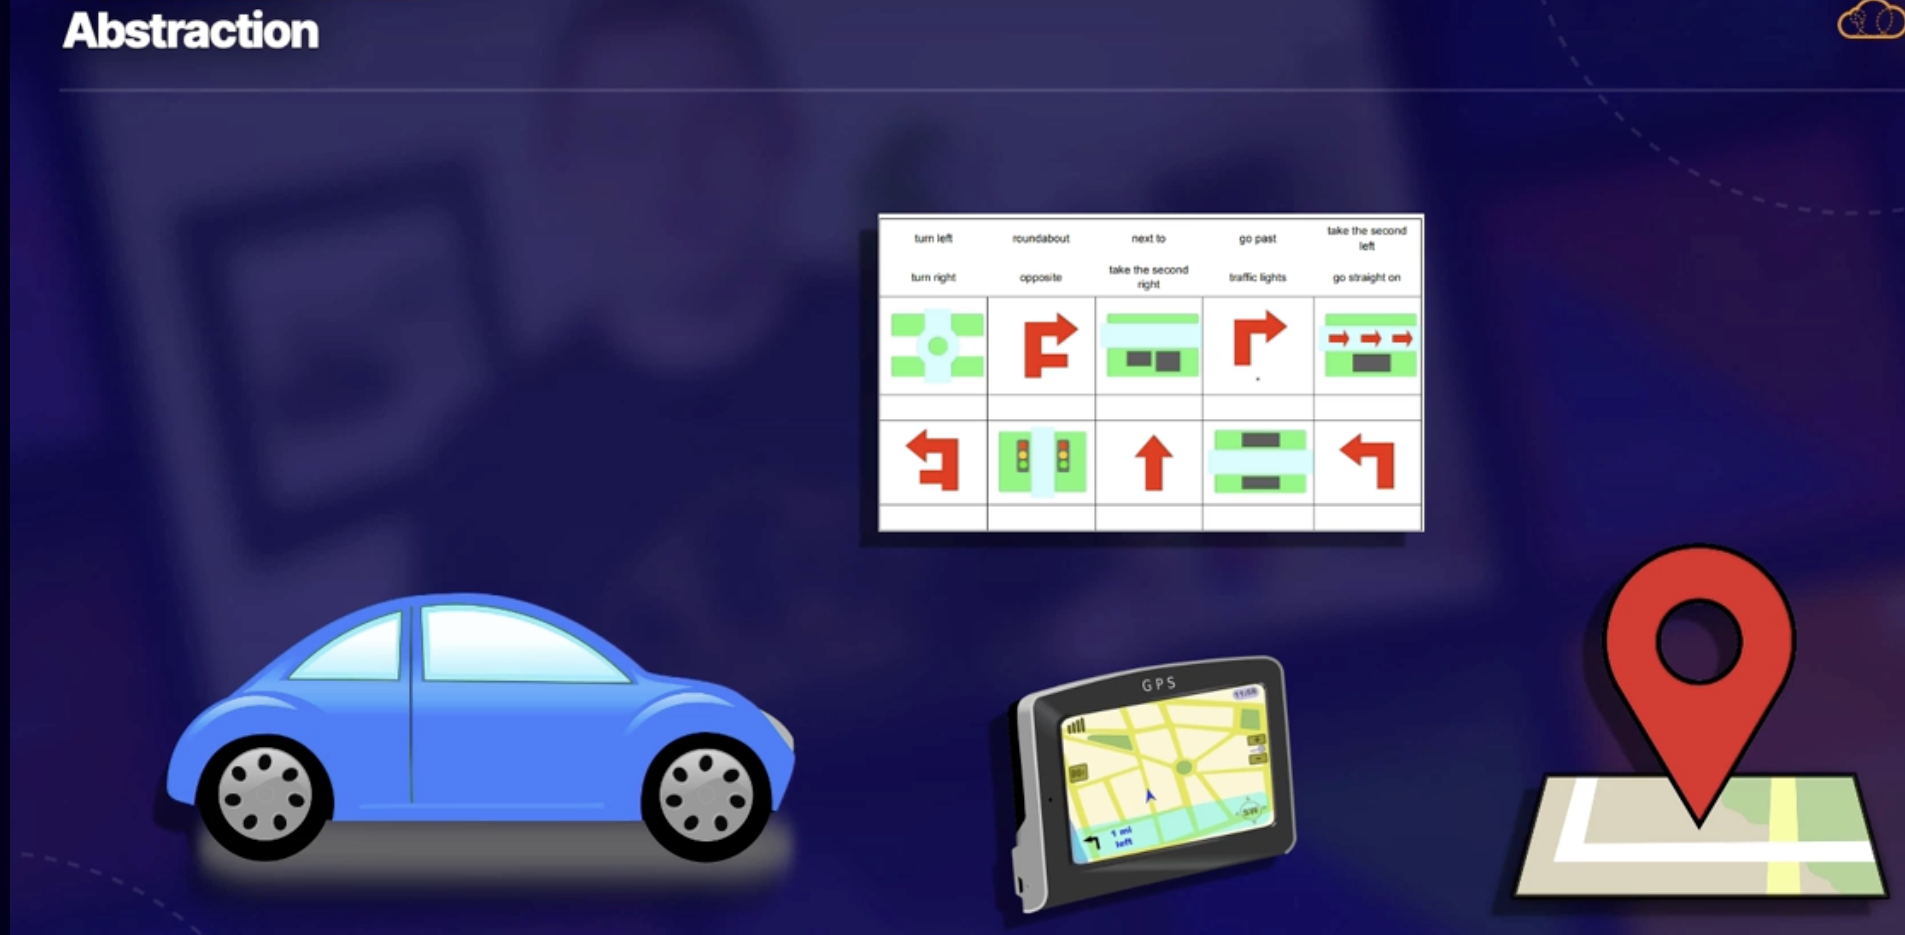
Option 1 - Imperative(procedural):
- Look at the map, find where you were and what your destination was
- For you to come up with your own direction in order for you to get where you want to be
- It takes a lot of effort and here there’s a high possibility to make a mistake as it’s not something you do every day
Definition: If you are performing all these steps by yourself it's called imperative or procedural code.
Option 2 - Declarative
- GPS system on you device
- Which look up your destination and make direction for you
Definition: if you are just defining the end state of where you want to be and letting a program or an application handle all of the rest, it is called declarative code because you're simply saying, I want to be at my destination and letting the code handle the rest.
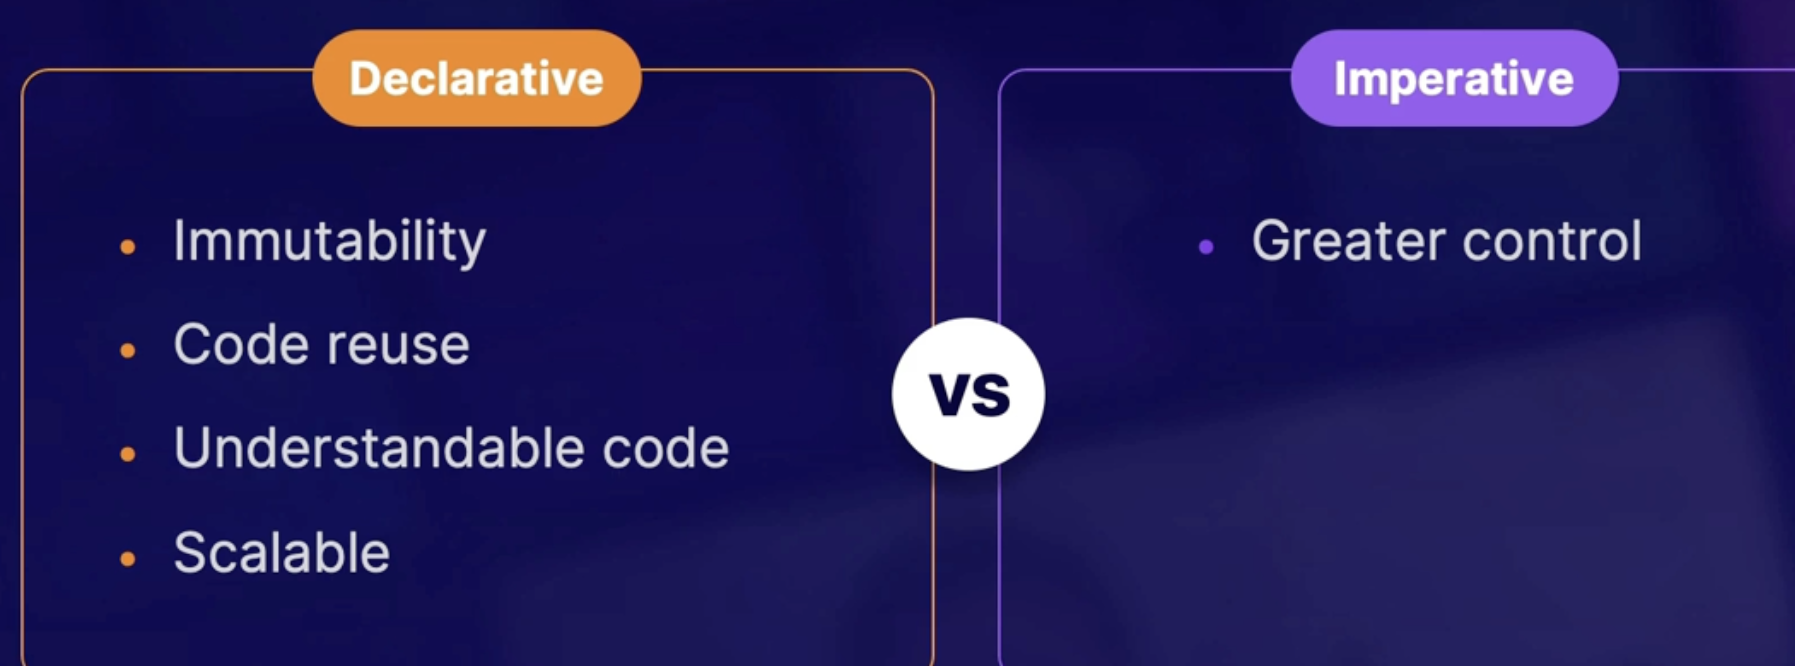
Abstraction
All the additional steps in option 2 are abstracted from you
While all you have to do is enter the destination and GPS handles the rest
Simplified code process
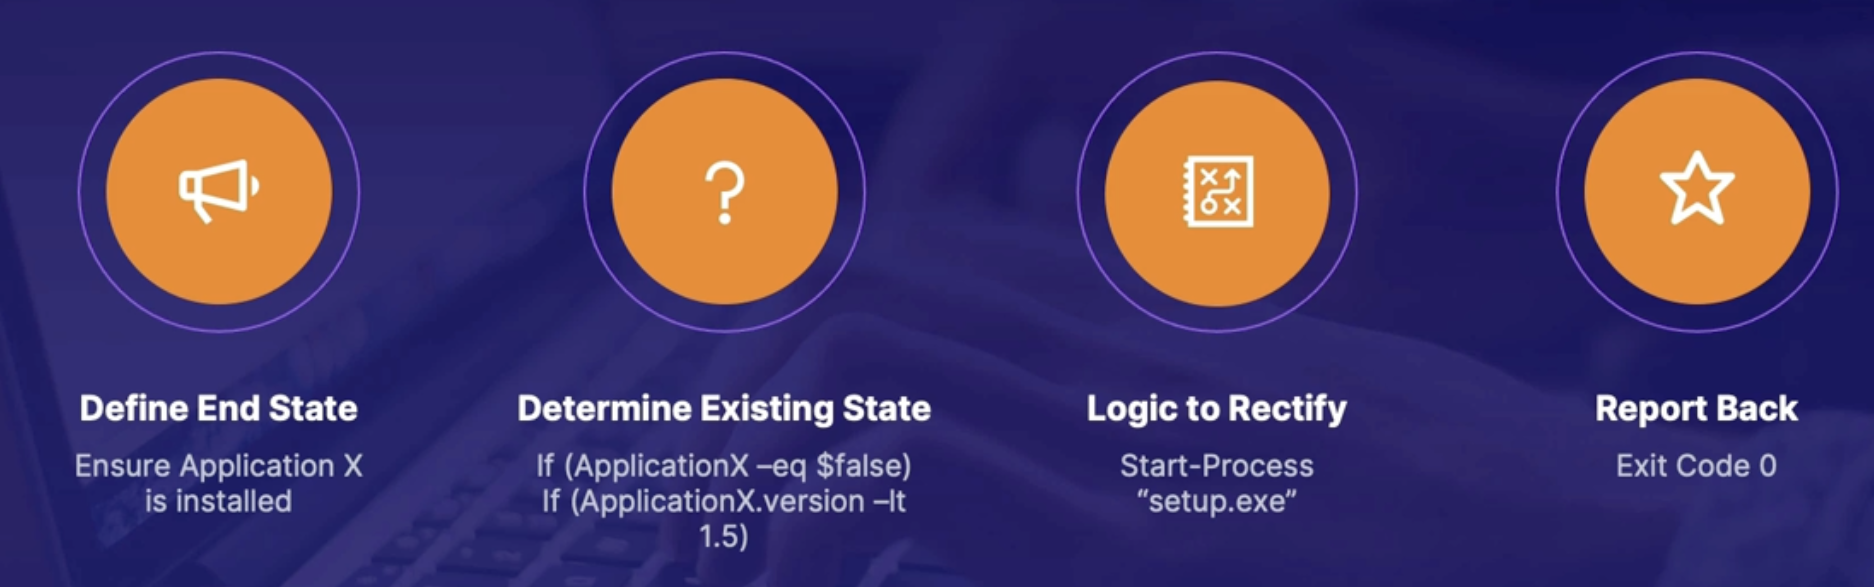
in order to determine if an application is installed, you're going to
- Define the end state.
- determine the existing state.
- have some sort of logic in order to rectify that.
Analogy
Think of the car analogy.
Defining the end state it was where we were supposed to be. The existing state is where we currently are. The logic to rectify is the directions. And reporting back is hopefully you get here.
Centralization
What:
- Centralization is essentially having some type of primary server as the configuration management mechanism
- where all the other systems will check in, probably pull that code, and have some type of reporting structure for it all handled by that server.
- And if that server goes down, you're not going to have very much configuration management afterwards.
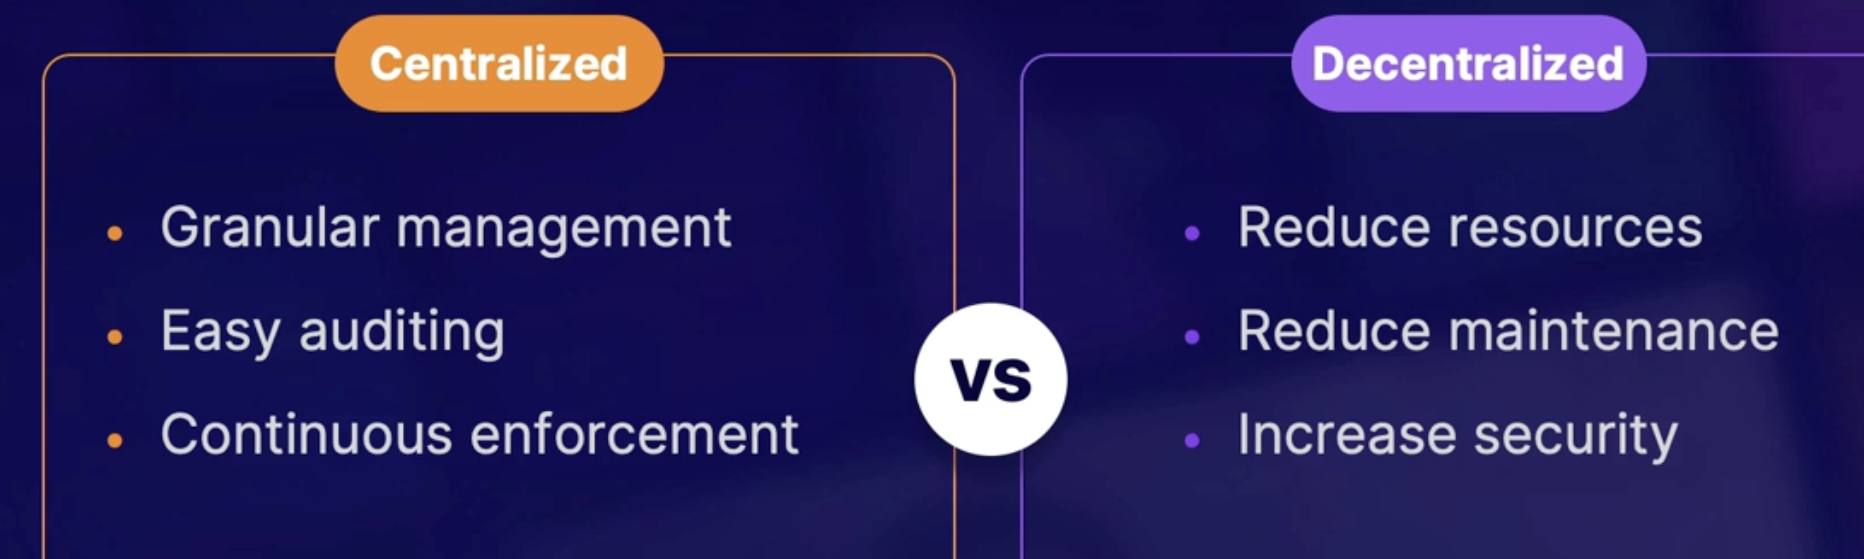
Agent-based management
What: There is an agent executable that needs to be installed on a server in order for it to be properly managed.
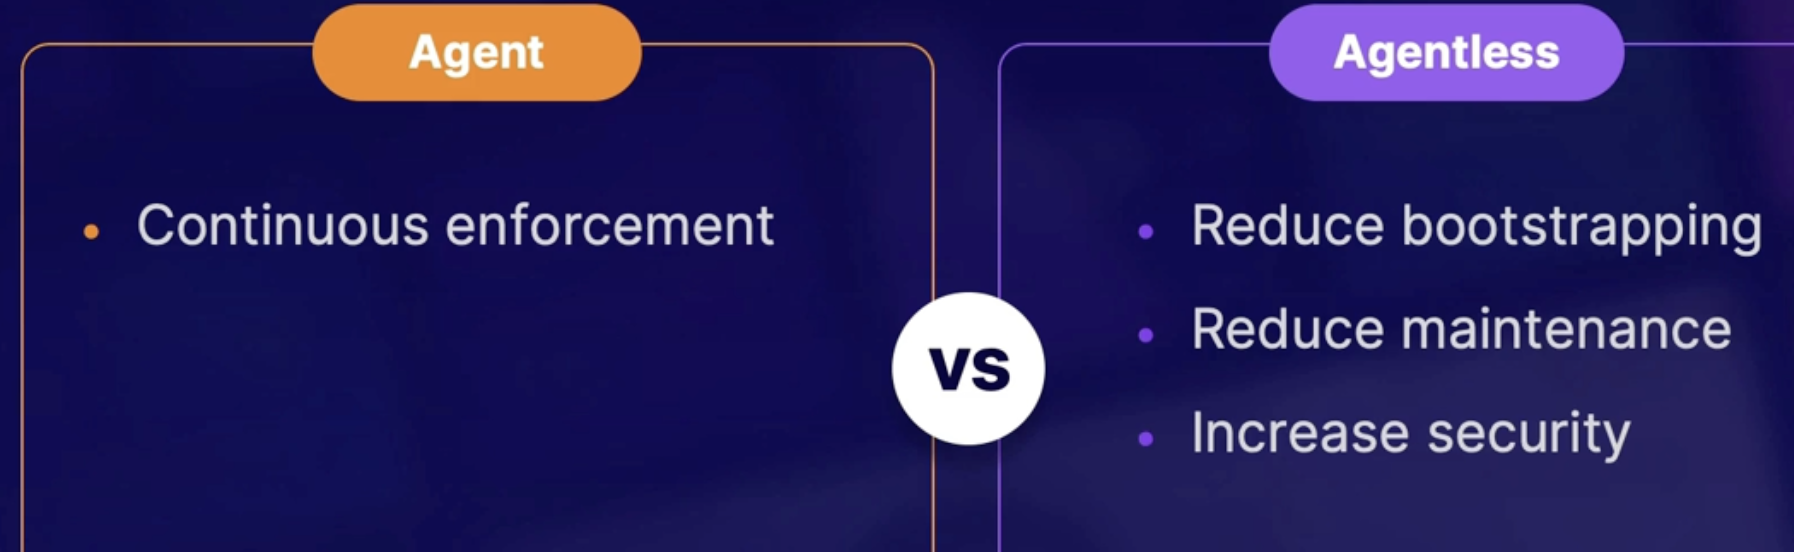
Summary
- Mutability: the ability of an environment to be changed
- Imperative language: is coded by full logic flow
- Declarative language: is coded by end state
- Centralization is whether a primary server gives instruction and receives feedback
- Agent-based enforcement requires a program to be installed on enforced machines.
Introducing PowerShell Desired State Configuration (DSC)
Aspect of PowerShell DSC
- Mutable: You make changes on the existing systems without having to redeploy the entire infrastructure.
- Declarative: if you want something to happen, you state that you do want it to happen, and the code on the backend is abstracted
- Centralized or Decentralized: it is decentralized. However, you can make a server for it, making it centralized.
- Agent-based: However, for all Windows systems, it works on the Windows Management Framework.
Important consideration of PowerShell DSC
- CI/CD: DSC Is best used in CICD pipelines to maintain state
- Applications: configurations made by PowerShell DSC can be applied in Azure automation
- DscBaseline: covers common DSC module and creates configuration files based on a target system
Anatomy of PowerShell DSC
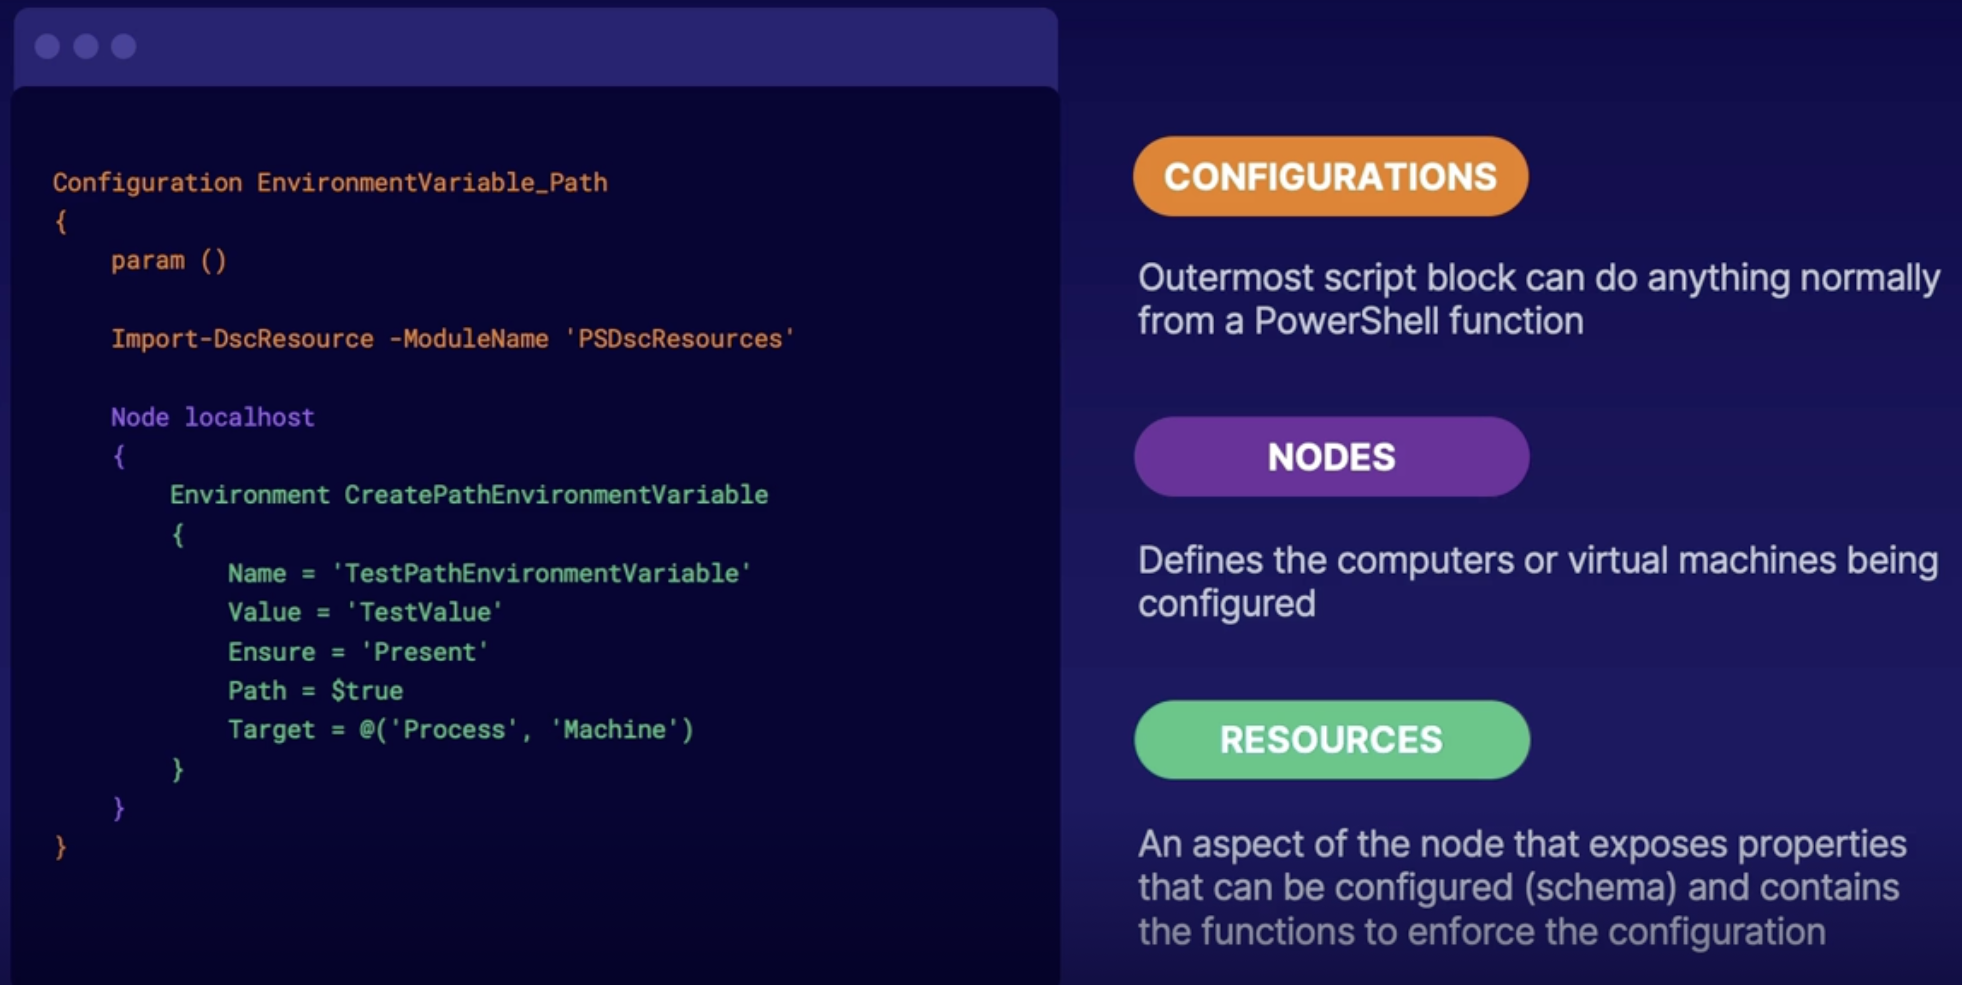
Summary
- PowerShell DSC: declarative and mutable configuration as code
- Contains configurations, nodes, and resources
Implementing PowerShell DSC for app infrastructure
Primary uses for PowerShell DSC
System | Application |
Azure automation for enforcing configuration across your enterprise | Pipelines for CICD workflow in DevOps |
Demo: Setup PowerShell DSC for DevOps pipeline
- You have a VM → configure as web server
- On VM, copy files( PowerShell script from a pipeline) and run DSC config
Summary
- automated CICD pipelines help update software faster and more reliably, ensuring all code is tested
- release definitions can deploy to an environment with every code check in
Summary
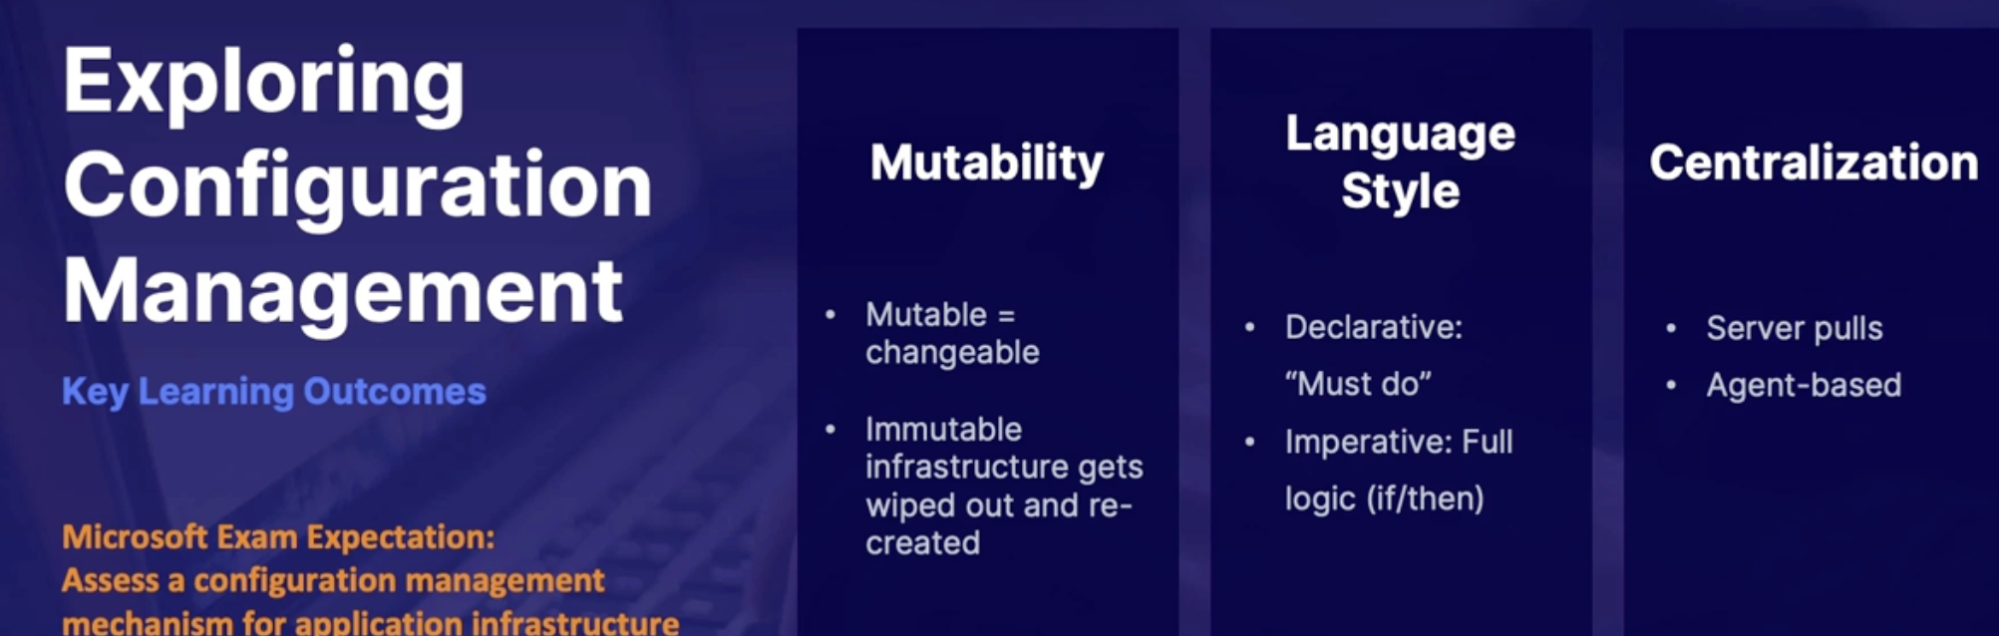
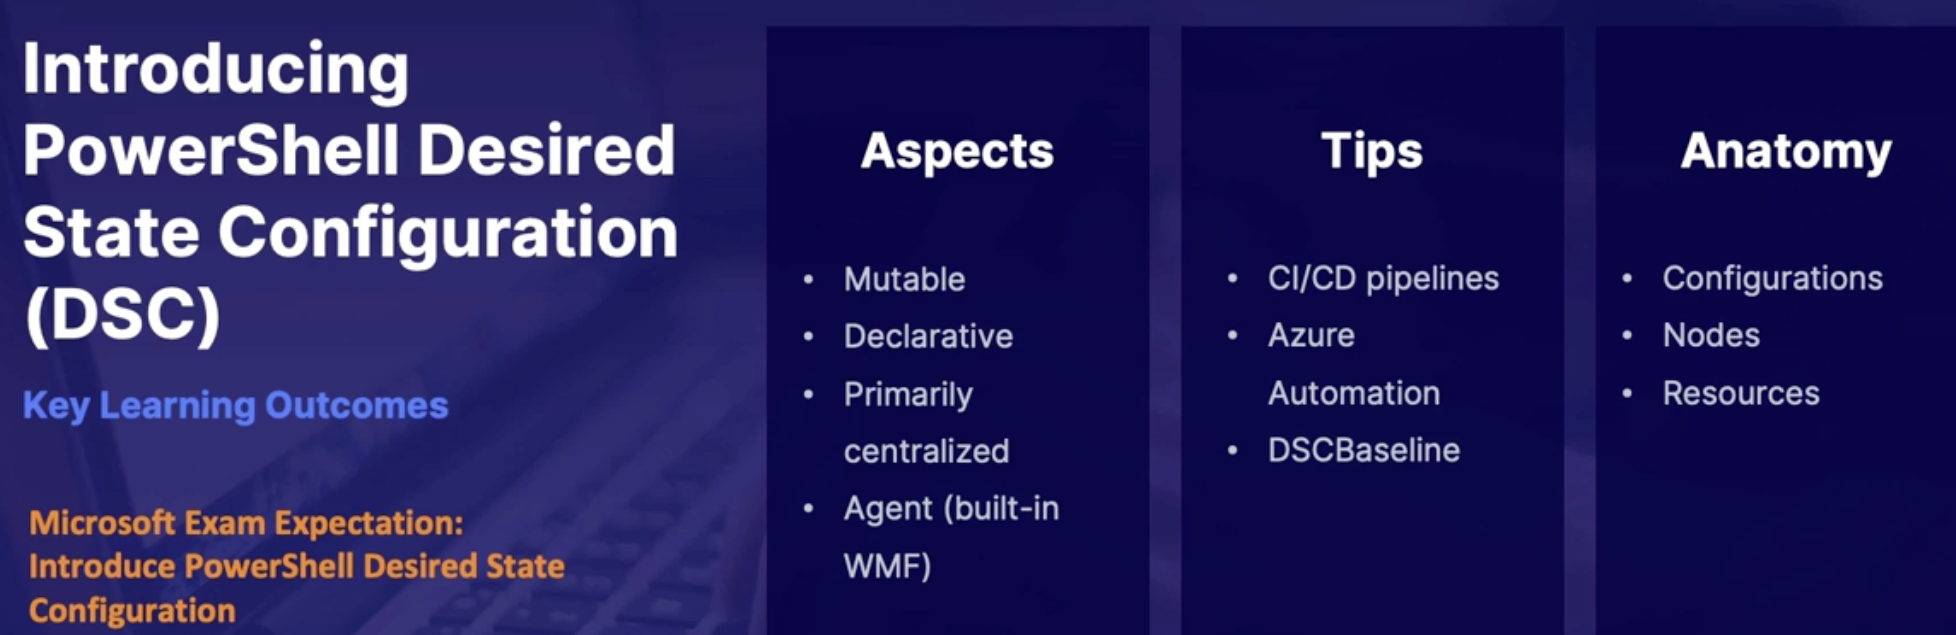
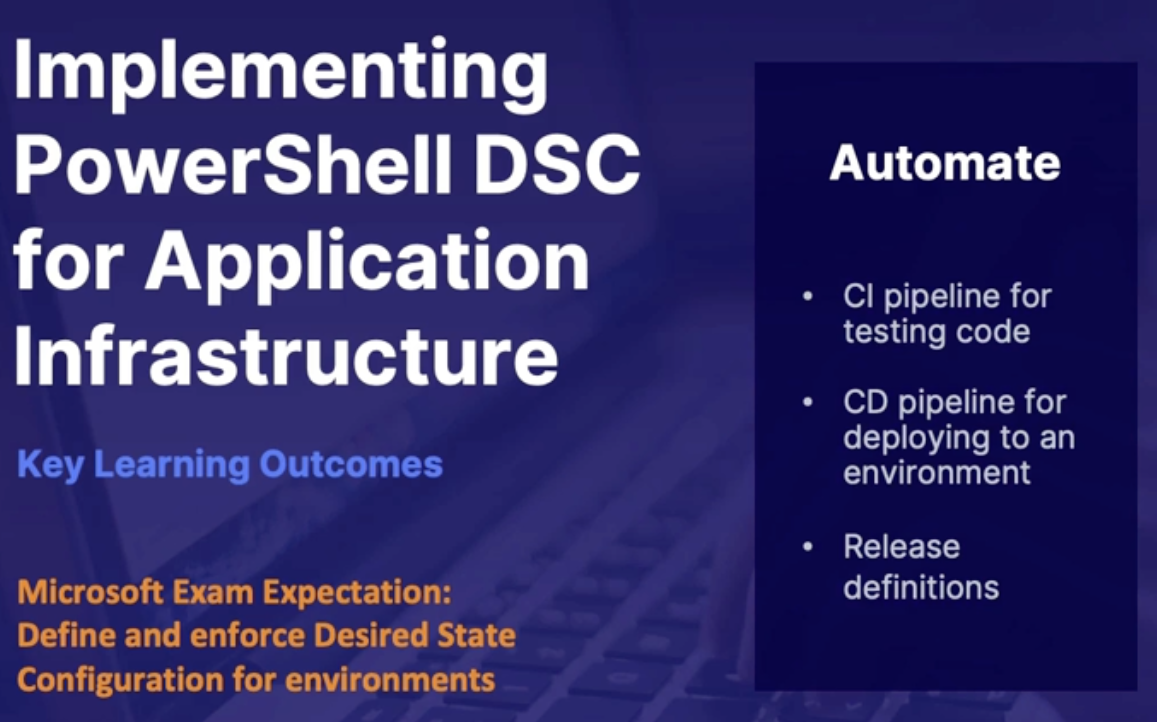

Lab create a CICD pipeline using PowerShell DSC
Agenda: You need to deploy a Windows server with IIS installed via CI/CD pipeline. Given the appropriate ARM templates, deploy this VM to Azure using Azure DevOps.
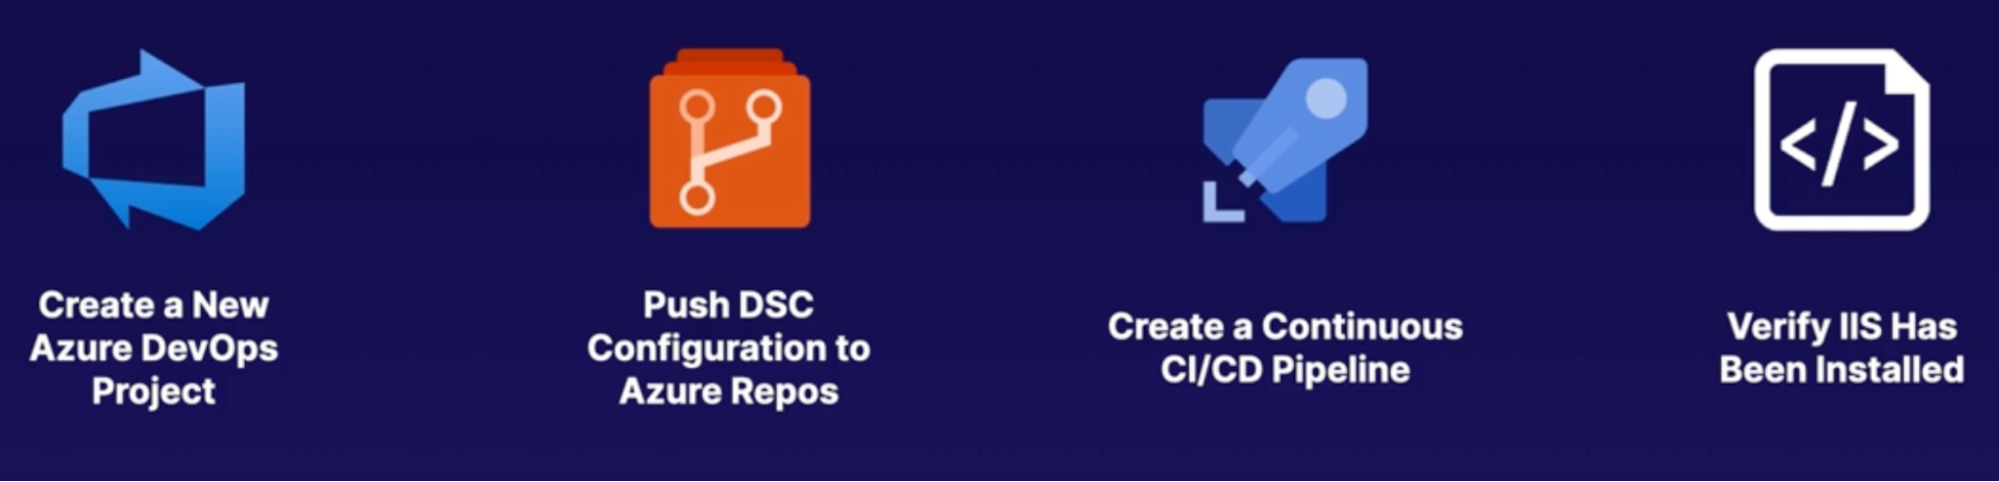
Chap - 14: Developing Deployment Scripts and Templates
Understanding deployment solution options
Deploying code
Deploying code to production has some process to go through
- We create a test environment to test the code before we push to production
- Test and prod environment must use the same build
- Once test env is successfully run, you deploy the same code to production
- Clean up test resources
Deployment solution
- GitHub Actions
- Azure pipelines
- Jenkins
- CircleCI
- ARM
- Terraform
- VS App Center
- Others!
Aspects of a deployment
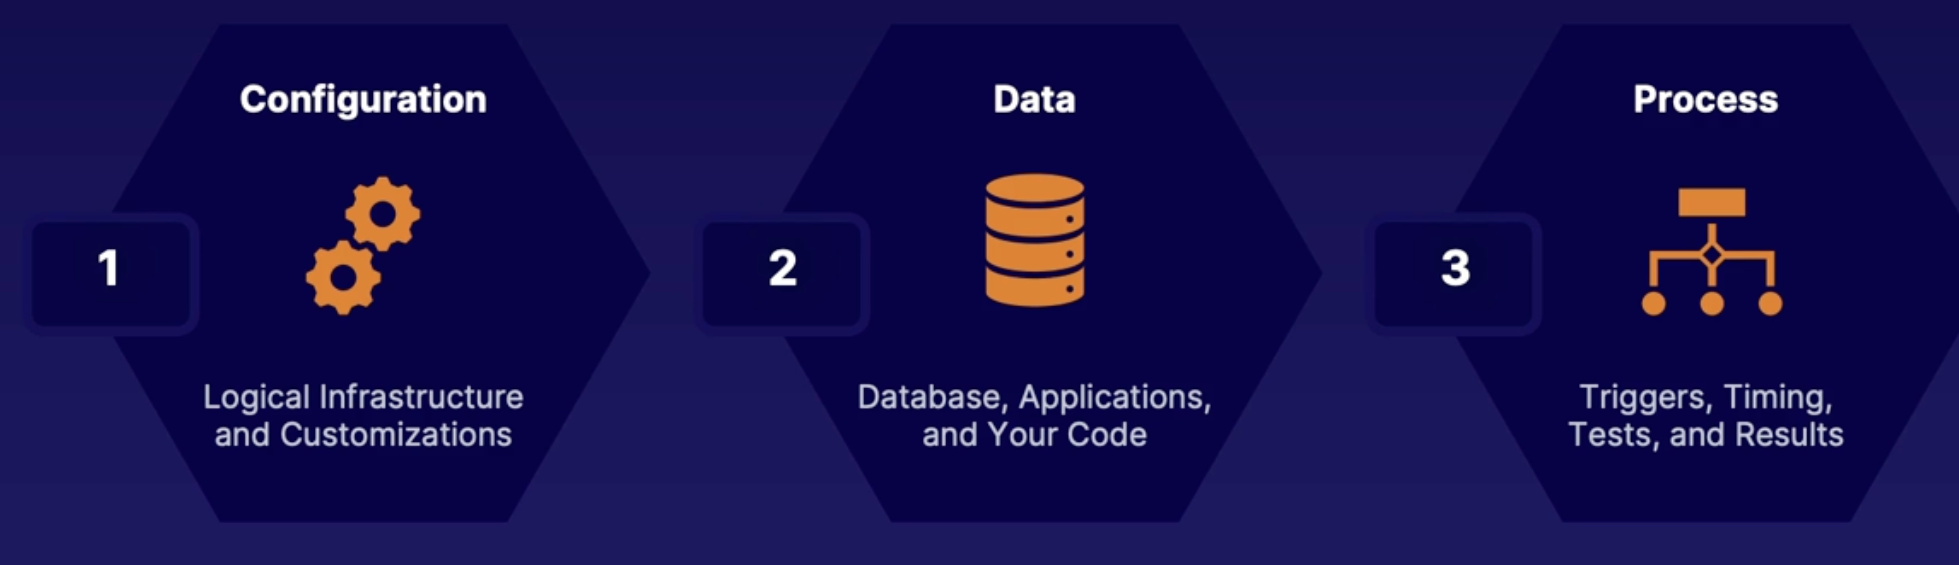
Topics for evaluating deployment solutions
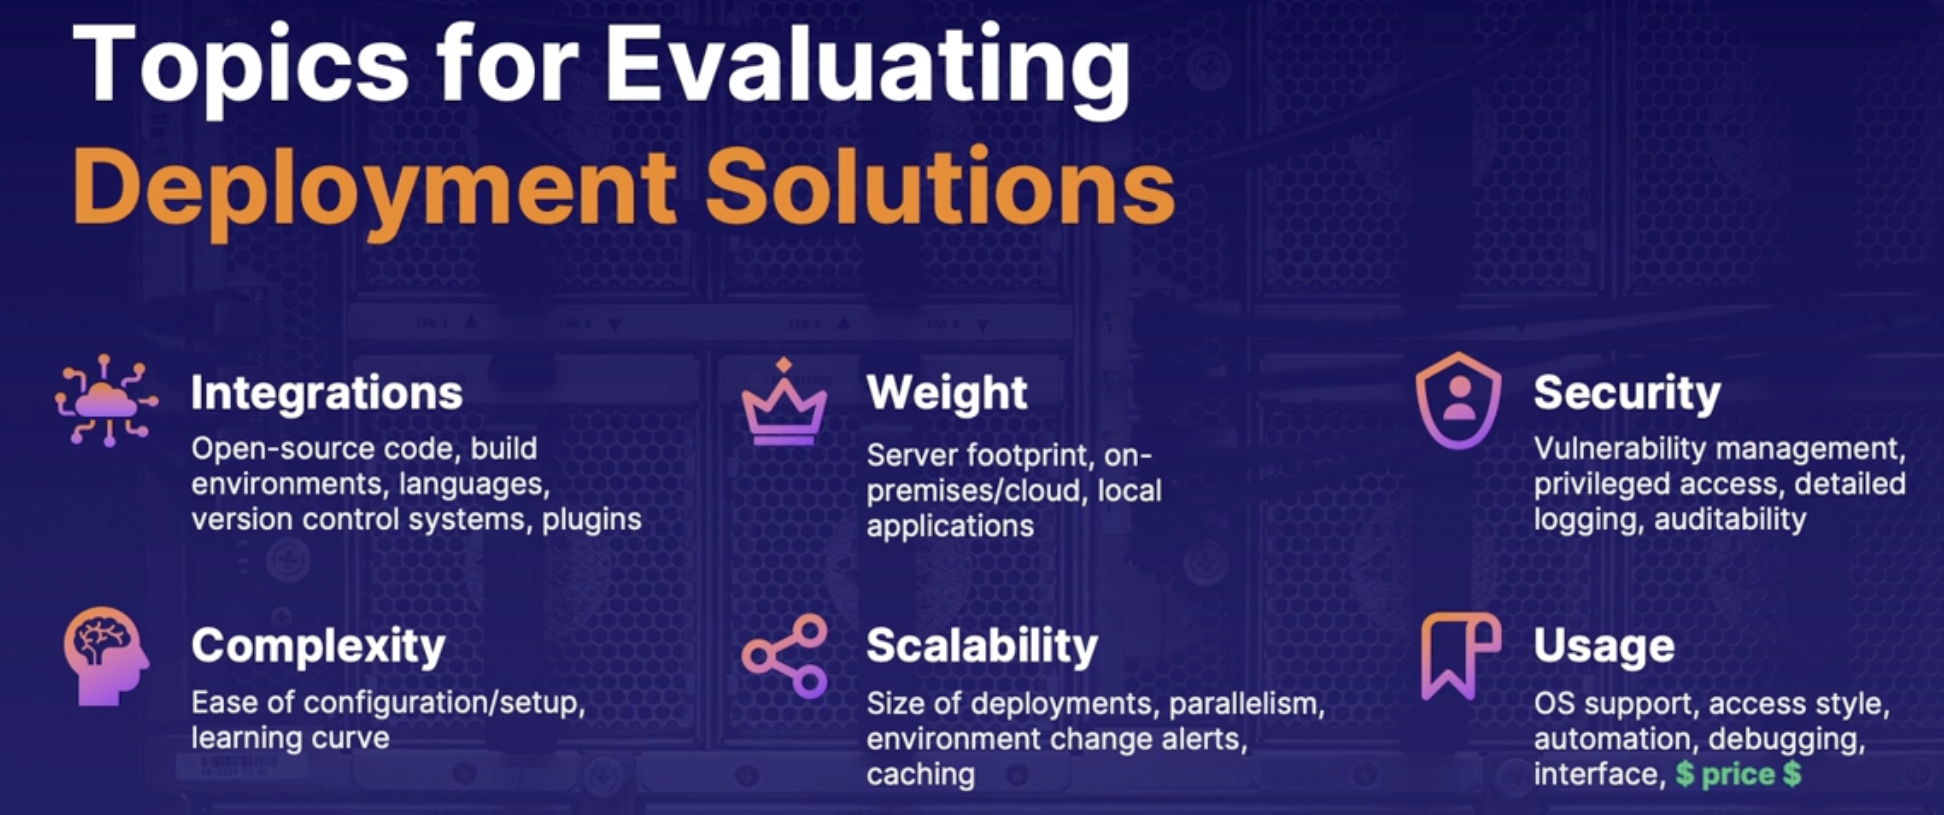
Summary
- Aspects of deployment: configuration, data and process
- lots of deployment solutions: and many right answers for a deployment scenario
- evaluating is primary based on usage complexity and integrations.
Exploring infrastructure as code: ARM vs. Terraform
Comparison
Azure | Terraform |
Azure-specific // will not be able to use in other cloud | Multi cloud provider |
Latest resources // as soon as Azure update change | Slower for new resources |
No state file // some tools look for existing state of infrastructure prior to make changes → ARM template is always Net-New // no state file | Relies on state file // review existing env, create state file, based on this info it will make change to the env |
No clean up command | Built-in cleanup command |
Code differences
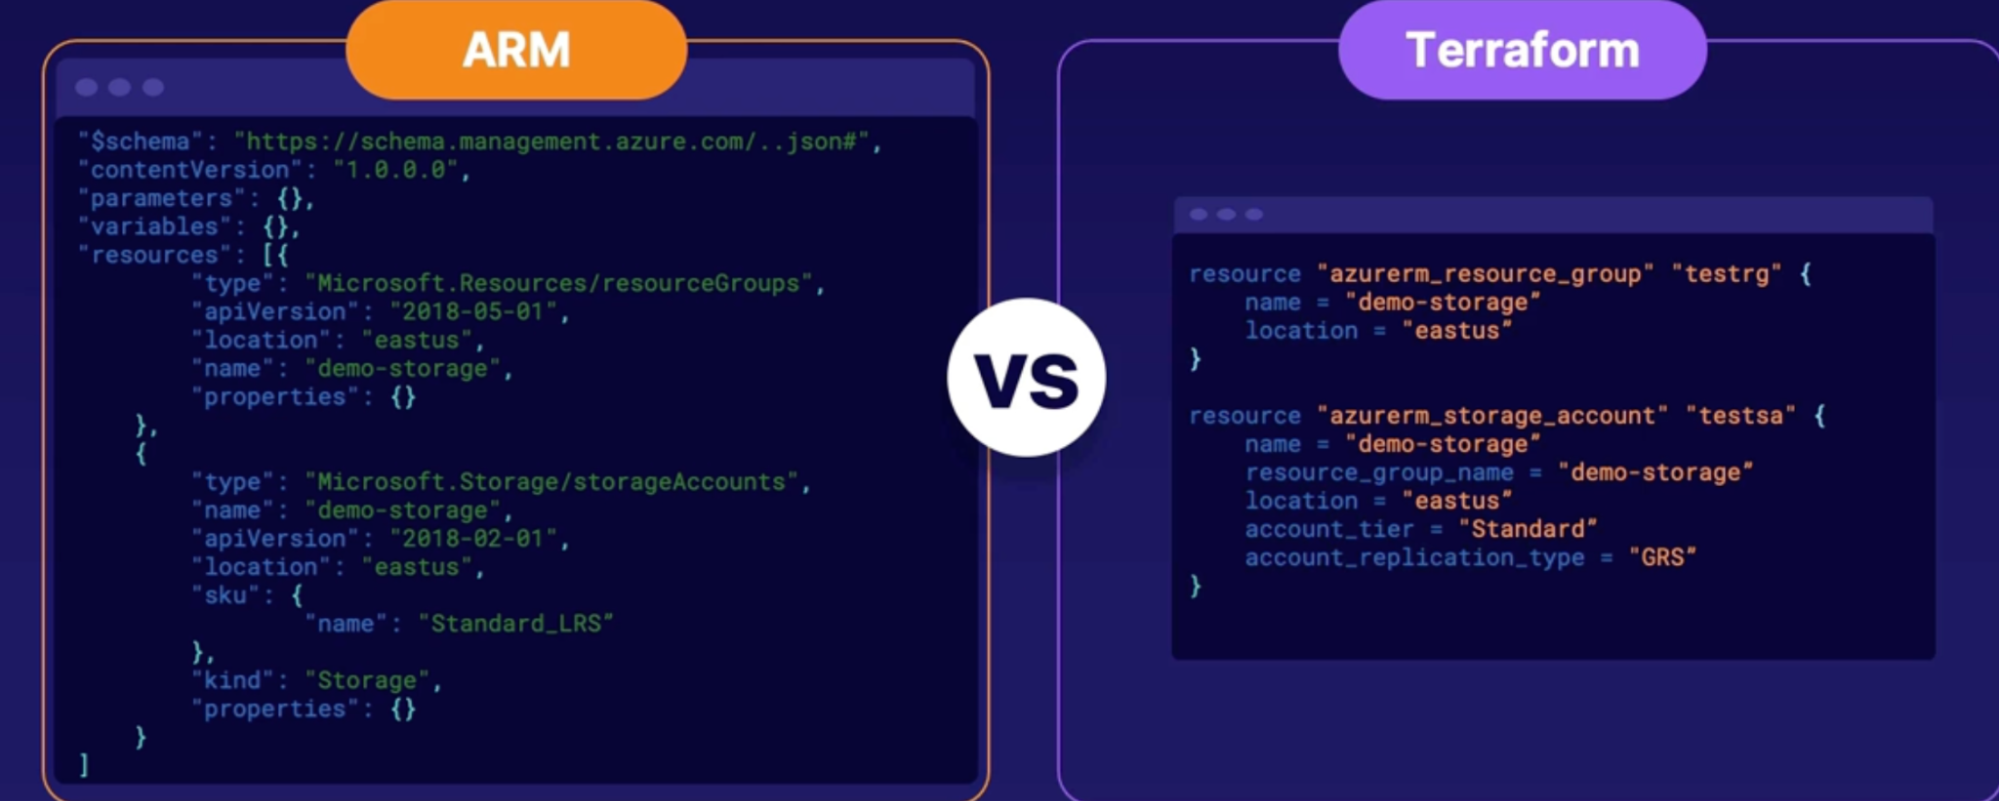
Demo: ARM template in Azure pipeline
Objectives:
- Create pipeline
- Add ARM template task
- Install terraform
- Add terraform task
Callouts:
- Validation only: will just validate the ARM template and make sure that it works.
- Complete: In resource group, if there is anything that does not currently exist or is part of this template file, then it will be deleted inside of that resource group.
- Incremental: it will not look at the existing resources inside of the resource group, it will just add whatever is inside of the template.
Callouts
- Add in 3 separate tasks: the workflow of Terraform is that there is an initialization, plan, validate and apply, and a destroy phase
- Init: when you start the initialization, you are initializing the working directory for the configuration files.
- This file going to be used throughout the validate, plan, validate and apply, and destroy phases.
- Asks
- Storage account: where you host the Terraform files
- Container: where you host the Terraform files
- Key file: is the state configuration file
- Once done, it's going to read the entire container of all the Terraform files I have inside of it, and when I do something like plan, and validate and apply, it's going to look at all of the Terraform files that I have inside of that container and plan and validate those.
- Plan: review the changes and identify what's going to be changed inside of the infrastructure, based off from the previous state configuration file or none, if there's none currently available.
- Validate and apply: validate the files and apply them towards the infrastructure actually making changes.
Summary
- Comparison: Azure specific versus universal cloud provider
- Code formats: terraform = .tf | ARM template = .json
- working together: terraform can deploy arm templates.
Exploring infrastructure as code: PowerShell vs. CLI
Code differences
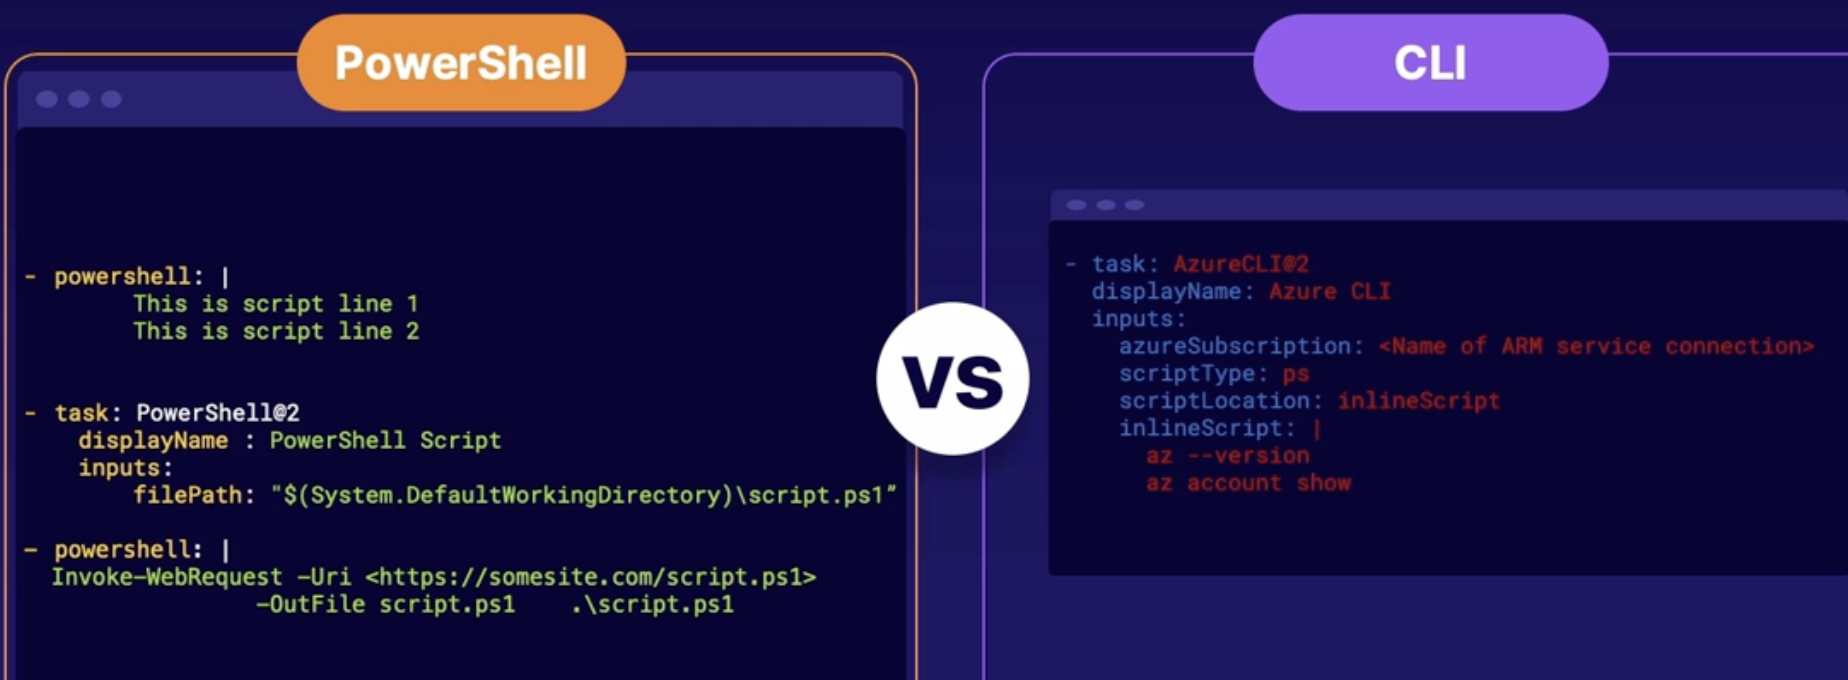
Comparison highlights
Powershell | CLI |
Both are very similar | For example, you can build Azure CLI with other programming languages like Python |
Go with what you’re familiar with |
|
Demo: Deploying with both PowerShell and CLI
Objectives: deploying with both power shell and CLI
- create pipeline
- add a task for PowerShell
- add a task for CLI
Summary
- Comparison: very similar in both usage on deployment
- PowerShell: has several ways to reuse existing scripts.
Linting ARM Templates
What is linting
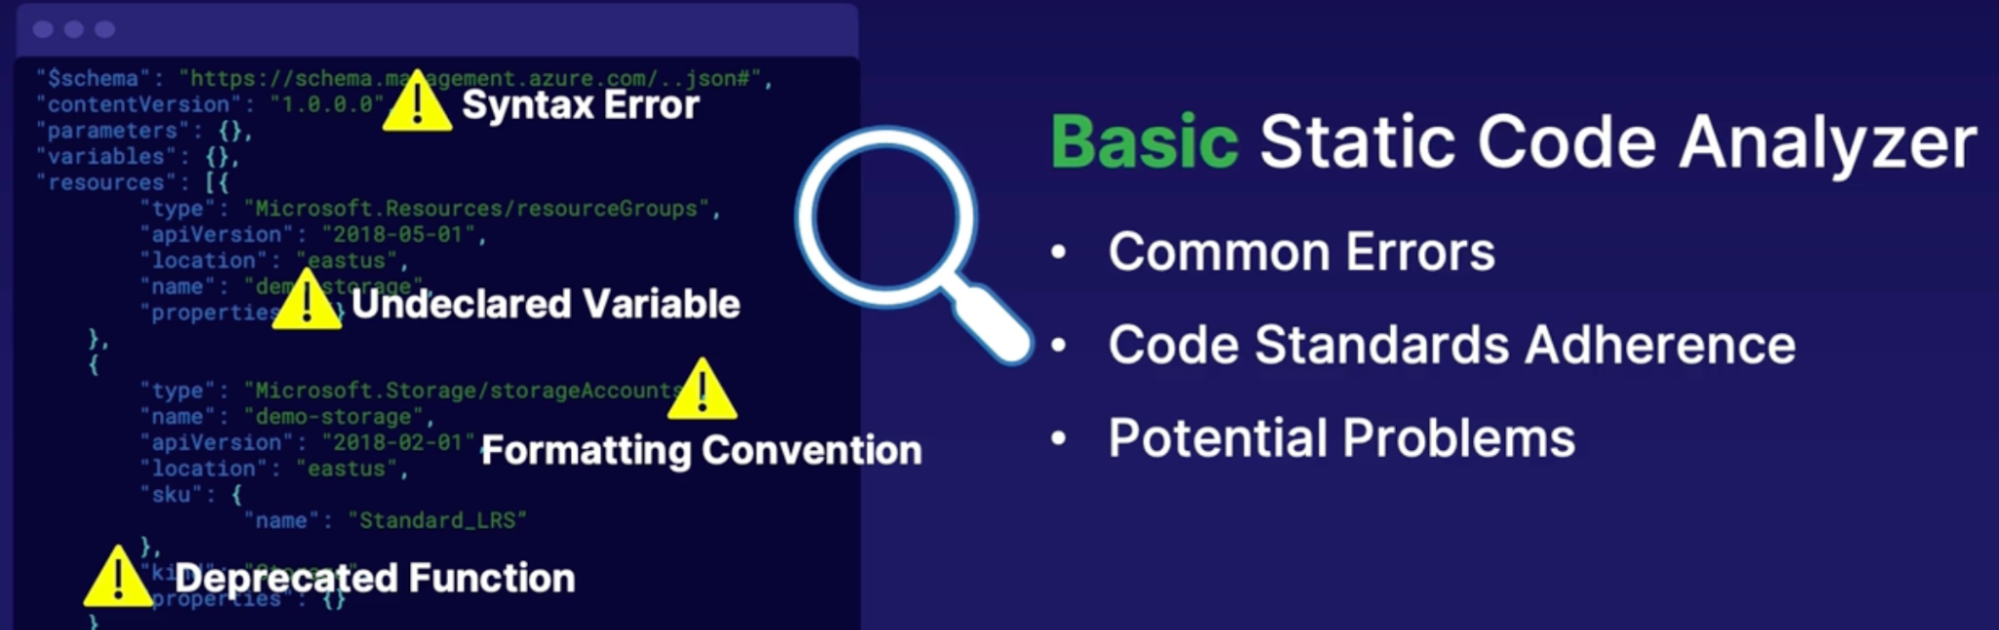
What: it’s a code analyzer that looks for error and problems in your code.
Once its found errors, it's your duty to remove error
Demo
Objectives: Validate ARM template Code
Steps:
- In pipeline create task NPM
- Install JSONLint globally in the build agent and run against ARM template
- Create a command line task
- Put ARM template file
- Working directory
- Add ARM template deployment
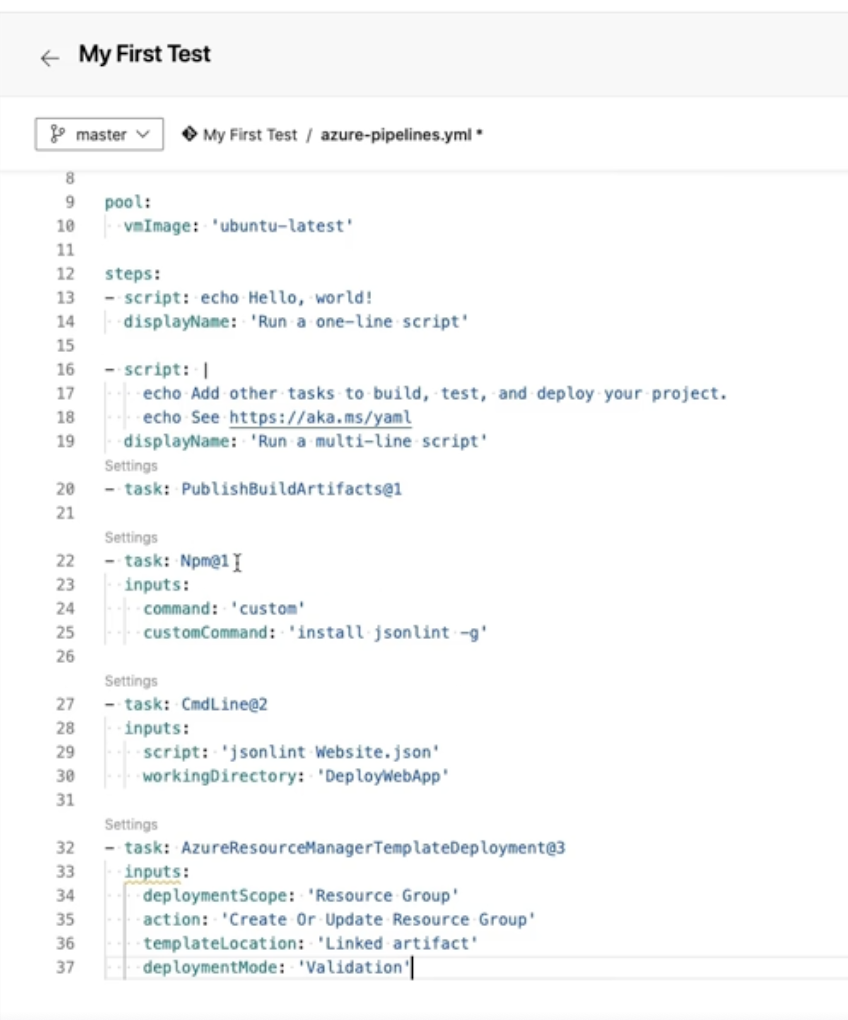
Summary
- Linting: is the process of checking static code for errors, usually by a tool
- common checks include: programmatic and stylistic errors, although some tool can be used for more
Deploying a Database
What is DACPAC?
Data-tire application package:
- Contans metadata information(objects, tables and view) of the database
- It contains schema of the database and data records or objects // which help us transport any database changes from the local machine to target machine
- Each one of those will be used to create database without data in it
Demo
Objectives: Deploy a database in a DevOps pipeline
- create a DevOps pipeline
- Job: SQL server database deploy(using DACPAC & SQL script)
- Deploy SQL using
- Sql Dacpac = select this
- Sql query file
- Inline Sql
- DACPAC file: supply file from your database server
- Go to your database
- Right click → tasks
- Export data tire application // will give bacpac (backup file)
- Extract data tire application // will give dacpac
- Specify SQL using
- Server
- Connection string
- Publish profile
- Server name
- Database name
- Authentication methods
- add a step to deploy SQL
Summary
- SQL DACPAC: a package containing SQL server objects(instance objects, tables and view).
Understanding SQL Data Movement
What is BACPAC?
What:
- it ‘s a backup package that contains data and schema of SQL server in order to form a production-ready database
- Now, the idea of a BACPAC in a DevOps environment is
- to take a source database, probably from a production server, and create a BACPAC of it.
- That way you can deploy it to a test environment where it would be a production-ready style database for you to perform your testing.
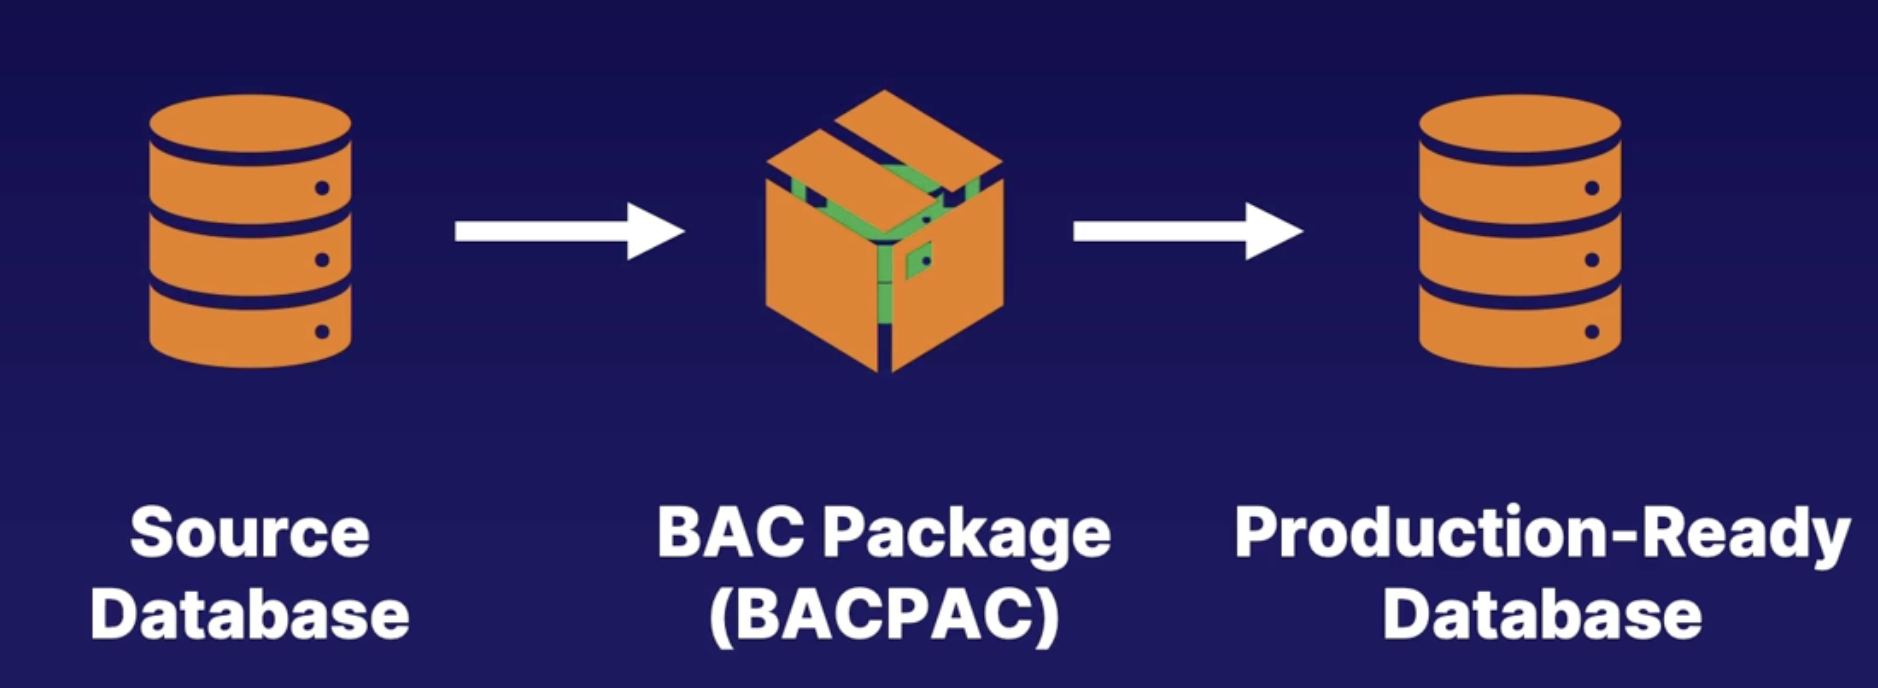
Demo
objectives: deploy a database in a devops pipeline
- edit a devops pipeline
- Job → task: Azure SQL database deployment
- Deploy type: SQL dacpac file
- Action
- Publish: incrementally update the database schema to match the schema of DACPAC file. If files not exist on server then it will create the database file; otherwise exiting database gets updated
- Extract: create the DACPAC file// contains schema info
- Export: create the BACPAC file // contains the data and database schema
- Import: import the schema from BACPAC file
- Script: is whatever T-SQL statement script you need
- Drift Report: create an XML report of the changes that have been made since it was last registered
- Deploy Report: create an XML report of the changes that would be made by publishing
- add a step to deploy SQL
- additional SQL flow actions: extract, publish, export, import, deployReport, driftReport, script
Summary
- SQL BACPAC: A package containing SQL Server schema and data
- SqlPackage.exe: allows data flow by special actions
- BACPAC Commands: Export, import
- DACPAC commands: extract, publish
Introduction to Visual Studio App Center
What is App Center
What: App Center allows you to deploy your application to multiple destinations
- Windows devices,
- Android,
- Mac
- iOS.
- Xamarin apps, React Native apps
- it integrates with Azure DevOps Pipelines. So, we can submit things to different places like the App Store as part of our workflow.
- Visual Studio App Center will actually be able to look at all the different devices and builds available, and give you a compatibility check based off from those.
Demo
Objectives: Integrate App Center with DevOps pipelines
- Create a pipeline
- Add an App Center step
- Task:
- Add App Center test
- Add App Center distribute
Summary
- App Center: mobile development lifecycle solution
- Supports: iOS, android, Windows and Mac OS app
- Integrates with Azure DevOps pipeline
Exploring CDN and IOT deployments
Azure CDN deployment with DevOps pipeline
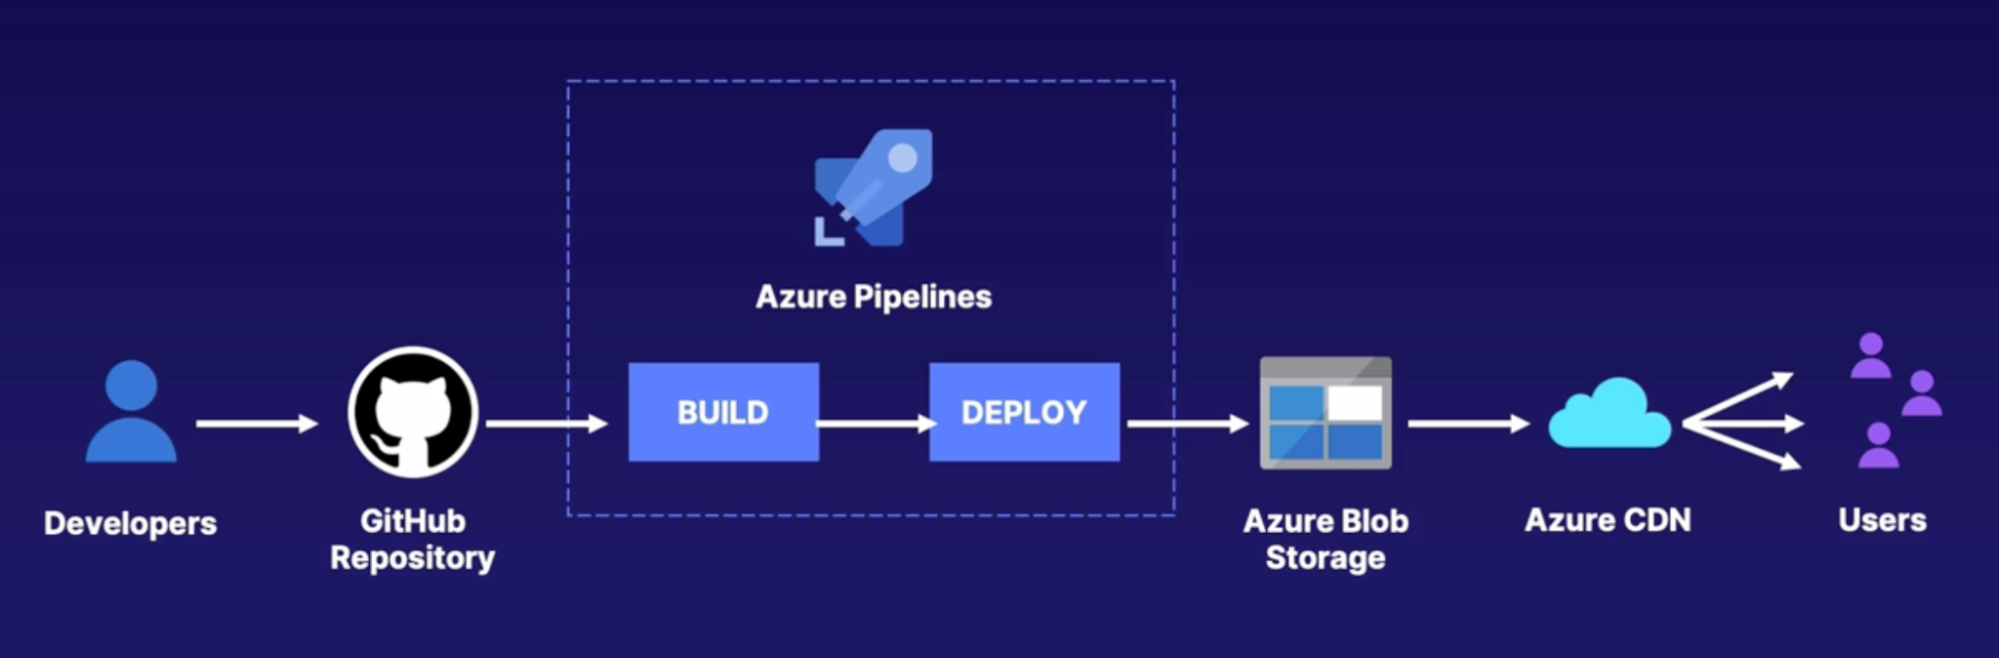
Flow is same as aws = S3 bucket + CloudFront
Azure IOT Edge deployment with DevOps pipeline
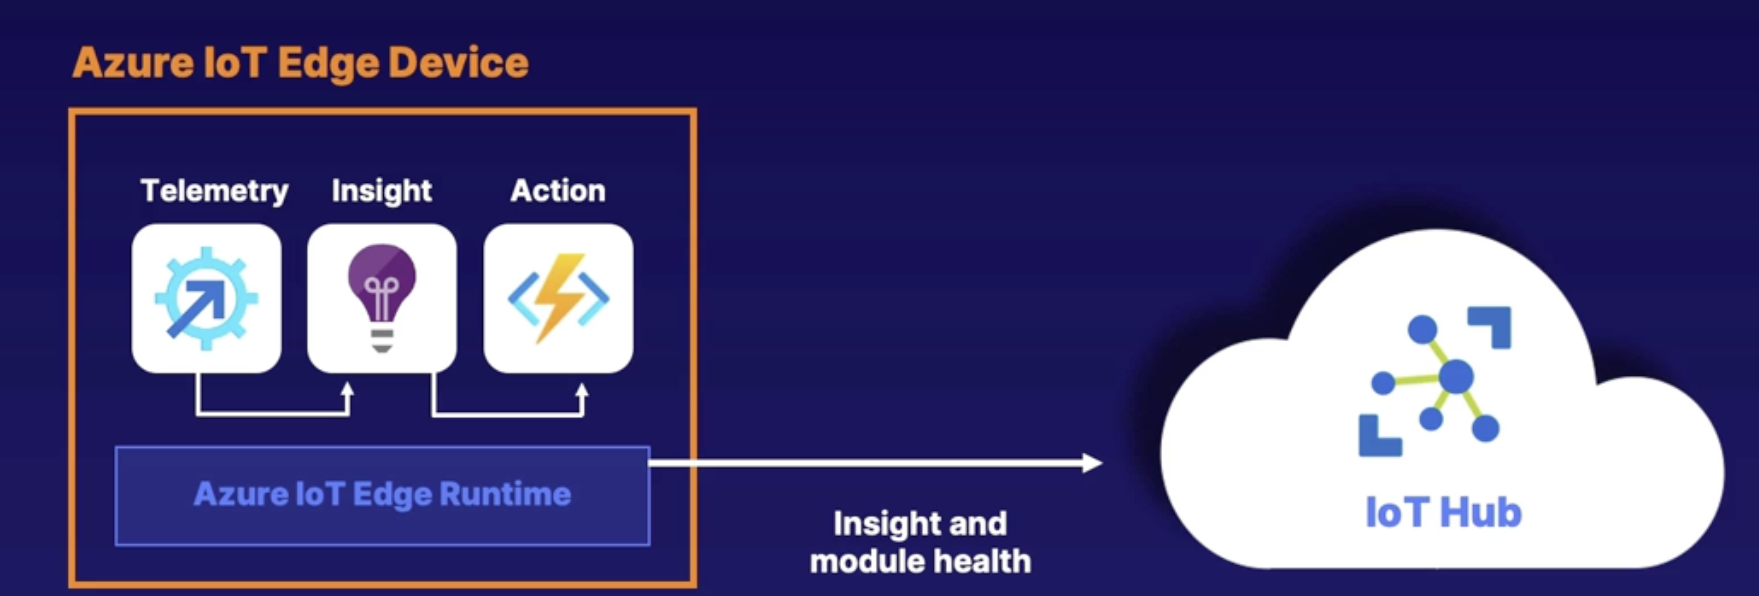
Demo
objectives: deployed to an IOT device with DevOps pipelines
- create a new IoT edge pipeline
- add an IoT deployment step
- review process
Summary
- CDN: deployments have steps for compression and caching before publishing
- IoT edge pipelines can be integrated with the IOT hub
- DevOps starter can be used to quickly set up some simple projects
Understanding Azure Stack and sovereign cloud deployment
Exploring environments
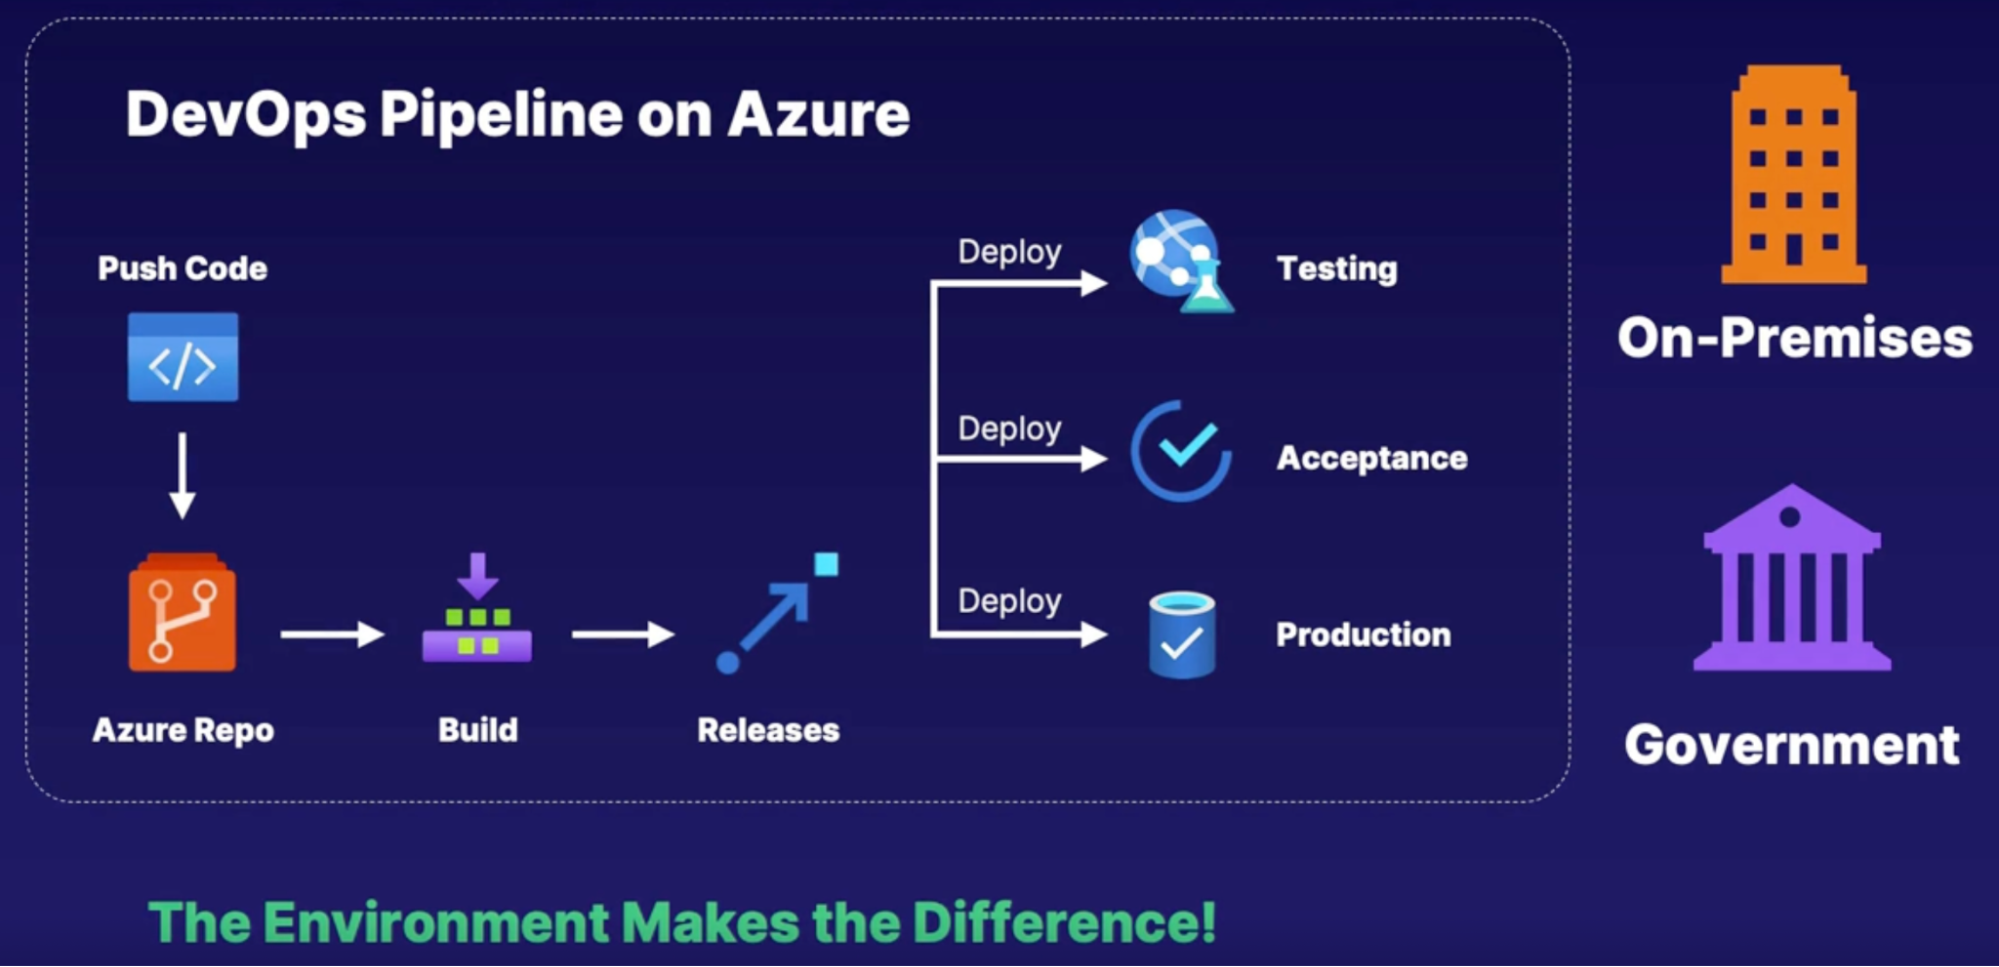
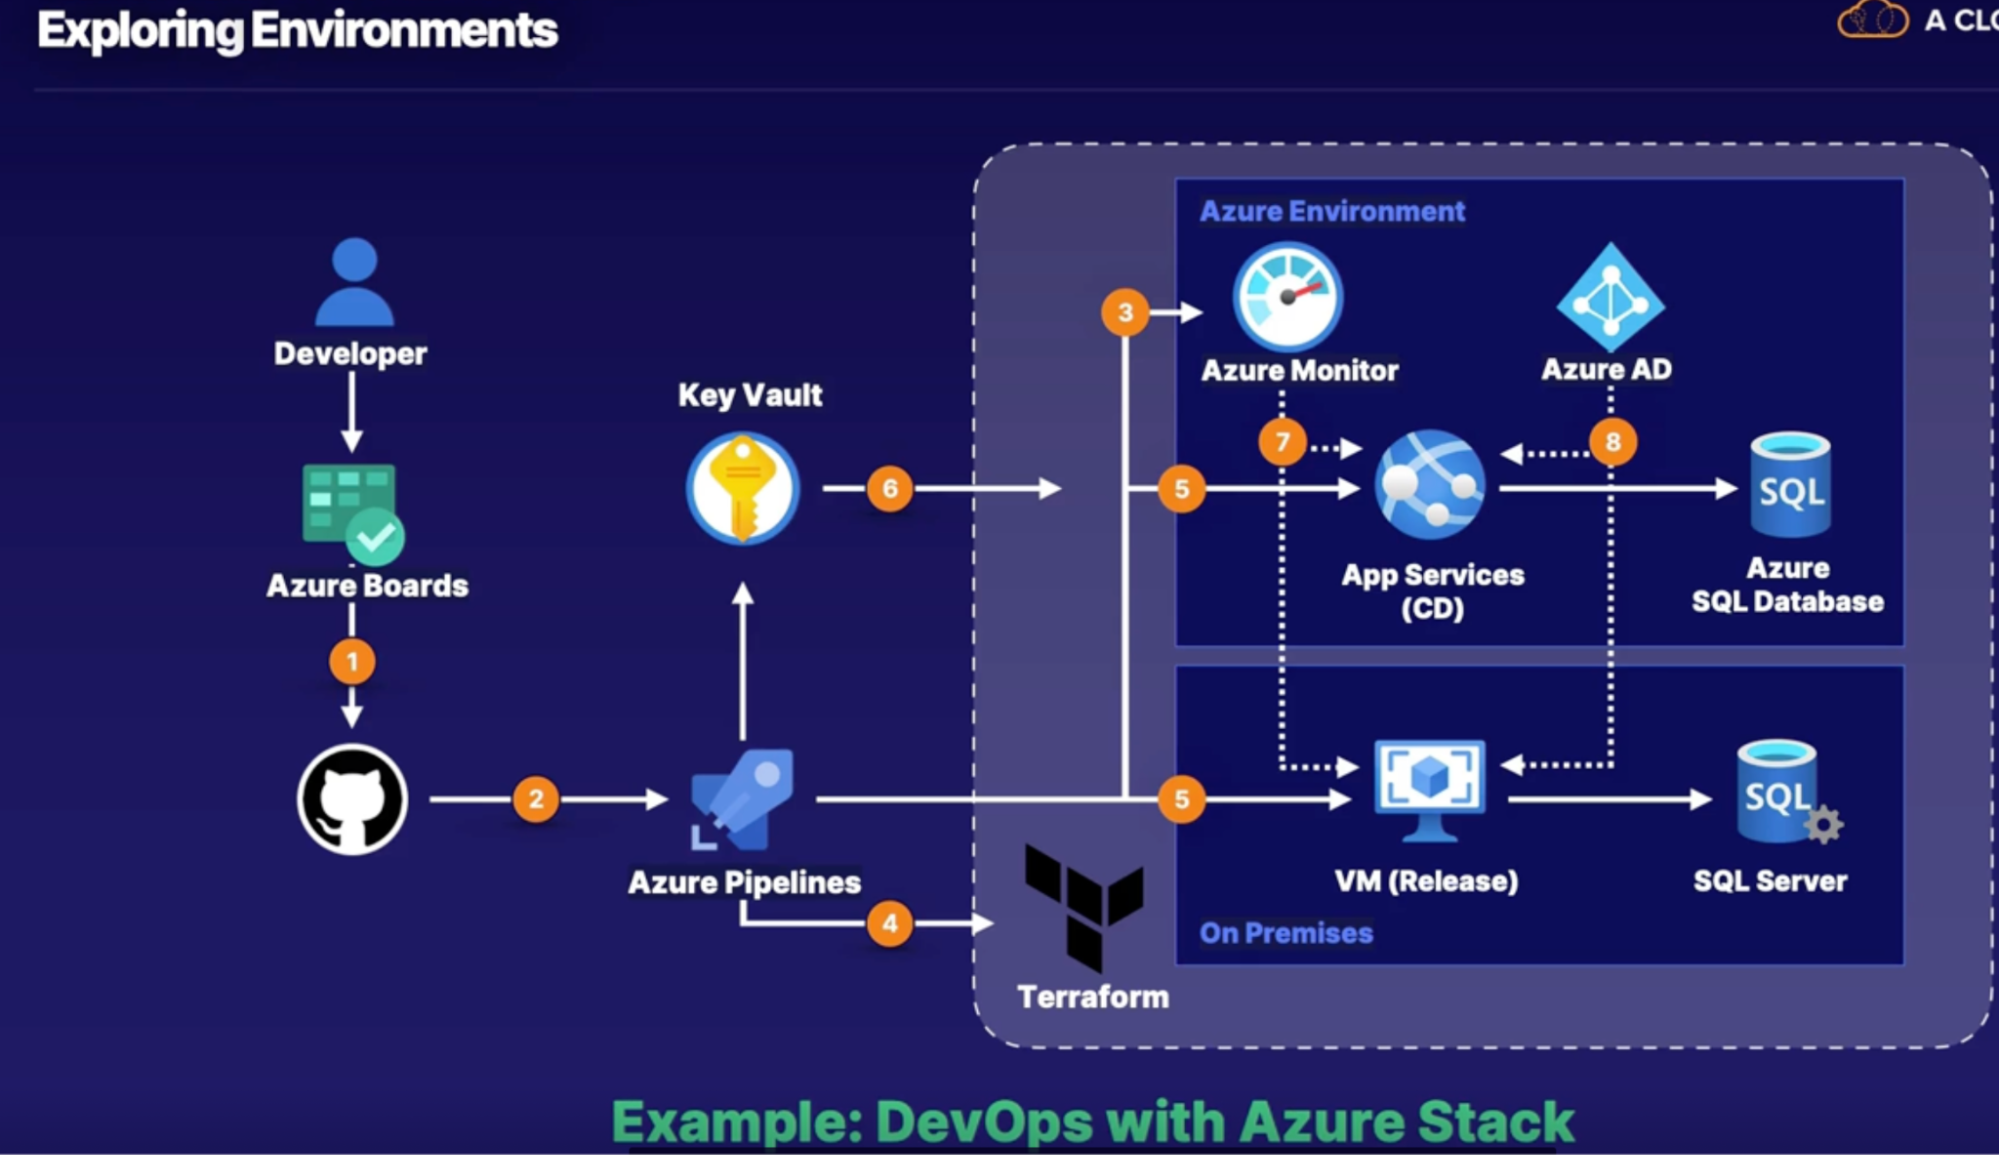
Demo
Objectives: explore environments
- review the environment options in service connections
Summary
- environments can be changed in Azure pipelines by defining service connections
- security and compliance assessments: can be done on pipeline to ensure security because Azure DevOps does not run on Azure Government or Azure China
Summary
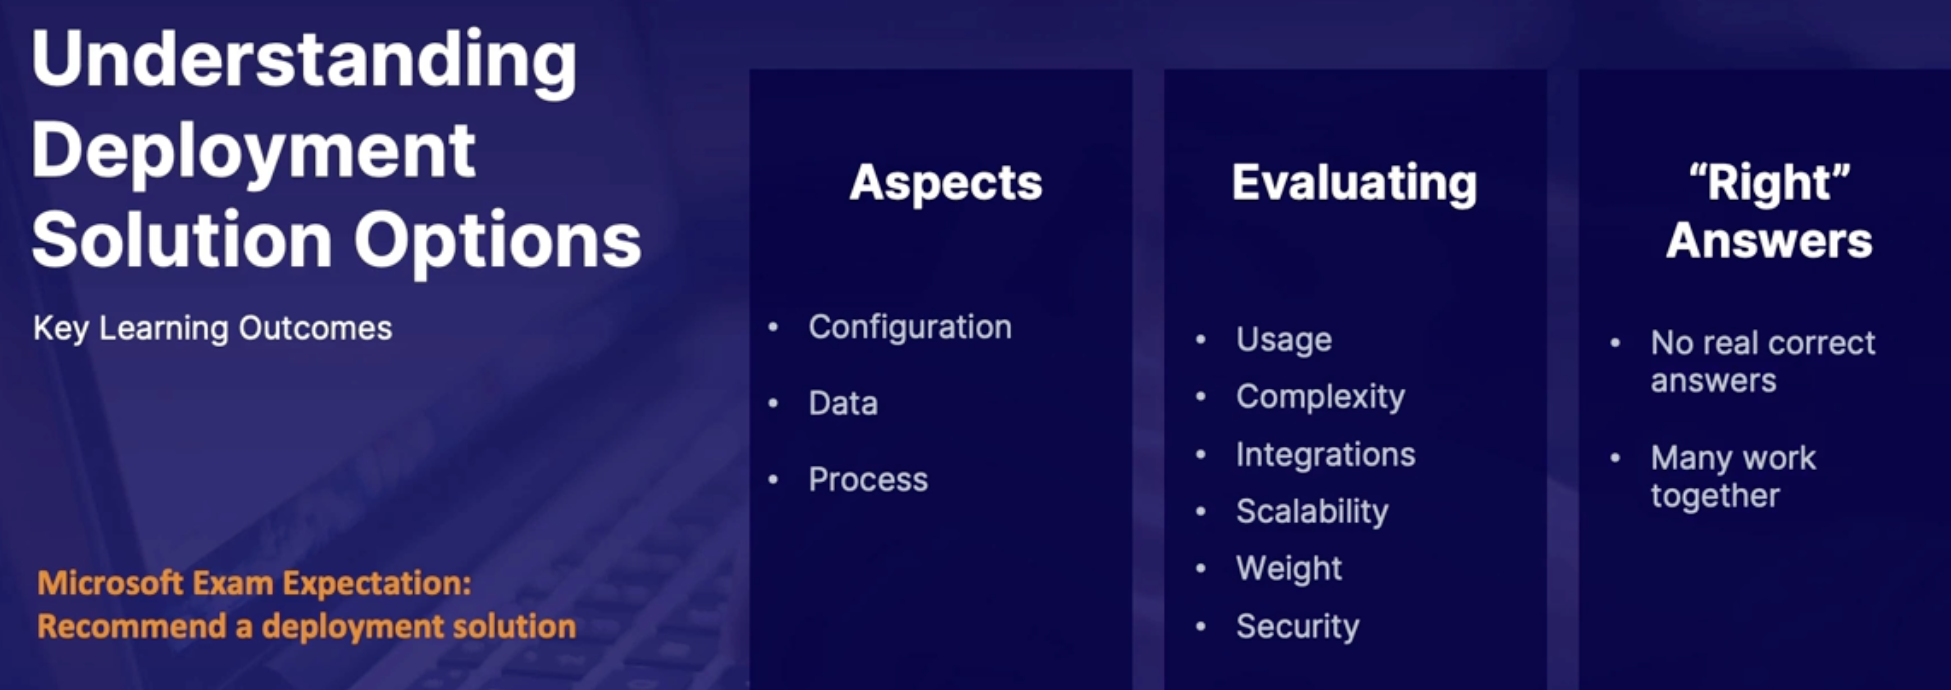
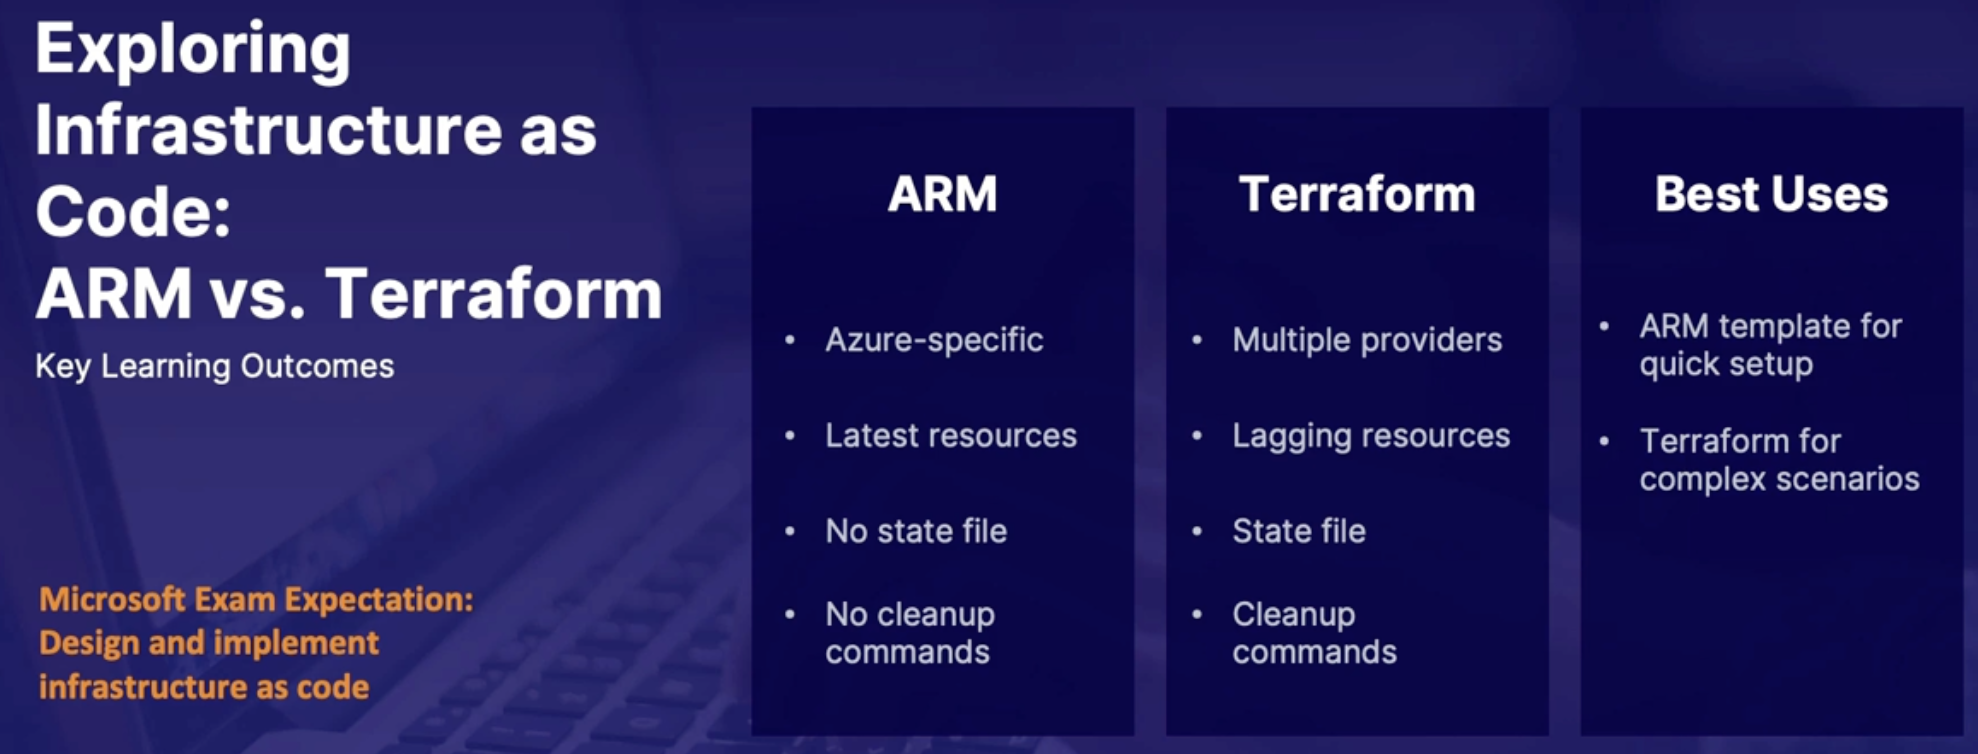

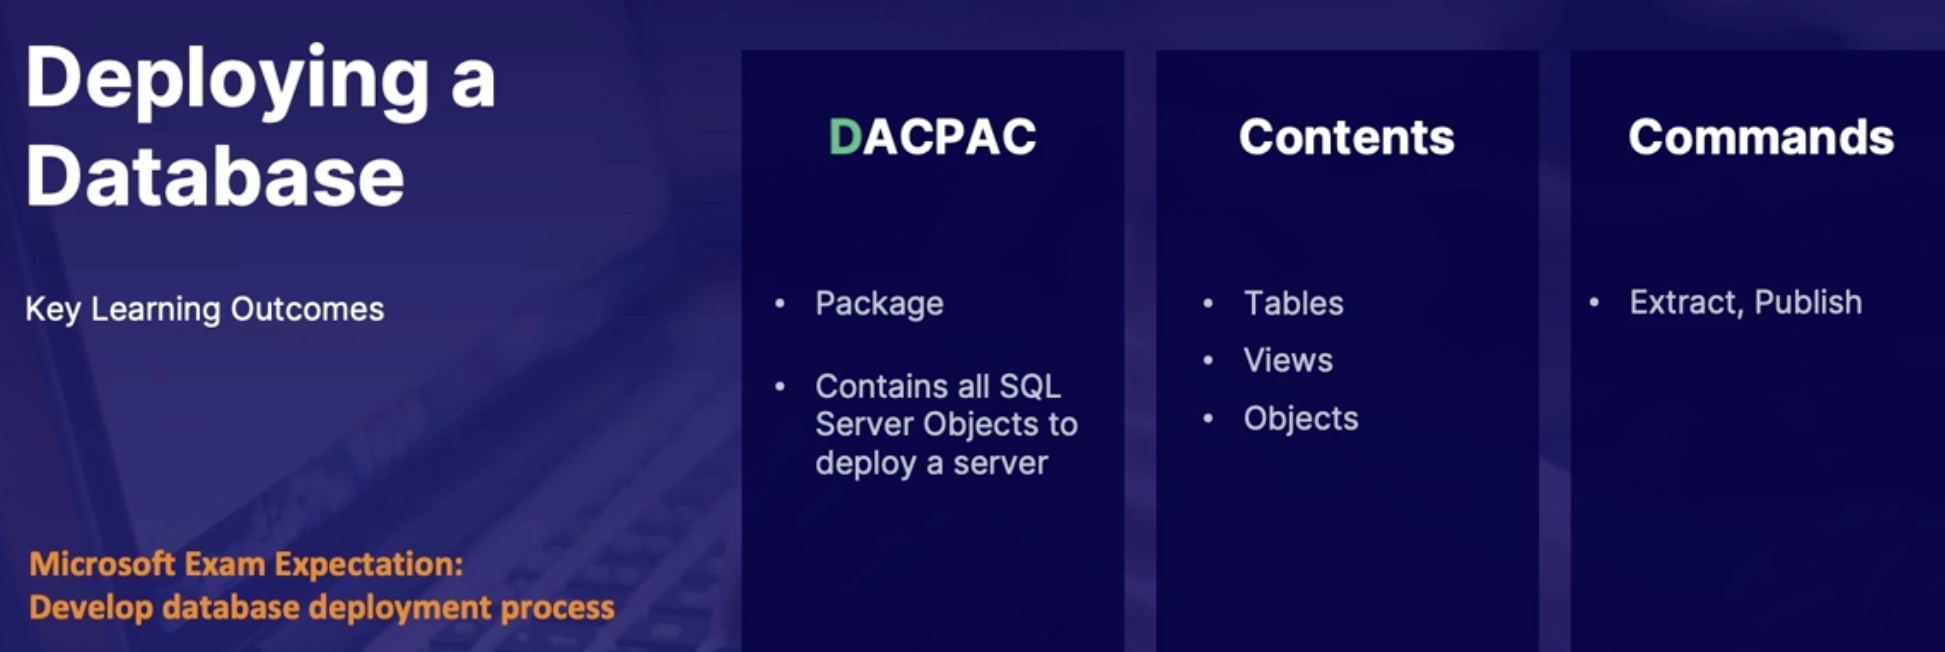
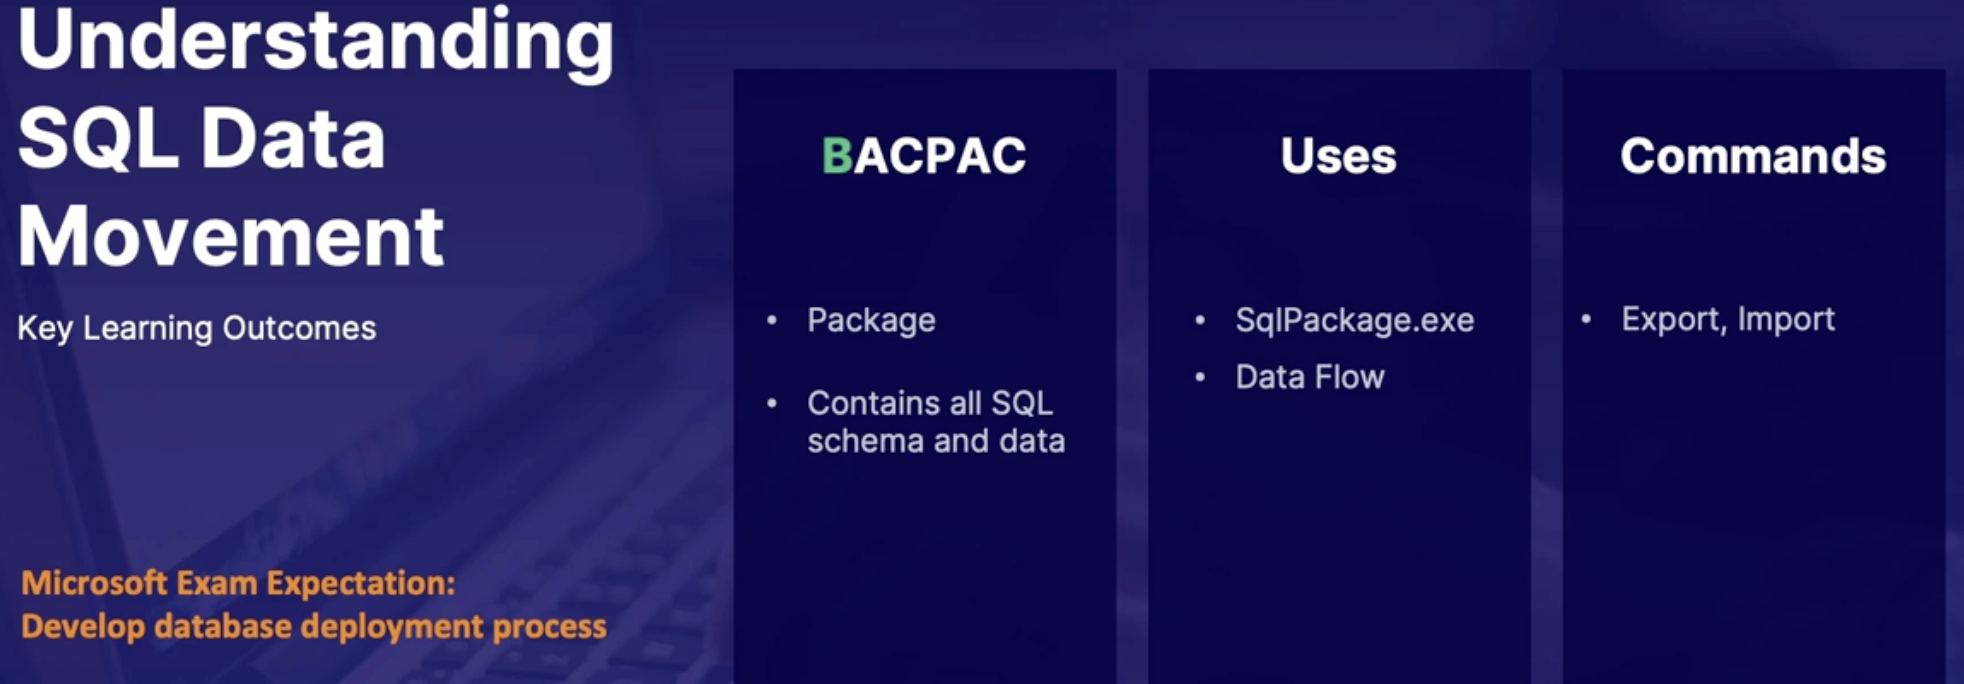
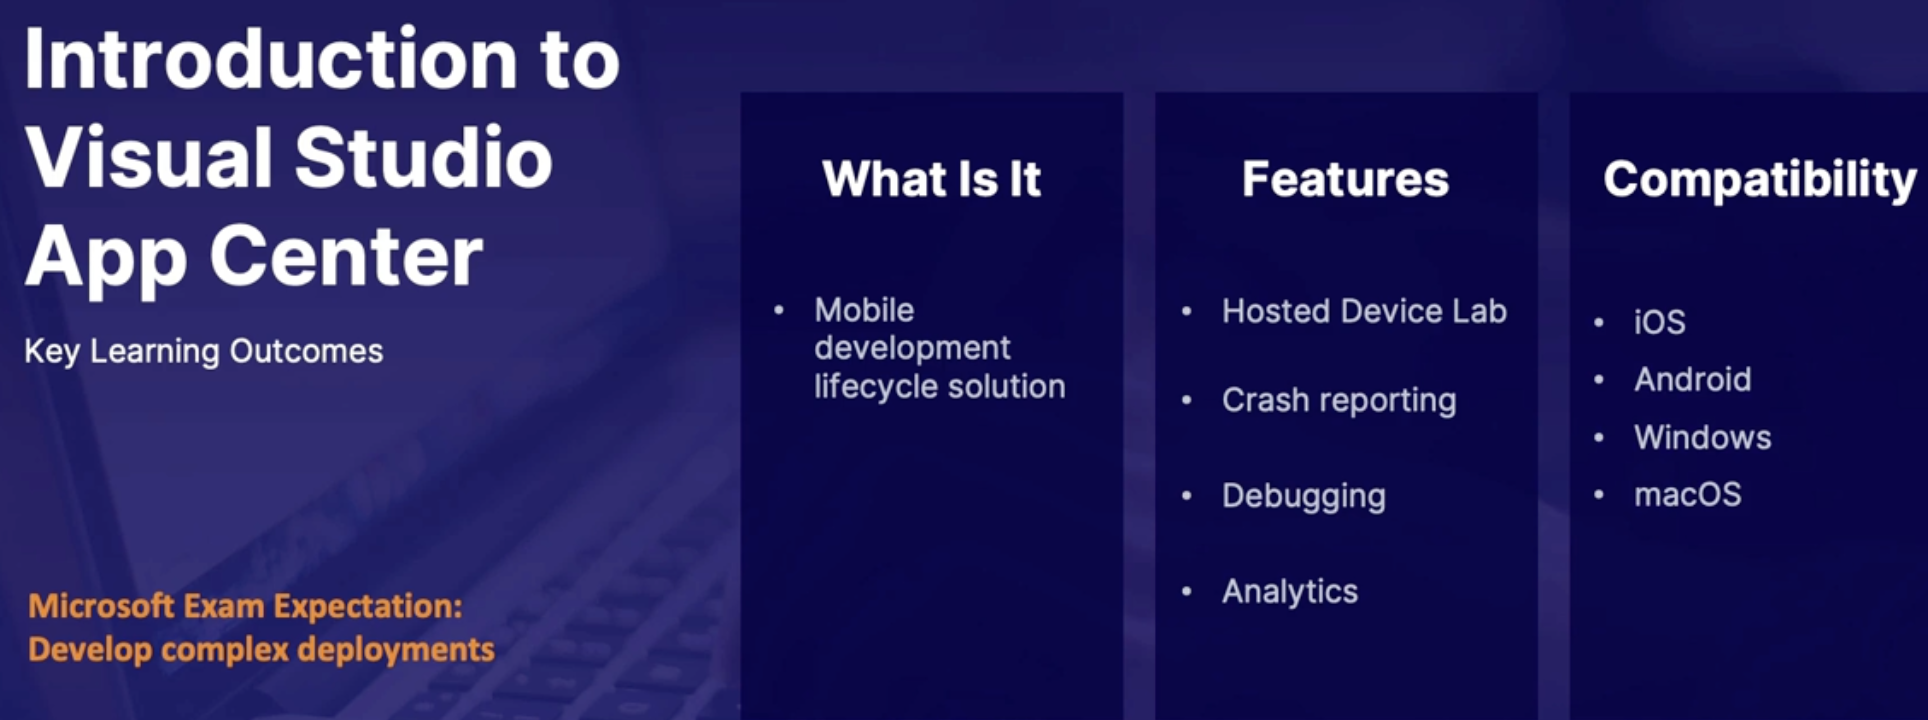


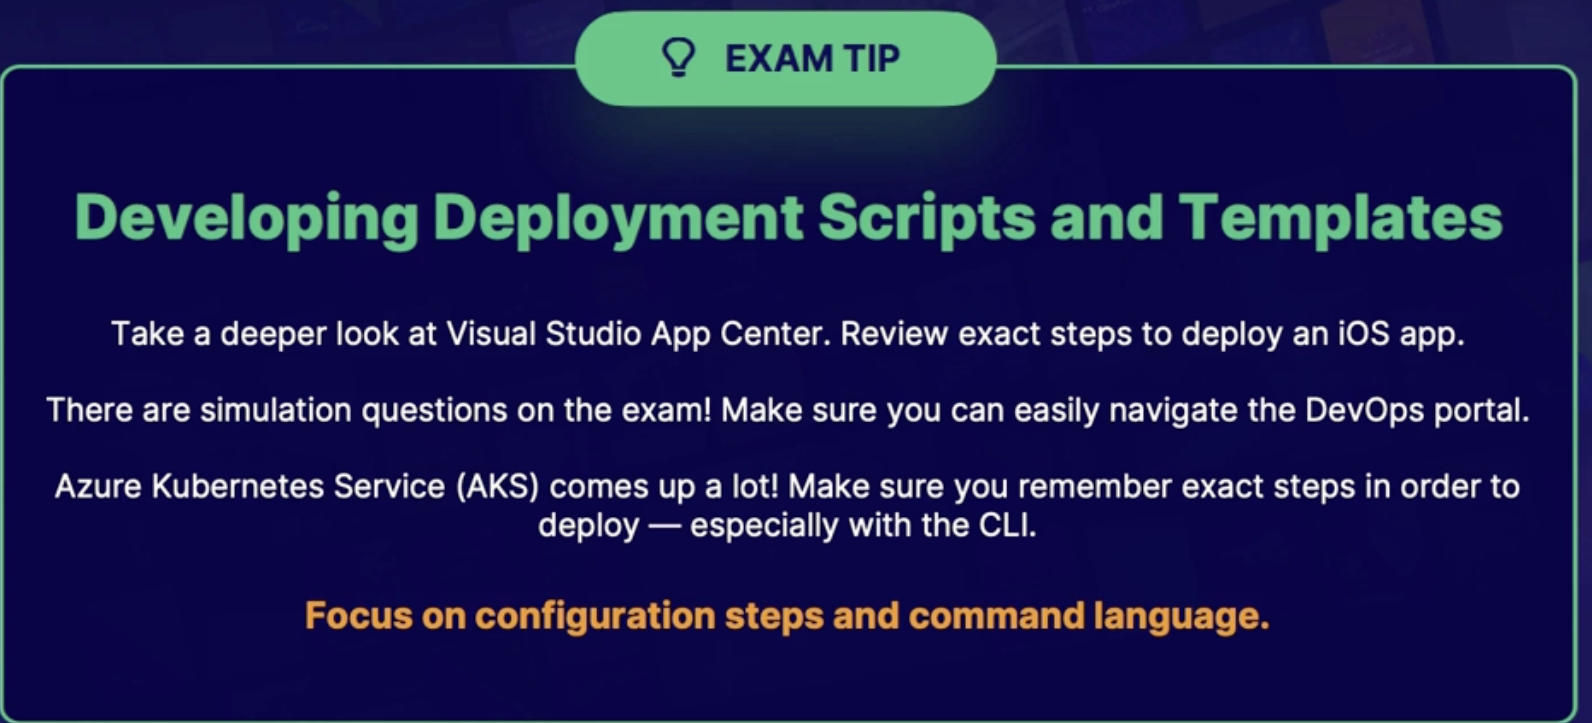
Lab: Build and Distribute an app in App center
What: Visual Studio App Center applications and distribution groups. In this scenario, we will create an application in App Center and then create a distribution group with an external user to be notified when there is a new build, which will help with collaboration across the development lifecycle.
LEARNING OBJECTIVES
- Create an Azure DevOps Repo
- Configure Visual Studio App Center
- Configure an Application Build
Scenario
- your team wants to increase collaboration with external users across the development cycle
- create an application in visual studio app centre
- create a distribution group to notify external users of new builds via email
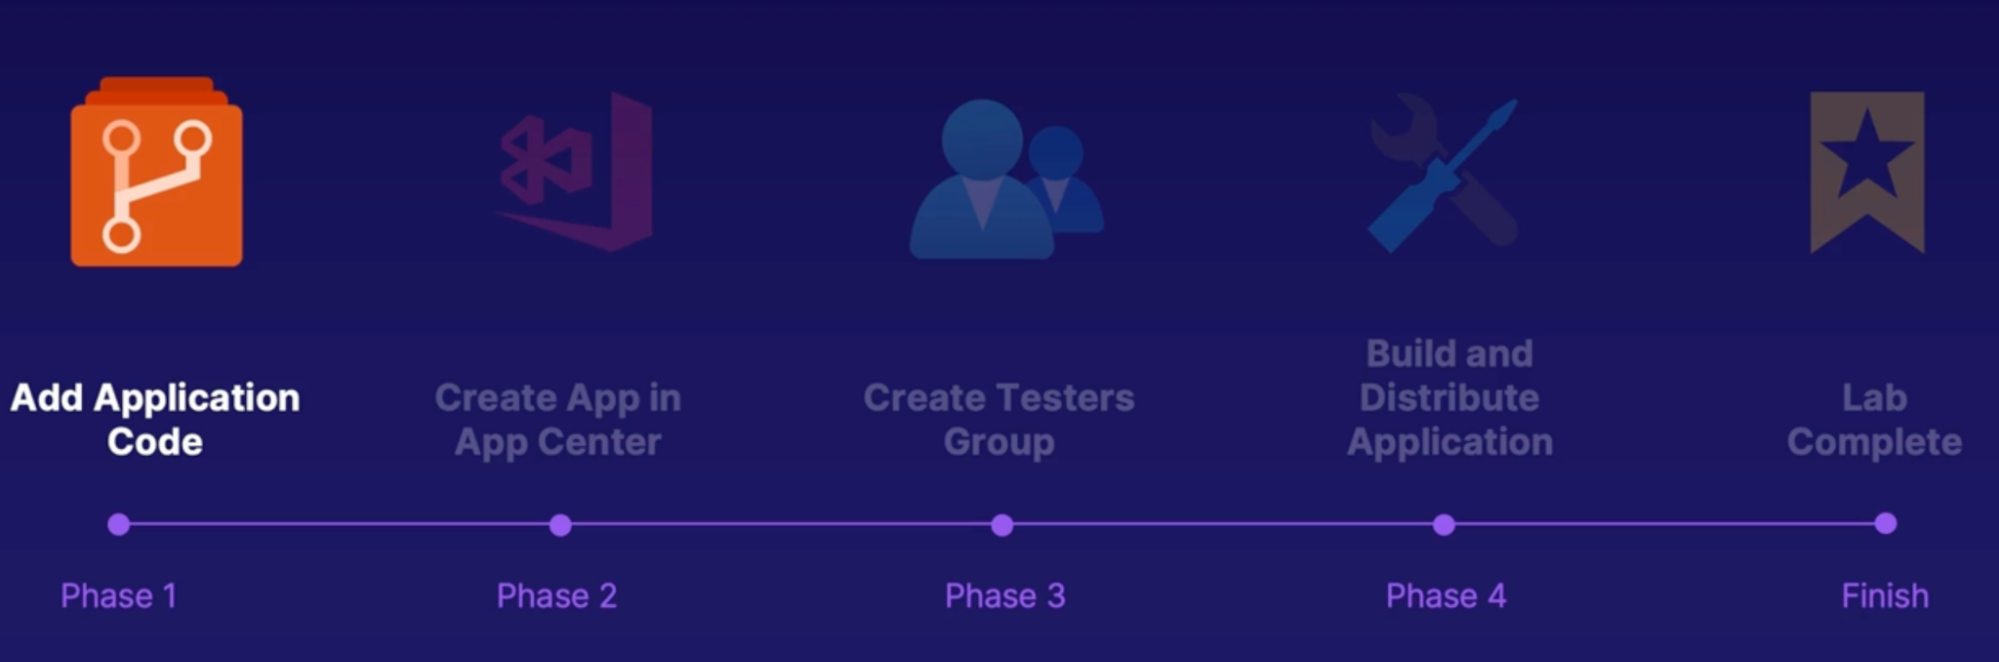
Steps
- Create an Azure DevOps Repo
- Create Azure DevOps project
- From project setting: policy → run on third-party application access via OAuth
- Import repo from GitHub
- Configure Visual Studio App Center
- Sign in to appcenter.ms
- Personal company or school
- Add new app
- Select name, OS(windows), platform(UWP)
- Under settings → people → add invite email
- Under distribute → group → add group
- Give name
- On - allow public access
- Invit email
- Configure an Application Build
- Under build → Azure DevOps
- Select your project
- Select your branch
- Build → App Center → configure build
- On: distribute build
- Enter the group name
- Save
Lab: Linting your ARM templates with Azure pipelines
Scenario:
- In order to ensure there are no errors in your deployment so you need to lint the code
- take the provided ARM templates and ensure there are no JSON errors
- do all of this only using Azure pipelines
Steps
- Create a new Azure org
- Push the ARM template into Azure repo
- Create a pipeline with limiting
- Task: npm
- Command: custom
- Command and argument: install jsonlint -g
- Task: cmd
- Script: jsonlint template.json
Lab: Building infrastructure with Azure pipeline
Scenario: You have been given an ARM template for a Linux VM to deploy to Azure. Using Azure DevOps, you must check the ARM template for errors (linting), and deploy the VM to the provided Azure environment.
Steps:
Create an Azure DevOps Organization
Push Code to Azure Repos
Create the Build Pipeline
Create the Release Pipeline
- Task: ARM template deployment
Lab: Deploy a python app to an AKS cluster using Azure pipeline
Objectives: You are responsible for deploying a Python app to AKS. You have the code and a pipeline template, and you must create a CI/CD pipeline in Azure DevOps.
Steps:
- Create an Azure DevOps Organization
- Import Code and Setup Environment
- Pipeline → environment → create a new environment
- Name: dev
- Resource: kubernetes
- Provider
- Azure subscription
- Cluster
- Namespace
- Service connection: docker registry
- Create Azure container registry via Azure CLI
- It has access keys, input this detail into service connection configuration
- Enter docker registry
- Docker ID
- Password
- Name
- Grant access to all pipeline
- Create the CI/CD Pipeline
- Access the AKS Cluster
Chap - 15: Implementing an Orchestration Automation Solution
Exploring release strategy
Canary deployment
What:
- you're deploying code to a small part of the production infrastructure.
- Once the application is signed off for release, only a few users are routed to it, which minimizes impact.
- If there's no errors or no negative feedback reported, the new version rolls out to the rest of the environment.
Rolling deployment
What
- The application's new version gradually replaces the old one.
- They'll actually coexist for a period of time where you're rolling out the new code to different parts of the infrastructure.
- During that time, the old and new versions will actually coexist without affecting the functionality or user experience.
- And this also makes it easier in order to roll back any new component and compatible with the old components.
Blue/Green deployment
What
- It requires 2 identical hardware environments that are configured exactly the same.
- While one environment is active and serving end users, the other one is idle.
- As soon as the new code is released to the inactive(idle) environment, it's thoroughly tested. And once it's been vetted, the idle environment becomes active, and the active environment becomes inactive.
| Rolling | Canary | Blue-green |
Use-case | benefits applications that experience incremental changes on a recurring basis, small changes | can work well for fast-evolving applications and fits situations where rolling deployment is not an option due to infrastructure limitations. doesn't require any spare hosting infrastructure | requires a large infrastructure budget, best suits applications that receive major updates with each new release |
How | Updates few existing server with the new version of the code.
Old and new applications runs parallelly.
If no bug found(on updated server) then all the remaining old coded server gets un update with the new code. // no new servers | Same as rolling where the new release available to some users before others. However, the canary technique targets certain users to receive access to the new application version, rather than certain servers.
A common strategy is to deploy the new release internally -- to employees -- for user acceptance testing before it goes public. | maintain two distinct application hosting infrastructures. At any given moment, one of these infrastructure configurations hosts the production version of the application, while the other is held in reserve // swap
deploy a new app version to reserved infrastructure(staging env) —> test staging deployment —> swap traffic from one infrastructure to the other // staging becomes production and former production goes offline |
Not suitable | Applications that get major update // because user gets the old version of the features which defeats the purpose |
|
|
Analogy |
| offers a key advantage over blue/green switchovers: access to early feedback and bug identification —> canaries, find weaknesses and improve the update before the IT team rolls it out to all users. |
|
Summary
- Canary deployment: deploy in a small part of the production infrastructure only a few users are routed to it until sign off
- Rolling deployment: YouVersion gradually replaces the old one coexisting
- Blue/Green deployment: two identical hardware environments, one active one idle
Exploring stages, dependencies and conditions
Release pipeline stage anatomy
Stages
Pipeline flow:
- Inside of a stage there's generally an approval.
- And after the approval, there are jobs.
- And inside of those jobs are tasks.
Stages: stages are logical boundaries in your pipelines where you can pause the pipeline and perform various checks.
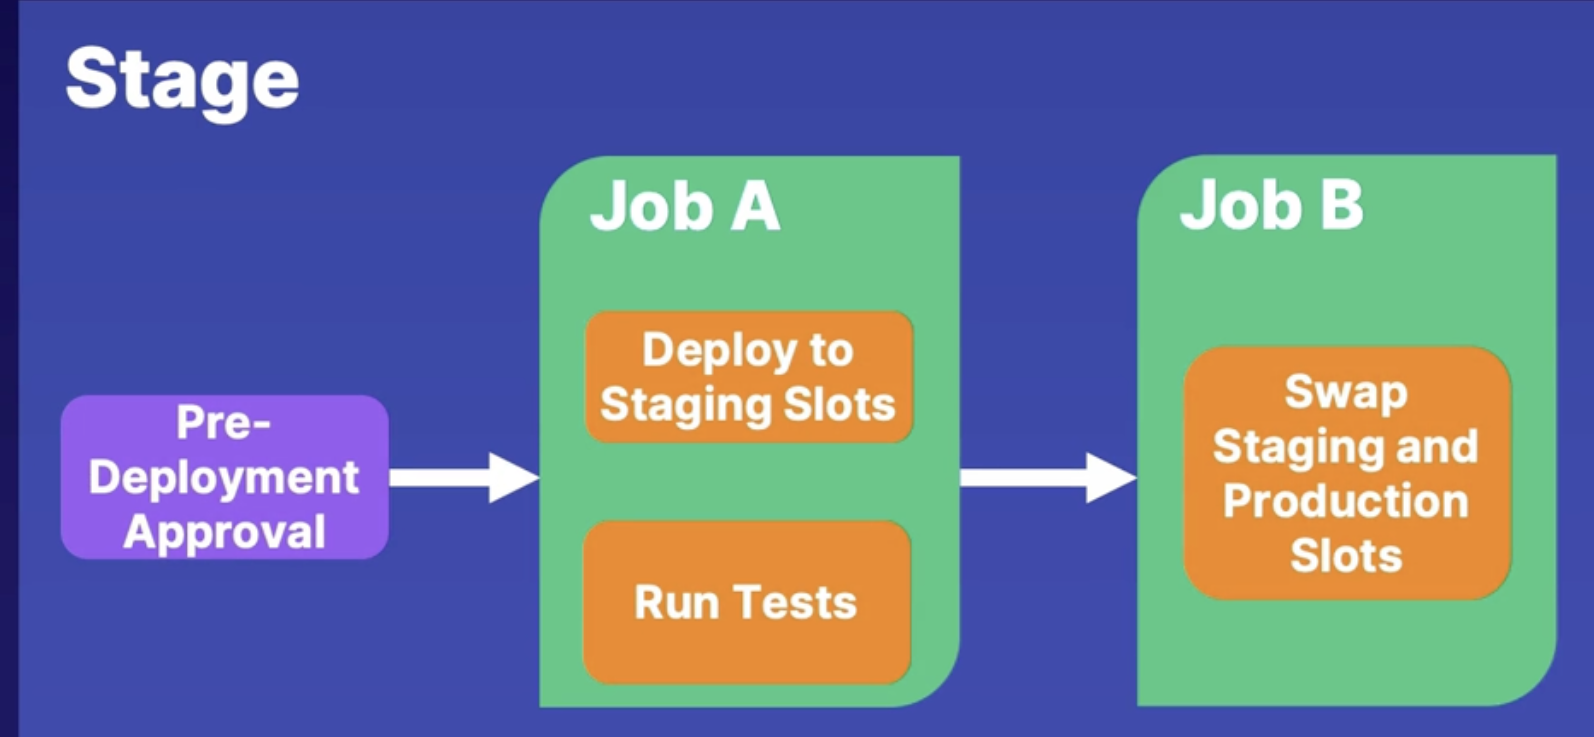
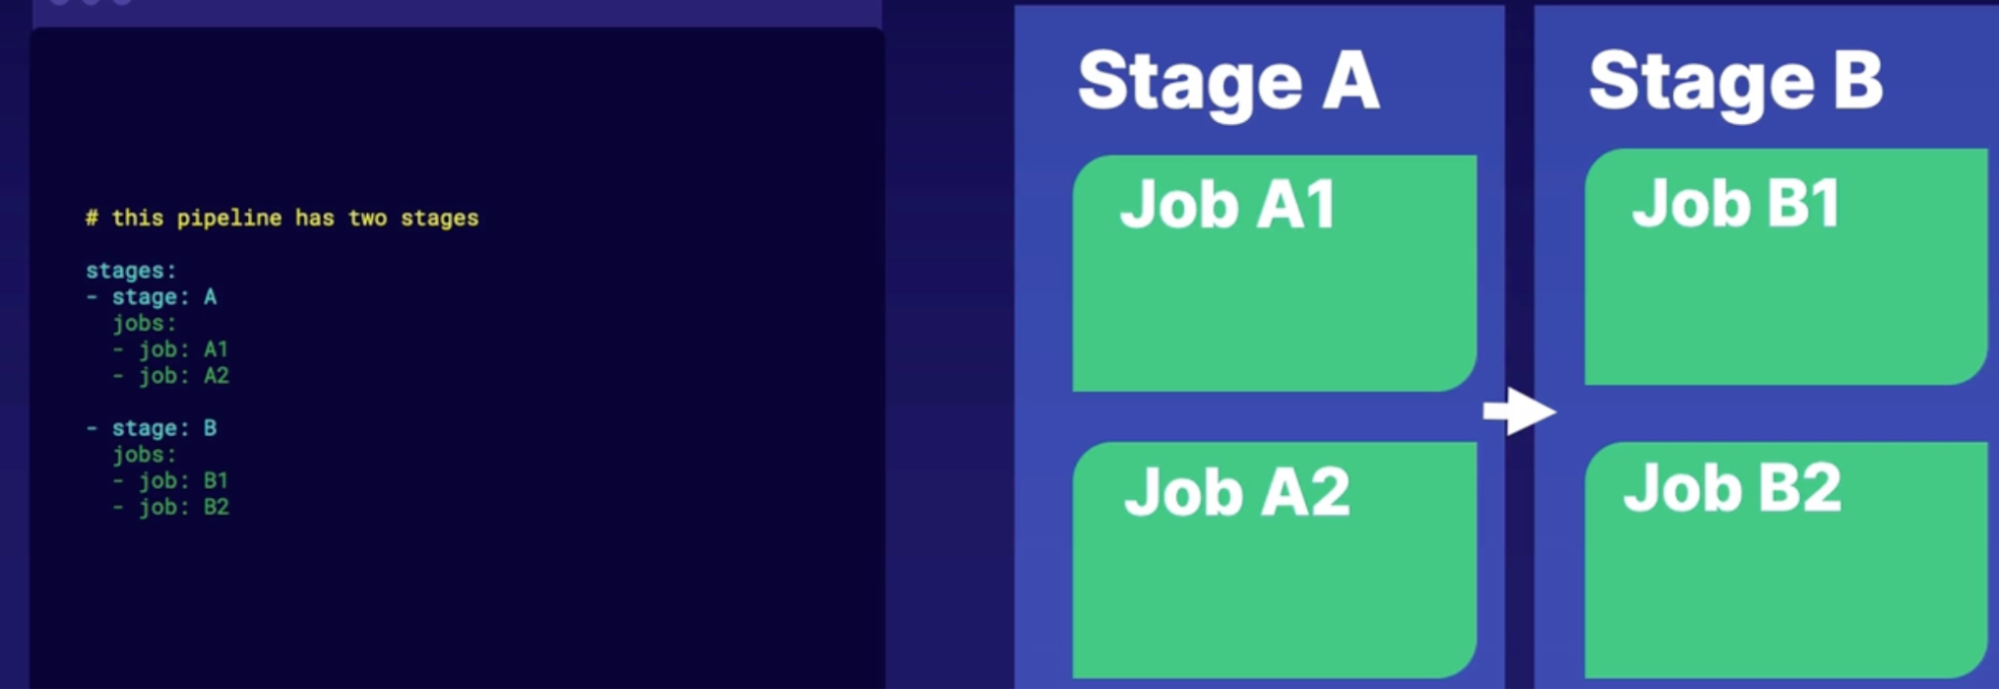
Dependencies
Properties
- dependsOn A #This stage runs after stage A
- dependsOn: [] # this stage runs in parallel to stage A
Conditions
Properties
- condition: succeeded(‘A’)
- condition: failed(‘A’)
Full stage syntax
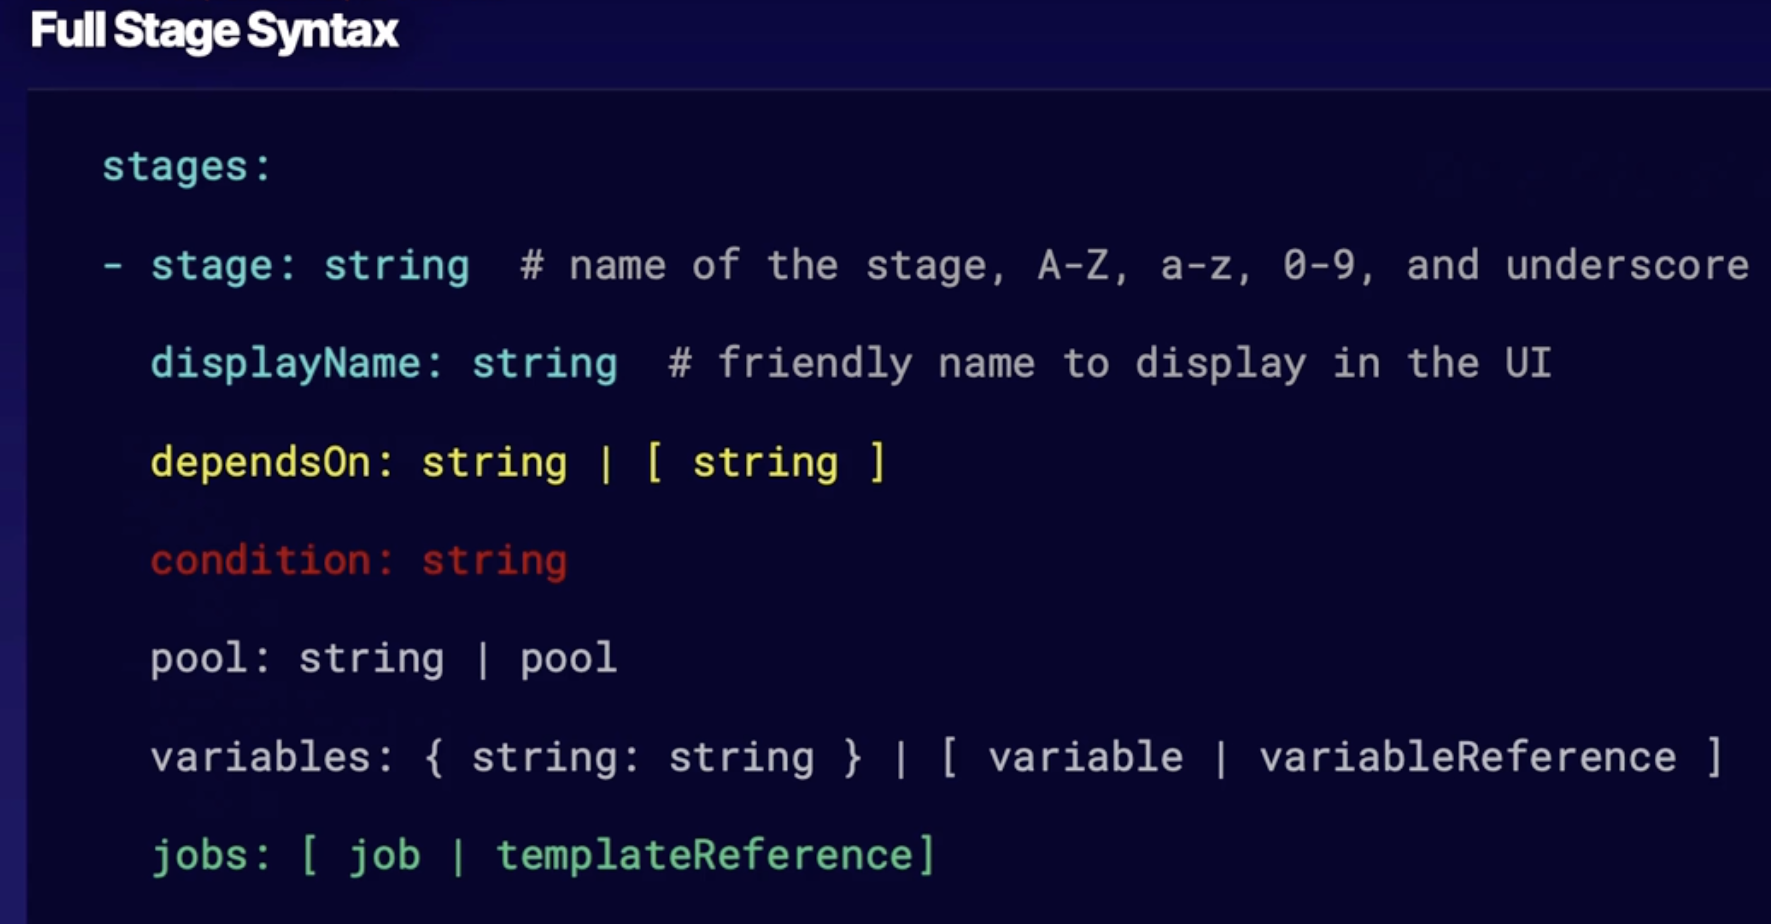
Summary
- stages organized pipeline jobs into major divisions
- dependencies are used to run stages, subsequently, in the order you specify
- conditions customize behaviors and reactions to other stages
Discovering Azure app configuration
The INI File
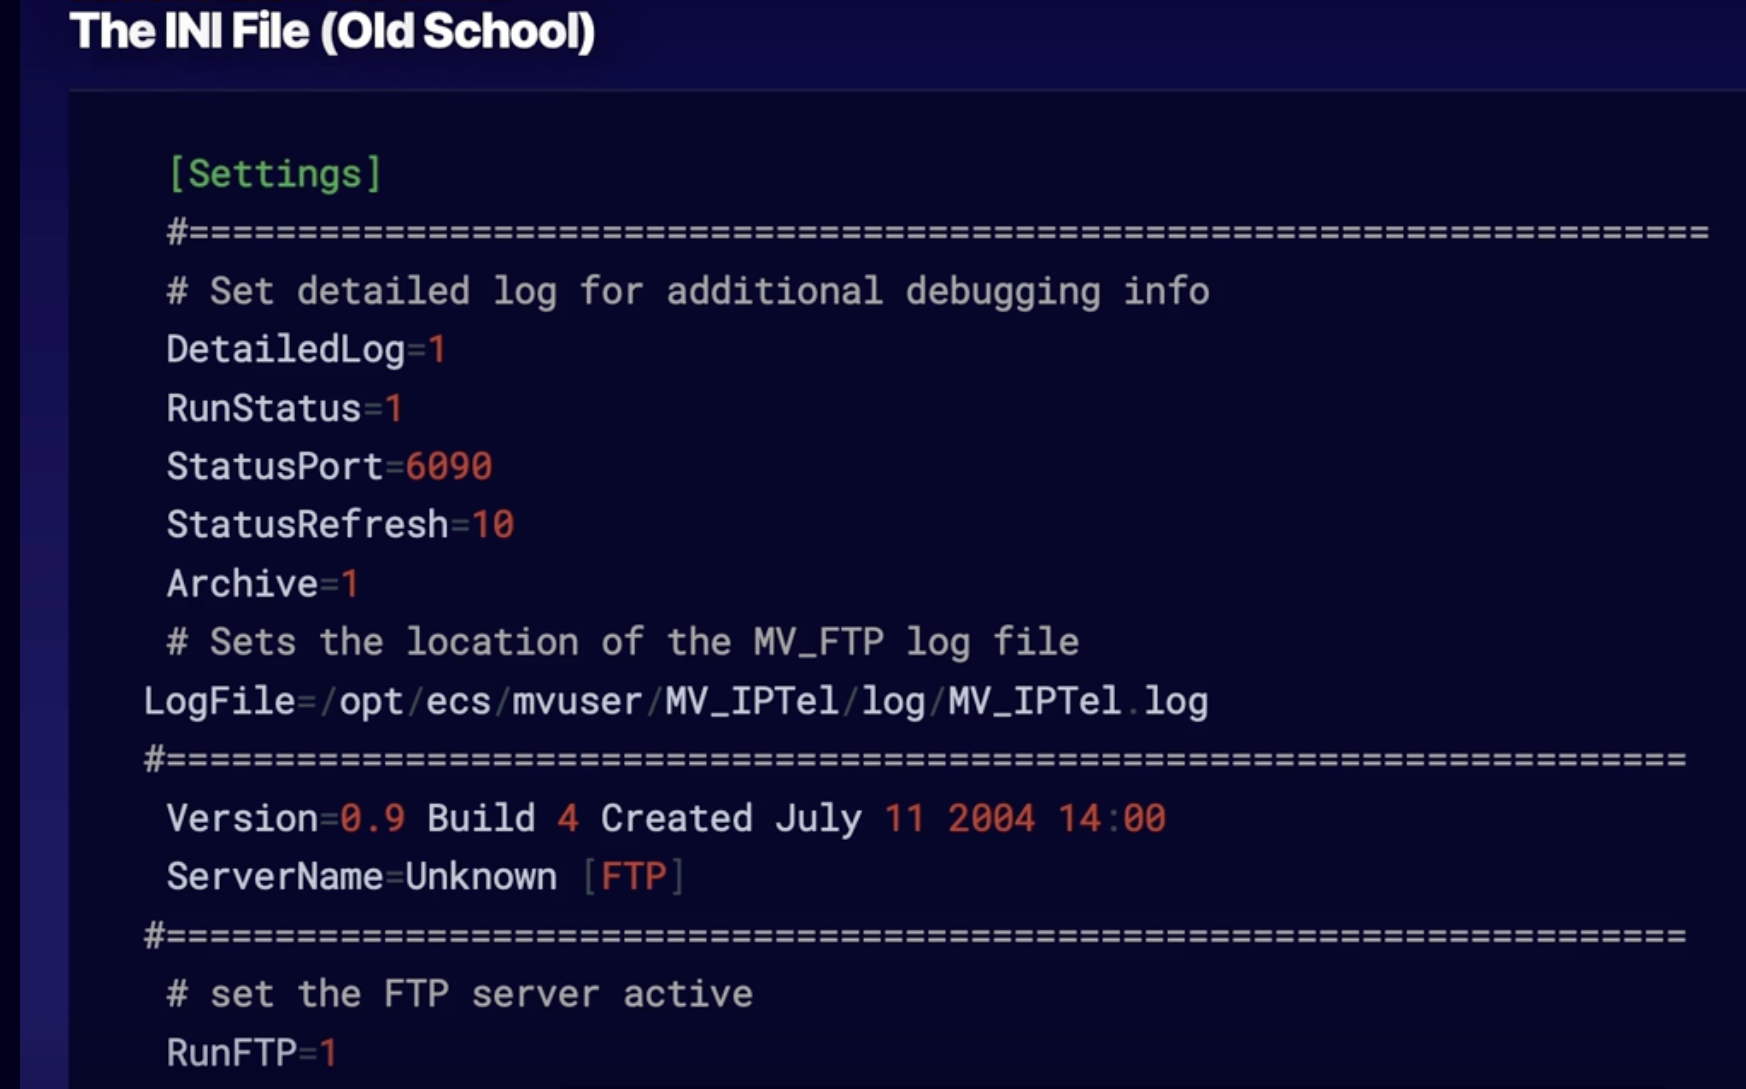
- The above old-school INI file or .INI file sat on servers.
- When server applications started up, it checked the INI file for its settings and configured itself in order to run.
How can you deploy app configurations?
Idea:
- There is an app configuration somewhere that configures servers.
- Now this works for a single server or a subset of servers.
- However, what if you need to apply that same app configuration for multiple VMs under multiple regions?
- Not going to do so good to use an INI file, user for Microservices, Azure Service Fabric, Serverless Apps, or our Continuous Deployment Pipelines
What is Azure app configuration
What
- it is a way in order to hold all of these app configurations, aptly named, and provide them to a series of Azure services.
Azure app configuration benefits
- fully managed service
- point in time replay of settings
- flexible key representations and mappings
- dedicated UI for feature flag management
- tagging with labels
- comparison of 2 sets of configurations
- enhanced security through Azure manage identities encryption of sensitive information
- native integration with popular framework
- works with Azure keyvault
Demo
objectives: create an Azure app configuration store:
Steps:
- create an app configuration store
- in Azure portal: create a resource - App Configuration
- configure settings
- access keys: use it in your code to connect to Azure app configurations
- configuration explorer
- key value: configure this
- key reference
- walk through the Key Vault options
Summary
- Application configuration settings: should be kept external to their executable and read in from their runtime environment or an external source
- Azure app configuration centrally manages application settings and feature flags
- Azure key vault: can be used in conjunction with Azure app configuration
Implementing release gates
What are gates
Gate sits between code and deployment
Gate has some sort of criteria making sure that the code is properly prepared and series of checks and balances
Scenarios for gates
incident and issues management
- seek approval outside Azure pipelines
- Quality validation
- security scan on artifacts
- user experience relative to baseline
- change management
- infrastructure health
Manual intervention and validations
two places where you can put gates
- pre-deployment conditions between code and deployment
- post-deployment conditions after the code deployment
manual interventions task pause the pipeline ensuring that somebody can get some type of work accomplished before the end of the gate
manual validation is an approval for the same thing, it will pause the pipeline until it gets a form of approval before moving on
Demo
Objective set up gates on a release pipeline
- set up gates
- on pipeline enable gates
- set up manual intervention // write instruction, notify user, reject/resume based on time
- on job, add a task: manual intervention
- set up manual validation // write instruction, notify user
- on job, add a task: manual validation
Summary
- Gates ensure the release pipeline made specific criteria before deployment
- manual intervention is a task step
- manual validation is an approval step
Summary
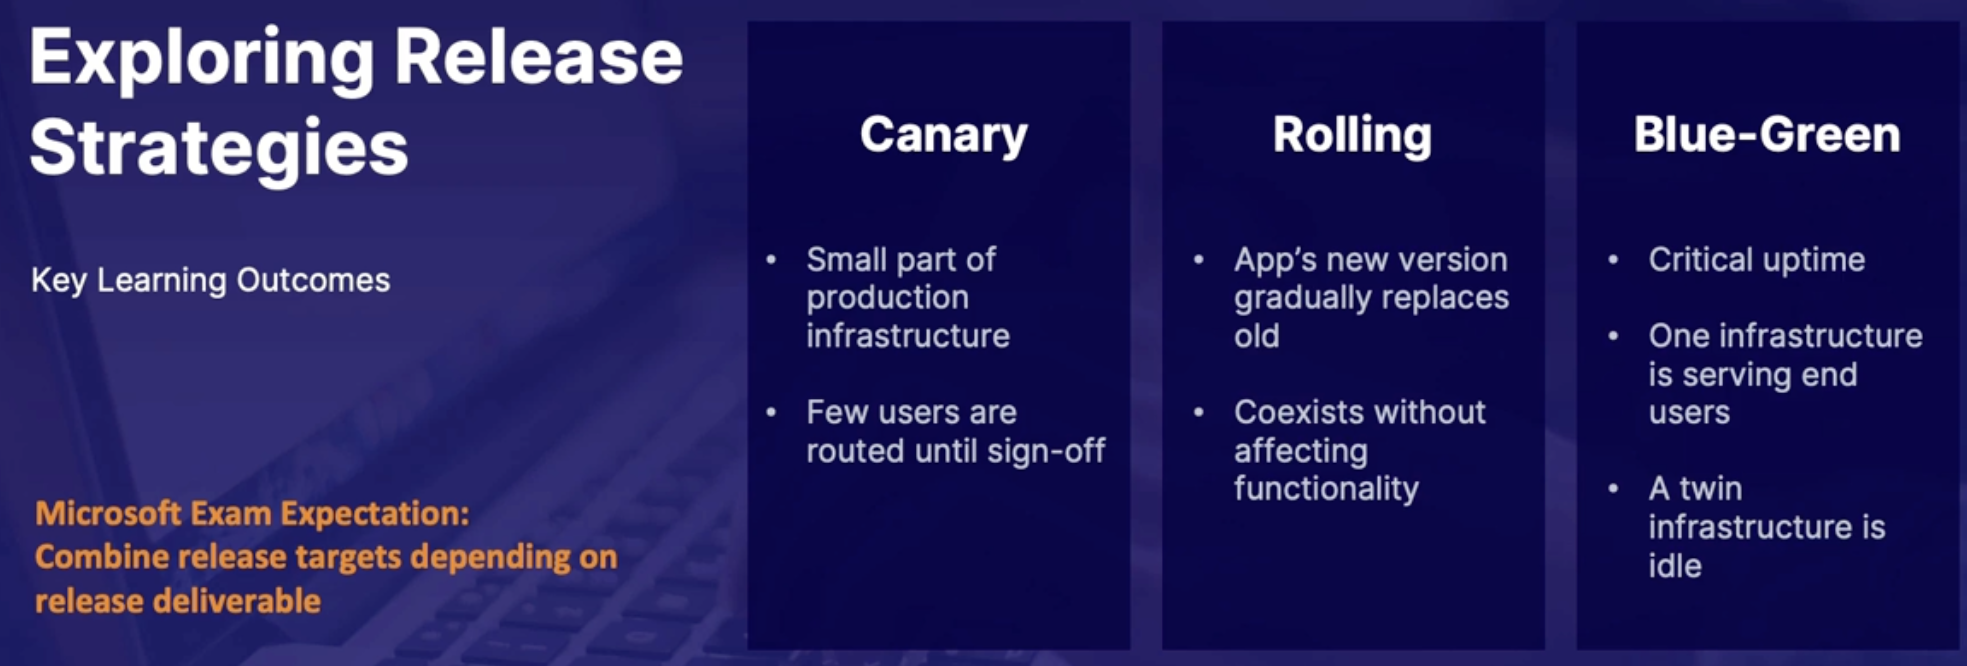
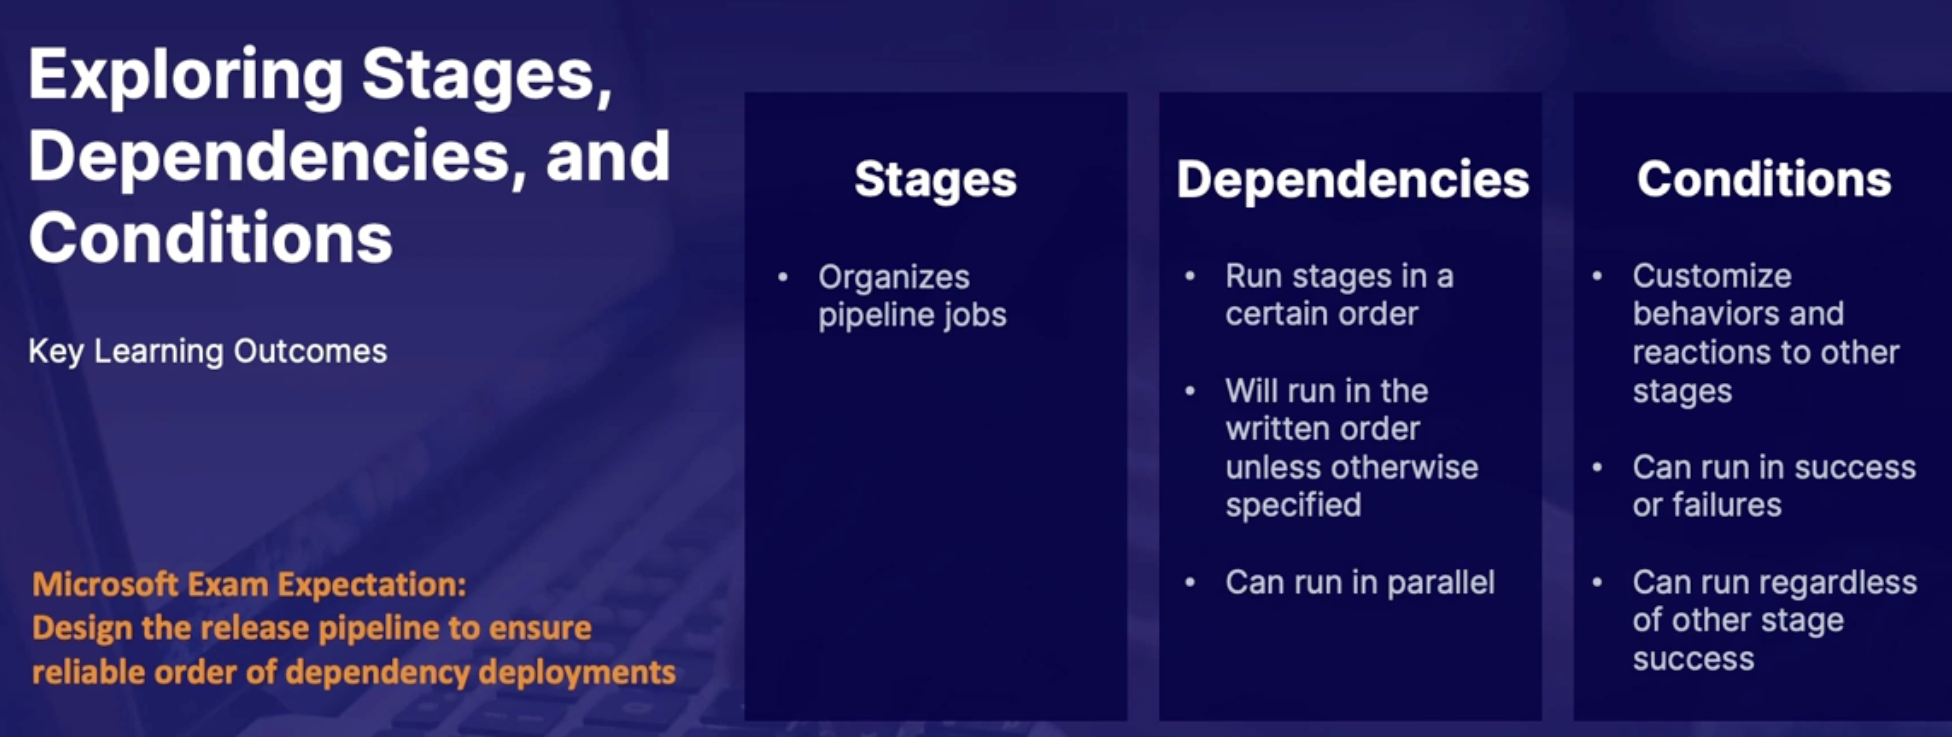
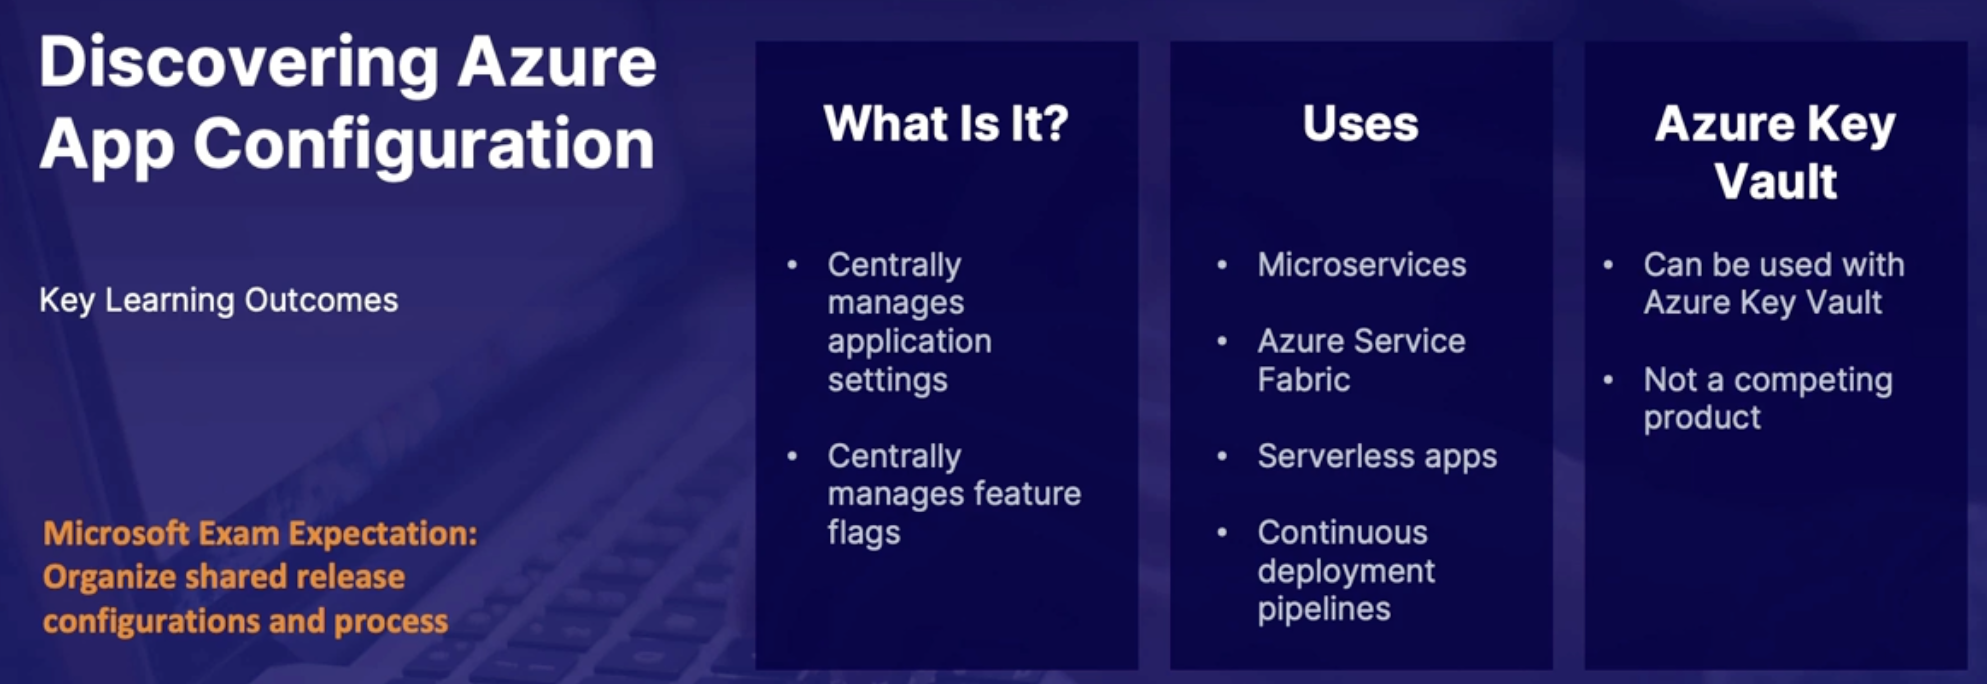
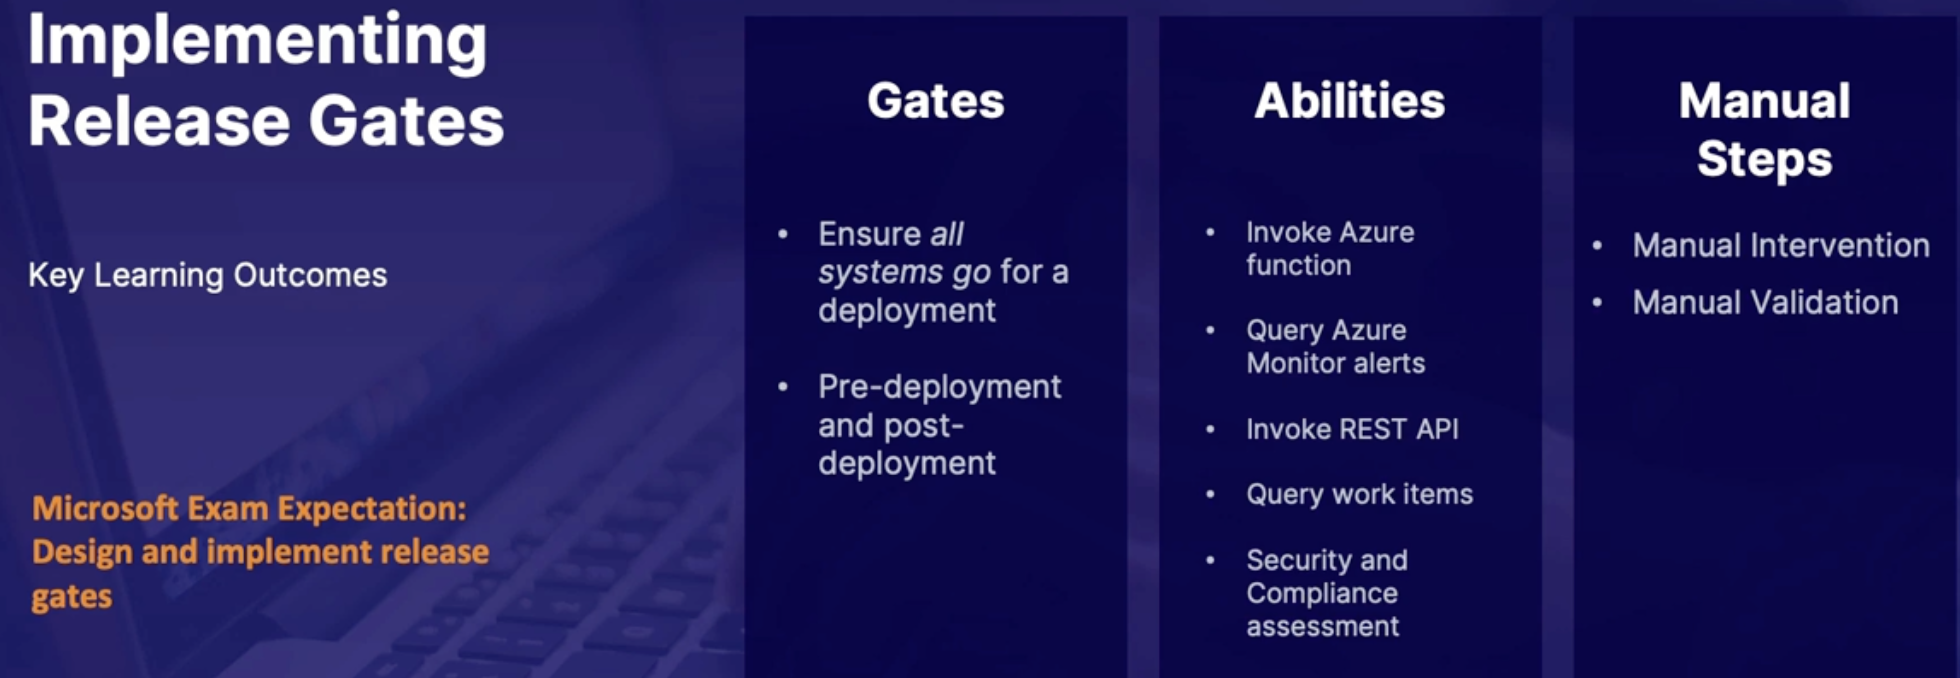
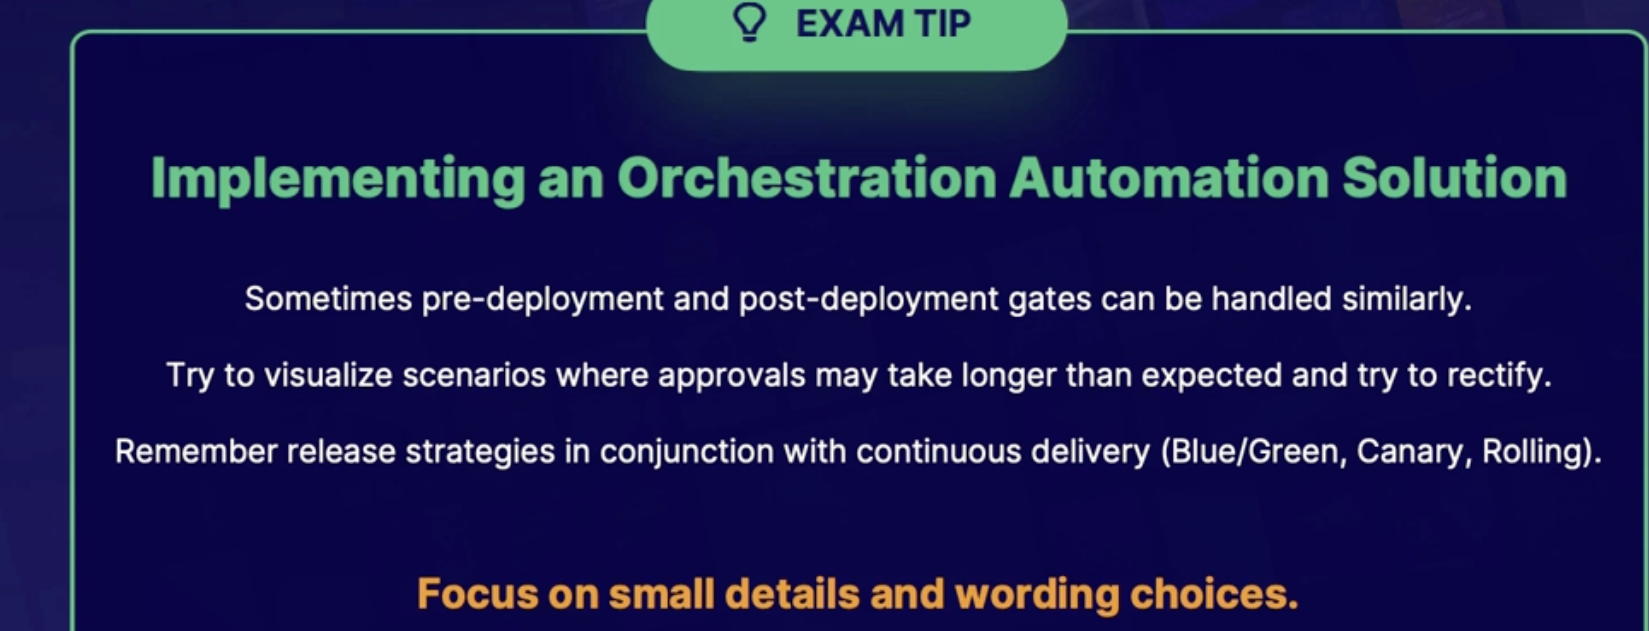
Lab: Creating a multi-stage build in Azure pipeline to deploy a .NET app
Scenario
- A.net core app needs to be deployed to Azure
- create a multistage YAML pipeline using YAML
- After the building deploy stages are complete verify you can access the application
trigger:
- stage
variables:
buildConfiguration: 'Release'
stages:
- stage: Build
jobs:
- job: Build
pool:
vmImage: 'ubuntu-latest'
steps:
- task: DotNetCoreCLI@2
inputs:
command: 'restore'
projects: '**/*.csproj'
feedsToUse: 'select'
- task: DotNetCoreCLI@2
inputs:
command: 'build'
projects: '**/*.csproj'
- task: DotNetCoreCLI@2
inputs:
command: 'publish'
publishWebProjects: true
arguments: '--configuration $(BuildConfiguration) --output $(Build.ArtifactStagingDirectory)'
- task: PublishBuildArtifacts@1
inputs:
PathtoPublish: '$(Build.ArtifactStagingDirectory)'
ArtifactName: 'drop'
publishLocation: 'Container'
- stage: Deploy
jobs:
- job: Deploy
pool:
vmImage: 'ubuntu-latest'
steps:
- checkout: none
- download: current
artifact: drop
|
Chap - 16: Planning the development environment strategy
Exploring release strategies
Deployment strategies and steps
Steps regardless what strategy you use
- enable initialization
- deploy the update
- route traffic to the updated version
- test the updated version
- in case of failure run steps to restore the last known good version
Deployment representations
you have 2 server (active/live + inactive/standby)
Deployment releases using virtual machines
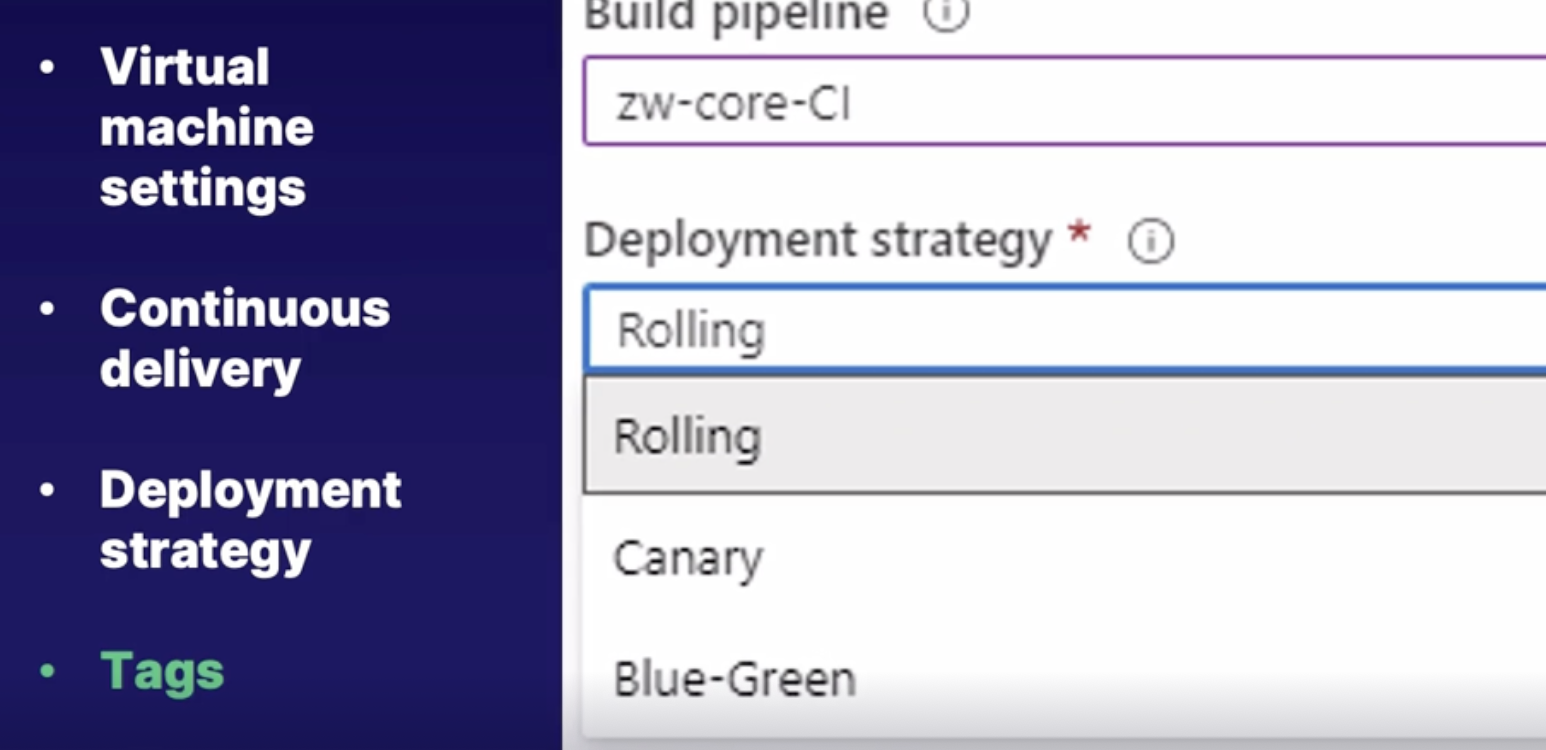
Blue - Green
- Both are identical env
- Green is standby and blue is live
- When you setting up deployment group you’ll be deploying it to the machines tagged green
- When the deployment occurs you will pause and wait for the swap to occur(making sure traffic has been routed to the green environment)
- Swap tags
Canary
- deploy canary
- pause
- deploy prod
Rolling set
- targets to deploy parallel
Deployment jobs
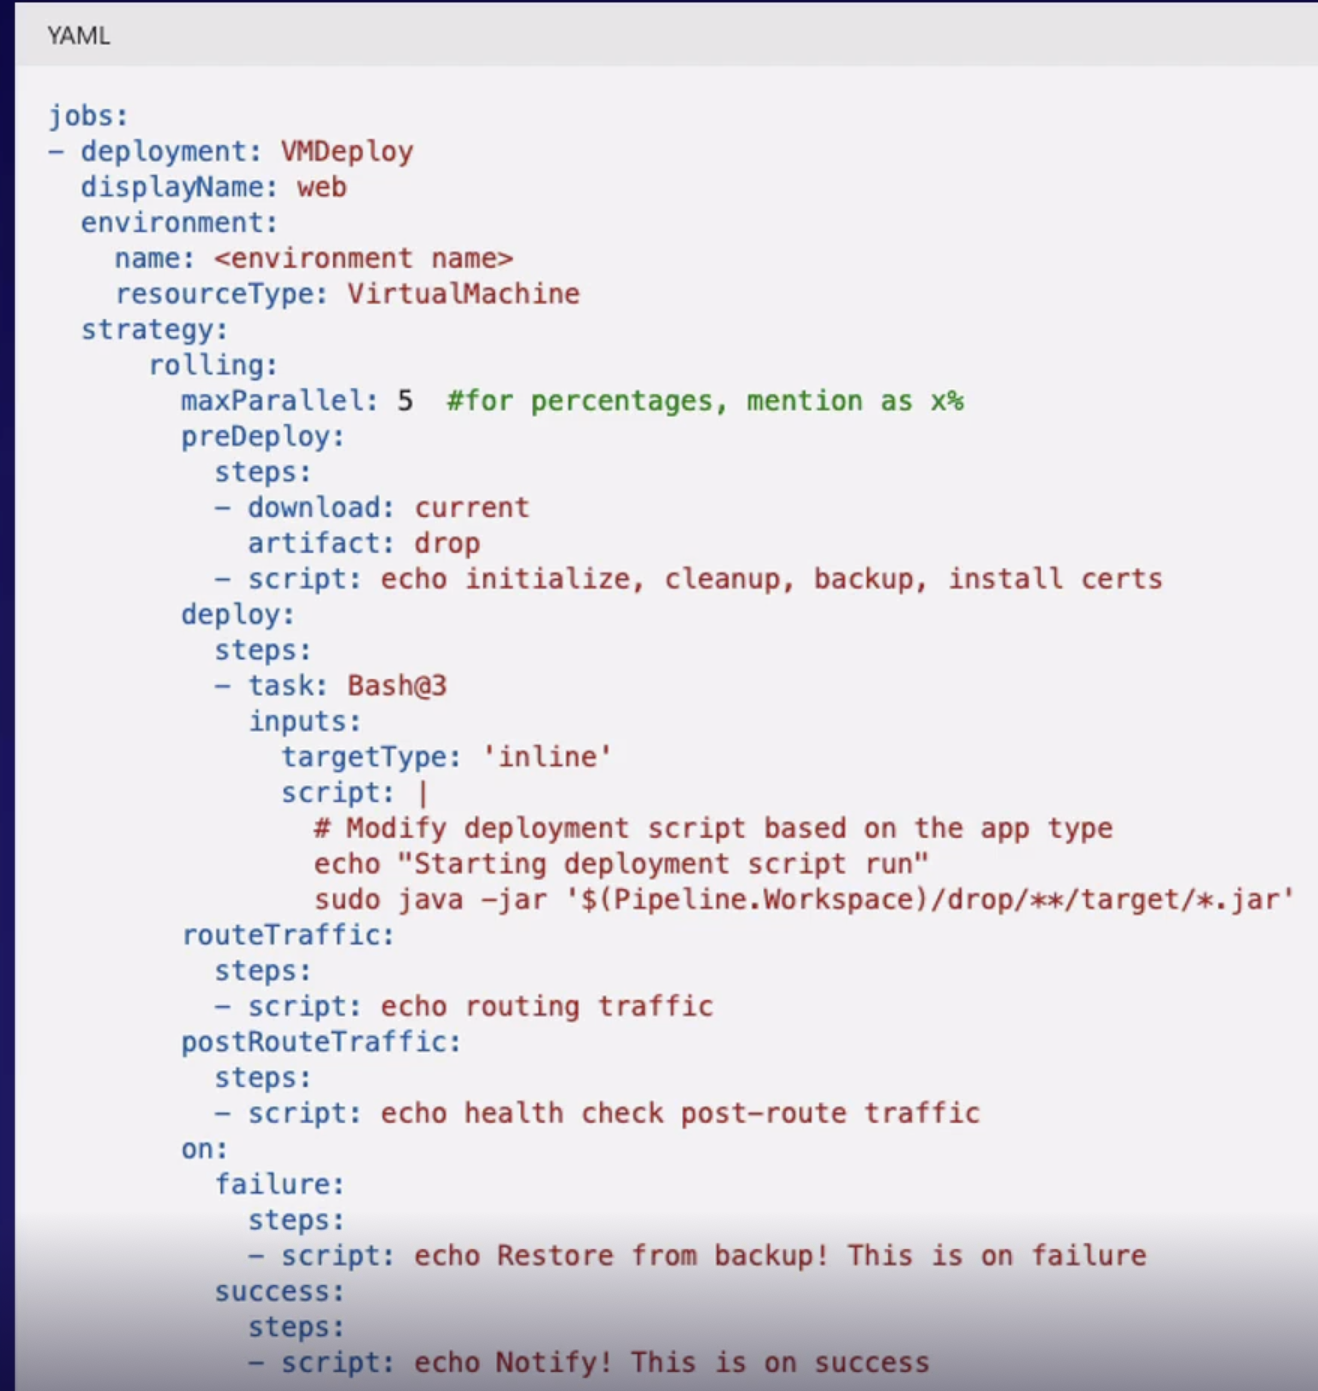
Summary
- Deployment groups are used on virtual machines with build/release agents, separated by tags
- Deployment strategies: all techniques enable initialization, deploy the update, route traffic, and test
- Deployment jobs: YAML is a very quick way to view all lifecycle hooks
Implementing deployment slot releases
What are deployment slots
Virtual machine has deployment groups = Azure webapps has deployment slots
Demo
objectives: Review deploy slots on an app service
- Open a Web app
- Under function app
- Add a slot
- Staging // will create another live app with its own hostname
- When you ready swap to staging
- Review deployment slot options
Summary
- Deployment slots: live app services with their own Hostnames
- Alternative to deployment groups: content and configuration elements can be swapped between two deployment slots
- Rolling and cannery strategies: are handled by specifying traffic % between the slots
Implementing load balancer and traffic manager releases
Load balancer and traffic manager
Load balancer: routs traffic inside a region
Traffic manager: routes traffic globally
Idea is global traffic management combined with local failover
Demo
Objectives: Azure traffic management in DevOps pipeline deployment release
- create a deployment release
- add a load balancing step
- from pipeline, add deployment group
- Job:
- add deployment group
- Restart load balancer
- Start load balancer
- Add Azure traffic manager steps
- Create a resource → traffic manager profile
- Routing method: performance
- Pipeline job/task → Azure traffic manager
what: route traffic between multiple servers
Summary
- Azure Traffic manager: global policy based routing
- Load balancer: inter-regional routing
Feature toggles
Feature flag branching
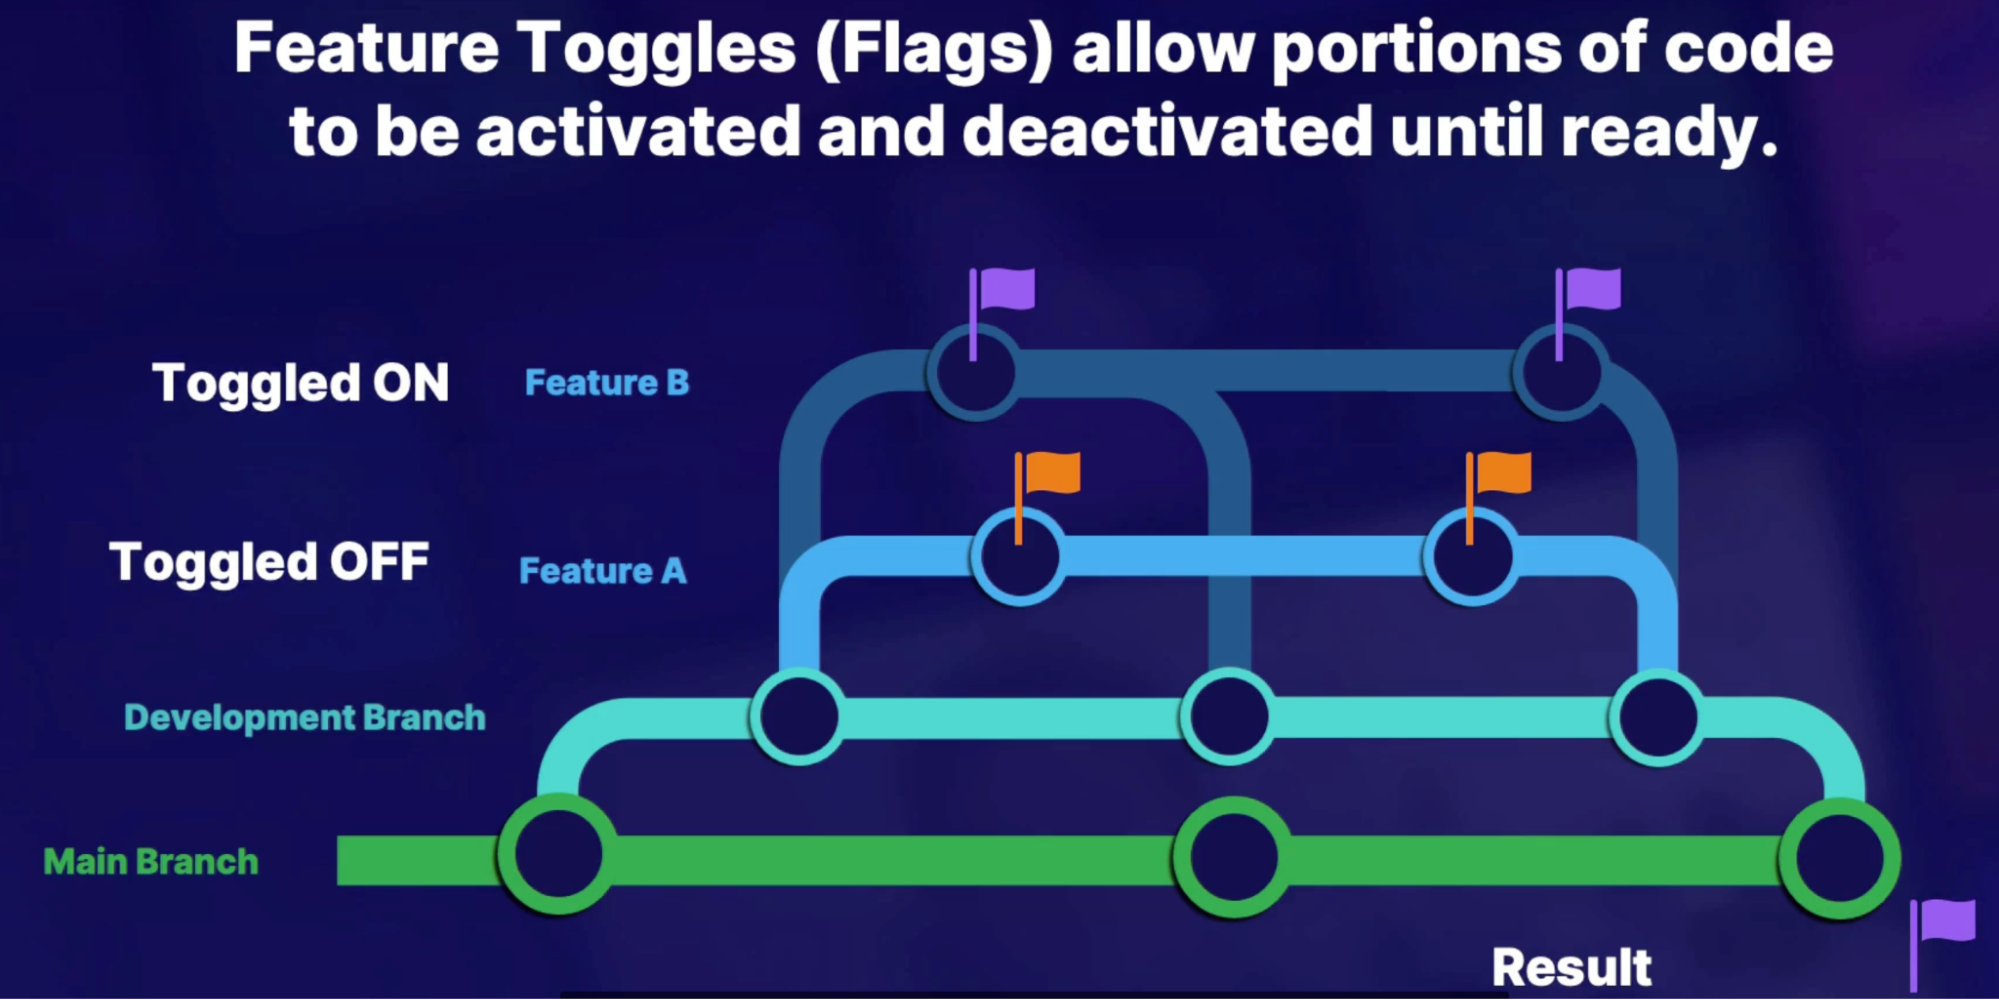
Demo
Integrate feature flags in pipeline deployment release
- integrate an app with feature flags into Azure DevOps
- Feature flag via app called launch darkly
- Add a task: launch darkly
- Set flag state: On
- Roll out feature flags in release pipeline
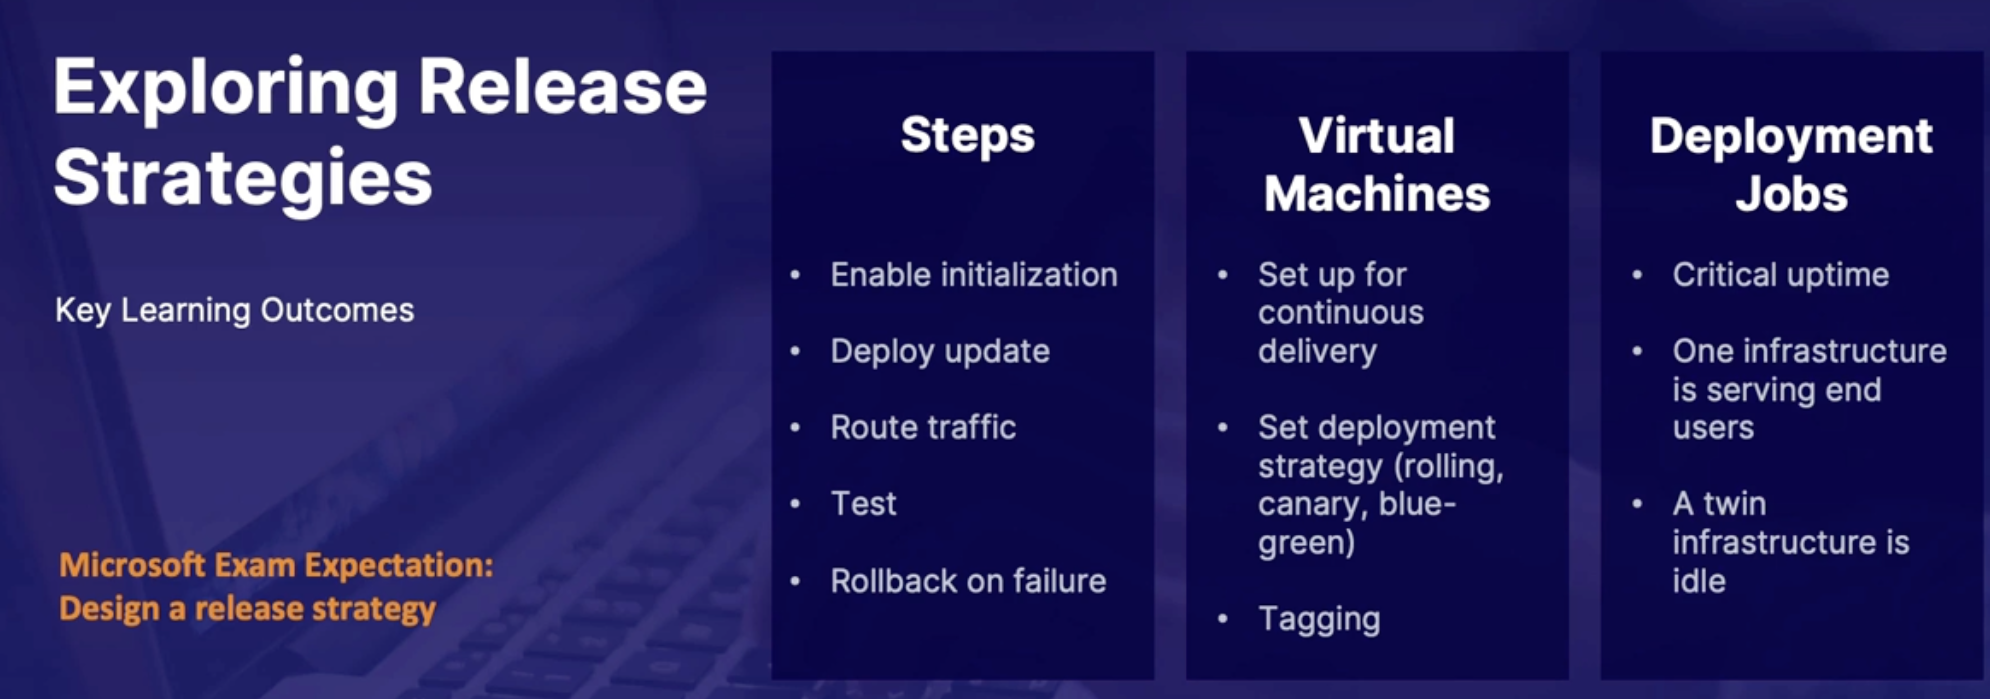
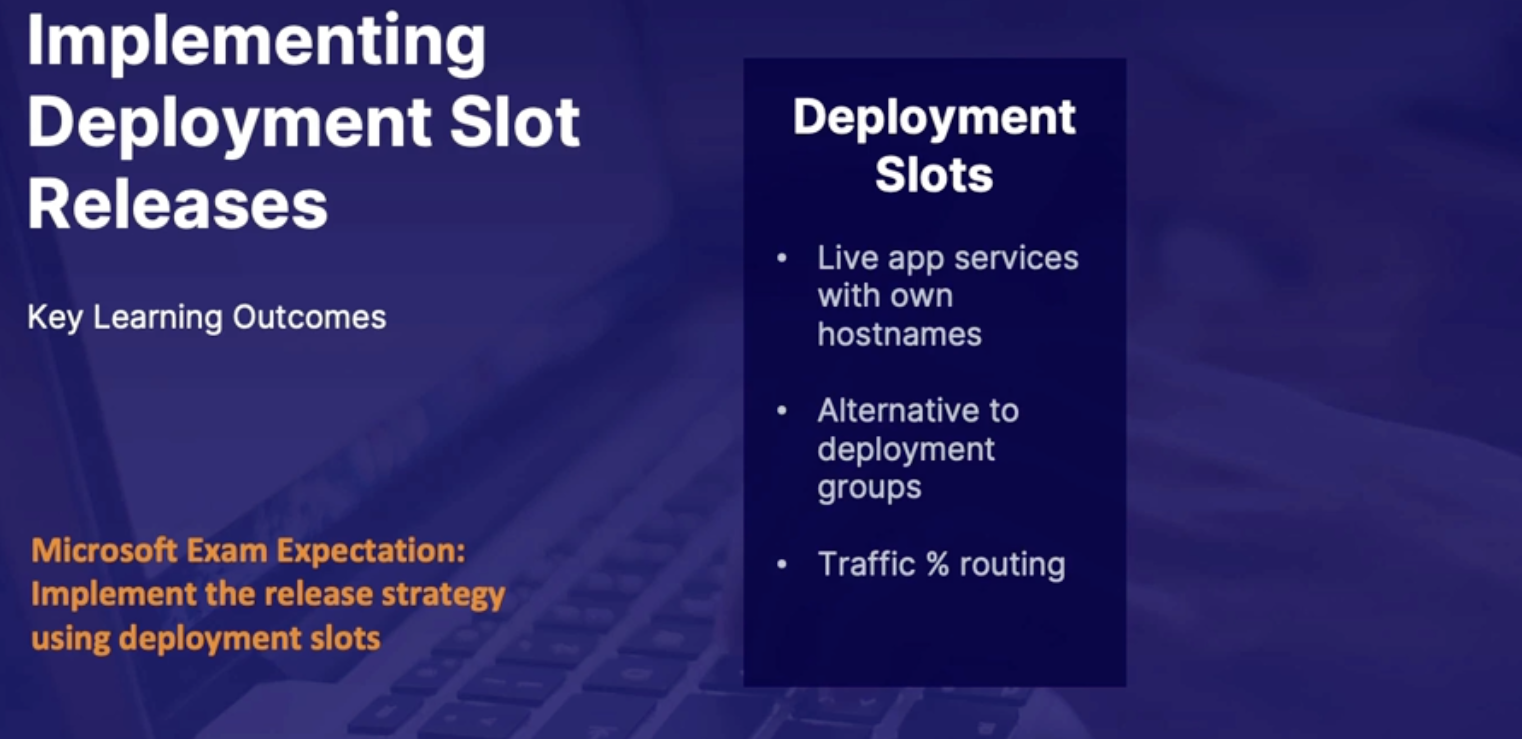

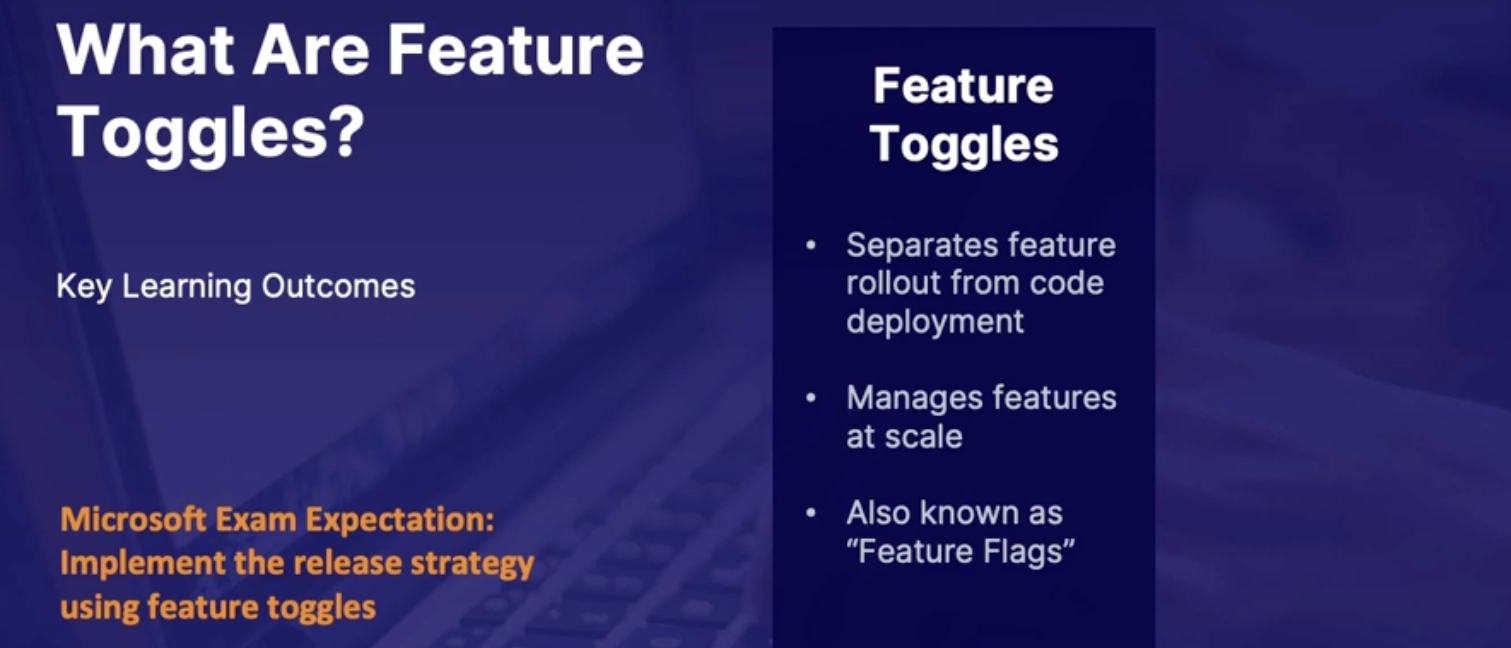
Lab: Deploy a node JS app to a deployment slot in Azure DevOps
Chap - 17: Designing an Authentication and Authorization Strategy
Azure AD Privileged Identity Management(PIM)
Why use Privileged Identity Management?
- We have a person that has privileges/access to resources.
- Now what if an Intern get access to production resources, it may cause a failure if the person don’t know what his doing
- we could have a breach type environment where somebody is pretending to be somebody else and still having those administrative rights over production resources.
Idea
- The idea of Privileged Identity Management is to limit access to secure information or resources.
What is PIM?
- It's a service inside of Azure Active Directory that enables management, control, and monitoring of resource access.
What does it do?
- Just in time: enables just-in-time privileged access to Azure Active Directory and Azure resources
- Time bound: can assign time-bound access to resources using start and end dates
- Approval: can require approval to activate privileged roles
- Multi-factor: enforce multi-factor authentication to activate any role
- Justification: can provide justification and enforce justification to understand why users activate.
- Notification: notifications for when privileged roles are activated
- Access review: can conduct access reviews in order to ensure users still need the roles that have been assigned to them
- Audit history: can have audit history where you can download for internal or external audits
How does it work?
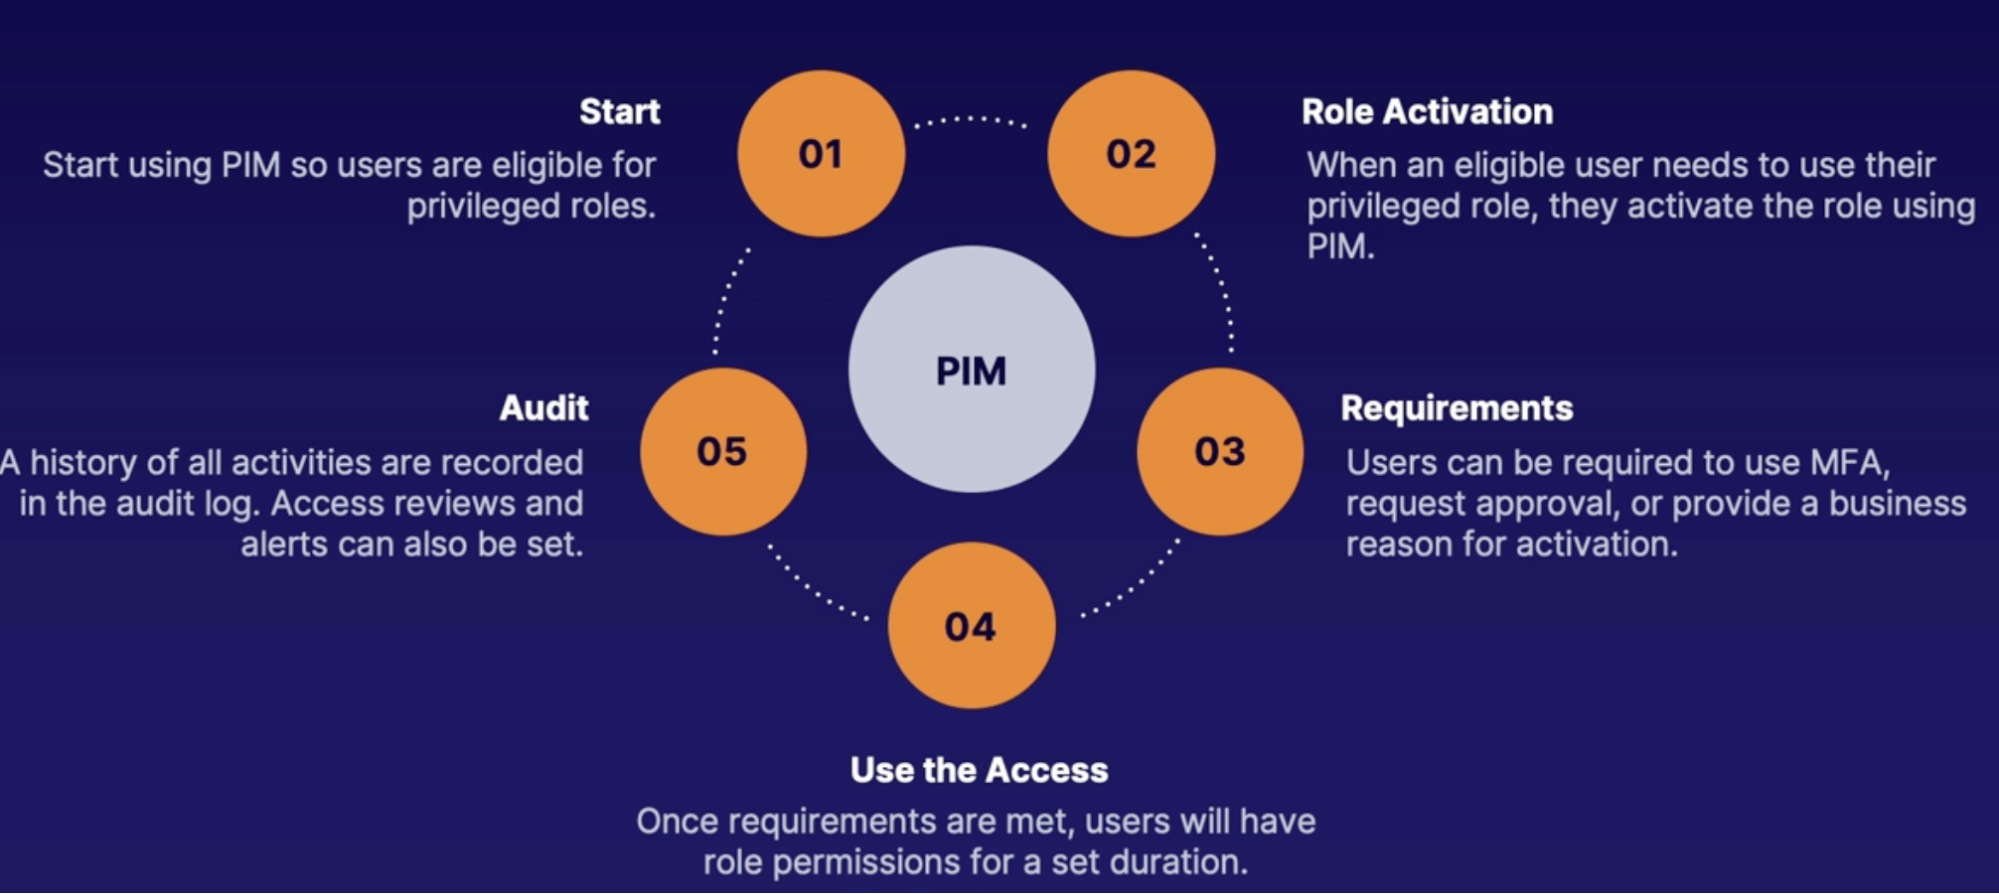
Summary
- Privileged identity management: enables management, control and monitoring of resource access
- Azure AD integrated: this service is part of Azure AD
- Activation you can require MFA, approval and justifications
Azure AD conditional access
Why use conditional access
Signals: In order for a person to access resources, it can send out a signal.
Example
- an access attempt on a non-compliant device(signal) for Office 365(resource)
- a non-work location trying to access a business-critical server.
Idea
- is that we want to make decisions on signals to enforce security policies.
What is Azure AD conditional access
- It is a service in Active Directory
- It uses if-then statements to enforce actions.
- You start with a signal. You use the if-then statement to make a decision and enforce those actions.
What does it do
For common signals we have
- membership,
- location,
- device/application usage,
- real-time risk analysis.
For Common decisions are to
- block access
- grant access,
- conditionally grant using something like multi-factor authentication.
How it works
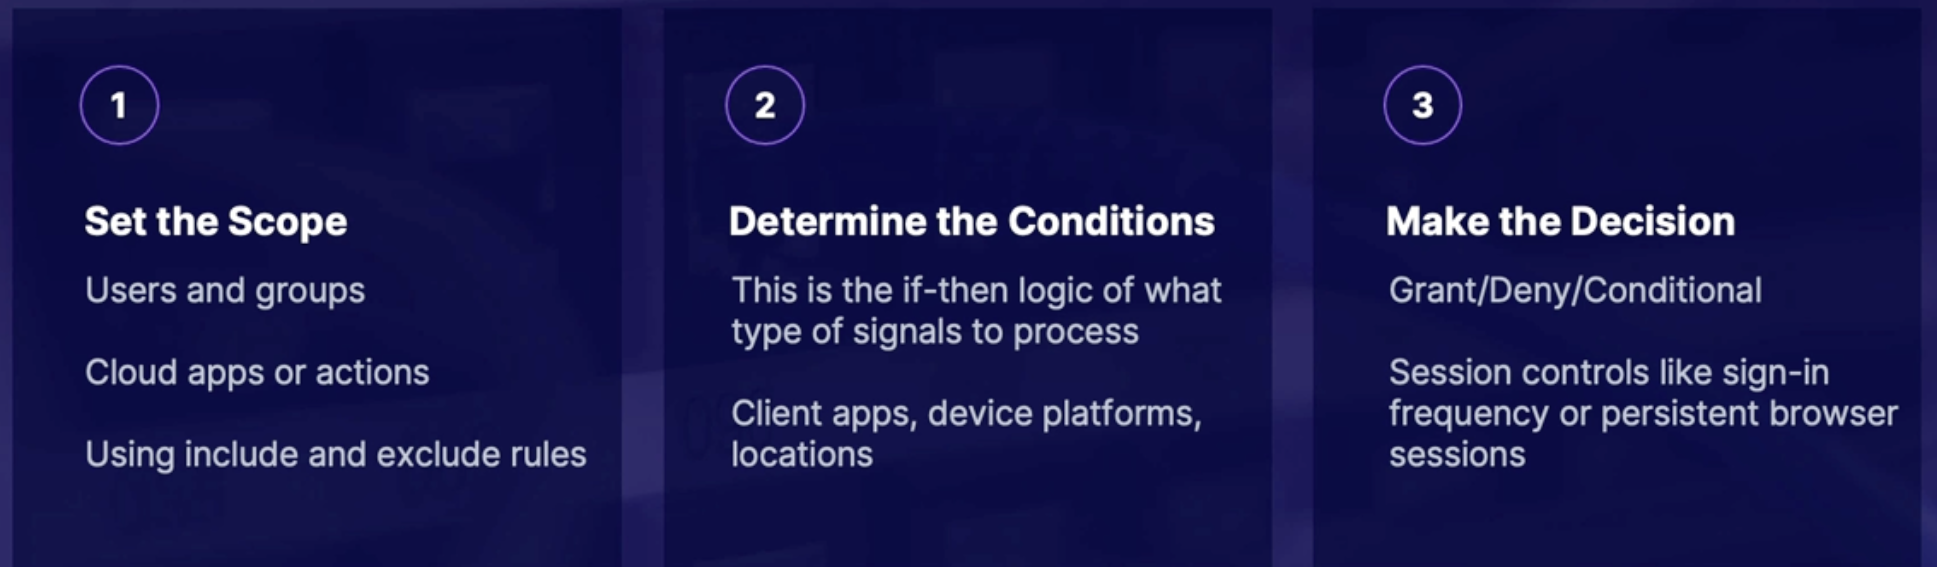
Summary
- what it is: a set of if-then statement policies that enforce actions
- anatomy: signals, decisions,and enforcement
- common signals: membership, location, device, or application, and real-time risk analysis
Implementing multi factor authentication(MFA)
What is MFA
- Determine person is real that access the resources
- 3 way you can determine you’re the right person
How it works & Available verification methods
- Something you have // MS Auth app, OAUTH Hardware token, SMS, Voicecall
- Something you are // FINGERPRINT
- Something you know // password
Enabling multifactor authentication
Signal → decision → enforcement
Demo
Objective: Enable MFA for Azure DevOps
- create a conditional access policy
- in Portal → Azure AD → security → conditional access
- Create a new policy
- Configuration
- User and groups
- Cloud apps: office 365
- Condition: device platform - IOS
- Grant access: require MFA
- Session: don’t need
- require MFA for web access
Summary
- enabling MFA: create a conditional access policy with grant conditions
Working with service principals
Using service accounts in code
What:
- there are multiple other resources/services that are needed in order to make that app work.
- order to access those other resources, you need some type of configuration file that contains a service account and credentials.
- proxy account: in order to access those resources for us without giving up too much information.
What are Azure service principles

How to access resources with service principals
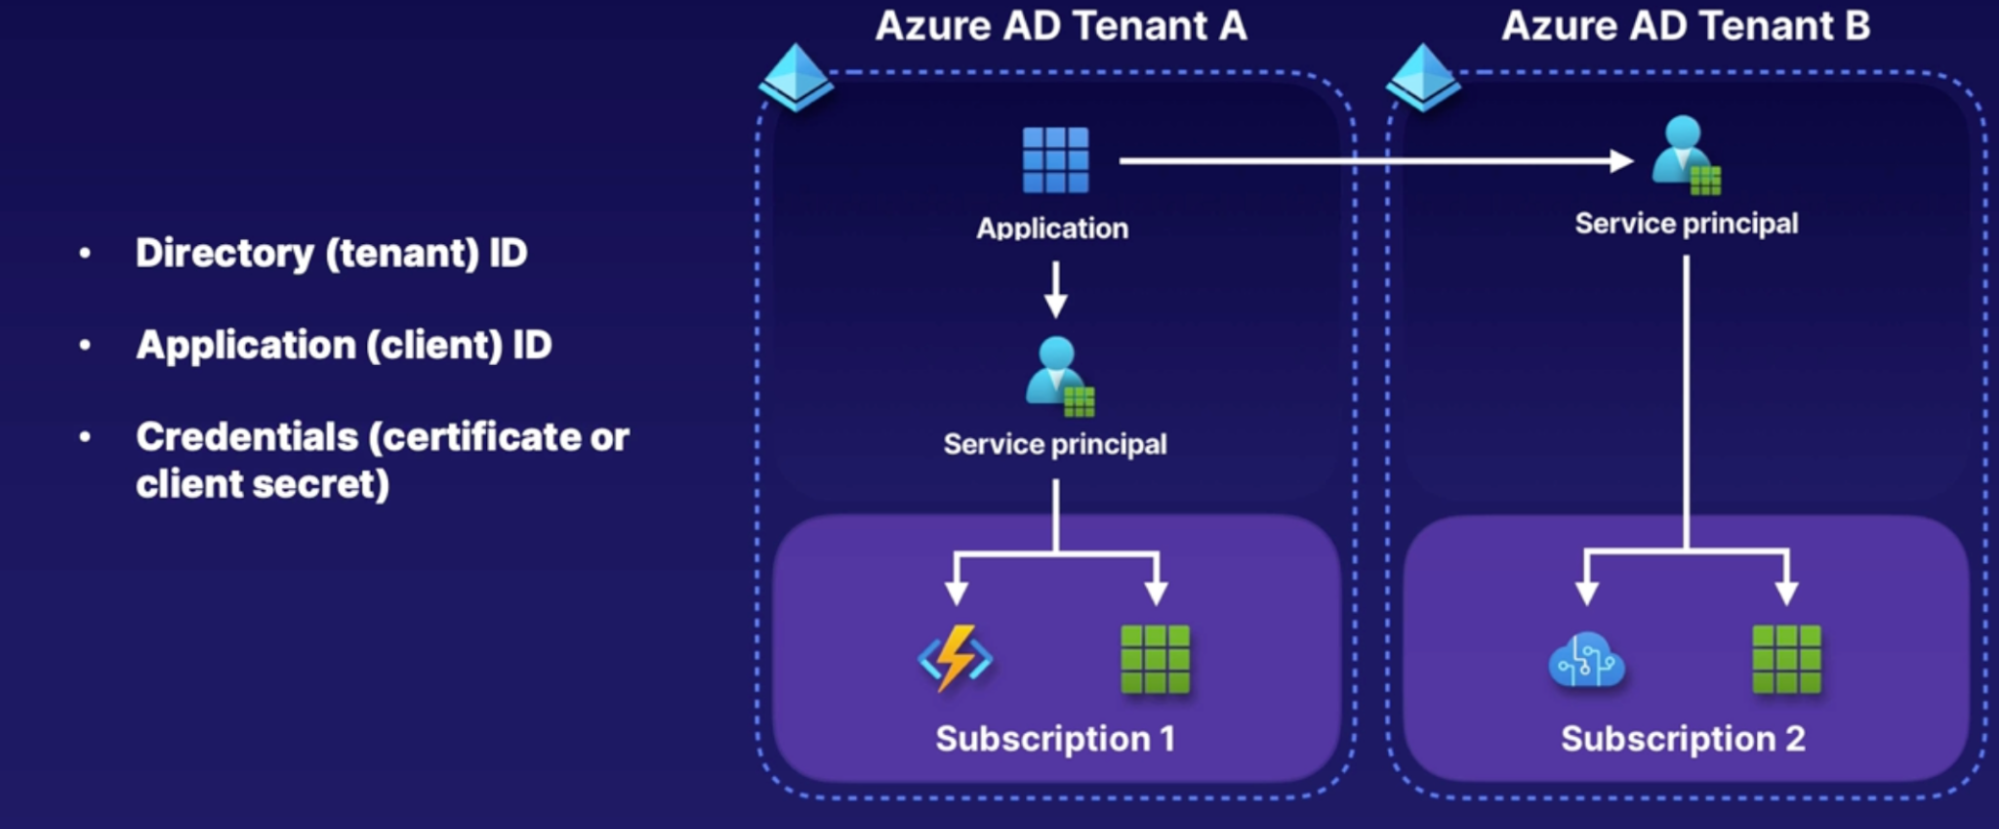
Summary
- Service principal: a proxy account or identity for an app or service
- Requirements: directory (tenant) ID, application (client) ID, and credentials
Working with managed identities
What is managed service identity (MSI)
Source and Consumer model:
- we have Azure resources that are assigned a managed identity,
- and on the right, we have the consumer resources that are going to support authentication from Azure AD so that you can access an additional resource.
2 types of MSI
- System managed identity
- it's tied to your application resource, and is deleted if your app is deleted.
- each app can only have one system-assigned identity
- User assigned identity
- Standalone - can be assigned to your application resource.
- The app can have multiple user-assigned identities
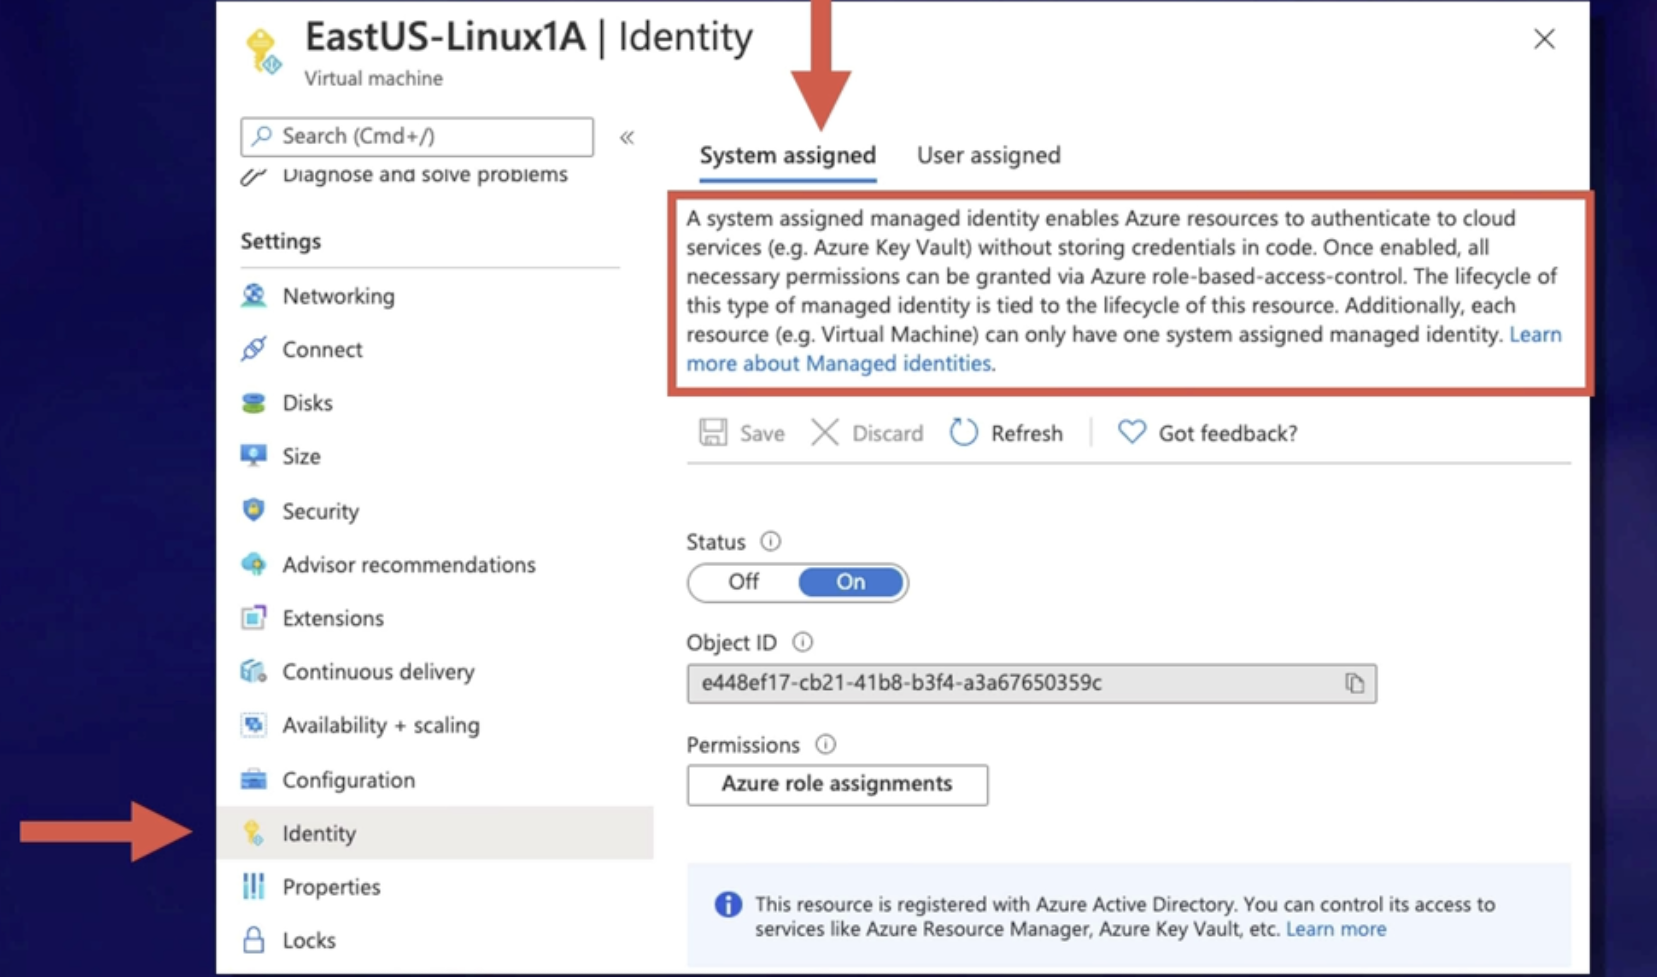
Demo
Objectives: Create a system and user managed identity in Azure
- assign a system managed identity to an Azure VM
- add role assignments
- add a user managed identity
Summary
- Managed identity: in Azure resource identity that allows access privileges to other Azure resources
- System managed identity: tied to your resource or app and is deleted if the resource is deleted
Using service connections
What is it
When you want to access other/remote services you need service connection to be able to access that remote service
Demo
Objectives: manage service connection in Azure DevOps
- create, manage, secure and use service connection
Summary
- Service connection: enables a connection to an external or remote service do execute tasks in the job
Incorporating vaults
What are key vaults
Key Vaults To
- store secret (password,API keys, tokens)
- Key management(data encryption)
- Certificate management (traffic encryption)
Azure key vaults
stores secrets and make them available to consumer like a Azure DevOps pipeline
Azure key vault using a DevOps pipeline
to connect Azure DevOps to Key vault we need service principal
Azure DevOps Phil connect to service principal, obtain the secret, and use it to deploy targets
Using HashiCorp Vault with Azure Key vault
Hashi Corp. vault can automatically generate service principles and use for Azure DevOps
you can’t use Hashi carpool vault and Azure Key Vault together
Demo
Objectives: use Azure Key Vault in a pipeline
- create a key vault
- configure service principal
- retrieve secret in a Azure pipeline
Summary
Lab: Read a secret from an Azure key vault in Azure pipelines
Summary
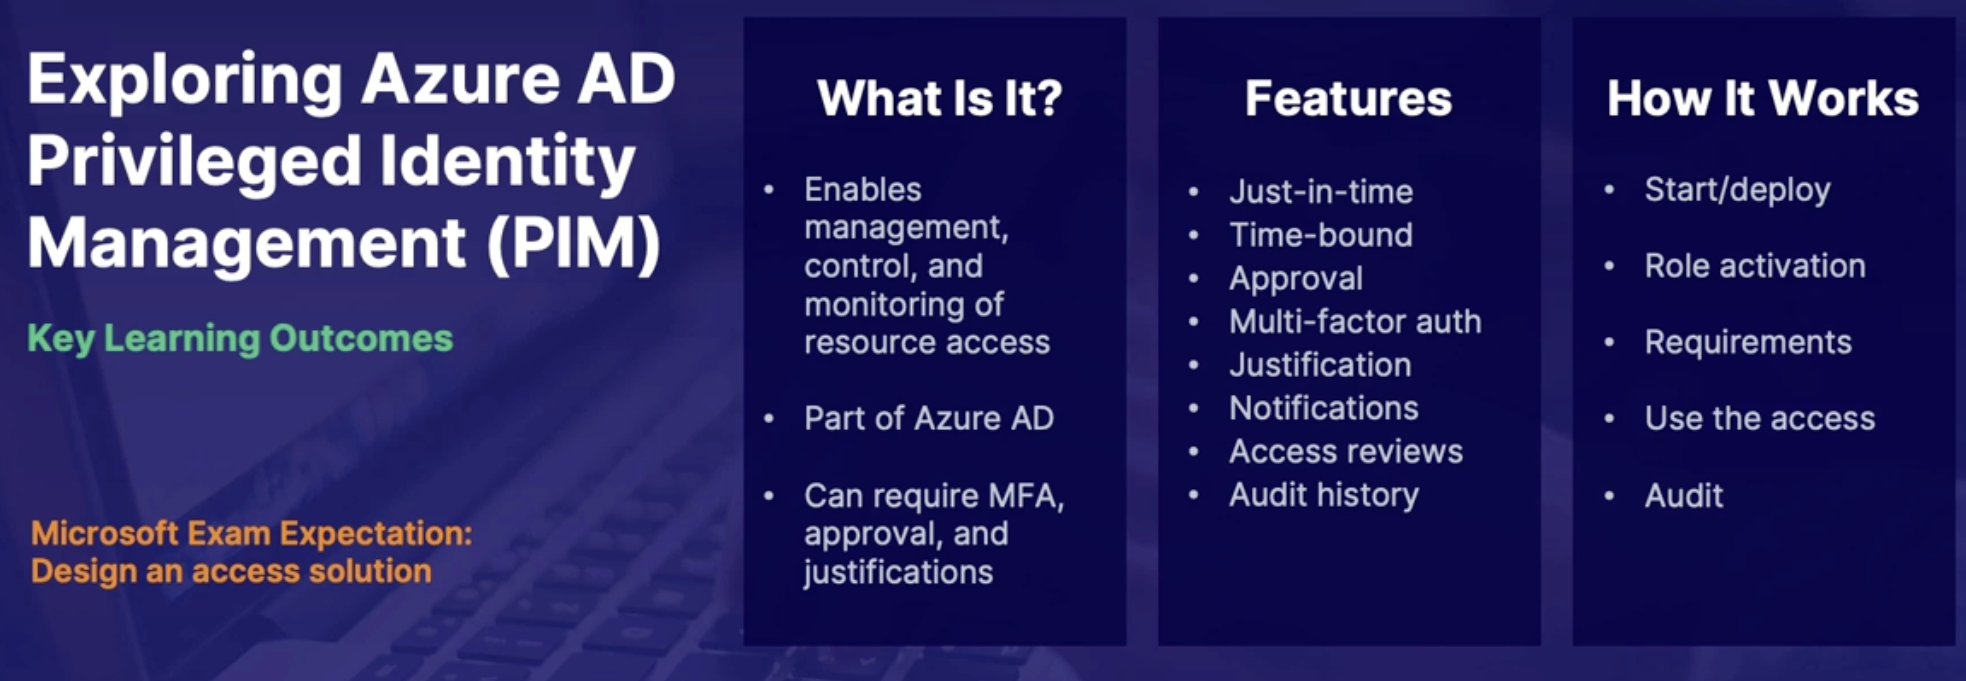
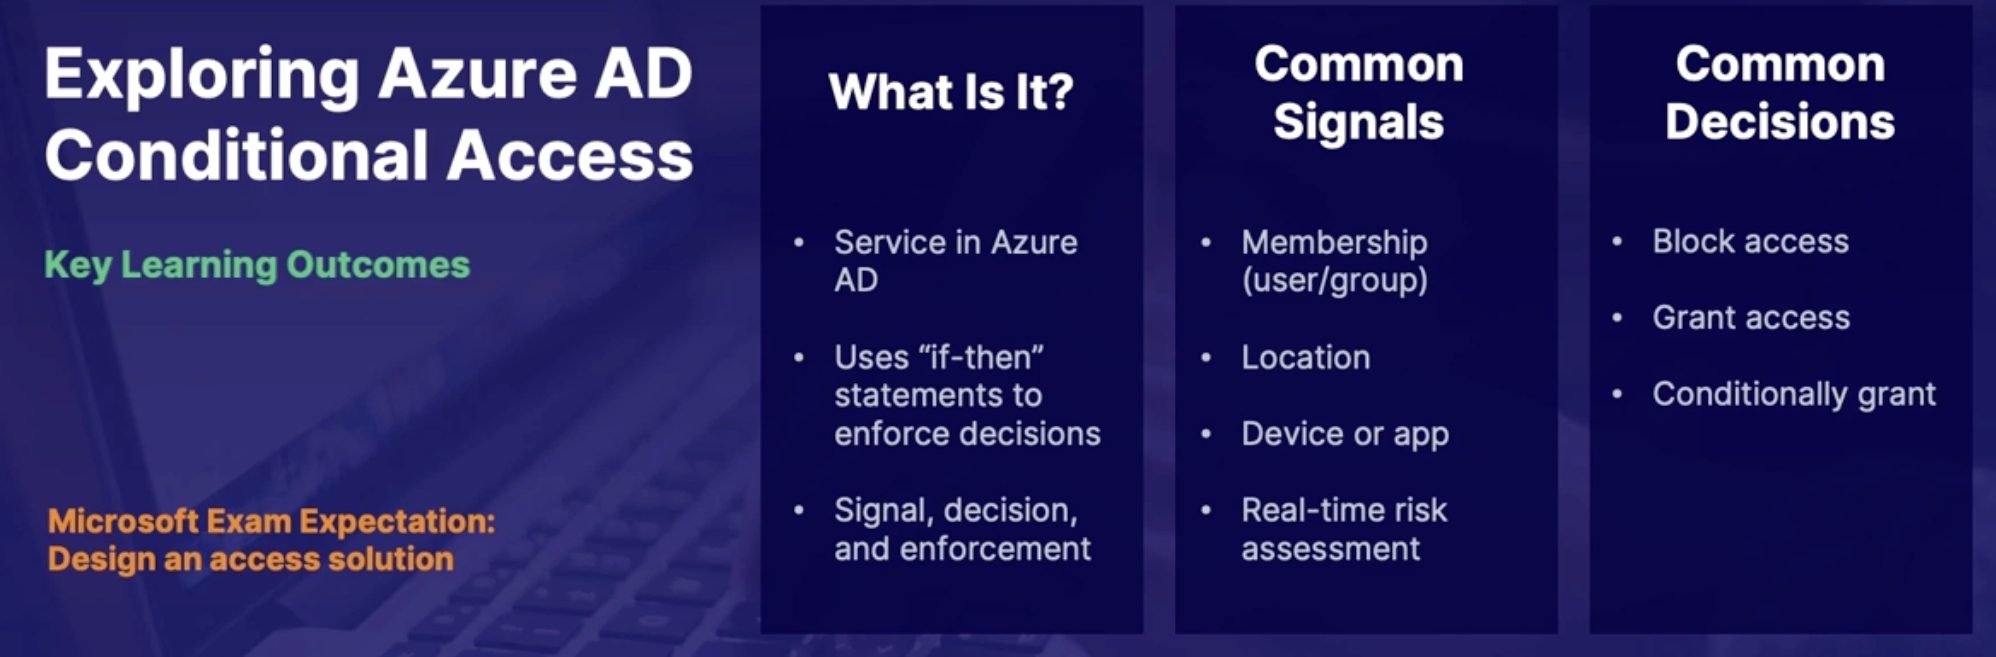
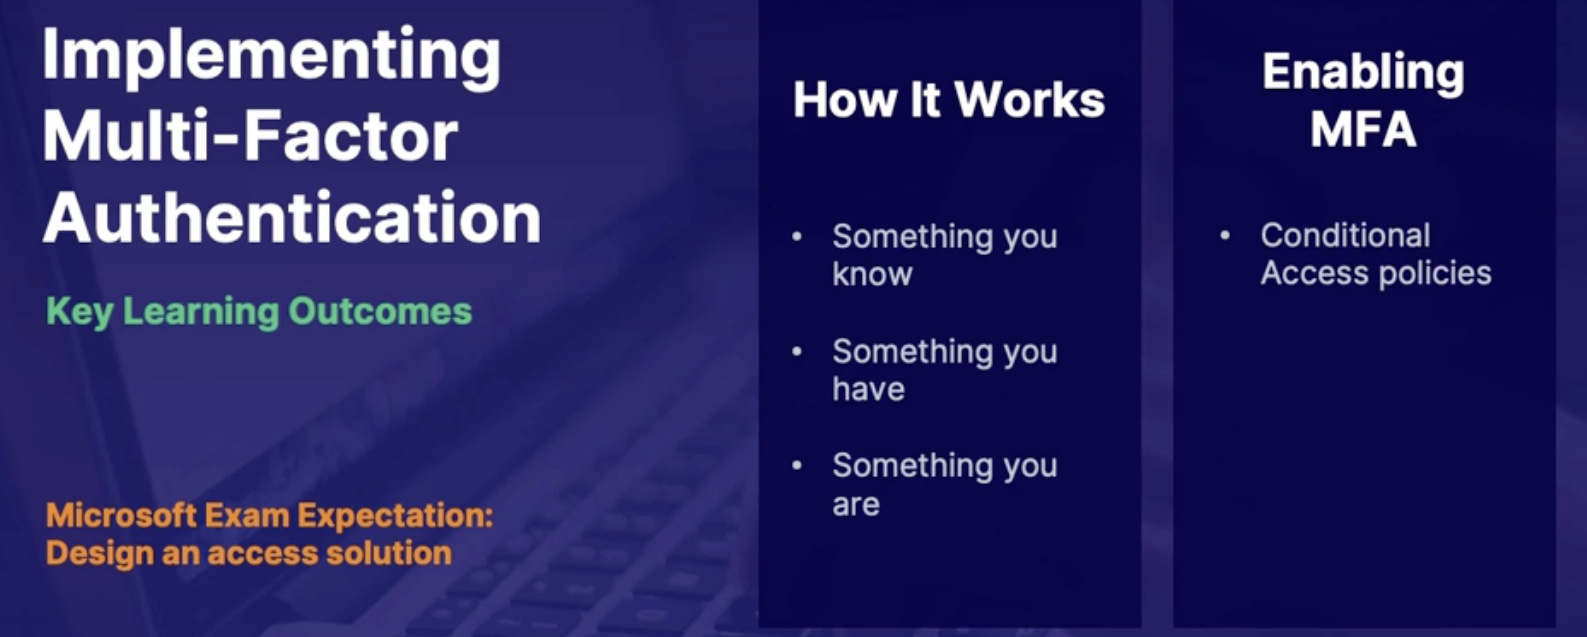

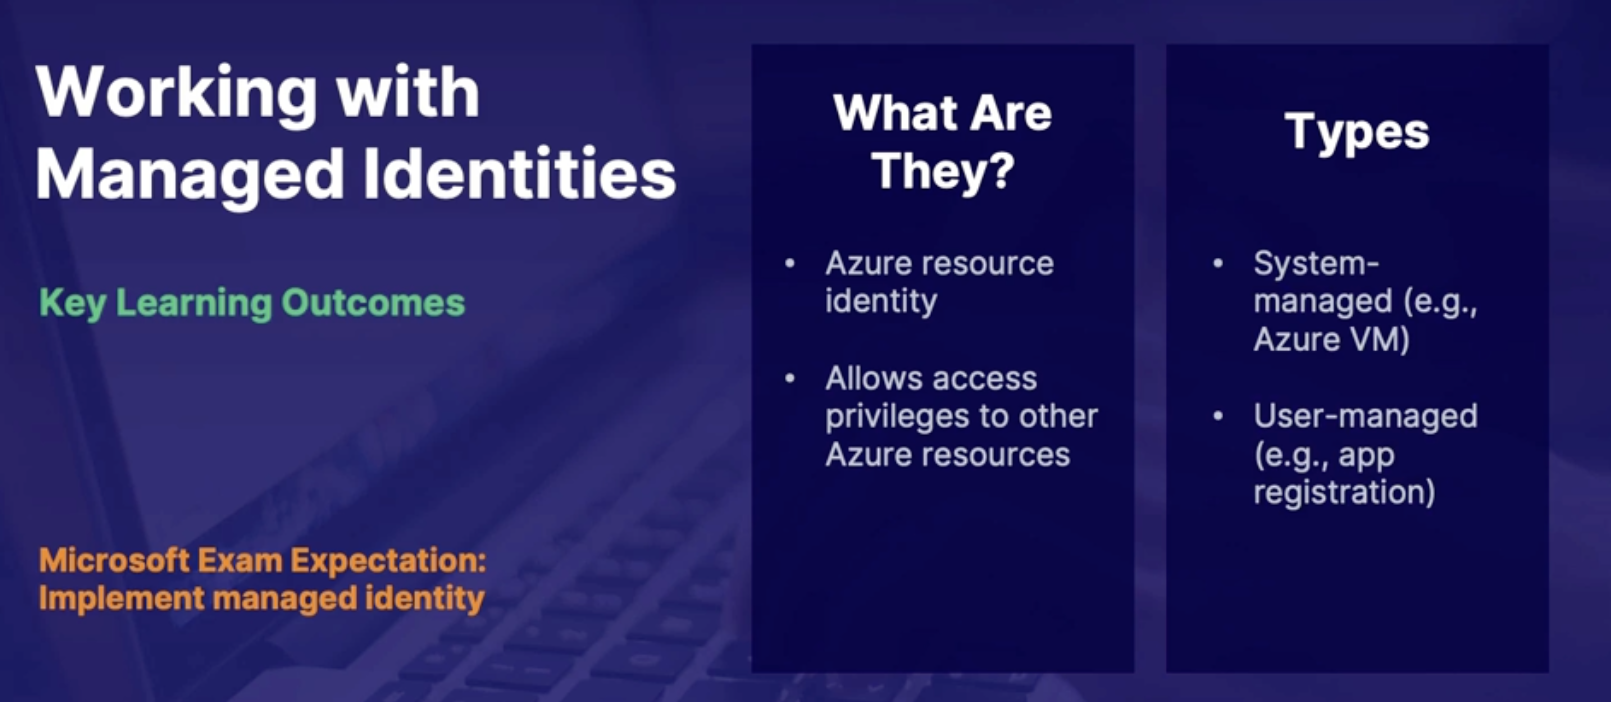
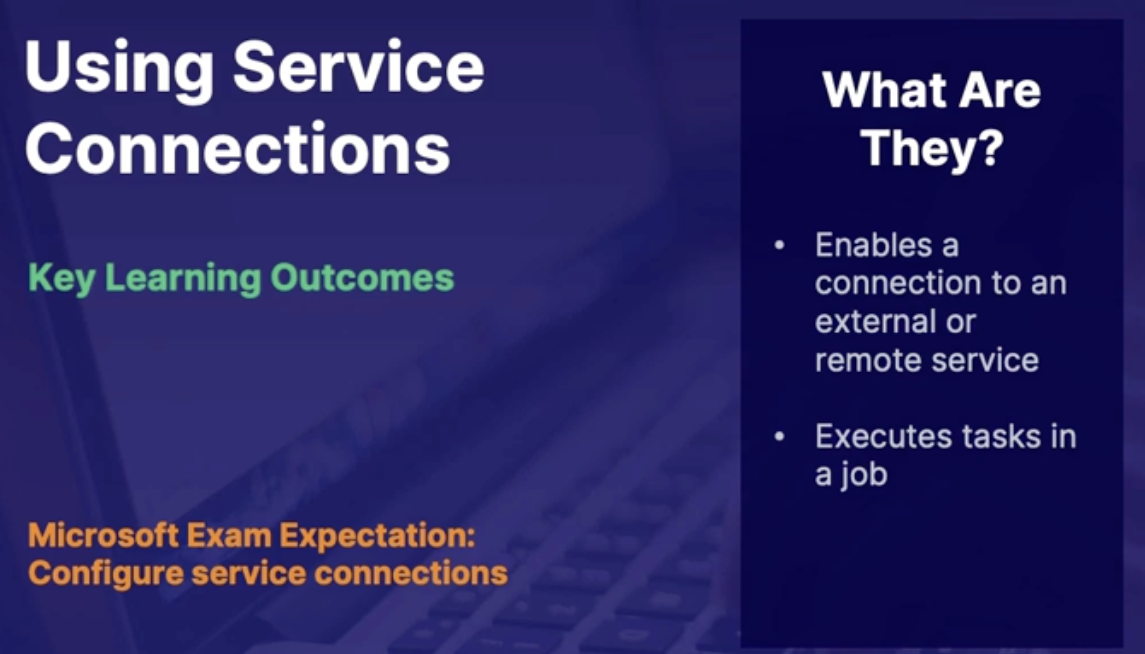
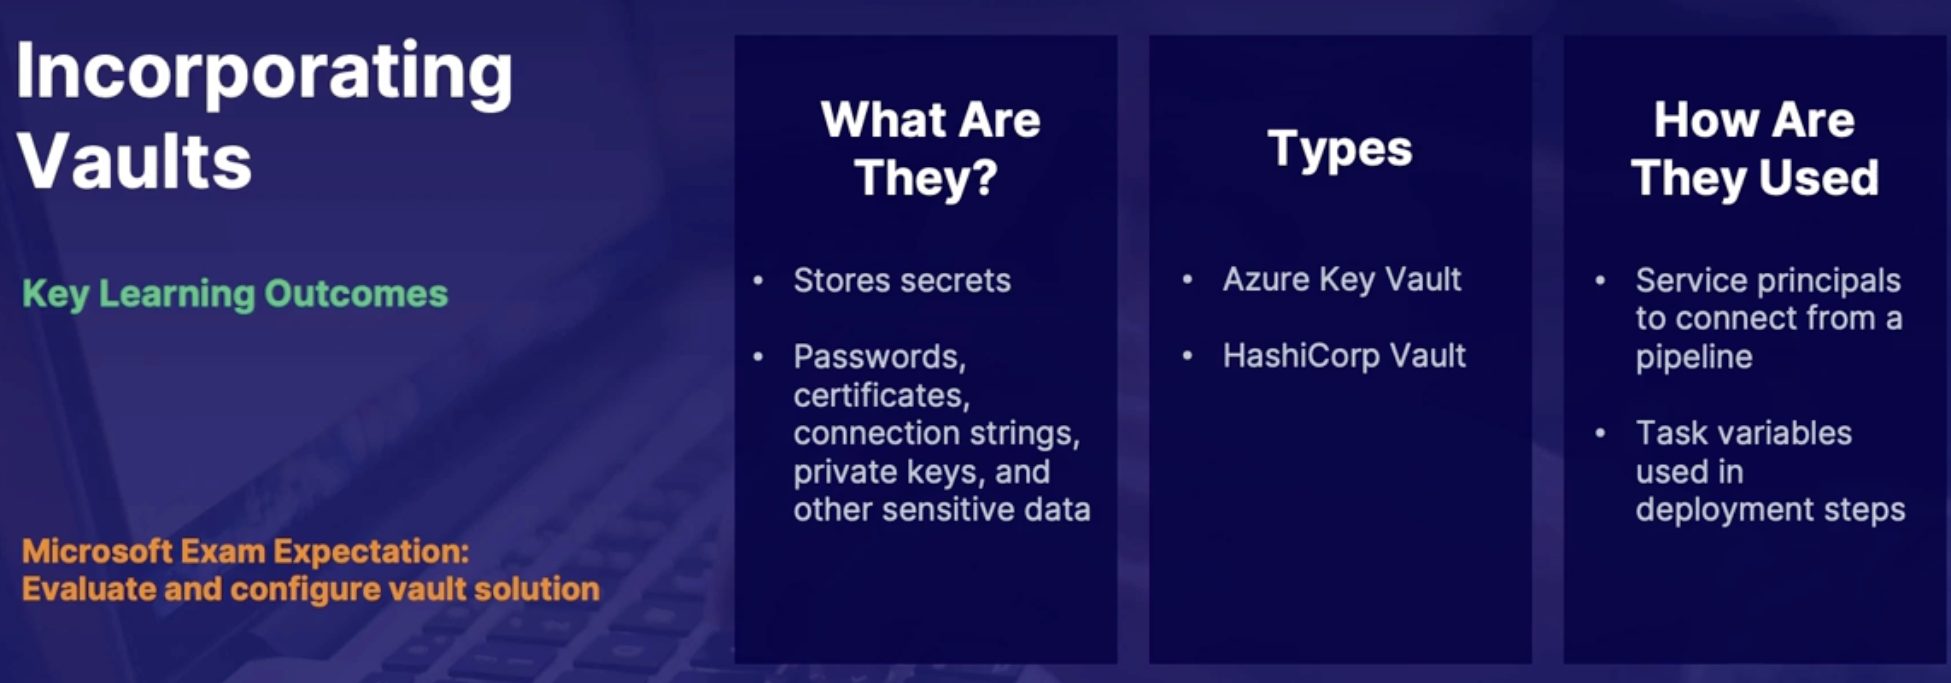
Chap - 18: Developing Security and Compliance
Understanding dependency scanning
Dependencies
Direct dependencies: When you build code, there are packages and libraries that you use as part of your code. These are known as direct dependencies.
Transitive or Nested dependencies: There's also a chance that some of your packages and libraries or dependencies that you use also have additional packages or libraries
Type of dependency scanning
Security dependency scanning
Security dependency scanning means
- scanning your code for all of the existing dependencies,
- and then matching those dependencies to known vulnerabilities inside of the known vulnerability database.
- There it can make recommendations, like upgrading the dependency versions, or suggesting code that you can add or modify in order to remove those vulnerabilities.
Compliance dependency scanning
What:
- checking all of your existing dependencies and transitive dependencies against license usage
- And there is a database called the Open Source Initiative (or OSI) that contains all the different licenses that are available.
Main compliance
- General Public License (or GPL)
- MIT license.
Aspects of dependency scanning
Summary
- Dependencies: packages and libraries that your code uses
- Security dependency: scanning access dependencies against non-vulnerabilities
- Compliance dependency scanning: access dependencies against licensing requirements
Exploring container dependency scanning
Aspects of container scanning
- Scanning: base image files for audits
- Updates: recommended container image versions and distributions
- Vulnerabilities: match found vulnerabilities between the source and target branches
There is a different type of containers scanning depending on what containers you use
- Docker enterprise: scanning in docker trusted registry
- Docker hub: uses Snyk and repo scanning
- Azure Container Registry: Qualys scanning Azure security center
Demo
Objective: scan a container for dependencies
- Navigate inventory in security center
- review Kubernetes recommendations
- review Azure container registry image recommendations
Summary
Incorporating security into your pipelines
Securing applications
Continuous security validation process
Secure application pipelines
Summary
- Securing applications: secure infrastructure, designing apps, architecture with layered security, continuous security validation, and monitoring for attacks
- Continuous security validation: should be added at each step from development to production
- passive/active tests: passive run fast, active runs nightly
Scanning with compliance with WhiteSource Bolt, SonarQube, Dependabot
- WhiteSource Bolt
Objectives: scan for dependency compliance using WhiteSource Bolt
- create a pipeline
- review whiteSource bolt extension options
- Review assessment report
Steps:
- add a whiteSource bolt task in pipeline
- where: first step in the build pipeline
- SonarQube
Objectives: skin for dependency compliance using sonarQube
- create a pipeline
- review SonarQube task options
- review assessment report
Steps
- add 2 task in pipeline
- one before build and one after
- task: repair analysis configuration(before build) and Publish quality get result(after build)
- Dependabot
Objectives: scan for dependency compliance using Dependabot
- review GitHub dependabot settings
- review assessment alerts
Steps:
- in GitHub, go to setting, security and analysis
- enable: dependabot alerts
- go to security, dependabot alerts // to see the alerts
Summary
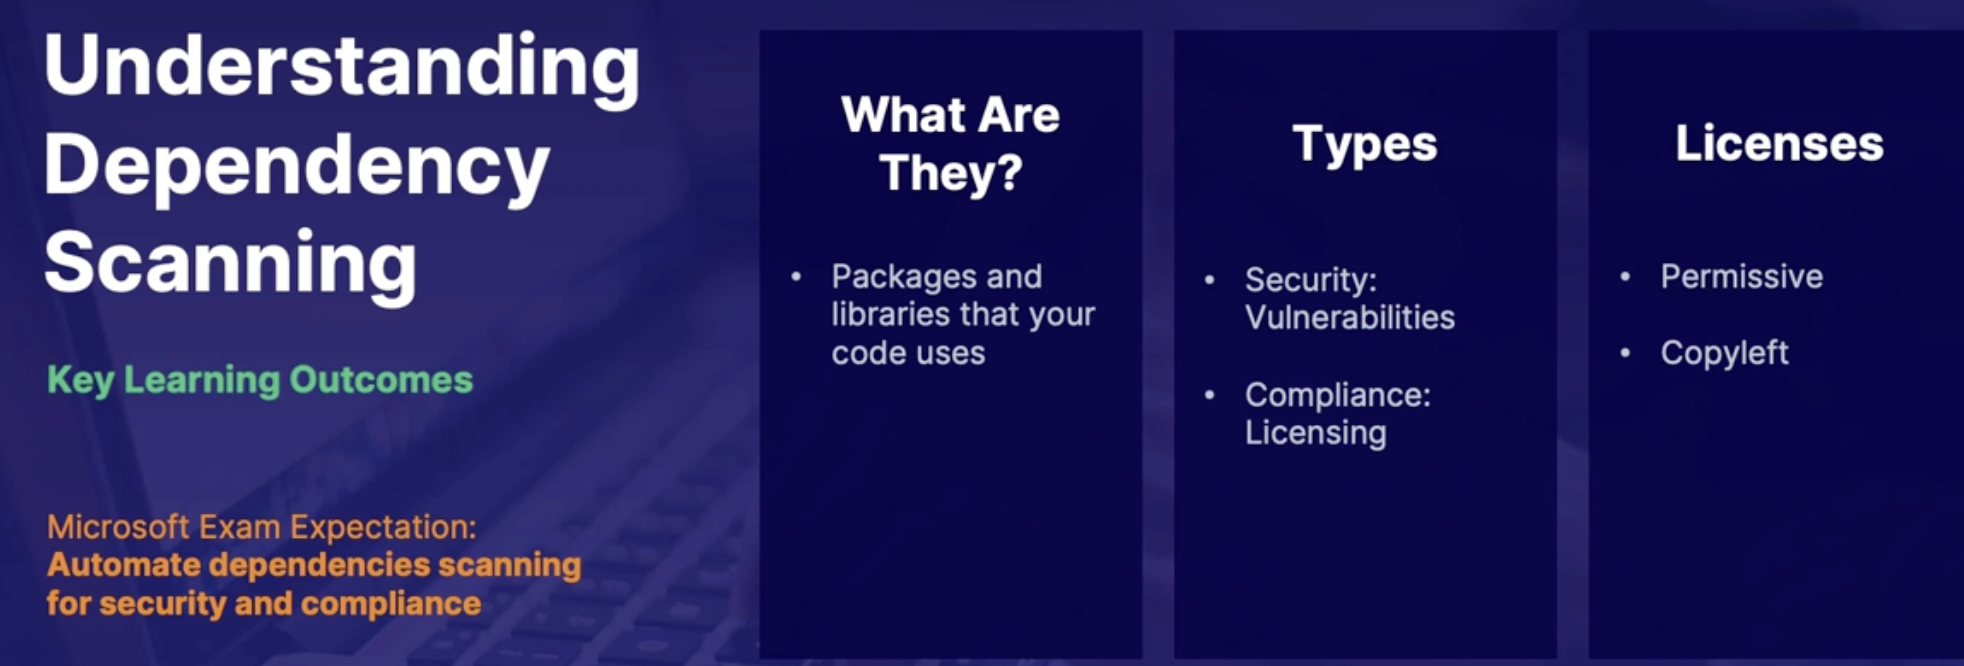
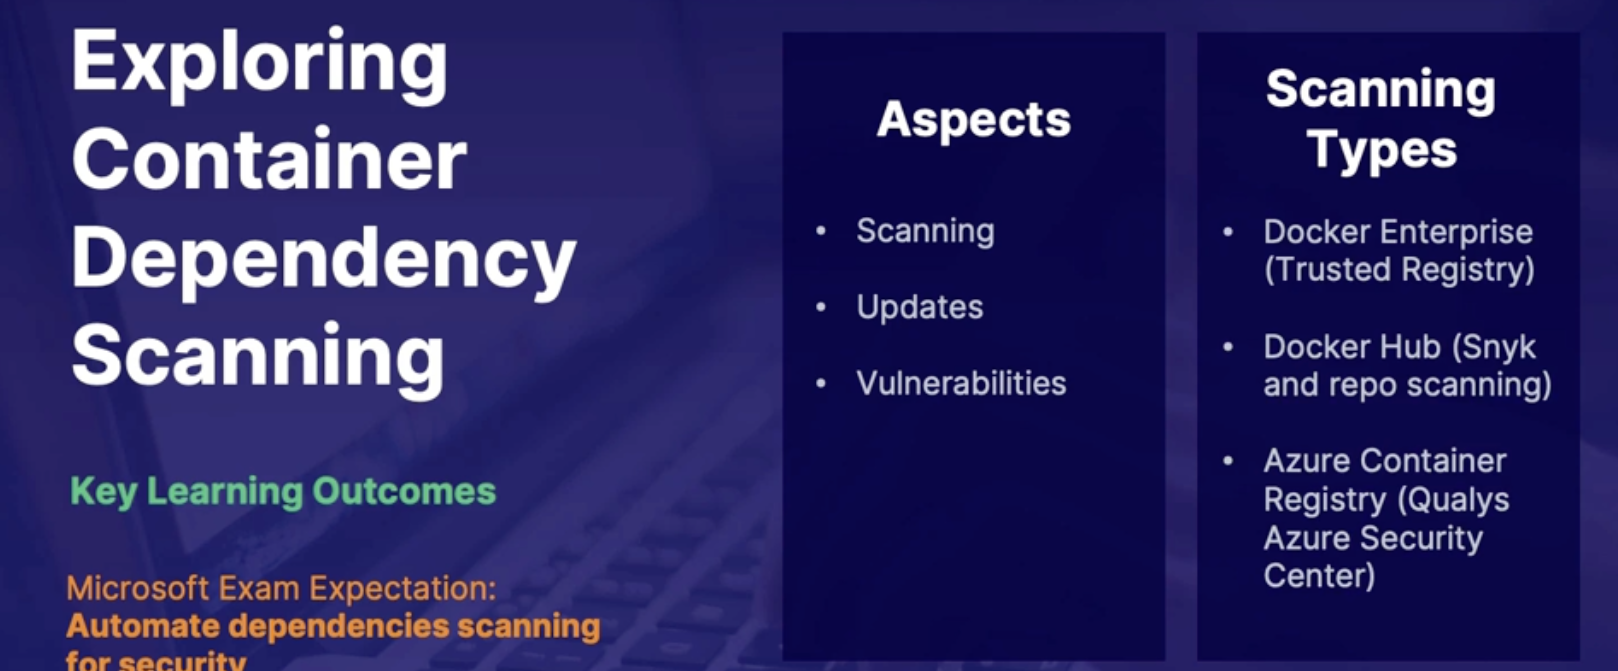
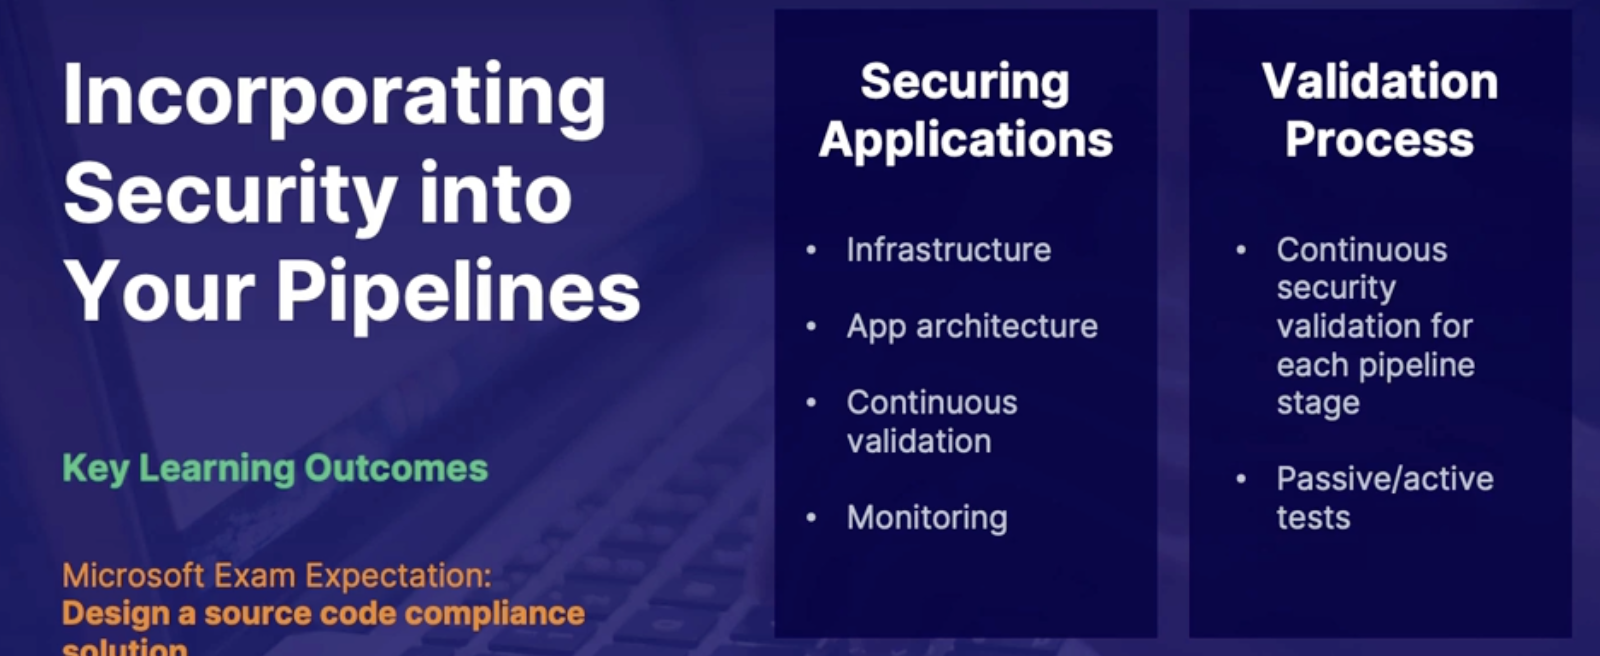
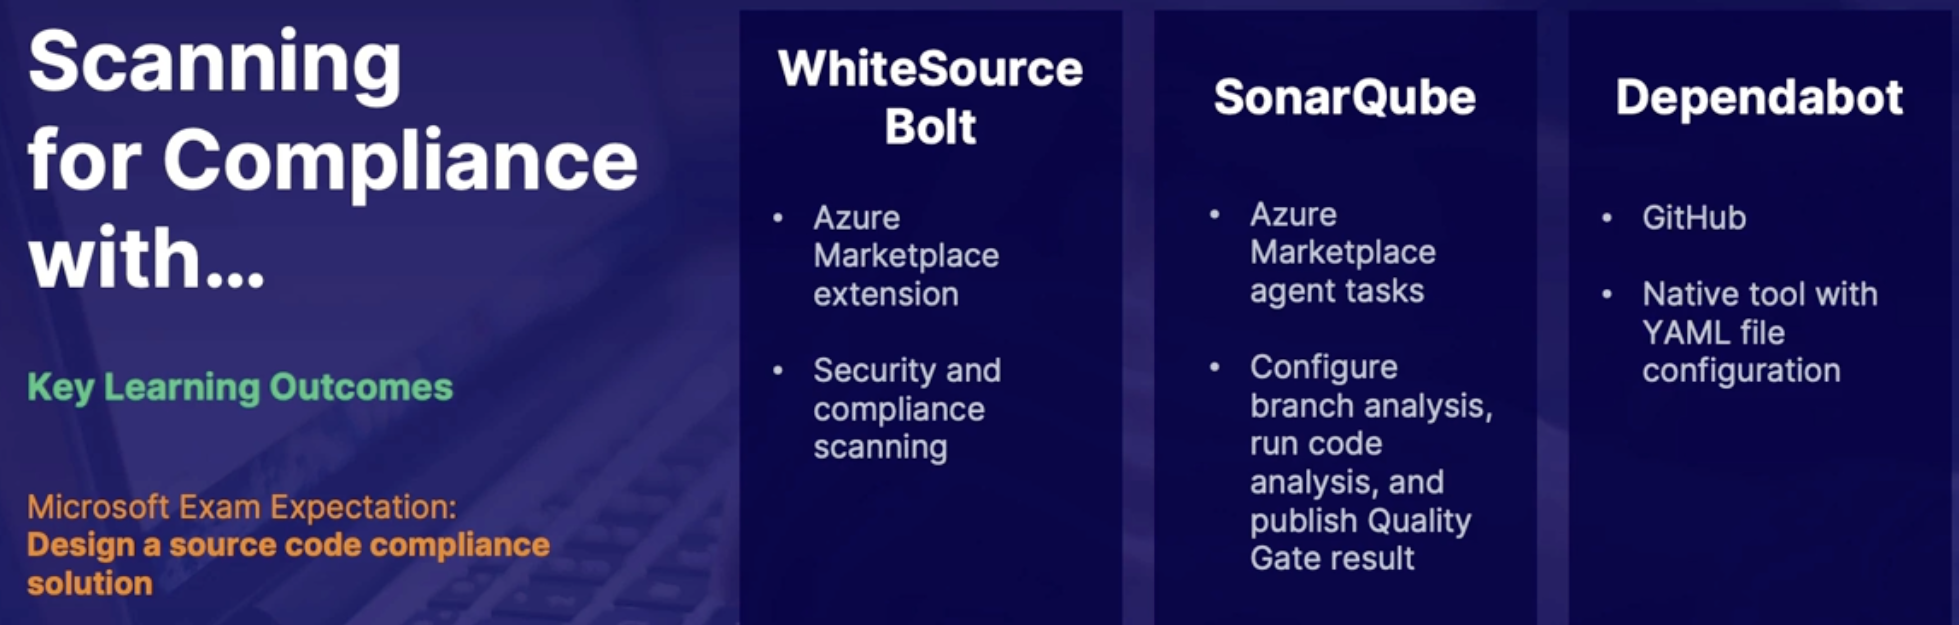
Chap - 19: Designing Governance Enforcement Mechanisms
Discovering Azure policy
Scenario
- Security team is struggling because dev and test environments are not matching up with production In terms of their configuration
- They have introduced a security policy but resources are not being deployed with proper security settings such as encryption
- Want to report an enforce standard across the organization
Azure policy
- Is used to monitor and enforce rules and standards across your Azure resources such as
- naming conventions
- tags
- resource sizes
- resource settings: what type of storage account should be used
- Data retention: how long you want the data to be stored
IMP: Azure policy can also be integrated into Azure DevOps pipelines by adding a gate as a pre-or post-deployment action When you configure security and compliance assessment
Azure policy Access
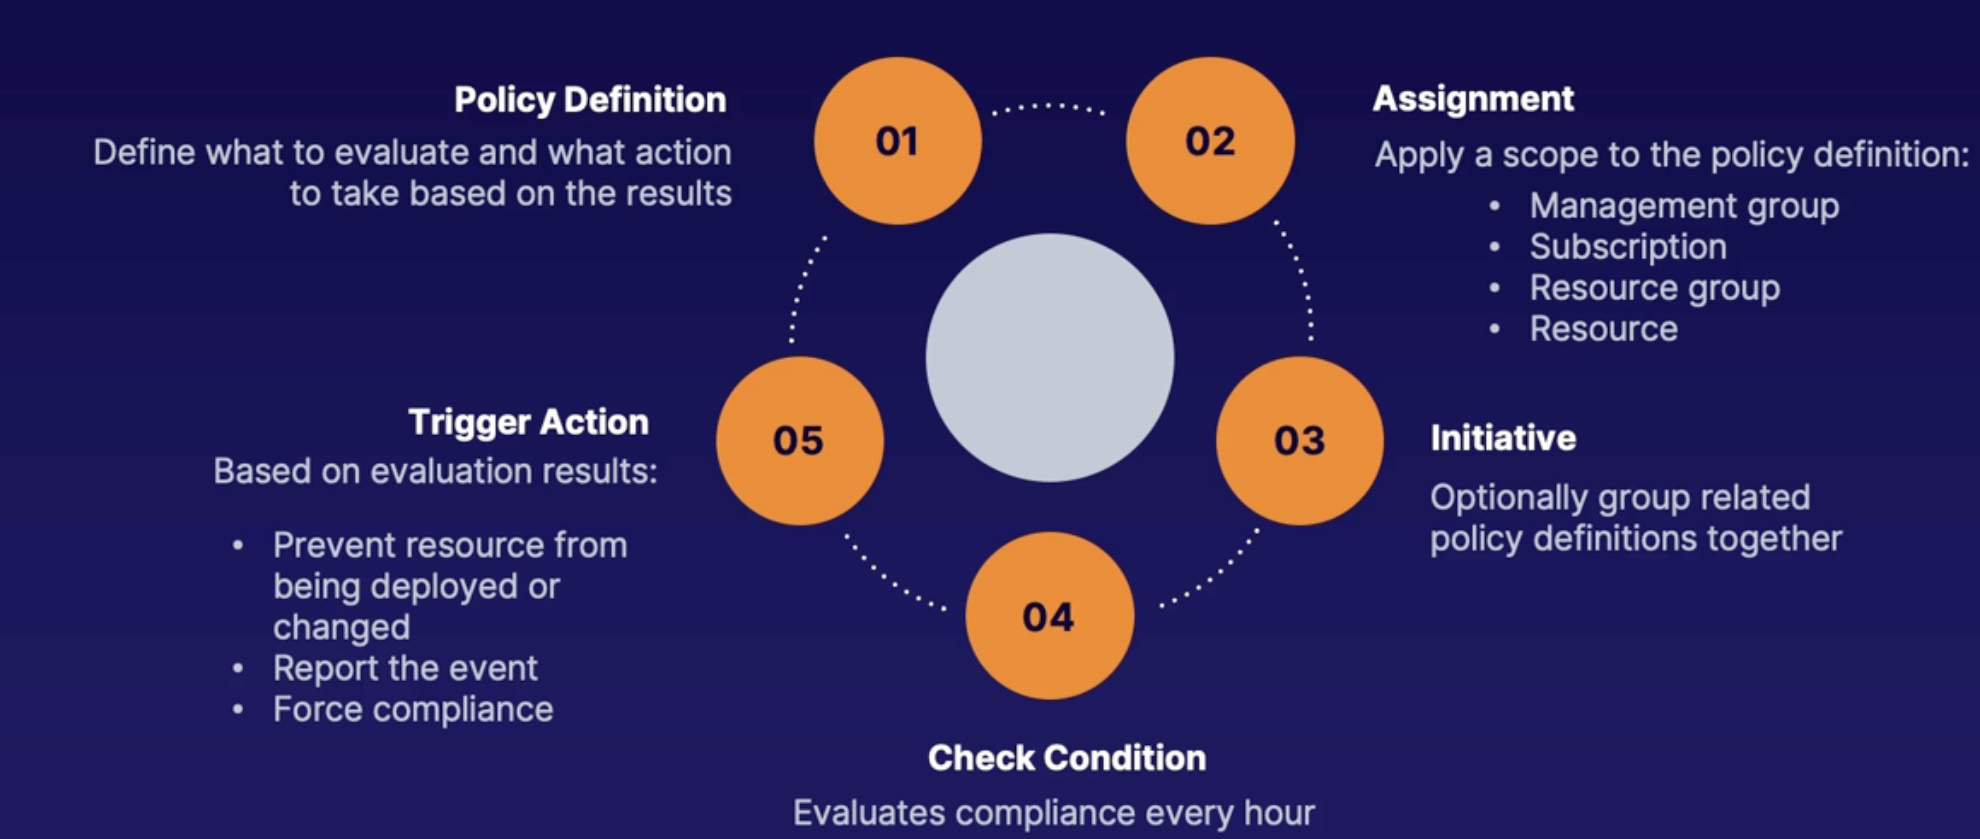
Demo
Explore Azure policy
- In Azure pipeline → Azure policy → definitions
- From drop-down definition type → policy
- Search encryption: all disks on VM should be encrypted
- Select assign
- Select scope: RG
- Azure policy → definitions → initiative definitions
Explore Azure policy integration with Azure DevOps
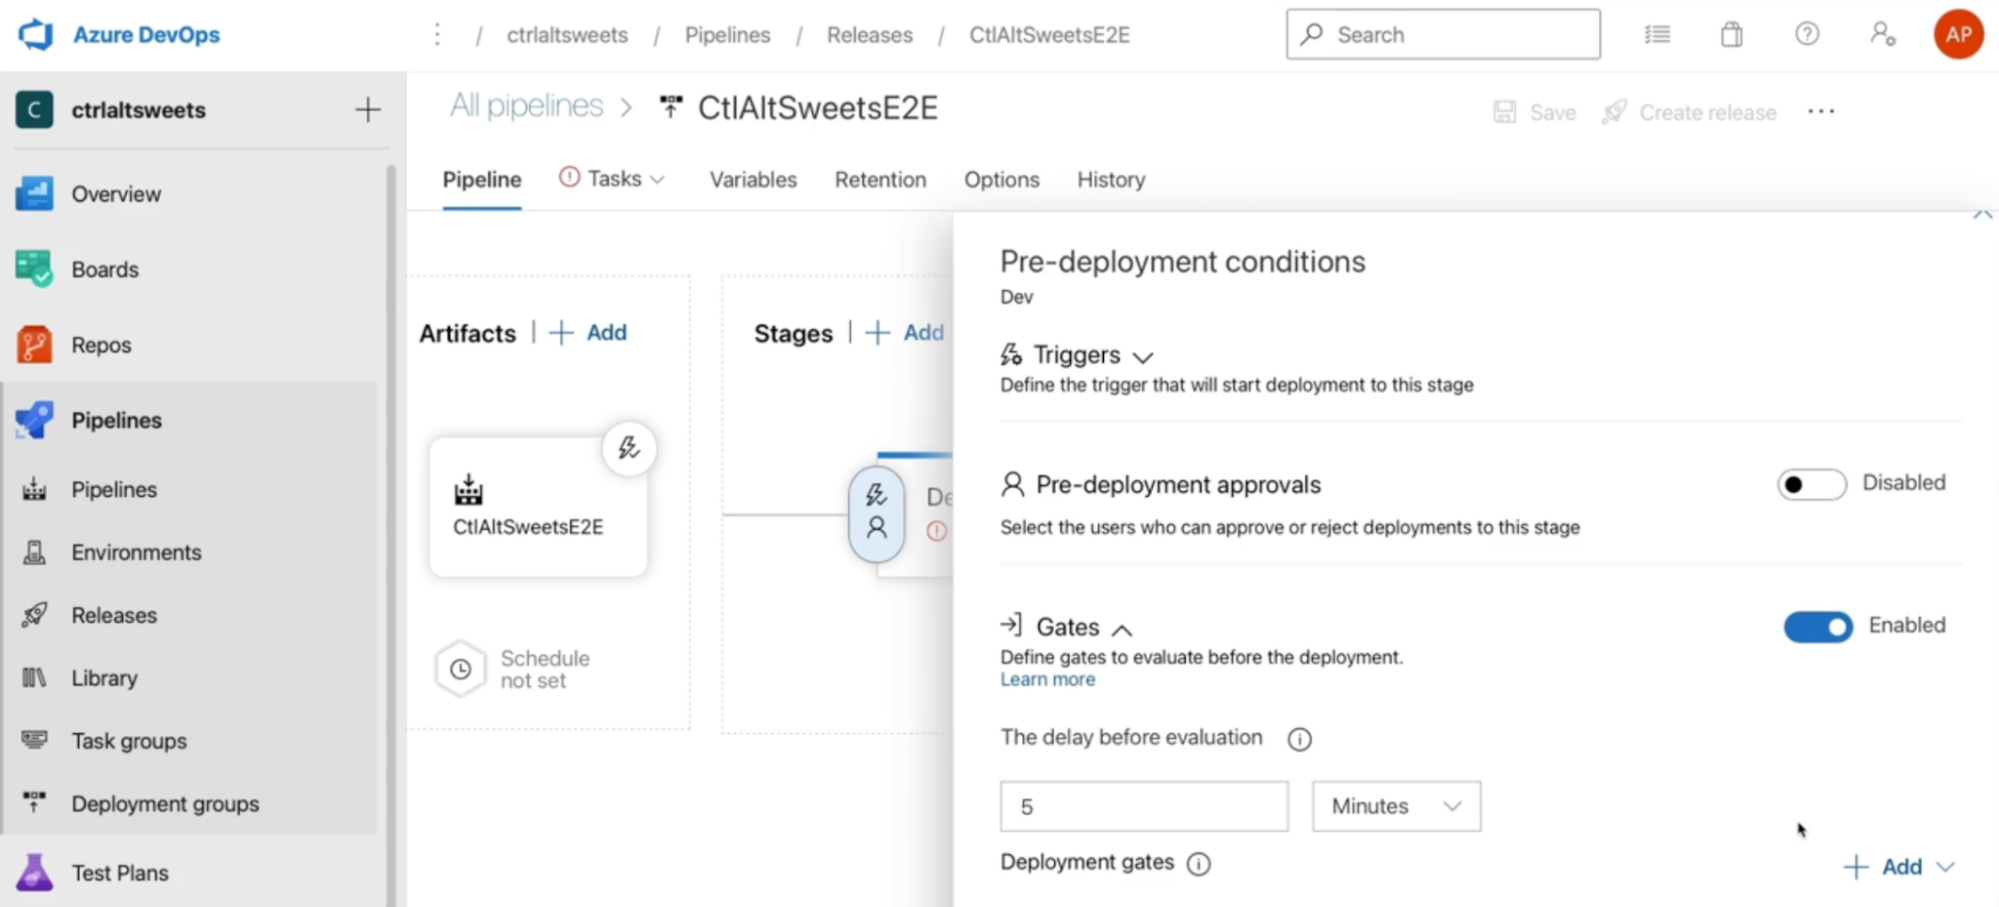
Summary
- Policy definition describes what to look at and what action to take
- An assignment is a policy definition with a scope
- An initiative is a group of related policy definitions
- A policy can prevent results from being built or edited
- A policy can just audit the event and report it
- A policy can change the resource so that it meets the policy definition
Understanding container security
Azure defender for container registry
Why do you need it: most vulnerabilities come from the base images for the container
What it does: it will scan the actual container registry and scan for vulnerabilities in the container images so that you can review the findings
How: it uses Qualys scanner to do the scanning // Industry leader in vulnerability scanning
- pulls the image from an Azure container registry into an isolated container that’s in the same region as in registry
- so if there are any issues they will be reported to Azure Security Center, as a recommendation to fix
Images can be scanned in 3 types
- image pushed
- recent image pulled
- imported images
AKS protection
when it comes to AKS, there are 2 levels of protection that are provided in Azure Defender
AKS flow: when it comes to AKS containers, there are one or more AKS containers running in a pod → Which are hosted on a Node Otherwise known as a virtual machine or server
Cluster: Consist of multiple Nodes(VMs), pods(running containers)
Nodes: VM or physical server running in your data centers or could be a VM in the cloud.
Pods: scheduling unit in Kubernetes(Each pod consists of one or more containers)
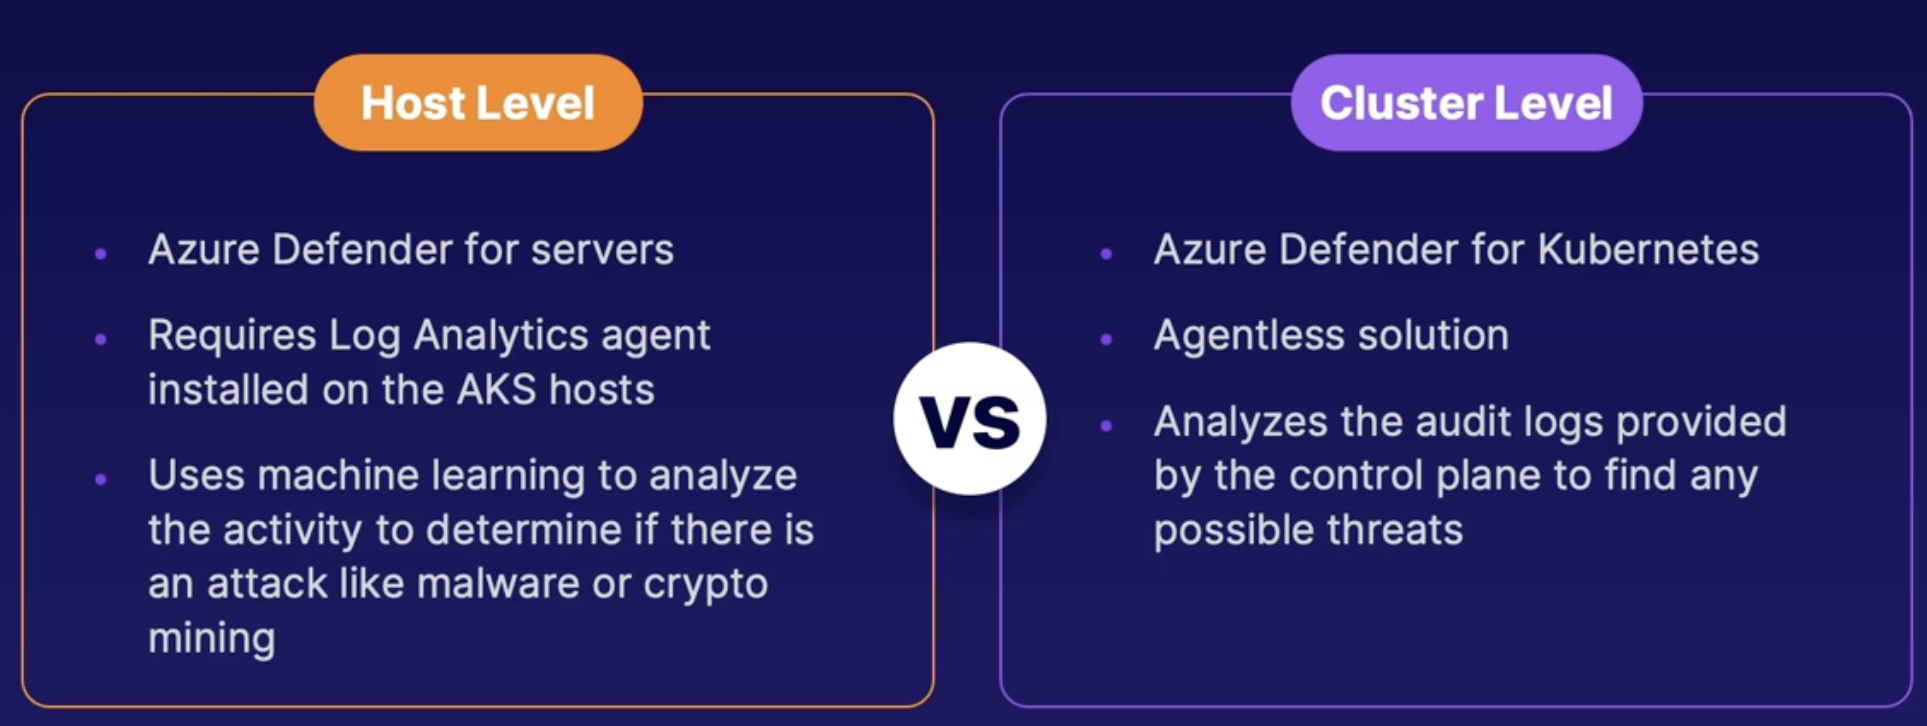
Summary
- Azure defender: for container registry pulls images into a sandbox container to scan for one vulnerabilities
- The container that I scanned can be images that were pushed, recently pulled, or imported
- When it comes to AKS, there are two levels of protection from the host and cluster level
- The host level protection: will use Azure defenders for servers to analyze security and determine if there are any attacks like crypto mining or malware
- Azure Diffenderfer for kubernetes: provides cluster level runtime protection by analyzing the audit logs from the control plane
Implementing container registry tasks
Azure container registry
What
- A private docker registry posted in Azure
- Used for image storage management
- Can build container images using Azure container registry tasks
Tasks (Quick, Automatic, Multi-step)
- Quick Tasks
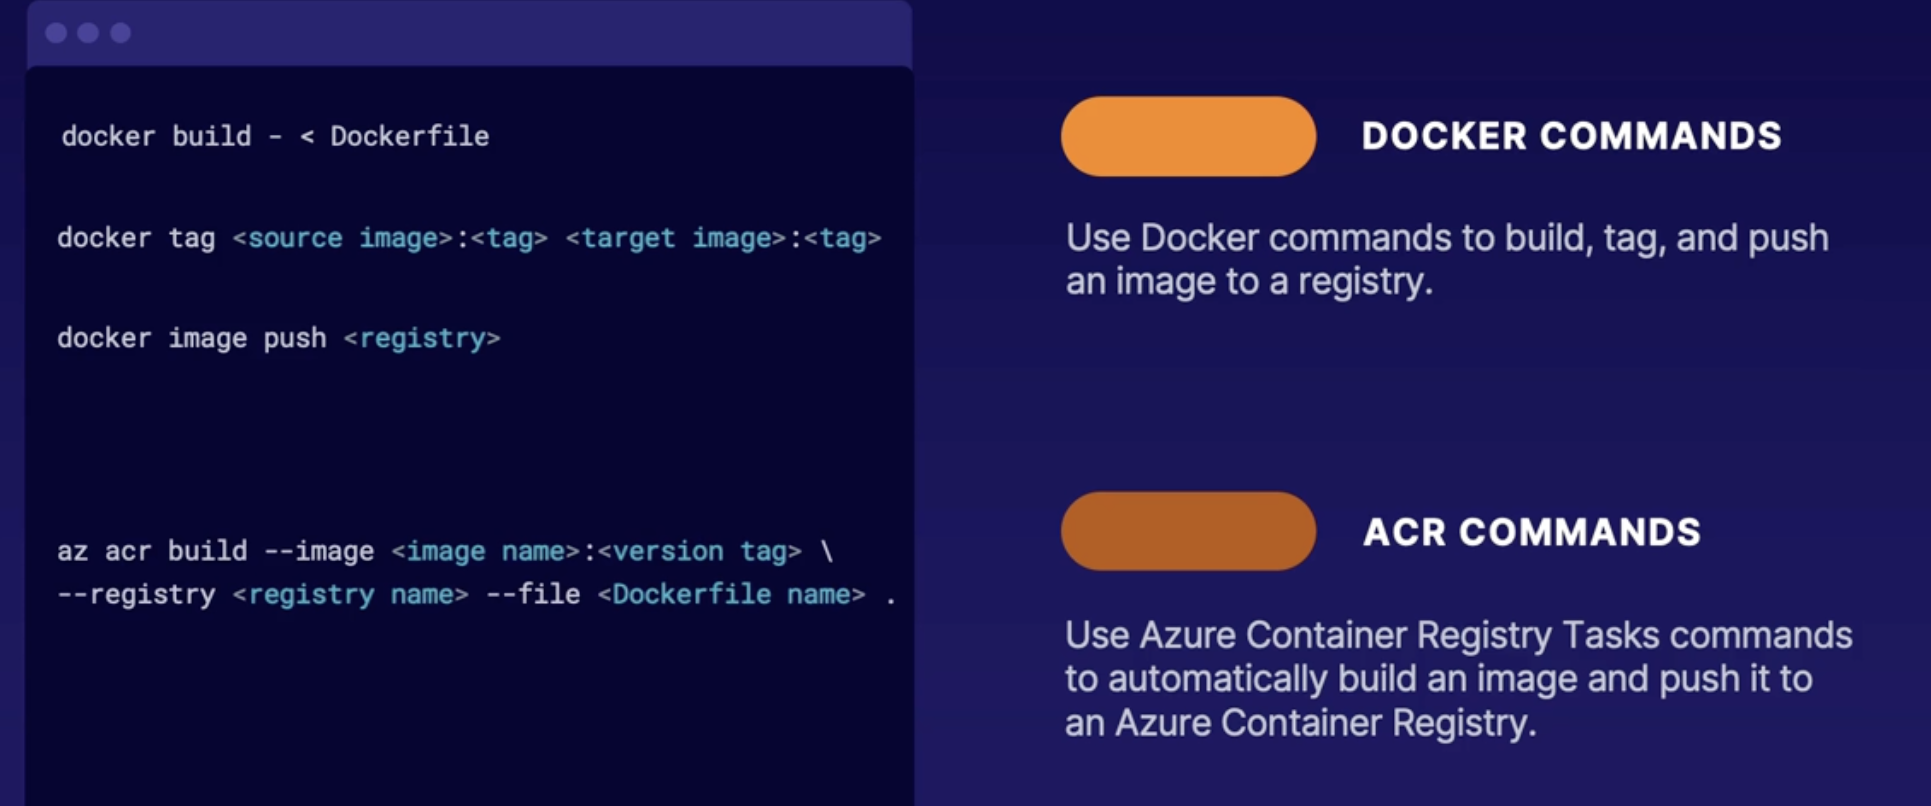
- Automatic tasks
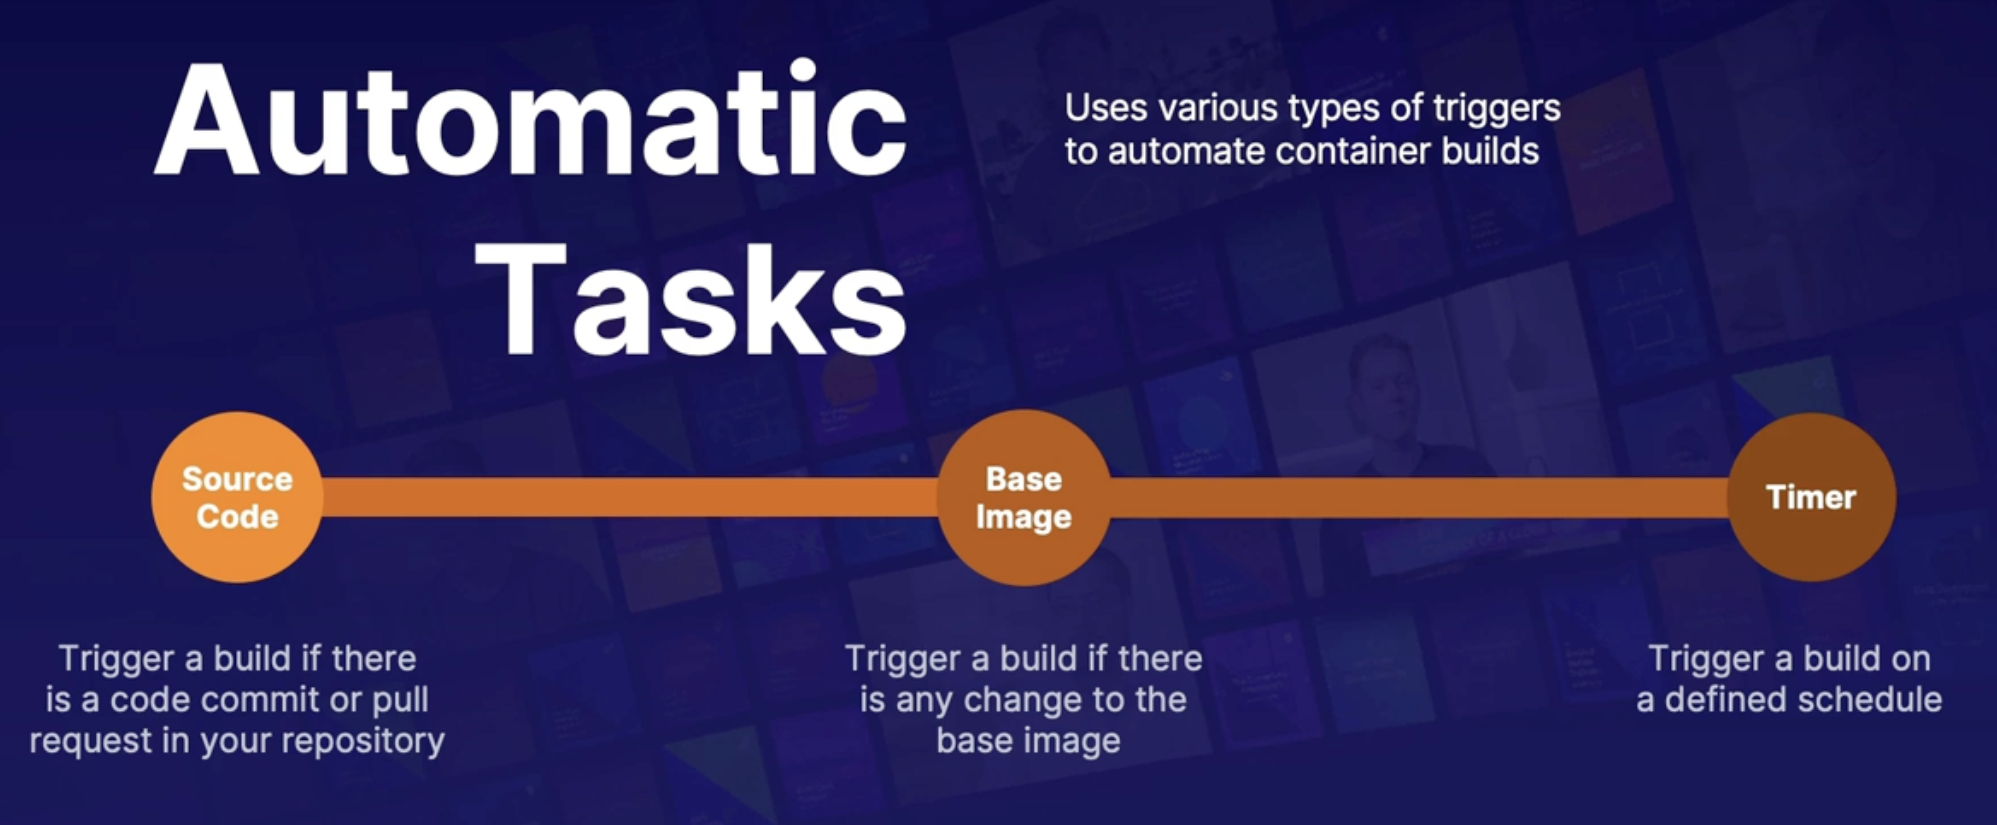
- Multi-step task
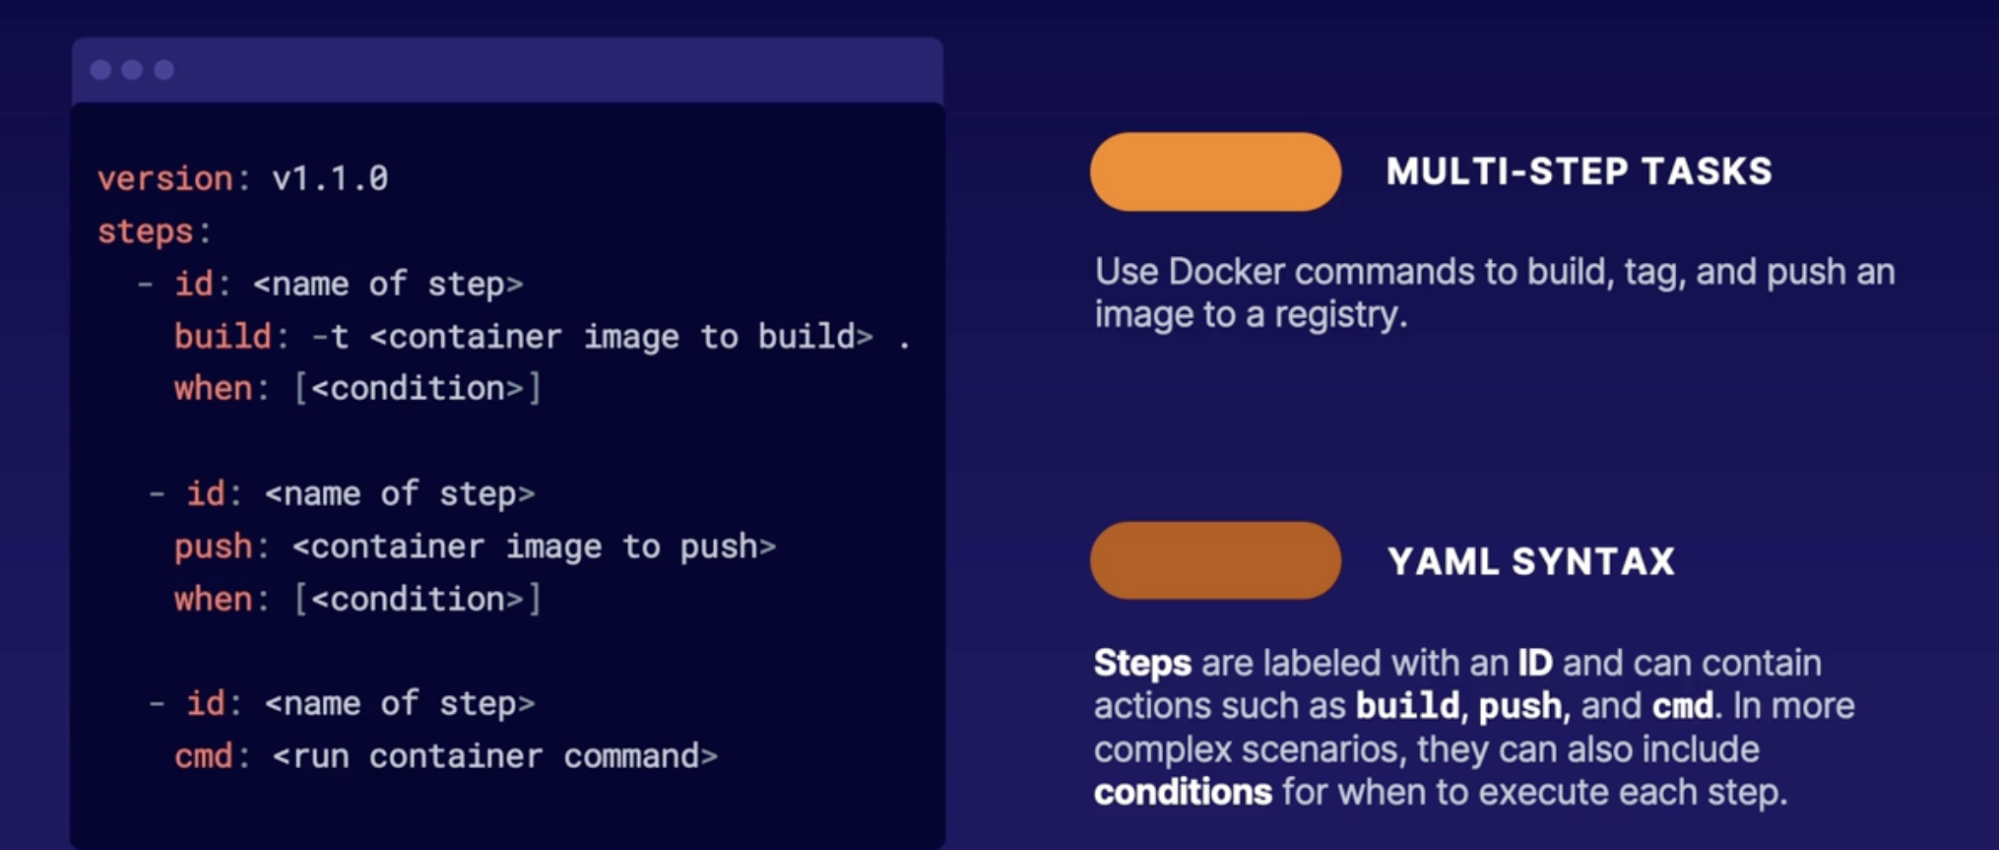
Summary
- Quick tasks: allows you to build container images on demand without local docker tools, you need Azure specific command to build and push your images into Azure
- tasks can be automatically trigger based on source code changes in base image or on the schedule
- for more complex scenario you can configure a YAML file to orchestrate a multi-step task with action such as build, push and CMD
Responding to security incidents
Emergency access accounts
When it comes to protecting information, one of the first steps is to
- manage who has access to what information
- follow least privilege, make sure that people will only have access to what they need and not more.
Configure emergency access accounts/break glass accounts
What: these are special accounts with high privileges that are not assigned to any specific person; rather, they're securely saved and only used in emergency situations.
Why do you need emergency access accounts
- administrators locked their account, or an administrator is on vacation or left the company,
- or possibly the federated identity provider is having an outage.
- And this would be a situation where the users sign into an active directory, and then the active directory checks in with a federated system that it trusts to verify the account.
- No access to MFA device or MFA service is down
Best practices
- Multiple accounts: in case there is an issue with one
- Cloud-only accounts: use an *.onmicrosoft account
- Single location: account should not be synced with other environments.
- Neutral: there should not be any information tied to a specific person
- Alternative: authentication the account should use a different authentication method than regular accounts
- No expiration: password should not expire
- no automated cleanup: it should not be automatically removed if there is a lack of activity
- Full permissions it should not be hindered by confidential access policies
What to do after the accounts are configured
- Monitoring: configured Azure active directories alerts to make sure that the accounts are not being used inappropriately
- Regular checks: make sure the accounts are still active and working
- Training: make sure all relative parties are informed about account policies and procedures
- Rotating a password: on a regular basis
Demo emergency access account monitoring
Set up log based alerts against the account in Azure AF
Summary
- emergency access accounts are also called break glass accounts
- emergency access accounts should be shared accounts with the credentials saved in a secure location
- preparation for account outages should be considered by having multiple cloud only accounts that use a separate authentication method
- policies should be reviewed to make sure the account don’t expire or get deleted
- ongoing monitoring on the account activity is recommended
- The account password should be rotated every 90 days, after an incident, or after a staffing change.
Summary
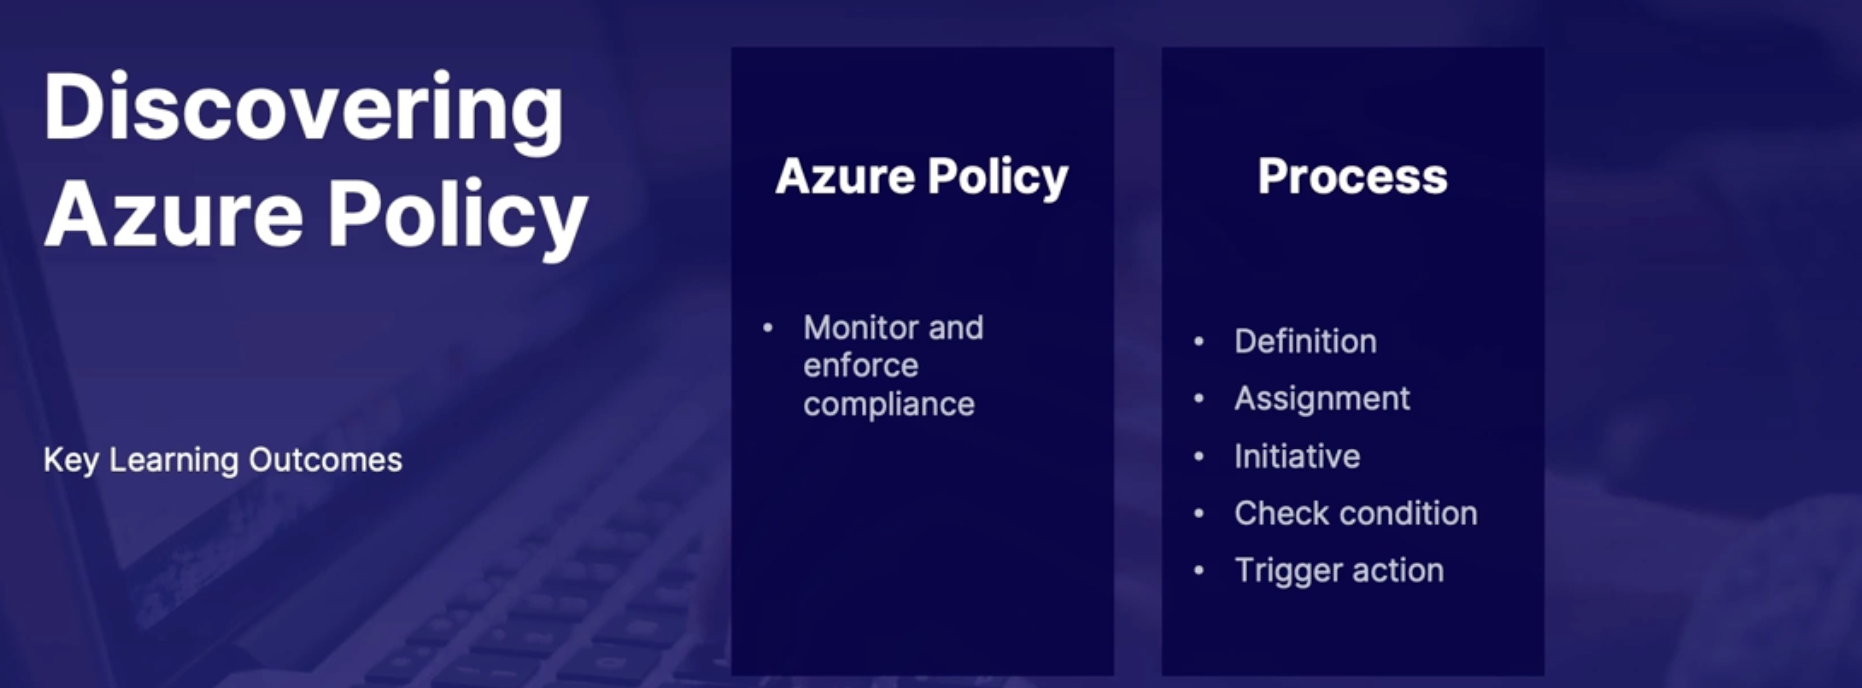
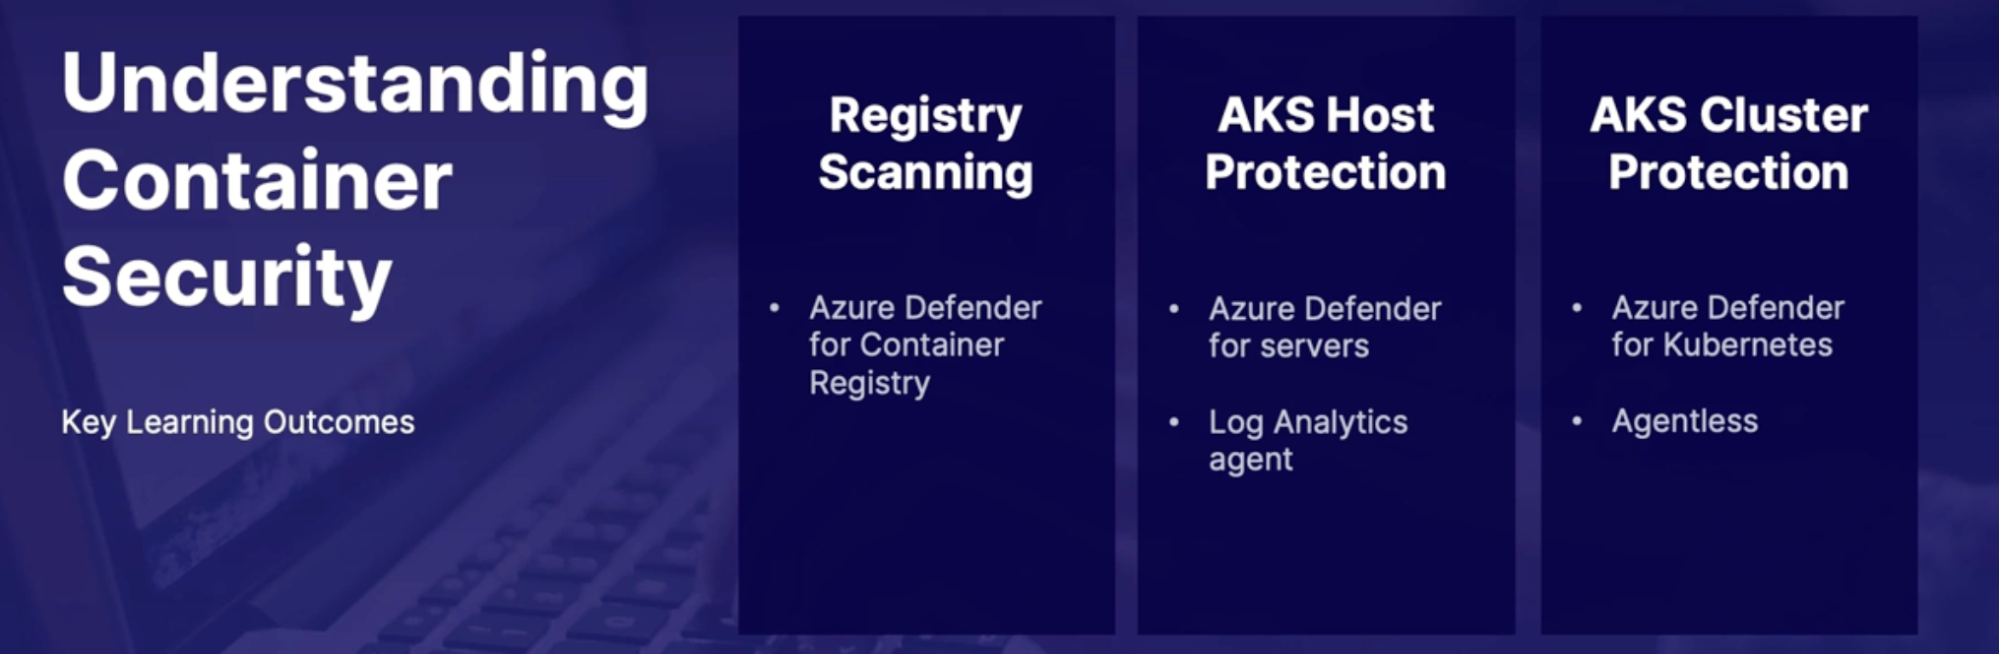
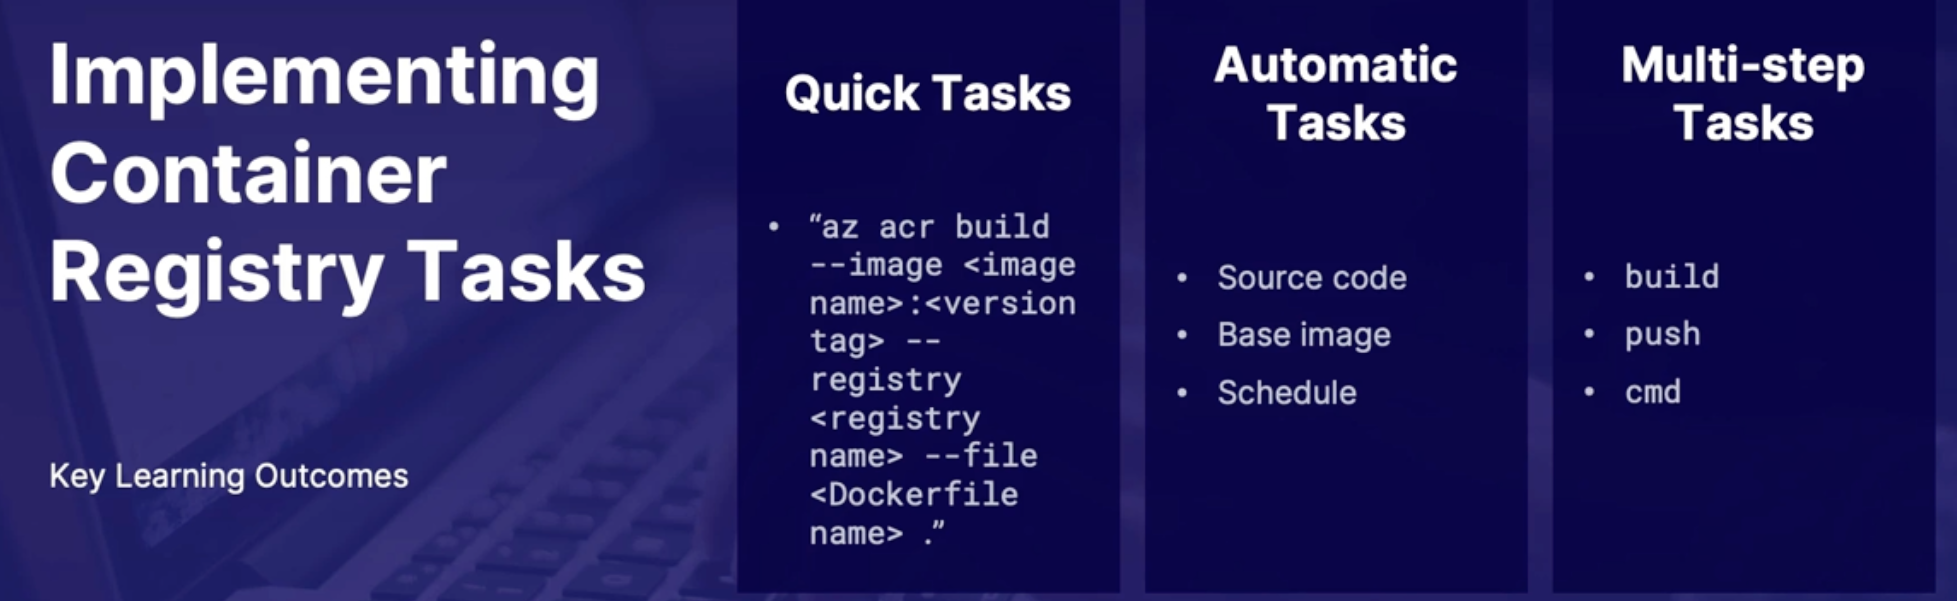
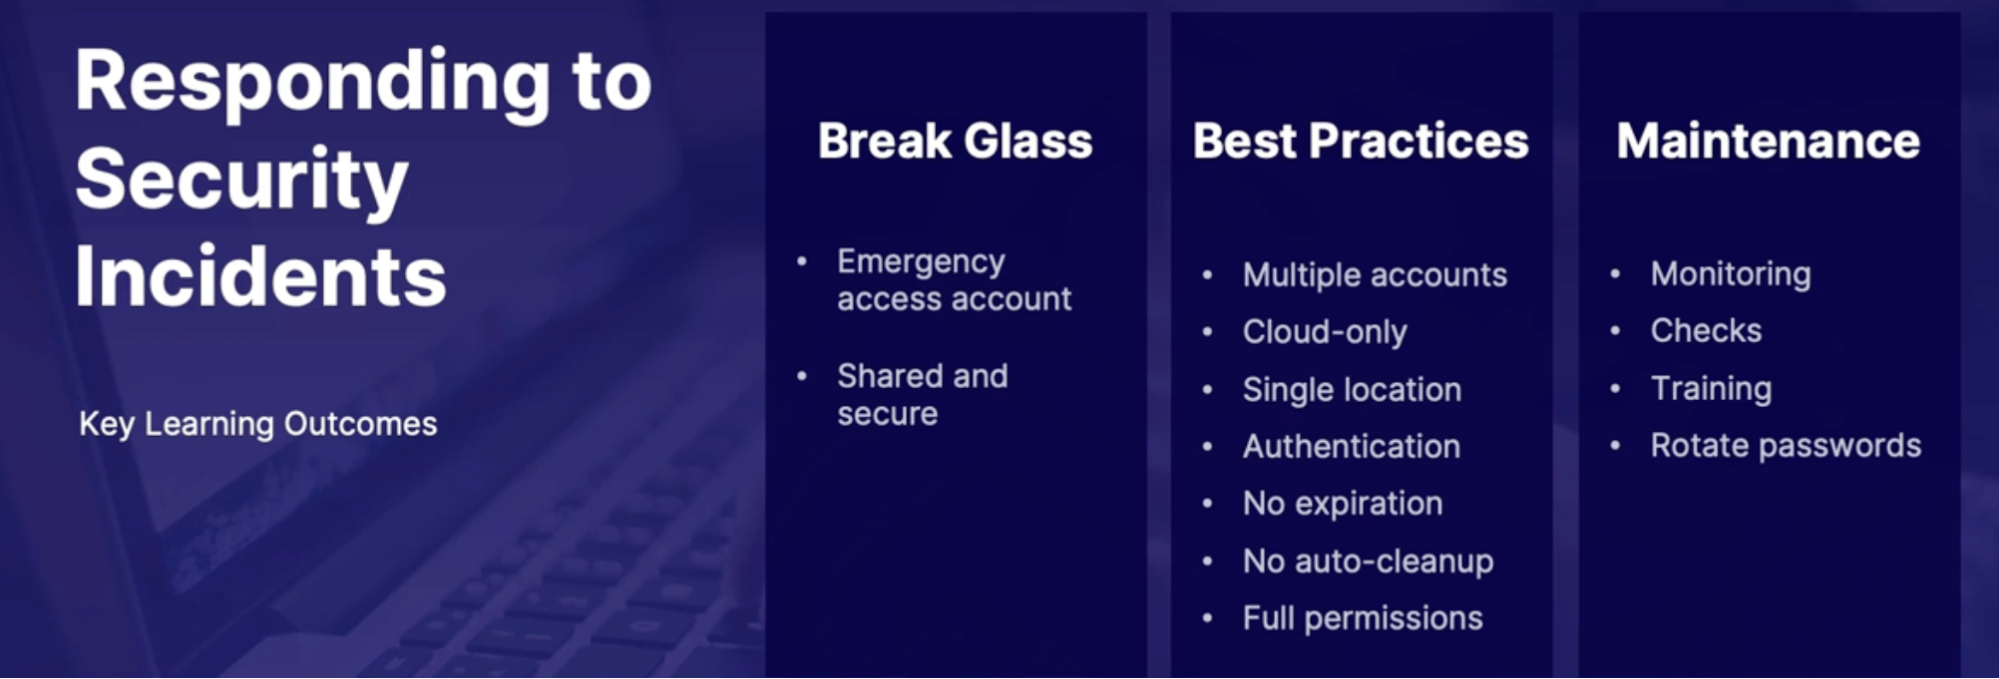
lAB: Build and Run a Container Using Azure ACR Tasks
Objectives: Your manager asks you to run a container, but you don't have Docker installed on your desktop. You've recently learned about Azure ACR Tasks built into Cloud Shell and decided to give it a try. Your goal is to create a new container registry and use ACR Tasks to build, push and run the container in Azure.
Steps
- create a new container registry
- create a docker file: to provide build instructions
- build and run the container: all within the cloud shell
Chap - 20: Designing and Implementing Logging
Why Logging
- provides the narrative of what has happened in the past To troubleshoot the failure
- A crucial part of determining the current health of a system as well as the building blocks for predicting when a failure will occur
Discovering logs in Azure
What are logs
Pieces of information that are organized into records and contain certain attributes and properties for each type of data
Ex: Server event logs which will give you properties like log name, source, ID, level, user, timestamp, category, details
Sources of logs in Azure
- Application
- VMs and Container
- Azure resources
- Azure subscription
- Azure tenants
- Custom sources
Log categories
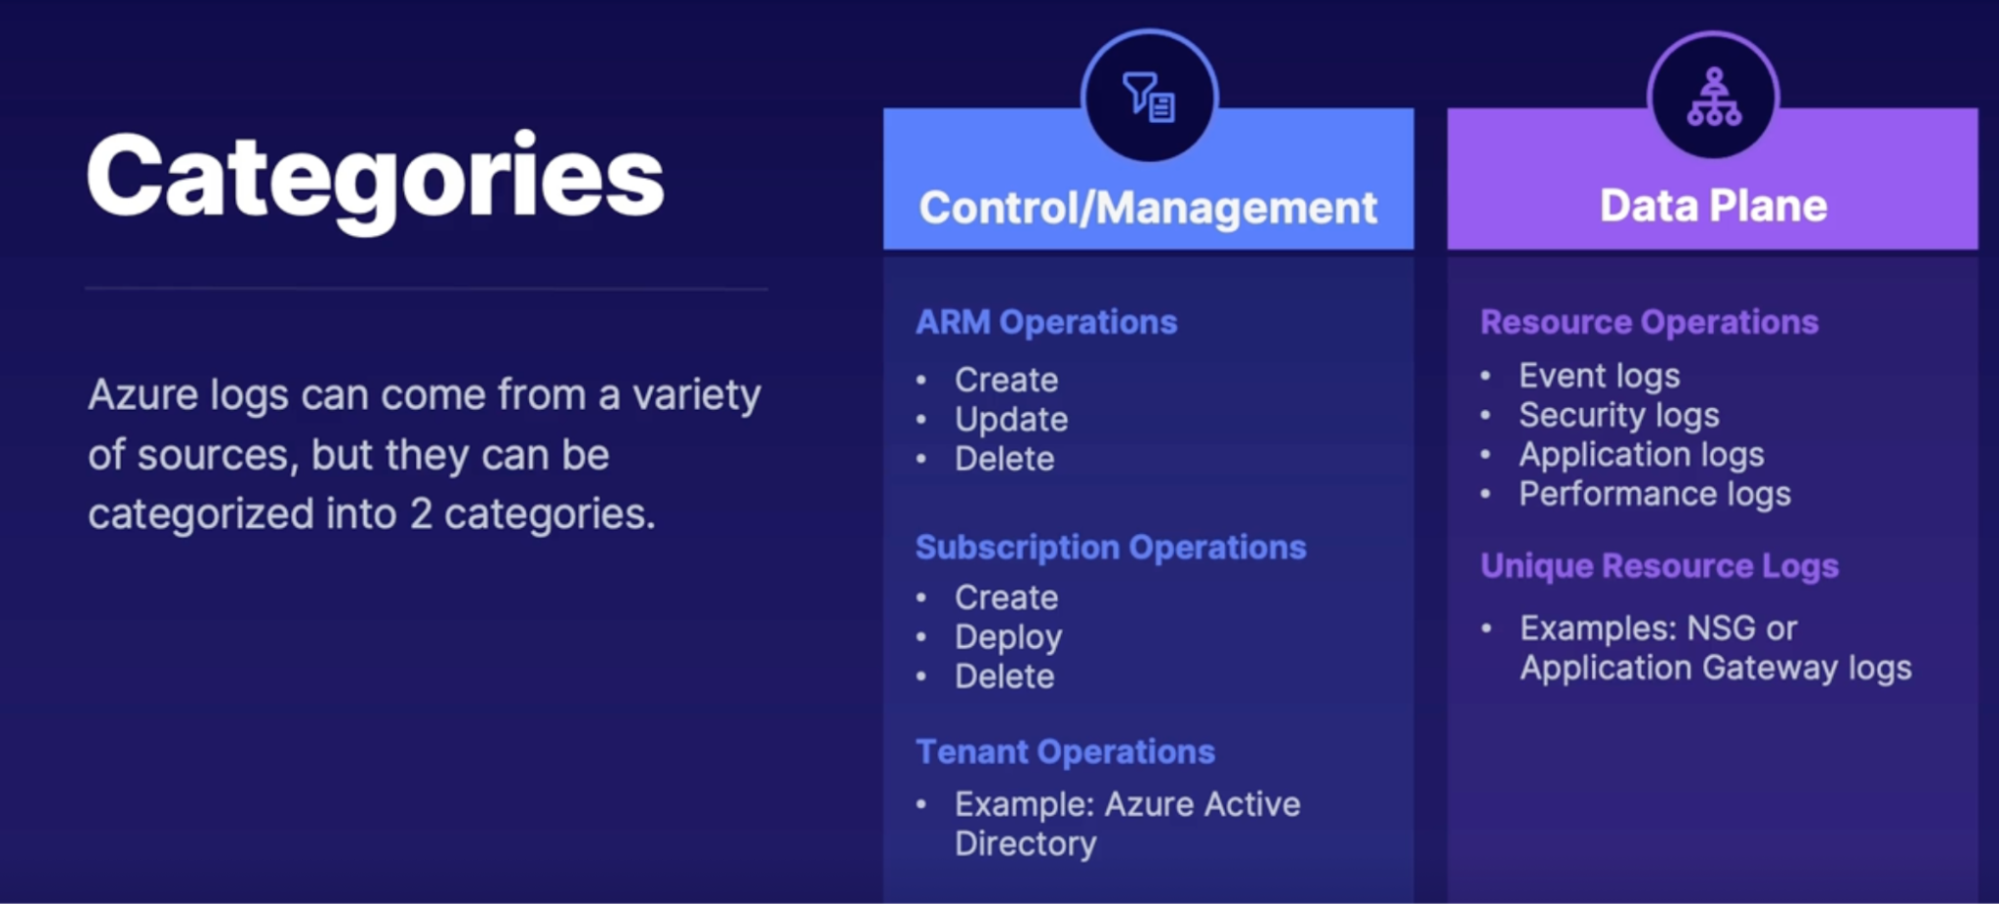
Diagnostic log storage locations
Diagnostic logs: there are certain Azure Resource logs that are not turned on by default but give you extra information. And these are called diagnostic logs. And these need to be configured to be sent to a certain target such as Azure Storage, Log Analytics workspace, Event Hub
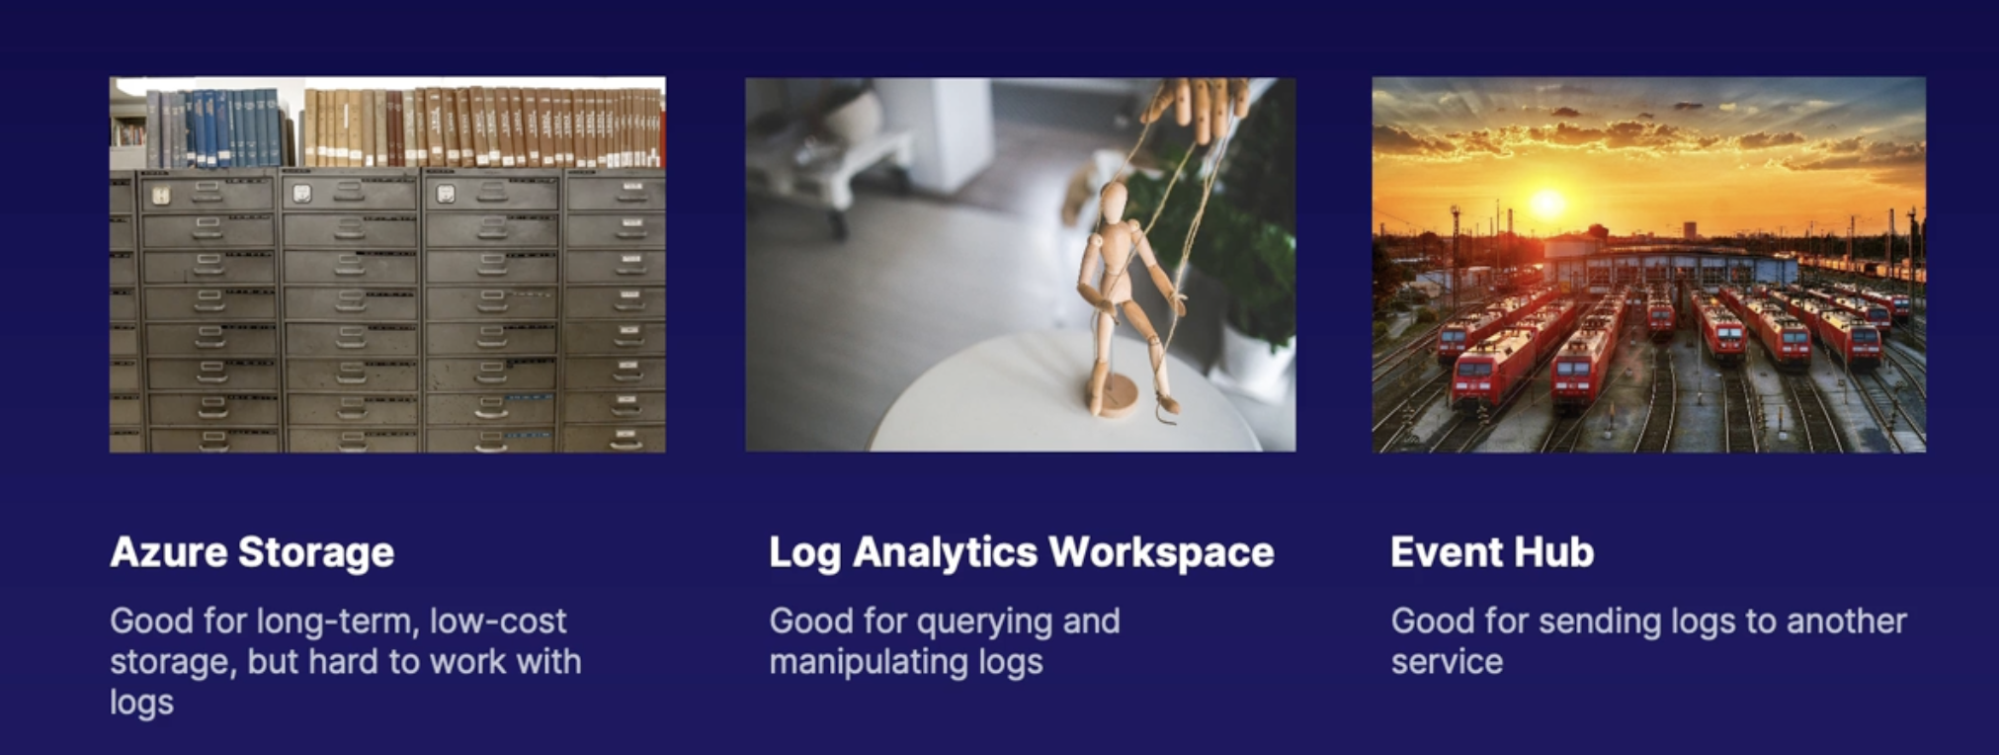
Demo exploring logs and configuring diagnostics
Summary
- Application in container logs provides information on deli Metairie and events on both an application and infrastructure level
- each Azure resource has its own unique set of logs
- logs are available for subscription and tenant level events such as activity logs and Azure activity directory logs
- diagnostics can be configured to send specified as a resource lock to Azure storage, Log analytics or and event hub
- diagnostic logs include retention settings
- with Azure storage you can configure items with hot, cool, archive storage tires
Introducing Azure monitor logs
Azure monitor logs
What
- Uses analytic workspaces and is previously known as operations management suits
- A central repository that is used to explore and manipulate metrics and logs from your Azure resources using Kusto Query Language(KQL)
Log analytics agent
- nearly every Azure resource can send logs into Log analytics
- To set this up on VM there’s still a manual process to get it configured
How
- The virtual machine will need an agent installed on the VM that will look into the various log directories and send them to a Log Analytics workspace.
- You can configure what logs are sent to the workspace

Demo:
Build and log analytics workspace
- Create a resource: log analytics
- Configure it
Configure storage retention
Price
- Daily Cap: how much data we want to be interesting per day and once you hit that amount of data then it will cap it off(you can select when)
- Data retention: how long you want your logs to be saved in log analytics workspace
Assemble log analytics queries
- Go to Azure monitor → logs
- Use kusto query to get the result you want
- Example: search VM named XYZ, search top 5 VM named XYZ
Example | Meaning |
Search in TABLE “Value” | Search something in the table |
Where VM = “XYZ” | Search VM named XYZ |
Where VM = “XYZ” | take 5 | Output 5 VM |
Where VM = “XYZ” | top 5 by TimeGenerated | Output most recent |
Where VM = “XYZ” | sort by TimeGenerated asc | Output oldest result by sorting |
Where VM = “XYZ” | top 5 by TimeGenerated | Project TimeGenerated, computer, name, val
| Output specific column |
Where VM = “XYZ” | summarize count () by Computer | Group records together to a specific aggregation |
Log analytics agent
- Log analytics → agent management // download the windows and linux server agent
- Log analytics → agent configuration // configure what type of logs are being sent to workspace (sys log, IIS log, Linux performance counters)
Summary
- Azure monitor log analytics were previously called operation management suite
- A log analytics workspace stores data from Azure resources so that they can be analyzed using the Kusto query language
- For Azure virtual machines, Microsoft recommends using the Azure log analytics VM extension
- when installing manually you will need the workspace ID and the primary key
- Data retention and a daily Cap can be configured in the usage an estimated costs tab
- KQL operators: search, where, take, top, sort, project, summarize, count
- KQL scalar functions: bin and ago
Controlling who has access to your logs
Scenario
- figure out how to manage access to the data in the Log Analytics workspaces.
- need to comply with data sovereignty rules in certain countries
- looking to save costs by reducing outbound Network traffic
- Need to control who can access resource data across multiple teams
How many workspaces to deploy
One Vs. Many
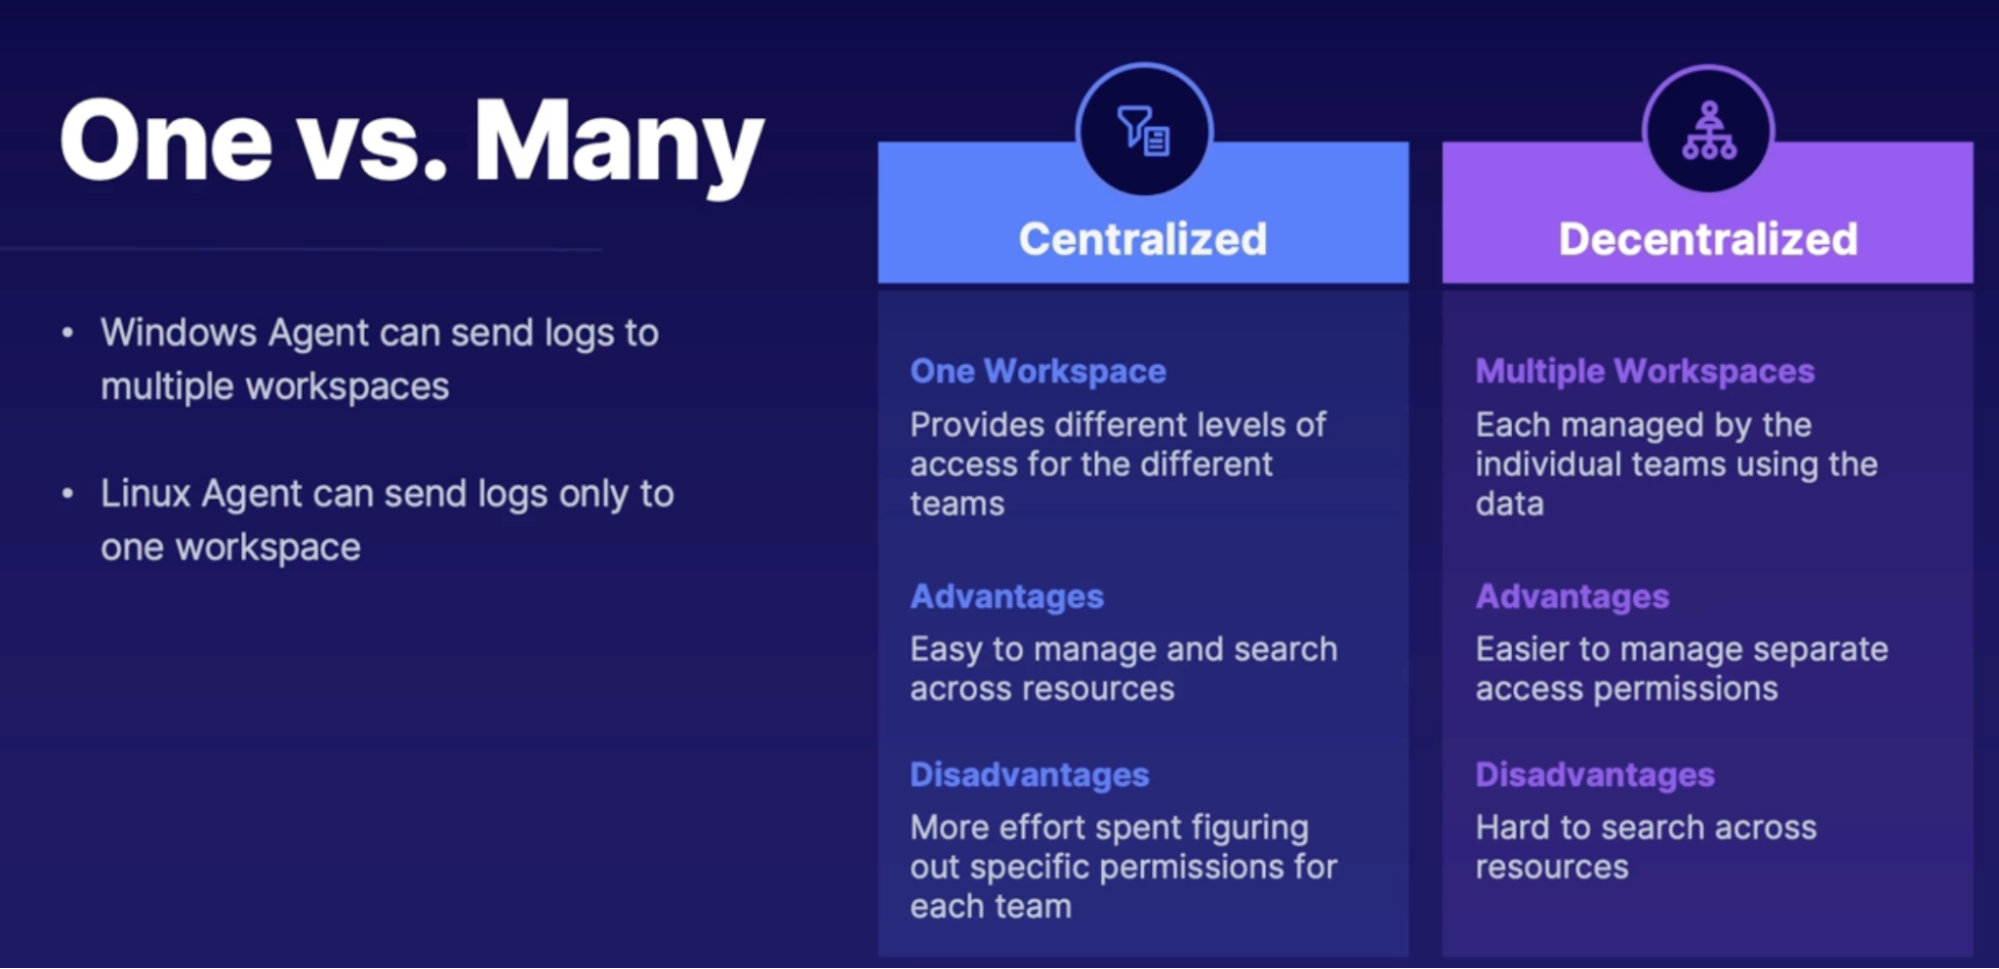
Access Modes
- Meaning the way user accesses the workspace and this determines the scope of the available data to that user
- it also determines what level of access that user has.
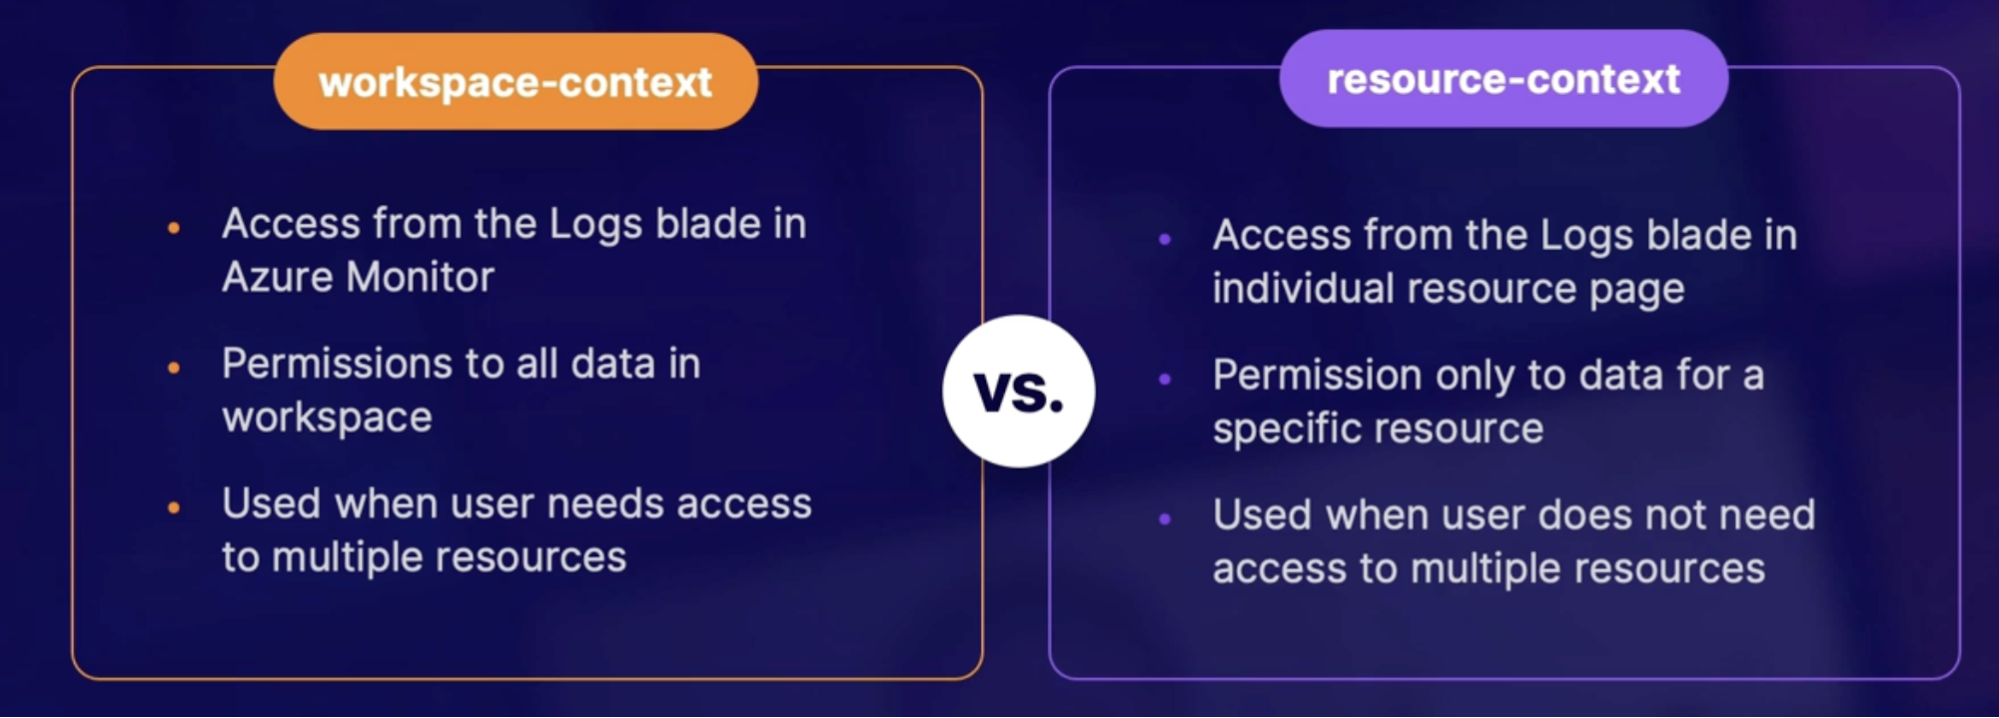
Access control modes
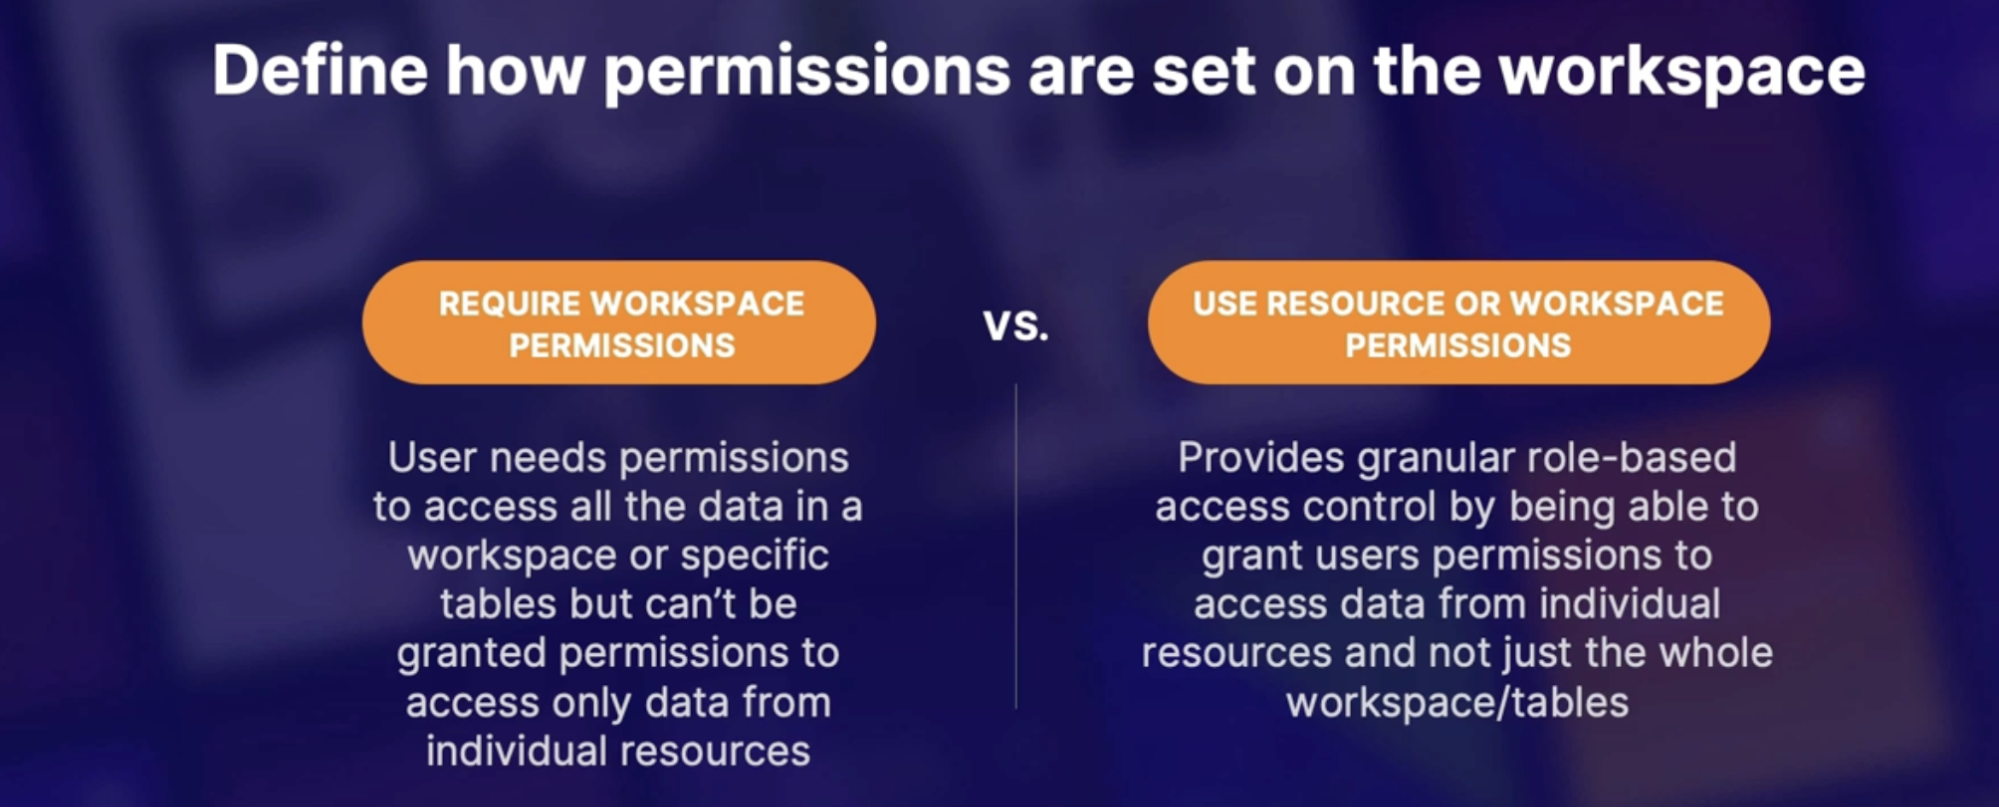
Built-In roles
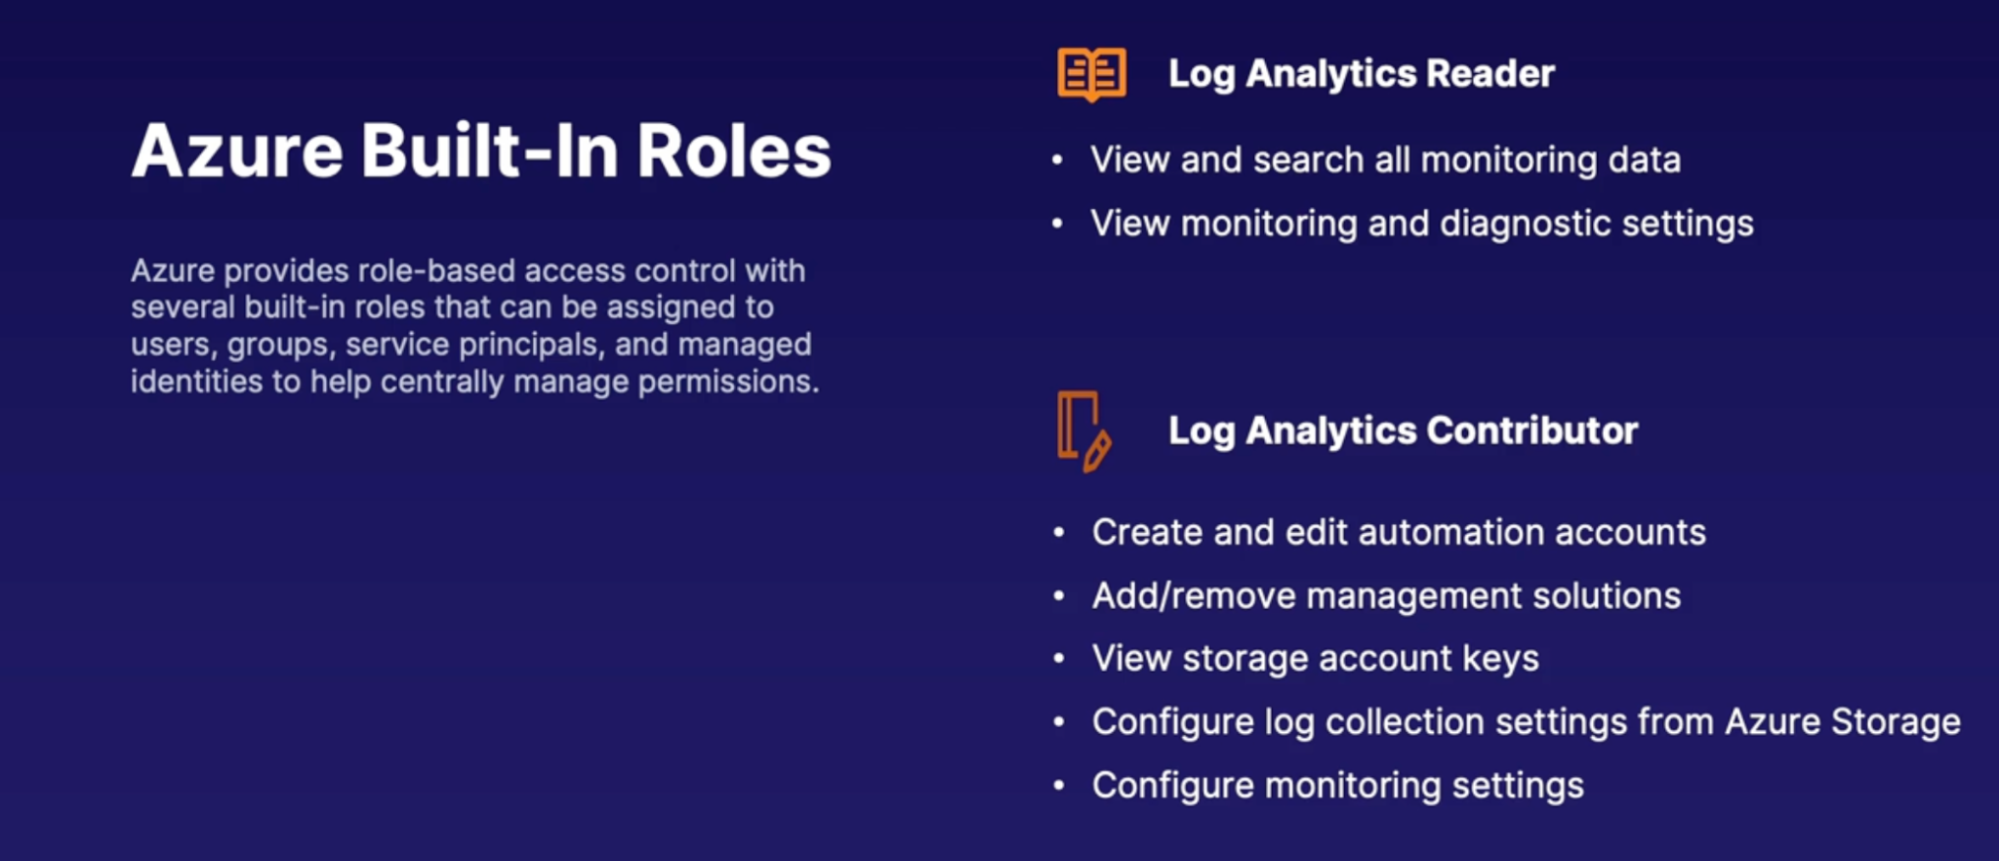
Custom roles table access
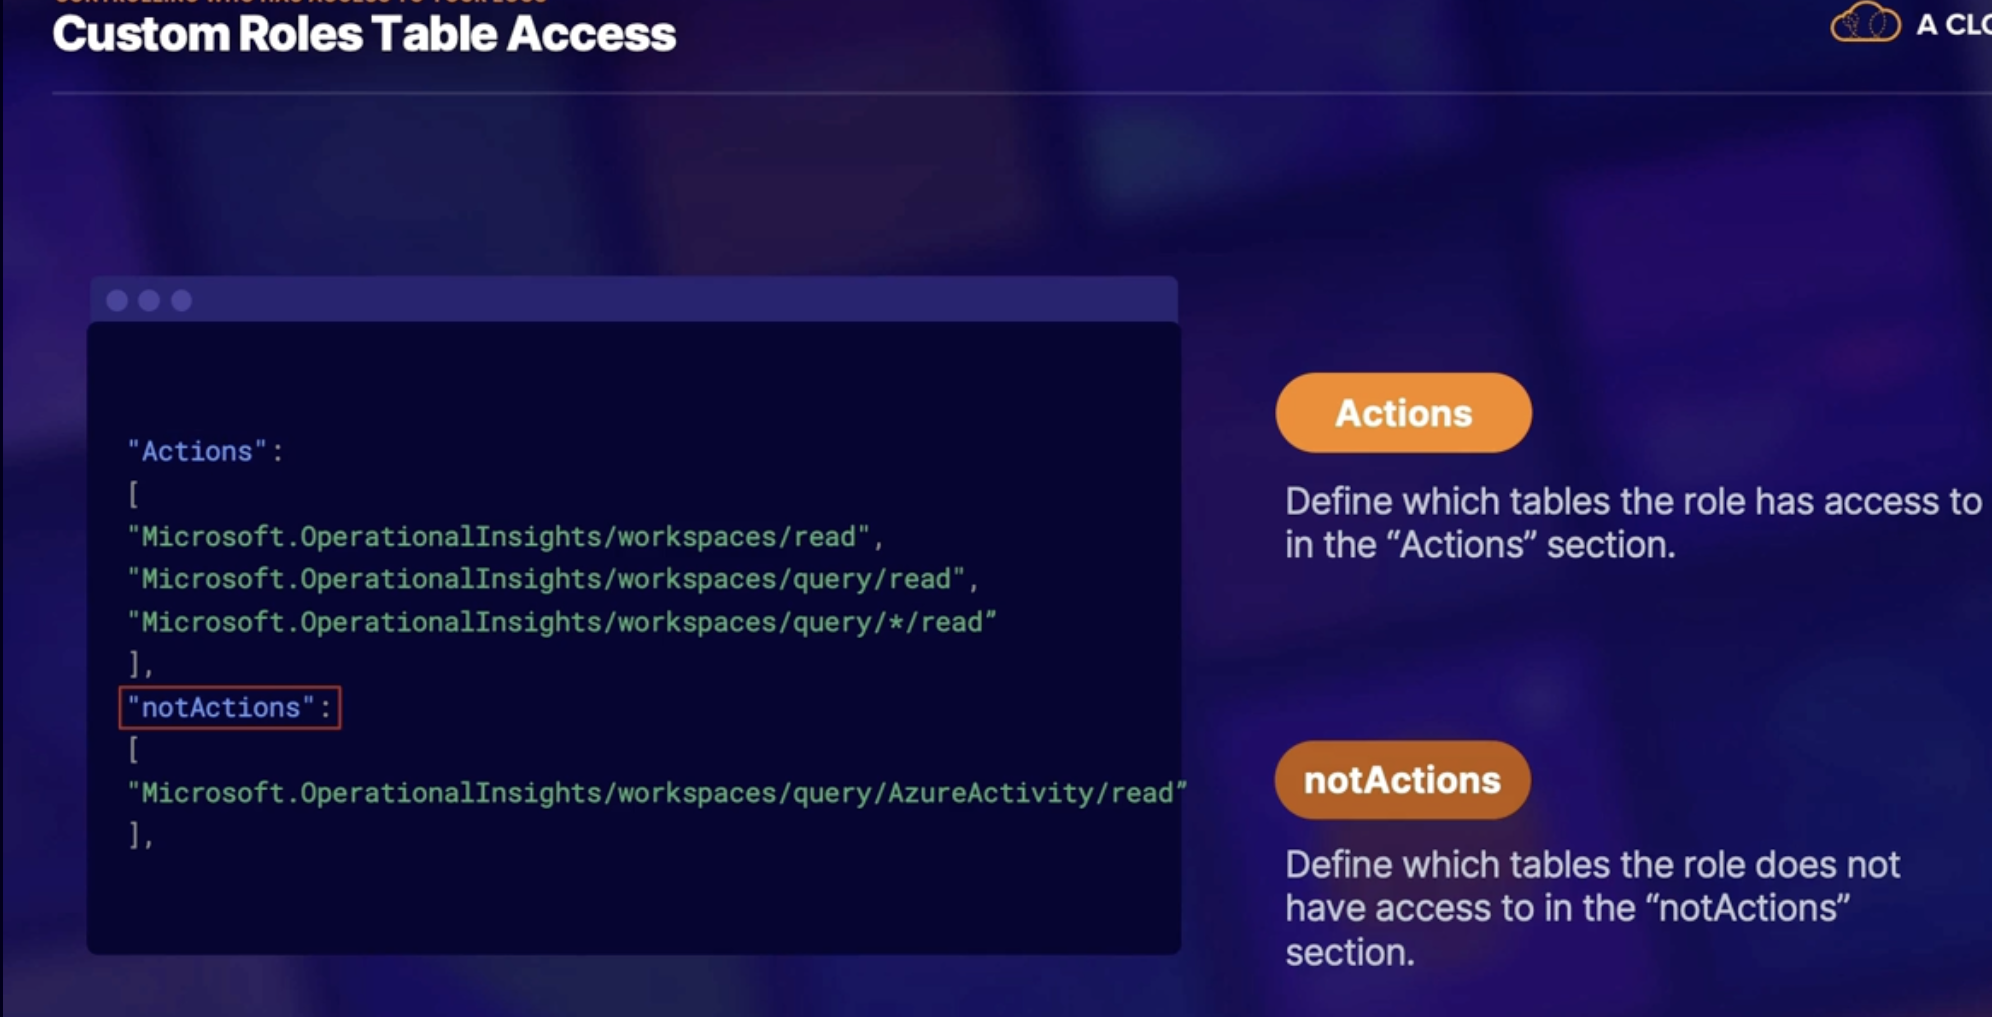
Demo: configuring access control
Summary
- centralized workspaces are easier to search but harder to manage access
- decentralized workspaces are harder to search but easier to manage access(individual workspaces for each group that needs access to that specific data)
- The workspace context from Azure monitor logs has access to the whole workspace
- The resource context has access only to the specific resource logs
- log analytics reader(no manipulation) and log analytics contributor are the built-in roles for log analytics workspace access
- access can be granted to specific tables in the “action” section of the custom role
- access can be denied to a specific table in the “notActions” section of the custom roles
Crash analytics
Crash analytics
What:
- When you view and analyze the crash events that have not been handled gracefully by your code.
- Ex: unhandled exceptions, or runtime exceptions from an unexpected event, or errors that are not handled by a try-catch block.
Why do we need it:
- oftentimes it's difficult to pinpoint issues because the error information is either vague or just not helpful.
- The goal is to learn as much as possible about the errors that led to the failure so that you can fix the issue.
How can we do this?
- Use crash report software
- Visual studio App Center
- Google firebase crashlytics
Visual studio App center diagnostics
What:
- determines that there's an issue going on and then provides insights into why the issue might be occurring. // helps diagnose the issue.
How:
- SDK: This is used to gather diagnostic information that will be used to determine what the issue is.
- Diagnostics: Device information, application information, running threads, installation/user ID
What happens when a crash occurs?
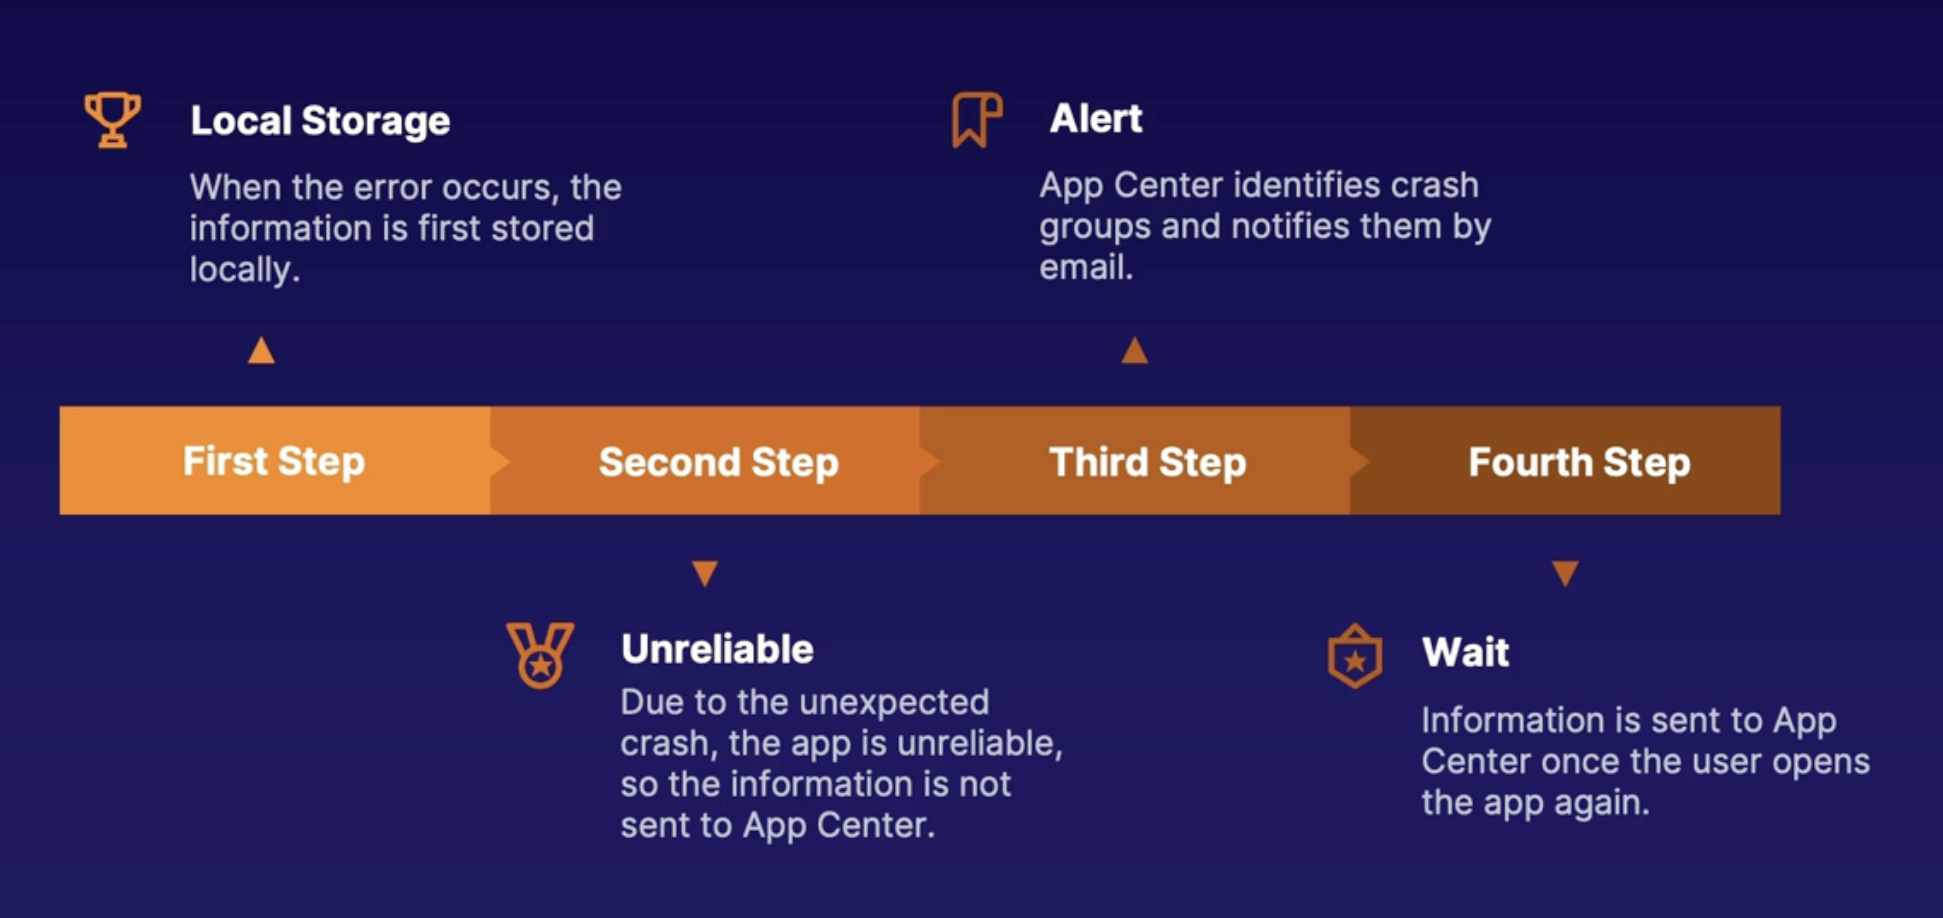
Google firebase crashlytics
crash reporting tool that:
- uses the firebase Crashlytics SDK
- automatically groups crashes together
- suggests possible causes and troubleshooting steps
- diagnosis issue severity
- presents user information
- provide alerting capabilities
Demo
- Open App Center page
- Add SDK to your app
Summary
- Visual Studio App Center SDK is needed to gather the information used for diagnostics
- App center diagnostics: information can be viewed in the crashes tab
- diagnostic information: includes device and application information, running threads, and IDs
- Google firebase Crashlytics provide similar crash analytics capabilities
- crash information can be found under the stability section in the crashlytics tab
Summary
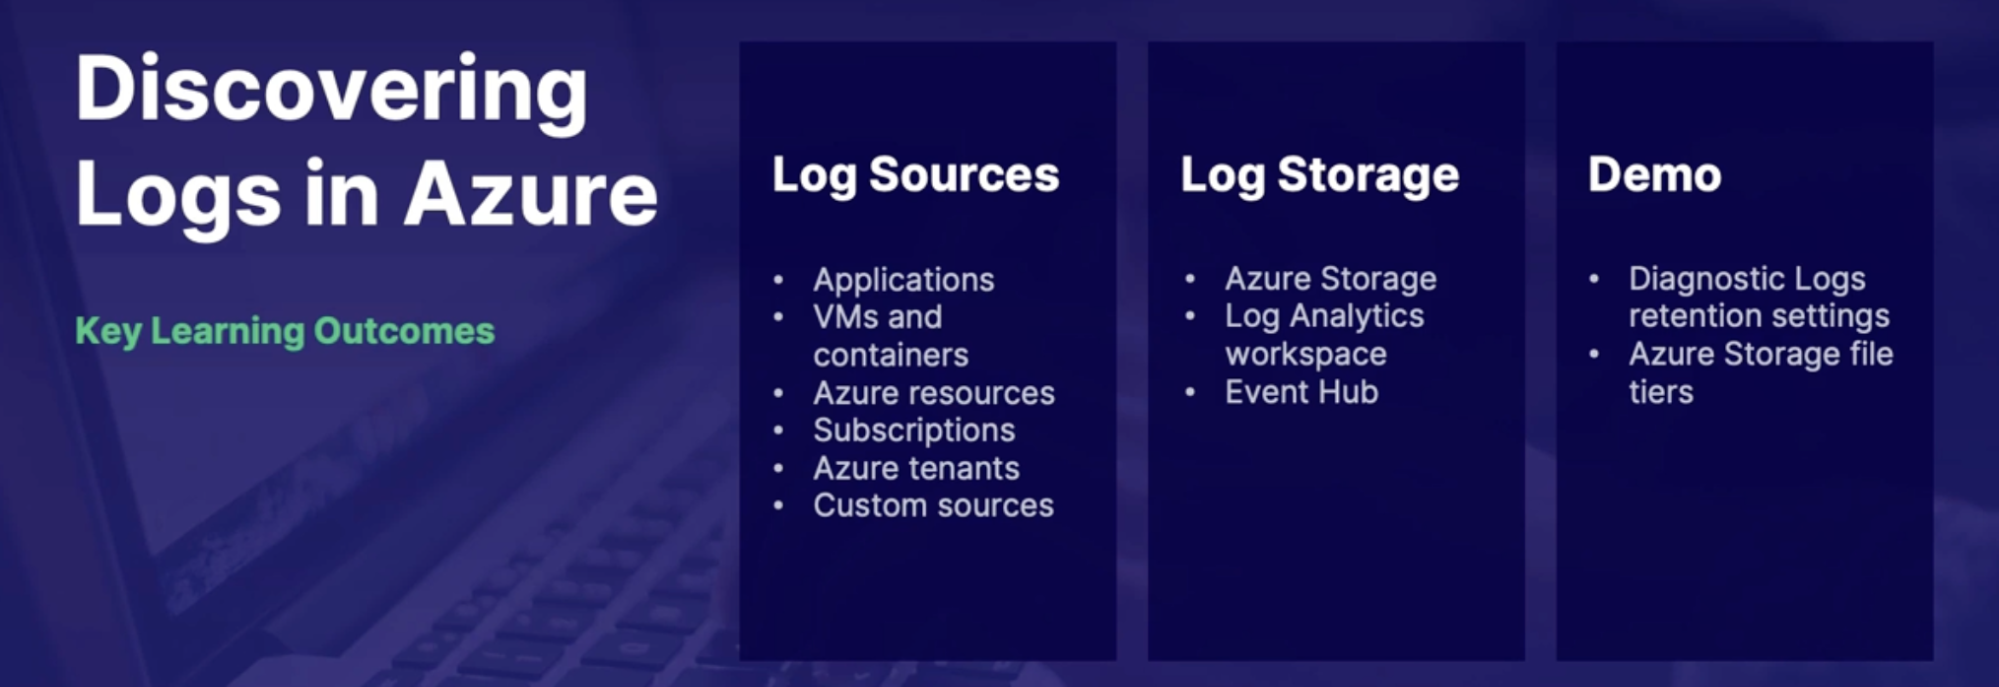
Chap - 21: Designing and Implementing Telemetry
Introducing distributed tracing
Scenario
- the team has instituted centralized logging using Azure Monitor logs,
- but they realized that they need more contextual information, which is challenging because they're not familiar with the whole environment.
- In the past, when they were called to fix a bug, it was very specific to their individual services,
- Now they want to learn how to utilize Application Insights to get the full picture of their application and system end to end.
Monolithic application/NTier architecture
What:
- These are large applications that have many components, all packaged into one giant artifact or executable.
- And what would happen is, over time, these artifacts would just get bigger and bigger while more features are added to the application.
Problem:
- The problem here is that these applications were slow to build, test, and deploy.
- Building
- When it comes to building, changes are hard to implement because the code is so tightly coupled.
- Changing one thing will likely have unintended consequences with other things in the application.
- Testing
- And when it comes to testing, you need to test everything in the entire application because it's all packaged together and everything affects each other.
- Deployment
- And when it comes to deployments, every single time you need to do an update you need to deploy the entire application at once.
So when it comes to monolithic applications,
- agility and maintainability suffer.
- They're also hard to scale because you would need to scale the entire application.
Microservices/Service-based architecture
What:
- the approach is to break down software components into smaller pieces, which are loosely coupled services(each components can be independently replaced or upgraded)
- because everything is separate, each service communicates with the other over a network, making REST API calls to each other.
Advantages | Disadvantages |
Reduced coupling: change in one component is less likely to cause an issue with another component | Complexity harder to keep track of where everything is running from |
Agility: easier to build test and deploy because you can focus on each component individually | Latency: all communication between components is through network calls |
Scalability: can scale components separately scalability can scale components separately |
|
What do we monitor
- Throughput: how much work the application performed in a certain amount of time
- for example, if you have a web application, you can measure a throughput by how many completed requests per second there are.
- Response times: how long it takes for a call to travel from one component to the other.
- error rates: how many errors are we getting, or what percentage of the time are we getting errors?
- 400 or 500 errors
- Traces: is to follow an application's flow and data progression. So if there is an error, a trace can allow you to see where and why it happened.
Distributed Tracing
Why do we need it?: to address the challenges of cloud native and microservice architecture where it is hard to Keep track of what happened, where, and how are each of the separate components performing
How does it work?: tracks the events by using a unique ID across all the services on all the resources in the call stack
How do we implement it? Application Insight SDK provides this functionality by default
Demo: Application Insights tracing
- From the Application Insight → failure
- See the charts and top 3 failed dependencies, error codes, exception type, operations(end to end transaction details) - view telemetry
- Application Insight → application map
- info about all the calls that are made to the various components(failed calls, performance info)
Summary
- Monolithic architecture have all the components of an application in one artifact
- Microservice architecture distributes the components on individual resources
- Distributed tracing uses a unique ID to produce a detailed log of all the steps in the call stack
- Distributed tracing capabilities are provided by default using the Application Insight SDK.
- The application map provides a visual of all the dependencies and their corresponding connection and trace information
- Traces can be found in the failures blade of Application Insights
Understanding User Analytics with Application Insight and App Center
User analytics
What:
- We have an application; if the users are not having a good experience with the app, then we've missed the point.
Why:
- by performing user analytics, we might find that some processes are not as intuitive to the user as we had thought
- and that there might be better ways of doing something.
Callouts
- The application is designed to provide a service for the users therefore, it is important to understand how they are using it and where it can be improved
Application Insights user analytics
View user analytics via Application Insights.
This provides
- Statistics on Number of users
- Sessions, Events, Browser, OS Information
- Location information - all comes from client-side JavaScript Instrumentation
Usage
usage blade in App Insight there are various sections
- Users:
- how many users visited the application.
- How: this number is counted by anonymous IDs that are stored in the browser.
- And this means that if a user changes their browser, or clears their cookies, or changes the devices that they're accessing the application from, this will look like an additional user from Application Insights perspective.
- Sessions:
- is a certain amount of time that a user spends on your application.
- And that session is over when either there's no activity from the user for more than 30 minutes or after 24 hours of use with continuous activity.
- And this section counts how many sessions the application has had.
- Events:
- counts how many times, pages and features have been used
- Funnels:
- to see if customers are following the path that you intended for them on the website, or if the users are leaving the site at unexpected points.
- User flows
- shows the overall general path that the users are taking on your website.
- It shows what parts of the page does the user click on the most and are there any repetitive actions?
Visual studio App Center analytics
- Active users: How many users are currently using the application
- Sessions: how many sessions the application had
- Geographic data: Where are the users accessing the application
- Devices: What devices are being used to access the application
- OS: What OS are they using on their devices
- Languages: what languages are used by the users
- Release: what version of the application is used
- Events: what actions the user performed on the application such as the beaches that they visit(custom events as well)
Export App Center data to Azure
- Data can only be saved for 28 or 90 days in App Center
- Data can be exported to either
- Azure blob storage: hard to query
- Azure Application Insight
Demo
Explore App Center analytics
- In App Center → Analytics
- See active users, session, device info, OS, Country and languages
Export data to Azure
- From settings → export → new export
- Blob: configuration is straight forward
- App insight(requires instrumentation key)
- Go to your Azure AppInsight instance
- On the essential page: get the instrumentation key
Explore Application Insights User Analytics
- From Azure App Insight Instance → Usage // find user information
Summary
- A session is a period of consistent activity from a user
- A funnel determines if the users are following the intended path
- A user flow shows the general course that the user takes on the application
- Data can be exported from App Center by navigating to settings and then export
- Data can be sent to Azure blob storage or Application Insights
Understanding User Analytics with TestFlight in Google Analytics.
Google Analytics
Web analytics tool that
- provides tracking and reporting on application traffic
- displays user demographics
- shows device and OS information
- collects error events data
- runs statistics on new Vs. returning users
How to start collecting Analytics
How Google configured data
- Analytics account
- initial account can be created by logging into Google Analytics with Google account
- Additional accounts can be configured in the admin section
- Analytics property
- A property groups the traffic data together for a specific application
- Configure Stream
- Manually add provided site tag to the head section of application pages
- automatically configures stream by adding the measurement ID to Google tag manager
Steps:
- Sign into https://analytics.withgoogle.com
- On the left blade, click on the Admin section - gear symbol
- Create account
- Account name
- Property name
- Create property (configure data stream)
- Click on Data Stream
- Choose a platform: Web
- Enter website URL
- Enter stream name
- From Tagging Instruction
- Global site tag (manual): if you select this then you have to embed the code snippet provided in this page to the head section of your HTML page
- Google tag manager(automatic): from the page grab the Measurement ID and add it to your Google tag manager and set it to trigger on all the relevant pages
- On the left blade, see the user data
Summary
- An analytics property groups application traffic together so only relevant data is sent
- A property is created in the admin section
- you can manually add the site tag provided in the property to the head section of your application pages(HTML Page) to configure a stream// once it’s configured it will start sending data to your Google analytics workspace
- you can use the measurement ID to automatically configure the stream using Google tag manager
Exploring infrastructure performance indicators
Performance
What is it?
- Performances how efficiently a component performs its work in a certain amount of time
Why do we need it?
- To make the most profit we want our system to be able to perform the highest quality work, as fast as possible, with the least amount of downtime
How do we measure it?
- Key performance indicators measure how well a system is performing(Number of queries processed per second or the number of requests)
High-Level performance indicators
- Requests: the number of requests and how long it takes to process them
- Traffic: Amount of network traffic volume
- Transactions: The rates at which transactions are being completed successfully or unsuccessfully
- Latency: how much time it takes to complete the work
Example data correlations
- Concurrent users Vs. request latency: how long does it take to start the process request?
- Concurrent users Vs. response times: once the request has started, how long does it take to finish?
- Total requests Vs. error rates: how well is the system processing request?
Low-level performance indicators
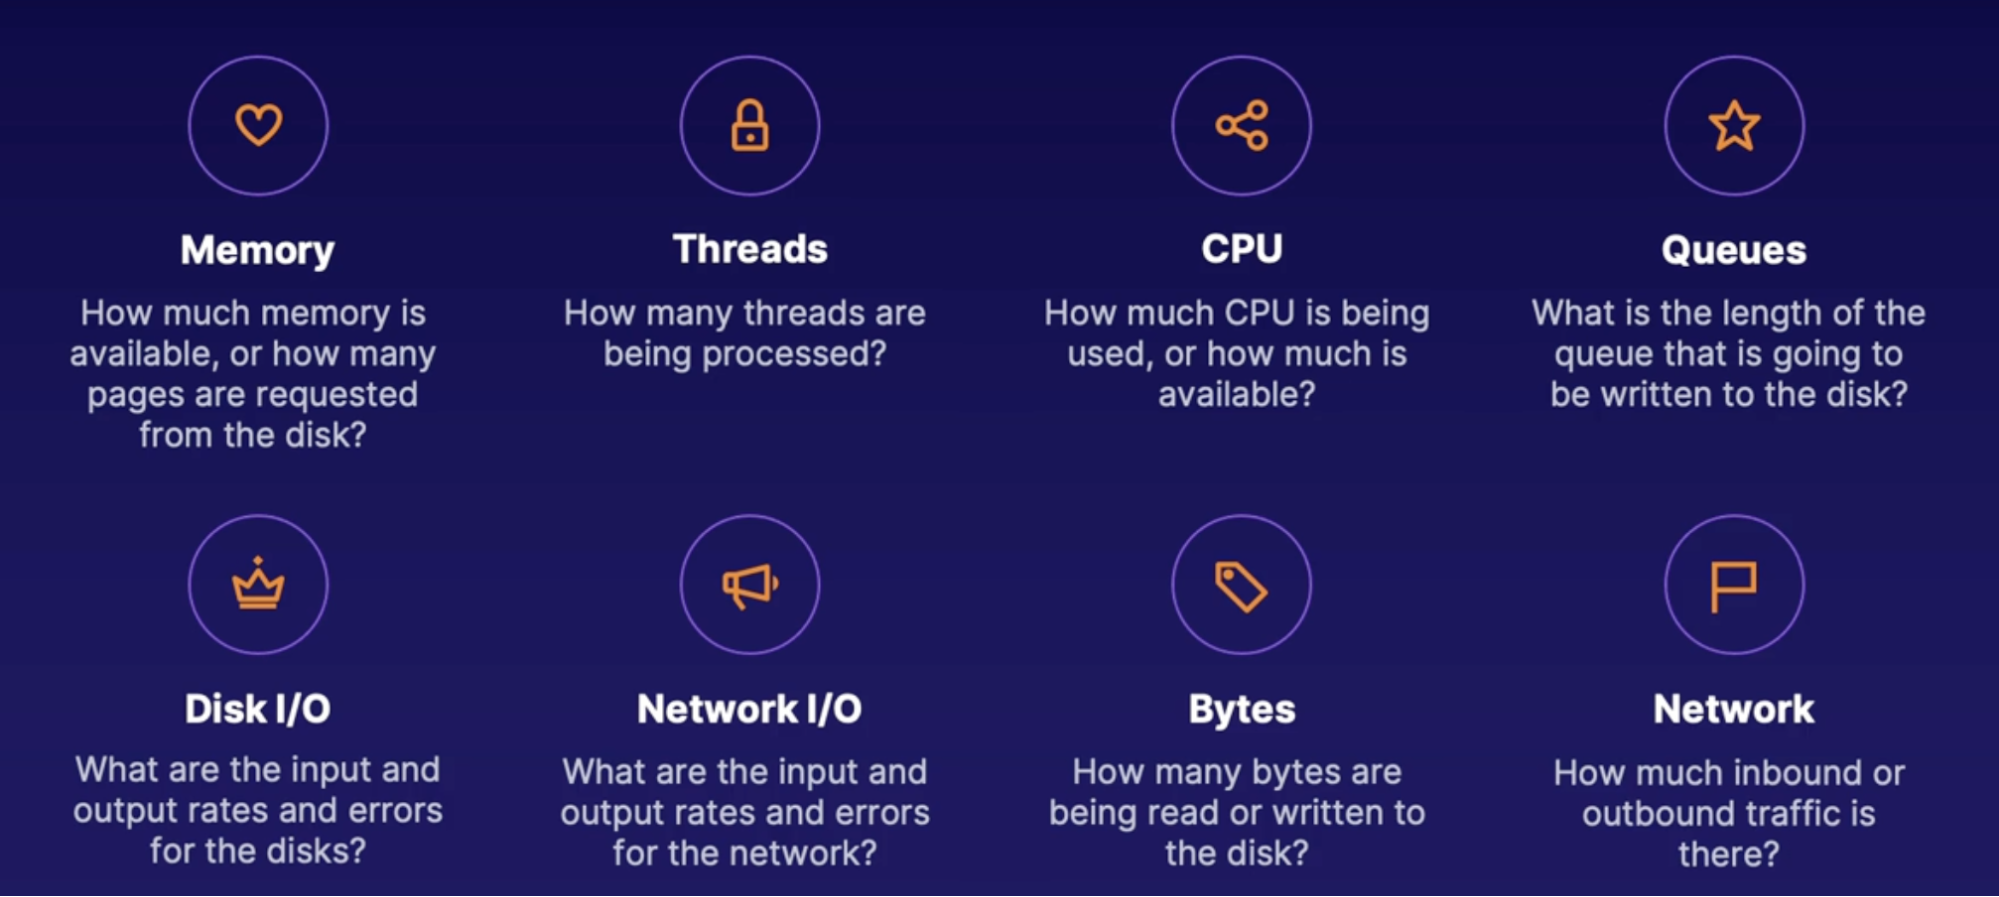
Disk I/O: it is the speed with which the data transfer takes place between the hard disk drive and RAM
How to collect helpful data
Understandable: it should be clear what each performance metrics is and why it is captured
Frequency: Data should be collected at logical intervals
Scope: Data should be able to be grouped and categorized into larger or smaller scopes
Retention: Data should not be deleted too quickly to establish baselines and historical trends
Summary
- Key performance indicators are metrics that tell us how well our system is performing
- request, traffic information, transaction data and latency are examples of common high-level performance indicators
- Performance indicators may be set on individual metrics or they may be set by correlating separate data points together
- memory and CPU utilization, number of threads, queue information, IO data, and network traffic are all examples of common low-level performance indicators
Integrating Slack and teams with metric alerts
scenario
- implemented application crash alerts with data from application insights
- identified key infrastructure performance indicators to alert on
- currently sending alerts to SMS and email but want to integrate chat apps like Teams, Slack
Action groups
when setting up an alert you need to configure what the alert should be on, and what the alert should do once it’s triggered
What: Action group are the notification and action settings that can be saved for one or many alerts
Settings consist of
- The name of the action group
- what type of notification will be sent
- what action to take when the alert is triggered.
Notification types
- Email Azure resource managers role: send an email to the users in a selected subscription role
- Email/SMS/Push/Voice: input specific user information to be sent to using the selected medium
Action types
- Automation runbook: receives a JSON payload to trigger a runbook
- Azure function: uses an HTTP trigger and point from an Azure function
- ITSM: Connect to supported ITSM tools(ServiceNow)
- Logic App: uses an HTTP trigger endpoint from a logic app
- Webhook: Webhooks endpoint for an Azure resource or third-party source
- Secure Webhook: uses Azure active directly to communicate with a webhook securely and put
Demo: trigger logic apps to send notifications to Teams and Slack
Steps:
- From Azure monitor → alerts
- Select resource - VM
- Add condition: Percentage CPU
- Actions: create action group
- Notification: Email/SMS/Push/Voice
- Actions: logic apps
Summary
- An action group defines how and who to send a notification to
- Additionally, you can select to trigger an automation runbook, a function, connect to an ITSM, a logic app, or a webhook.
Summary
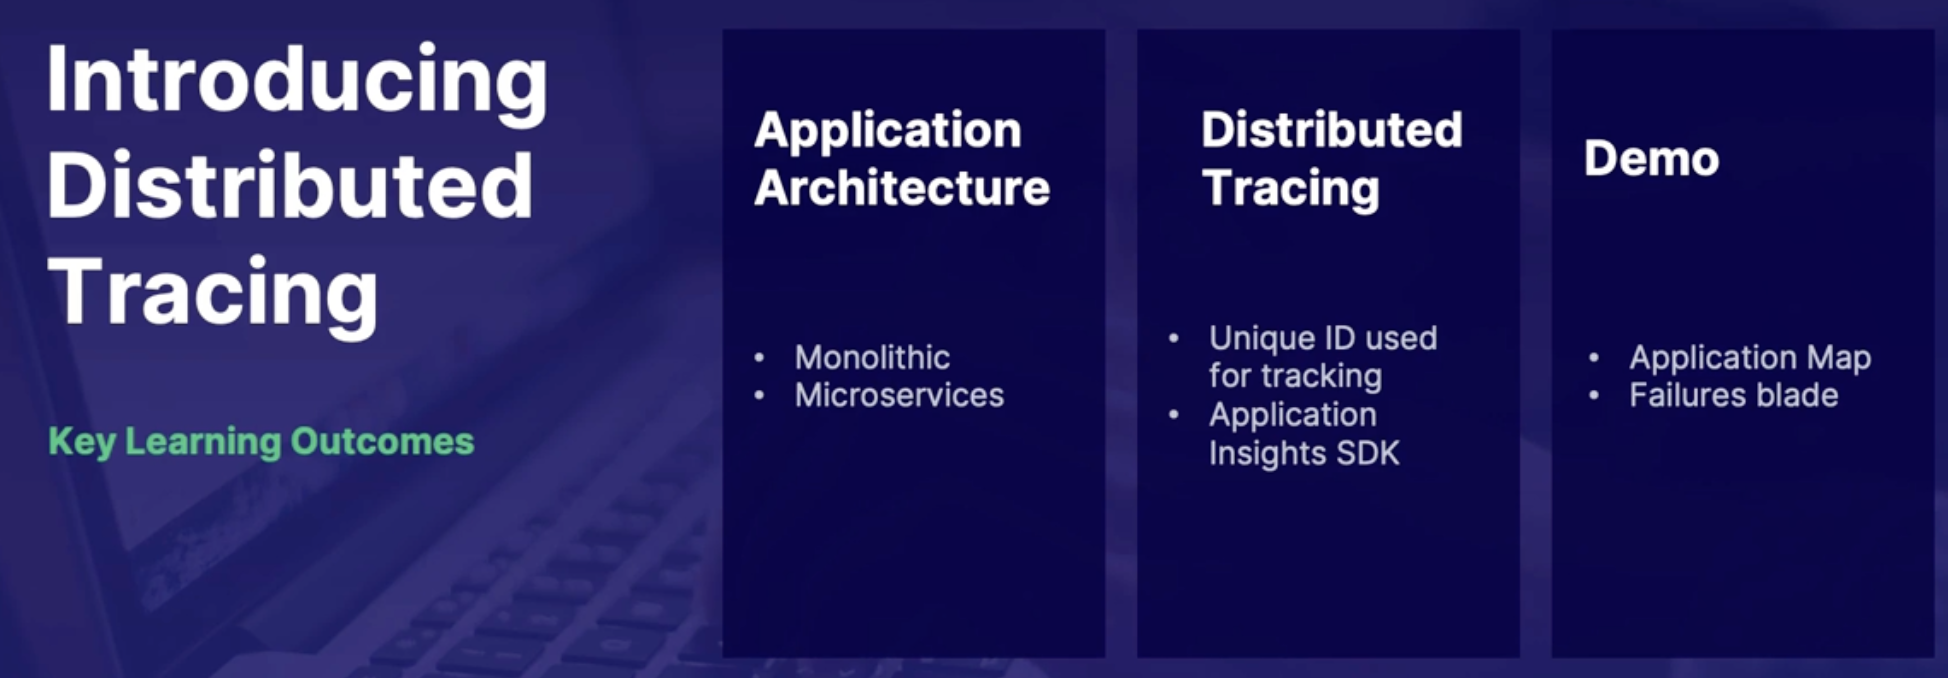
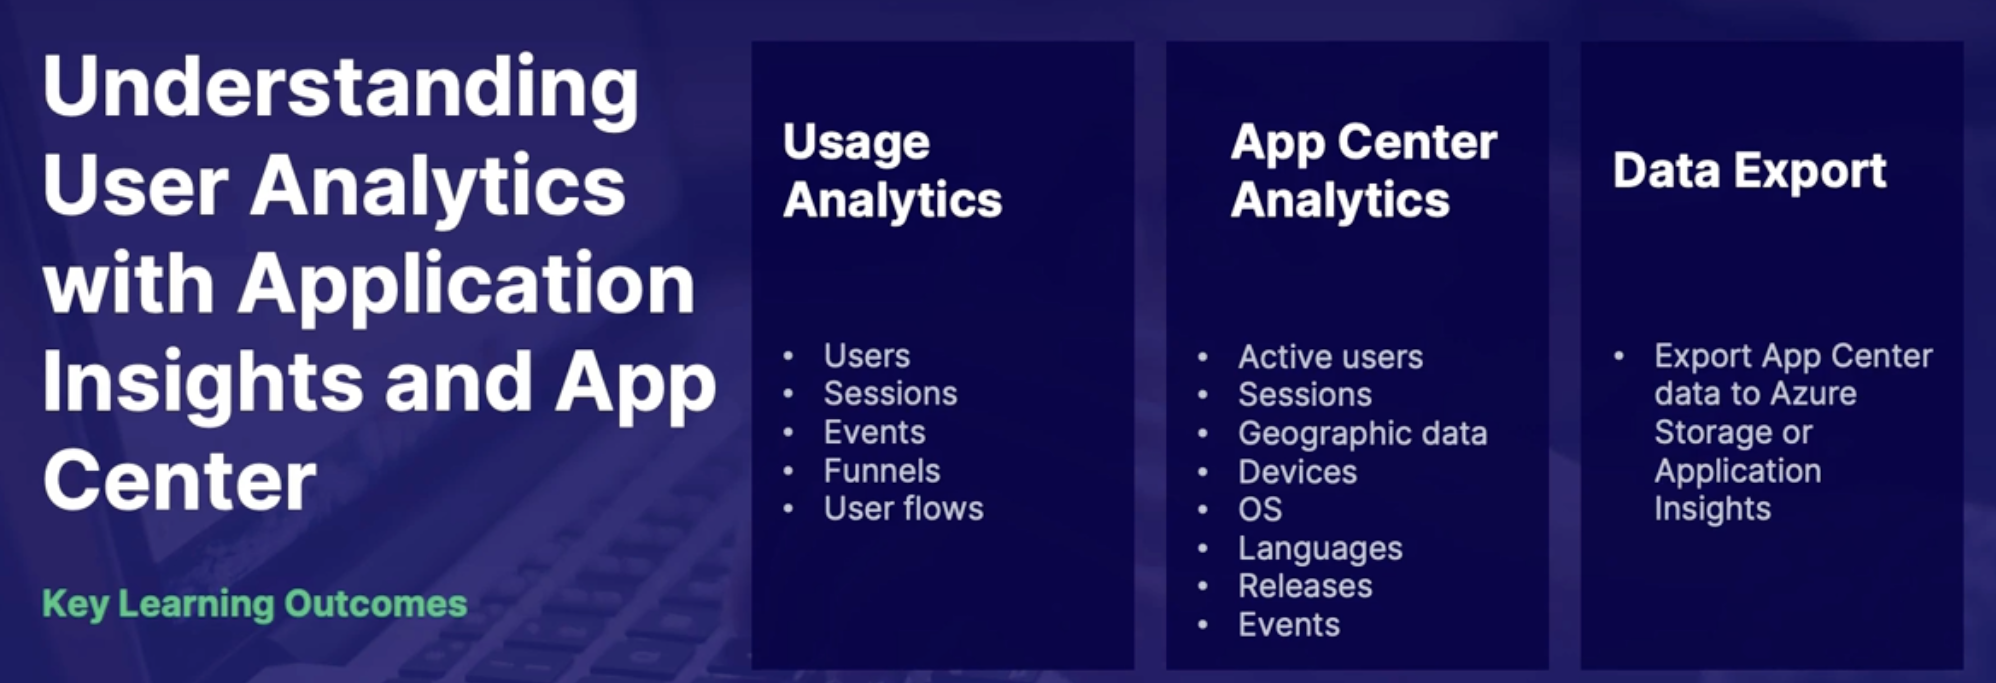

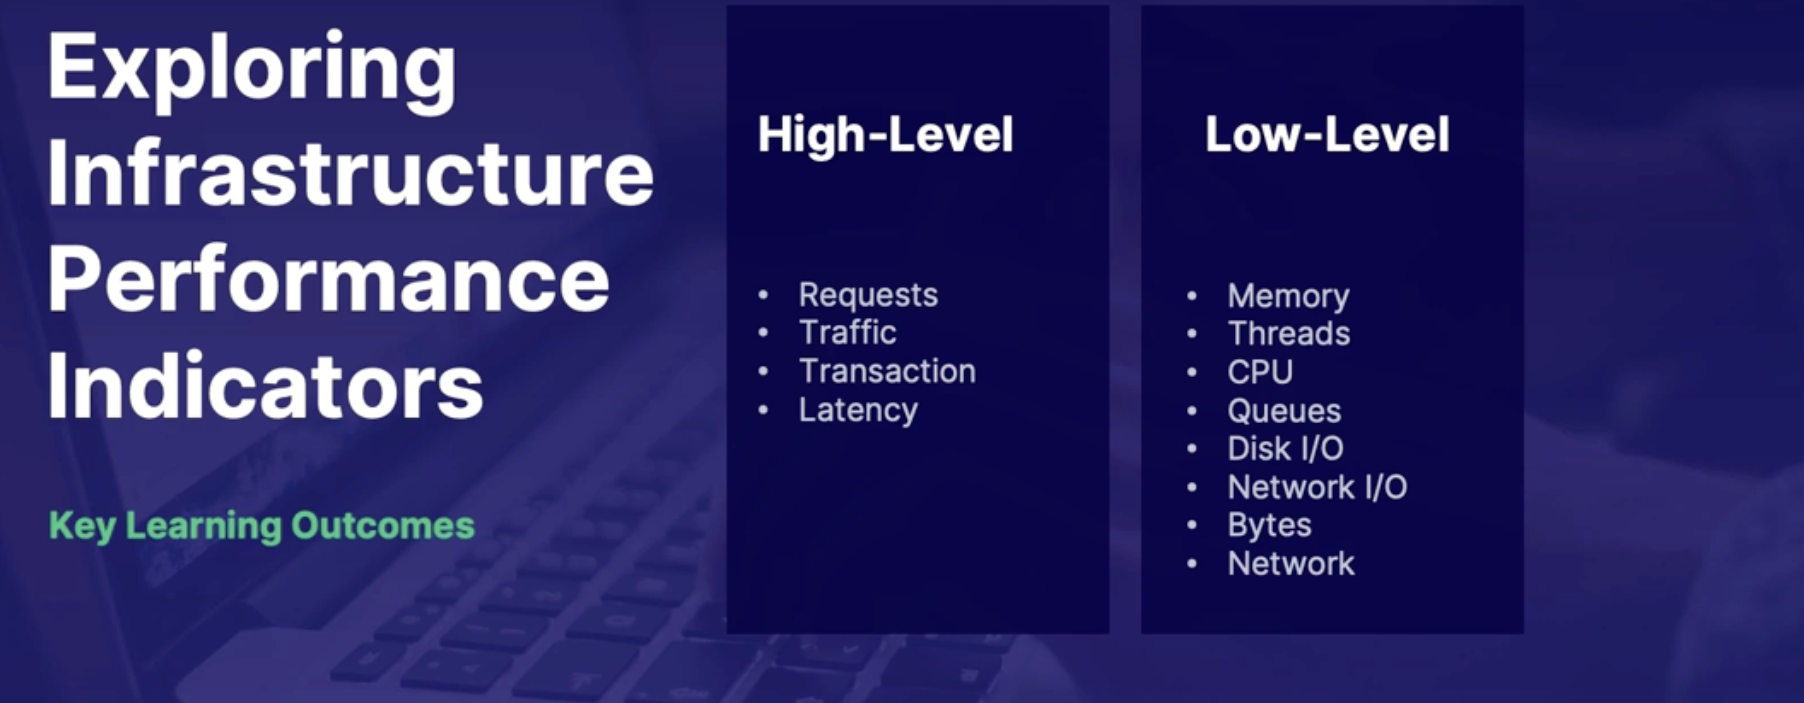
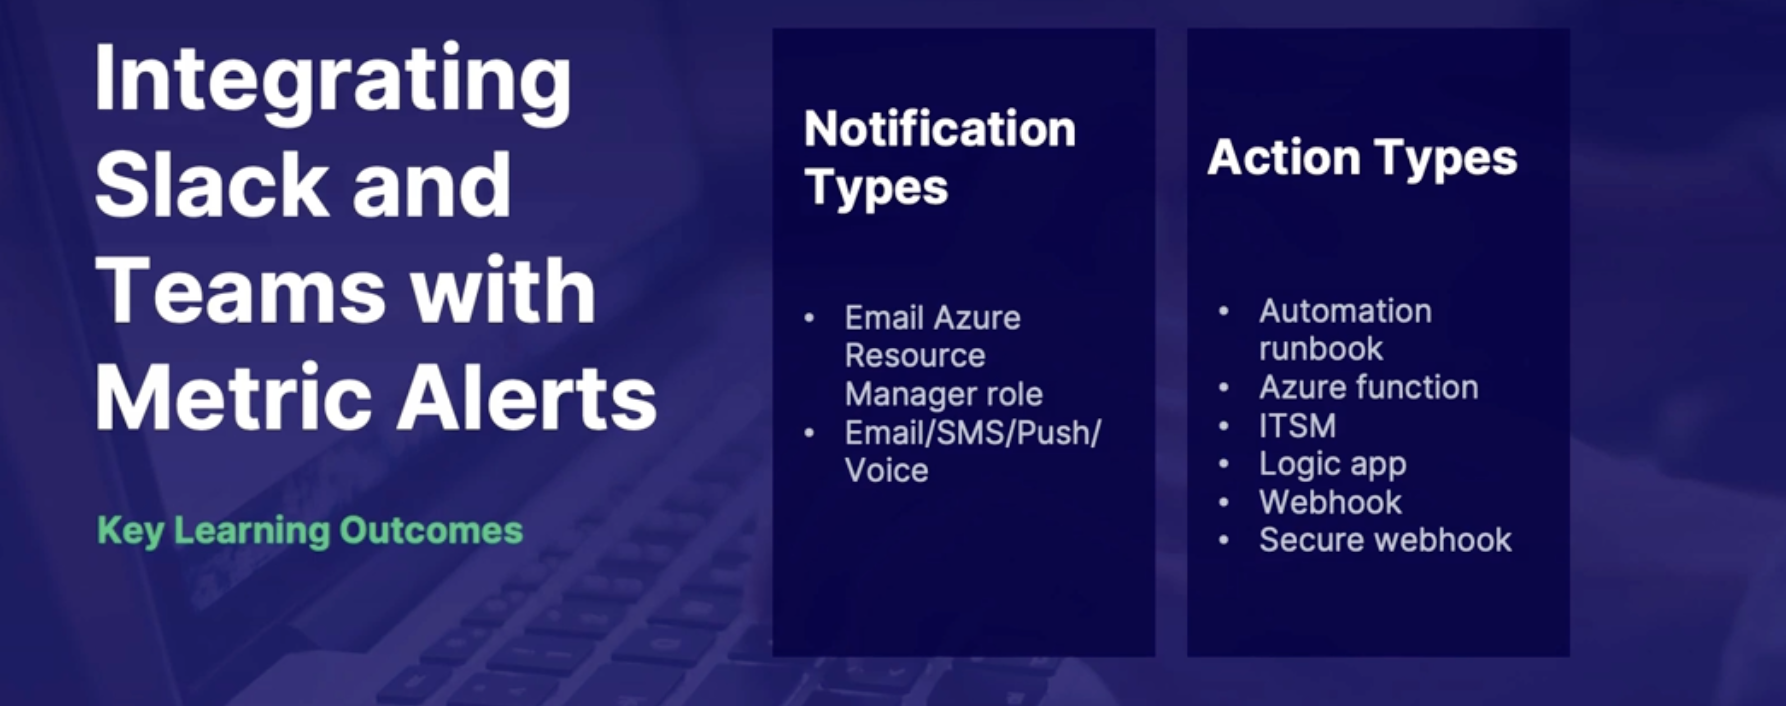
LAB: Subscribe to Azure Pipelines Notifications from Microsoft Teams
Objectives: In this lab, we will be learning about how to set alerts for activity from Azure Pipelines. In this scenario, we will be creating an Azure Pipelines build release and then configuring Microsoft Teams to receive the notifications for it, which will help with collaboration across the development lifecycle.
Callouts: you’ll get notifications in Teams every time you run pipelines
Chap - 22: Integrating Logging and Monitoring Solutions
Monitoring containers
Azure monitor container insight
What:
- service that provides information on the container infrastructure
- Available platforms:
- AKS
- self-managed Kubernetes cluster running on the AKS engine
- Azure Container Instances
- Kubernetes clusters on-prem, or maybe running in an Azure stack,
- as well as Red Hat OpenShift or Azure Red Hat OpenShift.
- Docker
- Moby
- CRI-compatible runtimes like CRO or Container D.
Azure Kubernetes service(AKS)
One of the more common platforms that it's used for is Azure Kubernetes Service.
Why is it needed?
- Limited metrics:
- very few metrics available for the Container Service namespace in the Metrics Explorer out of the box
- So by enabling Azure Monitor Container Insights, many more metrics and analytics become available to us.
- Windows and Linux
- supports both Windows and Linux containers
- It uses a containerized version of the Log Analytics agent, so it's all running with Log Analytics behind the scenes.
- Log Analytics
- When you enable container insights with a new log analytics workspace, it will be created in a new resource group
AKS Container insight configuration options
Can be configured by
- Azure portal
- ARM Template
- Terraform
- PowerShell
- CLI
Prometheus
What:
- Open-Source monitoring and alerting tool
- Cross-platform(Supported in windows and Linux)
- Developed by SoundCloud in 2012
- Central repository for matrics stored as key-value pairs
- uses a query language call PromQL
- often tied into Grafana to provide data visualizations
How do Prometheus work
2 components
- Server: server uses data exported by targets to collect metrics. So it’s pulling metrics from the various targets at configurable intervals.
- Targets : each of these targets utilize exporters, which are agents that expose the data on an HTTP metrics endpoint
Metrics examples
- total http requests,
- memory limits
- memory usage
Prometheus and Azure monitor integration.
- No Prometheus Server
- Integrate Prometheus with Azure so that Azure Monitor essentially works as your Prometheus server.
- which is helpful because that way you don't have to manage and support the server, and you can take advantage of the high availability that you get with Azure resources.
- Azure monitors pull data from Prometheus exposed endpoints
- available for AKS, Kubernetes, and red Hat openShift
- How to integrate
- Azure Monitor for containers needs to be enabled. this will install the containerized log analytics agent on the pod
- edit and deploy the conflict map file provided by Microsoft(YAML document - to configure what metrics should be collected)
- deploy with kubectl apply command
Demo:
Enable container insights using the portal
- azure portal → Kubernetes cluster
- monitoring → insight → enable it
- See the different sections: cluster, report, nodes, controller, containers
Explore container health metrics
Summary
- Azure monitor containers insights capture additional health metrics and logging
- Prometheus is a cross-platform open-source metric aggregations monitoring and alerting tool
- The main component of Prometheus is the Prometheus server which pulls metrics from the target exporters
- exporters are agents that expose HTTP endpoint for metric scraping
- integration requires enabling Azure to monitor container insights to install the containerized log analytics agent
- Microsoft provides a config map file that can be deployed to the environment for Azure monitor to pull Prometheus data
- URLs for scraping, Kubernetes service, and pod annotations can be edited in the ConfigMap file.
Integrating monitoring with Dynatrace and New Relic
Dynatrace
- Hub for Azure resource logs, traces, and metrics
- AI assisted insights
- auto discovery
- alerting capabilities
- great for hybrid or multi cloud environments
Dynatrace Integration
How to send data to Dynatrace
- depending on the resource there are different ways to send Azure data to Dynatrace
- Agent: agent installed on computer resources.
- Azure monitor integration: provides additional matrix for over 70 types of Azure resources
- Log forwarding: stream logs into Dynatrace logs from an Azure event hub using an Azure function
New Relic
- performance monitoring tool
- monitors application performance and behaviour
- provides real time data and insights
- diagnostic and root cause insights
- alerting capabilities
Other third-party monitoring alternatives
Other third-party monitoring alternatives can monitor Azure resources but don’t have the built-in integration such as Nagios and Zabbix
Demo
Azure integration with Dynatrace
- Dynatrace → settings → cloud and virtualization → Azure → connect new instance
- Configure it
Azure integration with New Relic
Summary
- to integrate azure with Dynatrace, you will need to register an app in AAD, create a secret and then assign permissions to the service
- to integrate Azure with new relic you will need the subscription/tenant ID. you will also need to register an app in AAD, create a secret, and then assign permissions to the service.
Monitoring feedback loop
Feedback loops
What are they? real time feedback sent to the developers from end-users and operators about the application
Why do we need them? helps improve quality and reliability of the application by allowing the developers to quickly respond to feedback
how do we implement them? continuously monitor the application through all phases of its life cycle - not just production // Idea here is if anything needs to be fixed, you fix them before it goes to the production
Scenario
- A change was made to the application in the dev environment that causes a secret to change in key vault
- The application was deployed to production and it caused an outage
- operators need to monitor and notify secret changes to developers and confirm the changes was planned
Demo: implement feedback loop using a logic app
- In Azure → key vault → events → logic apps → Azure Event Grid
- configure it
Summary
- feedback loops allows developers to quickly respond to issue by getting real time feedback from end-users and operators
- monitoring should be included in all lifecycle phases to catch things before being deployed to production
- A logic app can be configured to trigger based on events grid events
Summary