Docker by LinuxAcedemy
Docker 4
Docker version 4
Moby 4
Docker 5 Whys 4
How Docker works? 4
Why you need docker 5
What is the issue 5
How issue solved? 5
Use case of Docker 5
Code concepts 6
How to start in Cloud 6
Prerequisite 7
Docker Architecture 7
Client: where you run and execute command 7
Client-server architecture 8
What you do 8
Create Dockerfile 9
Create Image 9
Create container: 9
Docker objects 9
Call outs 10
Docker Engine 10
Running a container flow 10
Docker commands 12
Docker general command 12
Docker image command 12
Docker Container command 13
Exec Command Explained via Scenario 14
Container flag command 2 15
Docker Ports Command 16
Flow: 17
Execute container command 19
Docker logging Command 19
Docker Networking 20
Network Commands 21
Scenarios 22
Network subnet:gateway commands 22
Callouts 22
Scenarios 23
Docker storage 24
How docker stores data on a local file system 24
Layered Architecture 24
Category for data storage 24
Mount data 25
2 ways to handle Persistent data 25
Bind mount 25
Volume: Preferred way to store data 26
Docker Volume commands 26
Scenarios 27
Docker file 27
General guidelines 28
Create a Dockerfile 29
Instructions 30
Commands 31
Environment variables 31
Build and Run Containers with env 32
Build arguments 32
Build and Run Containers with Build env 33
Build commands & flags 34
Multi stage build 35
Tag Commands 35
Docker hub 36
Image Push Command 36
Objectives 37
Example 37
Lab challenge 38
You want to dockerize your application 38
Tagging and Pushing Images to DockerHub 38
Image history 39
Container management 39
Container processes commands 39
Start container automatically 39
Example command 40
Container events 40
Managing stopped containers 41
Docker portainer 41
Watchtower 41
Scenarios 41
Portainer 41
Watchtower 43
Docker Compose 44
Idea 44
Example 44
Issue resolved by docker-compose 44
Docker Compose File explained 45
Callouts: 45
Docker-Compose File 46
Compose with Volume and Network 46
Management Commands 47
Compose Commands 48
Example 48
Callouts 50
Container orchestration 50
Docker Swarm 51
What is docker swarm 51
Setup 52
How it works 53
What’s it for? 53
Swarm commands 53
Service 55
Example 55
Service commands 56
Swarm networking 56
Ingress network 58
Embedded DNS 61
Swarm Network commands 62
Swarm Volums 62
Volume commands 63
Deploy swarm stack 64
Example 64
Example 2 66
What’s Given 68
Docker
- Docker the container runtime and orchestration engine
- Started as a PaaS provider called dotCloud leveraged Linux Container
- 2013, become docker Inc
- Most people refer to the docker engine
Docker version
- Enterprise Edition (EE) (features at price)
- Access to certified images and plugins
- Same-day support
- Vulnerability scanning
- Core functionality for free
- Both are released quarterly
- CE is supported for 4 months
- EE is supported for 12 months
Moby
- The open-source project for docker is moby
- Breaks docker down into more modular components
Docker 5 Whys
https://www.youtube.com/watch?v=fqMOX6JJhGo&ab_channel=freeCodeCamp.org
How Docker works?
Dockerfile → docker image → container(many)
Dockerfile is used to create an image for an application
Image can run on any host with docker installed on it
Ops team - can use this image to deploy application
Why you need docker
Setup E2E application stack that includes various different services/technologies
- Webserver using NodeJs
- MongoDB Database
- Messaging system - redis
- Orchestration tool - Ansible
What is the issue
Developing an app with different components
Need something that helps us with compatibility issues and something that will allow us to modify or change these components without affecting the other components and even modify the underlying operating system as required
- Compatibility with the underlying OS
- Have to make sure that all the different services are compatible with the version of the OS. if it’s not then you have to look for OS that is compatible with all the services
- Check the compatibility between the services and the libraries and dependencies on the OS // matrix from hell
- the issue, where one service requires one version of a dependent library where another service requires another version
- every time something has changed we have to check compatibility between these various components and the underlying infrastructure
- difficult to set up a new environment when a New developer on board
- cannot guarantee the application we are building would run the same way in different environments/OS
How issue solved?
run each component in a separate container with its own dependencies and the libraries all on the same VM and the OS but within separate environments or containers
we just had to build a docker configuration once and all developers could get started with simple docker run command irrespective of what operating system they are on.
All they need to do is to make sure they have docker installed on their system
Use case of Docker
- Idea that your dev and prod environment are exactly the same
- But this is not always the case because you're not going to be always able to replicate bugs from dev to prod (because you’re running new packages in your dev env as compared to the prod environment)
- Docker solves this issue; the software you run in dev is exactly the same as you run in prod = easily tracks bug
- Simplifying configuration
- It lets you put your environments and configuration into code so you can go and deploy it; meaning you can use exact same docker configuration for all your environments
- The goal is to decouple infrastructure requirements from the application environment
- Code Pipeline Management
- Developer productivity
- Issue: setting up a local dev environment // docker solves this issue
- Solve: rather than install a bunch of packages(group of classes & interface) and software; you can simply install Docker, deploy a container, and then your code mapped into that container using a volume
Code concepts
- Package: is a collection of classes, interfaces and sub-packages of same type, and it arranges them into a group // Folder containing group (all the classes)
- Types: pre-defined and user-defined
- Pre-defined:
- don’t have to write these packages(classes), because it’s already developed by some developers
- You don’t need to import package, compiler use this package automatically since this bydefault installed
- Programmer makes this packages for personal use
- Docker isolates applications, rather than using a single web server that runs multiple applications; the application is isolated to a single container
- Let’s say app experiences some issue like DDoS attack or a memory leak, the impact is isolated to that single container rather than server it’s running on
- Server consolidation
- Debussing capabilities
- Multi-tenancy
How to start in Cloud
- Buy a server
- Install Docker CE
Prerequisite
# Uninstall old versions:
sudo yum remove -y docker \
docker-client \
docker-client-latest \
docker-common \
docker-latest \
docker-latest-logrotate \
docker-logrotate \
docker-engine
# Install Docker CE
# Add the Utilities needed for Docker:
sudo yum install -y yum-utils \
device-mapper-persistent-data \
lvm2
# Set up the stable repository:
sudo yum-config-manager \
--add-repo \
https://download.docker.com/linux/centos/docker-ce.repo
# Install Docker CE:
sudo yum -y install docker-ce
# Enable and start Docker:
sudo systemctl start docker && sudo systemctl enable docker
# Add cloud_user to the docker group:
sudo usermod -aG docker cloud_user |
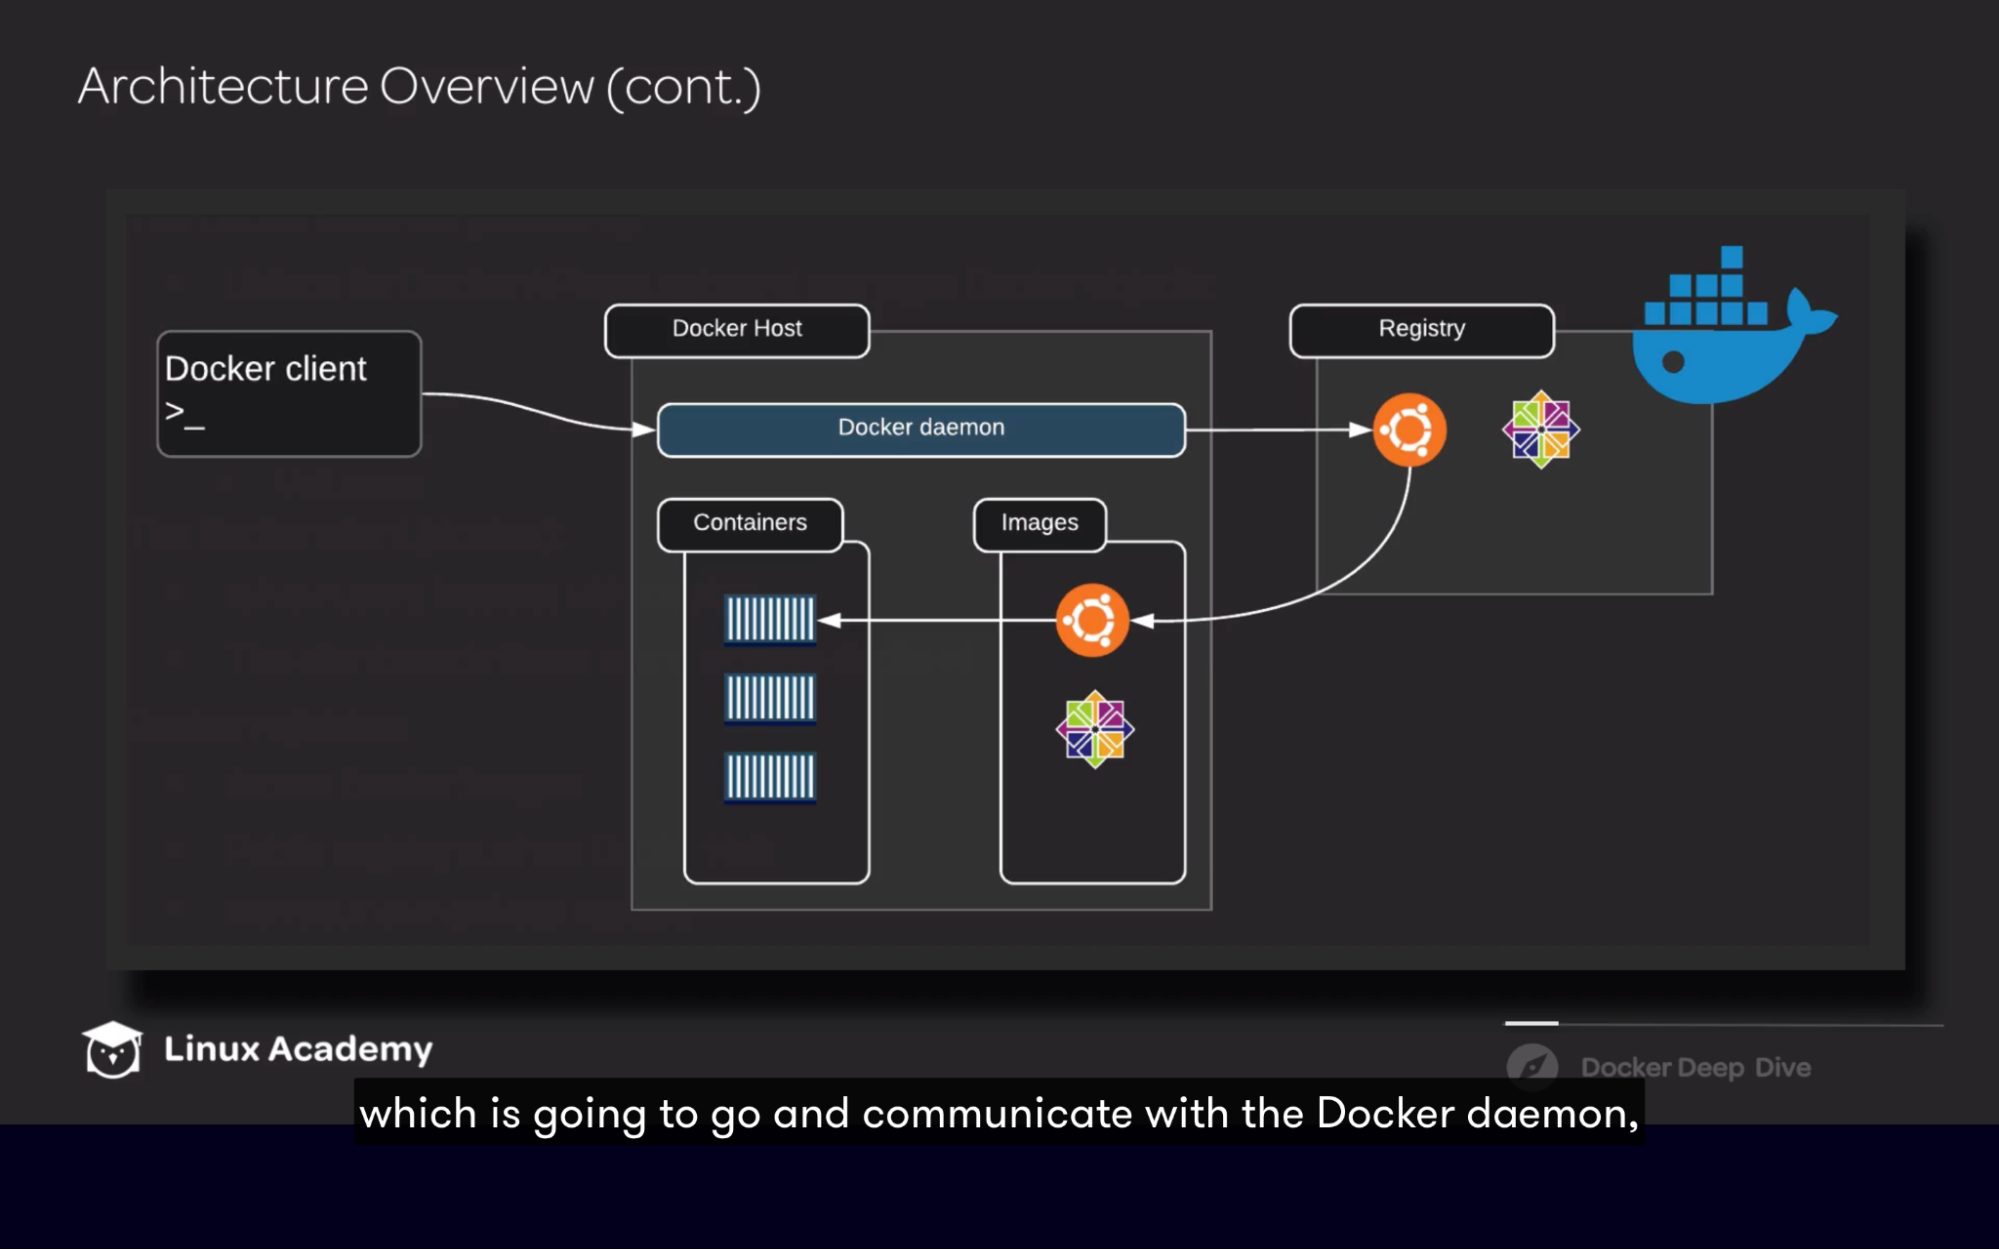
Docker ArchitectureClient: where you run and execute command Docker daemon: a persistent process that manages containers. - It listens for Docker API requests and then manages Docker objects. A few of these objects include images, containers, networks, and volumes.
- build, run, distribute docker containers
Client-server architecture - Docker daemon and client are separate binaries and the client can be used to communicate with different daemons.
- This means that you use the client to go and execute commands. The daemon is responsible for doing all the heavy lifting. This includes building, running, and distributing Docker containers.
- Both the daemon and the client communicate using a REST API via UNIX sockets or a network interface.
- Flow: execute a command via Docker client → it communicates with the API, which receives the request → and then tells the Docker daemon to execute the action.
- Docker registry: When we start getting into building our own images, we need a place a store them, and that is where the Docker registry comes in.
- Docker Hub: By default, Docker is set up to use Docker Hub. It's a public registry where you can go and save your images, as well as download other images created by other people or companies.
|
What you do
Client: communicate with docker daemon using the API
Create Dockerfile
Create Image
- Build an image out of the Dockerfile
- Store it on the Docker registry so your team can use it to create a container out of it
Create container:
- container is going to be based off an image.
- If that image does not exist on the Docker server, it will go and communicate with the Docker registry-
- by default, Docker Hub--to go and pull down that image to go and create the container.
- Communication between docker server and docker hub happens using docker image push and pull commands
Docker objects
- It’s a read-only template that contains a set of instructions for going and creating a docker container
- Read-only: you can not modify image content once it’s built. You can only modify it by initiating a new build
- Image is based on another image
- Create your own image according to your application
- Use a Dockerfile to build images
- Images are built from Dockerfile
- This file contains instructions on how that container should be setup
- Includes all binaries and libraries to run your application
- Runnable instance of the image that was created from
- When you use docker run command, docker creates container based off the image layers and creates a new writable layer on top of the image layer
- Writable layer is used to store data created by the container. Such as logs files written by the application. Any file that is created by container
- Life of this layer is only live as long as the container is alive. when a container is destroyed, this layer and all changes stored in it also destroyed
- Connect a container to network
- Add persistent storage
- Create a new image based on its current state
- Scale container across multiple docker daemons/Hosts
- You can have multiple docker hosts working together by enabling docker swarm
Call outs
- When you create a container based on some image; you can’t delete that image without deleting containers that build on that image
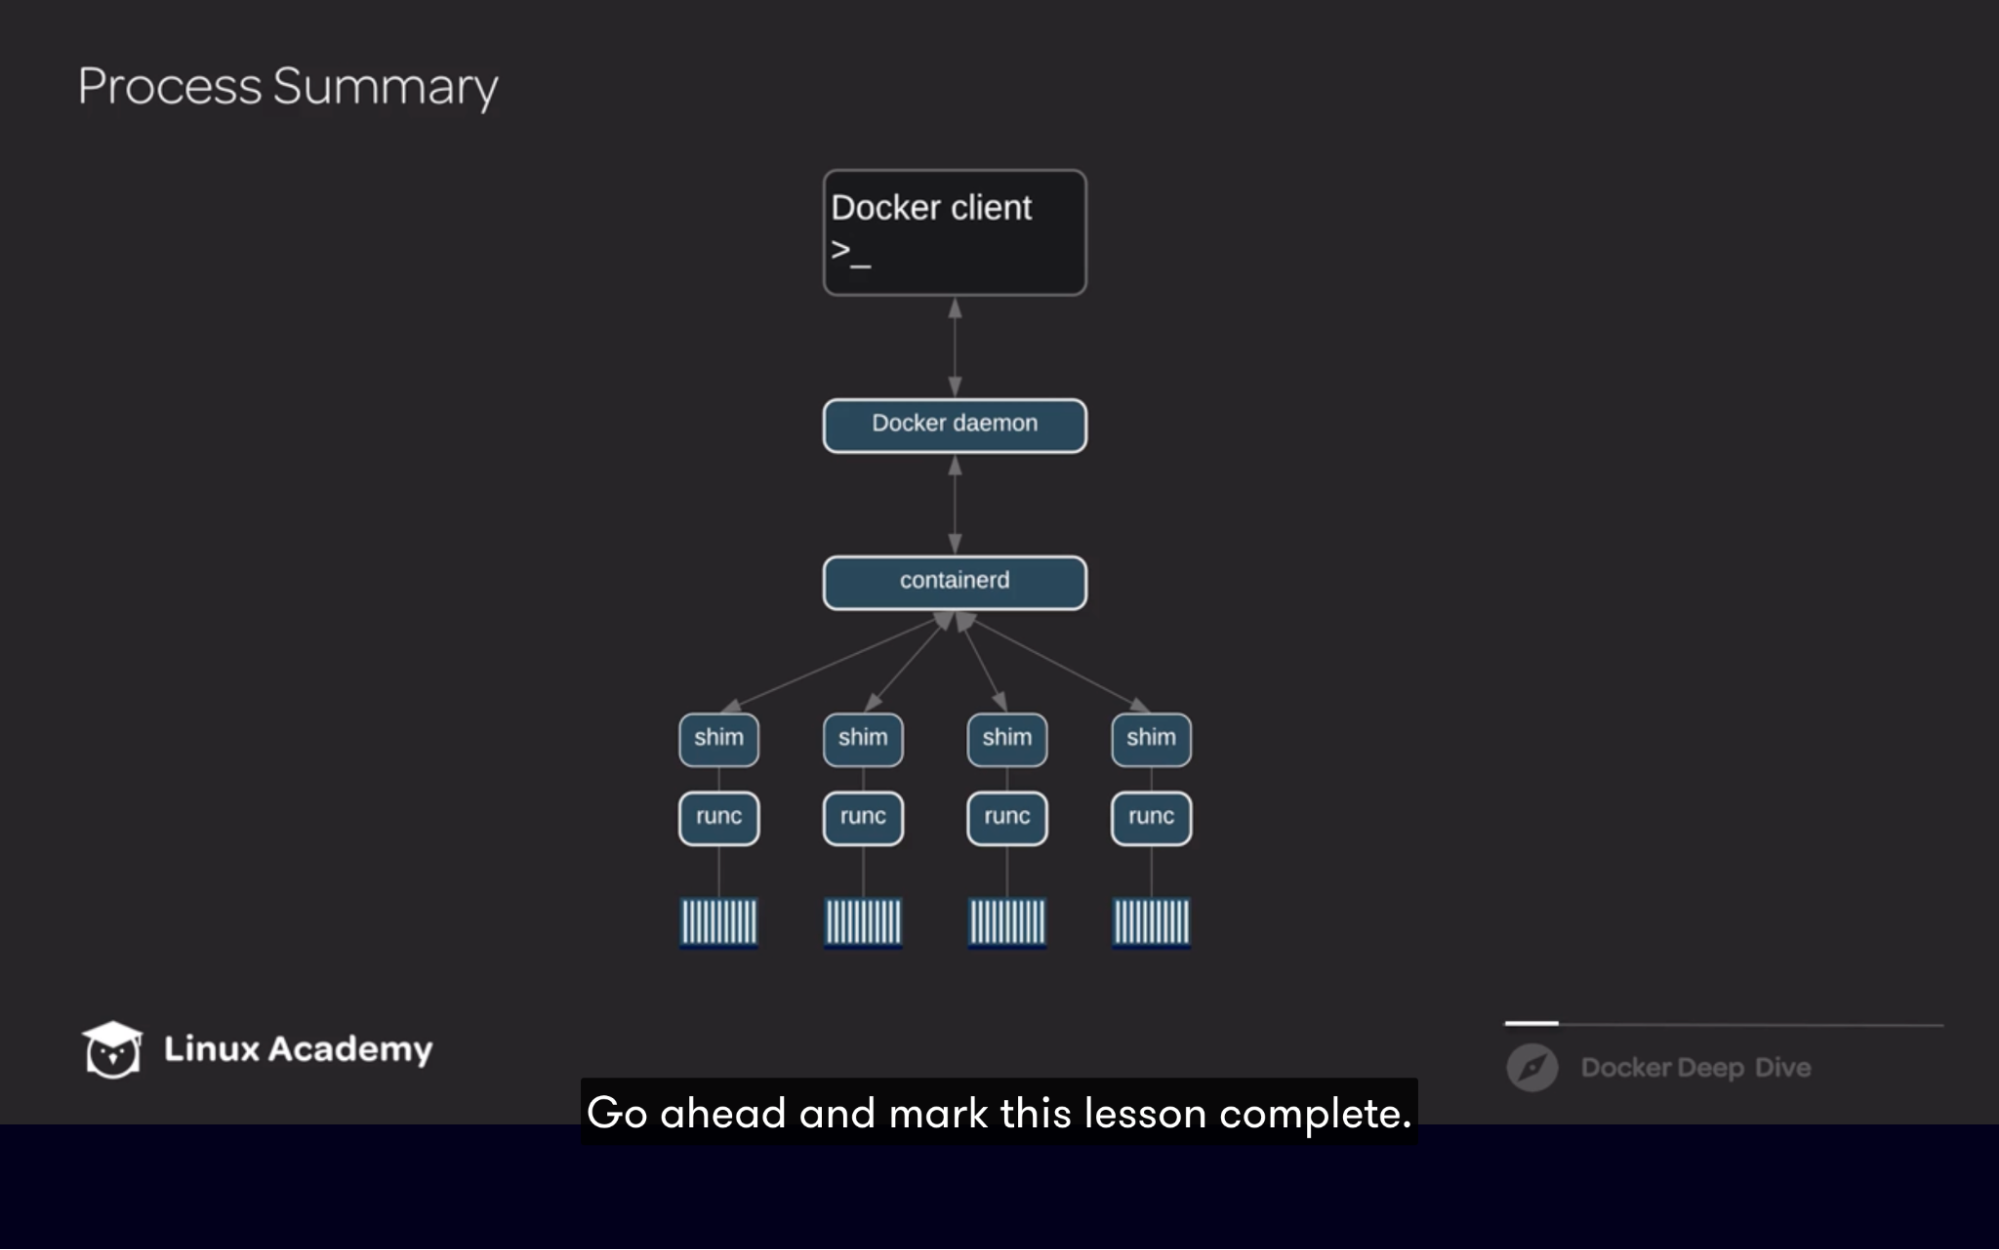
Docker Engine
Major components: all these component work together to create and run containers
- Docker client
- Docker demon
- Containerd
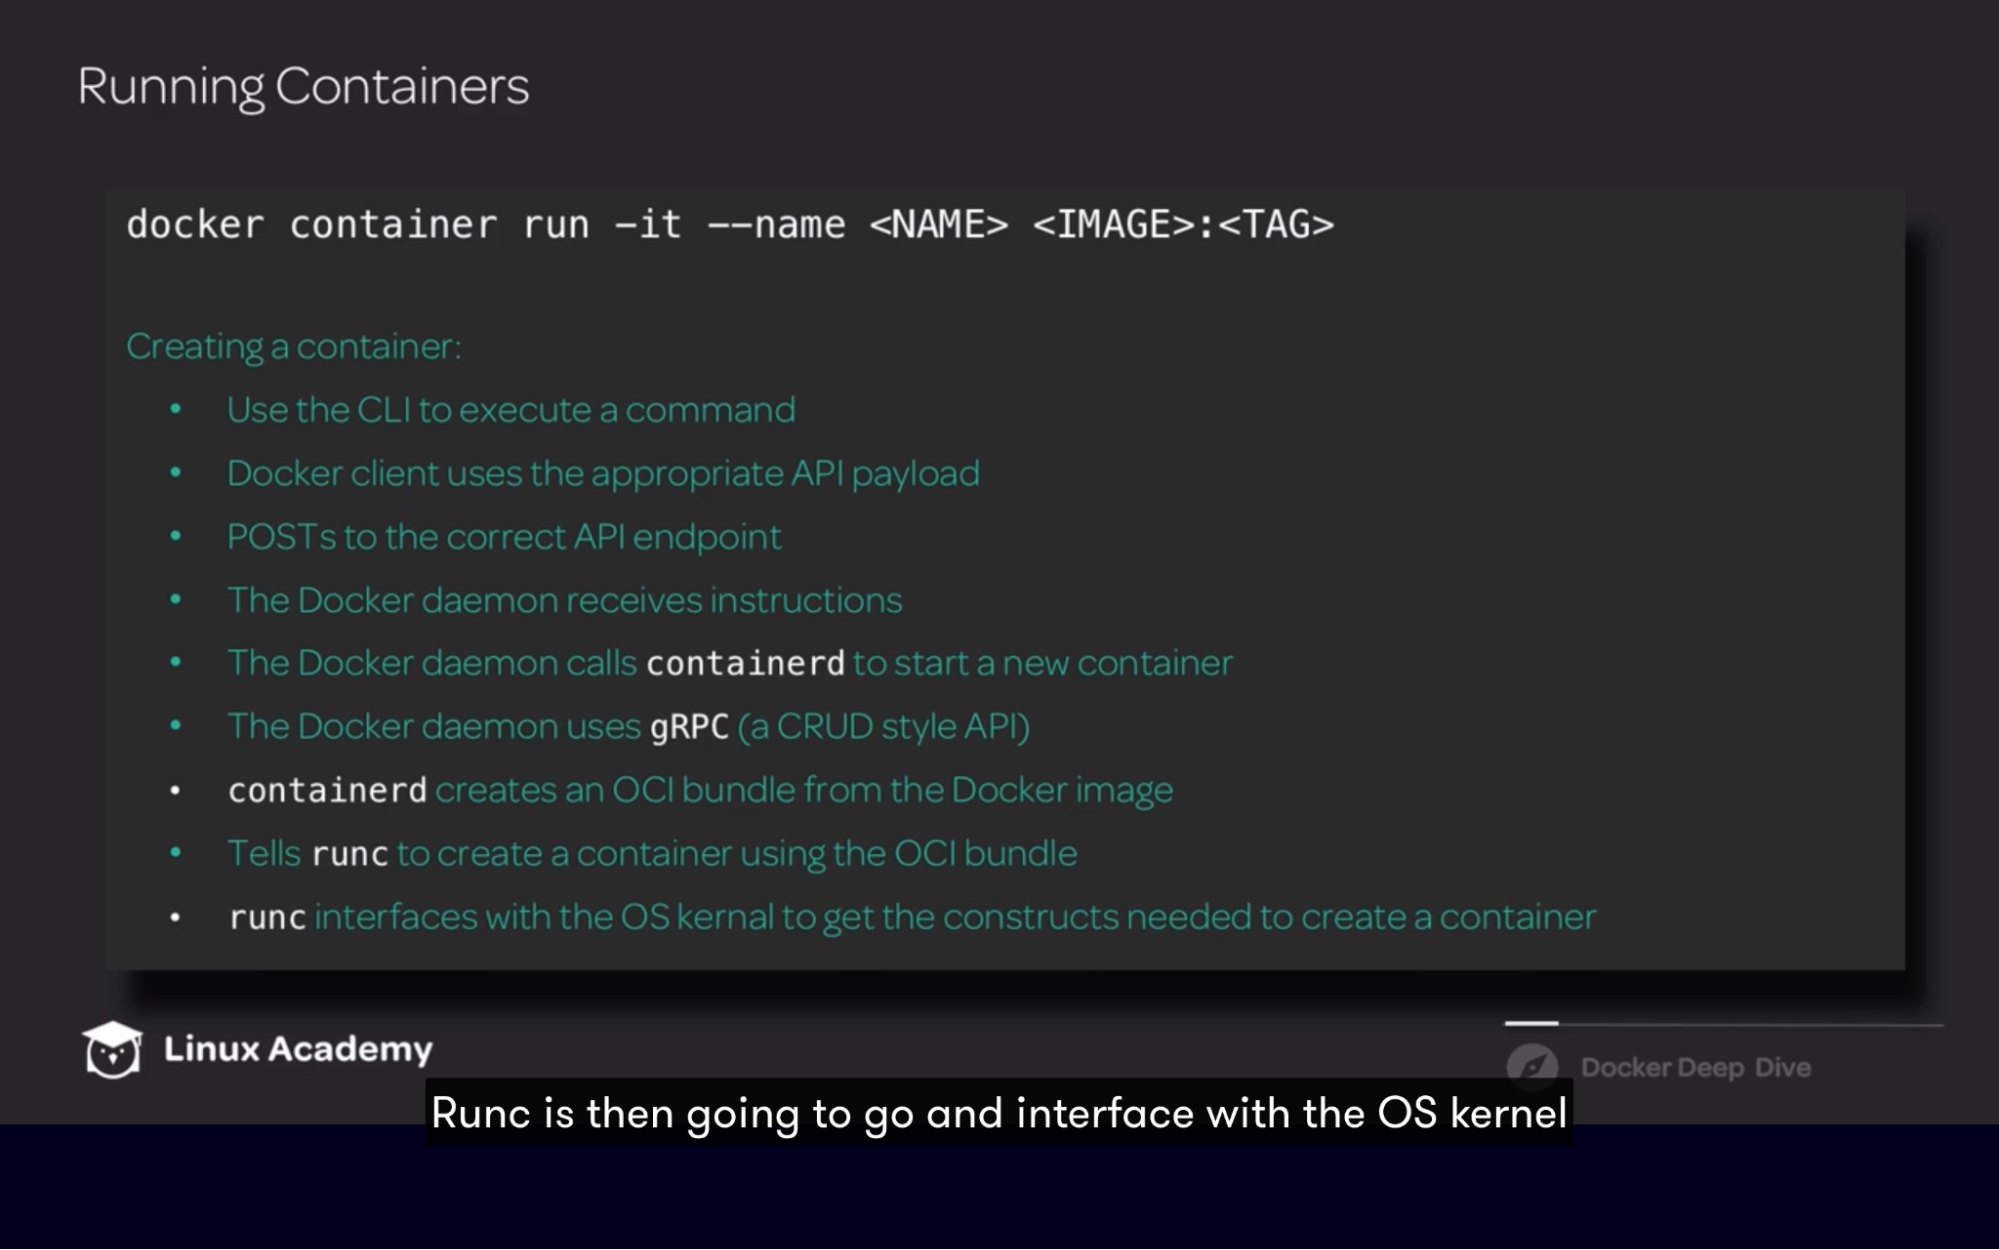
- Runc
Running a container flow
Docker commands
- Management commands
- Container and image commands
Docker general command
Command | What it does |
Docker -h | more | Docker help |
Docker systemctl restart docker | Stop and restart docker service |
Docker image command
Command | What it does |
Docker image -h | Returns a list of all commands that are associated with docker image |
Docker image ls OR docker images | Show all image with their ID, Tag, Size, Date |
Docker image pull nginx | Pull a image or repository from a registry (docker hub) - It will download the image and not run the container
|
Docker image inspect ImageID | Returns low level of info/details on docker objects in JSON - ID: sha256
- RepoTag: nginx:latest
- Env: env variables defined
- Cmd: command that gets executed when container starts up
|
Docker image push | Push a image or repository from a registry (docker hub) |
Docker image import
| Imports the contents from a tarball to create a filesystem image |
Docker rmi ImageID/Name
Docker rmi -f ImageID/Name | Remove Image - Make sure no container is running out of that image
Force remove |
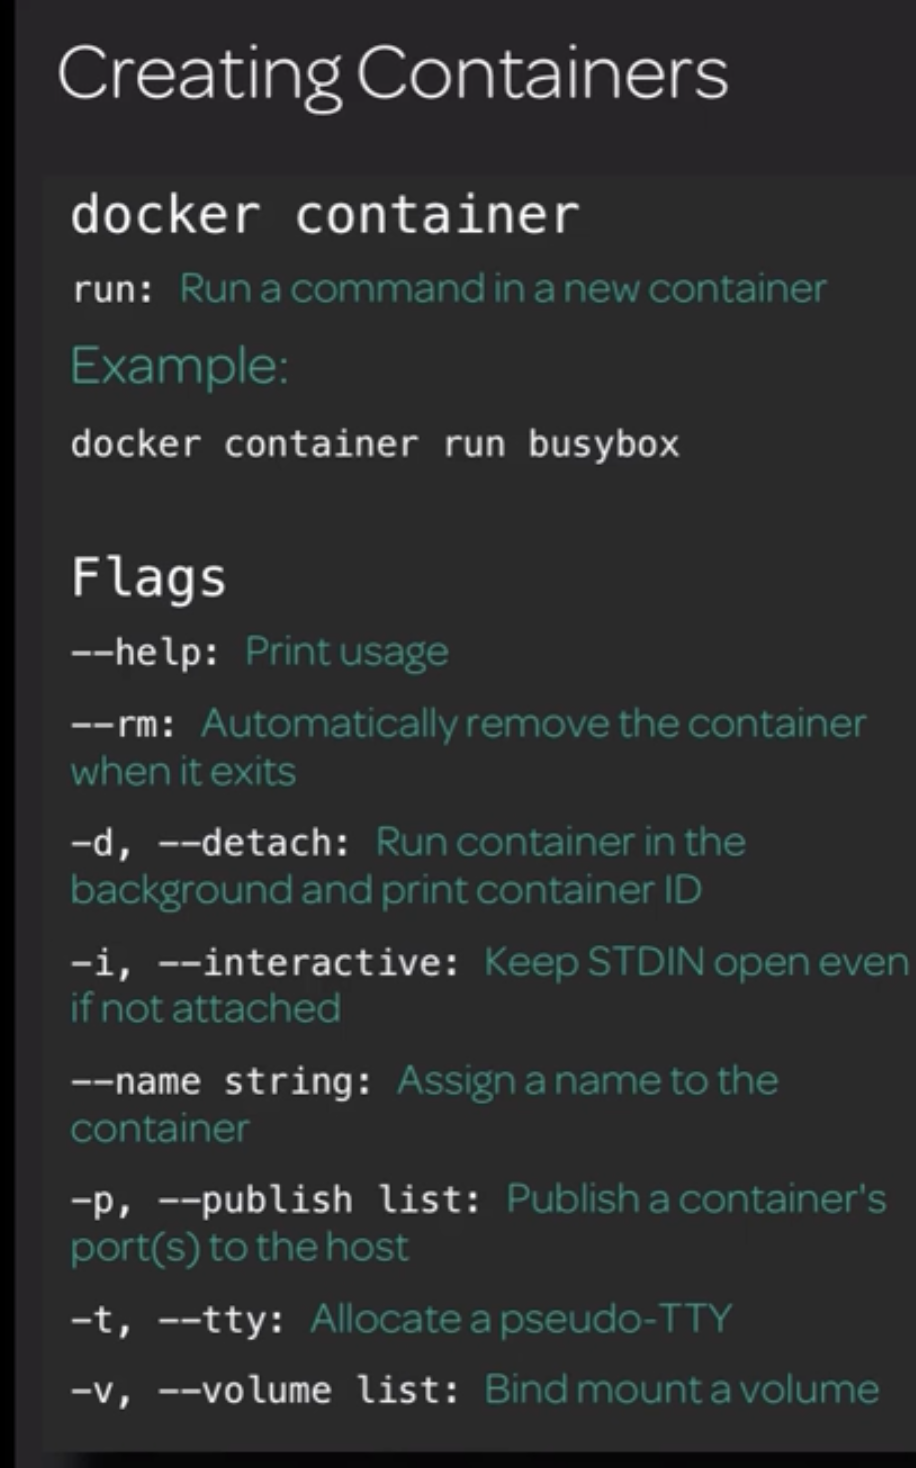
Docker Container command
Command | What it does |
Docker container -h | Returns list of all commands that are associated with docker containers |
Docker container ls OR ps
Docker container ls OR ps -a | Iist containers that are running
List all container including those that have been stopped |
Docker container run busybox | Run a command in a new container |
Docker container run -d -P nginx | -P = Takes all our ports that exists for this container and map it to a random port number -d = bcz if you don’t containers will run in the foreground and you can’t execute any other command
|
Docker container inspect ImageID | Returns detailed info on one more more container |
Docker container top ImageID | Display the running processes of containers - Master process
- Worker process
|
Docker container stats ImageID/ContainerName | Display a live steam container resource usage statistic |
Docker container logs ImageID/ContainerName | Return log data coming back from container |
Docker container attach ImageID/ContainerName | Attach local standard input/output, and error streams to a running container |
Docker container stop | Stop one or more running container |
Docker container start ImageID/ContainerName | Start one or more running container |
|
|
Curl localhost:32774 | Generate traffic - We need host port number that assigned to it
|
Docker container exec -it ImageID/ContainerName /bin/bash
Docker container exec -it ImageID/ContainerName ls /usr/share/nginx/html | Run a command in a running container i = interactive t = TTY - This is for going into the container and see the filesystem
- With exec you can execute any command that is present on container
Getting the content of that directory You’re not logging into that container to execute the command you need
|
Docker container pause ImageID/ContainerName | Pause all processes within one or more container |
Docker container unpause ImageID/ContainerName | Unpause all processes within one or more container |
Docker container rm -f ImageID/ContainerName | Remove one or more stopped/existing container f = use this flag if container is running; bypass the prompt |
Docker container prune | Delete/Remove all stopped container |
Exec Command Explained via Scenario
When you’re running the docker run ubuntu command, it runs an instance of the ubuntu image and exits immediately // you wouldn’t see the container running if you were to list the running containers because it’s the exit after executing the command
Why?
unlike a virtual machine, containers are not meant to host an operating system. containers are meant to run a specific task or process such as to host an instance of a Web server or application server or database or simply to carry out some kind of computation task. when the task is complete the container exits. a container only lives as long as the process inside it is alive. Ex: if a web service inside the container is stopped or crashes then the container exits
Ex: docker run ubuntu sleep 5
What we saw is executing a command when the container is running
What if we want to execute a command on a running container
docker run ubuntu sleep 5 | What we saw is executing a command when a container is running |
Docker exec <ContainerName> cat /etc/hosts | execute a command on a running container
|
Container flag command 2
Example: docker container run busybox
- It went, execute(sh) and stops
- Usage for practice purposes
Container is a long-running process
- When the command is being executed,
- stays in the foreground
- And doesn’t exit
Ex:
- In the case of busybox
- When the container starts up, it executes the command sh and then quits
- It’s not going to continue running in the foreground
- the Container Act like a task than a long-running process
- in the case of Nginx container
- When the container starts up, it’s executing Nginx
- Nginx continues to the run-up to the point where a container is terminated
Command | What it does |
Docker container run --help | Print usage // can’t use -h bc it’s reserved for something else |
Docker container run --rm busybox | Automatically remove the container when it exists
For some instances when we go and execute the task, we don’t need this container to hang around - Use --rm flag // to have the container automatically gets deleted once it’s completed
|
Docker Ports Command
Understand exposing and publishing ports on docker: https://www.youtube.com/watch?v=6by0pCRQdsI&ab_channel=SelfTuts
Host machine that contains docker containers
- Host has their own ports ranging from 0 to 65353
- You can select any port and attach application to that
- Container image has their port which should be mapped with host port in order to talk to the outside world
- Ex: if you have apache webserver on container; apache running on a default port 80; where your applications is running
- Ex: if you have mongoDB server on container; that has a default port 27017
- These applications are isolated from the host machine // so no one can access this service in your container without going inside your container (exec command to go inside and interact with app // not a good scenario)
- So you have to map/link (with -p tag) your local host machine port to this service port in order to be able to talk and use it’s services
- Use -p tag to link ports // we will access 8080 port on our host machine that will forward all the request to this docker container on port 80
Outside wants to talk to docker container // apache web server // code files
Command: docker -p <host-port>:<docker port> image
Flow:
- Outside → your host port (8080) → container port(80)
- Localhost:8080:80 // to connect to the web page

Exposing ports
- Exposing ports meaning we make them available to be mapped
- Remap them by -p and -P tag
3 ways on Container networking
- Exposing ports on container
- Docker container run -d --expose 3000 nginx // use expose flag to open port 3000 on nginx; we haven’t mapped anything to it yet
- Docker container run -d --expose 3000 -p 80:3000 nginx // host port 80 mapped to container port 3000
- If you curl localhost:3000 it return connection failed // because We don’t have a process that is listening on port 3000
- Docker container run -d --expose 3000 -p 8080:80 nginx // host port 80 mapped to container port 3000
- Map TCP & UDP ports
- Docker container run -d -p 8000:80/tcp -p 8080:80/udp nginx // can have multiple -p
- Randomly assign a port from host and map it to container using -P flag
- Docker container run -d -P nginx
- Docker container port to see all port mapping for a specified container
Execute container command
3 ways we can execute a command on a container
- Defining a command within a Dockerfile which will be executed when the container starts up
- Docker container run -d nginx
- Execute docker run: then define what command we want to executed by container when it starts up
- Overwrite Dockerfile by specifying when we execute a docker container run
- Docker container run -it nginx /bin/bash
- You are no longer in the docker host, you’re in container itself executing command.
- So any command you’ll execute now on, you’ll be executing it within container
- Docker container Exec command allows us execute a command on a running container
- This will only run while the container's primary process is running.
- the command will be run in the default directory of the container.
- However, there is a caveat to that. If the container is built using the working directory directive, it will use the working directory instead.
- Optionally, we can use the exec command to specify /bin/bash, which will take us to the prompt of the container, then we can go and execute the command we want to run from within the container itself.
- Docker container exec -it ImageID ls /usr/share/nginx/html
- Listing directory listed in /usr/share/nginx/html
Docker logging Command
Agenda:
- How to retrieve logs for our container
- How to go and send application log data to our container log
Callouts
- Logs need to be output to STDOUT & STDERR
- When your container stops because of error; we can troubleshoot the issue using docker container logs
Commands to retrieve log data
Docker container logs <Name> | show information logged by a running container(that is not running as a service - docker swarm) |
Docker service logs <Name> | show information logged by all containers participating in a service |
Docker Networking
When you install docker, it creaes 3 networks automatically
- Bridge: default network a container gets attach to
- If you want to associate a container with another network using --network command like this: docker run Ubuntu --network=none
- It’s a private internal network created by docker on the host
- All container attached to this network and they get an internal IP address usually in the range 172.17 series
- The containers can access each other using this internal IP addresses
- to access any of these containers from the outside world map the ports of these containers to the port of the docker host
- The containers are not attached to any network and doesn’t have any access to the external network or other containers. They run in an isolated network.
- Another way to access container externally is to associate container to host network
- It takes out any network isolation between the Docker host in docker container // meaning if you were to run a Web server on the port 5000, in a web container it is automatically as accessible on the same port externally without requiring any port mapping(using -p option) as the web container uses the hosts network
- this would also mean that you will now not be able to run multiple web containers on the same host on the same port, as the ports are now common to all containers in the host network

Network Commands
Docker network ls | List networks |
Docker network inspect <Name> | Getting detailed info on a network |
Docker network create <Name>
Docker network localhost --internal | Create a network
Network is internal and not bound to any of the interfaces(ex: Database container) |
Docker network rm <Name> | Removing a network |
Docker network prune | Remove all unused networks - Risky because we’re not controlling what network is going to be deleted
|
Docker network connect <Network> <Container> | Connect a pre-existing container to a network |
Docker container disconnect <Network> <Container> | Disconnect container from a network |
Scenarios
Connect and remove the container from a network
- Create a container // Nginx
- Docker container run -d --name NetworkTest -p 8080:80 nginx
- Create a network
- Docker network create br01
- Connect a pre-existing container to a network
- Docker network connect br01 NetworkTest
- Check if the container is attached to network we created
- Docker container inspect NetworkTest
- Remove container from a network
- Docker container disconnect br01 NetworkTest
Network subnet:gateway commands
Gateway: is the IP that is assigned to bridge and bridge is assigned all the interfaces on our server
Docker container create --subnet 10.1.0.0/24 --gateway 10.1.0.1 br02 | Disconnect container from a network |
Docker container create --subnet 10.1.0.0/16 --gateway 10.1.0.1 \ --ip-range=10.1.4.0/24 --driver=bridge --label=host4network br04 | Create Subset of IP(network) within the above range
--ip-range = define subset of IPs we want use
|
Docker container run --name n1 -it --network br04 centos /bin/bash
Docker container run --name <Name> -it --network <Network> <Image> <CMD> | Adding a container automatically to network |
Docker container run -d --name n2 --ip 10.1.4.102 --network br04 nginx
Docker container run -d --name <Name> --ip <IP> --network <Network> <Image>
Docker container inspect n2 | grep IPAddr | Container gets specific IP // Assigning IP to a container
To grab IP address |
Callouts
- When defining subnet; use private IP ranges and not public IP // t.e. 10.,192.,172.
- 3 files mounted into containers // using local name server from within docker; all this mapped through bridge network
- /etc/hostname
- /etc/host
- /etc/resolve.conf
Scenarios
Client wants to containerize the app, having 2 containers, one for the front end which stays publicly accessible, second for the database staying private
Requirements
- App with frontend and database
- Having 2 containers
- Frontend - public
- Database - on private network, not accessible via internet
How?
- Create 2 networks
- Public network for frontend
Docker network create frontend |
- Private network for database
- --internal make sure that Network is internal and not bound to any of the interfaces
Docker network create localhost --internal |
- Test your network
- Create MySql container attach to private network
Docker container run -d --name database \ –-network localhost \ -e MYSQL_ROOT_PASSWORD=GIVEPASSWORD \ Mysql:5.7 |
- Create Nginx container connected to both network
Docker container run -d \ --name frontend-app \ --network frontend \ nginx:latest |
- Connect nginx to localhost network
Docker network connect localhost frontend-app |
Docker storage
- Docker: stores data and manage file system of the container
How docker stores data on a local file system
- When you install docker it creates a folder structure at /var/lib/docker
- Inside docker directory, there are multiple folders such as
- Aufs
- Containers
- Image
- Volumes
Layered Architecture
Image:
- When running docker build, it creates read-only layers based off the Commands mentioned in Dockerfile
- Read-only: you can not modify image content once it’s built. You can only modify it by initiating a new build
- Advantage: suppose you have another application to deploy using a few steps similar to the first application’s Dockerfile(installing OS, packaging, and dependencies steps). In this case, docker build skips to download these steps because it’s already downloaded from the first application. And thus Image for 2nd application builds quickly and saves time.
Container:
- When you use the docker run command, docker creates a container based off the image layers and creates a new writable layer on top of the image layer
- Writable layer is used to store data created by the container. Such as logs files written by the application. Any file that is created by a container
- Life of this layer is only live as long as the container is alive. when a container is destroyed, this layer and all changes stored in it are also destroyed
Category for data storage
- Non-persistent // local storage
- Data that is ephemeral(data that is only exists for a short period of time). Ex: application code because it’s tied to the lifecycle of our container
- Every container has non-persistent storage
- Storage gets created with a container which is a read/write layer
- non-persistent storage is tied to the lifecycle of our container // when the container is deleted so is the data
- Persistent: data that is not ephemeral // data stick around using volume
- Volumes
- Volumes are decoupled from container
- Volume data lives outside of the life cycle of the container
- Application being ephemeral meaning, if our application talks to our database, we want to make sure that data is persistent and therefore it lives in the volume; this allows us to go and upgrade our database container without losing any database data that is tied to the application
Non-persistent data
- Referred to as local storage and graph driver storage and snapshot storage
- In docker Storage can be found under: /var/lib/docker/<storage-driver>
Mount data
Since we have to store database’s data created inside the container in the /var/lib/mysql directory, we need a volume on a docker host that takes the data from container’s directory.
When you create volume it creates a folder under /var/lib/docker/volume/{VOL_NAME} and the data will be stored there.
So SOURCE will be the volume created on a docker host
TARGET will be data created by the container in the respective directory
Docker container run -d --name <NAME> --mount type=bind/volume,source=<SOURCE>,target=<TARGET> <IMAGE>
2 ways to handle Persistent data
- When we use a bind mount, the file or the directory that is being used on the host machine is going to be mounted into the container.
- When to use:
- if we want to mount a single file into our container. Ex: configuration file
- The reason why using a bind mount to manage a configuration file is pretty handy is, it allows us to go and make a change to that file and then restart the container to go and pick it up. This way, we don't have to go and make a change to an image, rebuild it, and then go and redeploy the container.
- 2 ways to create bind mount
- Using the mount flag
Docker container run -d --name <NAME> --mount type=bind,source=<SOURCE>,target=<TARGET> <IMAGE> |
|
Docker container run -d \ --name nginx-bind-mount1 \ --mount type=bind,source=”$(pwd)”/target,target=/app \ nginx |
- Using the volume flag
Docker container run -d \
--name nginx-bind-mount2 \
-v "$(pwd)"/target2:/app \
nginx |
Volume: Preferred way to store data
- Create the volume
- Create your container
- Mounted in the directory in a container
- Data is written to the volume
- Deleting a container doesn’t delete a volume
- First-class citizens // they are their own object, have their own APIs. have their own subcommand
- Good for high performance or small block random access workloads
- Ex: EBS, OpenStack Cinder
- Uses protocol such as NFS, SMB
- Good for high-performance workloads
- Ex: Azure File Storage, NetApp FAS, EFS
- Large data blobs that don’t change that often
- Ex: S3, Ceph, MinIO, OpenStack Swift
- Linux: /var/lib/docker/volumes
Docker Volume commands
Docker volume -h | For help |
Docker volume ls | List volumes |
Docker volume create <NAME> | Create a volume |
Docker volume inspect <NAME>
| Inspecting a volume |
Docker volume rm <NAME> | delete a volume |
Docker volume prune | remove all unused volume |
Scenarios
Working in a project that requires a database, deploy a MySql container to your dev environment.
- Because you’ll be using mock customer data with a database, you need to make sure that the data is persistent (so the container needs a volume)
How?
- Create a volume mysql_data
- Deploy MySql container that will use the volume
Steps
Docker volume create mysql_data
Docker container run -d --name app-database \ --mount type=volume,source=mysql_data,target=/var/lib/mysql \ -e MYSQL_ROOT_PASSWORD=GIVEPASSWORD \ Mysql:latest |
Docker file
It’s a set of instruction on how to build an image
Instructions are commands used to start a container defined in the Dockerfile
- It’s a collection of read-only layers
- Each layer represents a Dockerfile instruction
- Layers are stacked on top of one another
- Each layer creates an image; each layer is delta of the changes from the previous layer
- Images are build using the docker image build Command
- Pass flags and Dockerfile
- From: base image
- Copy: copy code from docker host’s current directory to the container’s destination
- Run: builds your app with make
- CMD:
General guidelines
- Keep containers as ephemeral as possible.
- Meaning is you can go and stop and destroy your container at a moment's notice, create a new one to replace it with very little effort.
- Follow the sixth principle of the twelve-factor app, which is about processes.
- Execute the app as one or more stateless processes.
- Twelve-factor processes are stateless and share nothing. Any data that needs to persist must be stored in a stateful backing service, typically a database.
- Avoid including unnecessary files.
- Don't add any bloat to our image. All this will do is just make the image bigger.
- Use the .dockerignore file to avoid having unnecessary files getting copied over to the image
- In the .dockerignore file, all you have to do is supply a list of either files or directories you want to be excluded, and when the image is built, those files won't get copied over.
- Use multi-stage builds to reduce the size of your Docker image.
- In a multi-stage build, 2 Docker images are being built from 1 Docker file.
- The first image is used to create your build artifact. This will include all the tools that are necessary to build your image, as well as test it.
- The second image, which is the image that will be created, is where you copy your build artifact to. And this image will only have the necessary binaries and libraries to run your application.
- And this will greatly reduce the size of your image.
- Avoid installing any unnecessary packages.
- This will also contribute to the size of the image.
- Decouple the application.
- Ex: for WordPress We don't want one container that is running WordPress along with the database.
- We would decouple this by creating multiple containers, one for the WordPress application itself, and another for the database,
- Minimize the number of layers
- because as we add additional layers, we do add additional size to the image.
- And a good way of reducing the number of layers is by using multi-stage builds.
- sort multi line argument alphanumerically.
- This is going to help make your Dockerfile more readable,
- Also, it's a good idea to have a space before your backslash.
- Leverage the build cache
- When Docker goes to build an image, it's going to step through each instruction in order. And since each layer is its own image, Docker's going to go and look for a cached image. And if it finds that cached image, it's going to go and reuse it.
- Optionally, when you're executing a docker image build, you can use the no-cache flag, and set it to true.
- we're ready to go and build our first image.
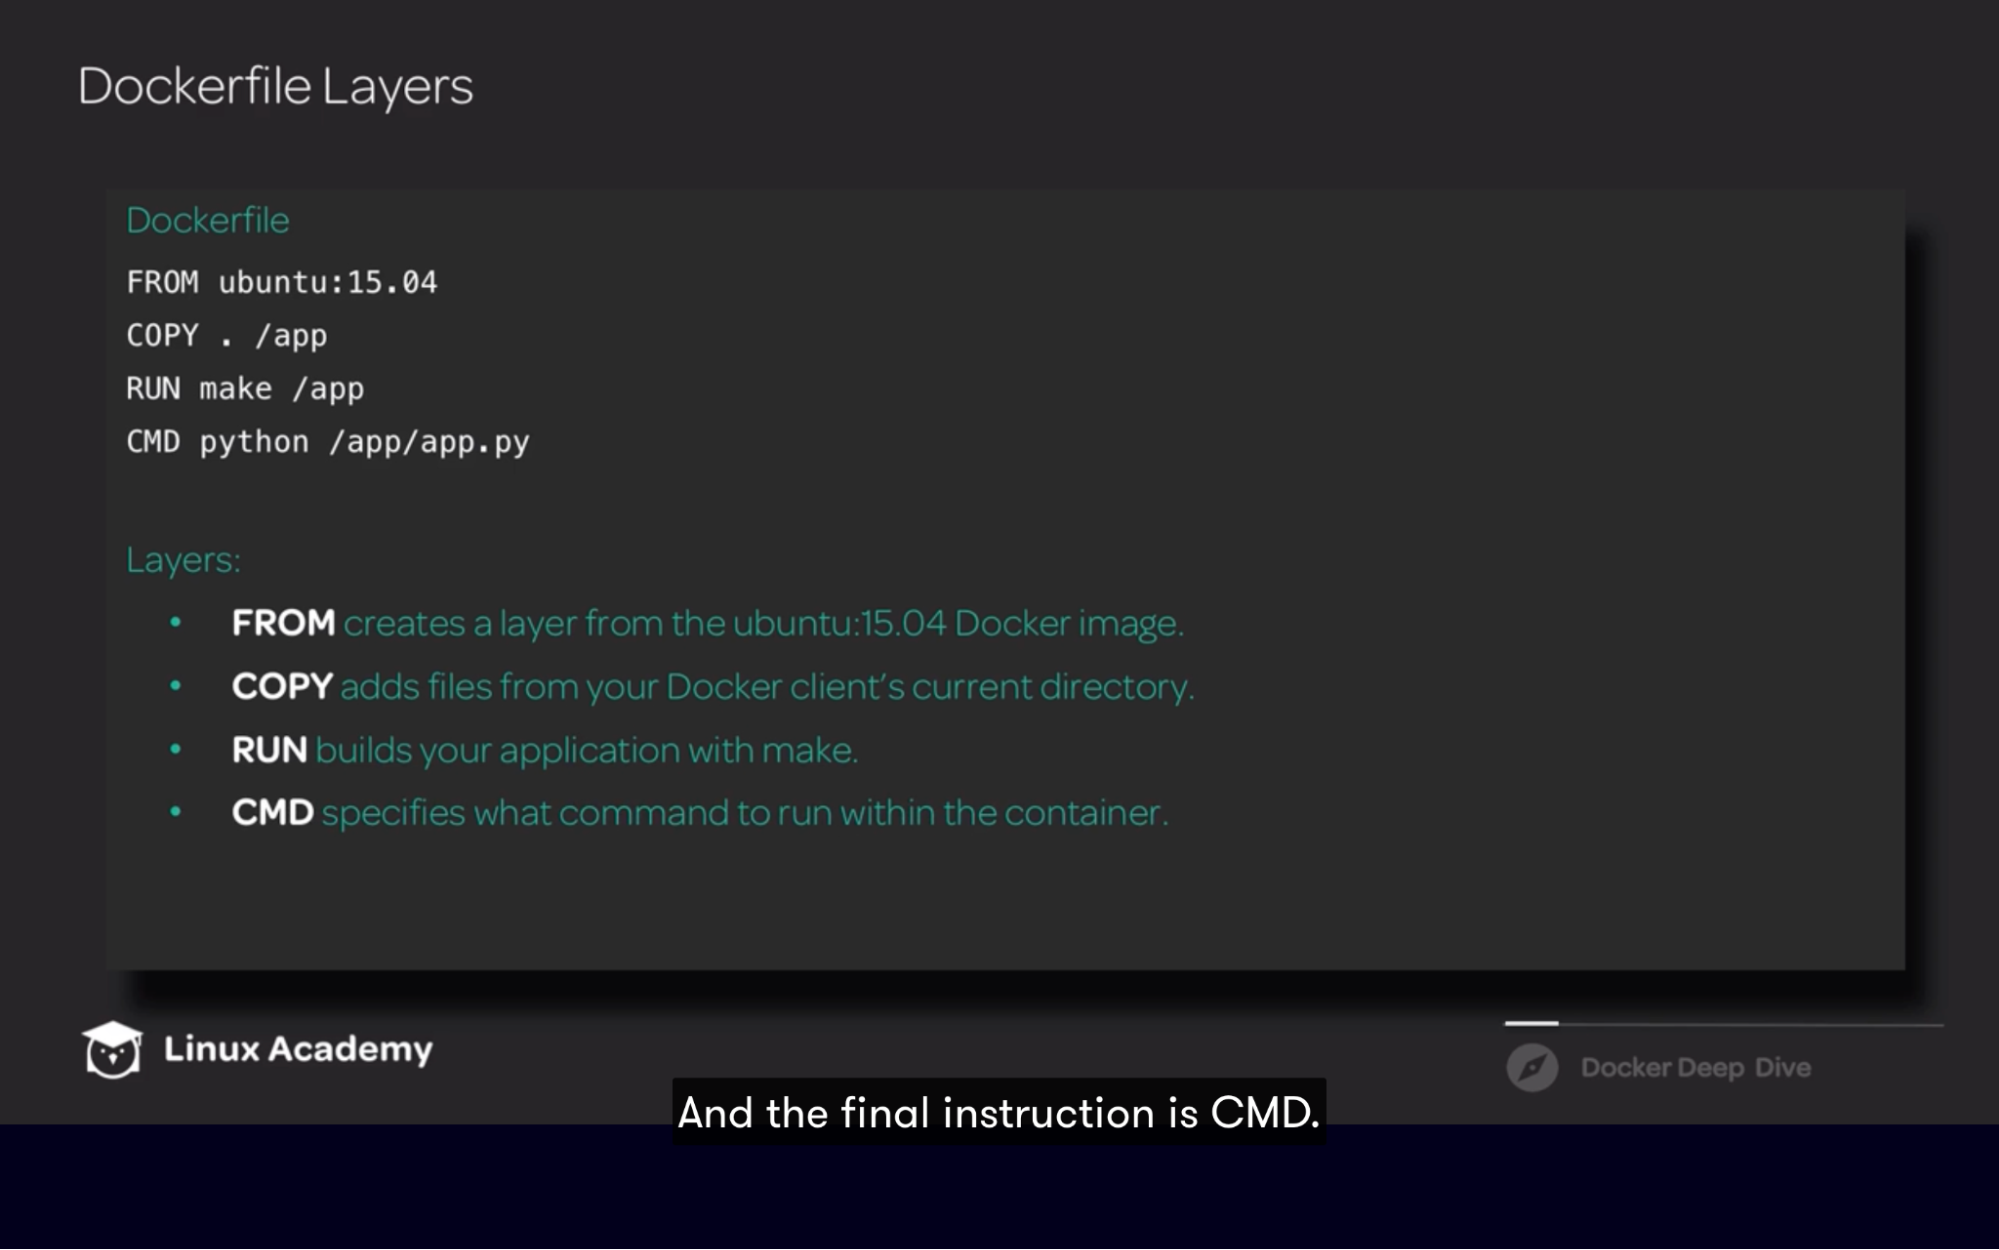
Create a Dockerfile
- Setup environment
sudo yum install git -y mkdir docker_images cd docker_images mkdir weather-app cd weather-app git clone https://github.com/linuxacademy/content-weather-app.git src |
- Create a Dockerfile
# Create an image for the weather-app
FROM node
LABEL org.label-schema.version=v1.1 # Add additional metadata using LABEL
RUN mkdir -p /var/node # Directory where your code gets stored
ADD src/ /var/node/ # Copies file/directory on to container by ADD & COPY
WORKDIR /var/node # set working directory for RUN,CMD,COPY,ADD,ENTRYPOINT
RUN npm install # command will be executed within working directory
EXPOSE 3000 # exposing container node
CMD ./bin/www # default command that executes when container starts |
Instructions
Working with Instructions
FROM: Initializes a new build stage and sets the Base Image
RUN: Will execute any commands in a new layer
CMD: Provides a default for an executing container. There can only be one CMD instruction in a Dockerfile
LABEL: Adds metadata to an image
EXPOSE: Informs Docker that the container listens on the specified network ports at runtime
ENV: Sets the environment variable <key> to the value <value>
ADD: Copies new files, directories or remote file URLs from <src> and adds them to the filesystem of the image at the path <dest>.
COPY: Copies new files or directories from <src> and adds them to the filesystem of the container at the path <dest>.
ENTRYPOINT: Allows for configuring a container that will run as an executable
VOLUME: Creates a mount point with the specified name and marks it as holding externally mounted volumes from native host or other containers
USER: Sets the user name (or UID) and optionally the user group (or GID) to use when running the image and for any RUN, CMD, and ENTRYPOINT instructions that follow it in the Dockerfile
WORKDIR: Sets the working directory for any RUN, CMD, ENTRYPOINT, COPY, and ADD instructions that follow it in the Dockerfile
ARG: Defines a variable that users can pass at build-time to the builder with the docker build command, using the --build-arg <varname>=<value> flag
ONBUILD: Adds a trigger instruction to the image that will be executed at a later time, when the image is used as the base for another build
HEALTHCHECK: Tells Docker how to test a container to check that it is still working
SHELL: Allows the default shell used for the shell form of commands to be overridden |
Commands
Docker image build -t linuxacademy/weather-app:v1 .
Docker image build -t <NAME>:<TAG> -f <Dockerfile_Path> | Build the application image -t = specify name and tag for the image -f = Dockerfile path // but since the DF is present in the weather-app directory we have used. |
docker container run -d --name weather-app1 -p 8081:3000 linuxacademy/weather-app:v1 | Create a docker container |
Environment variables
Use the --env flag to pass an environment variable when building an image
--env <Key>=<Value>
Use the Env instruction in the Dockerfile
ENV <KEY>=<VALUE>
ENV <KEY> <VALUE>
# Create an image for the weather-app
FROM node
LABEL org.label-schema.version=v1.1
ENV NODE_ENV="development" #Example 1
ENV PORT 3000 ##Example 2
RUN mkdir -p /var/node
ADD src/ /var/node/
WORKDIR /var/node
RUN npm install
EXPOSE $PORT
CMD ./bin/www |
Build and Run Containers with env
Create the weather-app container:
docker image build -t linuxacademy/weather-app:v2 .
Inspect the container to see the environment variables:
docker image inspect linuxacademy/weather-app:v2
Deploy the weather-dev application:
docker container run -d --name weather-dev -p 8082:3001 --env PORT=3001 linuxacademy/weather-app:v2
Inspect the development container to see the environment variables:
docker container inspect weather-dev
Deploy the weather-app to production:
docker container run -d --name weather-app2 -p 8083:3001 --env PORT=3001 --env NODE_ENV=production linuxacademy/weather-app:v2
Inspect the production container to see the environment variables:
docker container inspect weather-app2
Get the logs for weather-app2:
docker container logs weather-app2
docker container run -d --name weather-prod -p 8084:3000 --env NODE_ENV=production linuxacademy/weather-app:v2 |
Build arguments
- Build arguments to parameterize a Dockerfile
- It allows us to build time variables and these variables can be used through out the Dockerfile.
- Using build argument by --build-arg flag <Name>=<Value>
- Can use multiple build argument when building an image
- Also need to set build argument in Dockerfile using ARG instruction
Use the --build-arg flag when building an image:
--build-arg [NAME]=[VALUE]
Use the ARG instruction in the Dockerfile:
ARG [NAME]=[DEFAULT_VALUE]
# Create an image for the weather-app
FROM node
LABEL org.label-schema.version=v1.1
ARG SRC_DIR=/var/node # Supply build argument. This is default argument; if no argument supplied during build; this will used by default
RUN mkdir -p $SRC_DIR # Reference build variable
ADD src/ $SRC_DIR
WORKDIR $SRC_DIR
RUN npm install
EXPOSE 3000
CMD ./bin/www |
Build and Run Containers with Build env
Build the weather-app image: docker image build -t linuxacademy/weather-app:v3 --build-arg SRC_DIR=/var/code .
Inspect the image:
docker image inspect linuxacademy/weather-app:v3 | grep WorkingDir
Create the weather-app container:
docker container run -d --name weather-app3 -p 8085:3000 linuxacademy/weather-app:v3
Verify that the container is working by executing curl:
curl localhost:8085 |
Build commands & flags
Docker image build -t <NAME>:<TAG> | -t lets you write docker file name and tag |
-f, --file string
docker image build -t linuxacademy/weather-app:path-example2 --label com.linuxacademy.version=v1.8 -f Dockerfile.test . | Name of the docker file // just in case have duplicate dockerfile in the same directory and you want to test duplicate file first |
--force-rm | Always remove intermediate containers that are created during build process |
--label | Set metadata for an image |
--rm | remove intermediate containers after successful build |
--ulimit | Ulimit option |
docker image build -t <NAME>:<TAG> -<<EOF Build instructions EOF
docker image build -t linuxacademy/nginx:stind --rm -<<EOF FROM nginx:latest VOLUME ["/usr/share/nginx/html/"] EOF
| Building image by piping the Dockerfile through STDIN:
|
docker image build -t <NAME>:<TAG> <GIT_URL>#<REF>
docker image build -t <NAME>:<TAG> <GIT_URL>#:<DIRECTORY>
docker image build -t <NAME>:<TAG> <GIT_URL>#<REF>:<DIRECTORY>
docker image build -t linuxacademy/weather-app:github https://github.com/linuxacademy/content-weather-app.git#remote-build
| Building an image using a URL:
REF can be a tag or branch
DIR - if we have dockerfile in subdirectory
|
docker image build -t <NAME>:<TAG> - < <FILE>.tar.gz | Building an image from a zip file
- < = Import tar
|
Multi stage build
Use Multi stage build to make image small
It allows us to use multiple images within single Dockerfile to built a final product
It has 2 stages
- Build stage: install dependency, download source code, compile and test it
- Coping build artifact: copying artifact from build stage to eliminate all the intermediate steps
- Eliminate install dependency, download source code, compile and test it
Stages are not named, stages are numbered using integer starting with 0
We can name the stages; name is arbitrary value you can set
At last stage where we copying artifact, we need to reference the first stage
# Create an image for the weather-app using multi-stage build
FROM node AS build # Name the build stage
RUN mkdir -p /var/node/
ADD src/ /var/node/
WORKDIR /var/node
RUN npm install
FROM node:alpine
ARG VERSION=V1.1
LABEL org.label-schema.version=$VERSION
ENV NODE_ENV="production"
COPY --from=build /var/node /var/node #Reference the build stage by --from
WORKDIR /var/node
EXPOSE 3000
ENTRYPOINT ["./bin/www"] |
Tag Commands
Problem with tagging is we don;t know what source code is tied to that image
Solution is tag a image with commit hash
docker image build -t <name>:<tag>
docker image build --tag <name>:<tag> | Add a name and an optional tag with -t or --tag, in the name:tag format:
|
git log -1 --pretty=%H
docker image build -t linuxacademy/weather-app:<GIT_HASH> . | Use our Git commit hash as the image tag: - Use this command to get hash in source directory of the code
Build the image using the Git hash as the tag: |
docker tag <SOURCE_IMAGE><:TAG> <TARGET_IMAGE>:<TAG>
| Use the Docker tag to a create a new tagged image: - Tag a image off of another image
|
docker image tag linuxacademy/weather-app:<GIT_HASH> linuxacademy/weather-app:latest
| Tag the weather-app as the latest using the image tagged with the commit hash: |
Example with Hash Tag
Get the commit hash:
cd docker_images/weather-app/src
git log -1 --pretty=%H
cd ../ |
Docker hub
- building your image using the Dockerfile,
- tagging it, pushing it to a Docker registry, that way others can go and access it.
Image Push Command
https://hub.docker.com/ | Create a Docker Hub account: |
docker image push <USERNAME>/<IMAGE_NAME>:<TAG> | Docker Push: |
docker image tag <IMAGE_NAME>:<TAG> <linuxacademy>/<IMAGE_NAME>:<TAG> | Creating an image for Docker Hub: |
docker image push <USERNAME>/weather-app:<HASH>
| Push the image to Docker Hub:
|
Objectives
- Create an image
- Build image
- Tag image with Hash
- Push to docker hub
- Tag image with latest
- Push to docker hub
Example
# Create an image for the weather-app using multi-stage build
FROM node AS build
RUN mkdir -p /var/node/
ADD src/ /var/node/
WORKDIR /var/node
RUN npm install
FROM node:alpine
ARG VERSION=V1.1
LABEL org.label-schema.version=$VERSION
ENV NODE_ENV="production"
COPY --from=build /var/node /var/node
WORKDIR /var/node
EXPOSE 3000
ENTRYPOINT ["./bin/www"]
# Get the weather-app code:
git clone https://github.com/linuxacademy/content-weather-app.git src
# Use the Git commit hash as the image tag:
cd src
git log -1 --pretty=%H
cd ../
#Build the image:
docker image build -t <USERNAME>/weather-app:<HASH> --build-arg VERSION=1.5 .
# Tag the image before pushing it to Docker Hub:
docker image tag linuxacademy/weather-app:<HASH> <USERNAME>/weather-app:<HASH>
# Push the image to Docker Hub: docker login docker image push <USERNAME>/weather-app:<HASH>
# Tag the latest image:
docker image tag <USERNAME>/weather-app:<HASH> <USERNAME>/weather-app:latest
# Push the latest image to Docker Hub: docker login <USERNAME> docker image push <USERNAME>/weather-app:latest |
Lab challenge
You want to dockerize your application
How?
- Create a Docker image via Dockerfile
- Image should be small so use multi-stage build
- Test your image by creating a container via that image
- Create a Dockerfile that uses multi-stage build
- Build the image and tag it with git commit hash
- Deploy container using that image
Tagging and Pushing Images to DockerHub
- You just completed building a docker file and you’re ready to go build your image and push it to docker hub
How?
- Make sure you have a docker hub account
- Build your image and Tag it with git commit hash with build argument version i.e. 1.5 with above Build stage
- docker image build -t [USERNAME]/weather-app:[HASH] --build-arg VERSION=1.5 .
- Tag the image with latest with the tag command
- docker image tag [USERNAME]/weather-app:[HASH] [USERNAME]/weather-app:latest
- Push both the version to docker hub
- Push hashed version of the image
- docker image push [USERNAME]/weather-app:[HASH]
- Push the latest version of the image
- docker image push [USERNAME]/weather-app:latest
Image history
We have ability to see how image is build
- You can see list of layers has been created along with IDs and commands that were run
Container management
Container processes commands
Docker container top <NAME>
Docker container exec -it <NAME> /bin/bash top | Display the running processes of a container
Run Top command locally // when you logged in to the container |
Docker container stats <NAME> | Display a live stream of container’s resource usage statistics |
Start container automatically
by-default container restart is set to no. so every container we created won’t restart.
If the docker server stops and server rebooted, those containers are not going to start back up
4 option with container auto-start
To configure the restart policy for a container, use the --restart flag
Container set to
no | The default. Do not automatically restart the container |
on-failure | Restart the container if it exits due to an error. Which manifests as a non-zero exit code |
always | Always restart the container if it stops |
unless-stopped
Example when container will not start
Docker container stop <NAME> Sudo systemctl restart docker | Similar to always except that when the container is stopped, it is not restarted even after the docker deamon restarts
If you go and stop the container, it’s not going to restart. This means that this container will not restart even if the docker demon is restarted |
Example command
docker container run -d --name <NAME> --restart <RESTART> <IMAGE> | Automatically Restarting a container:
|
Container events
Docker system events
Docker system events --since ‘TIME_PERIOD’ | Get real time events from docker server |
Docker system events --filter <FILTER_NAME>=<FILTER> --since ‘1h’
Docker system events --filter type=container --since ‘1h’
Docker system events --filter type=container --filter event=start --since ‘1h’ | Filter events
Ex: filter event for container object type
Event=start // getting events when container starts AND anytime when a new container starts
Event = attach // ex: in distributive behavior
Event = die Event = stop |
Managing stopped containers
Docker container -a -q
Docker container -a -q -f status=exited | List all containers IDs including running and stopped -q = quiet
Pass these IDs to the script and can manipulate containers in some way(restart all stopped container via bash script)
List of container IDs that are exited |
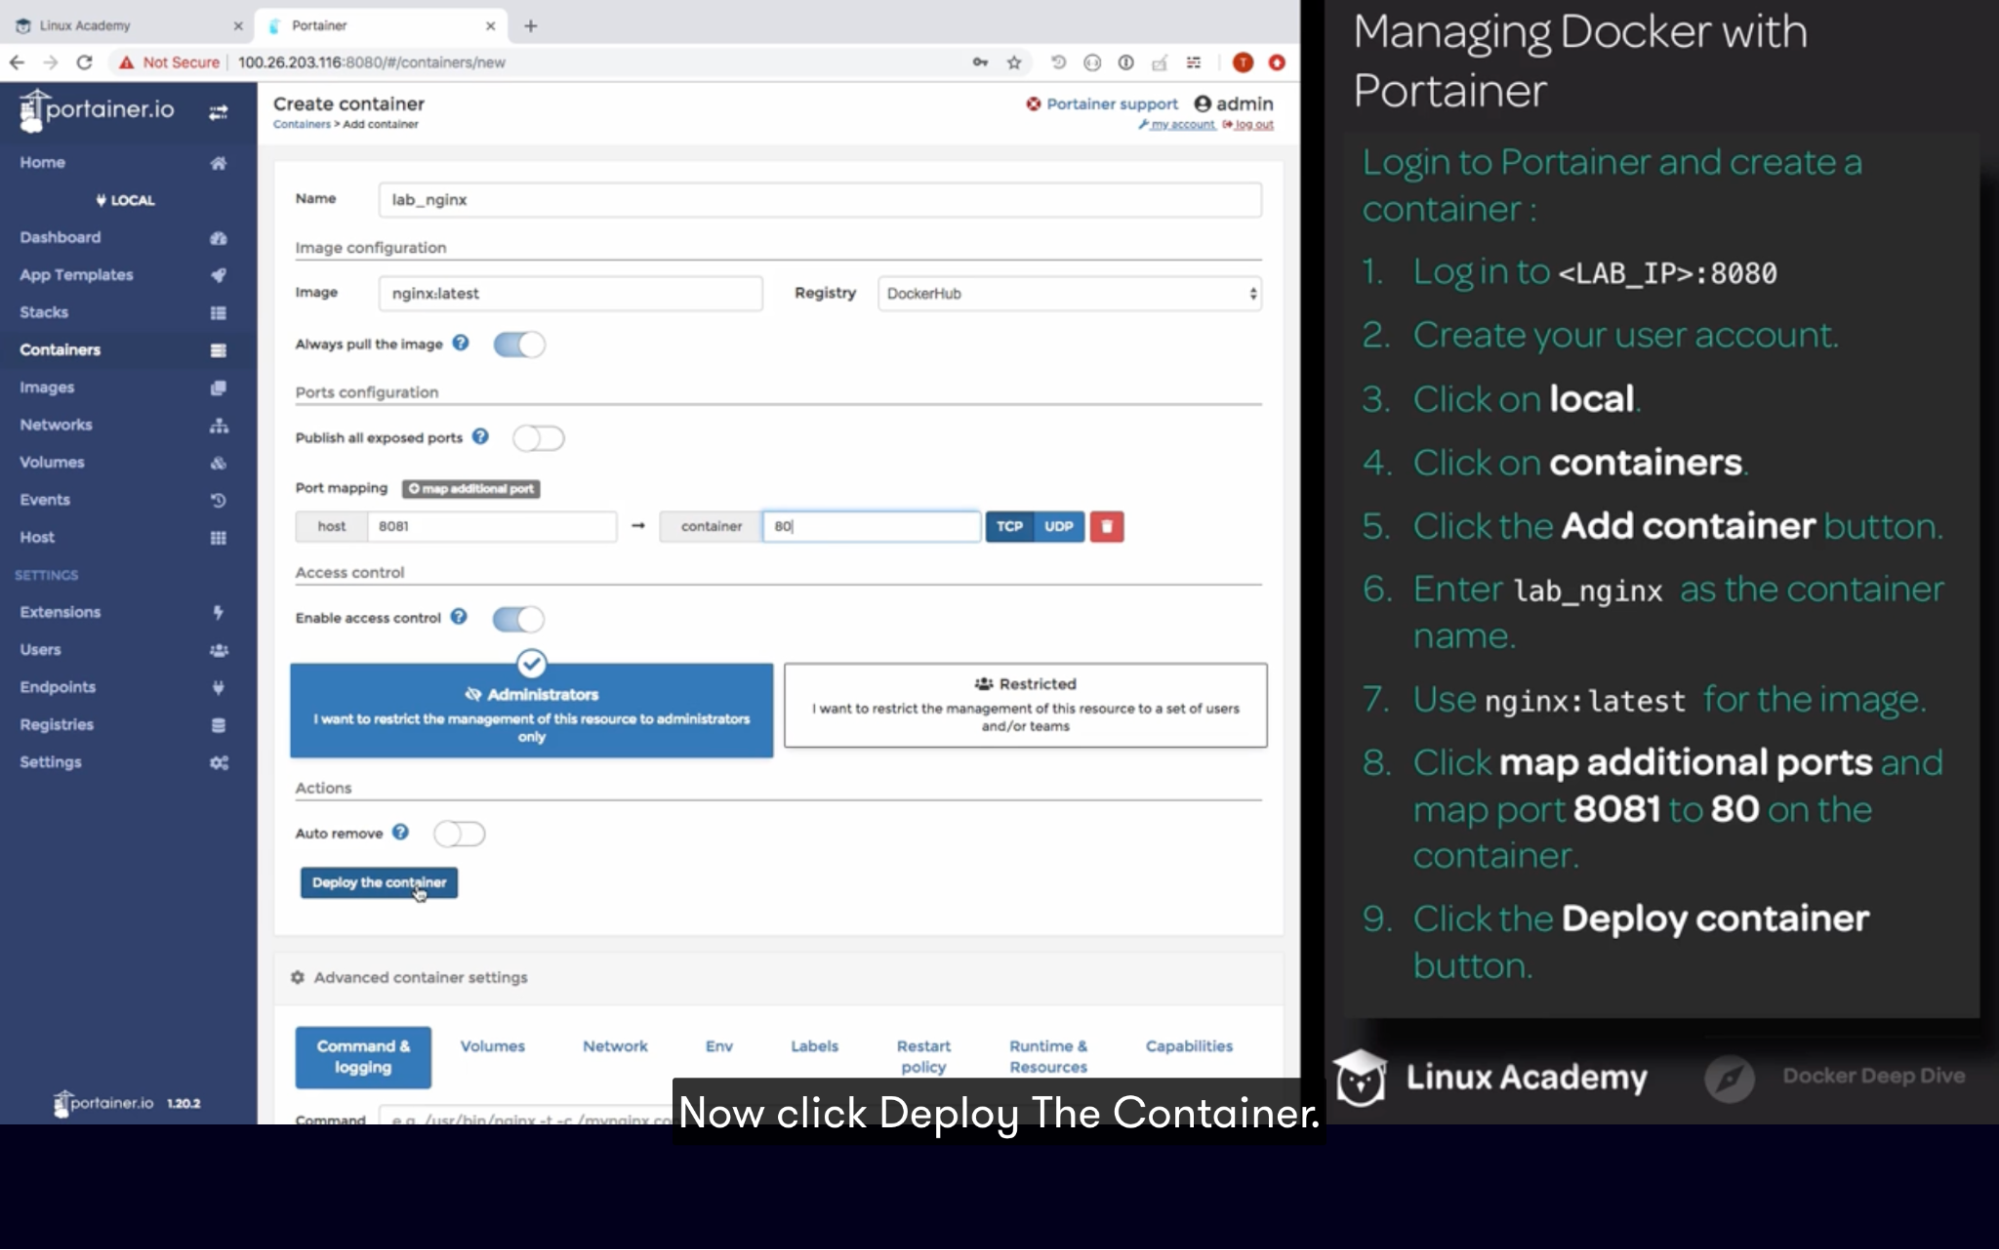
Docker portainer
To manage docker and docker swarm.
It’s an alternative of docker cli and lets you do everything with GUI
Watchtower
- Is a application that monitor your running containers to see if there’s any changes to it’s image
- If there is a change in image, it well restart the container using the new image
- This is used for keeping container up to date
- Whether you choose Watchtower or not it Depends on CICD process and change control policies
Scenarios
Portainer
You have several docker servers that you manage container on for client
Management of docker host has become a bit of a pain
Looking for all in one tool = portainer
- Deploy one of your docker host
- Create nginx container using it
We'll install Portainer and use it to manage our Docker host.
# Create a volume for Portainers data:
docker volume create portainer_data
#Create the Portainers container:
docker container run -d --name portainer -p 8080:9000 \
--restart=always \
-v /var/run/docker.sock:/var/run/docker.sock \
-v portainer_data:/data portainer/portainer
docker container ls
#The ls should output:
rivethead42/weather-app:latest
NODE_ENV production |
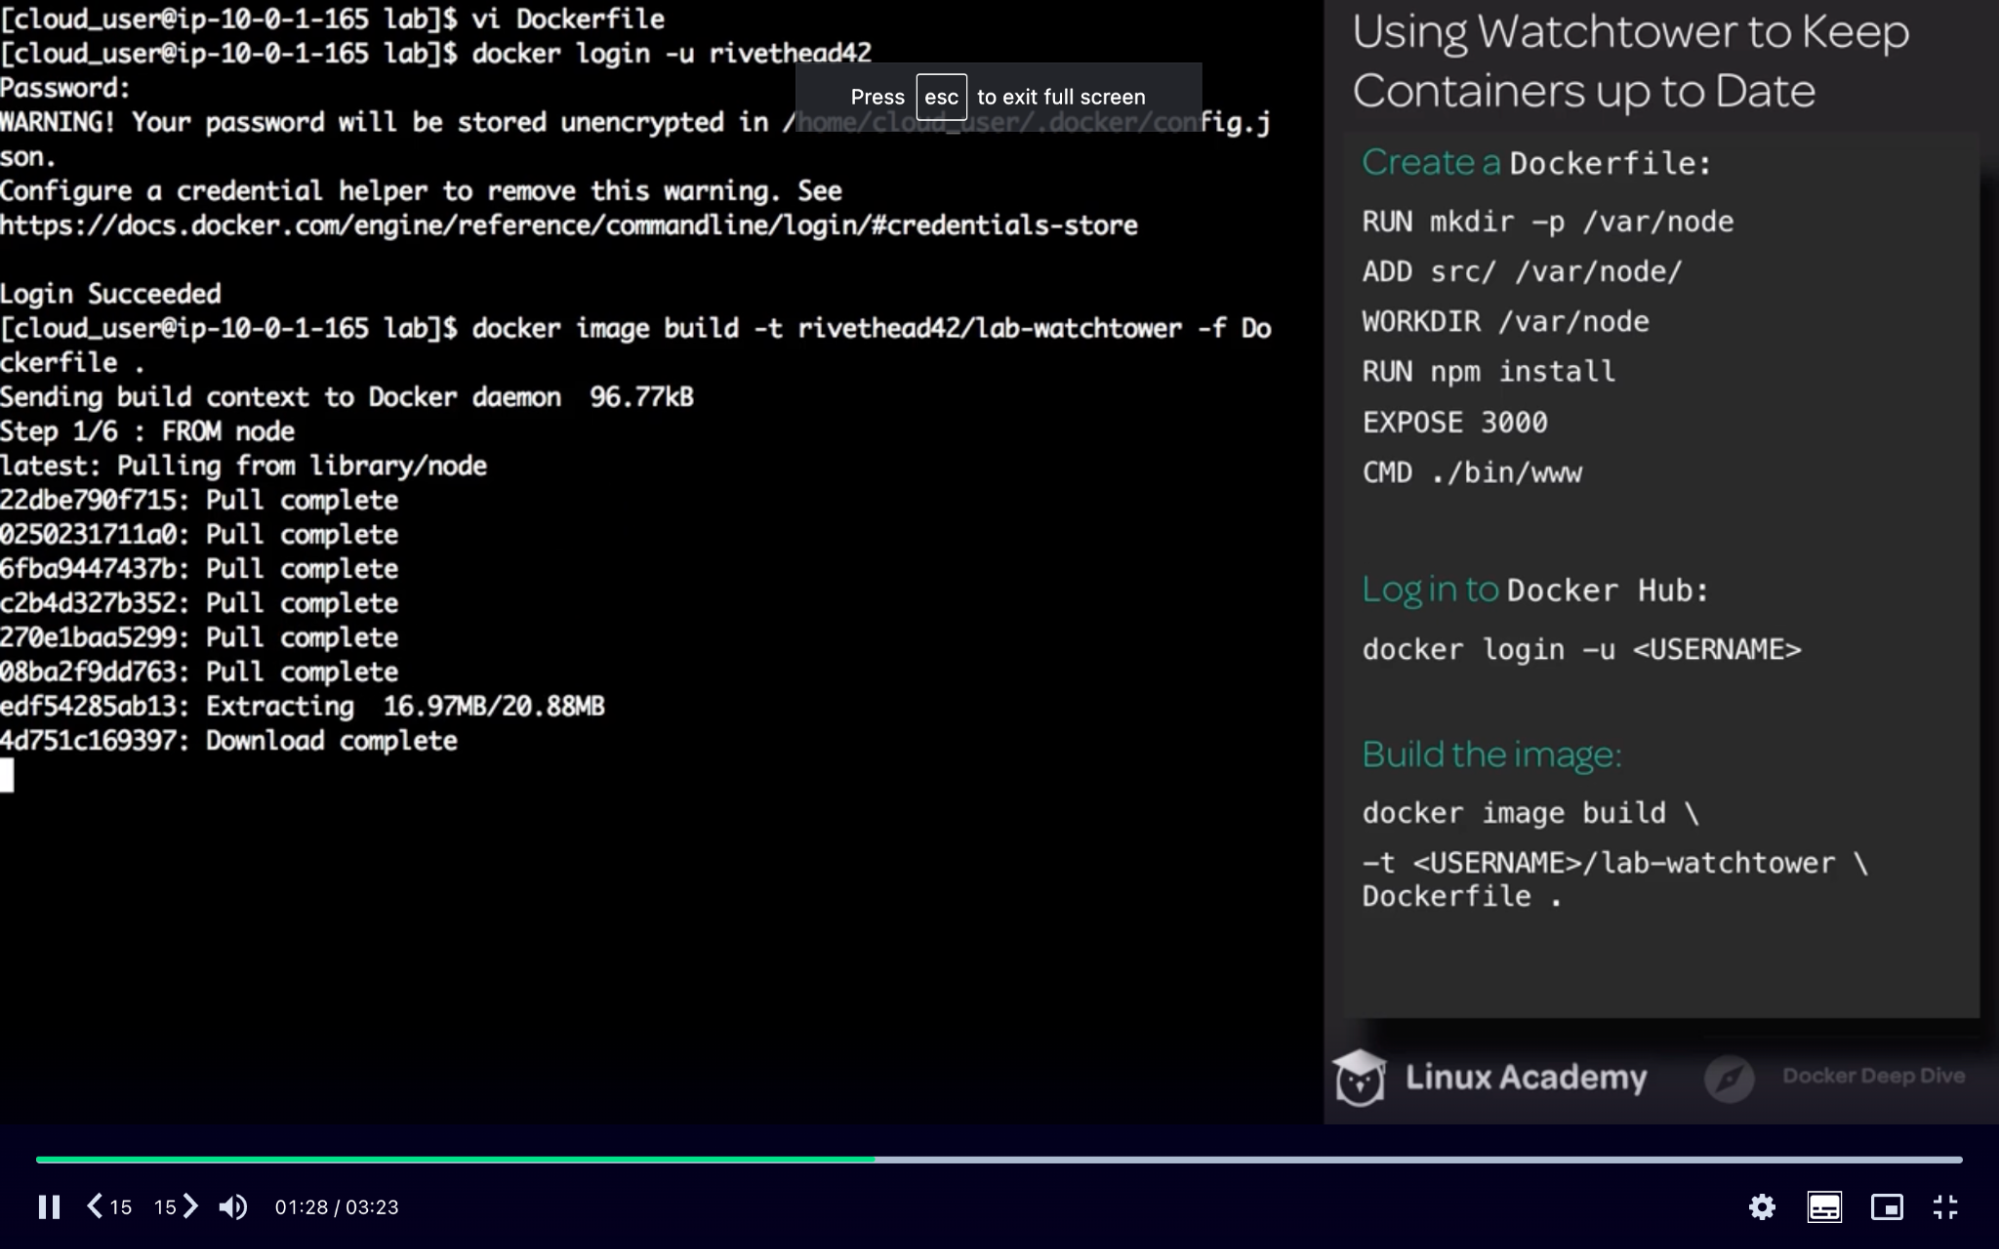
Watchtower
After having to manually update several container, you have decided to look into an automated solution
Watchtower: updates all running containers when changes are made to the image that the container is running
- Create a dockerfile that will be used to create a docker image
- Image push to docker hub
- Create container
- Deploy watchtower
- Update dockerfile
- Rebuild image and push to docker hub
- Watchtower watches changes every 30 second
- Once changes detected it will update the running container

Docker Compose
Idea
With Docker You’ll be deploying microservices, and as more and more of these services build up, they become a little bit more difficult to manage.
Example
let's say we have an application that is built using multiple microservices.
We have the web frontend, an ordering system, a catalog, and then the database that they all talk to.
Now deploying all these services individually can be a bit of a pain.
If you're running your application in a production environment, everything needs to work whenever you make changes. And if not, your customers will experience disruption
Issue resolved by docker-compose
Docker Compose allows you to go and declaratively describe your entire application in a single YAML file.
Then you're able to go and take that file and deploy your application and then manage the entire lifecycle of it using Docker Compose.
Docker Compose File explained
- Contains 4 types of low-level keys/properties.
- Version: define the compose file format & tied to docker engine - mandatory
- Services: define service definitions
- Each service definition is represent a container that is going to be built as part of the application
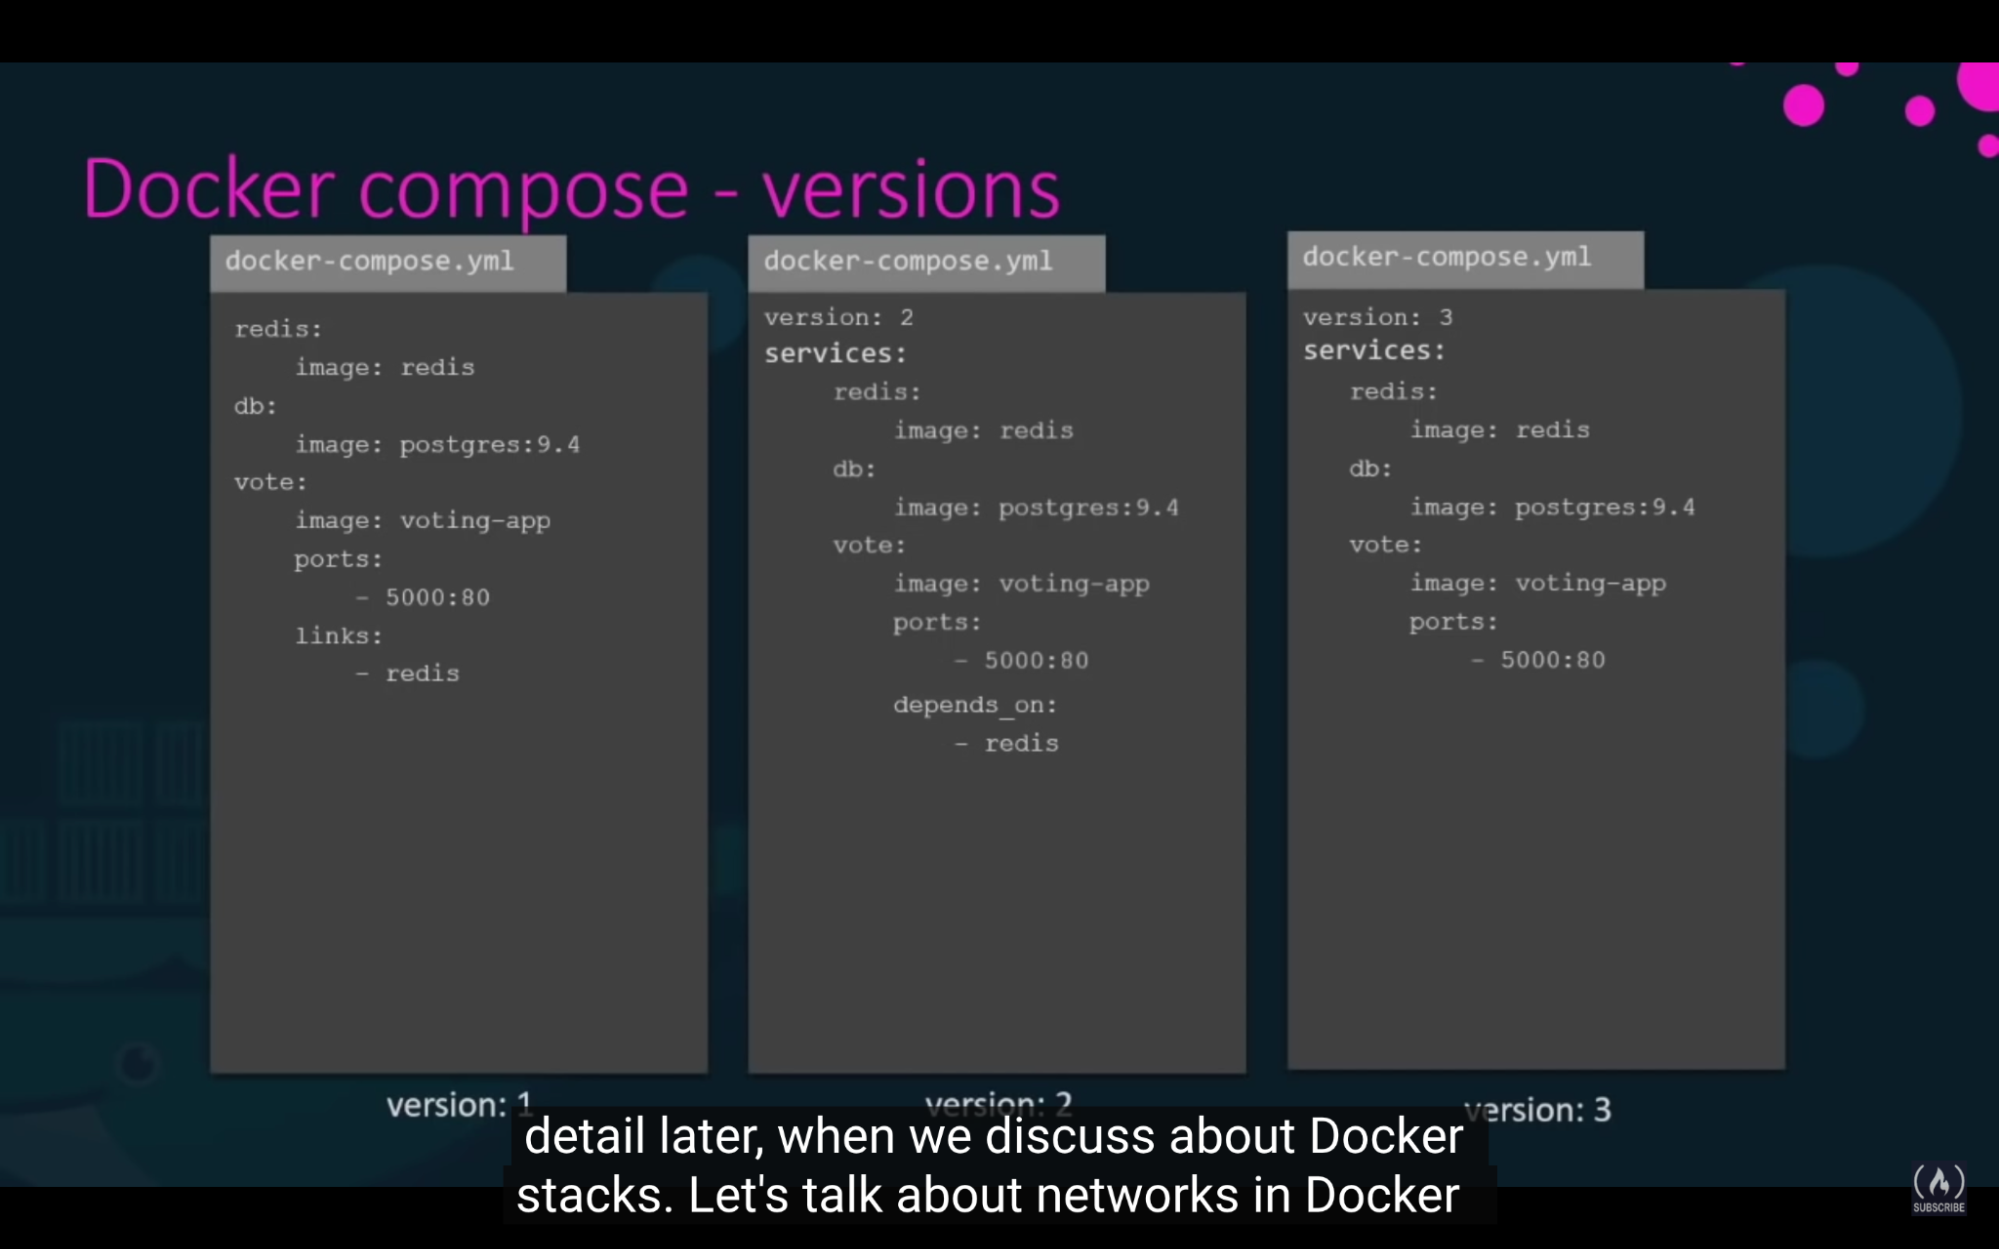 Callouts:
- with version 2 docker compose automatically creates a dedicated bridge network for application. And attaches all containers to that network
- All container then be able to talk to each other using service name // no need to ue links in version 2
- Version 3 comes with support of docker swarm
Docker-Compose File
# Create a docker-compose file: vi docker-compose.yml
docker-compose.yml contents:
version: '3'
services:
web:
image: nginx
ports:
- "8080:80"
volumes:
- nginx_html:/usr/share/nginx/html/
links:
- redis
redis:
image: redis
volumes:
nginx_html: {} |
Compose with Volume and Network
Objective
- Creating a ghost blog with MySql(2 services: ghost and MySql)
version: '3'
services:
ghost:
container_name: ghost
image: ghost:latest
ports:
- "80:2368"
environment:
- database__client=mysql
- database__connection__host=mysql
- database__connection__user=root
- database__connection__password=P4SSw0rd0!
- database__connection__database=ghost
volumes:
- ghost-volume:/var/lib/ghost
networks:
- ghost_network
- mysql_network
depends_on:
- mysql
mysql:
container_name: mysql
image: mysql:5.7
environment:
- MYSQL_ROOT_PASSWORD=P4SSw0rd0!
volumes:
- mysql-volume:/var/lib/mysql
networks:
- mysql_network
volumes:
ghost-volume:
mysql-volume:
networks:
ghost_network:
mysql_network: |
Management Commands
build: Build or rebuild services
bundle: Generate a Docker bundle from the Compose file
config: Validate and view the Compose file
create: Create services
down: Stop and remove containers, networks, images, and volumes
events: Receive real time events from containers
exec: Execute a command in a running container
help: Get help on a command
images: List images
kill: Kill containers
logs: View output from containers
pause: Pause services
port: Print the public port for a port binding
ps: List containers
pull: Pull service images
push: Push service images
restart: Restart services
rm: Remove stopped containers
run: Run a one-off command
scale: Set number of containers for a service
start: Start services
stop: Stop services
top: Display the running processes
unpause: Unpause services
up: Create and start containers
version: Show the Docker-Compose version information |
Compose Commands
docker-compose up -d | Create a compose service: - Make sure you run this command where your docker-compose.yml file is located // if toot you can supply path by -f
This will deploy everything listed in docker-compose file |
docker-compose ps | List containers created by compose: |
docker-compose stop | Stopping a compose service: |
docker-compose start | Starting a compose service: |
docker-compose restart | Restarting a compose service: |
docker-compose down | Delete a compose service: |
docker-compose build | If you make changes to Dockerfile after your compose up and running, you need to make sure it gets rebuilt before executing docker-compose up
|
Example
You have your application needed to be deployed to your production Docker server. You need to create 3 containers that will be load balanced by Nginx. So you need to have docker compose file that has following
- Create 3 app service on a private network
- Create Nginx service that will be publicly accessible
- Use load balance traffic
version: '3' services: weather-app1: build: context: ./weather-app args: - VERSION=v2.0 ports: - "8080:3000" network: - weather_app environment: - NODE_ENV=production weather-app2: build: context: ./weather-app args: - VERSION=v2.0 ports: - "8081:3000" network: - weather_app environment: - NODE_ENV=production weather-app3: build: context: ./weather-app args: - VERSION=v2.0 ports: - "8082:3000" network: - weather_app environment: - NODE_ENV=production nginx: build: ./nginx tty: true ports: - "80:80" network: - weather_app - frontend networks: frontend: weather_app: internal: true |
Callouts
- If you make changes to Dockerfile after your compose up and running, you need to make sure it gets rebuilt before executing docker-compose up
Container orchestration
You can run a single instance of your application (node.js)
Problem:
- What if a number of app users increase and that instance is no longer available to handle the load
- You deploy additional instance of your application by running docker run multiple times
- If container fails, you have to detect that and redeploy the docker container again to deploy your application instance
- You have to watch the load and performance of your application and deploy additional instance yourself
- Docker host health: What if a docker host crashes and become inaccessible?
- Containers hosted on that host become inaccessible too
Solve
- Engineer to sit and monitor the state performance, health of the containers and take necessary action // not a practical approach when you 1000 of container hosted
- Container orchestration is a set of scripts and tools that can help containers in production env
- Solution consists of multiple docker hosts that can host containers. That way even if one fails the application is still accessible through the other host.
- A container orchestration solution allows you to deploy 100 or 1000’s of instances of your application within a single command. this is a common use for docker swarm
- some orchestration solution can help you automatically scale up the number of instances when user increases and scale down when the demand decreases
- some solutions can even help you
- automatically adding additional hosts to support the user load.
- not just clustering and scaling, It also provides support for advanced networking between this container across the different hosts
- load balancing user request across different hosts
- Sharing storage between the host
- configuration management and security within the cluster
Container orchestration solutions
- Docker
- Easy to started but lacks some autoscaling features for complex production grade application
- Kubernetes
- Difficult to get started but provides lot of options to customize deployments and has support for many different vendors
- Supported by GCP, Azure and AWS
- MESOS
- Difficult to set up and get started. But supports many advanced features
Docker Swarm
What is docker swarm
you could now combine multiple docker machines/host/server together into a single cluster. docker swarm will take care of distributing your services or your application instances into separate hosts for high availability for load balancing across different systems and hardware.
2 components
- Swarm cluster (Enterprise grade and secure)
- Manage one or more Docker nodes as a cluster
- When you initialize it that node is always going to be manager
- Encrypted distributed cluster store
- Encrypted networks
- By default, communication between the nodes is encrypted.
- Secure join tokens
- Swarm also uses secure join tokens for both manager and worker nodes.
- Orchestration engine
- API for deploying and managing microservices
- Declarative manifest files for defining apps
- Provides availability to scale apps, and perform rolling updates and rollbacks
- Swarm was initially a separate product layered on Docker, since Docker 1.12 it has become a part of the engine.
Cluster
A swarm consists of one or more Docker nodes. Nodes are either a managers or a worker. And that first node is always going to be a manager.
Swarm can be run on anything from physical servers to virtual machines, cloud instances, and it could even run on raspberry Pi.
Managers:
- Manage the state of the cluster
- Dispatch tasks to workers
Workers:
- Accepts and execute tasks
State is held in etcd
- Configuration data and the state of the swarm is stored in etcd.
- etcd is also run in memory on the manager nodes, which means that it keeps things extremely up to date.
- Installed by default so you don;t have to manually configure it
Security
- Run docker in swarm mode because Swarm uses Transport Layer Security (TLS) to increapt communication
- handling the authentication of nodes and authorizing roles.
- automatic key rotation is also thrown in.
Orchestration
- The atomic unit of scheduling is a swarm service.
- The service construct adds the following to a container:
- scaling
- rolling updates
- rollback
- Updates
- A container wrapped in a service is a task or a replica.
Setup
To set up Docker swarm You must have a docker hosts or multiple hosts/servers with docker install on them. then you must design one host to be the swarm manager/master/ and other as slaves/workers
TODO:
- Create 2 servers for your worker and 1 for manager
- Install docker on both worker server
- On your manager, intialize docker swarm
- --advertise-addr flag: This flag specifies the address that will be advertised to other members of the swarm. This will include API access as well as the overlay network.
- When we initialize a swarm manager, we want to use the private IP. // swarm manager host private IP
# Initialize the manager:
docker swarm init \
--advertise-addr [PRIVATE_IP] # Swarm manager server’s private IP |
- Step 3 provided a join-token which we'll be using on both of the worker nodes.
# Add the worker to the cluster:
docker swarm join --token [TOKEN] \
[PRIVATE_IP]:2377 |
Perform docker swarm init on Swarm manager to intialize the swarm manager
Perform docker swarm join --token <TOKEN> to join the manager
Now you are ready to create services and deploy them on the swarm cluster
How it works
Key Component of swarm orchestration is Docker service. Docker services are one or more instances of a single application or service that runs across the nodes in the swarm cluster. for example in this case we could create a docker service to run multiple instances of web application across worker nodes in our swarm cluster. for this to work I have to run following command
docker service create --replicas=3 my-web-server
What’s it for?
Swarm commands
docker swarm init | Initialize swarm on master |
docker swarm join --token <TOKEN> | Append token on worker nodes |
docker node ls | Listing nodes |
docker node inspect [NODE_NAME] | Inspecting a node Info getting back - Role: manager
- Availability: active
- Hostname
- Platform: architecture
- OS
- Docker version and plugin
- State: ready
- Addr: private IP
- Reachability: true
- Addr: private IP with port
|
docker node promote [NODE_NAME] | Promoting a worker to a manager: Node name= enter node name you want to promote // this will turn status to reachable
Why? Maybe leader is on maintenance |
docker node demote [NODE_NAME] | Demoting a manager to a worker when we don’t need it |
docker node rm -f [NODE_NAME] | Removing a node form the swarm (node must be demoted first): -f = because the node is active |
docker swarm leave | Make a node leave the swarm: |
docker swarm join-token [worker|manager] | Getting the join-token: |
docker swarm join --token [TOKEN] \ <PRIVATE_IP>:2377 | Make the node rejoin the swarm: - You will have 2 copies of worker node. One is in down and another is in reachable status
- Remove down host via rm command // supply id
|
Service
An application that is deployed out to a Docker host running in swarm mode is deployed out as a service.
when a service is created, it is accepted by the swarm manager and the service definition represents the desired state.
Based on the number of replicas, the swarm will schedule replica tasks, and each task invokes a single container, and these containers run in isolation.
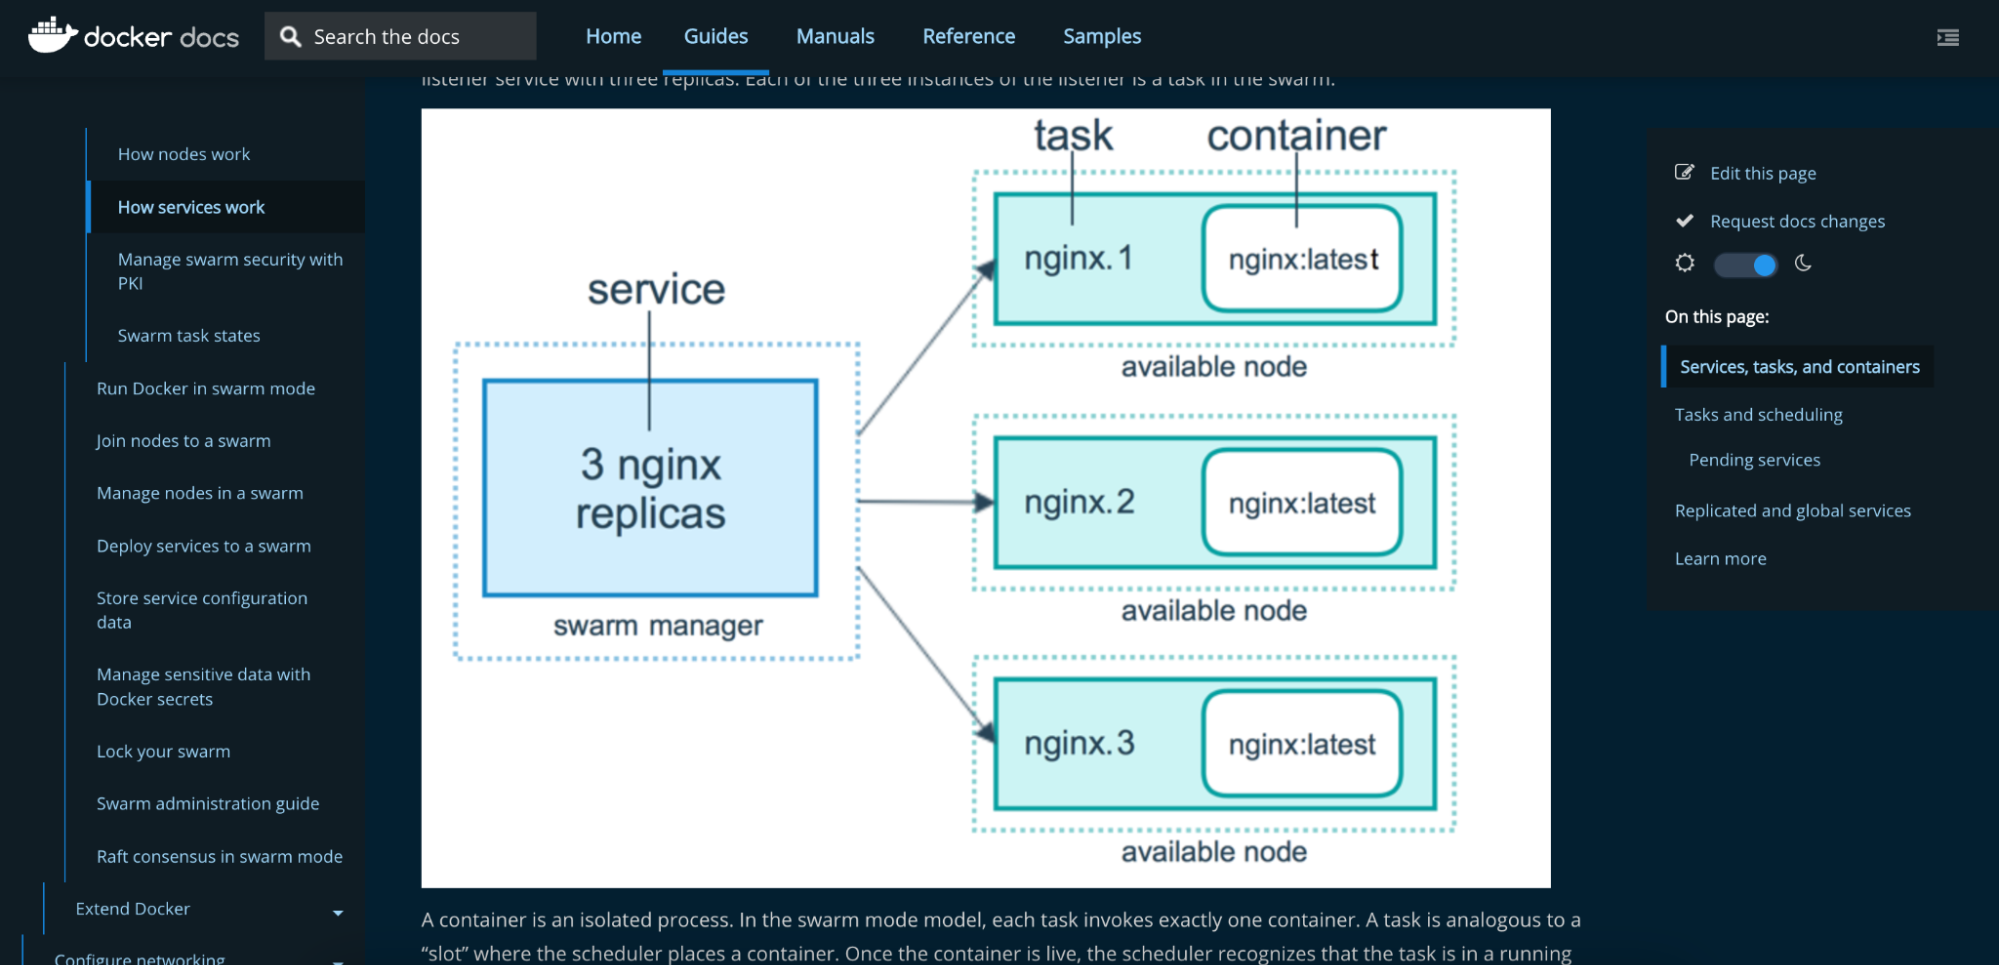
When looking at the diagram, we have a single service.
- It's an Nginx service with 3 replicas.
- The swarm manager will schedule out the 3 replica tasks, and those tasks will be scheduled onto an available node within the swarm.
When the container's live, the scheduler then recognizes the task is in a running state.
- If, for whatever reason, the container fills a health check or is terminated, the task is also terminated.
- If the minimum number of replicas is not met, then a new task will be scheduled and created.
Example
# Creating a service:
docker service create -d --name [NAME] \
-p [HOST_PORT]:[CONTAINER_PORT] \
--replicas [REPLICAS] \
[IMAGE] [CMD] |
Service commands
docker service create --replicas=3 my-web-server
docker service create -d --name [NAME] \ -p [HOST_PORT]:[CONTAINER_PORT] \ --replicas [REPLICAS] \ [IMAGE] [CMD]
| To create a service |
docker service ls | List services |
docker service inspect [NAME] | Inspecting a service |
docker service logs [NAME] | Getting a logs for service |
docker service ps [NAME] | LIst all tasks of a service |
docker service scale [NAME]=[REPLICAS] | Scaling a service up and down |
docker service update [OPTIONS] [NAME] | Updating a service
Use docker service -h for more help - -d // update services in detach mode
- --dns- // update DNS Server
- --entrypoint // override entrypoint
- --env-add list // update env variables
- Update CPU & memory limits
- adding & removing mount
|
Swarm networking
3 types of network in docker
- Bridge: by-default containers attached to
- Private internal network created by the docker on the host
- All containers attached to this network bydefault and get an internal IP address usually in the range of 172.17 series
- Container can access each other using this internal IP if required
- To access these containers from the outside world, Map ports of these containers to ports on the docker host
- None:
- Host:
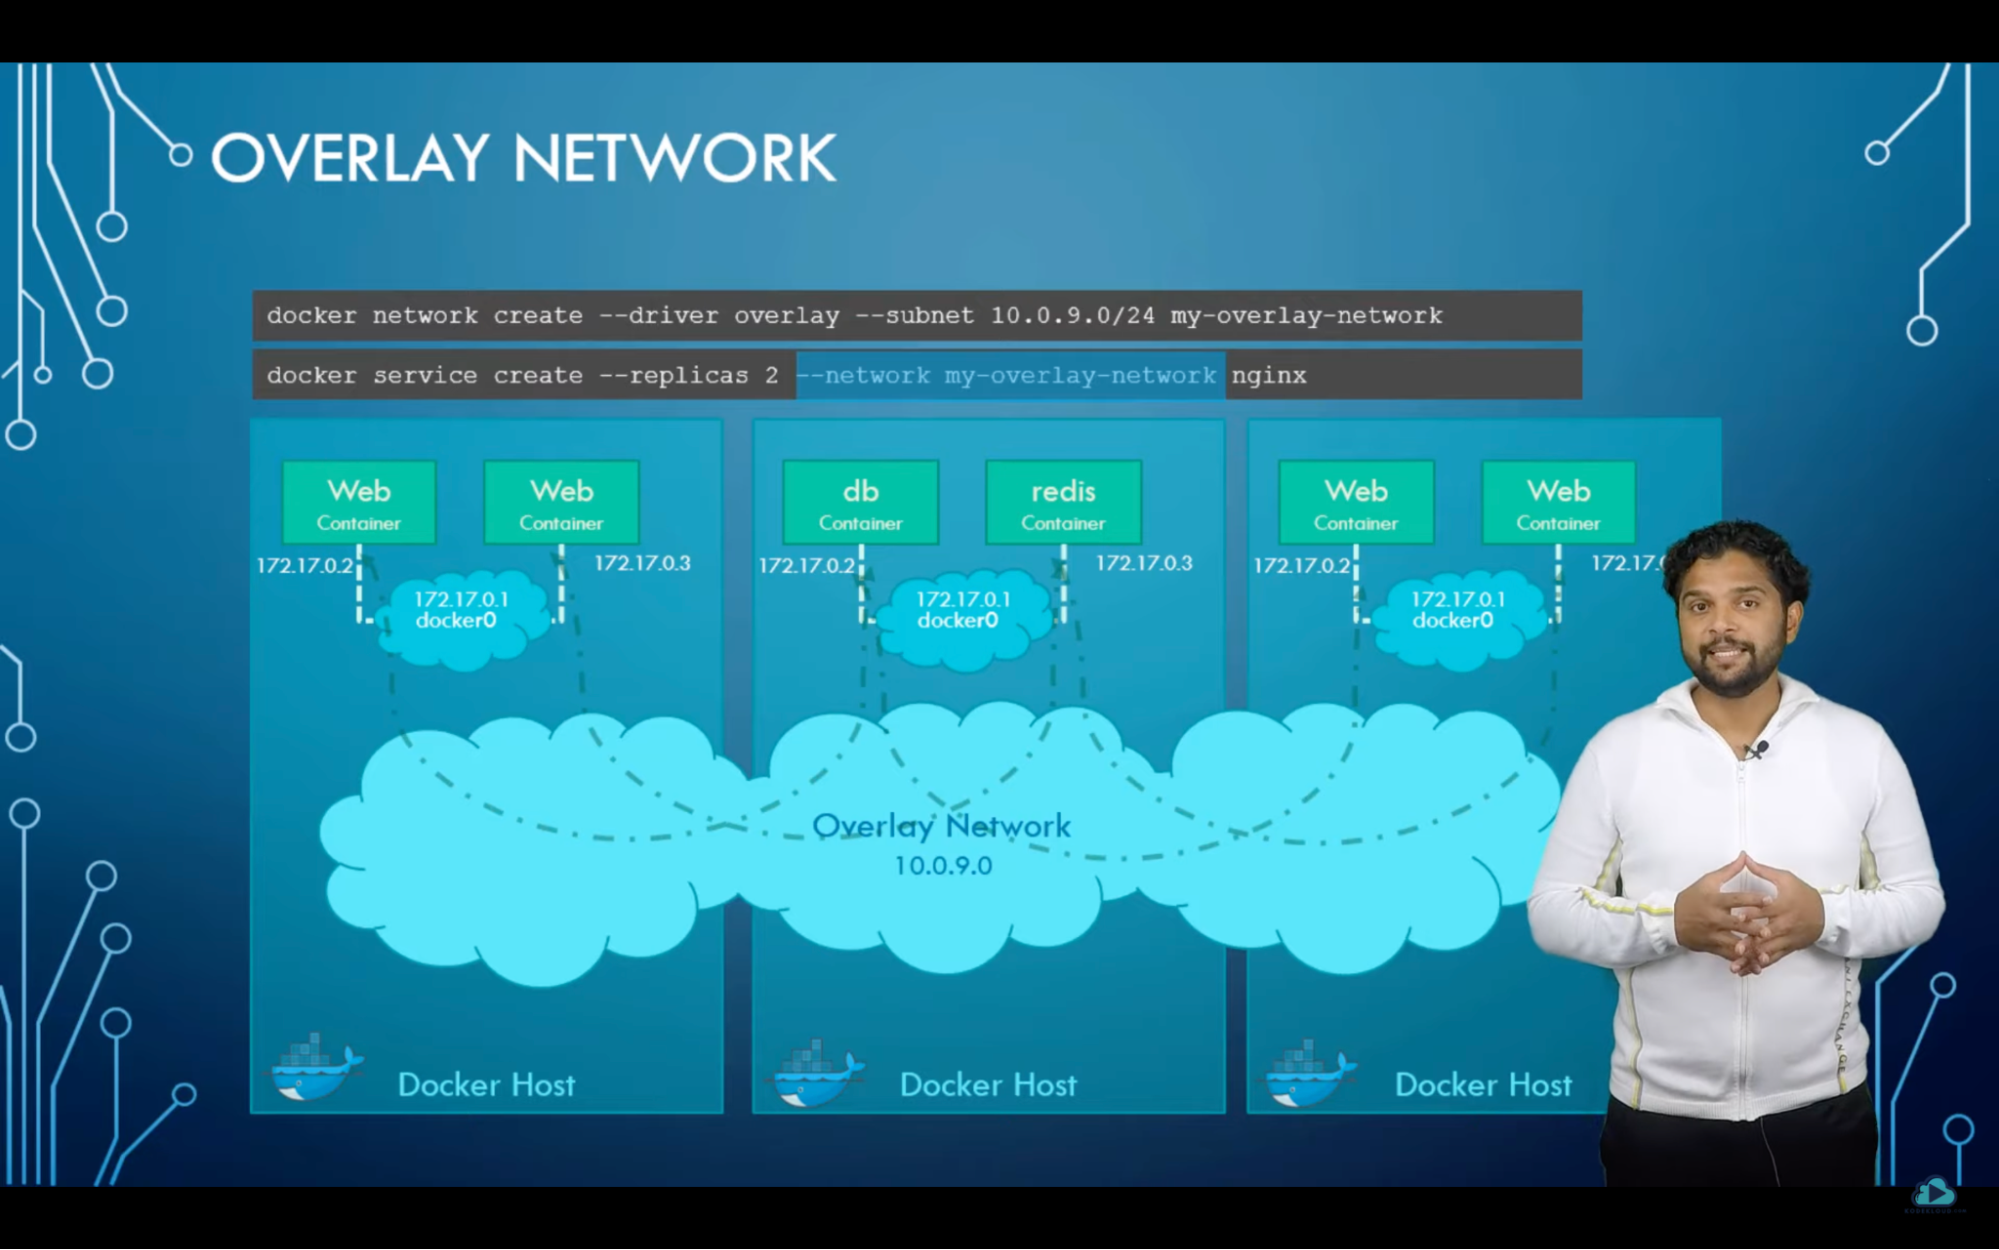
- You don;t need to use -p command to map container’s port to web server
Bridge networking concept
for example, we have multiple doctor hosts running containers. each docker host has its own internal private network in the 170.17 series allowing containers running on each host to communicate with each other.
however containers across the host has no way of communicating with each other unless you publish the ports on those containers and set up some kind of routing yourself. this is where overlay networks comes into the play
with docker swarm you could create a new network of type overlay which will create an internal private network that spans across all the notes participating in the swarm cluster. we could then attach the containers or services to this network using the network option
docker network create --driver overlay --subnet 10.0.9.0/24 my-overlay-network
docker service create --replica 2 --network my-overlay-network nginx |
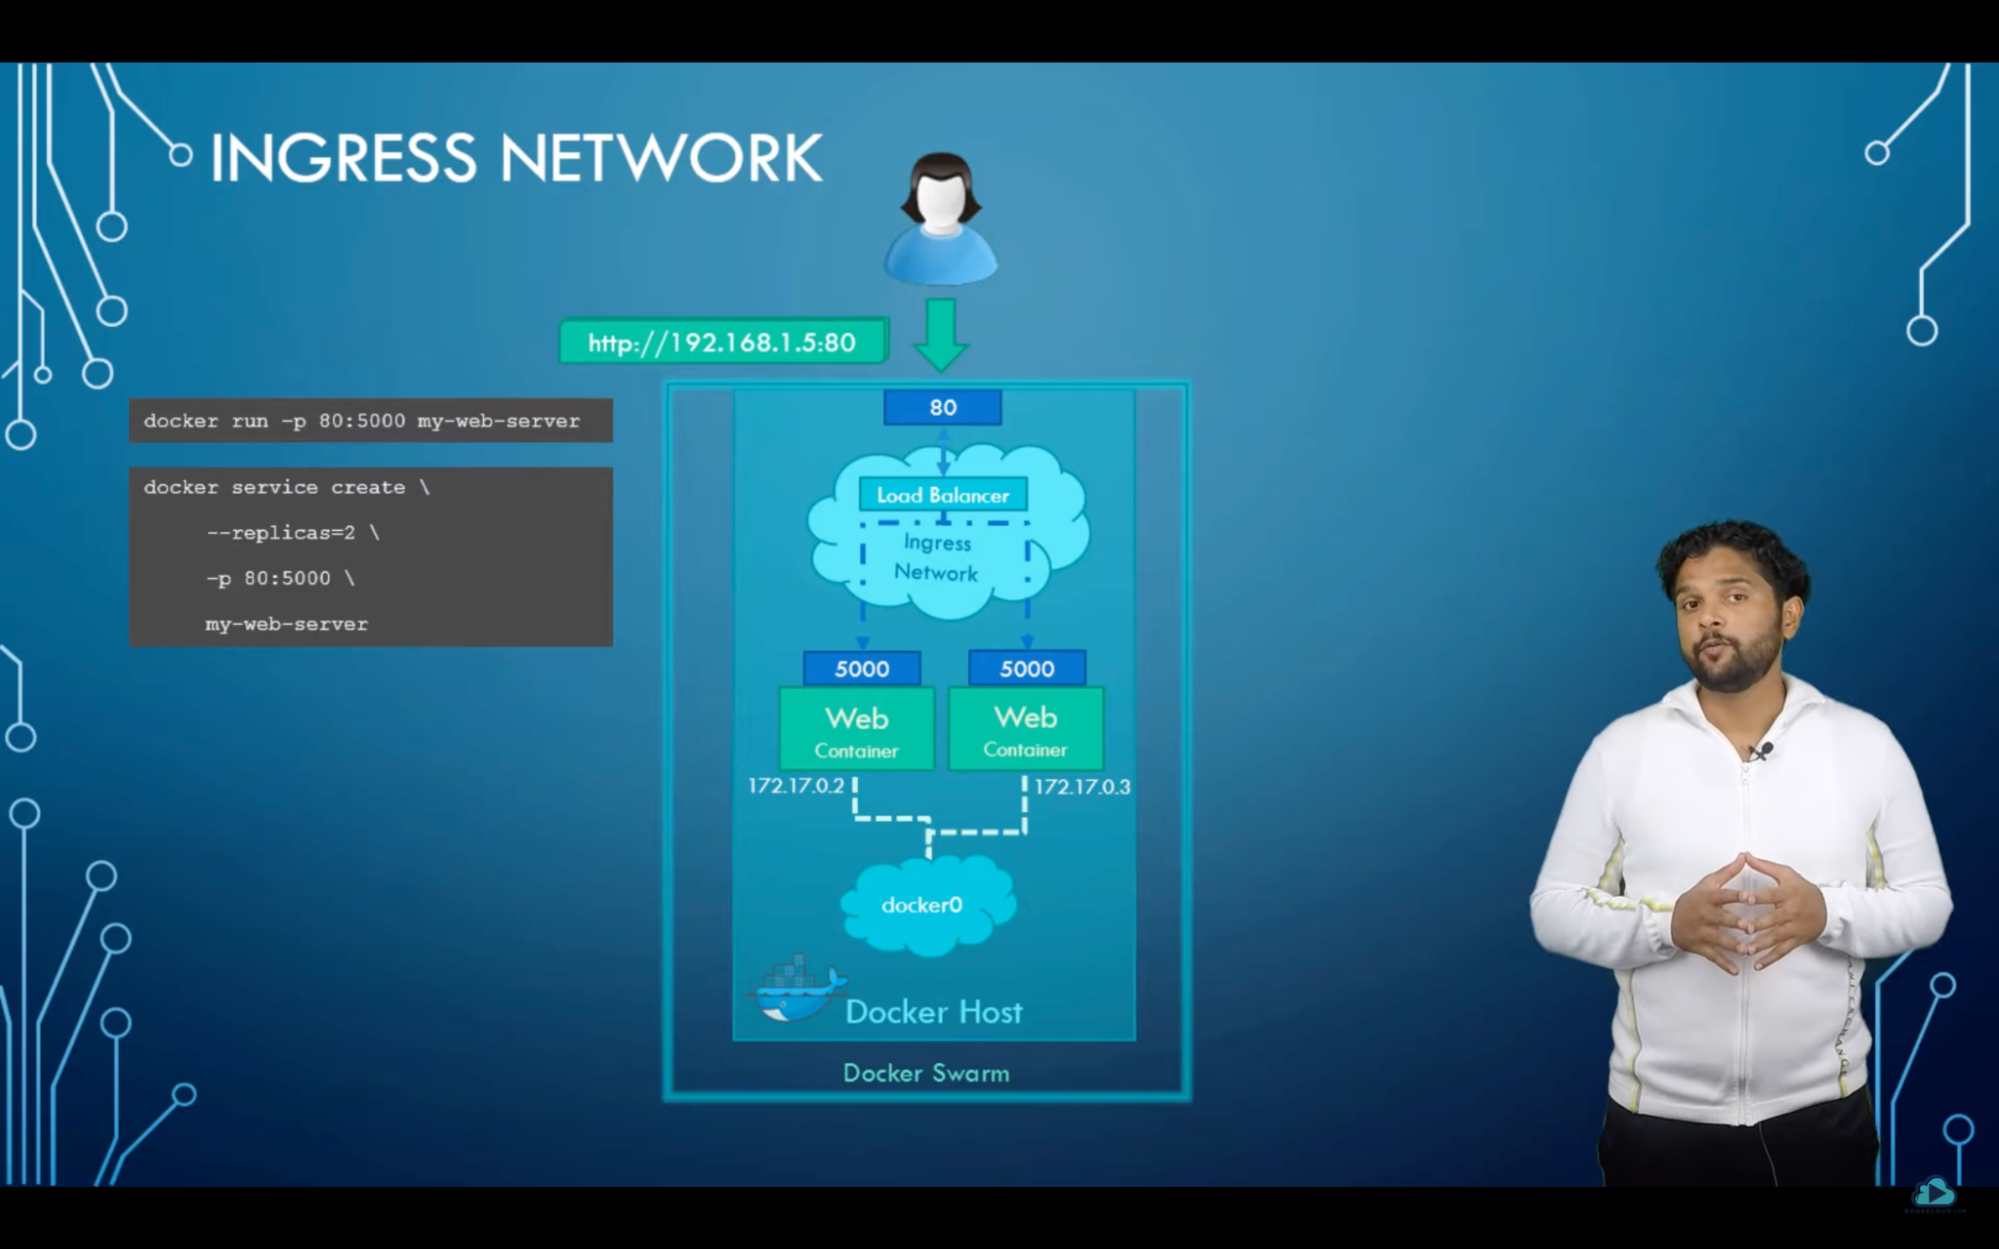
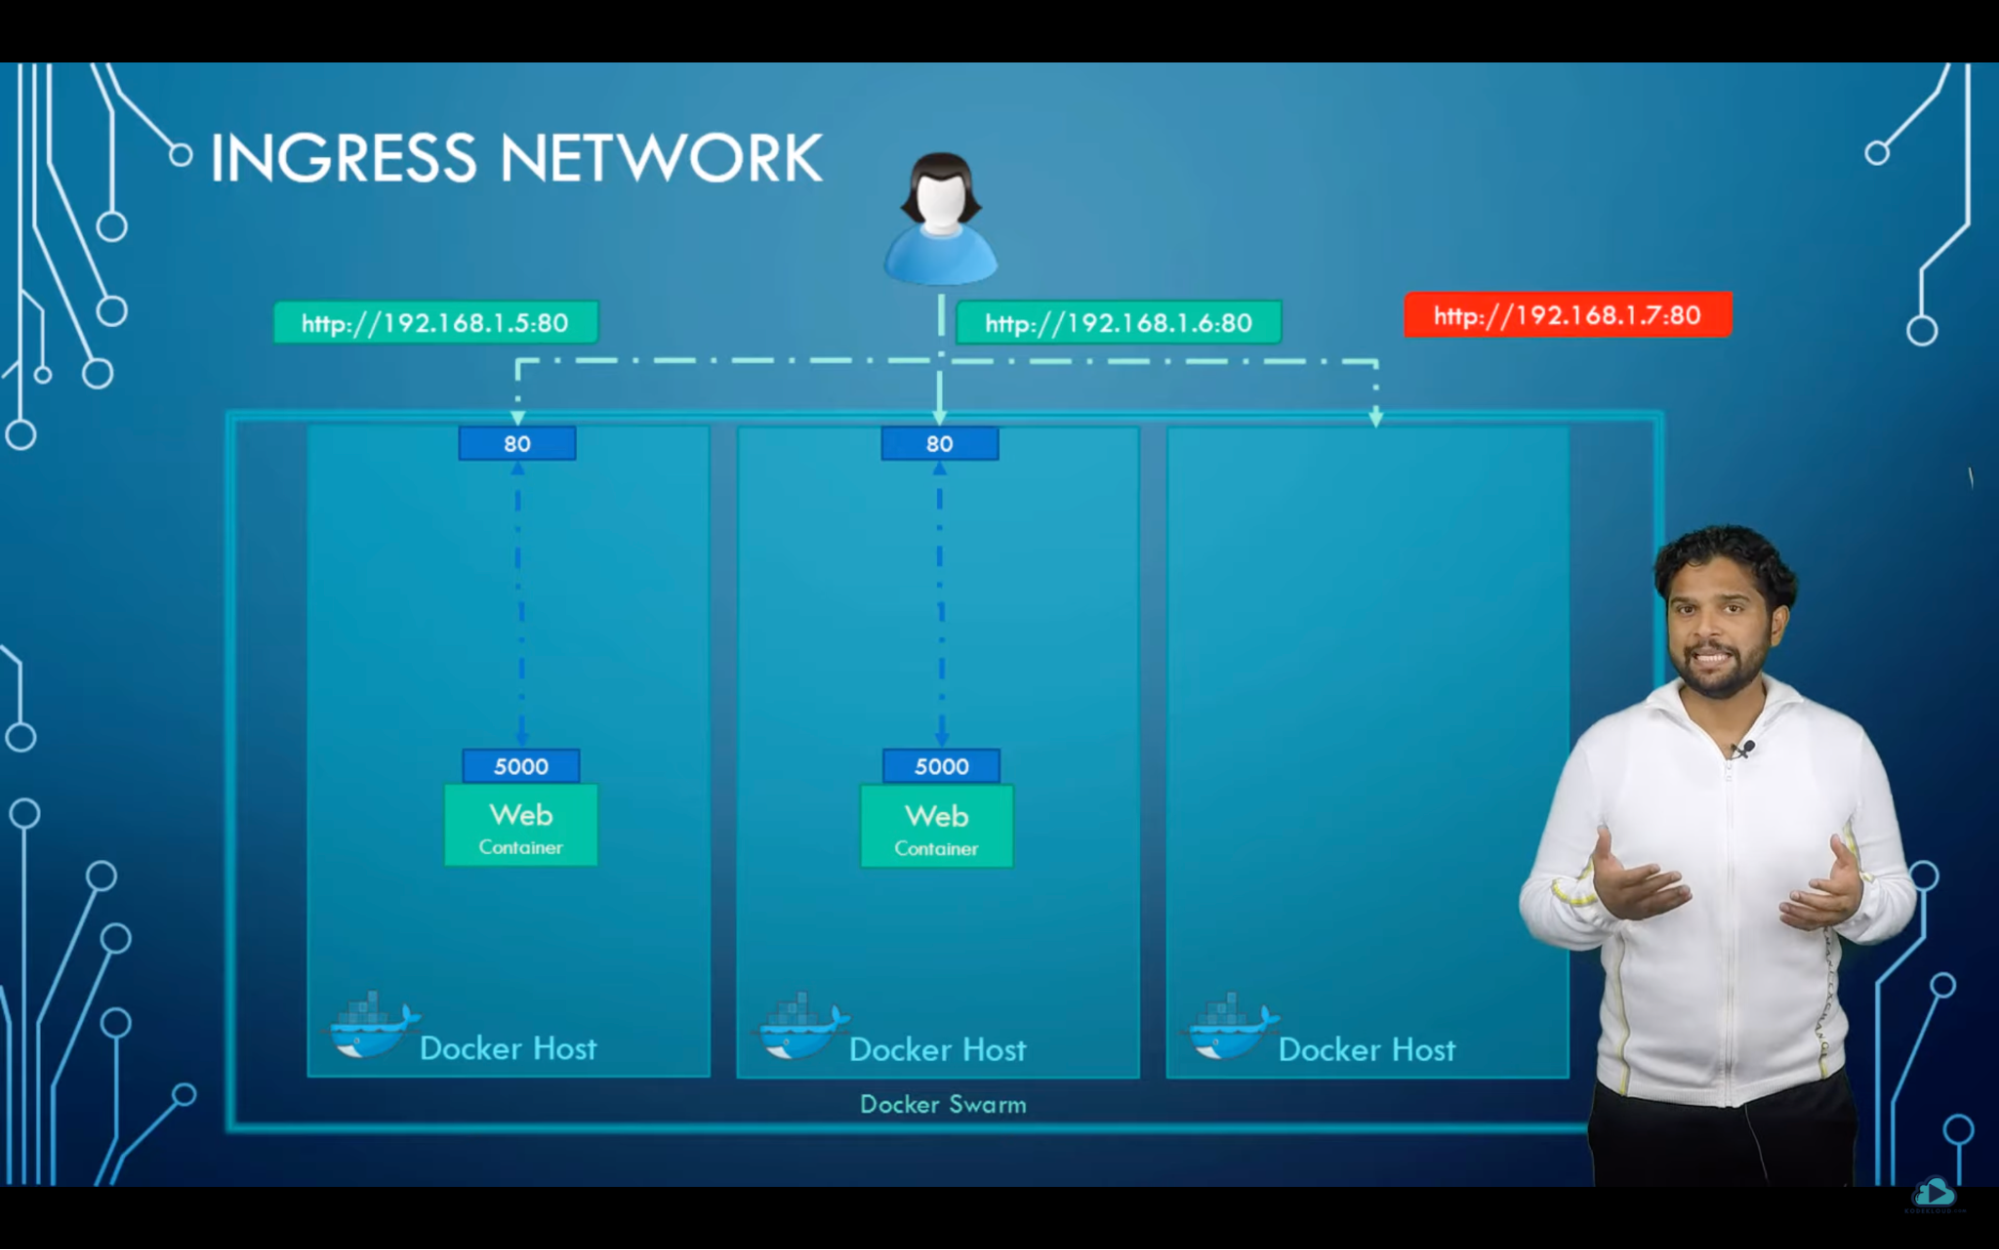
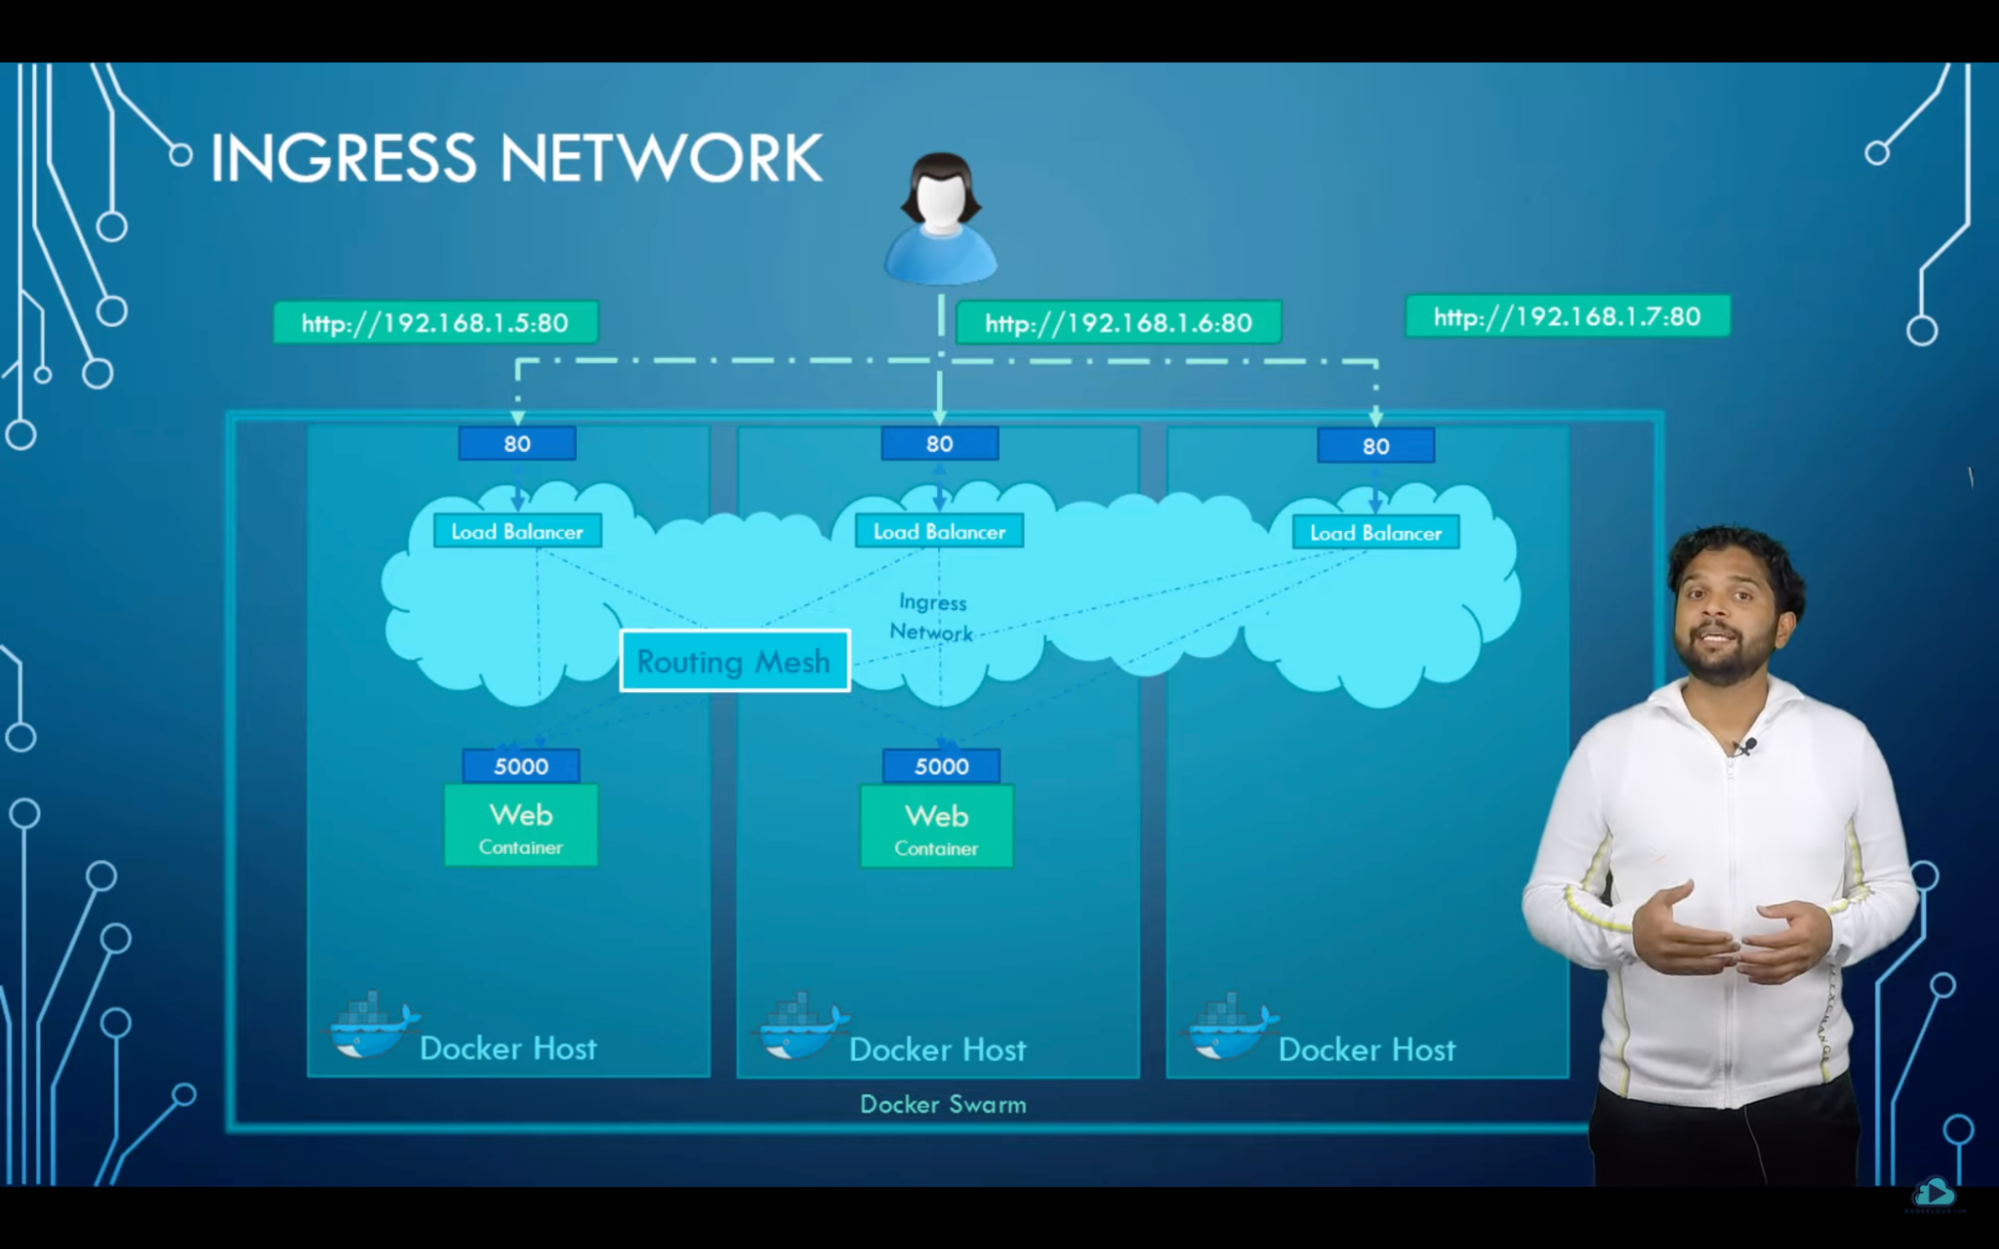
Ingress network
let’s say you have a single instance application listening on host port 80 and container port 5000 and for the outside world to connect to your Web container it needs to be map with host port 80. now if you were the create 2replicas you cannot use container port 5000 again. we cannot have 2 mappings on the same port. // issue resolved by ingress networking
When you create docker swarm it automatically creates an ingress network. it has a built-in load balancer that redirects traffic from the published port which in the case is port 80 all the map ports which are the ports 5000 on each containers
You don’t need to do any manual configuration you just have to create service you need by running the service by create command and publish the port using -p option. by this engress
network and internal load-balancing will simply work out of the box
how ingress network works when there are multiple nodes in the doctor Swarm cluster
what’s given
- 3 nodes docker swarm cluster
- running 2 instances of web server
- requested only 2 replicas; The 3rd docker host it’s free and has no instances
How this might work without ingress inteworking?
how do we expect the user to access our services in a swarm cluster of multiple notes
- we expect the user to be able to access services from any node in our cluster. meaning any user should be able to access the web server using the IP address of any of this container since they are all part of the same cluster.
- without ingress networking or user could access the web server on Node 1 and 2 but not on node 3 because there is no web service instance running on the note 3
with ingress network
- It’s a overlay network; single network that spans across all of the nodes in the cluster
- The way load balancer works is it received request from any node in the cluster and forwards that request to the respective instances on any other node essentially creating in routing mesh
- routing mash helps in routing the user traffic that is received on a node that is not even running an instance of the web service to other notes where the instances are actually running
- this is default behaviour of docker swarm and you don’t need to do any additional configuration
- you just need to create your service specify the number of replicas and publish the port. docker swarm will ensure that the instances are distributed equally across the cluster, ports are published on all the nodes and the user can access the service using the IP of any of the nodes and the traffic is routed to the right services internally
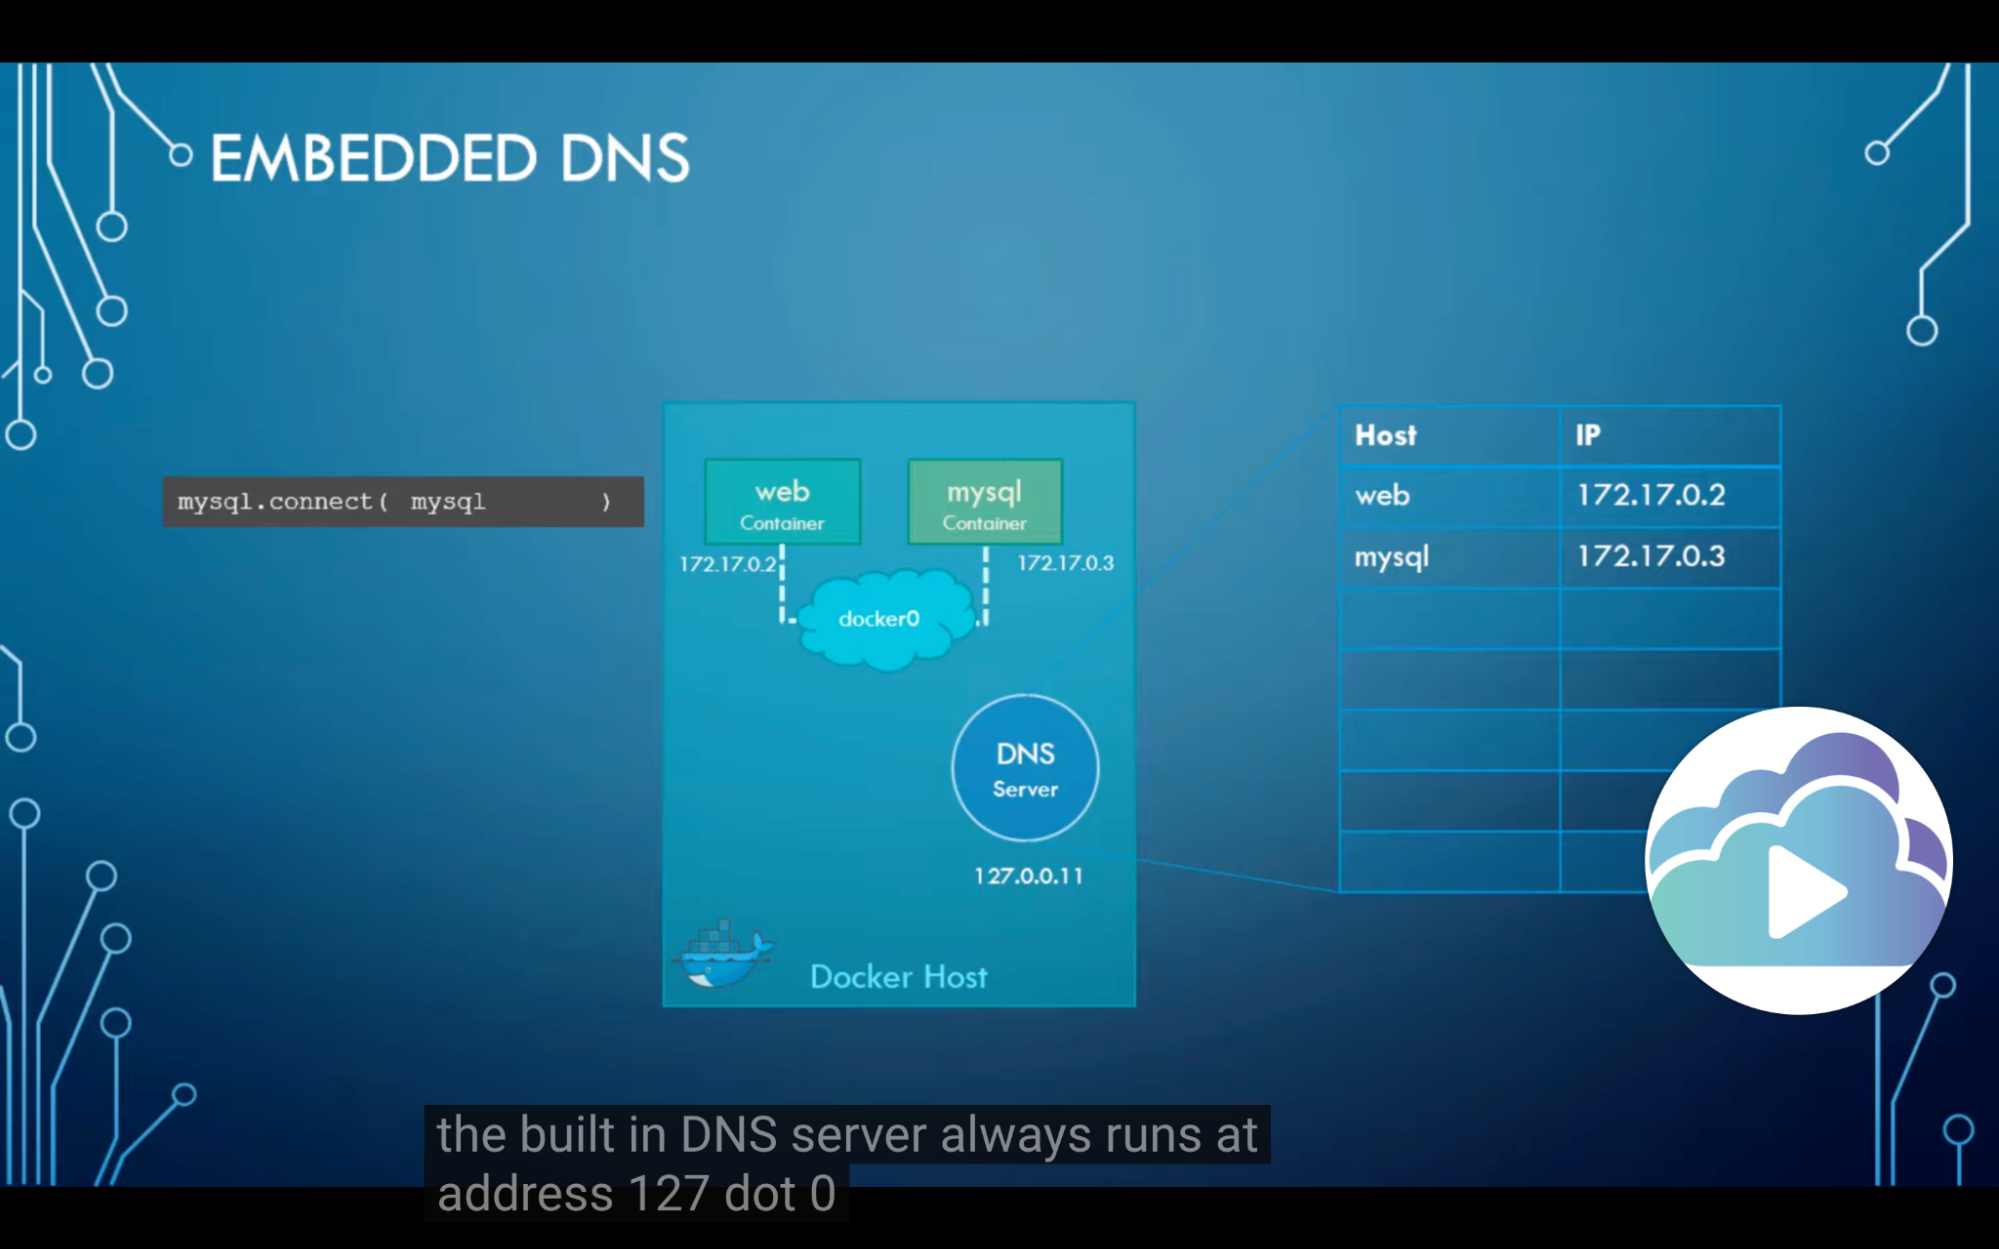
Embedded DNS
- how containers communicating with each other
What’s given
- Web service and mysql database on a same node // how communication happens
How?
- Use the internal IP address assigned to mysql container // not ideal
- Because container will not get the same IP when system reboots
- Use container name
- all containers in The docker host can resolve each other with the name of the container
- docker has a built-in DNS server that helps the containers to resolve each other using the container name
Swarm Network commands
docker network create -d overlay NET_NAME | Creating a overlay network -d = driver name |
docker network create -d overlay --opt encrypted NET_NAME | To encrypt data(Network) use --opt flag |
docker service create -d --name nginx_overlay --network NET_NAME -p 8081:80 --replicas 2 nginx:latest | Creating a service with an overlay network |
docker service update --network-add NET_NAME SERVICE_NAME | Update service into different network |
docker network rm NET_NAME | Remove network |
Swarm Volums
Issue:
- need to use a volume plugin, when it comes to using volumes in swarm mode. because the native driver for volumes is local. this means that if you create a volume, it's only going to be created locally to where that command was executed.
- For example, let's say we create a service with multiple replica tasks, and those tasks are running on different nodes. A volume will be created on each worker node.
- So for example, if we have worker 1 and 2, and we have 2 replica tasks, each are running on those individual nodes, then we're going to have 2 separate volumes created, which presents a problem
- because if you change the data on one of the volumes, it's not going to be updated on the other.
- So the data is not going to be persistent across those volumes, and that's the reason why we need to use a driver.
- And typically, this is going to be handled through some form of block storage device.
- It has a provider for EC2 with a number of different storage platforms, EBS, EFS, as well as S3. It also supports SEF, Dell EMC,
- For more plugin click here
Volume commands
docker plugin install [PLUGIN] OPTIONS[] | Adding plugins |
docker plugin ls | Listing plugins |
docker plugin disable ID | Disable plugin - Disable in order to remove plugin
|
docker plugin remove ID | Remove plugin |
docker volume create -d [DRIVER] [NAME] docker service create -d --name [NAME] \ --mount type=[TYPE],src=[SOURCE],dst=[DESTINATION] \ -p [HOST_PORT]:[CONTAINER_PORT] \ --replicas [REPLICAS] \ [IMAGE] [CMD]
| Create a volume using a driver: |
docker volume create -d local portainer_data | Create a volume on the manager: |
docker service create \ --name portainer \ --publish 8000:9000 \ --constraint 'node.role == manager' \ --mount type=volume,src=portainer_data,dst=/data \ --mount type=bind,src=/var/run/docker.sock,dst=/var/run/docker.sock \ portainer/portainer \ -H unix:///var/run/docker.sock
| Create a portainers service that uses a volume: |
Deploy swarm stack
STACK is deployed using docker compose file
docker stack deploy --compose-file docker-compose.yml prometheus | To deploy stack |
docker stack ls | List stack |
docker service ls | List services |
docker stack rm STACK_NAME | Remove stack |
sudo chown nfsnobody:nfsnobody -R /var/lib/docker/volumes/prometheus_data | Fix volume permissions: |
Example
# prometheus.yml contents:
global:
scrape_interval: 15s
scrape_timeout: 15s
evaluation_interval: 15s
scrape_configs:
- job_name: prometheus
scrape_interval: 5s
static_configs:
- targets:
- prometheus_main:9090
- job_name: nodes
scrape_interval: 5s
static_configs:
- targets:
- [MANAGER]:9100
- [WORKER1]:9100
- [WORKER2]:9100
- job_name: cadvisor
scrape_interval: 5s
static_configs:
- targets:
- [MANAGER]:8081
- [WORKER1]:8081
- [WORKER2]:8081 |
# docker-compose.yml contents:
version: '3'
services:
main:
image: prom/prometheus:latest
container_name: prometheus
ports:
- 8080:9090
command:
- --config.file=/etc/prometheus/prometheus.yml
- --storage.tsdb.path=/prometheus/data
volumes:
- ./prometheus.yml:/etc/prometheus/prometheus.yml:ro
- data:/prometheus/data
depends_on:
- cadvisor
- node-exporter
cadvisor:
image: google/cadvisor:latest
container_name: cadvisor
deploy:
mode: global
restart: unless-stopped
ports:
- 8081:8080
volumes:
- /:/rootfs:ro
- /var/run:/var/run:rw
- /sys:/sys:ro
- /var/lib/docker/:/var/lib/docker:ro
node-exporter:
image: prom/node-exporter:latest
container_name: node-exporter
deploy:
mode: global
restart: unless-stopped
ports:
- 9100:9100
volumes:
- /proc:/host/proc:ro
- /sys:/host/sys:ro
- /:/rootfs:ro
command:
- '--path.procfs=/host/proc'
- '--path.sysfs=/host/sys'
- --collector.filesystem.ignored-mount-points
- "^/(sys|proc|dev|host|etc|rootfs/var/lib/docker/containers|rootfs/var/lib/docker/overlay2|rootfs/run/docker/netns|rootfs/var/lib/docker/aufs)($$|/)"
grafana:
image: grafana/grafana
container_name: grafana
ports:
- 8082:3000
volumes:
- grafana_data:/var/lib/grafana
- grafana_plugins:/var/lib/grafana/plugins
environment:
- GF_SECURITY_ADMIN_PASSWORD=P4ssW0rd0!
depends_on:
- prometheus
- cadvisor
- node-exporter
volumes:
data:
grafana_data:
grafana_plugins: |
Example 2
After a few months of debate, we’ve decided to set up a cooking blog. After researching different platforms, we've chosen Wordpress with MySQL. We have a swarm cluster already set up where we host customer sites. To make maintaining Wordpress easier, we’ve decided to set it up as a stack. We'll need to create the Docker Compose file, deploy the stack, and finish the Wordpress setup.
Todo:
- Create a stack using docker compose
- Create a docker compose file
- Deploy word press blog
- docker stack deploy --compose-file docker-compose.yml wp
# Docker compose file content version: '3.1'
services:
db:
image: mysql:5.7
volumes:
- db_data:/var/lib/mysql
networks:
mysql_internal:
environment:
MYSQL_ROOT_PASSWORD: P4ssw0rd0!
MYSQL_DATABASE: wordpress
MYSQL_USER: wordpress
MYSQL_PASSWORD: P4ssw0rd0!
blog:
depends_on:
- db
image: wordpress
networks:
mysql_internal:
wordpress_public:
ports:
- "80:80"
environment:
WORDPRESS_DB_HOST: db:3306
WORDPRESS_DB_USER: wordpress
WORDPRESS_DB_PASSWORD: P4ssw0rd0!
volumes:
db_data:
networks:
mysql_internal:
internal: true
wordpress_public: |
What’s Given
- Create compose file
- Deploy stacks