Kubernetes 4
What: 4
Problem it solves 4
Features 4
Basics concepts 5
Pod 5
IP 6
External service (NodePort) 6
Internal service (ClusterIP) 6
Ingress 6
ConfigMap 6
Secrets 7
Volumes 7
Deployments 8
StatefulSet 8
What do we have up till now: 10
Architecture 10
Worker Node’s Main component/processes 10
1. Container runtime 11
2. Kubelet 11
3. KubeProxy 11
Issue: interaction with the cluster 11
Master process 12
API Server 12
Scheduler 13
Controller manager 13
ETCD 13
Callouts 14
Virtual network: 14
MiniKube & Kubectl 14
MinuKube 14
Kubectl 14
Minikube setup 15
Commands 15
General commands 15
Debugging pods 16
Debugging deployment 16
Command callouts 16
Layers of abstractions 17
YAML configuration file 17
3 parts of the configuration file 17
Connecting deployments to service to pods 18
Demo 20
Simple setup of nginx deployment and service 20
Complete application setup with Kubernetes components 20
Steps 21
Namespace 23
What 23
Create namespaces 24
Why do we need it 24
Use cases when to use Namespace 25
Characteristic of namespaces 25
Ingress 26
External service vs Ingress 26
YAML configuration file External service vs Ingress 27
Ingress controller 27
Ingress controller in Minikube 28
Multiple path with the same domain/host Configuring SSL certificate 28
Configuring SSL certificate 30
Helm 30
Helm chart 30
Features 31
Helm chart structure 31
Kubernetes Volume 32
3 Components of Kubernetes volume 32
Persistent volume 32
Persistent volume claim - PVC 35
Storage class 37
Local volume types 38
Local vs Remote volume types 38
Callouts 39
StatefulSet 40
Kubernetes Service 41
1. Cluster IP service 41
2. Headless service 41
3. NodePort service 41
4. LoadBlancer service 41
5. Ingress 41
6. ExternalName 41
Additional Concepts and Terminologies 42
1. Cluster 42
2. Master Node (Control Plane) 42
3. Worker Node 43
4. Pods: 43
5. Container 43
6. Service 43
7. Deployment 43
8. ReplicaSet 43
9. Namespaces 43
10. Ingress 43
11. ConfigMaps and Secrets 44
12. Volume 44
13. Request and Limit 44
● Additional concepts 45
Resource Overcommitment: 45
Resource Quotas: 45
Quality of Service (QoS) Classes: 45
14. Labels and Selectors: 47
15. Concepts to ensure pods are scheduled and managed in a Kubernetes cluster 48
NodeSelectors: 48
Node Affinity and Anti-Affinity 49
Pod Affinity/ Anti-Affinity: 50
Taints and Tolerations: 50
DaemonSets: 51
Pod Priority and Preemption: 51
Pod Spread Constraints: 51
Pod Topology Spread Constraints: 51
Pod Disruption Budgets (PDBs): 51
16. Probes (Liveness, Readiness, Startup) 52
17. StatefulSets: 53
18. Jobs/CronJobs: 53
19. Horizontal Pod Autoscaling (HPA) and Vertical Pod Autoscaler (VPA) 53
20. Custom Resource Definitions (CRD) 53
21. RBAC (Role-Based Access Control) 53
Flow 53
Nginx 54
Nginx Ingress Controller 54
Ingress Controller 55
Ingress Resources 55
Ingress Rules 55
Backend 55
Service 56
Pod 56
Namespace 56
Daemon 56
Node 56
Endpoints 56
Annotations 56
Helm 56
ReplicaCount 56
LoadBalancer 57
SSL/TLS Termination 57
NodeSelector: 57
Scenario for NodeSelector 57
Taints and Tolerations: 57
Scenario for Taints and Tolerations 58
Callouts 58
Kubernetes
What:
- Open source container, orchestration framework
- Founded by google
- Manages containers(from docker or other tech)
- Helps you manage containerized application in different deployment environments(Physical, Virtual VM, Hybrid deployment environments)
Problem it solves
- A trend from monolithic to microservices
- Increased usage of containers
- Demand for a proper way of managing those hundreds of containers
Features
- High availability or no downtime
- Scalability or high performance
- Disaster recovery, back up and restore
Basics concepts
Pod
- The smallest unit that you, as a Kubernetes user, will be configured and interact with.
- It is a wrapper of a container,
- On each worker Node, you will have multiple pods.
- and inside of a pod, you can have multiple containers. usually, you’ll have one pod per application.
- The only time you would need more than one container inside of a pod is when you have a main application that needs some helper containers to run inside services
- Usually, you would have one pod per application, so for example, the database would be one pod, the message broker would be another pod, the Server would be another pod, and your Java or node.js application would be It’s on pod
Pod: This is a component of K8S that manages the containers without our intervention
- For example, if the container stops or dies inside of a pod, it will be automatically restarted inside of the pod
- However, pods are ephemeral components. // meaning pods can die really frequently and when it dies, you want it to be recreated
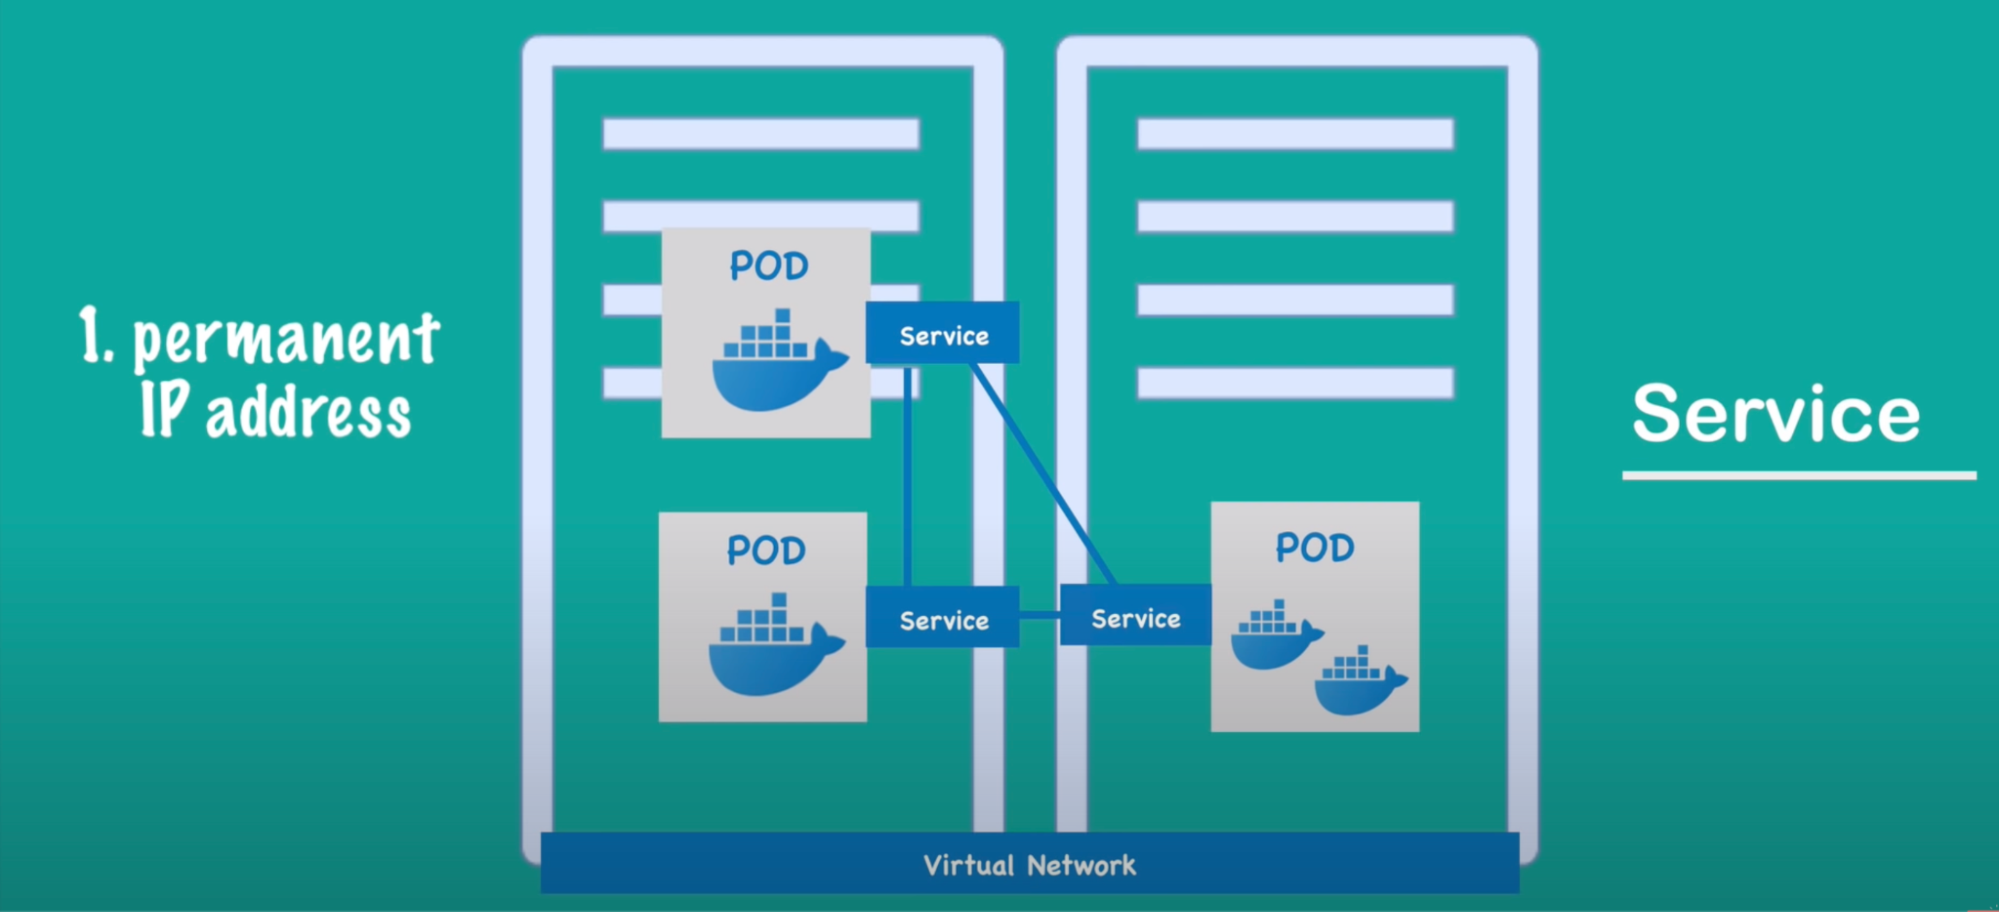
- issue: whenever a pod gets restarted or recreated → a new pod is created → It gets a new IP address. (so if you have your application talking to a database pod, using the IP address that pod has, and the pod restarts it gets a new IP address. It will be inconvenient to adjust that IP address all the time.
- Resolve: service - is an alternative or a substitute to those IP addresses. instead of having dynamic IP addresses, their services sit in front of each pod to talk to each other. so now if a pod behind the service dies and gets re-created, the service stays in place because their life cycle is not tied to each other
- 2 main functionalities: is a permanent IP address that we can use between the pods and at the same time it is a load balancer
IP
- Virtual network dispenses the K8S cluster so it assigns each pod its own IP address
- So each pod is a self-contained server with its own IP address
- The way they communicate with each other is by using internal IP addresses
- We don’t configure or create containers inside the cluster, but we only work with the pods, which is an abstraction layer over containers
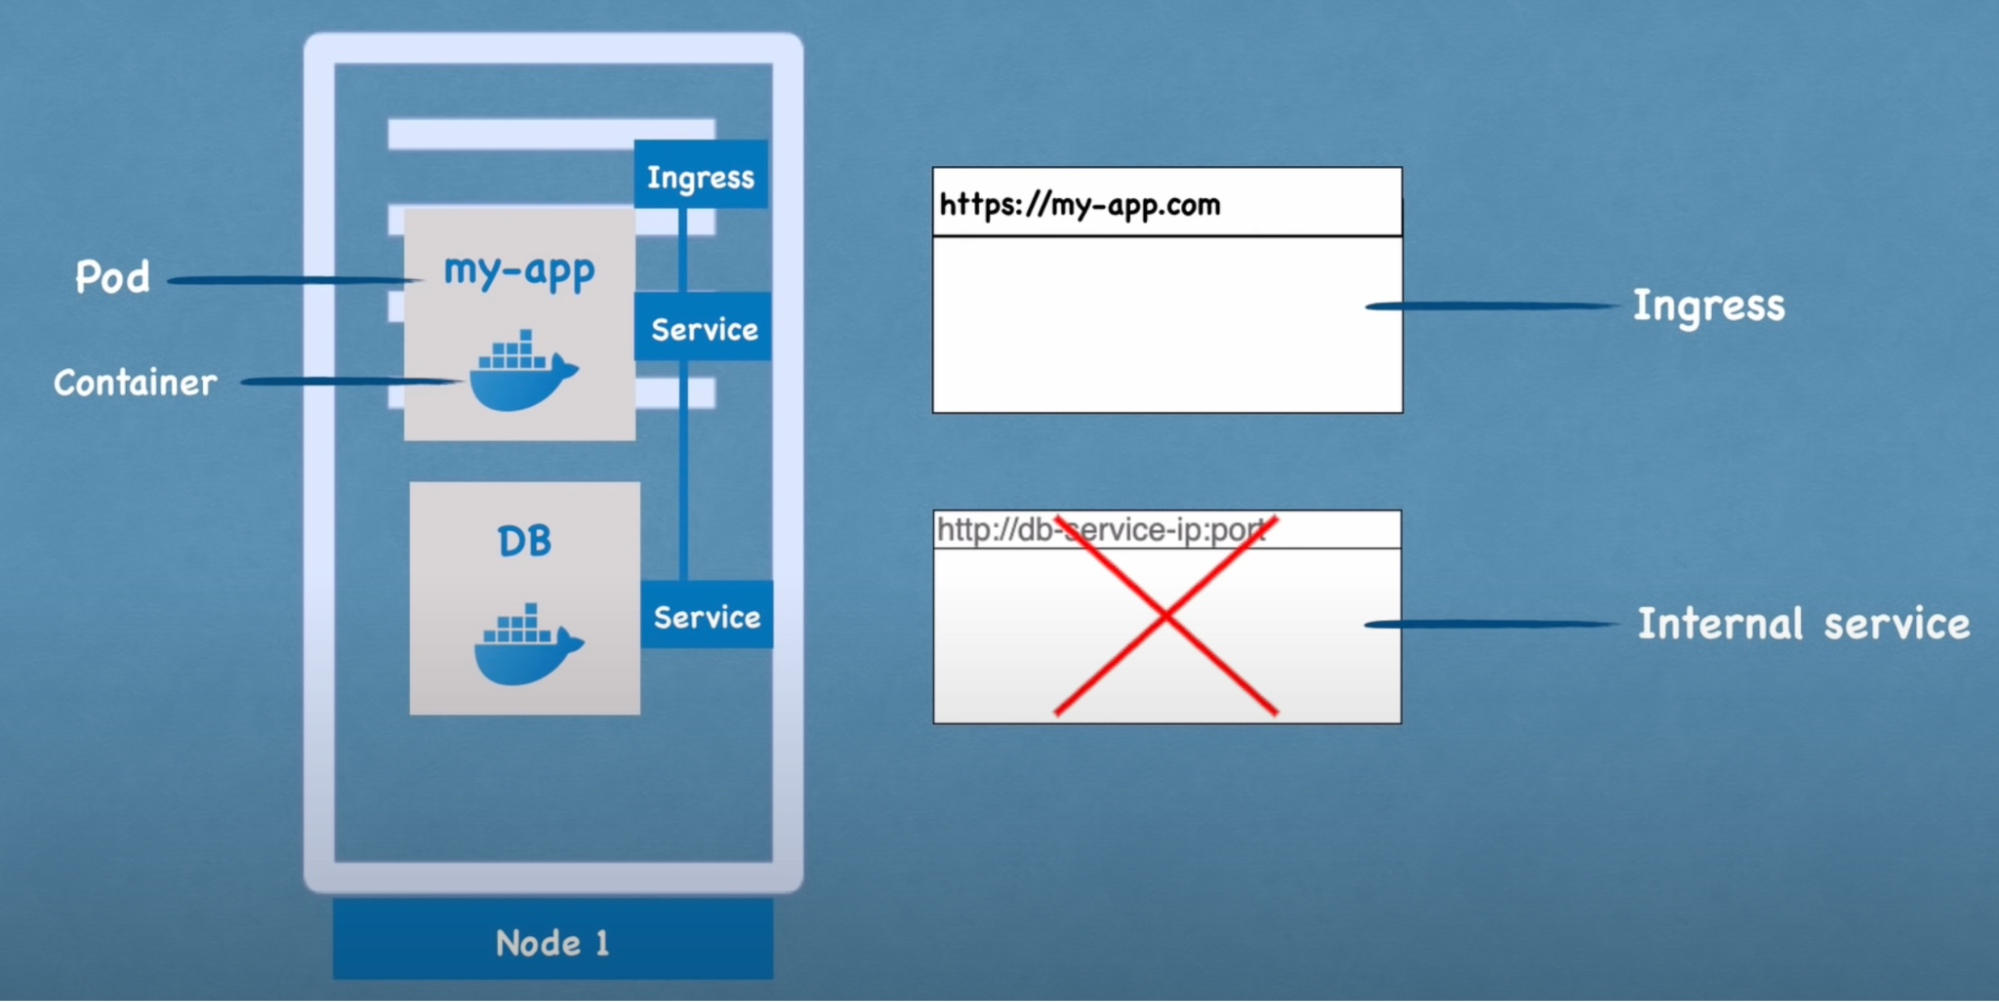
External service (NodePort)
- You need to create an external service in order to make your Application accessible through a web browser // assigns service an external IP address so it can accept an external request
- service that opens the communication from an external source
- This is the application URL: secure protocol(https) and domain
Internal service (ClusterIP)
- The database you do not want to expose it through a web browser.
Ingress
- Instead of external service, a request goes to ingress, and it is then forwarded to service. // practical usage(instead of using external service)
- Route traffic into the cluster
ConfigMap
- To store database endpoint.
- Let’s say your application has a database endpoint that is used to communicate(app→database = pod using service) between each other
- You need to configure the database endpoint URL
- This is inside of a build image
- If the service name or endpoint URL changes, you have to adjust that URL in the application → rebuild, push to repo, pull image in pod = tedious for small change
- ConfigMap: is an external configuration to your application. It contains configuration data like the URL of the database or other services.
- In Kubernetes you just connect it to the pod so the pod gets the data that ConfigMap contains.
- Advantage: if you want to change the service name, you make changes to ConfigMap → no new build and cycle
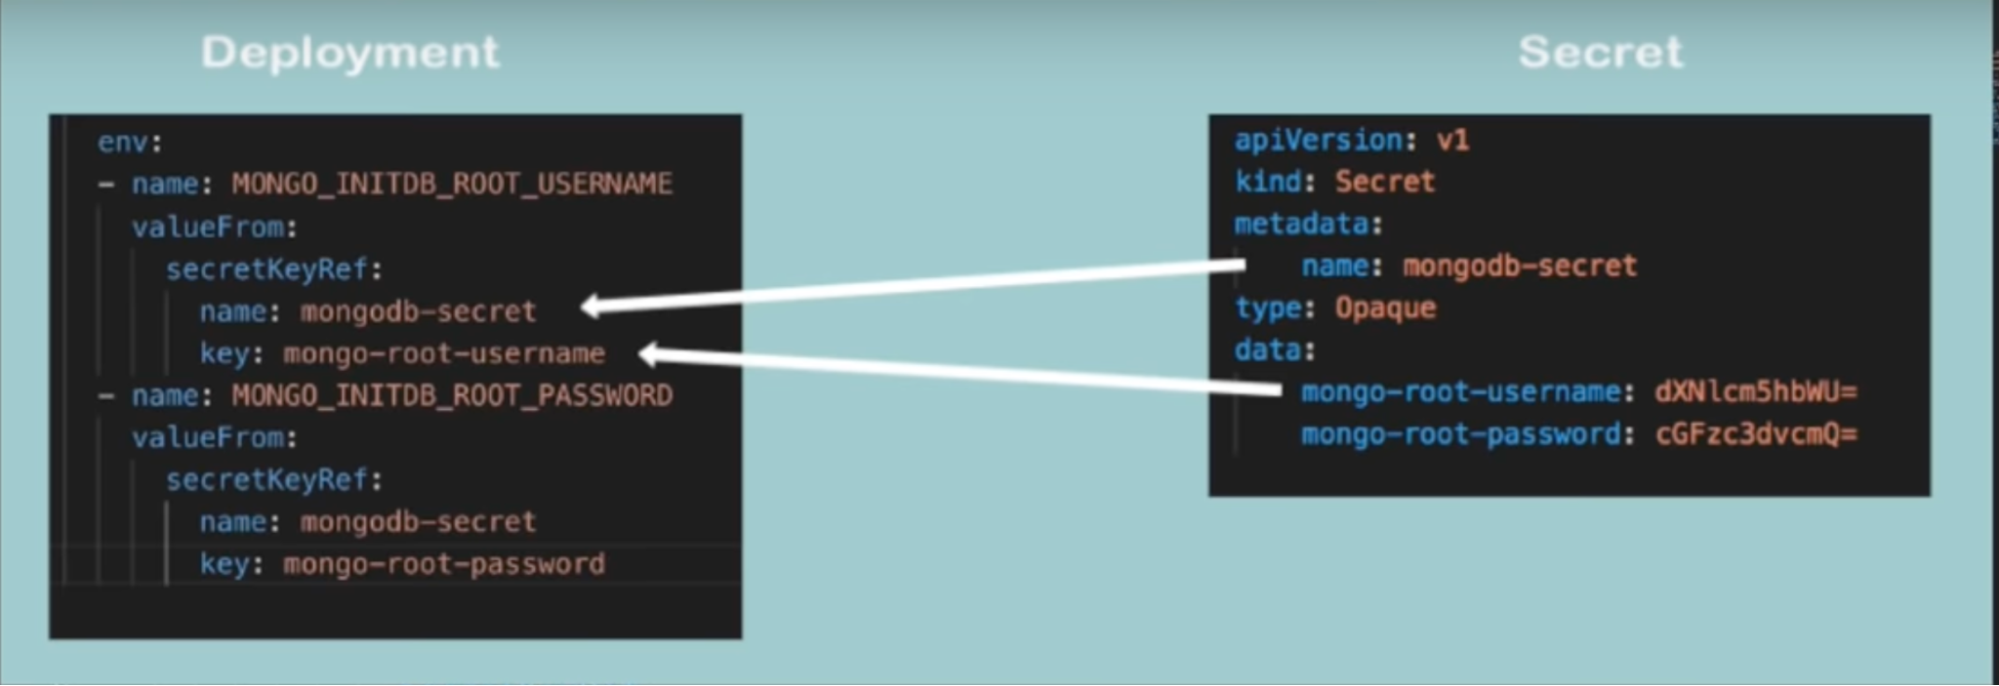
Secrets
- To store database username and password/certificate
- Insecure to store it in a ConfigMap in plain text
- Base 64 encoded
- Built-in security is not enabled by default
Volumes
- Database data Issue: Let’s say your database pod has data; if the pod gets restarted, the data will be gone = problem
- Volume: attaches physical storage on a hard drive to your pod. Storage could be on either a local machine on the same server node or remote storage(cloud storage) // external hard drive plugged into K8S Cluster
- Now if you start container all the data will be there
- Why?: K8S doesn’t manage data persistent so you have to manage it
Deployments
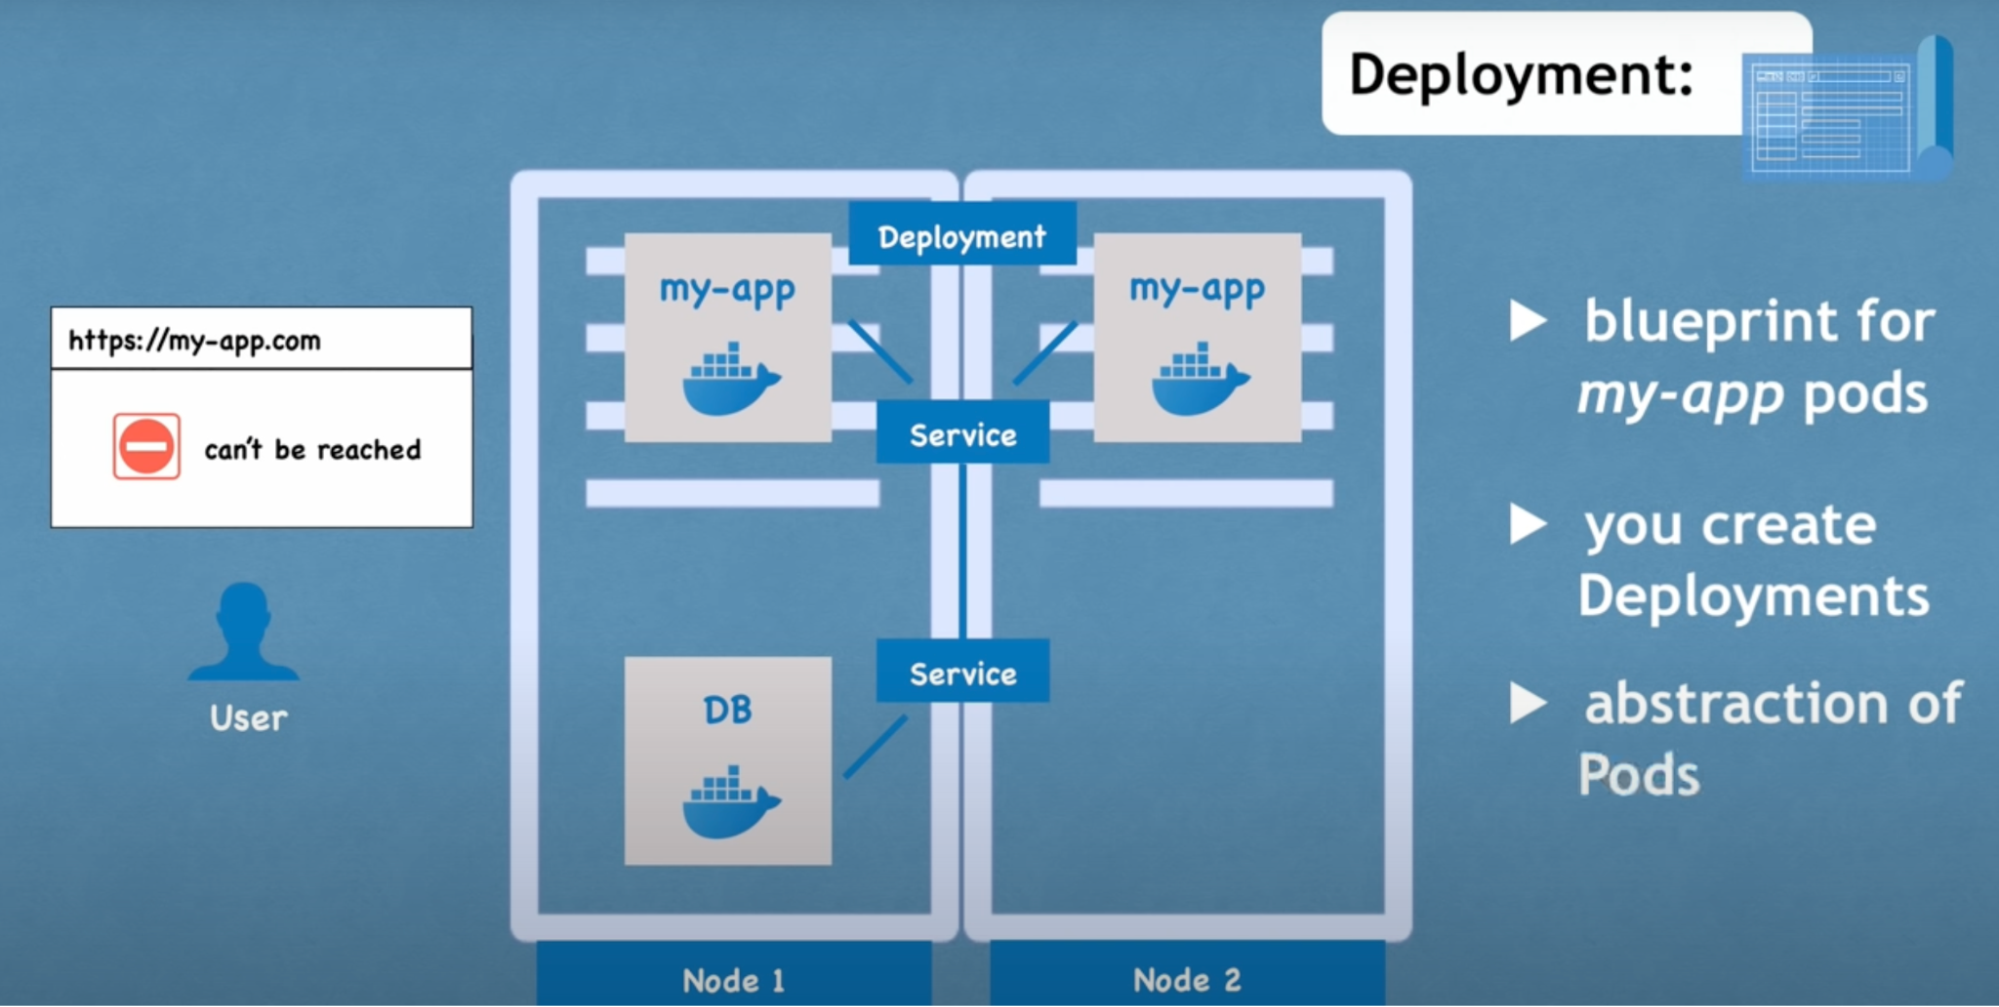
Application replica Issue: Let’s say you have one application on a pod and it stops for some reason → your user won't be able to access your site
Now what: replicate application on multiple servers
- We will create another node where a replica or clone of the application will run. Which will also be connected to the service
- How: In order to create second replica of your application, you wouldn’t create a second pod, you would define a blueprint for your application pod and specify how many replicas you’d like to run
- The blueprint is the deployment
- In practice, you will mostly work with deployment and not pods
- Flow: If one of the replicas of your application pod would die, the service then will forward the request to another replica, so your application would still be accessible to the user
Deployments
- You won’t be creating pods. You’ll be creating a deployment
- Where you define how many replicas you want
- Can scale up and down the number of replicas of the pod you need
StatefulSet
Database replica Issue: when one pod containing your database dies
Need: replicate your database as well
Issue: you can’t replicate the database using a deployment because database has a state which is its data // if we have clones or replicas of the database, they would all need to access the same shared data Storage in there; you would need some kind of mechanism that manages which pods are currently writing to that storage, or which pods are reading from that storage in order to avoid the data inconsistencies
StatefulSet: replication of database feature offered by another Kubernetes component
When: stateful application that has a database should be created using StatefulSet and not deployment
What: it will take care of replicating the pods and scaling them up and down making sure the database reads and writes or is synchronized so that no database inconsistencies are offered
IMP: Common practice to host database application outside of the Kubernetes cluster and just have the deployment or stateless application that replicate and scale with no problem inside of the Kubernetes cluster and communicate with an external database
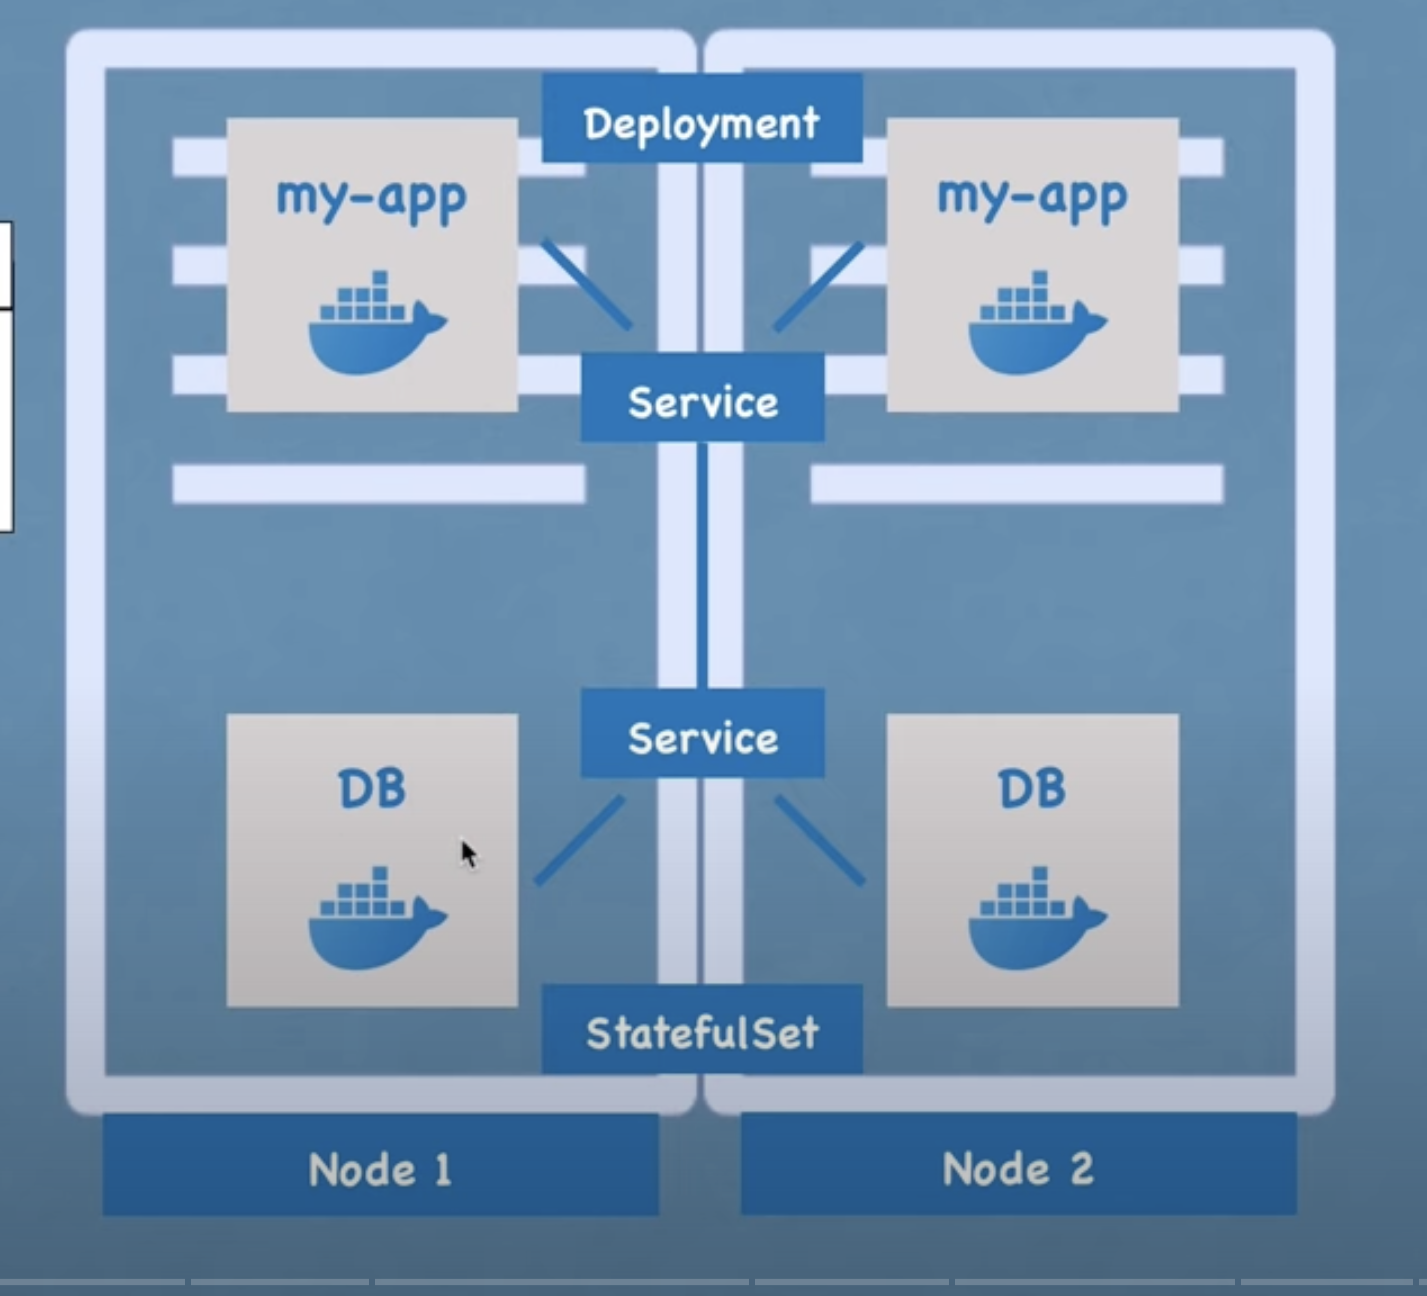
What do we have up till now:
- we have 2 replicas of the database and application
- they are both load-balanced.
- This setup is more robust. even if node1, the whole node server was rebooted or crashed, We still have a node2 with application and database pods running on it, and the application would still be accessible by the user until these two replicas get recreated, so you can avoid downtime
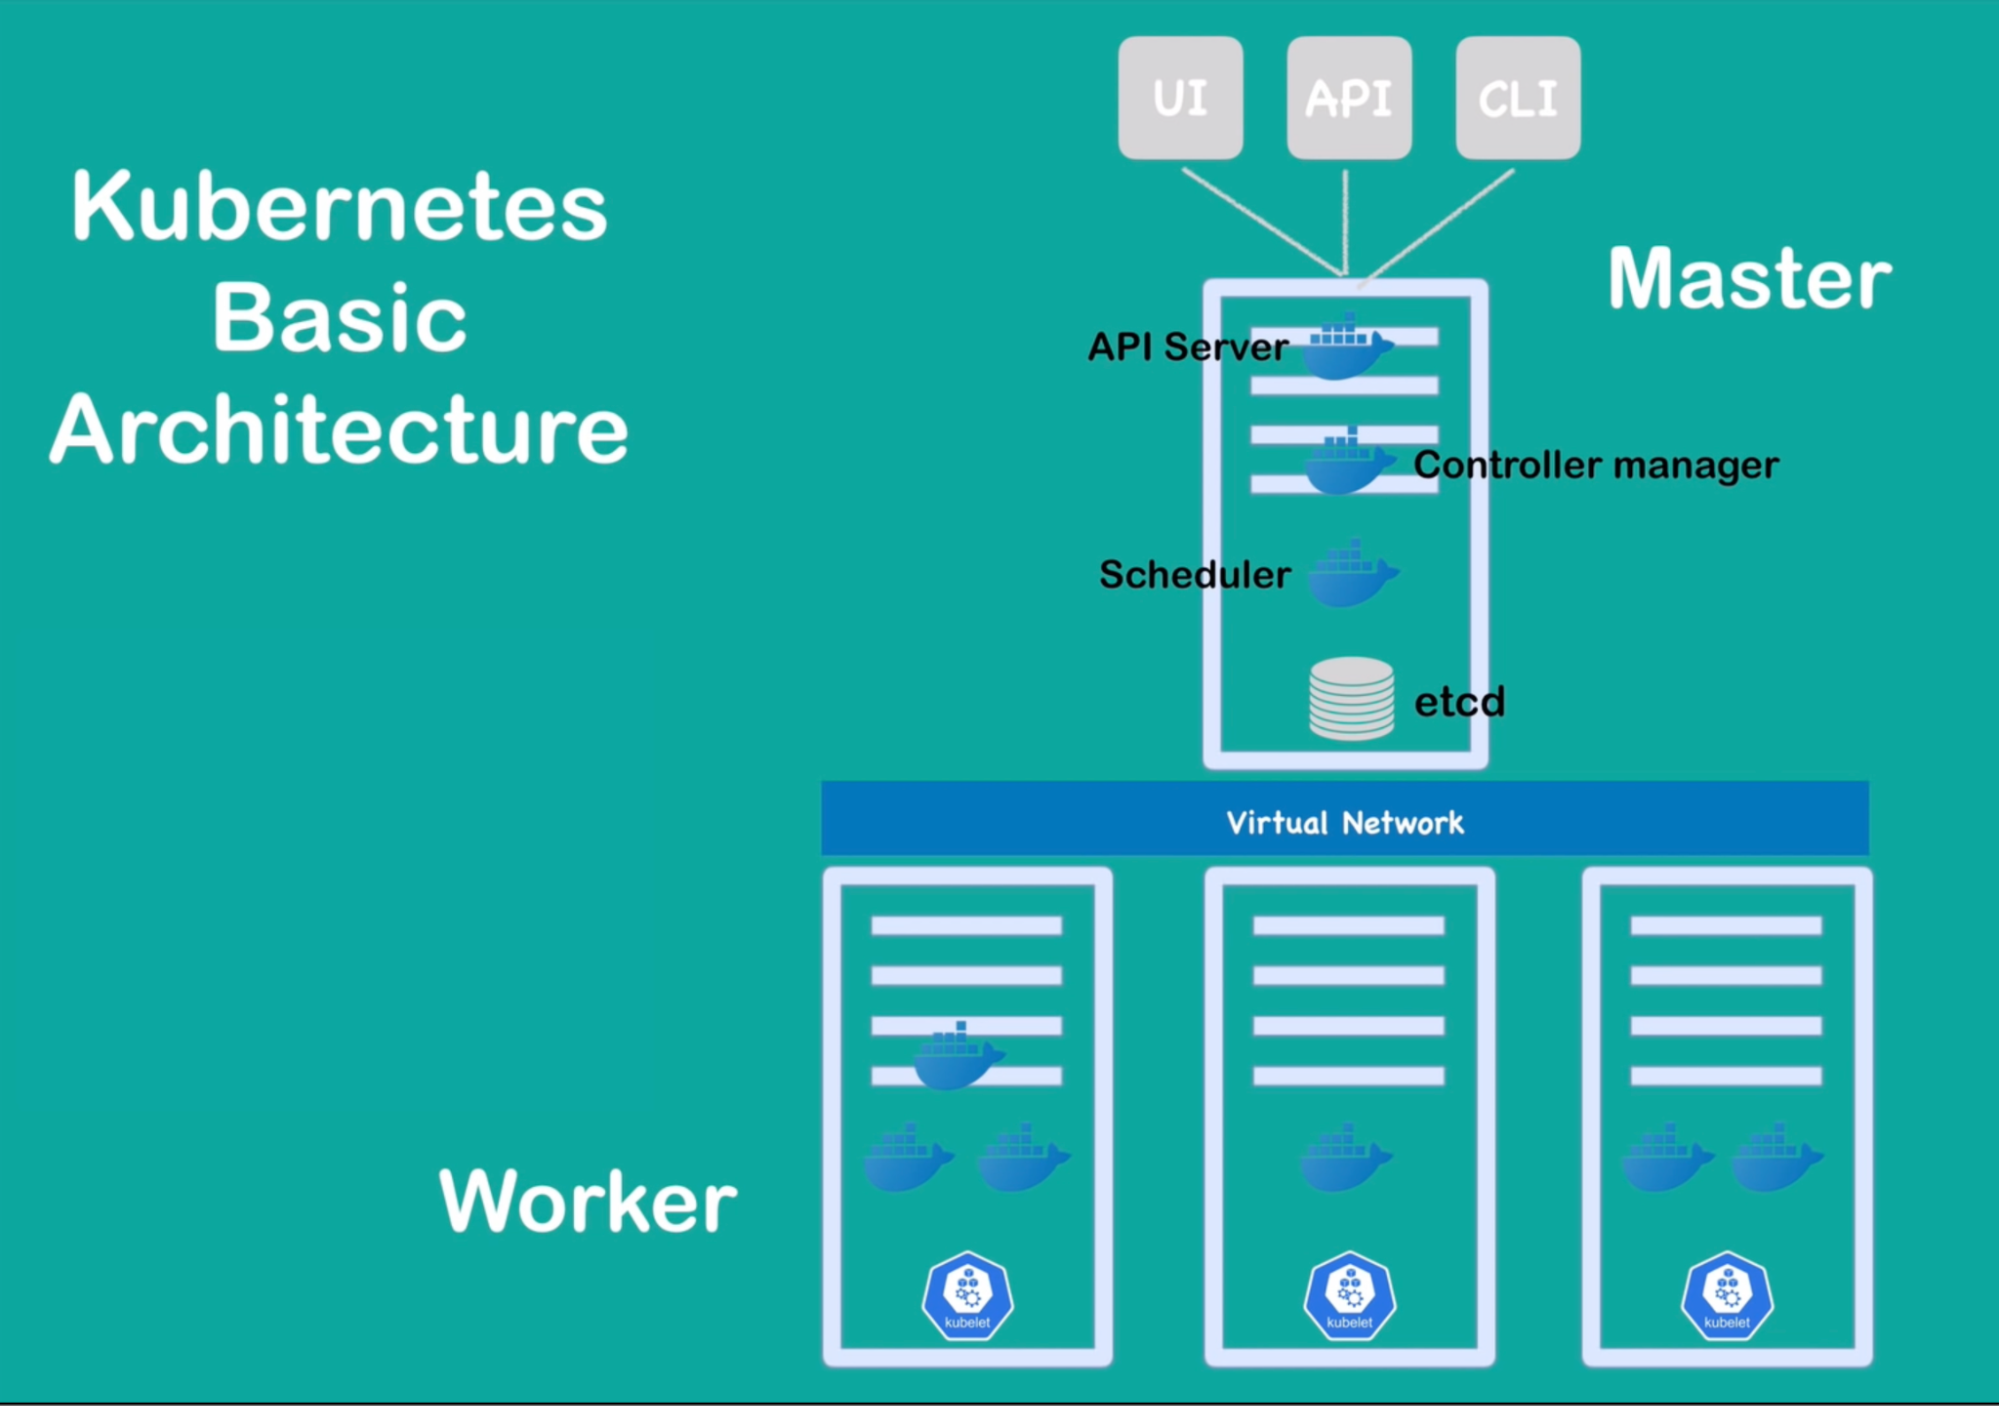
Architecture
Worker Node’s Main component/processes
- Worker | server | node
- Each node will have multiple application pods with containers running on that node.
- How: 3 processes must be installed on every node
- Worker nodes for the actual work
3 processes of Kubernetes cluster
Container runtime
- needs to run/install on every node. Ex: Docker, other technology
- Now you can run containers inside pods
- But who schedules containers into pods? → Kubelet
Kubelet
- schedules containers into pods.
- It has an interface with both container runtime and node(vm)
- Responsible for taking configuration and actually running/starting pod with the container and assigning resources from that node to the container like CPU RAM and storage resources // running pods = running application
- Communication between nodes happens using services // sort of load balancer that matches the request directed through the pods(database) and forwards it to another pod
KubeProxy
- responsible for forwarding requests from services to pods
- Must be installed on VM
- Make sure that communication works in a performant way with low overhead(ex: send the request, for example, from application to database on the same pod that request came through rather than sending it to replica running on another node = save network overhead)
Issue: interaction with the cluster
Issue: how do you interact with the cluster
How to:
- Schedule pod
- Monitor which pod dies
- re-schedule/re-start pod
- Join a new node
Answer: master nodes
Master process
4 process that runs on every master node.
- cluster made up of atleast 1 master node and a couple of worker nodes connected to it
- each node has a kubelet process running on it, kubelet is a Kubernetes process that makes it possible for the cluster to talk to each other and execute some tasks on those nodes like running application processes
- each worker node has docker containers of different applications deployed on it
- worker node: where the actual work is happening // application running
- master nodes: run several Kubernetes processes that are necessary to run and manage the cluster properly
API Server
- The entry point to the K8S cluster. A process to which the different Kubernetes clients will talk. ex: UI, API(script), CLI(Kubectl) - will talk to API server
- When you want to deploy an application to K8S cluster, you interact with the API server using a client(UI, API(script), CLI)
- Act as a cluster gateway that gets the initial request(create new service, schedule pod, deploy new application) of any request into the cluster
- Act as a gatekeeper for authentication: authenticated request gets through a cluster
- Flow: request → API server → validate request → forward req to other processes to create a component or schedule pods that you requested
- Good for security because you have one entry point into the cluster
Scheduler
- scheduling containers on different nodes based on the workload and the available server resources on each node.
- An intelligent process that decides on which worker node the next container should be scheduled on, based on the available sources on those worker nodes and the load that the container meets
- How It schedules the pod on different node;
- first it looks your request and determine how much resources(CPU & RAM) the application you want to schedule will need
- it look upon worker node and see which nodes are available to take this application
- if one node is less busy then it schedule the pod onto that node
- Process that schedules the pod is Kubelet
- Flow: start the pod to run application
- Request(schedule a new pod) → API server → scheduler → where to put the pod → Kubelet(schedule a pod)
Controller manager
- keeps an overview of what’s happening in the cluster, whether something needs to be repaired or if a container died, it needs to be restarted
- How it detects cluster state changes
- when pod dies, controller manager detects that and recover cluster state → it makes request to scheduler to reschedule that dead pods
ETCD
- Cluster brain
- Key value storage which holds at any time the current/actual state of the K8S cluster. so it has all the configuration data, status data of each node and container inside of that node. And back up and restore made from ETCD snapshots. you can recover the whole cluster state using that ETCD snapshot
- Has data about cluster changes; like, pod schedule or pod dies, all of these changes saved and updated into key value store of ETCD
- It has answer of following
- How does scheduler know what resources are available?
- How does the CM knows did the cluster state change?
- Is the cluster healthy when you make a query request to API server
- Application data is not stored in ETCD
Callouts
- Kubernetes cluster is made up of multiple masters
- Where each master node runs its master processes
- Where API server is load-balanced
- ETCD store forms distributed storage across all the master nodes
Virtual network:
Enables worker and master nodes to talk to each other
- spends all the nodes that are part of the cluster.
- It turns all the nodes inside of the cluster into one powerful machine that has the sum of all the resources of individual nodes
- worker node has the most load because they are running the applications inside of it usually on much bigger and more resources because they will be running hundreds of containers inside of them
- in a production environment, you would have at least two master nodes inside of the cluster to back up your worker node data in case the master fails
MiniKube & Kubectl
MinuKube
What:
- Local Test cluster setup: for testing purposes
- Creates Virtual box on your laptop
- Node runs onto VB
- 1 node K8S cluster: Node consists of master and worker on the same machine
- It has a docker runtime pre-installed // so no need to download it
- For startup/deleting cluster
Why
- When testing locally, setting up 2 master and multiple worker nodes is not easy and is expensive.
End
- Setup cluster/MiniKube cluster on your laptop
- You need a way to interact with the cluster to create a component
How
Kubectl
What:
- Kubectl to interact with your locally build MiniKube cluster to create pods and other components
- CLI tool for K8S Cluster
- Not only used for Minikube but it also for Cloud cluster
- For configuring Minikube cluster
How it works
- Kubectl commands send requests to the API server to create a component
- Then worker node take this request and create components
Minikube setup
Prerequisites
You’ll need a hypervisor.(hyperkit)
- brew update
- brew install hyperkit // install hypervisor
- brew install minikube // install minikube
- It will also install kubectl. So you don’t need to install it outside
- Commands
- minikube start –vm-driver=hyperkit// to start minikube OR minikube start –driverer=docker
- kubectl get nodes // get status of nodes
- minikube status // status of minikube
- kubectl version
- To know client/server version
For MAC user follow this guide
Commands
Link: https://gitlab.com/nanuchi/youtube-tutorial-series/-/blob/master/basic-kubectl-commands/cli-commands.md
General commands
Command | What it does |
kubectl get nodes | Get status of nodes // master |
kubectl get pods | Get status of pods |
kubectl get services | Get status of services |
kubectl get replicaset | To get the status of replicaset |
kubectl get deployment | To see what you have for deployment |
kubectl create deployment nginx-deploy –image=nginx | Create pod(in the form of deployment) - Check the get pod command
- Pod name get the prefix of deployment name & replicaset ID & it’s own ID
|
kubectl edit deployment [NAME] | Edit deployment |
kubectl delete deployment [NAME] | Delete deployment - Pod will be terminated
- Replicaset will be gone
|
kubectl apply -f FILENAME | To create/update component included in config file |
Debugging pods
Command | What it does |
kubectl logs [POD NAME] | To see the logs |
kubectl describe pod [POD NAME]
kubectl describe service [SERVICE NAME] | Get info about pods // State changes happening inside the pod |
kubectl exec -it [POD NAME] – bin/bash | Get the terminal of pod container as a root user // useful in debugging when testing something |
kubectl get pod -o wide
| More details on pod to chek which IPs are assign to them |
Debugging deployment
Command | What it does |
kubectl get deployment [DEPLOY NAME] -o yaml > nginx-deployment-result.yml | Get the status k8s automatically generates: This is updated configuration of your deployment(resides in ETCD) |
Command callouts
Pod
- You create pods in the form of deployment
- When you create pod through deployment, pod ID gets the → deployment name + replicaset ID + it’s own ID
Replicaset
- Is managing a replicas of pod; you’ll never create/delete/update replica of your pod in practice
Deployment
- Every CRUD operations done under the deployment
Layers of abstractions
- Deployment manages replicaset
- Replicaset manages all the replica of pods
- Pod is an abstraction of container
- Everything below of pod manages by Kuberenets
YAML configuration file
3 parts of the configuration file
First 2 lines are for declaring what you want to create
- Line 1: for each component there is different API version
- Line 2: name of the component
- Kind: name of the component
Part 1: Metadata
What: metadata of component that you’re creating
- Metadata contains name, label
Part 2: Specification
What: each component config file will have specification where you put every kind of config that you want to apply for that component
- Attribute of spec are specific to the kind
- Meaning one component ex: deployment will have it’s own specs where as other component service will have it’s specific specs
Part 3: Status
What: automatically generated and added by Kubernetes
How:
- Kubernets always compare what is desired state(in config file) and actual state
- If they don’t match; Kubernets fix it // self-healing
- If you specify if you want 2 replicas of Nginx deployment, when you apply this configuration, Kubernetes will adhere the status of your deployment, and it will update that state continuously,
- so for example, if a actual status at some point will say there is just one replica is running, then kubernetes will compare that status with the specification in your config and will know there is a problem there and another replica needs to be created
- where did Kubernetes get that status data to automatically add an update continuously?: info comes from ETCD(cluster brain) - Master processes that stores the cluster data, so it holds at any time the current status of any K8S component and that’s where the status information comes
Format of configuration file
- format: YAML files
- Why: human friendly data, serialization standard for all programming languages
- Syntax: Strict Indentation
- Store the config file with your code or on git repository
Connecting deployments to service to pods
Template has it’s own metadata and spec section
- Why? - this configuration applies to pods and pods should have their own Configuration inside of deployments configuration file
- spec: is a blueprint for a pod
- specify Image, port and name of the container
Connecting Components (labels & selectors & ports)
Connection established using labels and selectors
Metadata part contains labels
- Give component(deployment) or part, any key value pair (app: nginx) and this label will stick to that component
- for example: give this label to pods(pods Get the label through the template blueprint)
- We tell the deployment to connect or match all the labels with app: nginx to create the connection by selector
- that way deployment will know which pod belong to it
Connectine service to deployment using metadata → labels
- use the deployment metadata → labels into service spec → selector(label) to connect service and the deployment or it’s pods
- Because service should know which pods are registered with it
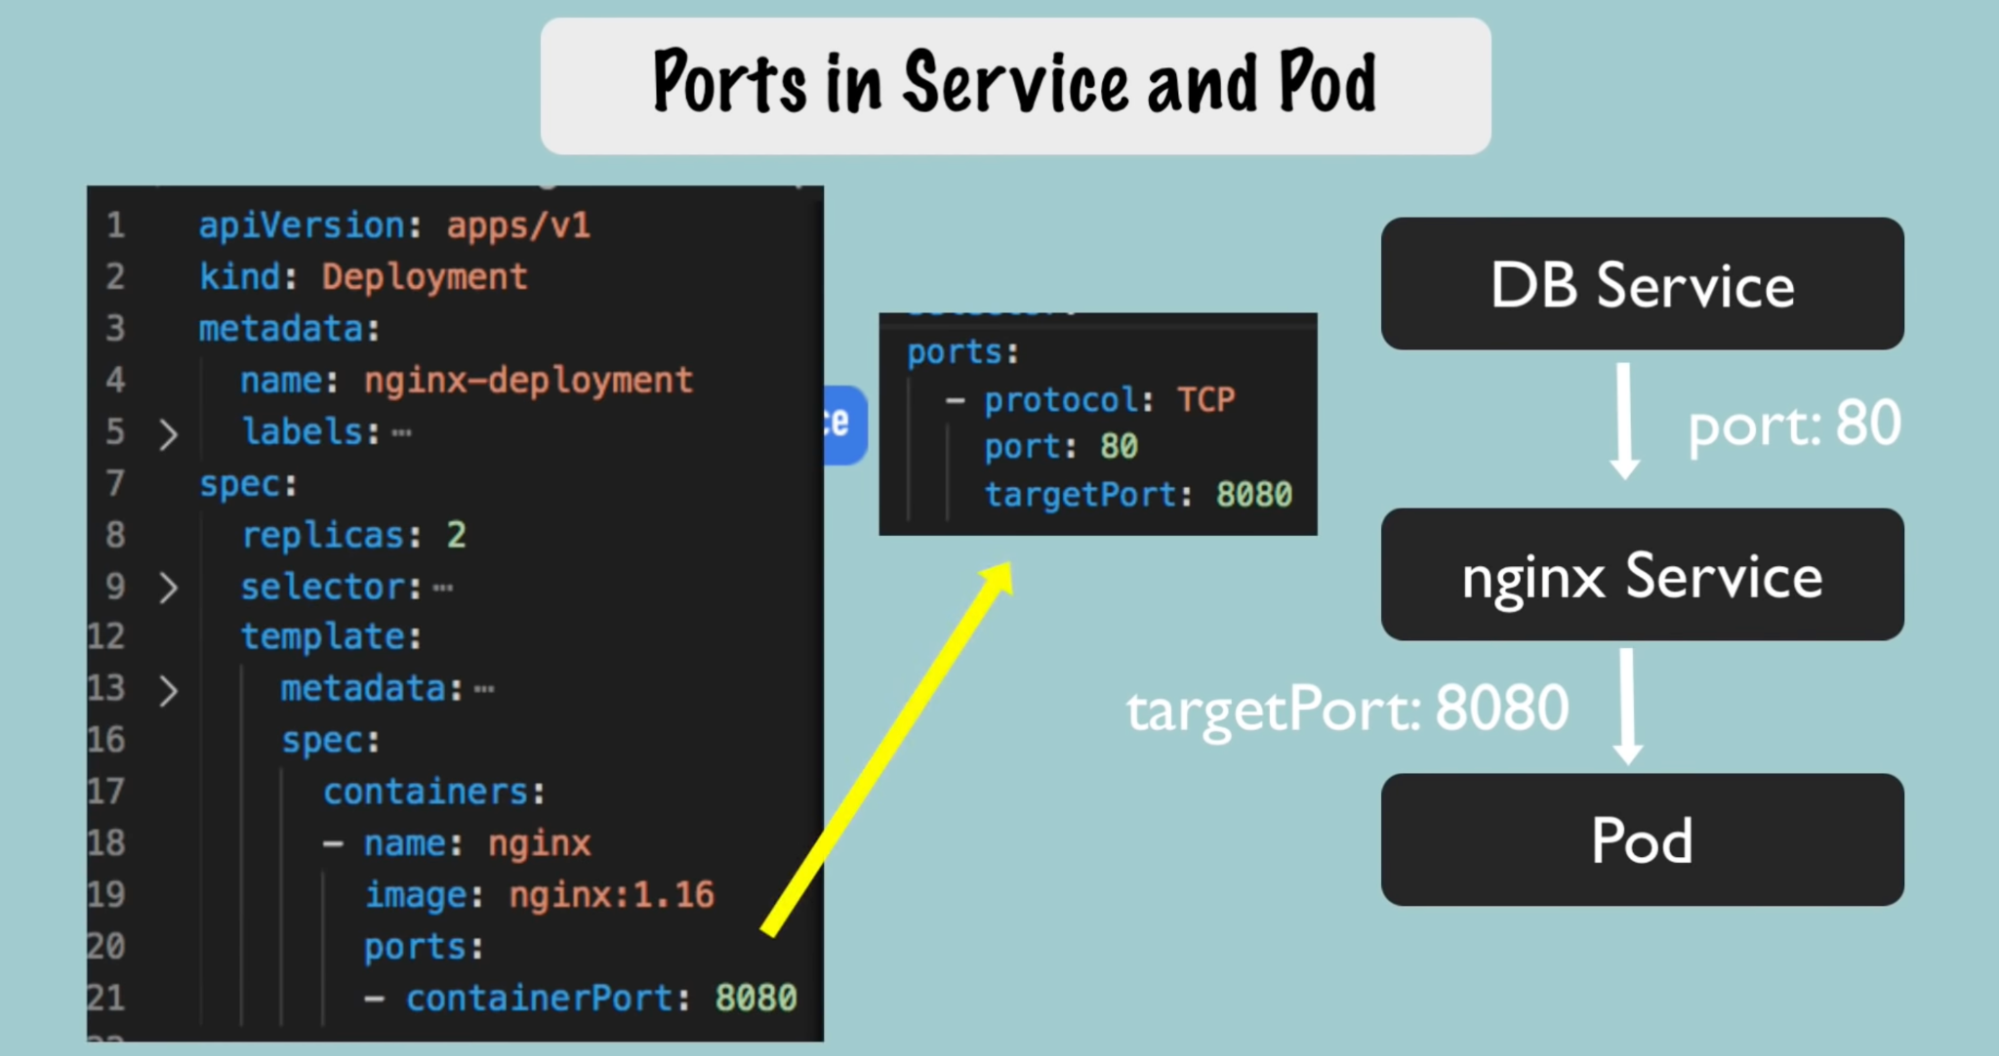
Specification port contains selectors
Service has it’s port configuration(ports:)
- Service has some port where it’s accessible at
- So if other service sends a request to ex: Nginx service, it needs to send request on port 80(service port). // service listening on port 80
- But service should know which port it should forward the request but also which port is that pod is listening(target port: 8080)
- Define in service target port: 8080
- Define in deployment ContainerPort: 8080
In deployment, container inside the pods, running or needs to run at some port
Demo
Simple setup of nginx deployment and service
Create 2 files
- Nginx deployment
- Specify deployment name, container port(8080), replica(2)
- Nginx service deployment
- Point service to container port(8080) - to connect to deployment,
- Service listening point(80) - to take request from other service(database)
Deploy
- kubectl apply -f filename
Inspect
- kubectl get pod // you’ll see 2 pod running
- kubectl get service // you’ll see one service created for nginx
- kubectl describe service serviceName // validate service has the right pods that it forwards requests to
- In the EndPoints field you’ll see the IP address endpoint of pods that service is forward request to
- kubectl get pod -o wide // more details on pod to chek which IPs are assign to them
- kubectl get deployment filename -o yaml > storefile.yml // see the status file that Kubernetes automatically generates → get the updated configuration from ETCD → save output in file
- Additional details you can see here
- If you want to copy deployment that you already have using automated script → you’ll have to clean teh deployment configuration form this file and deploy it from this blueprint
- kubectl delete -f filename
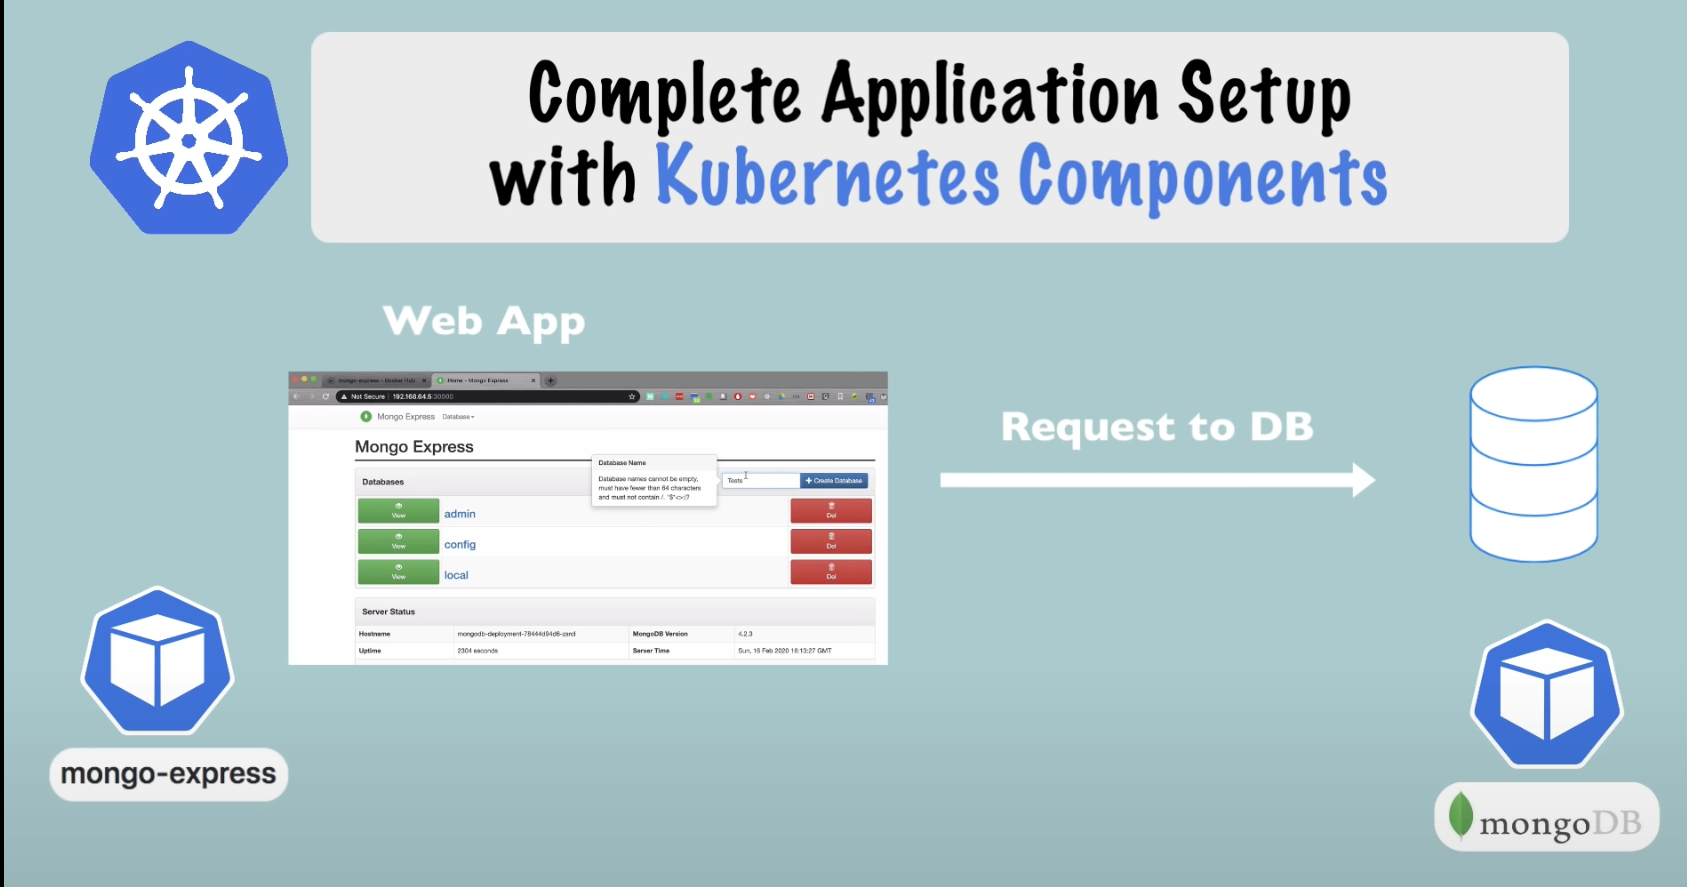
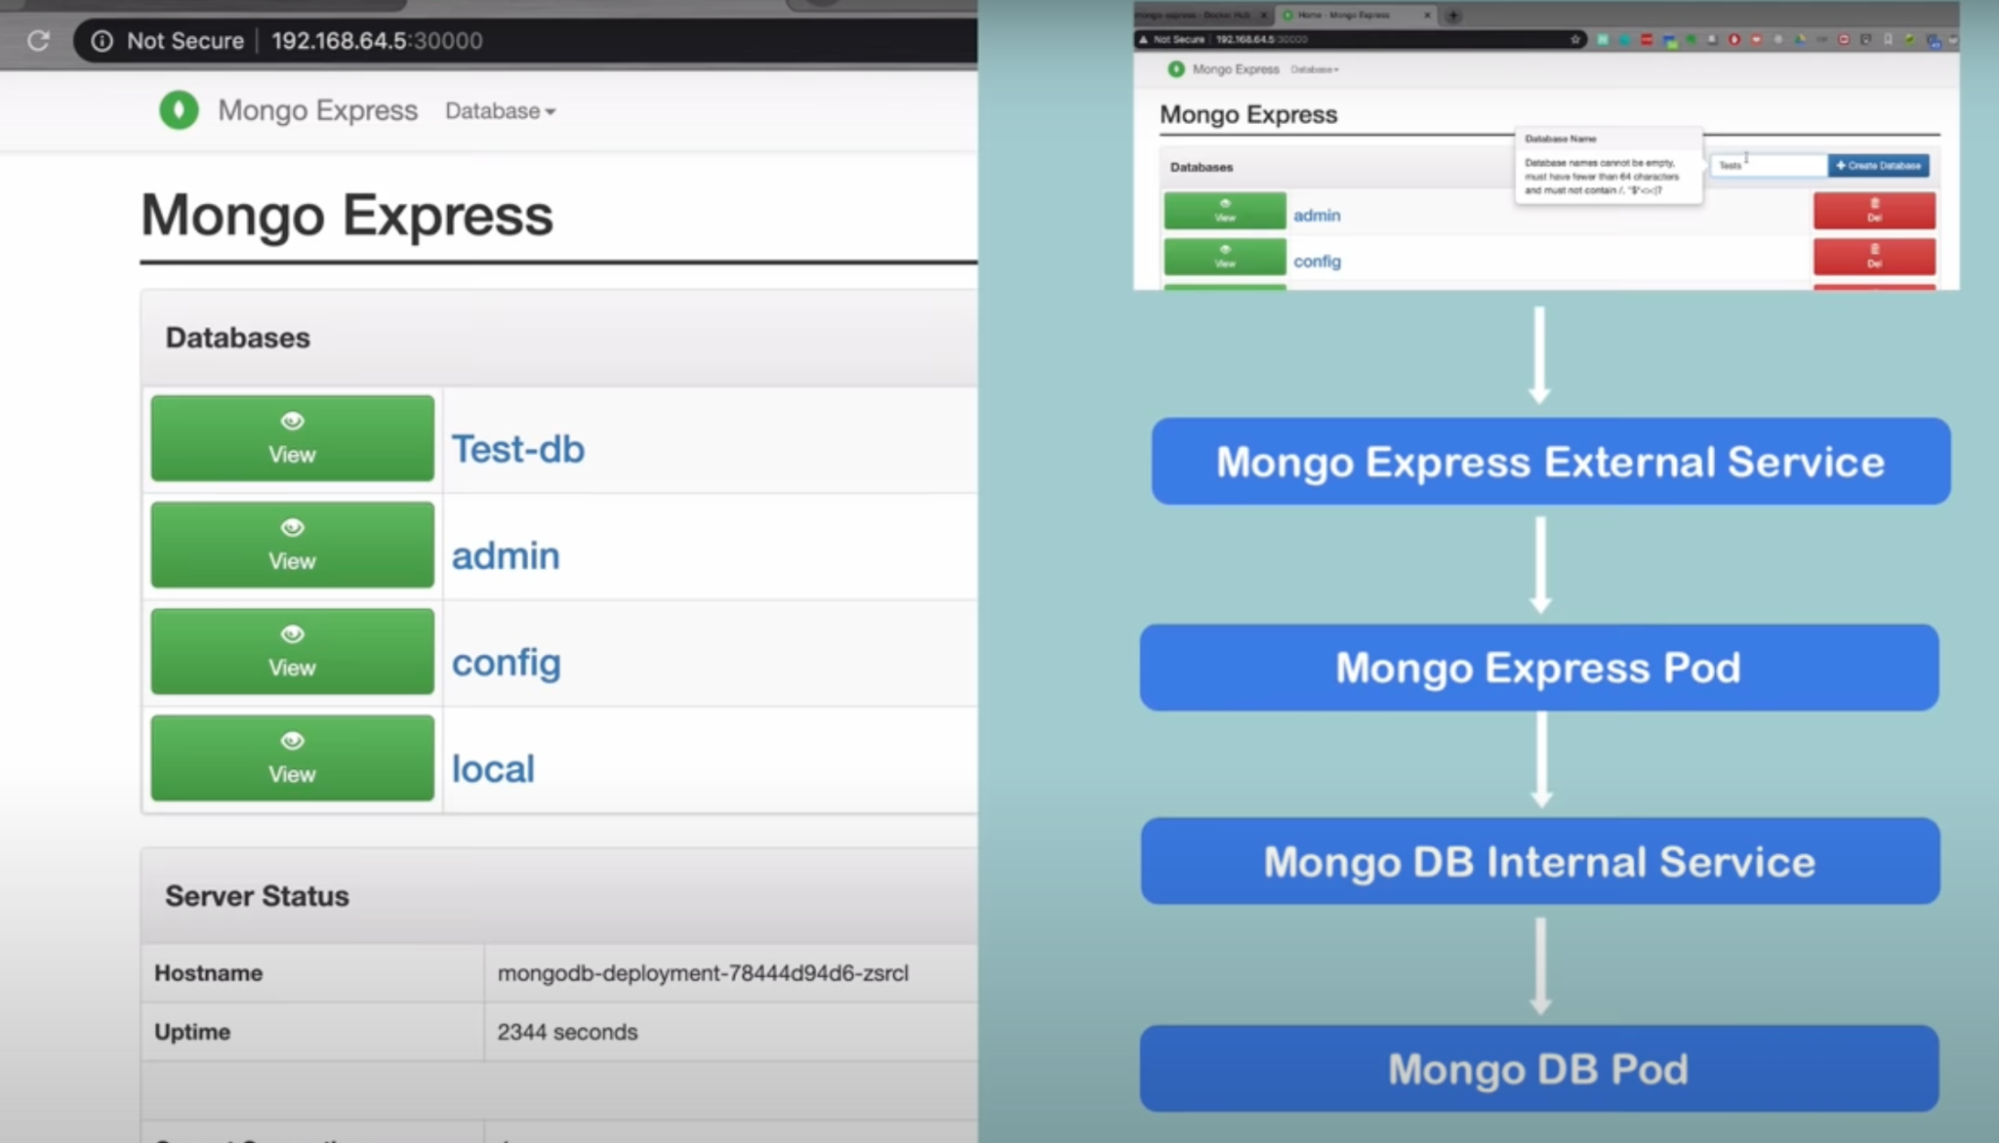
Complete application setup with Kubernetes components
What
- Deploy 2 application
- MongoDB and Mongo Express
Flow
Components
- MongoDB pod
- Internal Service // to talk to mongo db pod
- Internal service // no external request allowed to pod, only component in the same cluster will allow to talk to this service
- Mongo express deployment
- Need mongoDB database url(to connect to DB), username and password(to authenticate)
- Pass this info to mongo express via deployment config file using environment variable(Config Map and secret)
- Mongo express external service that allows access through browser // allow external request to talk to pod(mongo express)
- Url: Ip address of node and port of external service
Flow
- Request comes from web browser
- Request goes through Mongo Express External service
- Forwards to mongo express pod
- Pod will forwards to internal service of mongo db
- That is database url
- Service then forward to mongo db database pod
- It will authenticate request through credentials
Steps
- Create mongo db config file
- Create secret file
- kubectl apply -f file name
- kubectl get secret // to see the secret
- Now reference it to our deployment
- Apply Mongo db config file
- Create internal service // so other component in the cluster can talk to mongo db database
- Write the service component in the same file as deployment file
- Apply it using kubectl
- Create config map // that contains momgo db database server address
- Config map must be ready when referencing it // must deploy before referencing it
- Apply it using kubectl
- Create mongodb express deployment config file
- Create mongodb express service file
- Type: LoadBalancer // assigns external service an IP Address so it can accept external request
- nodePort: 30000-32767 // user can access application at
- Assign public IP address to external service
- minikube service AppServiceName
Callouts
- Internal service or Cluster IP is default
- External service, you have to specify type: LoadBalancer
- You also need nodePort ranges between 30000-32767
Namespace
What
- Organize resources in namespaces
- Can have multiple namespaces in a cluster
- Think of it as a Virtual cluster inside a cluster
- 4 namespaces By default
- kube-system
- no meant for your use // you shouldn’t create.modify under this namespace
- System processes are deployed here
- Master and kubectl processed deployed here
- kube-public
- Contains publicly accessible data
- It has a config map, which contains cluster info
- Kube-node-lease
- Holds info of nodes
- Each node has associated lease object in the namespace.
- determines the availability of an node
- Default
- resources you create are located here
- you can add or create new workspaces
Create namespaces
- Create with Command
- kubectl create namespace [NAME]
- Create with configuration file
- BEST WAY: because that way you’ll have history of what resources you have in cluster
Why do we need it
- No Overview
- If you have multiple deployments, replicaset, service and configMap within one default namespace, it will get difficult to have an overview of your components(what’s in there)
- You need a namespace divide your components/resources into groups // logically grouping your resources inside the cluster
- Examples
- database namespace where you deploy database and all required resources
- monitoring namepsace where you deploy prometheus
- Nginx ingress
- Elastic stack
- Conflicts: many team, same application
- When you have multiple team working on a same cluster. What if accidentally both team has a deployment with same name but with different configuration, in that case the team that deploys later will overwrite the deployment of initial deployment
- Resource sharing: staging and dev
- When you want to host your dev and stanging deployment onto the same cluster
- Re-usable component are nginx-ingress-controller and elastic stack(for login) used by both dev and staging environments. That way you don’t need to create it separately
- Blue-green deployment: you want to deploy 2 different version on the same cluster (one active and one inactive): it this case common/re-usable components can be utilized by both versions
- Access and resource limit on NameSpace
- When you’re working with multiple team and want to limit the access of namespace
- Let’s say 2 team working on a same cluster with diffrent namepsaces, you can then restrict the access of namespace, so they can do CRUD operations in their namespaces // increase security
- Limit resources that each namespace consumes
- Because clusters are limited resources, you want to give each team a share of resources for their application. So if 1 team consumes too much, cluster will run out of resources and other team can’t deploy their application
- Define resource quota on namespace: how much CPU, RAM, and Storage one namespace can use
Use cases when to use Namespace
- Structure your components.
- Avoid conflicts between teams
- share services between different environments
- access and resource limits on Namespaces level.
Characteristic of namespaces
- you can’t access most resources from another namespace
- if you have secrets or configmap of a shared service, you will have to create configmap and secret in each namespace where are you are going to need that
- Service can share across namespaces
- Some components cannot be created within a namespace
- live globally in a cluster
- you cannot isolate them
- resources are volume or persistent, volume and node(when you create a volume, it is accessible through the whole cluster because it’s not in a namespace.
- you can list resources that you do not want to keep in namespace with K8S commands
- kubectl api-resources –namespaced=false
- kubectl api-resources –namespaced=true
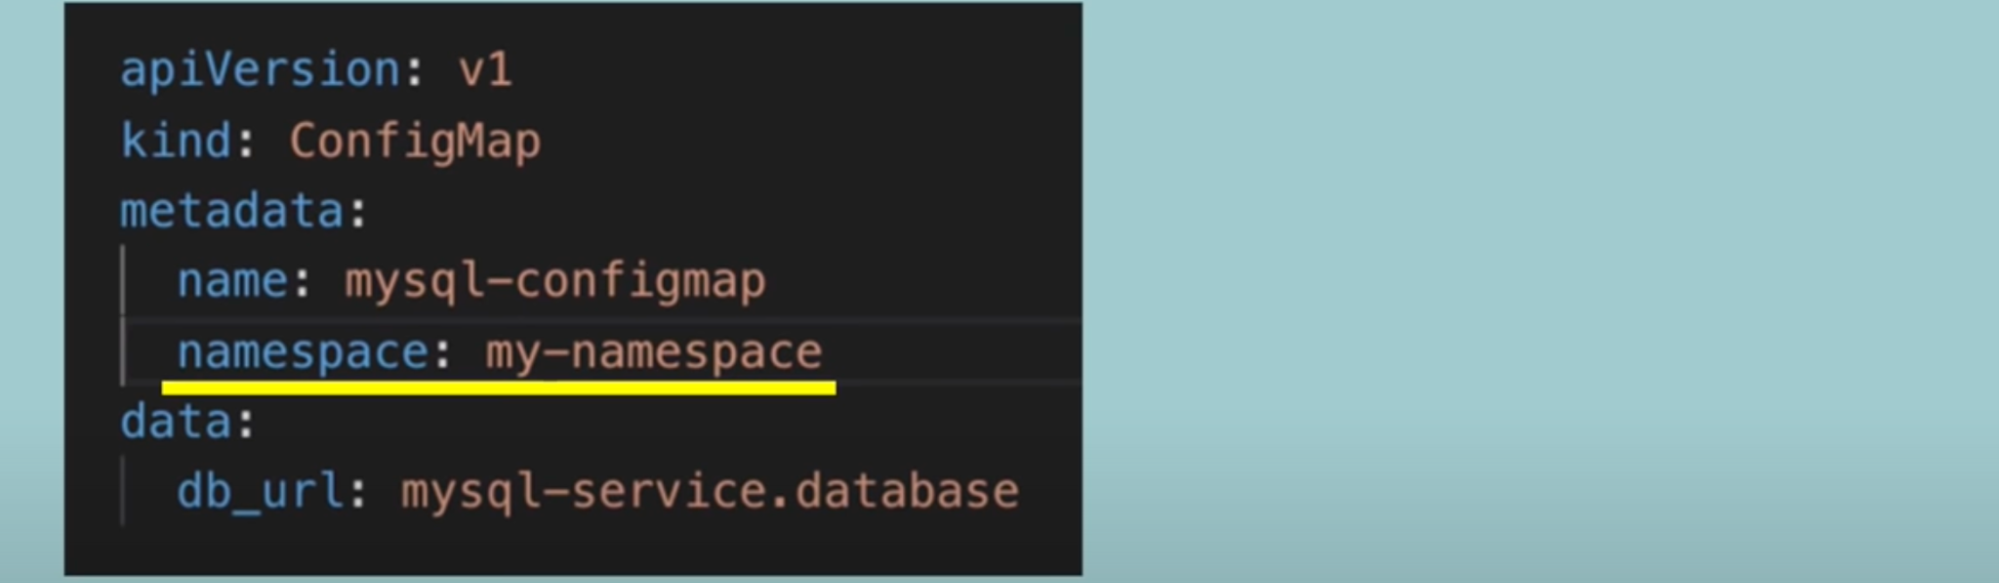
Create component in a Namespace
- kubectl apply -f FIlENAME –namespace=NSNAME
- have namespace inside the configuration file
You can also change active namespace
- Download the kubectx tool: brew install kubectx
- kubens: to see the namespace
- kubens NSNAME: command to switch to different NS
Ingress
External service vs Ingress
Scenario:
- Where you have application pod and service
- First thing you’ll need for your application to be accessible through web browser // external request should reach to your application
How to achieve this
External service:
- You can access the application using http protocol + IP address of the node + port
- This works in a test environment.
- Not practical // impractical you need domain name(not ip + port)
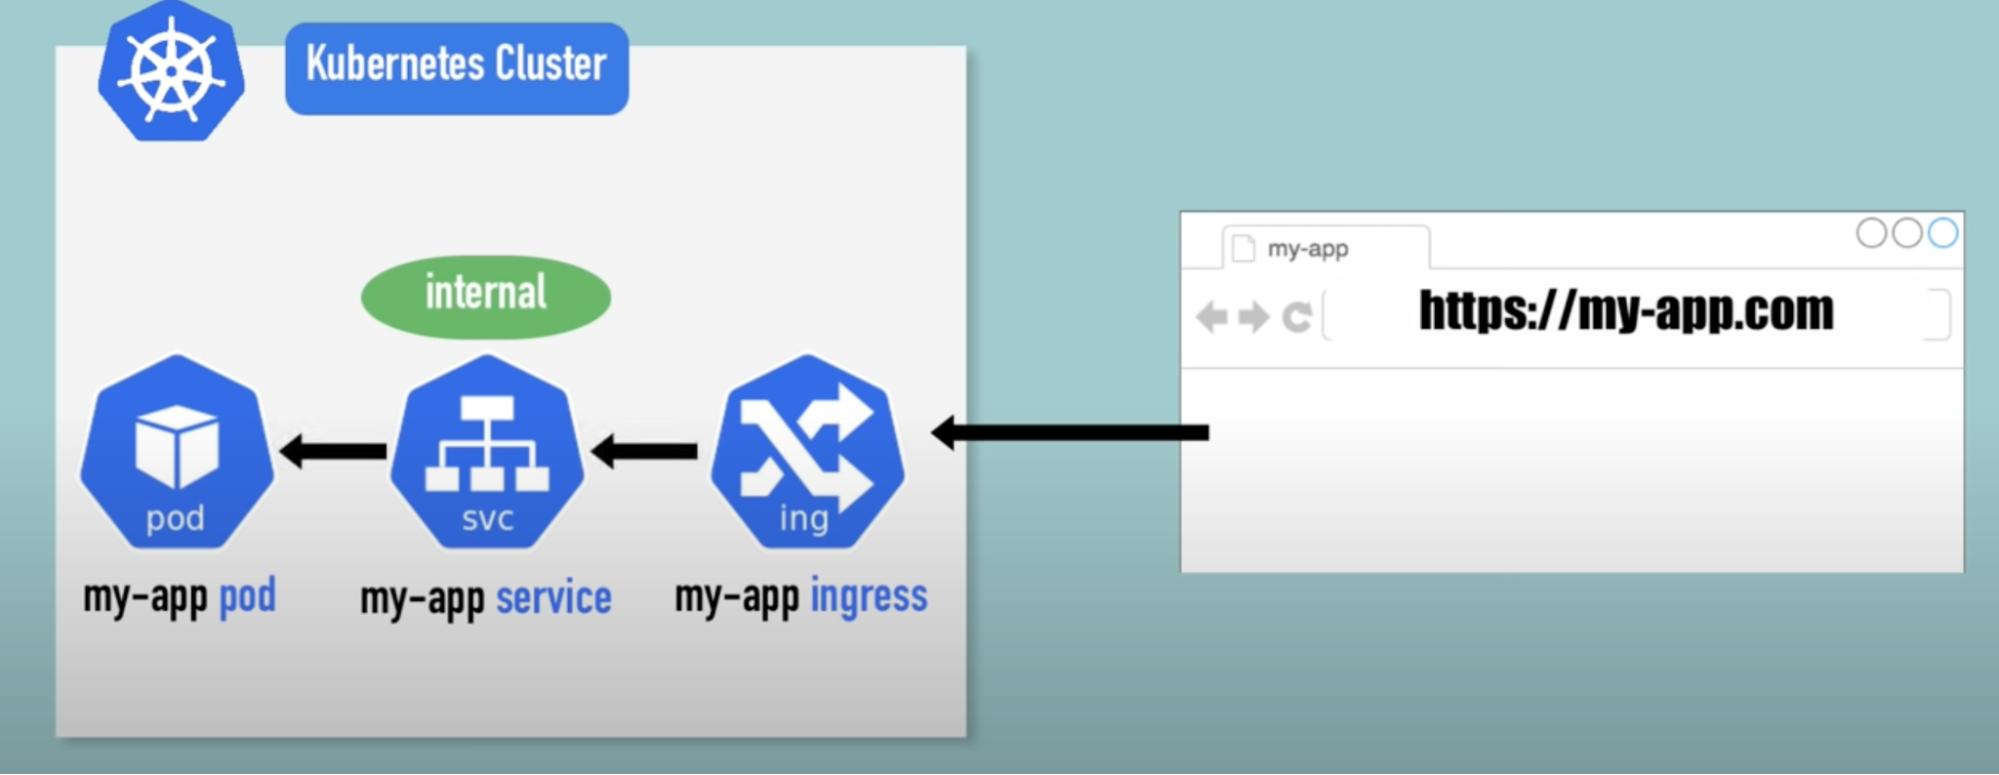
Ingress
- Final product should look like http protocol + domain name
- You’ll have ingress(separate component along with service and app)
- Instead of external service, you’d have instead internal service. So you’ll not open your application through IP address and port
- Flow: browser request → ingress(separate component) → internal service → pod
YAML configuration file External service vs Ingress
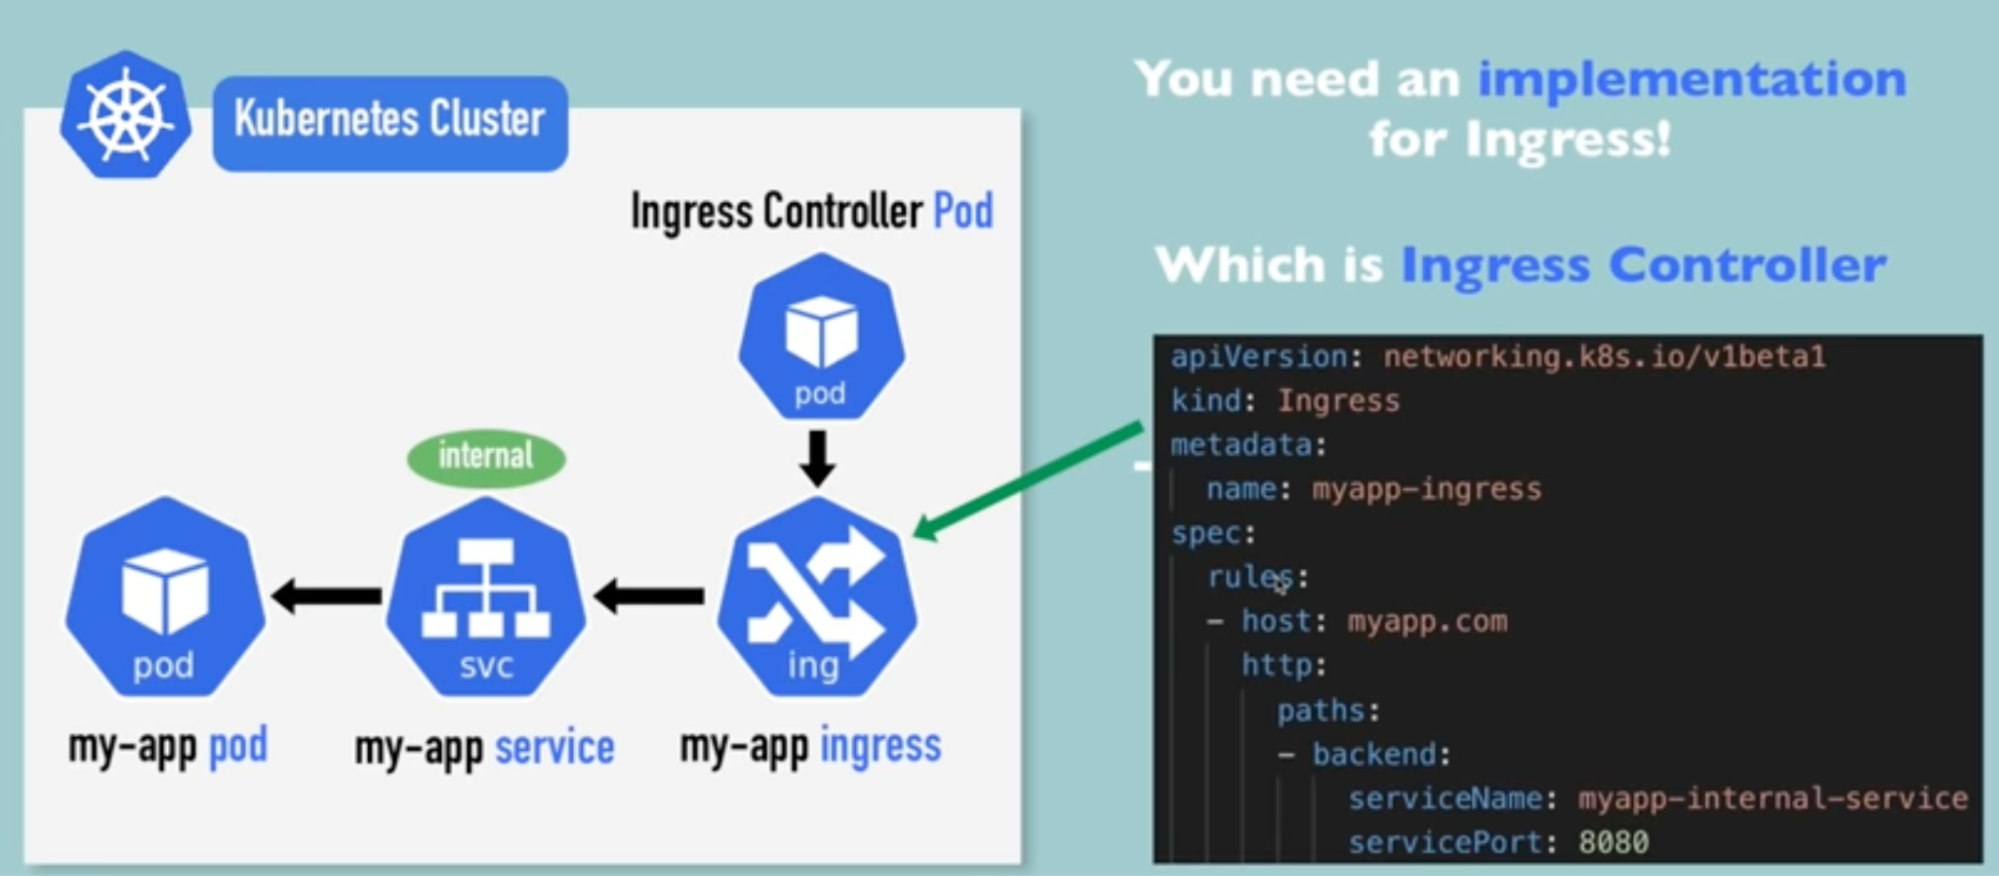
Ingress controller
If you create above ingress component alone, it won’t work for ingress routing rules to work
Need:
- Implementation for ingress
- Which is ingress controller - ingress controller pod (see the above image to understand flow)
How:
- Install ingress controller - which is another set of pod that runs on your node and does evaluates and processes ingress rules(you defined in the ingress component) and manage redirections
- Many third party implementations(you need to choose)
- K8S Nginx ingress controller (from Kubernetes)
What :
- Entry point to cluster - for all the requests to domain and subdomain rules that you configured
- Evaluates all the rules (define in the ingress component) - you may have 50 rules or 50 ingress component created in the cluster. So this Evaluates and decides which forwarding rule applies for that specific request
- Manages redirection
Different Entrypoints
- If using cloud → load balancer - this is your entry point and you need to configure it to ingress controller
- Bare metal → you need to configure some kind of entrypoint
- External proxy server: software or hardware solution
- This is separate server
- You’d give this a public IP address and open ports(in order for request to be accepted)
- And this proxy server will then act as a entrypoint to cluster
- No server in K8s cluster is accessible from outside
Flow: request → proxy server/Load balancer → ingress controller → ingress component(to check ingress rule) → service → app
Ingress controller in Minikube
Steps
- Install ingress controller in Minikube // automatically states K8S Nginx implementation of ingress controller
minikube addons enable ingress # install ingress controller
kubectl get pod -n kube-system # to check the controller |
- Create ingress rule // so controller can evaluate
kubectl apply -f FILE_NAME # Create ingress rule
kubectl get ingress -n NS # To see the created ingress
kubectl describe ingress NAME -n NS # To see the ingress |
- Configure default backend process
- Why: if you don’t have your controller rules setup in controller component, this will automatically route to some kind of error page // custom error message response
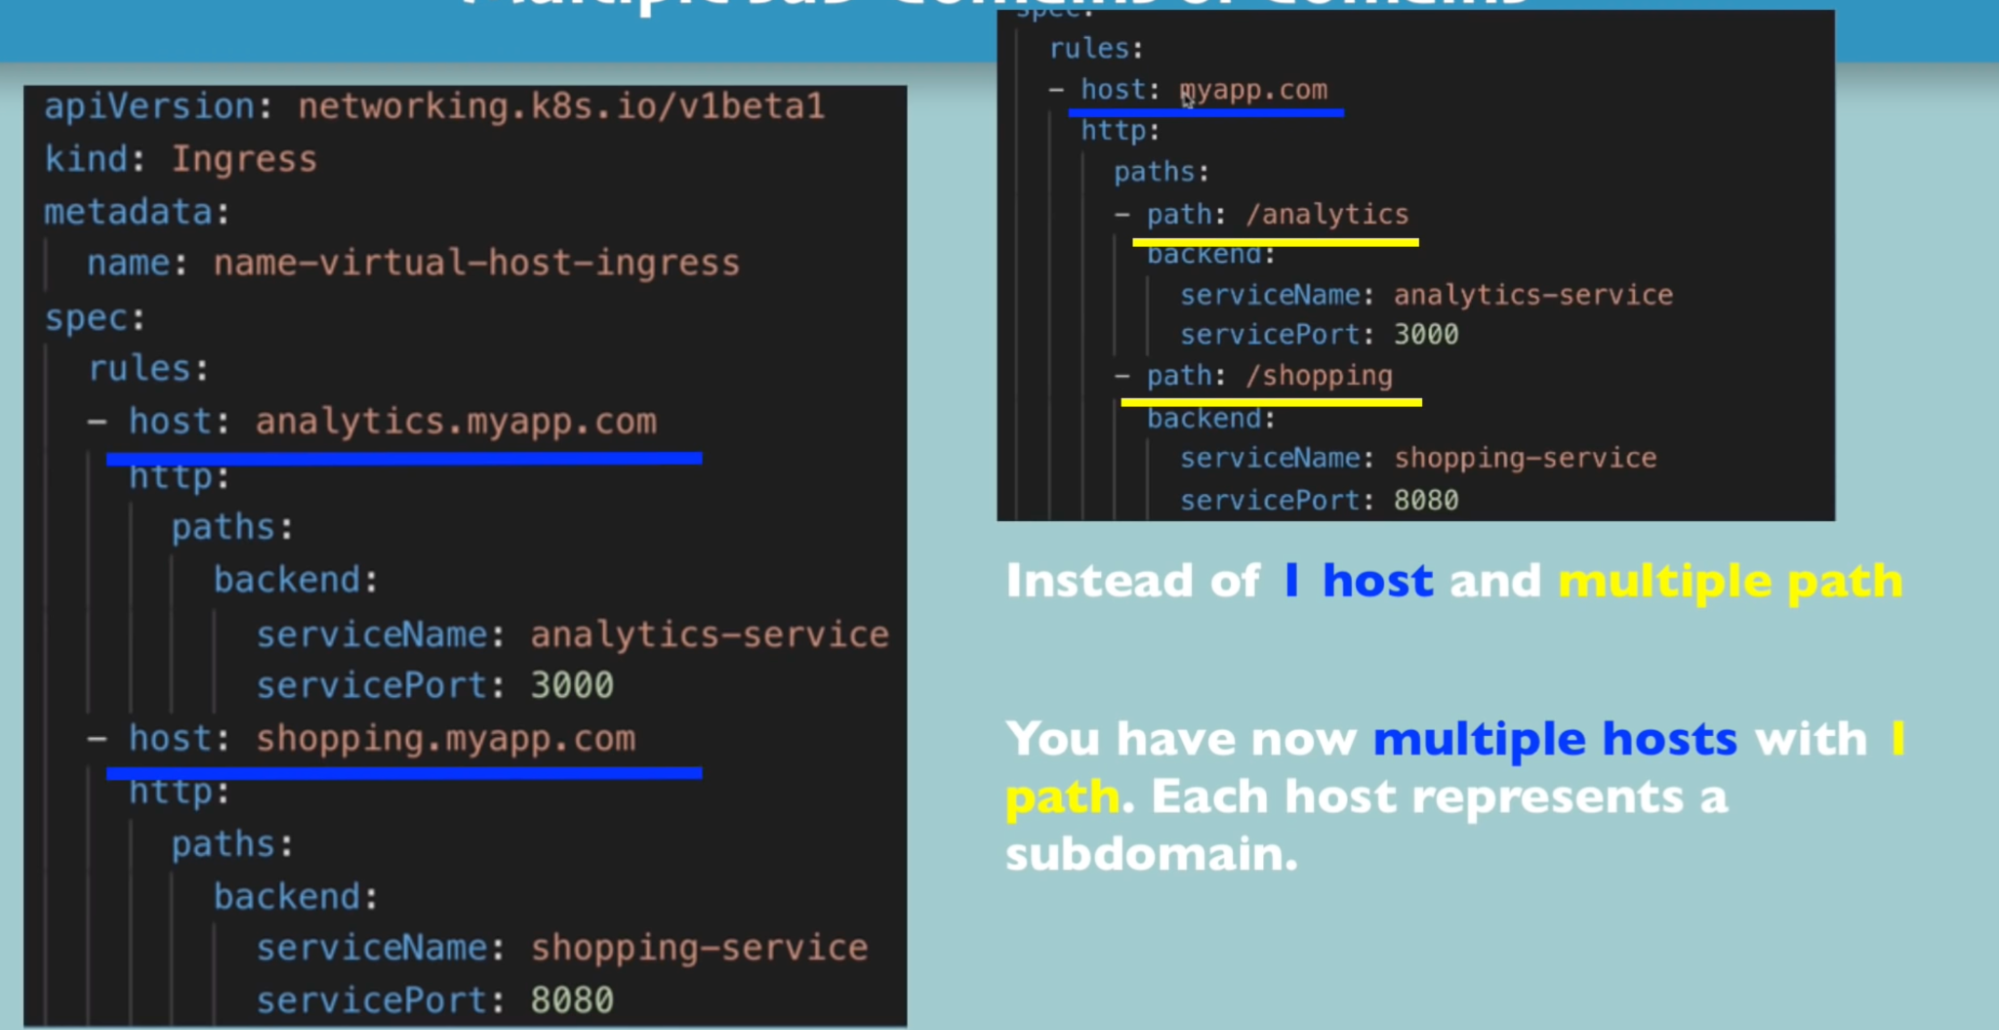
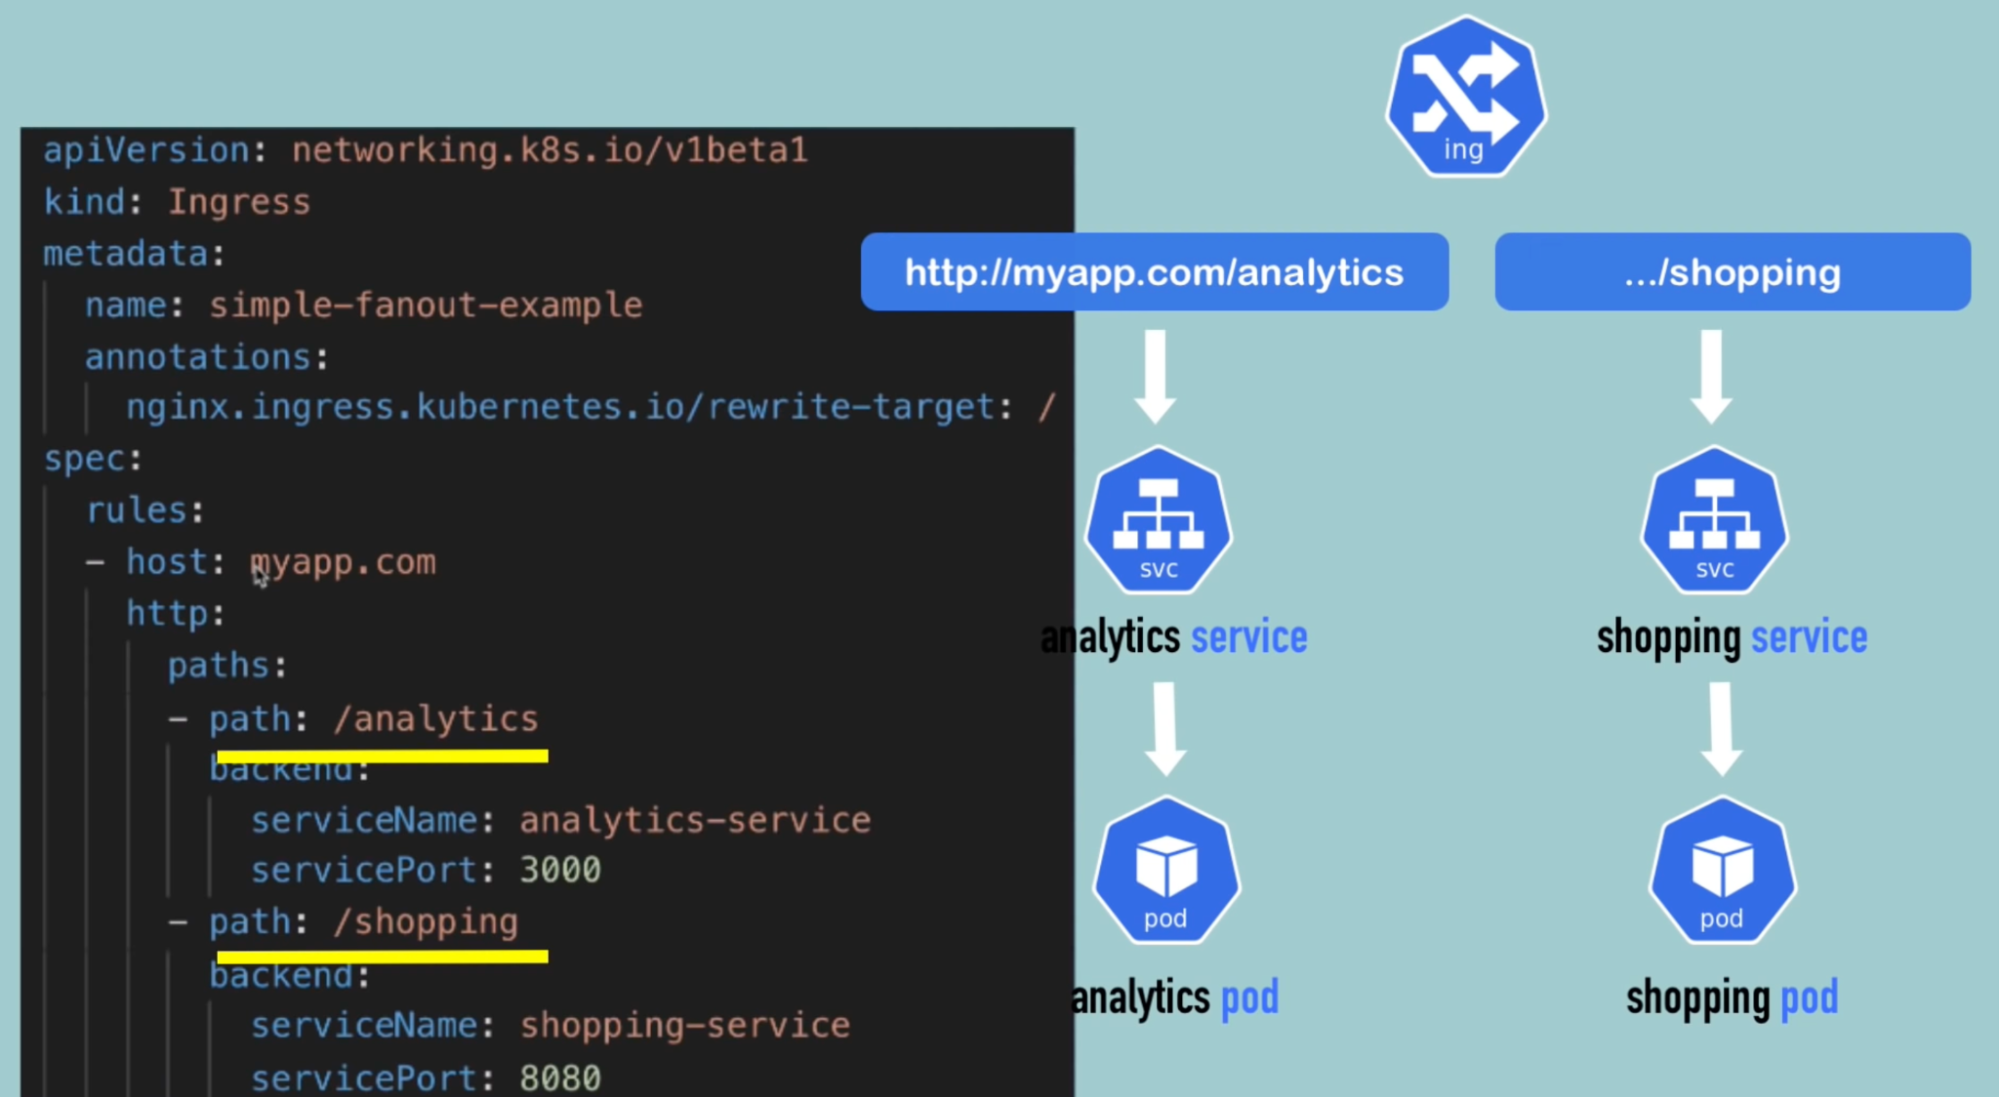
Multiple path with the same domain/host Configuring SSL certificate
What: one domain(google) but many service(analytics, shopping, calendar, gmail)
- All application/service are accessible with the same domain
Use case - 1: same domain with multiple applications/service
Callouts
- This will have one host and multiple paths
Use case - 2: sub domain for multiple applications/service
Callouts
- This will have multiple host
Configuring SSL certificate
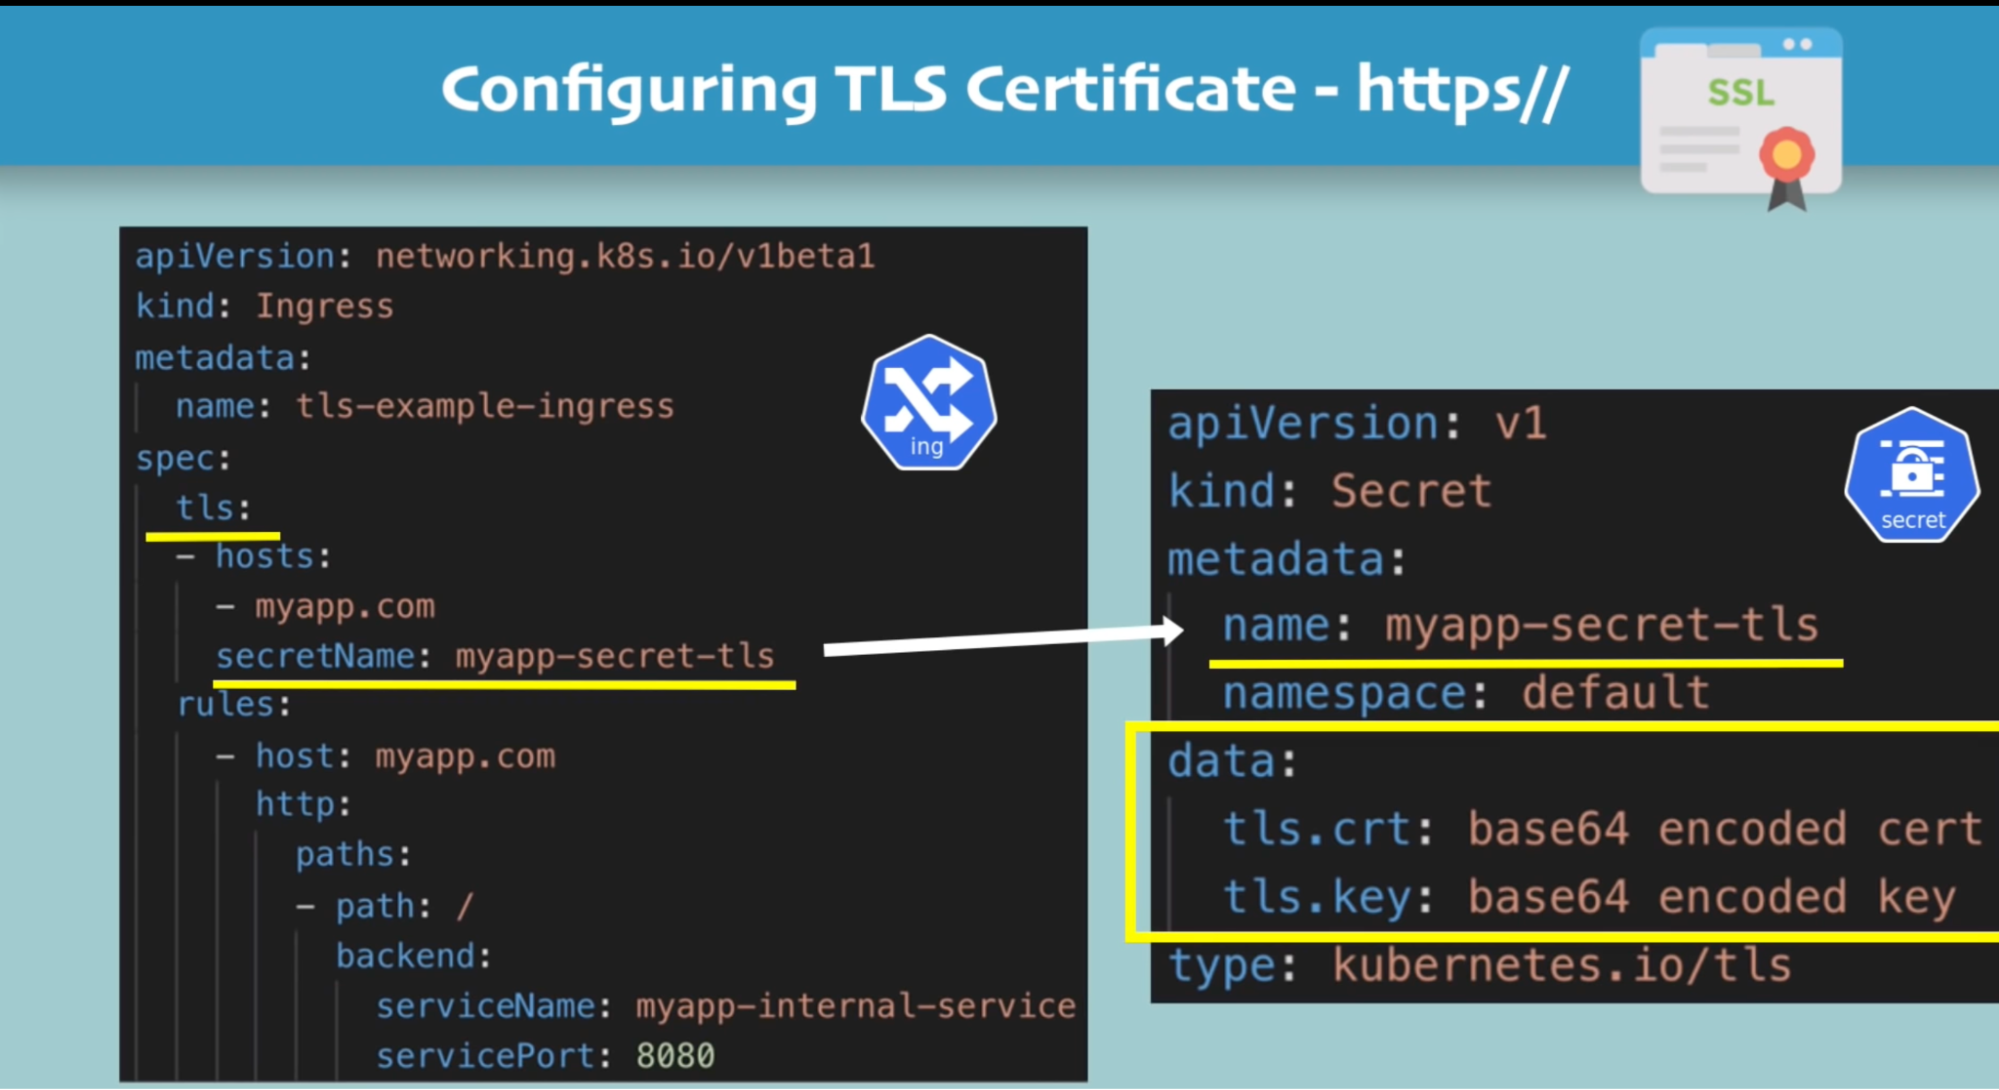
Callouts
- Data key needs to be “tls.crt” and “tls.key”
- Values are file content NOT file paths/location
- Secret component must be in the same namepsace as the ingress component
Helm
What: package manager for kubernetes
- Package YAML files
- And distributes them in public and private repository
Why: so multiple team can use single set of yaml manifest file if they want to
- You can reuse the the configuration
- Sharing Helm chart across team
When to use:
- When you have stateful application uses different types of database
- Monotorning apps
Helm chart
- Bundle of YAML files
- Create your own HELM chart with helm
- Push them to Heml repository
- Download and use existing one
Features
When: you have multiple microservices, that uses same set of deployment and service configuration with the only difference is application name, version and docker image name
- So only difference is some values, rest of the configuration remains the same
- So instead of having multiple deployment and service file, you could use generic template with replaceable values using Helm
- Useful when using CICD builds
- Same application across different environment(dev, test, prod)
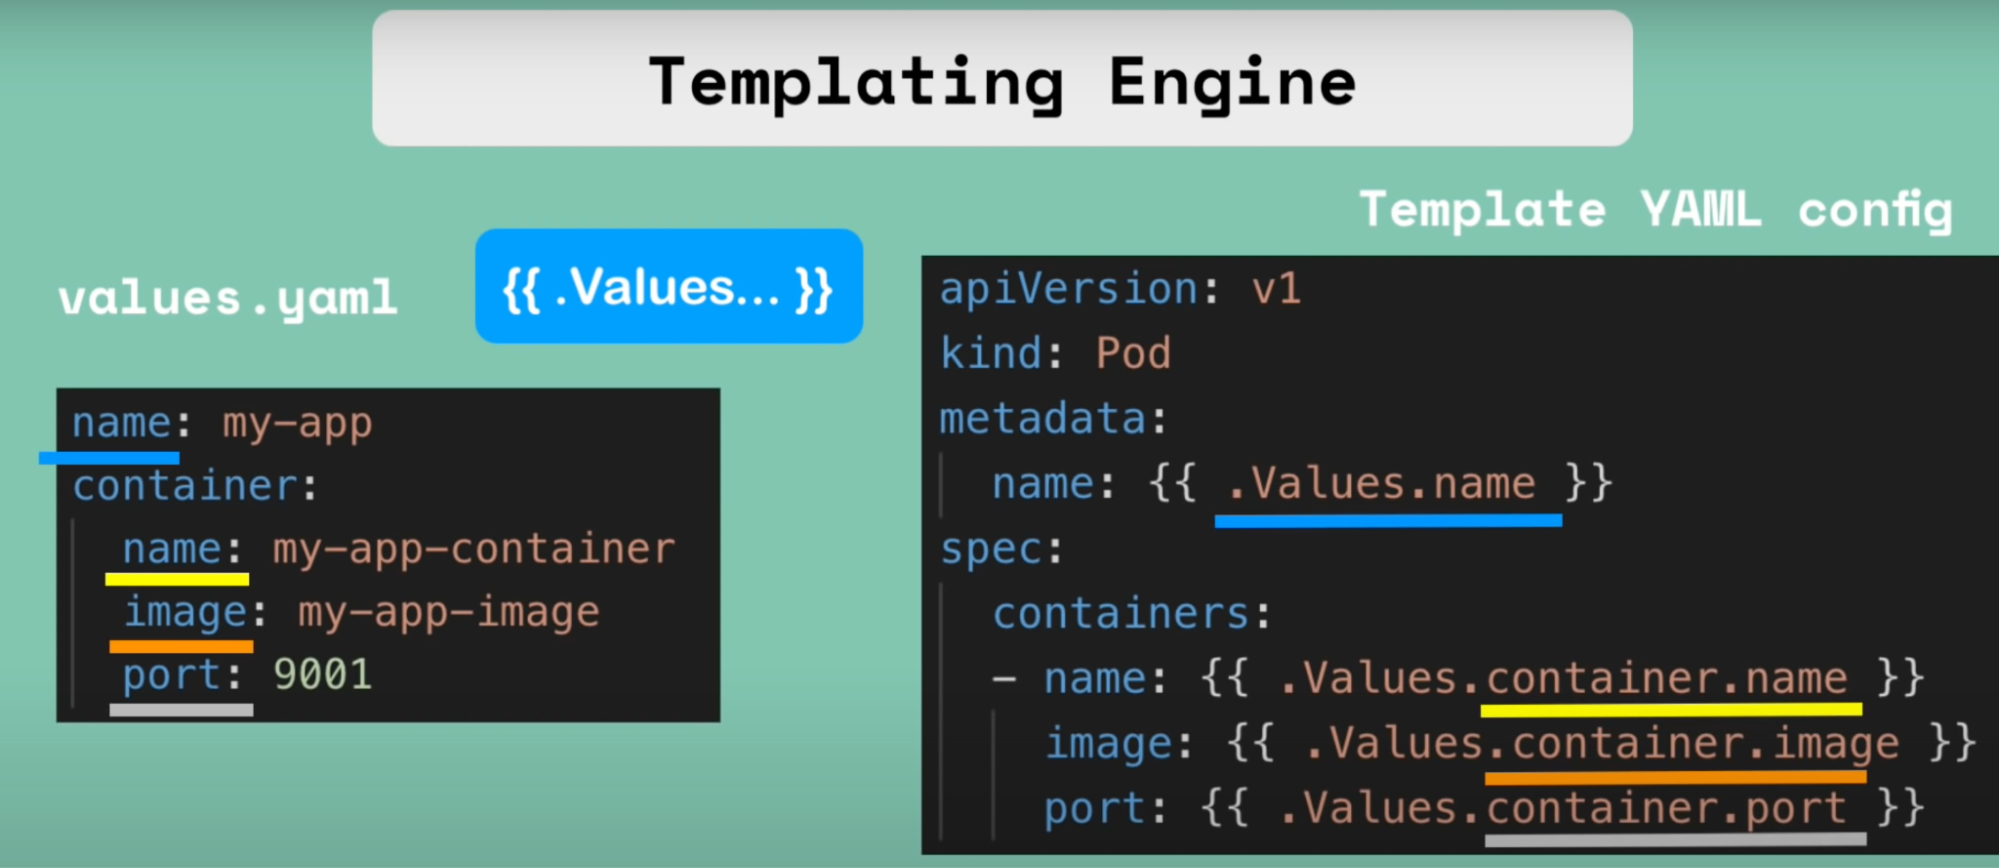
How:
- Define a common blueprint
- Dynamic values are replaced by placeholders // template file
- So you’ll have template YAML file (blueprint) and values.yaml file(external file) from where you can populate the values to the template YAML file
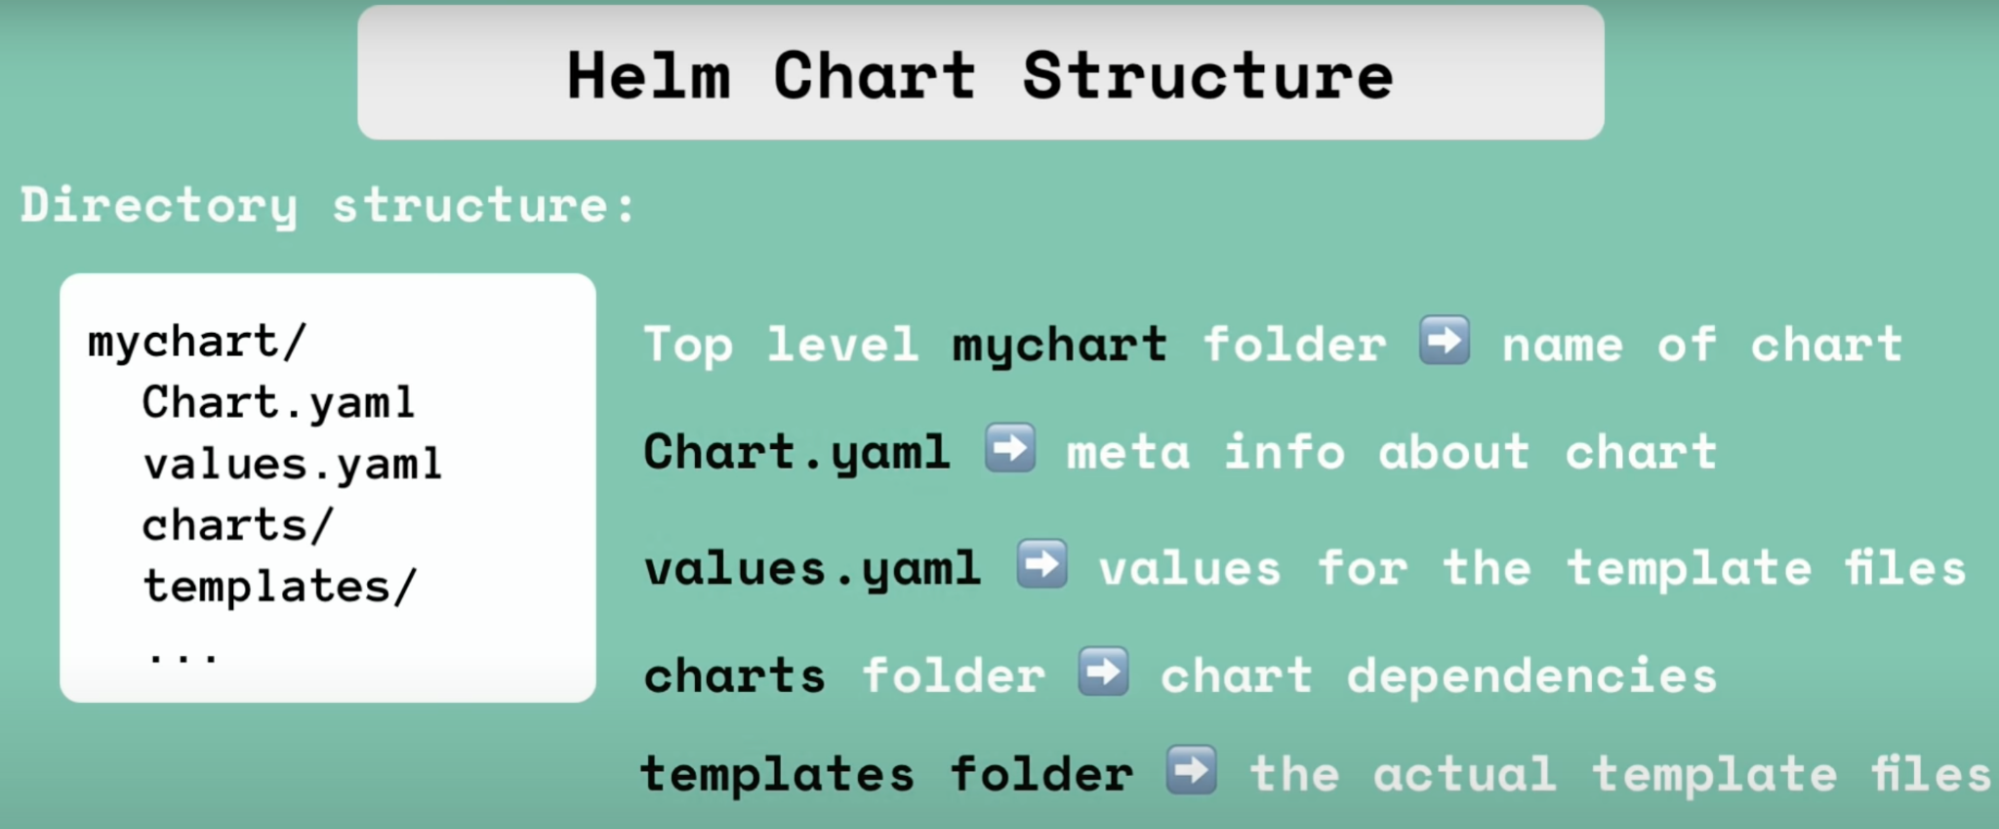
Helm chart structure
- Chart.yml - contains meta info about chart, such as name, description, dependencies
- Values.yml - contains values you populate into the blueprint yaml template
- Charts - chart dependencies
- Templates - actual template file(blueprint)
Kubernetes Volume
Need: to persist data in K8s using volume
What: application pod needs to read/write data in the database data
Why: When database pod dies, database that has will also be gone. So we need to persist data
How:
- Need storage that doesn’t depend on pod lifecycle // external storage where data kept stored
- So when pod dies and new pod gets created it will read the data from existing storage to get uptodate data
Requirements:
- Need storage that doesn’t depend on pod lifecycle
- Storage must be available on all the node servers. Because you don’t know on which node, the database pod restarts
- Storage needs to survive even if cluster crashes
3 Components of Kubernetes volume
Why: for data persistence
What for:
- Application that has database like MySql,
How: application writes/updates/read data from database pod
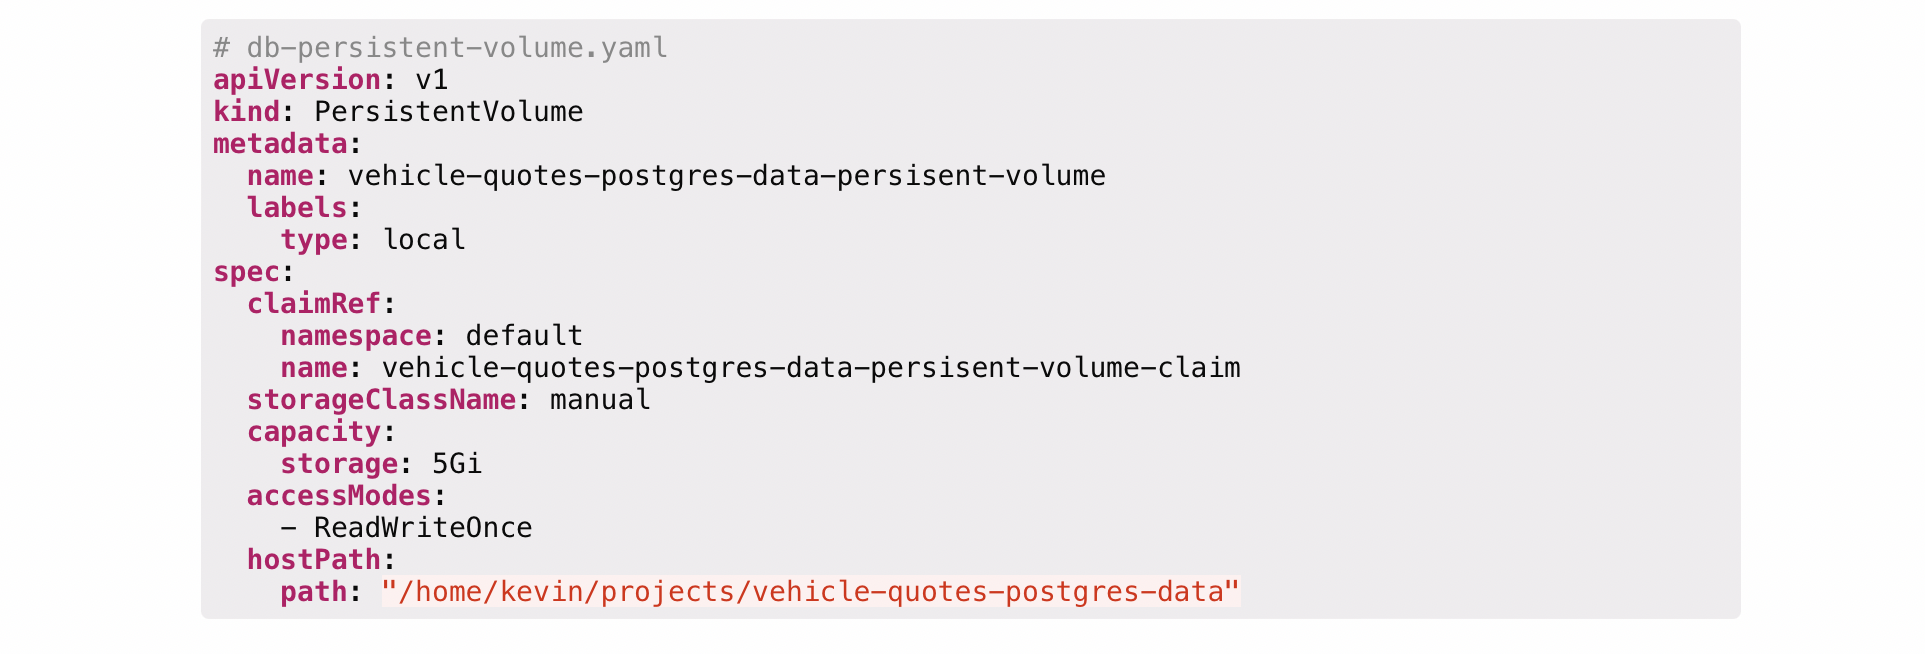
Persistent volume
What:
- A cluster resource just like CPU and RAM used to store data
- PV is just an abstract component, it must takes storage from the actual physical storage such as local disk(from cluster node), external nfs server or cloud storage
- Created via YAML file
- Kind: persistentVolume
- Spec: ex: howmuch storage should be created for the volume
- Think of it as a external plugin to your cluster
- Scenarios when configuring volume
- You can have multiple storage configured with your cluster where one app uses local storage, another uses external nfs storage and third app uses cloud storage application
- Or one app can also uses multiple storage type
Questions
- Where does this storage comes from
- Needs to take storage from actual physical storage like local disk(from cluster node), external nfs server or cloud storage and made available to cluster
- Who makes it available to the cluster
- What type of storage do you need for your application - you decide
- You need to create and manage them(backup and make sure they don’t get currupt)
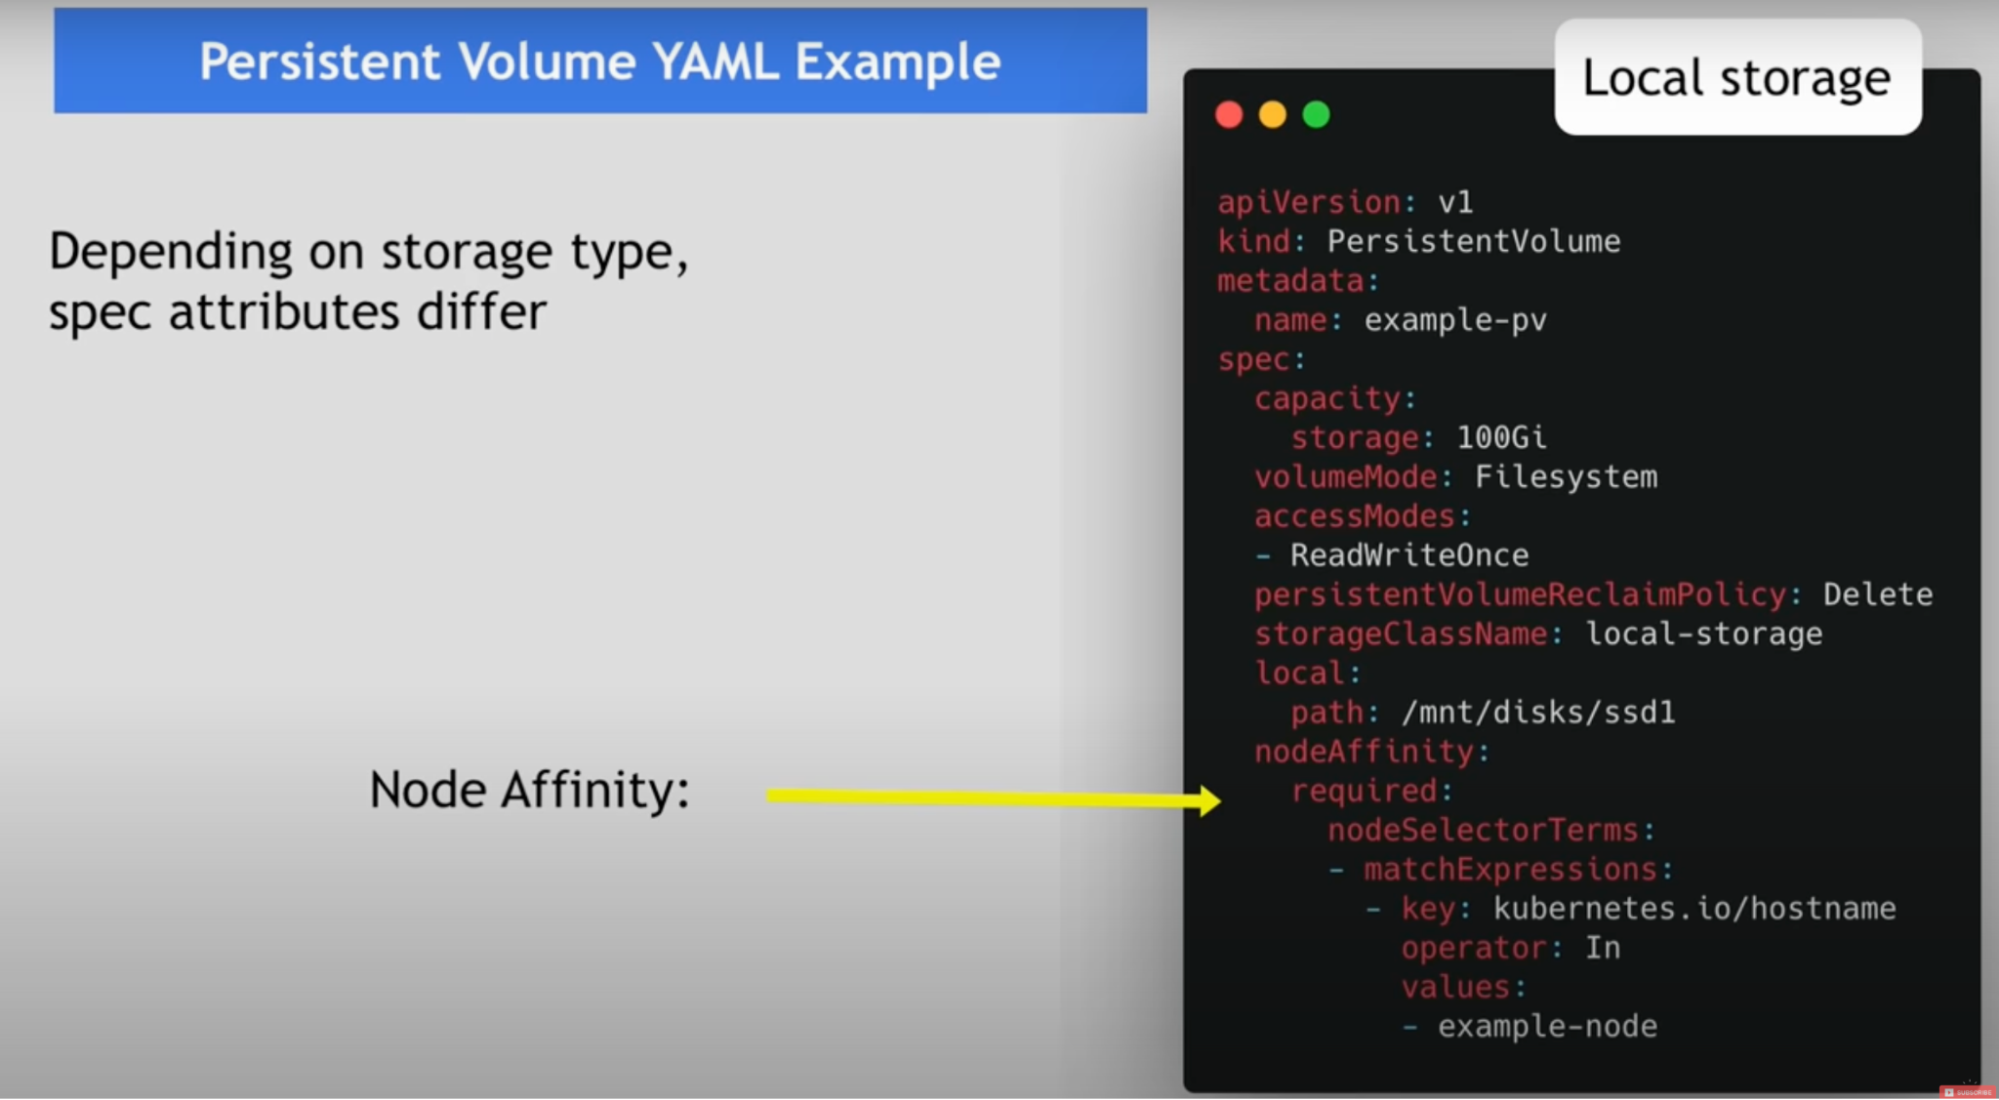
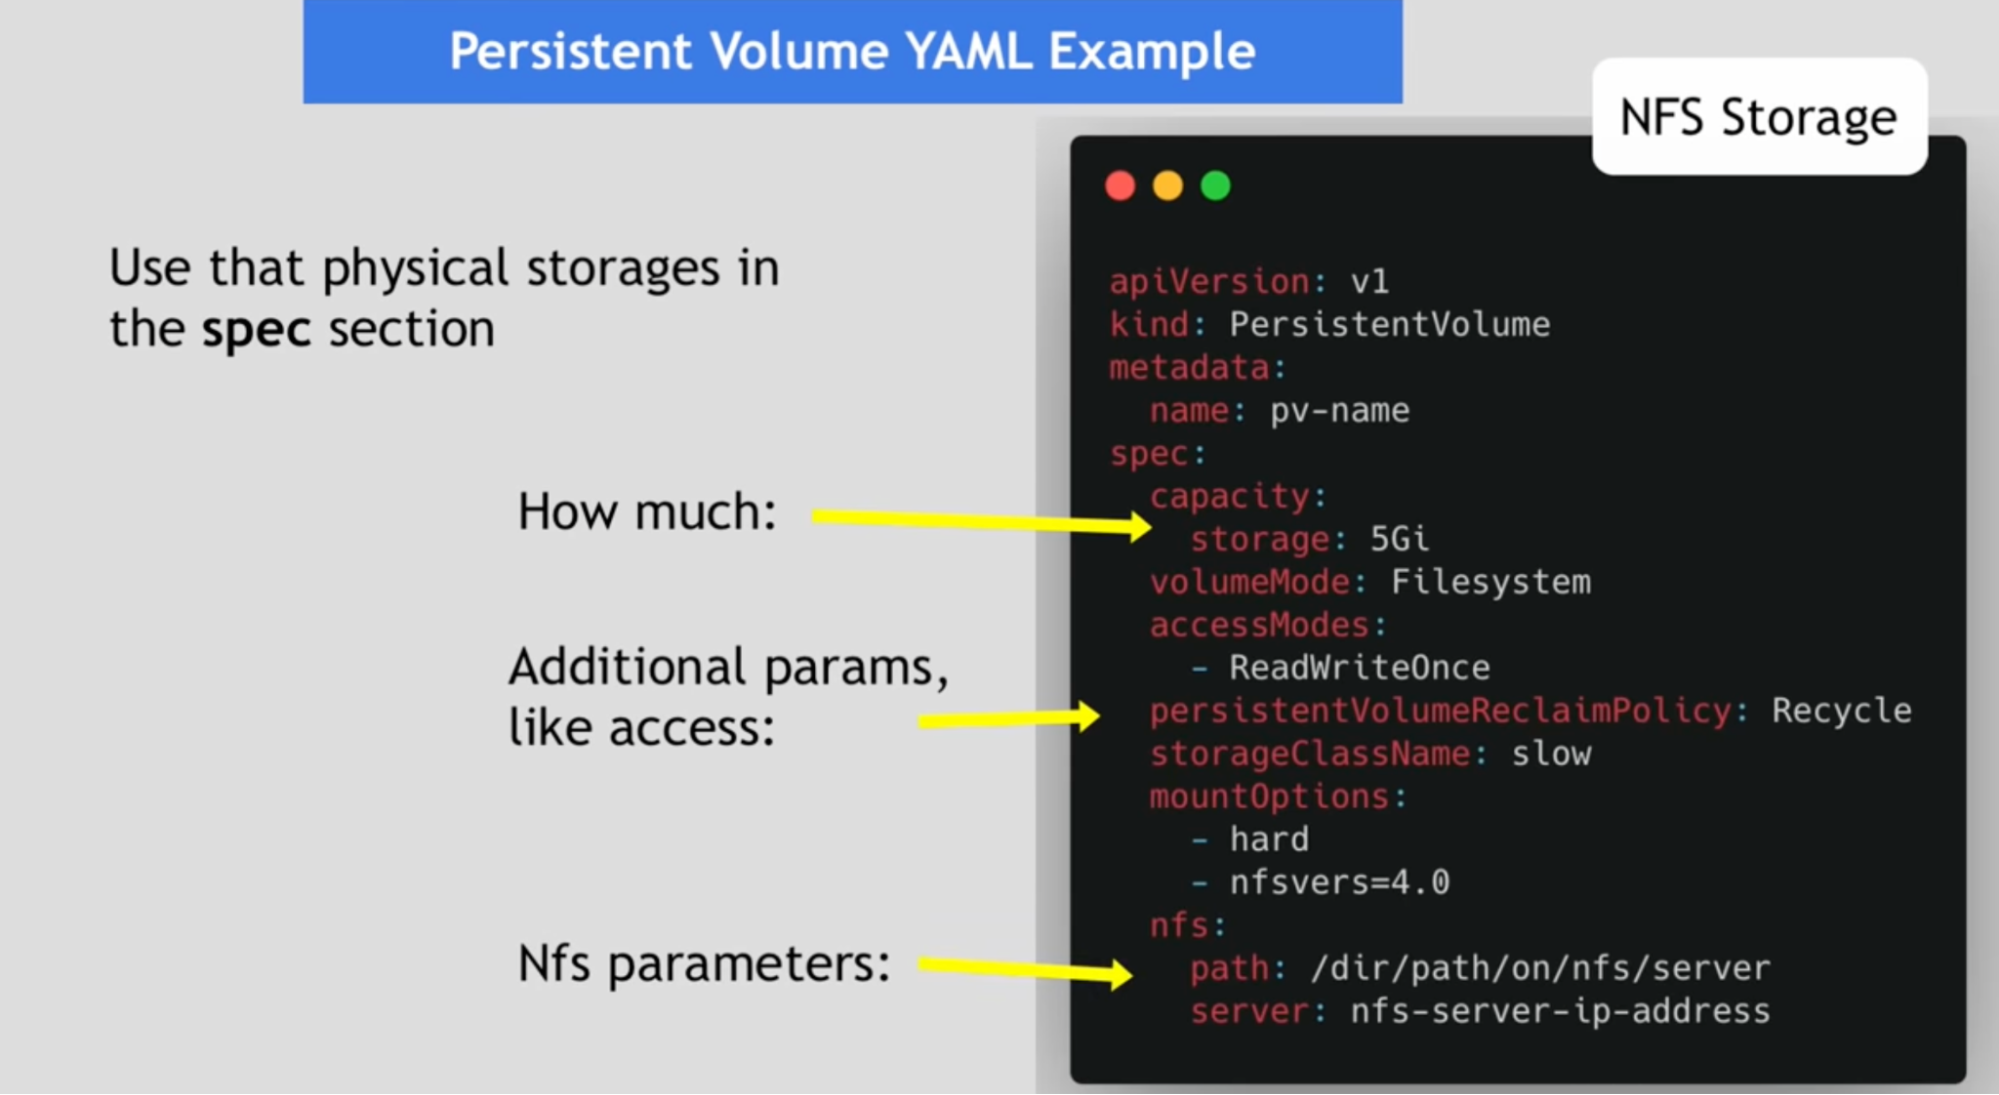
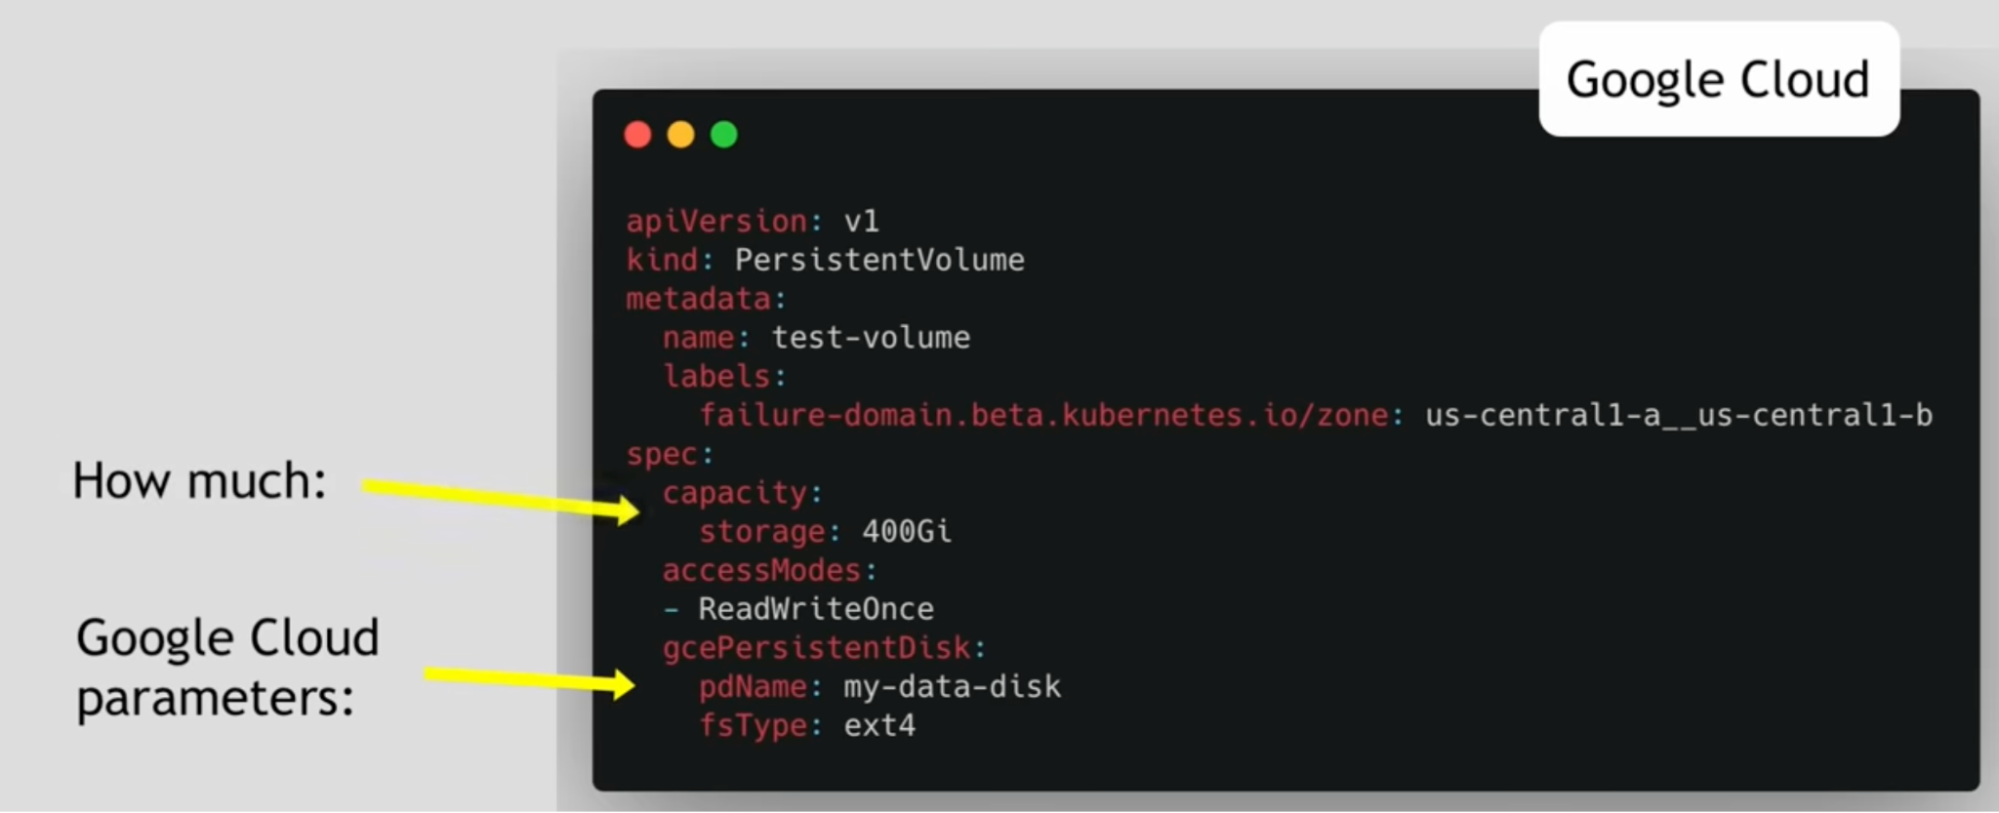
Persistent volume YAML example
- Nfs storage
- Google cloud storage
- Local storage on the node
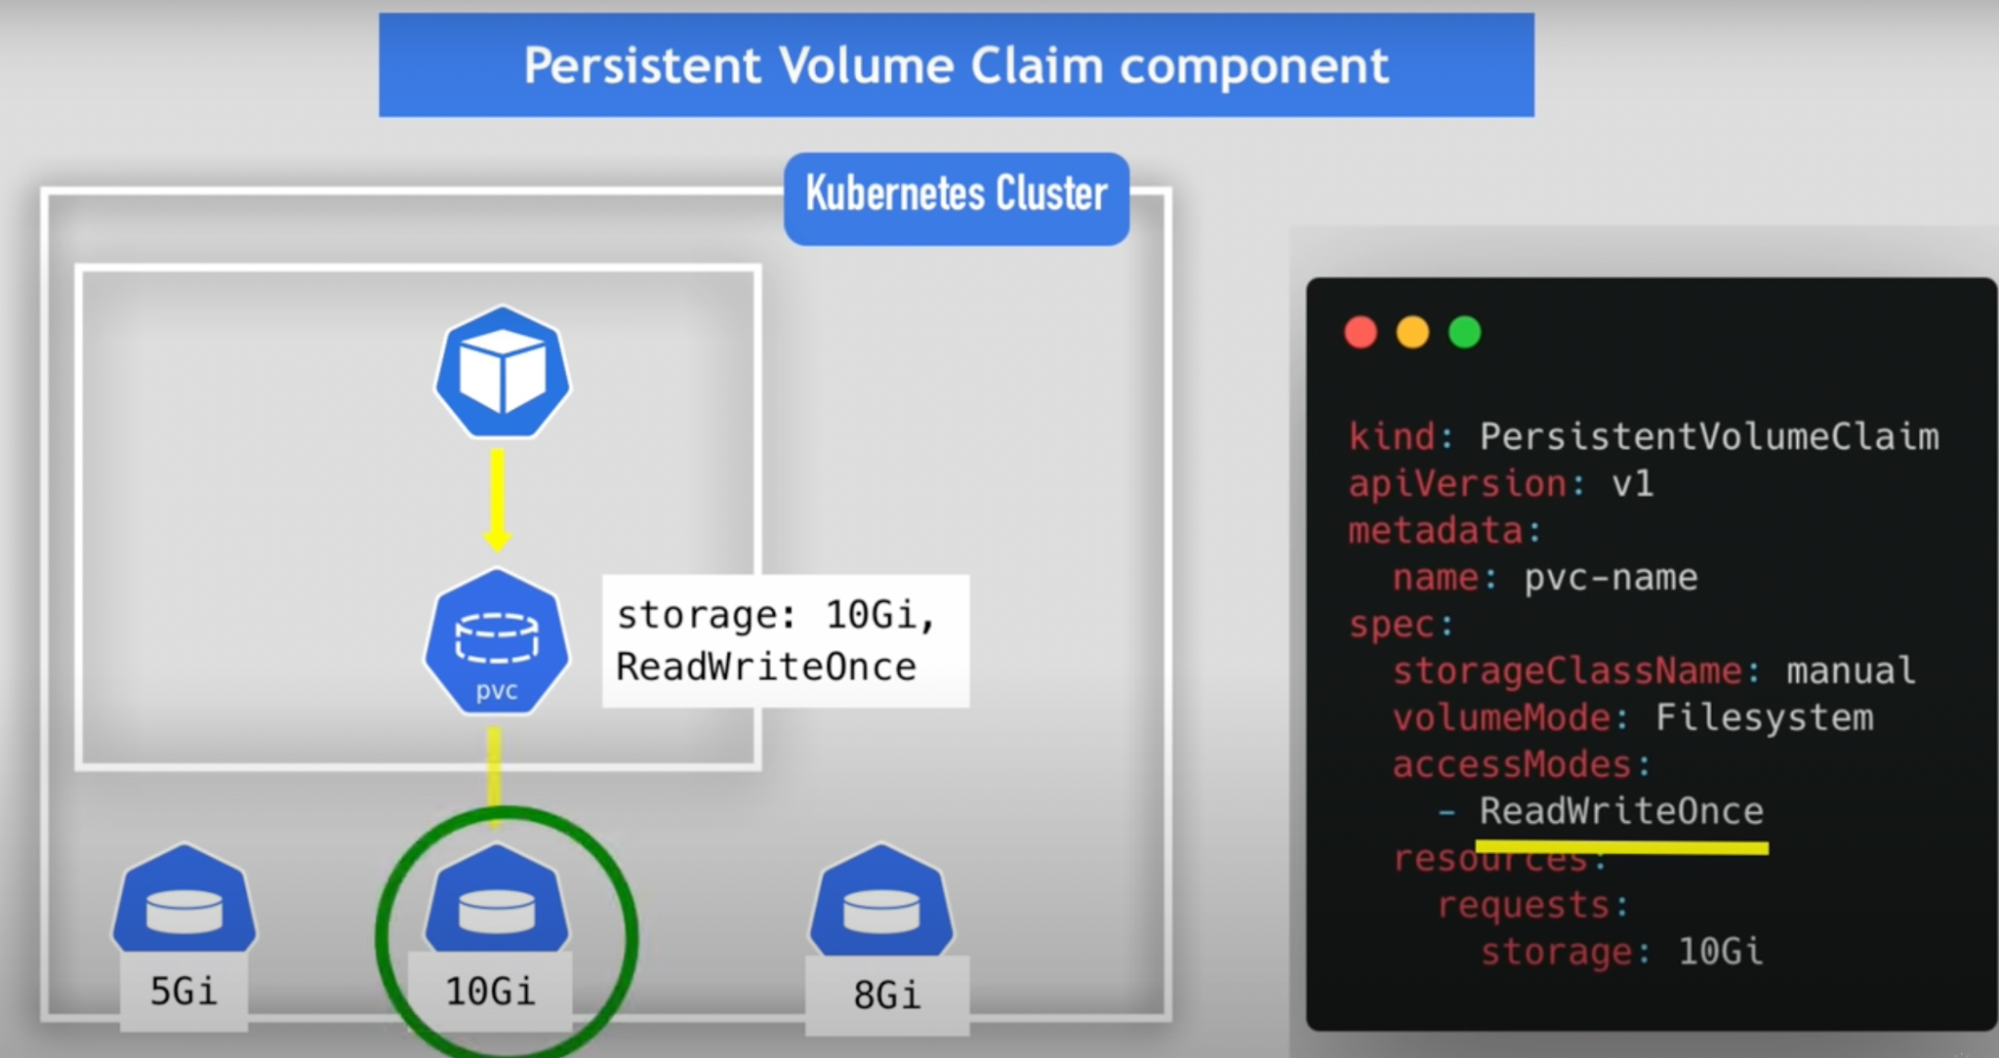
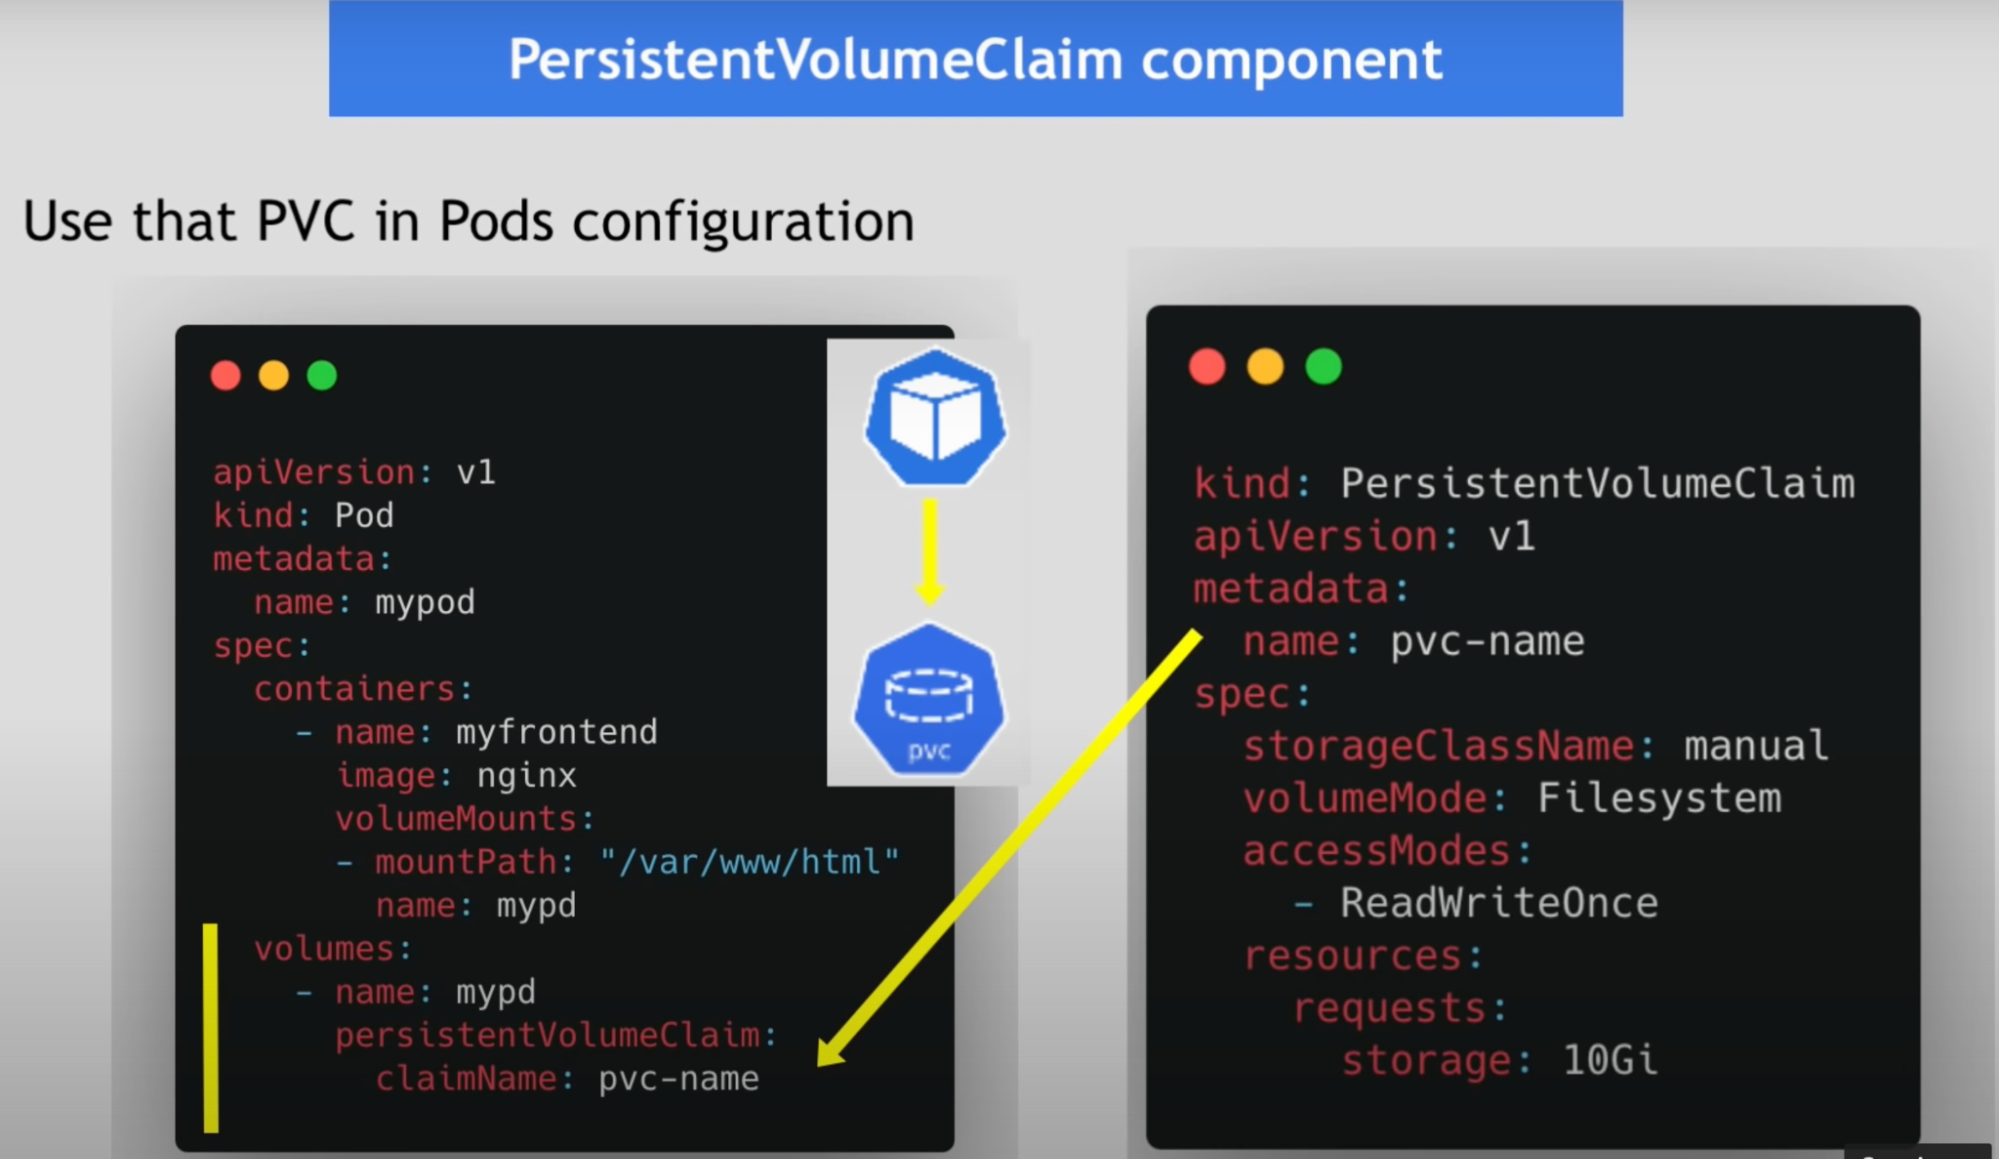
Persistent volume claim - PVC
Application has to claim that persistent volume using PVC
Created using YAML configuration
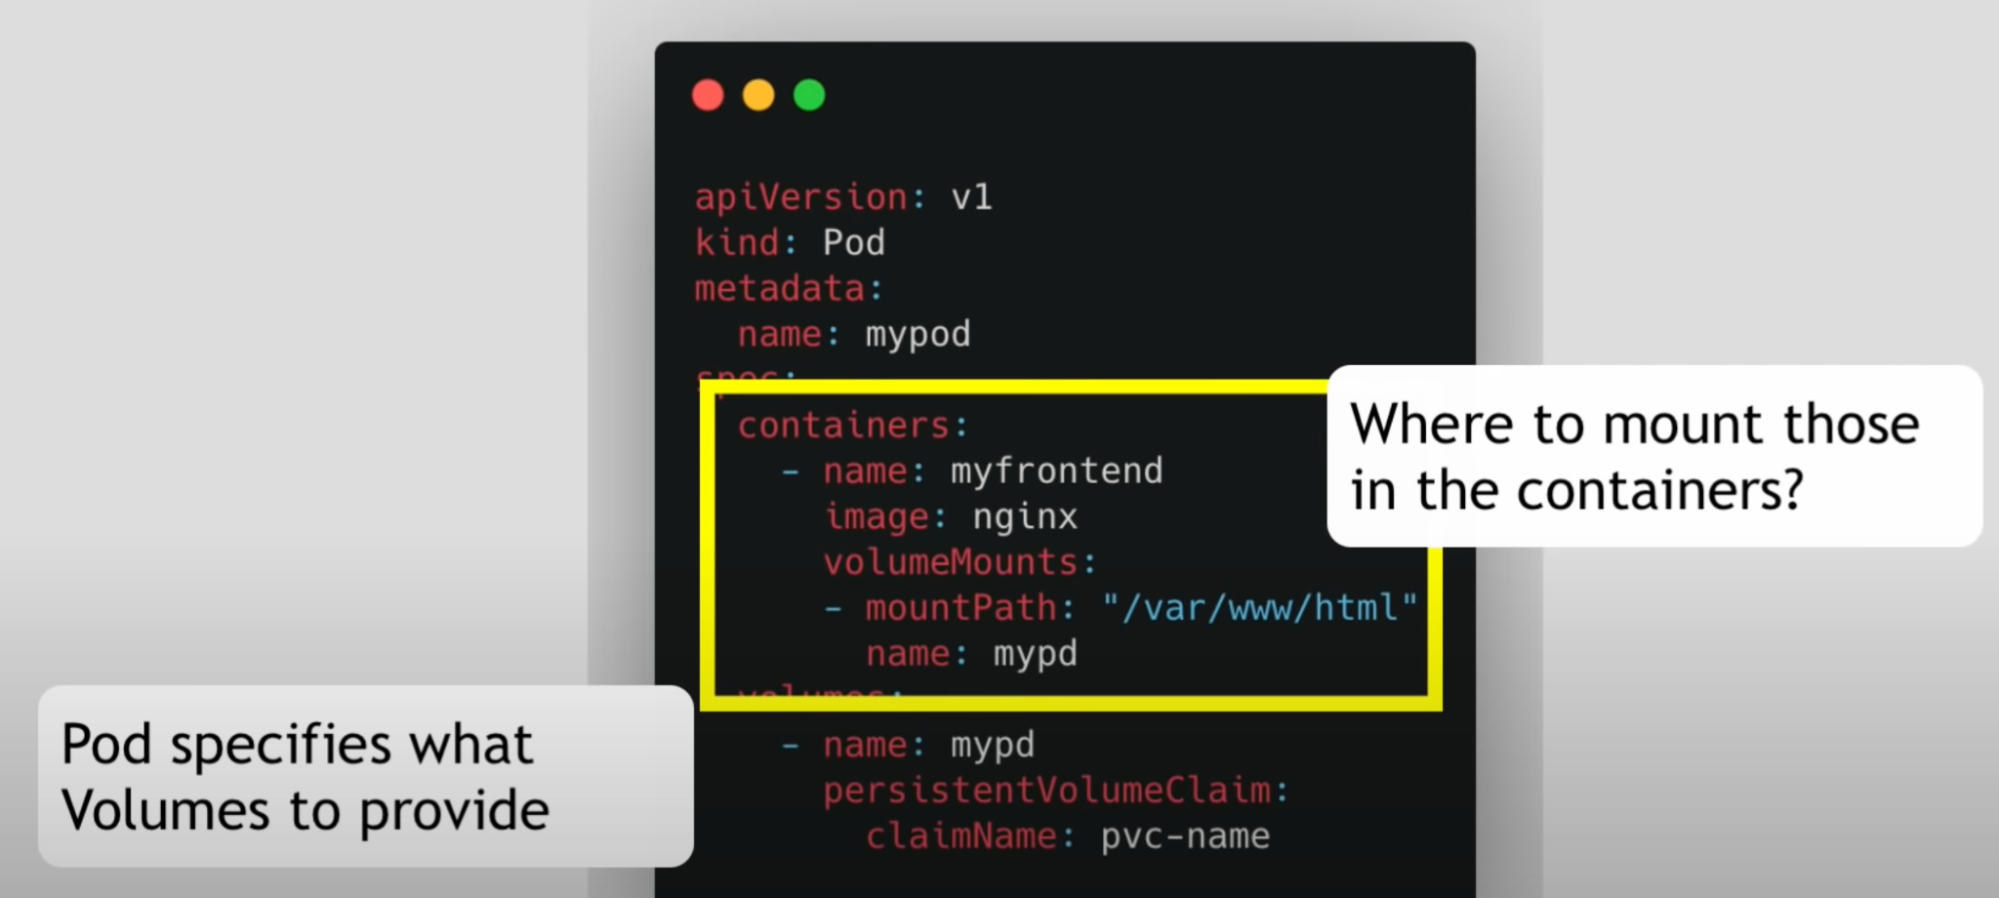
Use the PVC in pod configuration
Why: so that all the pods have access to that PV storage

Issue: Dev needs to ask system admins to create PV they need for the application before the deployment, and admin then manually request cloud storage provider and creates 100 PV for all the applications that need storage // tedious and time consuming - this issue solved by Storage class
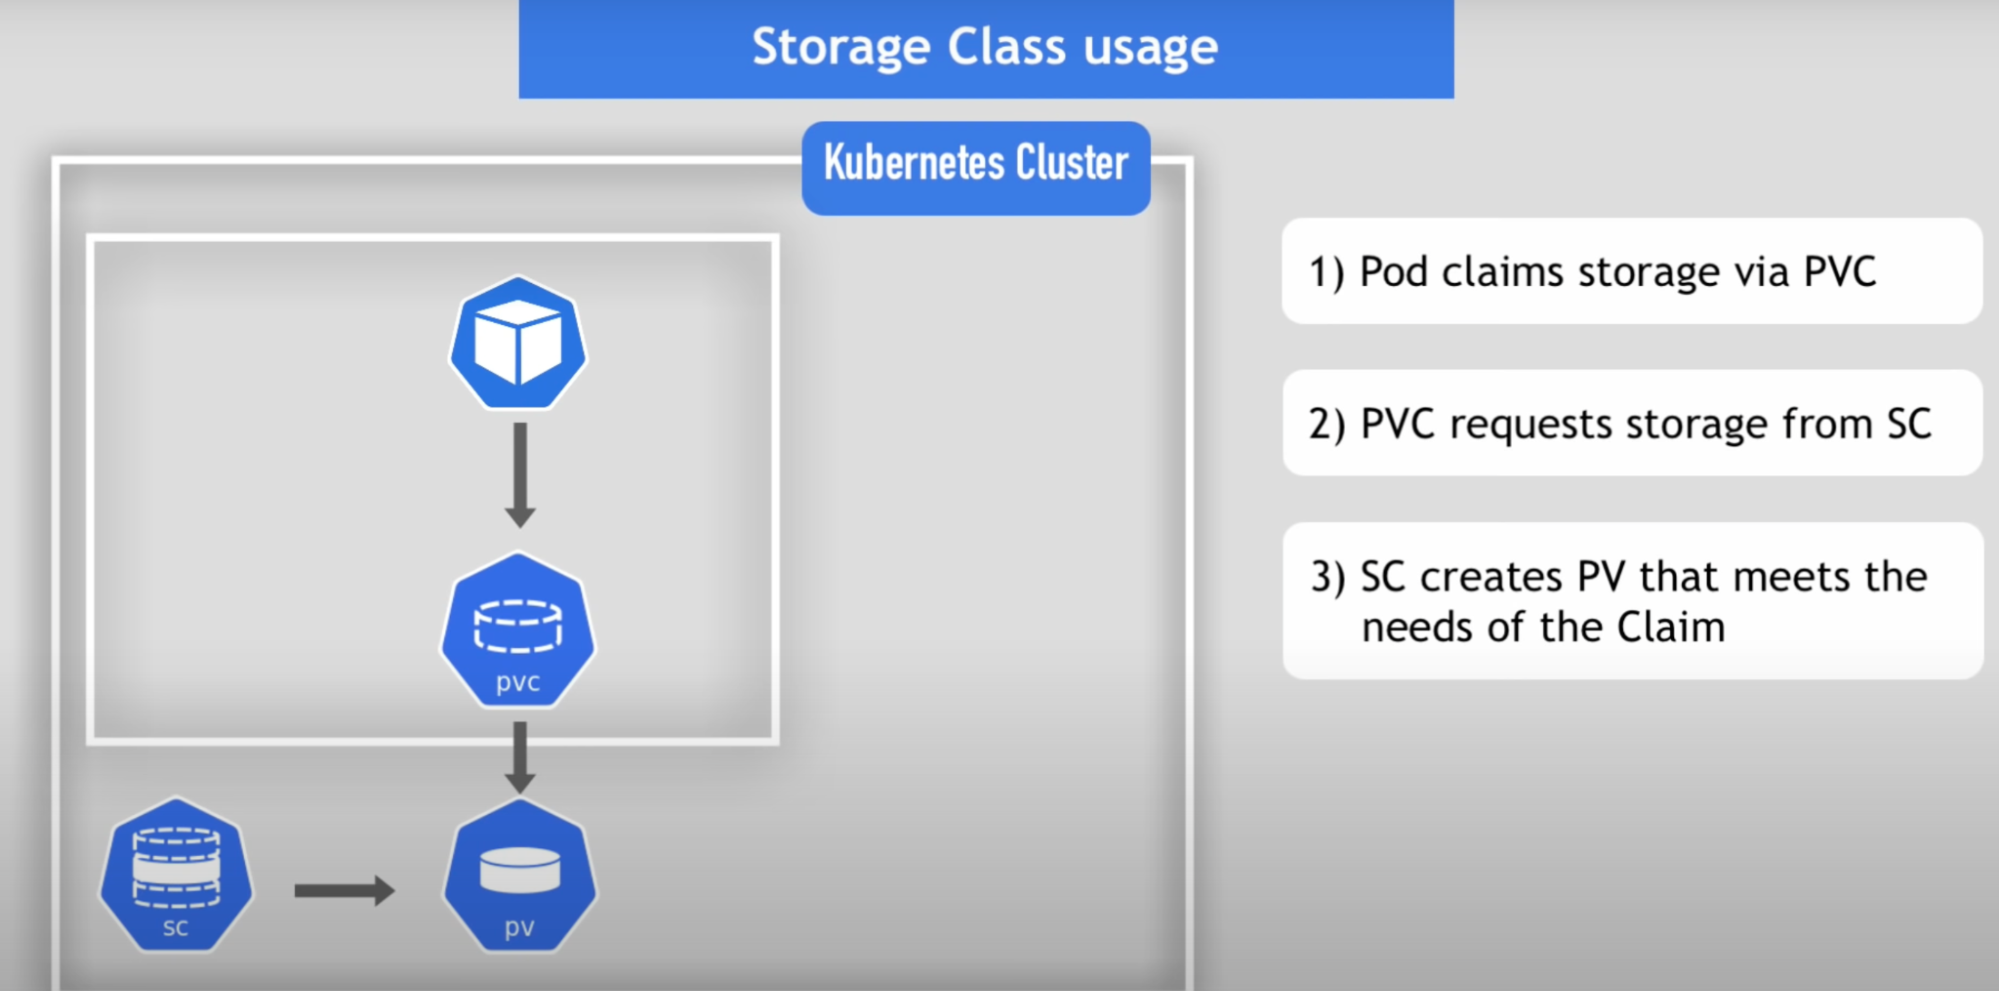
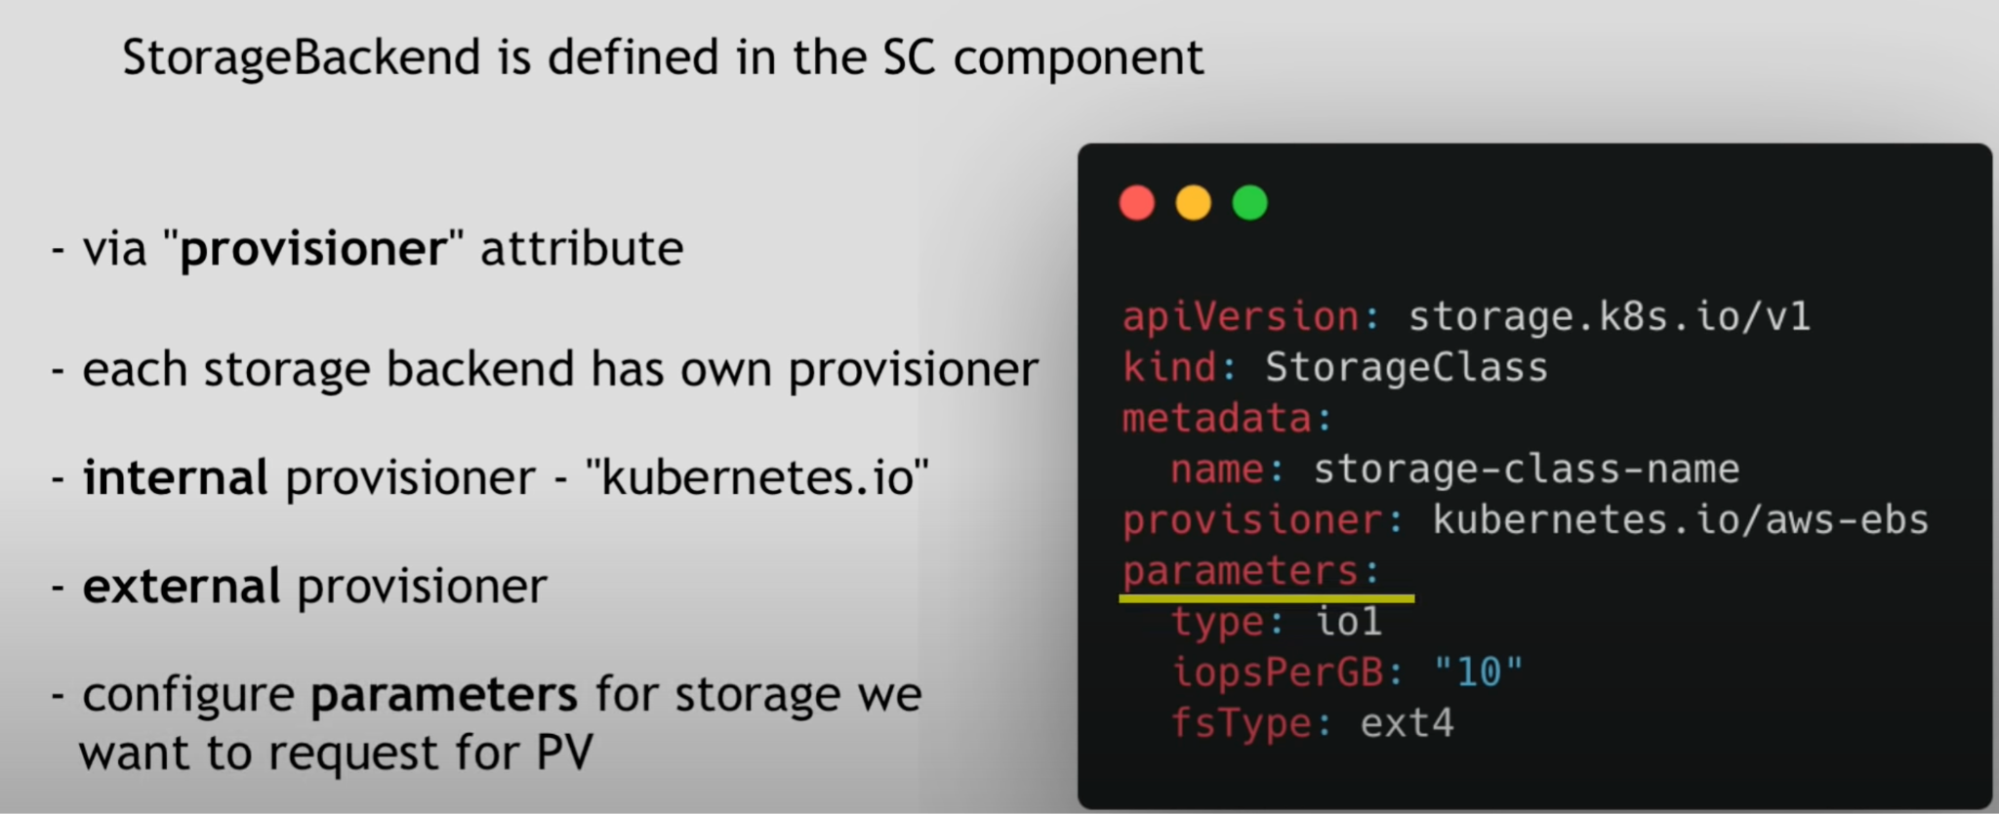
Storage class
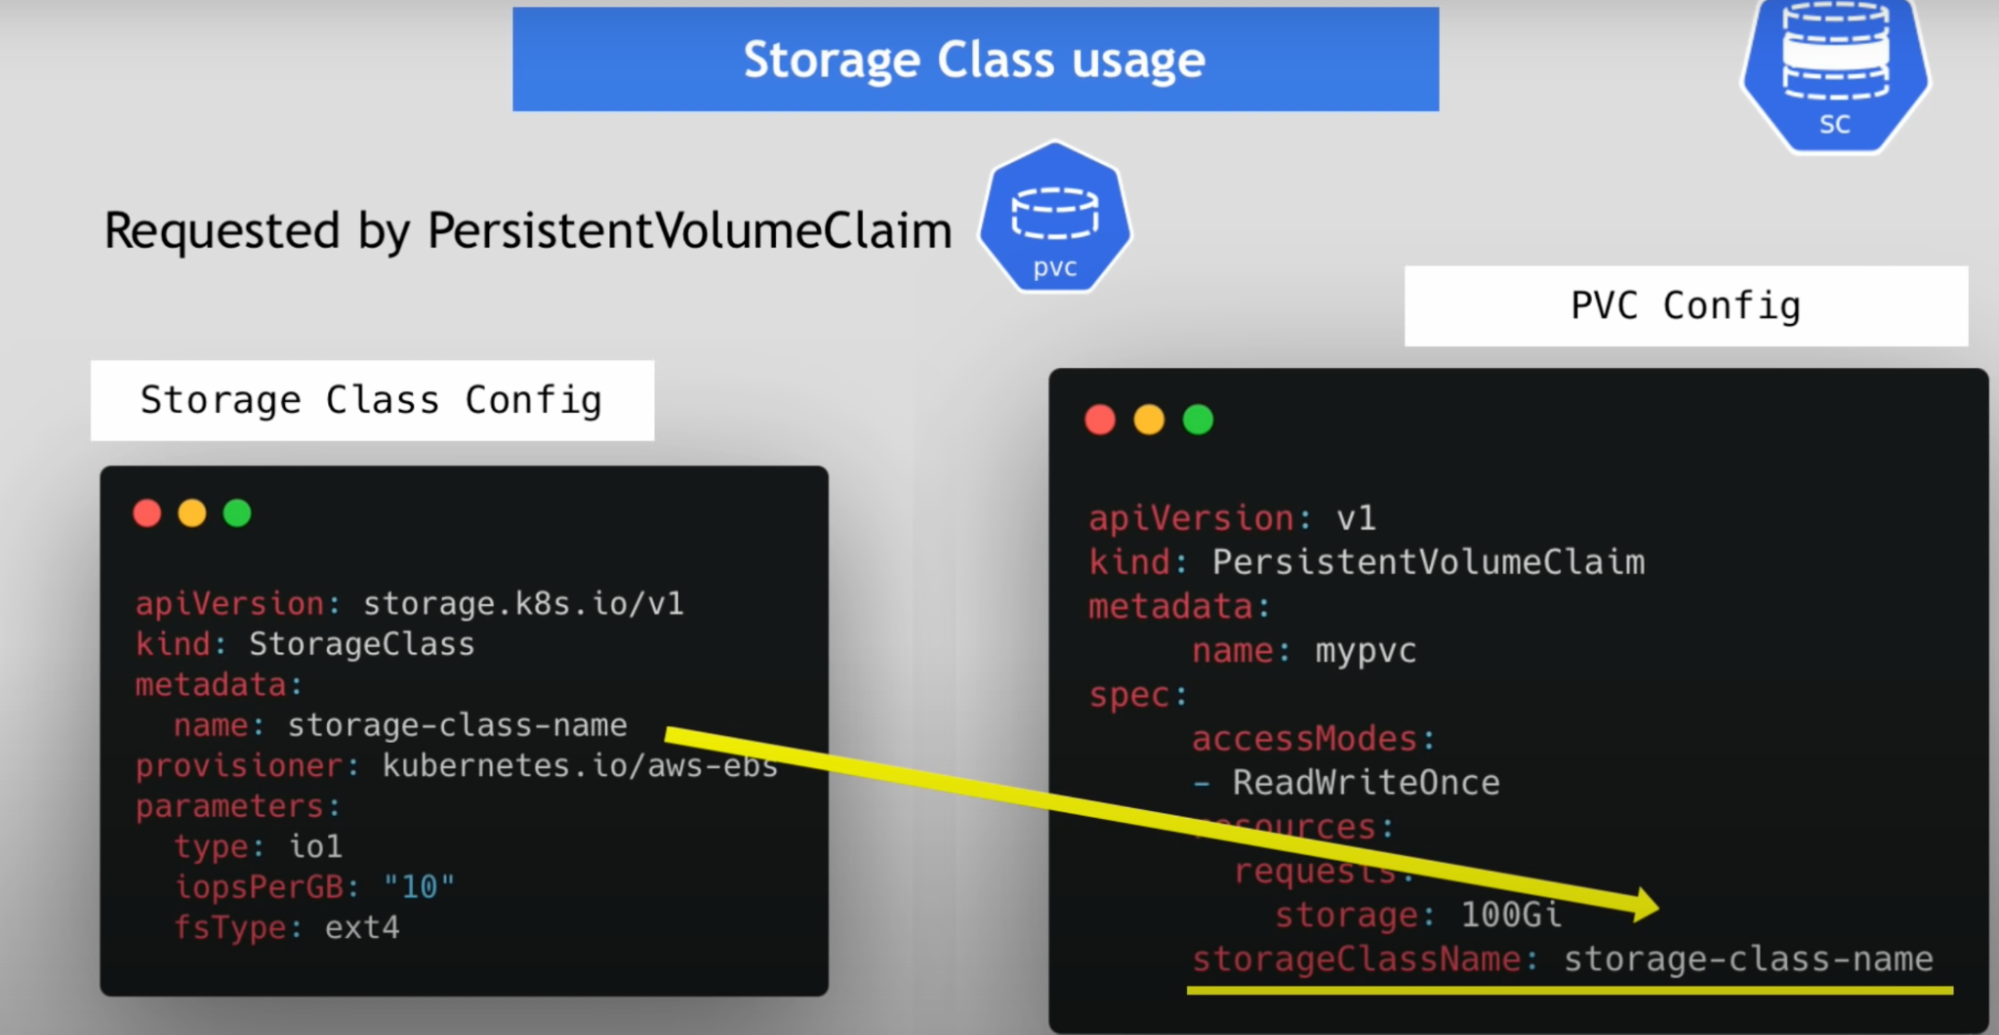
- Storage class provisions persistent volumes dynamically whenever PVC claims it
- Created by YAML config file
In the below image/file StorageClass creates PV volumes dynamically in the background
Define storage backend in the persistent volume component, now we have to define in the storage class component using the provisioner attribute
Storage class usage
Local volume types
What: managed by Kubernetes
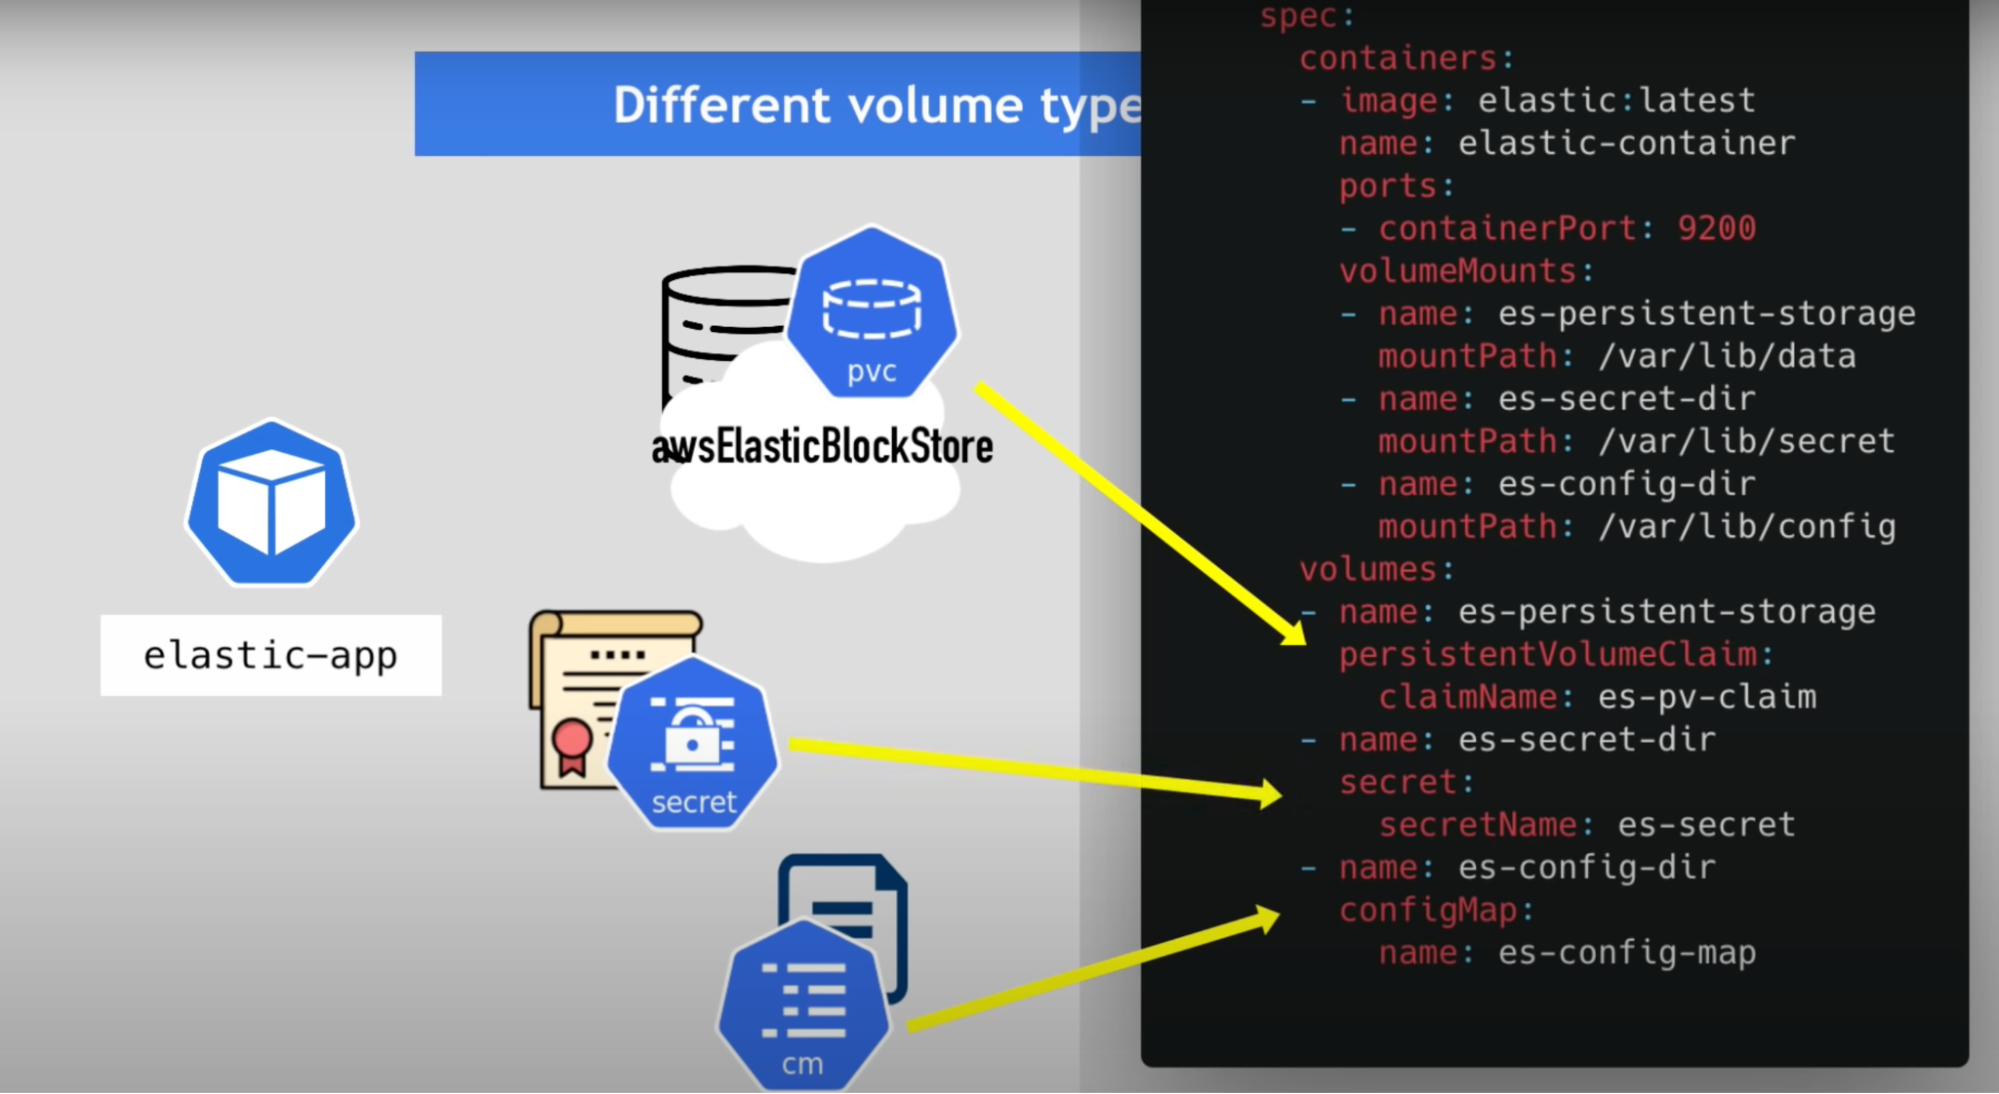
Types:
- ConfigMap
- Secret
Usage in YAML:
- Use the same way as volumes
Local vs Remote volume types
Each volume has its own use case
Local Volume types violate 2 and 3 requirement for data persistence
- being tied to one specific node
- surviving cluster crashes
always use remote volumes
K8s Administrator and K8s User
persistent, volume are resources that needs to be there before the pod that depends on it is created
there are two main roles in Kubernetes
- administrator:
- Who sets up and maintains the cluster and also make sure the cluster has enough resources
- configure the actual storage(nfs, cloud) that would be available for cluster
- creates the PV component from these storage backends
- these are generally system administrators or devops engineers in the company. Developer states them how much and what type of storage they would need to run their application.
- Kubernetes User:
- Deploys the Application in the cluster either directly or through CI pipeline
- User create claim to PV
Callouts
- Volumes is directory with some data
- These volumes are accessible in container in a pod
- How made available, backend by which storage medium
- Defined by specific volume type(aws, azure)
- Mount multi-type volumes to your app pod
- Dev needs to ask system admins to create PV they need for the application before the deployment, and admin then manually request cloud storage provider and creates 100 PV for all the applications they need storage // tedious and time consuming - this issue solved by Storage class
StatefulSet
Scenario:
- You have java application talks to MySql database to write/update/read data into it
- You need to replicate application pod as well as MySql pods so that application can handle more client request and database can handle more java request
Application replication
- This is easy as pods are identical to each other and you can easily replicate and delete pods based on your requirement
- Why easy: because pods are identical
- Why pods are identical: because they don’t deal with data and doesn’t store it so you can easily replicate them using the existing pod configuration
- Replication done by deployment
Database replication
Database pods are difficute to replicate compared to Application pods
- Can’t be created/deleted at the same time
- Can’t be randomly accessed
Why:
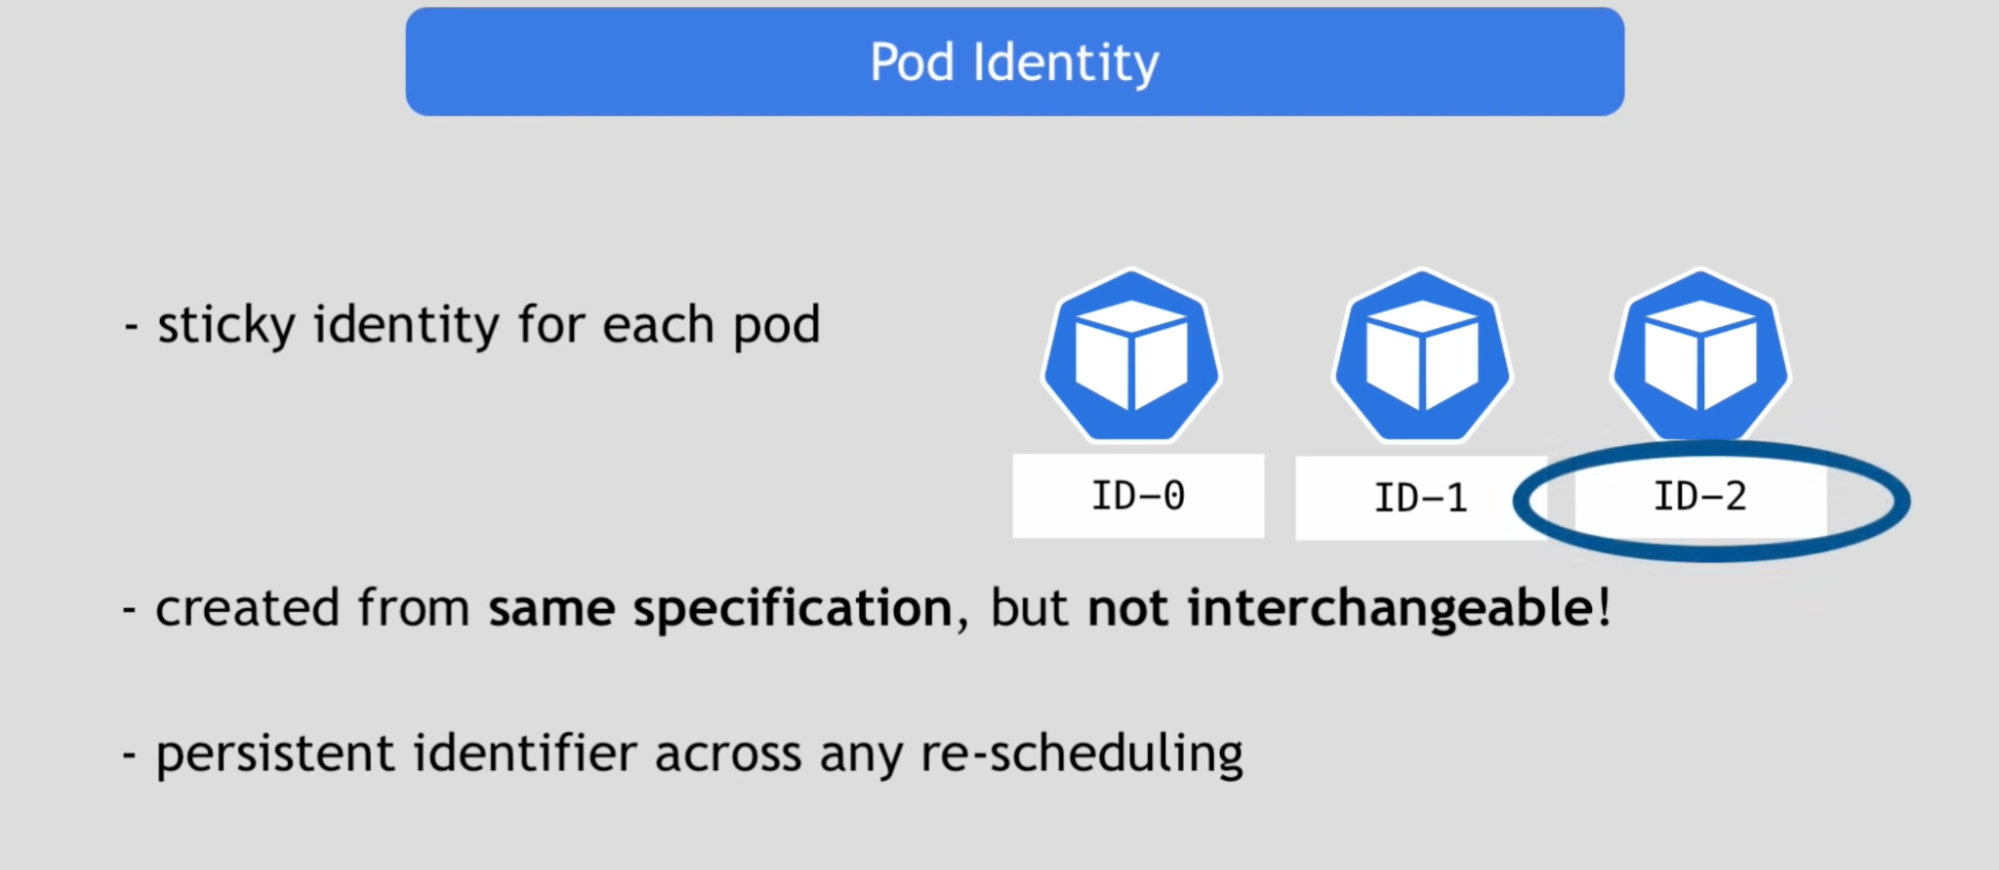
- Replica pods are not identical. Because each pods have their own additional identity on top of the common blueprint of the pod that they get created from
- Giving pod their own required identity is StatefulSet does different from deployment
- StatefulSet maintains the sticky identity for each pod
- So when pod dies and new gets replaced by new pod, it keep it’s identity(ID-2)
Kubernetes Service
6 Types are
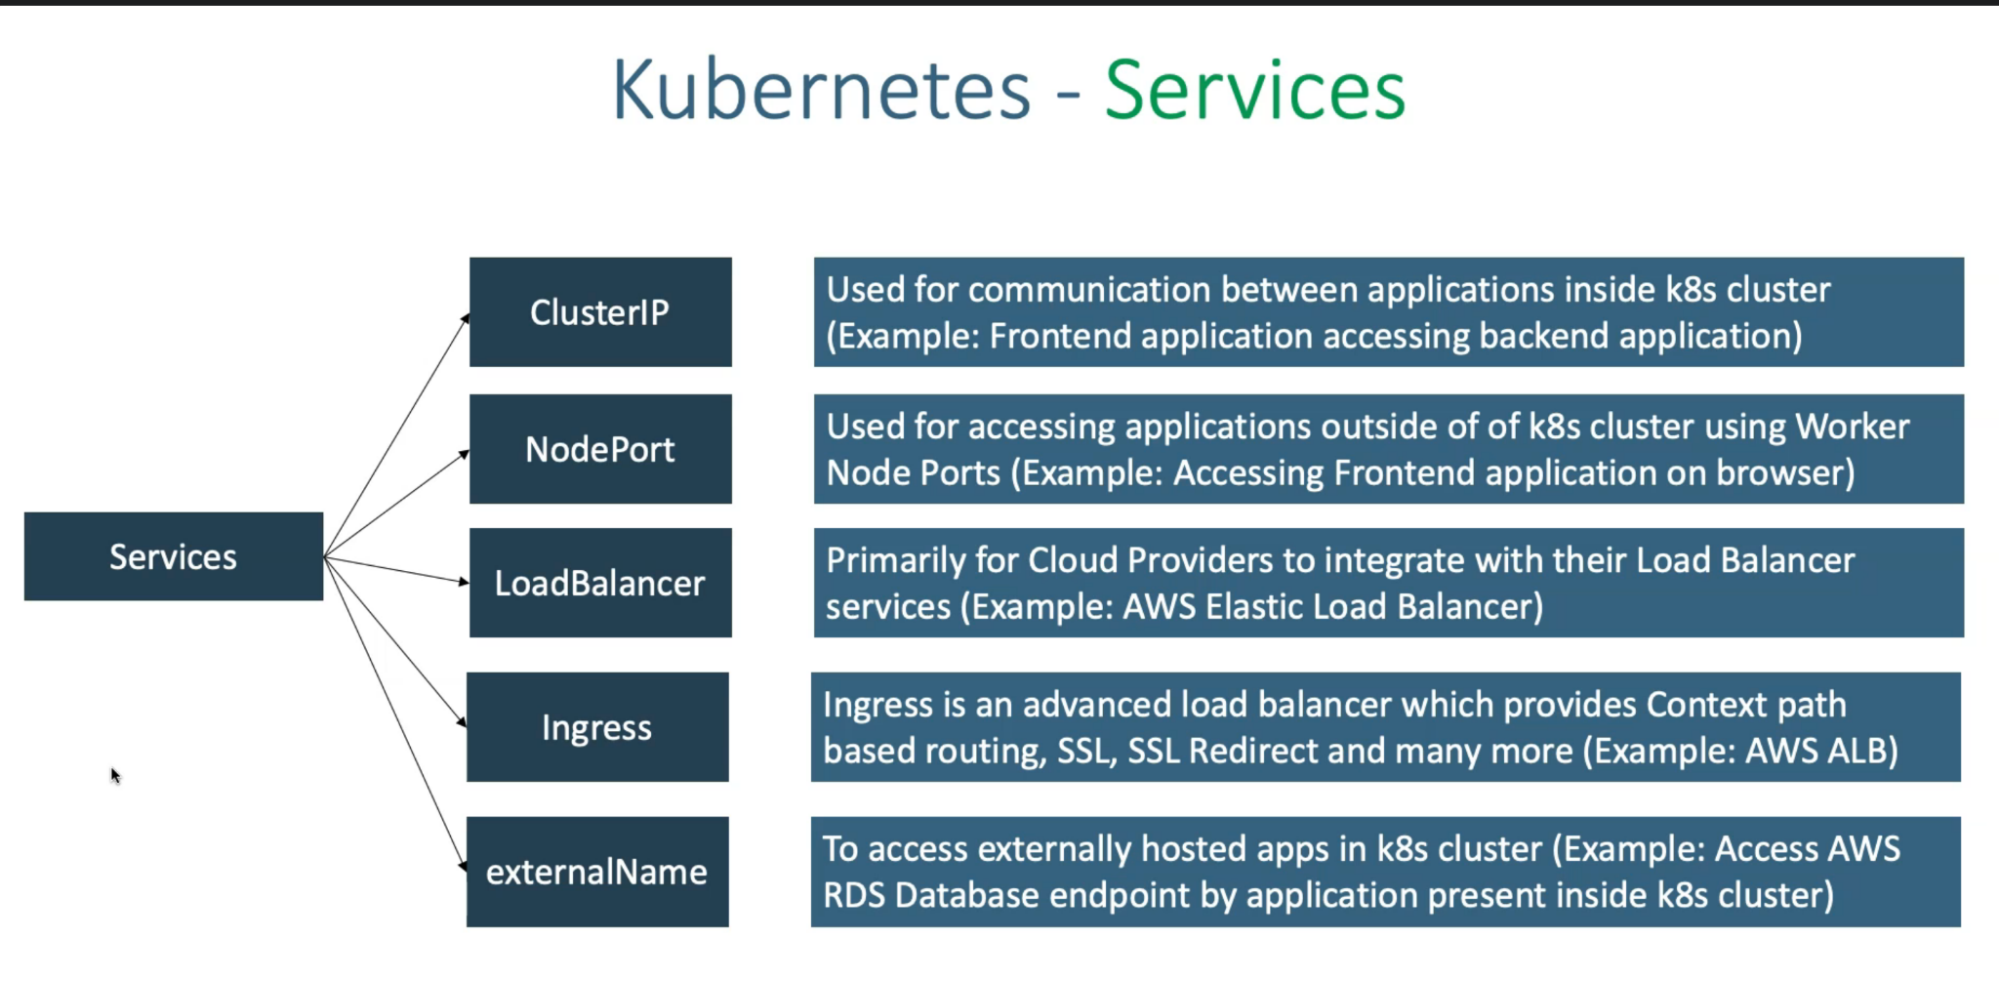
Cluster IP service
- What: Internal to K8s cluster
- Default service in K8s. so you don’t need to mention it in your yaml files
Headless service
NodePort service
- What: access pod service via the internet
LoadBlancer service
- What: access pod service via the internet
- How: In the cloud(ex: Azure), if you create an LB service, it will create public IP and associate with LB. So, say you have 10 LB services; it will create 10 public IPs and attach/map to LB in order to access that service via the internet
Ingress
- What: access pod service via the internet
ExternalName
When:
externalName: if you have a backend that uses AWS RDS database. So if you want to access AWS database inside a AKS cluster, you need to define DB externalName service
Cluster IP: if you have frontend app that needs to talk to your backend app, you must use Cluster IP
LoadBalancer and Ingress: if your user needs to access your frontend application then use either of these services
Additional Concepts and Terminologies
Cluster
- Group of machines, physical or virtual, working together as a single system(or distributed machines are combined to form a single, powerful machine.)
- A Kubernetes cluster consists of at least one master node and several worker nodes
Master Node (Control Plane)
- It's responsible for the management of the Kubernetes cluster. It's the entry point for all administrative tasks.
- The main components of a Master Node are the
* entry point to the K8S cluster
* serves the Kubernetes RESTful API
* When you want to deploy an application to K8S cluster, you interact with the master node’s API server using a client(UI, API(script), CLI)
* schedules the pod on a different node
* how: first it looks at your request and determines how many resources(CPU & RAM) the application you want to schedule will need. it look upon worker node and see which nodes are available to take this application
* keeps an overview of what’s happening in the cluster, whether something needs to be repaired or if a container died, it needs to be restarted
* ex: when pod dies, controller manager detects that and recovers cluster state
* Brain of the cluster - holds the data about cluster(actual status)
* Key value storage which holds at any time the current/actual state of the K8S cluster: you can recover the whole cluster state using that ETCD snapshot
Worker Node
- Each node is an individual machine that runs applications using Pods | where the containers (your applications) run.
- The master node communicates with worker nodes to schedule the deployment of Pods, which are the smallest deployable units in Kubernetes and can contain one or multiple containers.
Pods:
- These are the smallest deployable unit of computing in Kubernetes.
- A Pod represents a single instance of a running process in a cluster and can host one or many containers within it.
Container
- Containers are lightweight and standalone runnable packages that include everything needed to run a piece of software, including the code, a runtime, libraries, environment variables, and config files.
Service
- Services provide network access to a set of Pods, and Kubernetes routes traffic to Service via a DNS name and port number. They can also balance load and track the health of the pods.
- It's like a door to your application. It's a stable way of accessing the deployed Pods of an application because while Pods may come and go, the service stays the same.
Deployment
- Deployments manage the desired state for your applications and update its Pods via ReplicaSets
- It defines what the application looks like, how many copies you want, and Kubernetes ensures this state is maintained. If a Pod goes down, the Deployment makes a new one.
ReplicaSet
- While deployments are like recipes, ReplicaSets are the cooks.
- They ensure that the number of Pods specified in the Deployment exists in the cluster. If a Pod goes down, the ReplicaSet notices and promptly starts a new one.
- For example, if you have an app and want to make sure that three instances (Pods) of your app are always available, you would use a ReplicaSet.
Namespaces
- Namespaces are a way to divide cluster resources between multiple users or teams. It's like having multiple virtual clusters within one physical cluster.
Ingress
- Ingress is an API object that manages external access to the services in a cluster by HTTP/HTTPS routes.
ConfigMaps and Secrets
- Allow you to separate your configurations from your pods and store secrets like passwords and API keys.
Volume
- Volumes in Kubernetes allows you to store data for a container
- Kubernetes supports various types of volumes, like local disk, cloud storage, etc.
- PV: pod writes data to PV. This PV is available on every node in cluster. So when pod on node1 dies and needs to recreate on another node, PV will be still be the same.
- PV is network-attached storage in the cluster that all nodes can access. It's just like a network hard drive available to all the computers in a network.
- Even if a Pod dies and gets started on a new Node, it can reattach to the same PV and continue accessing its data.
- This decoupling of storage from the individual nodes allows for data persistence across Pod and even Node restarts
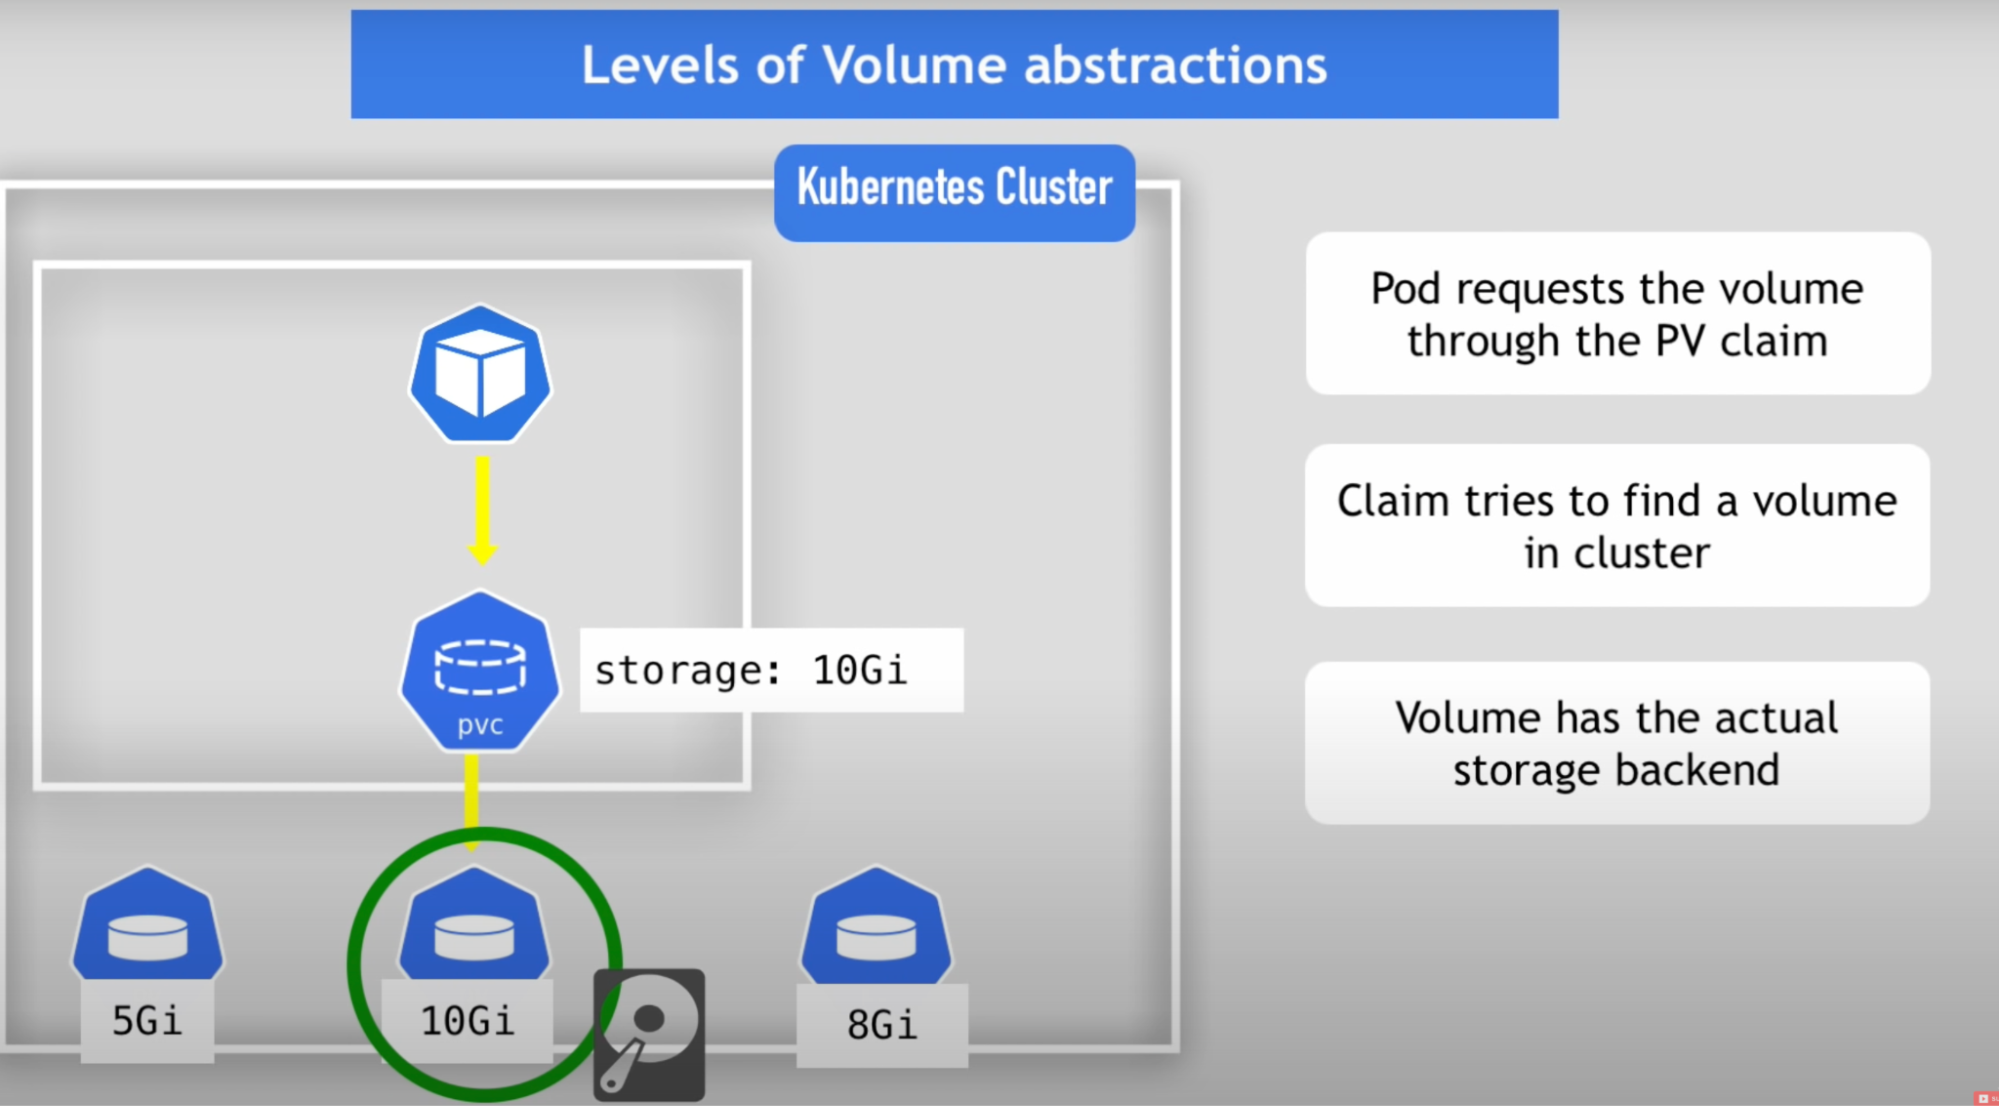
- PVC: The way a Pod requests a PV or network storage in our analogy is through a Persistent Volume Claim (PVC)
- PVC is a request for storage by a user. It's similar to a Pod. Pods consume node resources and PVCs consume PV resources.
- PVC tells Kubernetes "I need some storage of this size", Kubernetes finds a suitable PV and binds the PVC to the PV. Now, a Pod that's using this PVC knows that it can write data on the storage represented by the PVC,
- PV will always be the bigger. A PVC will always request a storage amount equal to or less than the size of the PV, as you can't claim more storage than what is actually available.
- Ex, assuming there's a PV of size 10 GB available in the cluster. If a PVC requests 10 GB of storage, it can claim the entire space available on that PV. If a PVC only requests 5 GB of storage, it could also claim space on that PV, but only half of it.
Request and Limit
- Definition: A "request" is the amount of a particular resource (CPU or memory) that a container initially asks for. request is what Kubernetes guarantees to provide to the Pod.
- Purpose: It tells the Kubernetes scheduler how much of each resource a container needs. The scheduler uses this information to find an appropriate node to place the container.
- Effect: If a container's resource request cannot be satisfied by any node in the cluster, the container won't be scheduled to run.
- Example: If you set a CPU request of "250m" (meaning 250 milliCPU units or 0.25 CPU core) for a container, you're telling Kubernetes that the container needs at least this much CPU to run efficiently.
- Definition: A "limit" is the maximum amount of a particular resource that a container can use if those resources are available in the system. The limit is the point where Kubernetes says, "No more, that's as far as you can go."
- Purpose: It defines an upper bound on resource usage to prevent a container from consuming excessive resources, which could negatively impact other containers and workloads on the same node.
- Effect: If a container exceeds its resource limit, it may be throttled (in the case of CPU) or terminated (in the case of memory).
- Example: If you set a memory limit of "256Mi" (meaning 256 Mebibytes or 256 * 2^20 bytes) for a container, you're capping the container's memory usage at this amount.
Resource Overcommitment:
- Definition: Kubernetes is allowing more resources/pods to be scheduled on a node than the node physically has available because it expects not every Pod would be using 100% of its request all the time. It means scheduling more pods than the node can realistically handle in terms of available CPU or memory.
- Resource overcommitment occurs when the total resources requested by pods on a node exceed the actual physical capacity of that node.
- Issue: This could cause issues if all Pods use their maximum limit simultaneously.
- Scenario Example: If you have a node with 2GB of RAM and 2 CPU cores, and you schedule pods with a total request of 3GB of memory and 1.5 CPU cores, you're overcommitting resources. While Kubernetes may still schedule the pods, it could lead to performance issues or pod eviction if resources become scarce.
Resource Quotas:
- Definition: A resource quota is a way to limit the amount of resources a namespace can consume within a cluster. It allows you to control the aggregate resource usage of a group of pods in a namespace.
- Use Case: Resource quotas are useful when you want to enforce resource limits at the namespace level to prevent any single namespace from monopolizing cluster resources.
Quality of Service (QoS) Classes:
- Definition: QoS classes in Kubernetes help the scheduler make decisions about which pods to evict if the node is under resource pressure. There are three classes:
- Guaranteed: Pods in this class have resource requests equal to their resource limits. They are not evicted for resource reasons unless they exceed their limits.
- Pod must get the resources on the node, and they can't get resources on the node if they exceed their limit.
- Request and limit values have to be similar.
- Usage: If Requests = Limits
- Example:
* Pod C (Guaranteed):
* Memory Request: 2Gi
* CPU Request: 1 (1 CPU core)
* Memory Limit: 2Gi
* CPU Limit: 1 (1 CPU core)
* Pod D (Guaranteed):
* Memory Request: 1Gi
* CPU Request: 0.5 (0.5 CPU core)
* Memory Limit: 1Gi
* CPU Limit: 0.5 (0.5 CPU core)
- Pod C and Pod D have their resource requests equal to their resource limits. They are not evicted for resource reasons unless they exceed their specified limits. They have dedicated resources.
- Burstable: Pods in this class have resource requests and can consume resources up to their limit. They can be evicted if the node is under heavy resource pressure, but they're given a chance to use their requested resources first.
- Pod can get resources that are requested. They can even get resources up to their limit only when resources on the node are available. If not, they will not get up to their limit but still get the requested quota.
- In this class, the request's value will always be smaller than the limit.
- Usage: If Requests < Limits
* Example:
* Pod A (Burstable):
* Memory Request: 1GB
* CPU Request: 500m (0.5 CPU core)
* Memory Limit: 2GB
* CPU Limit: 1 (1 CPU core)
* Pod B (Burstable):
* Memory Request: 512Mi (0.5 GiB)
* CPU Request: 250m (0.25 CPU core)
* Memory Limit: 1Gi
* CPU Limit: 0.5 (0.5 CPU core)
- Pod A and Pod B have specified resource requests and limits. They will be given the resources they requested before any BestEffort pods. However, if the node is under heavy resource pressure, it can still be evicted.
- Best-Effort: Pods in this class don't specify any resource requests or limits. They get the leftover resources on the node. They can be evicted first under resource pressure. These Pods are considered the lowest priority, and resources will be provided to them only when they're available and not being consumed by higher QoS Pods.
- Pod can get resources on the node only if the resources are available. If not, it can't be scheduled.
- You don't have to specify the request and limit.
- Usage: No Requests & Limits
- Use Case:
- Imagine you have a Kubernetes cluster with various applications running. Some applications are more critical than others. You want to ensure that your critical applications always have the resources they need, even under heavy load. This is where QoS classes come into play.
- For example, if you have a critical database application, you would want to set its QoS class to "Guaranteed" to ensure it always has the resources it needs to operate without interruptions.
- Limit for a specific resource (such as CPU or memory) will typically be set higher than the "request" for that same resource.
- It is possible to use just Requests without Limits and vice versa.
- If you use only Requests, your pod will be guaranteed a certain level of resources but can potentially use up all available resources on the node.
- If you specify only Limits, your pod could potentially be scheduled onto a node that doesn’t have enough resources, causing Kubernetes to frequently kill and restart your Pod if it uses more resources than the node has available.
- A common practice is to set Requests for ensuring the Pod gets scheduled onto a Node with adequate resources, and specify Limits to ensure that a Pod does not overuse resources and affect other Pods.
CPU | RAM |
250m (mili) = .25 CPU core | 512 MB |
500m (mili) = .5 CPU core | 1 GB |
14. Labels and Selectors:
- Labels:
- Definition: Labels are key-value pairs that you attach to Kubernetes objects (like pods, services, deployments, etc.) to organize and categorize them.
- Purpose: They provide metadata about your objects. You can think of labels as little pieces of information that help you identify and group related resources.
- Example: Let's say you're managing a set of web servers. You could label them with "environment: production" and "app: web-server". This way, you're tagging them with information about their purpose and environment.
- Selectors:
- Definition: Selectors are used to filter and find objects based on their labels.
- Purpose: They allow you to query your resources based on the labels they have. This is incredibly useful for tasks like grouping, scaling, and applying configurations to specific sets of resources.
- Example: Continuing with our web servers example, if you want to find all the web servers in the production environment, you'd use a selector to look for objects with the label "environment: production" and "app: web-server".
- Service Discovery: In a microservices architecture, services need to discover and communicate with each other. Selectors can be used to group pods that provide similar services. For example, all web servers could be labeled with app: web-server, and a service can be created to forward traffic to all pods with this label.
- Load Balancing: When you have multiple pods providing the same service (like web servers), a service with a selector can balance incoming requests across all pods that match the labels.
- Scaling and Auto-Healing: Using tools like Horizontal Pod Autoscaler (HPA) or ReplicaSets, you can automatically scale the number of pods based on metrics. For instance, you might want to maintain a certain number of pods with a specific label (e.g., environment: production).
- Applying Policies: You can use selectors to apply policies or configurations to specific groups of pods. For example, you might want to apply a certain set of security policies or resource limits to all pods with a specific label.
- Rolling Updates: During a rolling update, you may want to update pods incrementally. A selector can be used to identify the pods that need updating.
- Troubleshooting and Debugging: When investigating issues, you might want to focus on a specific group of pods. You can use a selector to filter logs, events, or metrics related to those pods.
- Canary Releases: For canary releases, you can use selectors to target a specific subset of pods for testing new versions while keeping the rest on the stable version.
- Resource Management: You can use selectors in combination with ResourceQuotas or LimitRanges to apply resource constraints to specific groups of pods.
In summary, selectors allow you to define logical groupings of pods based on their labels, and this grouping enables you to apply various operations or policies to those groups. It's a fundamental concept in Kubernetes that provides a powerful way to manage and operate your applications.
15. Concepts to ensure pods are scheduled and managed in a Kubernetes cluster
NodeSelectors:
- NodeSelector is the simplest form of node selection constraint in Kubernetes. It's like telling the Kubernetes system "I want my pod to run on a node with this specific label."
- Example: Let's say you've nodes that are labeled with 'disk=ssd'. You've a pod that requires SSD storage, so in the pod configuration, you use a NodeSelector with 'disk=ssd' to inform Kubernetes to schedule the pod on one of these nodes.
- If you have multiple nodes with the label "disk=ssd", and your Pod's NodeSelector is set to "disk=ssd", the scheduler will consider all those nodes as potential candidates for scheduling.
- Limitation: This leads us to its limitation. What if we want to schedule pods on a node that satisfies either of a few conditions? NodeSelector does not support logical OR operations between different selectors, it only supports AND matching. In such a case, NodeSelector will not work & you need Node Affinity/Anti-Affinity.
- Implementation: Create a node/s with certain labels, the pod definition can include the nodeSelector term to specify the desired label.
Node Affinity and Anti-Affinity
- Node affinity/anti-affinity is conceptually the same as NodeSelector but it allows you to specify complex rules regarding the placement of pods on nodes using label selectors in a more expressive way (not just AND operations) which can be based on required, preferred, or anti-affinity rules..
- Using operators such as In, NotIn, Exists, DoesNotExist, Gt, Lt. You can also specify the weight of these rules and preference for placing pods using "soft" and "hard" affinities. The more rules that match, the higher the weight, the more likely the pod will be scheduled on that node if it meets the 'hard' conditions.
- Node Affinity: extends the functionality of the NodeSelector by allowing you to specify rules rather than a single label condition. I prefer my Pod to run on nodes with SSDs, but if that's not possible, it's okay to run on HDDs
- requiredDuringSchedulingIgnoredDuringExecution: the pod will only be scheduled on nodes that have the label disktype: ssd.
- preferredDuringSchedulingIgnoredDuringExecution: the scheduler will try to place the pod on nodes with the label disktype: ssd, but it's not a hard requirement, if there are no nodes with that label available, the scheduler will still place the pod on a node that doesn't have the label.
- Anti-Affinity: is about avoiding scheduling a Pod on nodes that have certain characteristics.
- requiredDuringSchedulingIgnoredDuringExecution: It allows you to say, the pod must not be scheduled on a node that has certain label.
- preferredDuringSchedulingIgnoredDuringExecution: pod would prefer not to be scheduled on a node with the label kubernetes.io/os equals 'windows'. If all nodes are windows, it can still be scheduled. If multiple nodes meet the anti-affinity condition, the weight is taken into account.
- Example: Node affinity can be thought of as: "Run this pod on nodes with SSD AND in region US-East", or "Try to run this pod on nodes with SSD, but if that's not possible, run it anywhere else". Anti-affinity ensures that a group of pods aren't co-located on the same node, like: "Don't run this pod on the same node as pods from service A".
Pod Affinity/ Anti-Affinity:
- Pod Affinity allows you to specify rules regarding the placement of pods relative to other pods. Similarly, Pod Anti-affinity can prevent the scheduler from placing Pods that manifest certain label selectors in the same domain because they repel each other.
- Pod affinity: how pods should be placed relative to other pods. It involves scheduling pods onto nodes based on the labels of other pods running on those nodes.
- Anti-Pod affinity: It tells Kubernetes to avoid placing certain pods together on the same node.
- Use Case:
- Pod affinity: when you have two services that need to communicate frequently. To reduce the latency, you might want them to reside on the same node.
- Anti Pod affinity: having high-availability of a critical service. You'd want to ensure that multiple instances of the service don't end up on the same node (which could be a single point of failure).
- Example: Suppose you have a service that needs to interact frequently with another service and you want these two services to be close together, you can use Pod Affinity to achieve this.
Taints and Tolerations:
- Nodes with taints will refuse pods that don't tolerate their taints. It's like adding certain characteristics (or blemishes) to nodes and telling the pods which characteristics (or blemishes) they can tolerate.
- The purpose of taints is to restrict the scheduling of pods. When a node is tainted, the scheduler rejects any pods that do not tolerate the taint.
- Tolerations on the other hand, are applied to pods and allow (but do not require) the pods to schedule onto nodes with matching taints.
- Example: Let's consider a highly sensitive part of our workload. We don't want non-critical or large pods taking up resources on these isolated nodes, hence we "taint" these nodes with "dedicated=critical:NoSchedule" to discourage non-critical pods from being scheduled on such nodes. Only pods with a matching toleration against this taint will be scheduled on such nodes.
- Implementation: To taint a node: kubectl taint nodes node-name dedicated=critical:NoSchedule
tolerations:
- key: "dedicated"
operator: "Equal"
value: "critical"
effect: "NoSchedule" #If there are no nodes with this label, don't schedule me anywhere." |
- I'm a critical Pod, and I can only be scheduled on nodes labeled with 'dedicated=critical'. If there are no nodes with this label, don't schedule me anywhere."
DaemonSets:
- A DaemonSet ensures that all (or some) Nodes run a copy of a Pod. This becomes particularly useful for Daemon applications such as log collectors, monitoring applications, or application that need to be present on individual nodes.
- Example: For a log collector application, you want it to run on every node in your cluster, to make sure all logs are captured. In this case, you use a DaemonSet because it ensures a pod runs on all or certain nodes in a cluster.
- Implementation: YAML file for kind: DaemonSet
Pod Priority and Preemption:
- Pod priority indicates the importance of a pod relative to other pods. If a node does not have enough resources for all pods, the lower-priority pods might be preempted to free up resources for others.
- In the given example, the "high-priority" class has a higher value, so it's considered more important than ones with lower values or default (no specified PriorityClass). The Kubernetes scheduler considers it as more important during deployment, and Kubernetes system also considers it more important when making eviction decisions if the node faces resource pressure.
- Example: During a heavy load situation, a Kubernetes cluster can prioritize necessary system pods above less critical user workloads, ensuring system stability.
Pod Spread Constraints:
This allows you to specify rules for spreading pods across nodes in a cluster to ensure high availability and fault tolerance.
Pod Topology Spread Constraints:
- This is similar to pod spread constraints but allows you to spread pods based on topology domains, such as zones in a multi-zone cluster.
- Allows you to evenly distribute pods across your cluster among failure-domains such as zones, regions, and nodes.
- Example: If you have a cluster-wide app and you want to ensure a certain level of high availability, you can apply pod topology spread constraints to spread replicas into different zones as much as possible.
Pod Disruption Budgets (PDBs):
- DBs are used to limit the number of pods that can be disrupted simultaneously during voluntary disruptions (like maintenance).
16. Probes (Liveness, Readiness, Startup)
What: Kubernetes uses the Liveness, Readiness, and Startup Probes to determine the health of pods.
- Liveness Probes: A Liveness probe checks if the application within a pod is running. If the liveness probe fails, Kubernetes restarts the container.
- Just because of pod is running, that doesn’t mean that the application is running. Sometimes application is not responsive due to some reasons(application that gets locked or frozen after running for a certain period). So the idea is to send a request to the app and see if we get response. If not then restart the pod(even if the pod is running)
- Example: For instance, consider a simple application that gets locked or frozen after running for a certain period due to some bug or unexpected condition. The application is running, but it's not able to handle requests or perform its operations. Here, a Liveness probe can be beneficial.
- Readiness: A Readiness probe is used to know when an application is ready to accept requests.
- Usage: Use Readiness Probes when your app is running but not ready to receive traffic
- Example, suppose you have an application that needs to load a large dataset or some configuration on startup. While the application might be running (passing a Liveness probe), it's not yet ready to serve requests. A Readiness probe helps to inform Kubernetes when to start sending requests, avoiding possible errors or slower responses.
- What does it mean long initial startup time: By default, Kubernetes assumes that applications are ready as soon as they are running. This works well for simple applications, but for complex ones that require initial startup time to load large datasets or establish connections with databases, they might be running but not yet ready to serve requests.
- If don't have a Readiness prob: If you don't specify a readiness probe, Kubernetes starts sending traffic to your pod as soon as it starts, which might lead to errors if the application isn't ready to handle it. If this is fine for your application, you might not need a readiness probe.
- Startup: The startup probe is used to know when a container application has started. It disables other liveness and readiness checks until it succeeds, making sure slower starting applications aren't killed by Kubernetes.
- Example: Consider an application that takes a considerable amount of time to start (say, due to database migrations), during that time, it won't pass readiness or liveness probes. This is where the Startup probe is helpful – it gives your application enough time to get up and running before the Liveness and Readiness probes start checking.
- The startup probe tells Kubernetes to wait for a certain period of time before doing liveness or readiness checks. This can help the application to handle any long-running startup processes like database migrations or loading large data files. After that time has passed or the startup probe has succeeded, Kubernetes begins liveness and readiness checks as usual.
17. StatefulSets:
- It manages the deployment and scaling of a set of Pods and provides guarantees about the ordering and uniqueness of these Pods.
18. Jobs/CronJobs:
- It creates one or more Pods and ensures that a specified number of them successfully terminate. CronJobs manage time-based Jobs, i.e., they are scheduled to run at fixed times.
19. Horizontal Pod Autoscaling (HPA) and Vertical Pod Autoscaler (VPA)
20. Custom Resource Definitions (CRD)
21. RBAC (Role-Based Access Control)
Flow
- Understanding Workload Requirements:
- It starts with understanding the requirements of your workloads. What resources (CPU, memory) do they need to operate efficiently?
- Setting Requests and Limits:
- Based on the workload requirements, you set resource requests and limits for each pod. Requests ensure that Kubernetes schedules the pod on a node with enough available resources. Limits prevent a pod from consuming excessive resources.
- Quality of Service (QoS) Classes:
- Next, you consider the QoS class for each pod. This helps you prioritize which pods get access to resources under different scenarios.
- Resource Quotas (if needed):
- If you're working with namespaces, you might also set resource quotas to limit the aggregate resource usage of a group of pods within a namespace.
- Monitoring and Adjusting:
- After deploying pods, you monitor their resource usage. If needed, you can adjust requests and limits, or change the QoS class to optimize performance.
- Horizontal Pod Autoscaling (HPA) and Cluster Autoscaler (if needed):
- If your application's load is dynamic, you might set up HPA to automatically adjust the number of replica pods. Cluster Autoscaler can be used to manage the overall capacity of the cluster.
- By following this flow, you ensure that your pods are provisioned with the right amount of resources, have the appropriate QoS class, and are managed effectively within your Kubernetes cluster.
Nginx
What
- NGINX is an open source web server that can also function as a reverse proxy, load balancer, mail proxy, and HTTP cache.
Where
- NGINX is typically utilized on web server machines (from your personal Linux machine to cloud servers on Azure, AWS or Google Cloud, etc.)
When
A few typical use-cases when one would use NGINX:
- Static website: Here, NGINX could be used as a web server to directly serve static content.
- Load balancing: NGINX can distribute the traffic to several servers, it's also used to decrease response times and increase reliability through redundancy.
- Reverse proxy: NGINX can be utilized as a reverse proxy, protecting web servers from attacks, and can also manage caching and SSL termination.
How
- NGINX works asynchronously, meaning each request is processed simultaneously with other requests. It can manage thousands of requests concurrently without the need for creating new processes for each new request, making it very efficient.
- The client communicates with NGINX, which then communicates with the web application if needed.
- Furthermore, NGINX can also store the information it gets from the web application for a defined time, this caching functionality makes responses to similar future requests faster.
Nginx Ingress Controller
What
- The NGINX Ingress Controller for Kubernetes is essentially a bridge between Kubernetes and the NGINX server.
- It's a software component within a Kubernetes cluster that takes incoming HTTP(S) traffic and directs it to the correct service within the cluster based on a set of rules known as ingress rules.
- It interprets ingress rules and configures NGINX accordingly so that it can route traffic from outside the cluster to the appropriate services.
- It acts as the entry point for your cluster. It lets you consolidate your routing rules into a single resource as it can be configured to give services externally-reachable URLs, load balance traffic, terminate SSL / TLS, and offer name based virtual hosting.
When & When
- The NGINX Ingress controller is used in a Kubernetes cluster. You would use this when you have applications running on AKS and you want to control access to these applications in a centralized manner. Ingress objects allow you manage settings like SSL termination, path-based routing, etc.
How
- The NGINX Ingress Controller is deployed within a Kubernetes cluster as a specific kind of pod, known as a daemon. This daemon acts as a vigilant guardian, monitoring the Kubernetes API server's /ingresses endpoint for any changes to Ingress resources.
- This continuous monitoring is executed with the goal of maintaining and fulfilling the stipulations stated in the Ingress resources. When an external HTTP/HTTPS request is routed to the cluster, the Ingress Controller acts as a solid traffic cop, directing the request to appropriate services in the cluster. These services are identified based on the routing rules defined within the Ingress resources, making sure that every request reaches the right destination.
Terminology Used in The NGINX Ingress Controller:
Ingress Controller
- This can be thought of as a traffic control tower in Kubernetes. It is responsible for directing incoming network traffic and forwarding it to the appropriate services within the cluster, based on rules defined in Ingress Resources.
Ingress Resources
- These are Kubernetes objects that contain traffic routing rules. Think of them as the rulebooks for the Ingress Controller. Each Ingress Resource has one or more rules, which define how to route the incoming requests.
Ingress Rules
- A part of the Ingress Resource, these stipulate how to match incoming requests and relay them to the services. They act as traffic signs on your network highway. They might indicate paths, hostnames, or other HTTP request aspects to match and direct traffic appropriately.
Backend
- This is a fall-back section in the Ingress Resource. If none of the rules match the incoming request, the Ingress Controller sends the request to the defined Backend. Usually, this is a service within the cluster.
Service
- A labeled group of pods (which run your applications), exposed as a single entity. When an incoming request matches an Ingress rule, it's forwarded to the corresponding service.
Pod
- The smallest and simplest unit in Kubernetes object model that you create or deploy. A pod encapsulates an application container (or, in some cases, multiple containers).
Namespace
- Namespaces are a way to divide cluster resources between multiple users or teams. It's like creating different virtual clusters within the same physical cluster.
Daemon
- A specific kind of Pod that runs on every node in the Kubernetes cluster. This essentially implies that as you add nodes to your cluster, daemons add copies of their respective pods.
Node
- A node is a worker machine in Kubernetes and may be either a virtual or a physical machine, depending on the cluster.
Endpoints
- Endpoints in the context of the Kubernetes API are network addresses (IP and port) that can receive network traffic.
Annotations
- These are arbitrary non-identifying metadata you can use to store extra information with Kubernetes objects.
Helm
- A package manager for Kubernetes. It's used for packaging, sharing, and deploying applications on Kubernetes clusters.
ReplicaCount
- This setting controls the desired number of pods that should run for a particular deployment. If a pod fails, the controller makes sure another one replaces it to maintain the same count.
LoadBalancer
- A way to expose your service to the outside world. When you create a service with the LoadBalancer type, Kubernetes provisions a cloud load balancer and routes external traffic to it.
SSL/TLS Termination
- This refers to the process of handling encrypted (HTTPS) requests at the load balancer level, alleviating the need for the application servers themselves to handle encryption and decryption tasks.
NodeSelector:
- This function essentially involves Pod's preference. Pods use NodeSelector to choose the type of nodes they want to be placed on
- NodeSelector is about Pods choosing Nodes (A Pod saying "I work well in this type of Node")
- But here's a key point: NodeSelector does not stop other Pods from being placed on the Node if it's necessary. The Node does not disallow or restrict Pods without a matching selector.
Scenario for NodeSelector
- Suppose, in a company, we have two types of servers: Basic servers and High-Memory servers. We label the Basic servers as server-type=Basic and the High-Memory servers as server-type=High-Memory.
- We have an application (Pod) that needs a lot of memory. So, we use a NodeSelector to make sure it gets scheduled on a server-type=High-Memory.
- This Pod (high-memory-app) will now explicitly be scheduled on Nodes with the label server-type=High-Memory.
- Still, if there's a need, other Pods (without NodeSelector or even those with server-type=Basic NodeSelector) might be scheduled on our High-Memory server if no other resources are available.
Taints and Tolerations:
- Taints and Tolerations work from the Node's perspective, not just the Pod's, and allow the Node to say "I do not allow Pods to be placed here unless they can tolerate my taint". Taint is like a rule set on the Node. Pods cannot be scheduled onto the Node unless they have a matching toleration.
- Taints/Tolerations is more about Nodes disallowing Pods unless the Pods have a specific toleration (A Node saying "I only work with specific type of Pods").
Scenario for Taints and Tolerations
- Continuing with our previous scenario, let’s say some of the High-Memory servers are very expensive and we want to reserve them only for high-memory applications.
- We apply a taint to the High-Memory servers like this: kubectl taint nodes high-memory-node-1 high-cost=yes:NoSchedule.
- Now, by default, no Pod will be scheduled on high-memory-node-1, unless it has a toleration for the high-cost=yes taint.
- We need to add a corresponding toleration to our high-memory application:
- With the toleration, high-memory-app can now be scheduled on high-memory-node-1, despite the taint. And importantly, no other Pods (e.g., basic Pods) can use high-memory-node-1, ensuring that the high-cost, high-memory Node is only used for appropriate workloads.
Callouts
Pods
- The smallest unit of K8S
- Abstraction over container
- Usually, one application per pod
- Database, application, and server each get one pod
- They need to talk to each other to send/store data
- Each pod gets it’s own IP address
- Ephemeral - dies frequently
- New IP Address on a re-creation
Service
- Pods communicate with each other using service target than IP
- A permanent ip address(attached to each pod)
- The lifecycle of pod and service is not connected - even if the pod dies, it’s service ip address remains the same - no need to change the endpoint.
- External service: service that opens the communication from an external source
- You’ll need Type:LoadBlanacer, NodePort:30000-32767
- Internal service: you don’t want your database to be open to the public request
Ingress
- Instead of external service, a request goes to ingress, and it is then forwarded to the service. // practical usage
ConfigMap & Secret
- ConfigMap to store database endpoint
- Secrets to store database username and password
Volume
- Physical storage attached to pod.
- Storage could be on local machine or on the same node or cloud storage
Deployment
- You won’t be creating pods(in case of failure and relication). You’ll be creating a deployment
- Where you define how many replicas you want
- Can scale up and down the number of replicas of pod you need when one of your applications gets down
StatefulSet
- Replica of a database would be handled by StatefulSet
- Use it when you have a database application
Architecture
- In practice, you’ll have
- 2 master nodes = consumes less resources(RAM & CPU)
- 3 worker node = more resources(RAM & CPU)
- As the complexity of your application and need of more resources grows you add more master and worker node
- How to add a new Master/worker-node server
- Get a new bare server
- Install all the master/worker-node processes
- Add it to the cluster